1
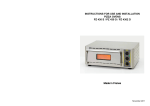
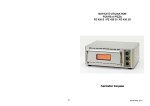
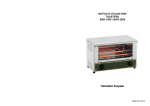
Operation Manual For Sodir Vitro Ceramic Machines Models – Panini VC, Majestic VC, PVC VC-400 765 Westminster Street Providence, Rhode Island 02903 U.S.A. Tel: (401) 273-3300 3300 Fax: (401) 273-3328 www.equipex.com e-mail: [email protected] IMPORTANT SAFEGUARDS When using electrical appliances, basic safety precautions should always be followed, including the following: 1. Read all the instructions before use. 2. Do not touch hot surfaces; use handles or knobs. 3. To avoid electric shock, do not immerse the power cord, or any part of the unit, in any liquid. 4. Close supervision is necessary when any appliance is used, especially around children. 5. Unplug appliance from the electrical outlet when not in use, and before cleaning. Allow appliance to cool before installing or removing any parts or accessories, and before cleaning. 6. Do not operate any appliance with a damaged cord or plug, or if appliance should sustain damage, or malfunction in any way. In this event, return appliance to the nearest authorized service facility for examination, repair or adjustment. 7. The use of accessories and/or attachments not recommended by the appliance manufacturer may cause injury or damage to the appliance, and may void your warranty. 8. Do not use outdoors. 9. Do not allow the power cord to hang over the edge of a table or counter, or to be exposed to hot surfaces, as damage may occur. 10. Do not place appliance on or near a burner, or in a heated oven. 11. To disconnect an appliance, first turn all controls to the ‘off’ position; then unplug the power cord from the wall outlet. 12. Do not use appliance other than for its intended use. 13. SAVE THESE INSTRUCTIONS FOR LATER USE! INTRODUCTION The SODIR VITROCERAMIC GRILLS — Models PANINI VC, MAJESTIC VC and PVC - 400 — are uniquely designed to offer fast, quality cooking. They are ideal for last minute preparation, as they ensure very quick cooking of sandwiches and such foods as steak, hamburgers, and sausages. This is due to the design of the ceramic chamber under the glass. Cooking is achieved by both direct heat transfer from the Vitroceramic plate to the food, cooking the outside, and by infrared rays that cook the center of the product, thus preserving its nutritional value. The grills are versatile in application and easy to operate. The moveable top on models Panini and Majestic is spring counterbalanced. Top and bottom heating elements are thermostatically controlled up to 570 o F. The units come equipped with a removable front drip tray. Specifications: Model Electrical NEMAPlug PANINI VC 120V, 1.8KW, 14 Amps 5-15 P MAJESTIC VC 208/240V, 1PH, 3.3KW, 12/14 Amps 6-20 P PVC-400 120V, 1PH, 1.8KW, 14 Amps 5-15 P Preheating Turn the grill ON using the ON/OFF switch(s) (the green light(s) will go on) and turn the temperature control knob(s) to the desired temperature. The orange light(s) will go ON, and stay ON, until the desired temperature is reached. The orange light(s) will then go out. The preheat time will var y depending on the cooking temperature settings and the electrical specifications of your model. It will normally take 5-10 minutes for your grill to reach cooking temperature. After reaching the set temperature, the orange light(s) will cycle ON and OFF as the thermostat cycles to maintain temperature. The green light(s) remain ON until the unit is shut off with the power switch. Cooking SODIR Panini grills can be used for a wide variety of foods. Following are some suggested guidelines for foods frequently cooked on this grill. Cooking times will vary depending on the food products, temperature settings and desired results. Sandwich Temperature: Time: 400-450 o F 1-3 minutes Wrap Temperature: Time: 375-450o F 30-90 seconds Chicken Breast Filet Temperature: Time: 475-500 o F 2-3 minutes Beef Steak Temperature: Time: 475-550 o F 2.5-4.5 minutes Burger Temperature: Time: 500-550 o F 2-4 minutes Adjusting Handle Tension WARNING: Disconnect (unplug) electrical power supply before servicing Allow the grill to cool. Remove the spring protection cover, at the top rear of the unit, by unscrewing the two Torx screws, and then pulling it up. With a flat head screwdriver, tighten or loosen the screws on the handle straps until the desired tension is achieved. There are four (4) screws, two (2) on each side. Re-install the spring protection cover and Torx screws prior to use. See attached drawing below. CLEANING WARNING: Disconnect (unplug) electrical power supply before cleaning Allow the grill to cool before cleaning. Carefully scrape the debris from the upper (if supplied) and then lower grill plates, and then clean with glass top stove cleaner. Never allow cold water, or any cold material, to contact the warm grill surface as it may crack. To clean the grill, scrape or brush the debris toward yourself and through the hole provided, into the removable drip tray. Use a cloth dampened slightly with a soap and water mixture to clean the stainless steel housing, upper grill covers, spring protection cover and the drip tray. Clean the grill thoroughly at the end of each day. Failure to do so may cause hard to remove build up. In order to remove this build up from the grill plates, you may carefully use a commonly available grill scraper knife. DO NOT spray the unit with any cleaning liquid before unplugging it DO NOT allow water to drip into the housing or around the electrical components DO NOT immerse in water for cleaning DO NOT allow cold water to contact warm surface You should inspect all parts on a regular basis to ensure that all is in proper working order. If a part is damaged, have the unit repaired by an authorized service agency prior to returning the unit to operation. If you have trouble locating a service agency in your area, please consult our website at http://www.equipex.com/, or call us at 1-800-649-7885 and ask for customer service. These models must be taken to a service facility; in-store service is not covered. Face Plate – Panini, PVC-400 .... 7igriANFigiWiligtrONVO.7 PVC-400, Panini, 120V 1 2 3 4 6 7 8 9 Lighted Switch Thermostat Top Heating Element Bottom Heating Element Orange Pilot Light Two Hole Terminal Block Three Hole Terminal Block High Limit Thermostat Majestic VC 220V 1 2 3 4 5 6 7 8 9 Switch Thermostat Top Heating Element Bottom Heating Element Green Pilot Light Orange Pilot Light Two Hole Terminal Block Three Hole Terminal Block High Limit Thermostat Spare parts PS-400 VC 110 V DWG # Part Number Qty Spare part 1 53100 1 Hole cover 2 A16013 1 Three holes domino 3 A16012 1 Two holes domino 4 A07033 1 Pushing switch 5 A08003-1 1 Orange pilot light 6 A06042 1 Thermostat 7 A14078 1 Knob 8 A13003 4 Foot 9 B07001 2 Compression spring 10 37234 1 Ceramic chamber lock 11 37242 1 Bottom casing 12 D06003 1 Ceramic chamber 13 37230SE 1 Drip tray 14 A10032 1 Cord closer 16 15 C01008 1 Cord with plug 16 A06050 1 17 53101COL2 1 Safety thermostat Casing with flat glass Spare parts PANINI VC 110 V DWG # Part Number Qty 1 Spare part D06001 2 Ceramic chamber 2 F01064 1 Handle assembly 3 A15008 1 Top plate handle 4 37240 1 Stainless steel cover 5 B04027 2 Handle strap 6 A16013 1 Three holes domino 7 A16012 1 Two holes domino 8 A07033 1 Pushing switch 9 A08003-1 1 Orange pilot light 10 A06042 1 Thermostat 11 A14078 1 Knob 12 A13003 4 Foot 13 B07001 4 Compression spring 14 37234 2 Ceramic chamber lock 15 37242 1 Bottom casing 16 37230SE 1 Drip tray 17 A10032 1 Cord closer 16 18 C01008 1 Cord with plug 19 C04008 1 Spring girdle 20 37237 1 Spring protection 21 A06050 Safety thermostat 22 37239COL 1 Top frame with grooved glass 22 37239COL2 1 Top frame with flat glass 23 37241COL2 1 Casing with flat glass Spare Parts MAJESTIC VC 220 V DWG# Part Number Qty Spare part 1 D06002 4 Ceramic chamber 2 F01063 2 Handle assembly 3 A15008 2 Top plate handle 4 37251 2 Stainless steel cover 5 B04027 4 Handle strap 6 A16013 1 Three holes domino 7 A16012 2 Two holes domino 8 A07033 2 Pushing switch 9 A08003 2 Orange pilot light 10 A06042 2 Thermostat 11 A14078 2 Knob 12 A13003 4 Foot 13 B07001 8 Compression spring 14 37247 4 Ceramic chamber lock 15 37253 1 Bottom casing 16 37244SE 1 Drip tray 17 A10032 1 Cord connector 18 C01008 1 Cord with plug 19 C04008 2 Spring gridle 20 37248 2 Spring protection 21 A06050 2 Safety thermostat 22 37250COL 2 Top frame with grooved glass 22 37250COL2 2 Top frame with flat glass 23 37252COL2 1 Casing with flat glass LIMITED WARRANTY Your new EQUIPEX product is warranted to the original purchaser for a period of one year from the date of purchase. This limited warranty is against defects from original factory imperfections in material and/or workmanship and includes labor for replacement of defective parts, provided repairs are performed by an authorized service agency. Our obligation under this war warranty is limited to repairing or replacing any part or parts thereof. The CUSTOMER must inform the Service Agency of warranty coverage and provide a copy of the dated sales or delivery receipt BEFORE WARRANTY REPAIRS BEGIN. Replacement parts and accessories are warranted for ninety (90) days from the date of purchase when purchased separately and will be verified by dated sales receipt or packing slip for that item. All parts or accessories replaced under warranty must be ret returned urned to the Service Agency. This warranty applies only to equipment under normal use and service in the U.S.A. and Canada. It does not apply to any item which has been repaired or altered in any way so as, in the judgment of EQUIPEX, to affect its reliability. THE FOLLOWING ARE NOT COVERED UNDER WARRANTY: 1. Damage caused by abuse, misuse or dropping or other similar incidental damage caused by, or as a result of, customer failure to follow assembly, operation, cleaning, user maintenance or storage instructions. 2. Labor to replace inoperative parts such as bulbs, plugs or racks due to normal wear and tear or abuse. 3. Materials or labor to repair scratched, stained, chipped, pitted, dented or discolored surfaces, attachments or accessories. 4. Transportation charges to or from a service agency for repair of your machine. If you should have questions relating to this issue, please call Equipex at 1-800-649-7885. 5. Labor charges to install or test attachments or accessories, which are replaced for any reason. 6. SHIPPING DAMAGES. Visible and hidden damages are the responsibility of the freight carrier. The consignee must file the claim promptly against the carrier. KEEP ALL ORIGINAL CONTAINERS AND PACKAGING MATERIAL FOR CARRIER INSPECTION. 7. Products placed or stored in the equipment are not subject to this warranty and no responsibility is assumed thereof. THIS WARRANTY IS GIVEN EXPRESSLY AND IN LIEU OF ALL OTHER WARRANTIES, EXPRESSED OR IMPLIED, FOR MERCHANTABILITY AND FOR FITNESS TOWARD A PARTICULAR PURPOSE AND CONSTITUTES THE ONLY WARRANTY MADE BY EQUIPEX, LLC. IT NEITHER ASSUMES, NOR AUTHORIZES ANY PERSON TO ASSUME FOR US, ANY OTHER LIABILI TY IN CONNECTION WITH THE SALE OF THE SUBJECT EQUIPMENT. For service, please lease call EQUIPEX at 1-800-649-7885, menu option # 3 765 Westminster Street Providence, Rhode Island 02903 U.S.A. Tel: (401) 273 273-3300 Fax: (401) 273-3328 3328 www.equipex.com e-mail: [email protected]