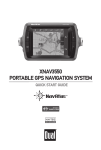
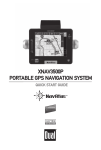
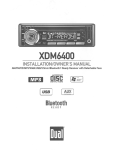
1
XGPS300
GPS Navigation & Battery Cradle
INSTALLATION/
OWNER'S MANUAL
. .XGPS300 INSTALLATION
acme
om
1II
I
COlI:
"
ll:
:me;
:
~c:Clj:accc:
l:l20;o1O:
CHH
l
Preparation
The XGPS300 turns any iPod touch~ into a fullyfeatured GPS navigation device with real-time, voice
prompted turn-by-turn directions. Use the included
Car Windshield Mount to secure the iPod and cradle
to the vehicle for easy access while on the road.
Note: The XGPS300 is only designed to fit an iPod
touch. Inserting any other device, such as iPhonel»
can cause damage to both the unit and the device.
Mounting Location
• Attach Mount in location that is easily within reach
from driver's seat.
• Ensure that chosen location wMI not obstruct
visibility, mirrors, airbags or any vehicle controls.
Note: Certain states regulate mounting locations
for safety reasons. Be sure to check and adhere to
local regulations when attaching Mount.
Note: A GPS signal strength indicator will appear
in top right corner of screen during navigation. If
signal strength is weak for no apparent reason,
try changing mounting location to ensure optimal
sig na I strength.
Attaching Holder
• Align four slots on
back of Holder with
four clips on front of
Mount as illustrated
in Figure 1 (at
right). Slide until
Holder clicks
into place.
HOLDER
2
~
CAR
WINDSHIELD
MOUNT
Figure 1
XGPS300 INSTALLATION •
·:;nn11 malO:
II I I 0
~
I nc;
lCU1H
IICI l :
II
It 0
;
1lI:H
c:e
:
::
II:'"
Insta Ilation
Installing Car Windshield Mount
• For best hold, first clean the windshield glass in
desired mounting location.
• Raise lever on Mount, attach to Mount to window
in desired location and depress lever to secure.
Attaching iPod touch
• Slide iPod touch into Cradle as illustrated in
Figure 2 (below). If using first generation iPod
touch, remove rubber spacer from Cradle before
inserting iPod.
Figure 2
.,
iPod touch
- iPod touch
& CRADLE
/
HOLDER
Figure 3
• Slide iPod touch and Cradle into Holder as
illustrated in Figure 3 (above).
• To adjust viewing angle, tighten octagonal nut to
hold the Holder in place, then rotate to desired
viewing angle.
3
. .XGPS300 INSTALLATION
:w,
II:UCCOllll:cmw:
:0
c ::nm l m : ;;:
C :;1; 0
: t: ; at :;c;:m:Ol: Hal
::e: 'ml
;;
Cradle Controls
Battery Indicator
Press Battery Indicator
button, and the four LED
lights above will illuminate to
indicate current charge.
Power Switch
Move Power switch
to GPS to power GPS
function. When not
using GPS, move Power
switch to Battery to
charge iPod touch or to
Off to save battery.
Power
Volume
Volume controls on Cradle allow easy volume
adjustment.
Headphone Jack
To listen with headphones, plug headphones into
headphone jack at base of unit.
USB Port
Use included mini USB to USB cable to connect unit
to computer for charging / syncing iPod.
Volume Down
Headphone Jack
4
Volume Up
XGPS300 INSTALLATION . ll:C:CI:1Ca::m mcc::mccc Ie c
co COliC:
:1
CI,me II
~l
Bemell cea:
m:::c:::C:O'CCCl;:cc~m:c::n
llC:lCl:::CCI:~'
lOonCCOllllCC:::::C;: ,,:
c c c m:m cccmm
Holder Wiring
12V Power Adaptor
Use included 12V power adaptor to connect Holder
to vehicle's power source to power GPS or charge
iPod.
Audio Out
Use Audio Out port to connect Holder to vehicle
stereo system with 3.5 mm mini stereo audio cable
(not included).
Removing iPod
To remove iPod and Cradle from HoLder. puLL back
on tab at top of Holder. and iPod and Cradle wiLL
slide out easily.
Note: Navigation functions wiLL operate even when
iPod and Cradle are not positioned in Holder.
Getting Started
Installing Software
To enabLe navigation on iPod touch. Launch iTunes
on computer and connect to iTunes Store. Search
for / download NavAtLas application. then sync iPod.
Launching NavAtlas
From iPod main menu. select NavAtlas icon to
activate application and begin navigation.
Note: Navigation only works when iPod is installed
in Cradle. If navigation error messages appear.
ensure proper installation and make sure power
switch is on.
Note: The first time the software runs. displayed
location may not be near actual location. Location
will be automatically updated when device is taken
outside and can receive GPS signals.
5
•
11m mil e l m
XGPS300 INSTALLATION
I
1m
lUI
me
m
lcm
me
lie t
1m III
::e
g
~
m::: I
1110 ommomm
llllmllmm
I I lUI I uml I COIll
Navigation
,
Main Menu
..
.
.o::) ..Xl
%-'/.~":::-;j:';.):: ..... :ru~ ..)~ ..N~ ,..(~ ...
">Xo:'~:-:-»:.~Q'n~c"";::r.
OVAL NJvAtl.~
When NavAtlas application
is accessed on iPod touch.
a Main Menu will appear
showing the following options:
• Where to?
• View Map
• Route
• Options
~II ,rl. ilj
.1!..·;:';;:t
~
~
,:·I:!:.:·:".,
,):•• •1·.:;
·:·:·:·::::::::;::f:::::~~(\U~t:}t:?:F:,r1t:H:n:~:rn:t:· <~:~:::;:\:~::::~~ft :~:~:~:,:"
~:}?/r\nrT <.: ::~:. ~;':.--~:::: ti ::> ;;..:: ~
:~}t~~:~:~:~;:?r):
Where t01
'-':':':';': ;: : :;:;":": : ,. . . . . . . . . . . . . .
. .,
,':,\::::}}':'
{,:(i.i.:.::':: :'
Search for a locatl'on by
keyword. contacts. address or
...:::;::)')"""'
i:
phone number. or access saved Favorite Locations.
A. Touch keyword search
box. and unit will dispLay a
keypad. Input keyword(s).
and touch Search. Unit will
display a list of locations.
Touch Location to seLect.
B. SeLect option to search by
stored Favorites. Recently
Found Locations. Contacts.
Address. Zip Code. points of
interest (POI). City Name.
. . ~fyFound
B
11 CotUctf
11 Adch..
.!it
ZIp Code
"'POl
I
Chy"'me
<-/.'I';«o)QIY~"~
c
~»' C'\.i!'''I'~ ... '~~ Vc¥'
Phone Number, Coordinate,
Emergency location and Locations saved as My POI.
C. Touch "Near Current Location" bar to qualify
search. Options incLude: Near Current Location and
Search in Selected City.
Once desired location has been found using one
of the above search functions. touch Gol to begin
navigation. To cancel navigation at any time. select
Cancel Route from Main Menu.
6
XGPS300 INSTALLATION •
o 11m c:m:m:::
II
cel: em te :::::1 m: :mlH ;::m 1m: tam:
r
c
Navigation
Navigation Screen
The Navigation Screen
will be displayed when
a route is set.
A. Touch to manually
update current location.
B. Press Menu to
return to the Main
Menu at any time.
G
H
I
J
K
F
L
C. Press to hide or
reveal ~avigation
screen Icons.
D. Press to enter simulation mode.
(:J.}
E
•.•~ • .•.
0
c
A
B
E. Touch to toggle between three available Map
View options: North Up. Heading Up and 3-D.
F. Press "+" to zoom in for more detail; press "_" to
zoom out to view a larger map area.
G. Displays next street name.
H. Displays direction / distance remaining until
next turn.
I. Displays current speed.
J. Indicates destination location.
K. Press to move current location on map to center
of screen.
L. Indicates last GPS receiving position.
M. Displays current street name.
7
. .XGPS300 INSTALLATION
{foe:l'
mw: mm
c
::I~~:: lCw~c:mc: IC~"
1m;
I : n : mCClIonmCQmc:
::c
Route
Route
Press Route on Main Menu
to display Route Menu.
which includes the following
options.
Current Route
Press Current Route to view
information on starting
location and destination. as
well as to select additional
options: Route Option. Route
Intersections. Route Preview.
Detour. Reverse Route
Search and Cancel Route.
" " Current Route
/
Edit Route
Open Route
"
Menage Route
"... fWYefH Routing
Edit Route
Press Edit Route to make changes to current route
during navigation.
Open Route
Press Open Route to access a route that has been
previously stored.
Manage Route
Press Manage Route to edit or delete stored routes.
Reverse Routing
Press Reverse Routing to reverse a stored route.
Note: You may exit map view temporarily during
navigation to adjust options on another screen. To
return to map view. select Route from Main Menu.
then touch Done button in the top right corner of
screen.
8
I'So::
:
II
,,:;
"~~~:::l'«~UQ.
Ie..
1>:::*~~
,IIQ-"U::II_~III:"""llll_II:III_11
I_~l
I
XGPS300 INSTALLATION •
:W~~·:':'»:~o::··::'::,m~
:l::
(me S :;i';t:m::·
mn::~ S::Hc:nl::::mCHI$:cmm~:umsssu
~(s» ~alC'Cnll"IH::mmo'c:l:ma",:~(m:l:i'O'O::JOalf~'~'
~ :n
SlI«IGncmc::CGS:S"HC r
Options
Options
From Main Menu. select Route Option to manually
adjust route options.
A
;.~~>
~-
-: .: --
.-.-: .. ,: : ,<'. :. "," ."
• Fa.tft1
.•. . . . .'•.. .'.. . . \
. .
" •..
i
,J.
Car
; Truck
<
.; "
'."
!
B
'.-'
"',"
.
U·Turn
i Tolf Roads
i
i
Hipay
1 Ferry RQlIte
·····~:t
A. SeLect a Route Type:
• Fastest: Selects route with fastest driving time.
• Shortest: Selects route with shortest distance.
• Al Route: Utilizes stored information to design
route based on user driving habits.
B. Select a Vehicle Option:
• Car: SeLects best route for cars.
• Truck: Selects best route for trucks.
C. Select Avoidances. including:
• U-Turn
• Toll Roads
• Highway
• Carpool Lane
• Ferry Route
• Unpaved Road
9
. .XGPS300 INSTALLATION
21 C
l
~
f
l
c~mc:mlnmUI:mlmo
Ie: :=; :
Ie c ce::
;;:;::
::::;
::mcm::cum;u~~:C';H::::::m:::m:~~:«lO:oY"':(>X-:-:V:«~
Settings
Settings
From iPod main screen. press
Settings then NavAtlas to
display Settings Menu. which
includes the following options.
:+
A:
Map Cokww
Fa'lOrlt. . On Map
Or'
(: POt On,...
B L.. ~<············
......
"
....
',,'."
C .i~<··.
::'-:::'::':>-.::--.:::--.:.::.'::::;-.-::.::-:::"
, VOl<;. 0uIda~
... ~
EI
.....
• Map Colors - Select colors for map display.
• Favorites on Map - Select symbol used to
indicate Favorites on map.
• POI on Map - Select symbol used to indicate
POI on map.
B. Adjust Units to display in either miLes or
kilometers.
C. Turn Voice Guidance prompts On or Off.
Store Favorites or POI
• Press desired location when visible on map.
• Press the "+" in the bottom left corner of screen.
• Select either Add to Favorites or Add to My POI.
• If desired. use keypad to enter new location name
when prompted.
• Press Done. and information will be stored.
10
XGPS300 INSTALLATION •
'~M'Mm:::::ml
mm"mmo::: m ;
ccmccm:'''m'c~cc'
. oS!
~'*
~ ~
-~:rc"
-,
H :::;;;
~:"H
~ "C',C"';j(" ~,..,-c-~
--
~
..
C
"I
Limited One-Year Warranty
This warranty gives you specific legal rights. You may
also have other rights which vary from state to state.
Dual Eleclronics Corp. warrants this product to the
original purchaser to be free from defects in material
and workmanship for a period of one year from the
date of the original purchase.
Dual Electronics Corp. agrees, at our option, during
the warranty period, to repair any defect in material
or workmanship or to furnish an equal new, renewed
or comparable product (whichever is deemed
necessary) in exchange without charges, subject to
verification of the defect or malfunction and proof of
the date of purchase. Subsequent replacement
products are warranted for the balance of the
original warranty period.
Who is covered? This warranty is extended to the
original retail purchaser for products purchased from
an authorized Dual dealer and used in the U.s.A.
What is covered? This warranty covers all defects in
material and workmanship in this product. The
following are not covered: software,
installation/removal costs, damage resulting from
accident, misuse, abuse, neglect, product
modification, improper installation, incorrect line
voltage, unauthorized repair or failure to follow
instructions supplied with the product, or damage
occurring during return shipment of the product.
Specific license conditions and copyright notices for
the software can be found via
http://www.dualav.com.
11
XGPS300 INSTALLATION . .
Limited One-Year WarrantY((Ont'd)
What to do?
1. Before you call for service, check the troubleshooting guide in your owner's manual. A slight
adjustment of any custom controls may save you a
service call.
2. If you require service during the warranty period,
you must carefully pack the product (preferably in
the original package) and ship it by prepaid
transportation with a copy of the original receipt
from the retailer to an authorized service center.
3. Please describe your problem in writing and
include your name, a return UPS shipping address
(P.O. Box not acceptable), and a daytime phone
number with your shipment.
4. For more information and for the location of the
nearest authorized service center please contact us
by one of the following methods:
• Call us toll-free at 1-866-382-5476
• E-mail [email protected]
Exclusion of Certain Damages: This warranty is
exclusive and in lieu of any and all other warranties,
expressed or implied, including without limitation
the implied warranties of merchantability and fitness
for a particular purpose and any obligation, liability,
right, claim or remedy in contract or tort, whether or
not arising from the company's negligence, actual or
imputed. No person or representative is authorized
to assume for the company any other liability in
connection with the sale of this product. In no event
shall the company be liable for indirect, incidental or
consequential damages.
12
;
,r:
lPI,COO::
I:C:;1
cr.
0»>
C11;1;;;;.or,."~~..«oV.v.>~~N:.»"~Q~N~~~)CI(I(q;
XGPS300 SPECIFICATIONS"
General
Cradle Dimensions (WxHxD) : 2.5" x 5.1" x 0.8"
Holder Dimensions (WxHxD) : 2.8" x 5.8" x 1.0"
Voltage
Cradle input voltage: 5V DC.
Note: Please use only the included USB cable
for connecting to a computer.
Holder input voltage: 5V DC
Note: Please use only the included cigarette jack
power adapter for in-car use.
Cigarette jack power adapter
Input : 12V DC ..... 24 V DC
Output: sV DC
GPS
50-channel u-bloxs engine
Internal Battery
Capacity: 1,1 OOmAH
Operation time: approximately 10 hours
(GPS mode, volume level set at 50%)
Charging time: 4 hours
Please note: design and specifications are subject to
change without notice.
13
XGPS300 SPECIFICATIONS.
Environmental Requirements
With iPod touch
Operating temperature: 32° to 95° F (0° to 35° C)
Nonoperating temperature: _4° to 113° F (-20° to
45° C)
Relative humidity: 5% to 950/0 noncondensing
Without iPod touch
Operating temperature: 14° to 140° F (-10° to 60° C)
Nonoperating temperature: _4° to 176° F (-20° to
80° C)
Relative humidity: 50/0 to 950/0 noncondensing
Please note: design and specifications are subject to
change without notice.
14
FCC Compliance
This device complies with Part 15 of the FCC Rules. Operation is
subject to the following two conditions:
(1) this device may not cause harmful interference, and
(2) this device must accept any interference received, including
interference that may cause undesired operation.
Warning: Changes or modifications to this unit not expressly
approved by the party responsible for compliance could void
the user's authority to operate the equipment under FCC rules.
Note: This equipment has been tested and found to comply with
the limits for a Class B digital device, pursuant to Part 15 of the
FCC Rules. These limits are designed to provide reasonable
protection against harmful interference in a residential
installation. This equipment generates, uses and can radiate
radio frequency energy and, if not installed and used in
accordance with the instructions, may cause harmful
interference to radio communications. However, there is no
guarantee that interference will not occur in a particular
installation. If this equipment does cause harmful interference
to radio or television reception, which can be determined by
turning the equipment off and on, the user is encouraged to try
to correct the interference by one or more of the following
measures:
· Reorient or relocate the receiving antenna.
. Increase the separation between the equipment.
· Connect the equipment into an outlet on a circuit different
from that to which the receiver is connected.
· Consult the dealer or an experienced radiofTV technician for
help.
".'
Dual
Dual Electronics Corp.
Toll Free: 1-866-382-5476
www.dualav.com
©2009 Dual Electronics Corp.
iPod is a registered trademark of Apple Inc. Other trademarks
and trade names are those of their respective owners. "Made
for iPod" means that an electronic accessory has been designed
to connect specifically to iPod and has been certified by the
developer to meet Apple performance standards. Apple is not
responsible for the operation of this device or its compliance
with safety and regulatory standards.
....,
r
lease use the included 3.5mm to 3.5mm
cable to connect the XGPS300 to your car
stereo. Problems with the sound may
occur if a different cable is used.
D
0
r"'I.
I
C
'-.:
C
h
-