1
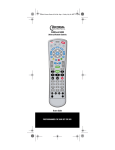
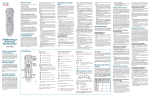
M.VEFIFF60153.Phase2.crw1
12/22/06
5:45 PM
Page 1
Welcome to
Verizon FiOS T V
Congratulations. You made a great choice by subscribing to FiOS TV.
It’s going to revolutionize your television experience.
As a Verizon FiOS TV subscriber, you can unleash the full potential of your
television and enjoy the programming selection, picture and sound quality
that only fiber-optic technology can deliver.
This guide will help you get the most out of your FiOS TV. You’ll learn about
our dynamic Interactive Programming Guide that helps you control how
you watch TV. And find out how to access our extensive Video On Demand
library. While you’re at it, spend a few minutes getting familiar with your
new, easy-to-use remote control. If you have our supercharged Digital
Video Recorder, you’ll learn how it lets you record TV, so you can watch
what you want, when you want.
Thank you for choosing FiOS TV. Now get ready to experience the power
of fiber optics.
M.VEFIFF60153.Phase2.crw1
12/22/06
5:45 PM
Page 2
Table of Contents
The ABCs of Fiber Optics
4
The Verizon FiOS Difference
5
The Optical Network Terminal
6
ONT Power Supply Unit
8
Battery Backup Unit
9
BBU Audible Alarms
10
BBU Indicator Signals
11–12
Verizon FiOS TV Router
13
Troubleshooting Tips
14
ONT Indicator Lights
15
Remote Control
16
Your Remote Control at a Glance
18
Easy-to-Use Buttons
19
Getting Started with Your Remote
20–21
Program Your Remote
21–26
Introducing Verizon FiOS Widgets
27
Troubleshooting
28
Device Codes
Interactive Programming Guide
Introduction
30–35
36
37–39
Main Menu
40
Search
40
M.VEFIFF60153.Phase2.crw1
12/22/06
5:45 PM
Page 3
TV Listings
41
Video On Demand
42
Mini-Guide
42
Help
43
High Definition Television (HDTV)
Digital Video Recorder (DVR)
43
43–44
Settings
44
Parental Controls
45
Quick Tips
46–49
Digital Video Recorder
50
DVR lets you control the show
51
Getting Started
52
Recording TV
52–55
Controlling Live TV with the DVR
55–57
Set Top Boxes
58
Your Gateway to Verizon FiOS TV
59
Standard Definition
60–61
High Definition
62–63
Digital Video Recorder
64–65
Notes
66–68
M.VEFIFF60153.Phase2.crw1
12/22/06
5:46 PM
Page 4
The ABC’s
of Fiber Optics
M.VEFIFF60153.Phase2.crw1
12/22/06
5:46 PM
Page 5
The Verizon FiOS Difference: Understanding
your new fiber-optic connection
Now that you’re hooked up, here’s how it works. Although traditional
telephone and cable TV networks use mostly copper wire and coaxial
cable to deliver services, Verizon FiOS is 100% fiber optic, bringing you
state-of-the-art voice, TV and high-speed Internet service. With FiOS,
your home is now ahead of its time.
Verizon FiOS uses hair-thin strands of glass to carry information, in the form
of laser-generated pulses of light. When those pulses of light reach your
home through our network, they are converted into electrical signals in a box
installed outside your home called the Optical Network Terminal (ONT). Once
the signals have been converted, your home’s existing telephone wiring and
coaxial cable carry voice and TV signals to your phones and TV sets. Either
CAT5 or a combination of CAT5 and coaxial cable is used to carry
Verizon FiOS Internet signals. Similarly, when information is sent from your
home, those electrical signals are changed into light pulses in the ONT so
they can travel to their destinations.
Unlike traditional self-powered telephone or cable television service, your
Verizon FiOS service depends on your home’s power source.
5
M.VEFIFF60153.Phase2.crw1
12/22/06
5:46 PM
Page 6
The Optical Network Terminal (ONT ):
Your light source
Traditional telephone service uses copper wire to transmit communications
signals. Verizon FiOS, however, transmits signals using hair-thin strands of
glass fiber and laser-generated pulses of light.
When that light reaches your home through the Verizon network, it is
converted into electric signals in a box installed outside your home called
the ONT. That way, it can be “read” by your telephones and computers.
Information that is sent from your home will be converted from electric
signals to light in the ONT.
Unlike traditional self-powered telephone service, your Verizon FiOS service
depends on your home’s power source.
FiOS TV Installation Diagrams
Depending on the type of home you live in, your FiOS TV service will be
installed using either the model shown below or the one on page 7.
Single-Family House
Router
Optical Network
Terminal (ONT)
6
ONT Power Supply Unit (OPSU)
& Battery Backup Unit (BBU)
M.VEFIFF60153.Phase2.crw1
12/22/06
5:46 PM
Page 7
Some Apartments/Condominiums
If you live in a building with multiple units, such as an apartment building or
other location with multiple tenants, the ONT and Battery Backup Unit (BBU)
may be installed in your apartment’s utility room or closet (see Single-Family
House diagram). However, in many apartments and condominiums, the
ONT/BBU are installed in a centralized location in your building. In that case,
the information on pages 6–12 may not apply to you.
Router
Optical Network
Terminal (ONT)
ONT Power Supply Unit (OPSU)
& Battery Backup Unit (BBU)
7
M.VEFIFF60153.Phase2.crw1
12/22/06
5:46 PM
Page 8
The ONT has a power cord that goes into your home through the ONT Power
Supply Unit, where it plugs into an existing standard electrical outlet.
To ensure connectivity to the Verizon FiOS network, please make sure
your ONT Power Supply Unit is plugged in at all times.
One of these ONT models will be installed in your home.
ONT Power Supply Unit (OPSU):
Your electricity source
Your ONT requires electricity to operate all Verizon services provided
on the FiOS network. The OPSU supplies that power by connecting your
ONT directly to an electrical outlet in your home or garage.
The OPSU contains a single indicator light that tells you
if electrical power is present. If the indicator light is dark,
electricity is not flowing from the outlet to the ONT.
In normal operation, the light should be green.
The ONT requires very little power to operate. In fact, the amount of power
needed is as little as what it would take to operate a couple of night-lights.
Problems with your equipment or service?
Please go to fioshelp.verizon.com or call the Verizon Fiber Solutions Center at 1-888-553-1555.
8
M.VEFIFF60153.Phase2.crw1
12/22/06
5:46 PM
Page 9
Battery Backup Unit (BBU):
Continuous power when you need it
In case your ONT Power Supply Unit is accidentally unplugged — or in the
event of a commercial power failure — a BBU has been installed to provide
you with backup power for voice service for approximately four hours.
Your BBU was installed in a location in your home or garage where it can
be easily monitored — most likely near the OPSU. The BBU is connected
directly to the ONT to provide backup power if it’s needed. In addition,
the BBU contains a series of indicator lights that tell you whether your
service is being powered by your home’s electricity or the battery.
The BBU also tells you when the battery needs to be replaced. The average
life of your battery is between one and four years, depending on the average
temperature of the environment. When your battery does need to be replaced,
you can purchase a sealed lead-acid battery at a major electronics outlet or
home improvement store.
Note: Battery disposal standards and requirements vary by state. If you need to replace the sealed lead-acid
battery in your backup unit, please check the following Environmental Protection Agency resources for
proper disposal instructions: visit epa.gov/epr/products/batteries.html
or call the EPA directly at 1-800-424-9346.
9
M.VEFIFF60153.Phase2.crw1
12/22/06
5:46 PM
Page 10
BBU Audible Alarms:
Both BBU models are equipped with an audible alarm to inform you of
problems with your BBU. The alarm sounds for two seconds and then is
silent for 58 seconds. The conditions listed below are the potential reasons
for the audible alarm. You can use the alarm in combination with the
indicator lights to troubleshoot your BBU issue.
Low Battery — Alarm is silenced if the battery voltage goes above 12V
(electrical power has returned), the battery is fully discharged or the battery
is removed from the BBU.
Foreign Voltage — Alarm is silenced once the foreign voltage has been
properly removed.
Replace Battery — Alarm is silenced when the battery is removed.
Overcurrent — Alarm is silenced once the overcurrent has been
properly removed.
Since you are responsible for the management of your battery, it is very
important that you familiarize yourself with the indicator lights and audible
alarm, to ensure that you have backup power if it’s needed.
Please note: During a power outage, only your telephone service will receive power. Your backup
battery will not operate your Internet or video services, or your router.
10
M.VEFIFF60153.Phase2.crw1
12/22/06
5:46 PM
Page 11
BBU Indicator Signals:
You have received one of the following BBU models as part of your FiOS
installation. Please look at the photos to determine which model you have.
Model #1:
The BBU model at right has four distinct lights to signify certain conditions,
as described below.
Lights:
Systems:
Green — Operating normally.
Blinking Green — Battery is going through a self-test.
Yellow — ONT is operating from the battery and the
battery is discharging.
Blinking Red — Battery is fully discharged and needs
to be replaced.
Battery:
Green — ONT is operating normally. BBU is on standby.
Yellow — Battery is either recharging or conducting a self-test, or the BBU is
providing power to the ONT.
Red — Battery is low. When this light comes on, approximately two hours of
talk time remain.
Replace Battery:
Red — Battery needs to be replaced.
Auxiliary:
Green — Auxiliary battery pack (ABP) is connected to the BBU. ABP option is
currently not available.
Off — No auxiliary battery pack is connected.
Problems with your equipment or service?
Please go to fioshelp.verizon.com or call the Verizon Fiber Solutions Center at 1-888-553-1555.
11
M.VEFIFF60153.Phase2.crw1
12/22/06
5:46 PM
Page 12
Model #2:
The alternate BBU model below uses a combination of buttons and lights to
signify certain conditions described below.
Buttons:
Battery Emergency Use — To protect you in an emergency, the BBU will shut
down approximately one hour before the battery is fully depleted. If you need to
make a phone call, press the Battery Emergency Use button once. This will
enable the ONT to reboot, and up to one hour of battery life for talk time will be
provided for emergency calls. After the button is pushed, all remaining battery life
is used.
Alarm Silence — Press this button to silence an audible alarm.
Lights:
Auxiliary Power:
Not currently available.
Replace Battery:
Red — Battery needs to be replaced.
Battery Power:
Red — ONT is operating off battery power; no AC power available.
Blinking Red — Battery power is low.
System Status:
Green — Indicates normal operation.
Blinking Green — Indicates system fault.
12
M.VEFIFF60153.Phase2.crw1
12/22/06
5:46 PM
Page 13
Verizon FiOS TV Router:
State-of-the-art sharing
As part of your Verizon FiOS TV service, you received a router, which has
been tested for use with Verizon FiOS TV. Your router contains special
diagnostic software that can help us troubleshoot and correct problems,
should you experience trouble with your connection.
13
M.VEFIFF60153.Phase2.crw1
12/22/06
5:46 PM
Page 14
Troubleshooting Tips
If you experience problems with your FiOS TV service, the following checklists
could save you a call to the Verizon Fiber Solutions Center. It will also help us
get to the root of the problem faster, when you do call.
Power:
1. Check to see if you are experiencing a power outage.
2. If there is no power outage, check to see if your OPSU is plugged into
an electrical outlet and that the indicator light is illuminated.
3. If the indicator light is not illuminated and the outlet is a Ground Fault
Circuit Interrupter (GFCI), check to make sure it hasn’t been tripped.
If it has, press the reset button.
4. Check the fuses and circuit breaker to make sure your outlet is working.
Reset the breaker or replace fuses, if necessary.
5. After taking these steps, recheck the indicator light on the OPSU to see
if it is illuminated. If it is, recheck for service.
Battery:
If you are experiencing a power outage, please review the following battery
troubleshooting steps:
1. Check the lights on your BBU (see pages 11–12) and check the
battery connection inside the BBU.
2. If the battery is properly connected and the Replace Battery indicator
light is red, replace the battery in your BBU, as it is fully discharged.
3. After taking these steps, recheck the BBU indicator lights. If the battery
lights are not in normal status, call the Verizon Fiber Solutions Center
for assistance.
If you have gone through the above Power and Battery checklists and are
still experiencing problems with your FiOS TV service, call the Verizon Fiber
Solutions Center directly.
Problems with your equipment or service?
Please go to fioshelp.verizon.com or call the Verizon Fiber Solutions Center at 1-888-553-1555.
14
M.VEFIFF60153.Phase2.crw1
12/22/06
5:46 PM
Page 15
Here’s a quick guide
for reading your ONT Indicator Lights:
Green light:
Green light:
The battery is
connected and
the voltage level
is adequate.
The main AC power
is available.
No light:
The ONT is not
operating from the
battery, or the
battery is depleted.
Red light:
The ONT has detected
a hardware failure.
No light:
There is no power
at the ONT.
No light:
Adequate video
signal or video port
is enabled.
Red light:
Blinking light:
The video signal is
below the adequate
voltage level.
The ONT is not
synchronized with the
Central Office.
Green light:
No light:
The ONT is fully
operational and
connected to the
Central Office.
Green light:
The ethernet port is
transmitting data.
No light:
No activity, or the
ethernet port is
disabled.
At least one
telephone is in an
off-hook condition.
Blinking light:
At least one
telephone has been
in an off-hook
condition for over
an hour.
No light:
All telephones are in
an on-hook condition.
Power for services provided on the Verizon FiOS network must be supplied by the customer. Customer
is responsible for backup battery replacement. Backup battery does not supply power for Internet or
video services. Certain telephones, answering machines and other telephone equipment not meeting
industry standards may not work with service provided on the Verizon FiOS network.
15
M.VEFIFF60153.Phase2.crw1
12/22/06
5:47 PM
Page 16
Remote Control
M.VEFIFF60153.Phase2.crw1
12/22/06
5:47 PM
Page 17
Everything you need to know about your
new FiOS TV remote
Whether you’re browsing through channels, recording your favorite shows or
ordering the latest hit movies from our extensive Video On Demand library,
your new and enhanced FiOS TV universal remote control does it all.
Your remote has new features and functions that allow you to access all the
advanced features of Verizon FiOS TV. In addition to operating your Set Top
Box, you can use your four-in-one remote control to operate up to three
other devices of your choice.
Take a moment to review the capabilities of your new remote control and
learn about all the features of your new FiOS TV service.
17
M.VEFIFF60153.Phase2.crw1
12/22/06
5:47 PM
Page 18
Your Remote Control at a Glance
Guide accesses
the Verizon FiOS TV
Interactive Programming
Guide (IPG).
Power turns the selected
or programmed devices
on or off.
DVD, AUX, TV, STB
Menu accesses the
on-screen display for the
currently selected device.
select the programmed
device for the remote
control.
Info displays a
Exit closes any
on-screen display
and returns you to
regular viewing.
This button is
reserved for future
enhanced Widget
updates.
description of
the show you are
watching or have
selected in the IPG.
Options displays
helpful information.
(if available)
Favorites displays
On Demand provides
your favorite channel
listings.
access to Video On
Demand programming.
Skip Back activates
Last returns to the
last selected channel.
Press again to return
to the current channel.
instant replay.
Skip Forward jumps
forward in recorded TV.
FiOS TV returns to
live TV programming.
18
REC records the current
program to the DVR STB.
A (Widgets) provides
DVR launches
instant access to local
weather, traffic updates
and more.
the DVR menu.
M.VEFIFF60153.Phase2.crw1
12/22/06
5:47 PM
Page 19
Easy-to-Use Buttons
Selects the video source for
some TV, DVD, VCR or
Home Theater Systems.
Rewinds VCR, DVD, VOD or
DVR media.
Plays current VCR, DVD, VOD
or DVR media.
Changes display format.
Fast-forwards VCR, DVD, VOD
or DVR media.
In TV mode, turns
Picture-in-Picture (PIP)
on or off (if available).
Records to VCR or DVR.
Pauses VCR, DVD, VOD or
DVR media.
CC
Toggles between
closed-caption options.
Stops VCR, DVD, VOD or
DVR media.
Buttons B, C and D are reserved
for future program-specific
selections.
Use these keys to enter a
channel or device code number.
For example, to access channel
2, press 2 or 0-0-2.
19
M.VEFIFF60153.Phase2.crw1
12/22/06
5:47 PM
Page 20
Getting Started with Your Remote
Install Batteries
Your remote requires two AA batteries. The first set is included and should
last up to six months under normal usage.
To test if the batteries have been installed correctly, press a few keys on the
remote. One of the Device Keys (DVD, AUX, TV, STB) on the top of the
remote will flash briefly when you press a key.
Get to Know Your Remote
Your remote is now ready to control your FiOS TV Set Top Box (STB).
To start, try the following:
• Turn on your TV.
• Press the STB key on the top of the remote to make sure you are in
FiOS TV “STB MODE.”
• Press the CH+ key to see the next higher channel.
• Press 5 - 0 then OK to tune to channel 50.
• Press Last to return to the last channel.
• Press Info to see information about the current program. Press Exit to
return to TV watching.
• Press Guide to see a list of TV programs. Press Exit to return to
TV watching.
• Press the Menu key to launch the FiOS TV Main Menu. From the Main
Menu, you can access all the features of your FiOS TV service.
• Press the
and
keys to navigate through this menu.
We suggest that you become familiar with all the options on the Main
Menu. To select any item, press OK. Press Exit at any time to return
to TV watching.
20
M.VEFIFF60153.Phase2.crw1
12/22/06
5:47 PM
Page 21
You are probably already familiar with most of the keys on the remote;
however, there may be a few that are new to you.
Options is reserved for extra options or help based on what you
are doing.
Favorites displays your list of favorite channels. (The first time you
press the key, you will be invited to set up your favorite channels.)
On Demand displays a list of movies and other types of programs
you can watch at any time.
Widgets accesses local weather, traffic and other information.
If you have an STB with a built-in DVR…
displays your list of recorded programs.
is a rocker button. Press the lower half of the button to pause the
program. Press the upper half of the button to continue to play from
where you left off.
jumps back a few seconds in the program you are watching.
jumps forward, if you are watching a recorded program.
records the current program.
Program Your Remote
Your new remote control comes from the factory ready to control your FiOS
TV service. However, VOL+, VOL- and Mute will not work until you program
the remote with the brand of TV you have. In addition to your STB and TV,
your remote can also control two additional devices, such as a DVD player
and an audio receiver.
This is called “programming the remote.” If you don’t want to control devices
other than your FiOS TV STB, you do not need to program the remote.
21
M.VEFIFF60153.Phase2.crw1
This Device Key
DVD
AUX
TV
STB
12/22/06
5:47 PM
Page 22
Controls This Type of Device
DVD and VCR
Audio Receivers and VCR
TV
FiOS TV Set Top Box only
How to Program Your Remote
We will use the example of programming your remote to control a TV.
The procedure is the same for DVD players and audio receivers.
1. Look up your TV’s brand in the TV code listing that starts on page 30.
2. Circle the first 4-digit number displayed for your brand of TV.
3. Turn on your TV.
4. Press and hold the TV key.
5. While holding down the TV key, press the OK key.
6. Release both keys. The Device Keys will blink twice.
7. Enter the 4-digit TV code you circled. The TV key will blink
three times.
8. To test to see if this was the correct code, point the remote at your
TV and press Power. If the TV turns off, you have successfully
programmed your remote.
9. If the TV does not turn off, repeat all the steps using the next code in
the list.
10. For future reference, write down the code that worked, in case you
must reprogram your remote.
NOTE: If some of the keys on the remote do not operate your TV as you
would expect, then you can try the next code in the list for your brand of TV.
22
M.VEFIFF60153.Phase2.crw1
12/22/06
5:47 PM
Page 23
To program the remote to control a VCR or DVD player, press and hold
the DVD key, instead of the TV key, in steps 4 and 5. To program an audio
receiver, press and hold AUX instead. You can assign a DVD or VCR to the
DVD key. The AUX key is reserved for audio receivers, amplifiers and VCRs.
NOTE: The remote will exit the programming mode after 20 seconds if no
key is pressed.
What if None of the Codes Worked?
If none of the codes worked, try the following procedure. (As before, we will
use the example of a TV. For other devices, use the appropriate Device Key
instead of the TV key, in steps 2 and 3.)
1. Turn on your TV.
2. Press and hold the TV key.
3. While holding down the TV key, press the OK key.
4. Release both keys. The Device Keys will blink twice.
5. Press 9 - 2 - 2.
6. Point the remote at the TV.
7. Press
.
8. Press
. Every time you press
, the remote sends out a new
power-off command to the TV. Keep pressing
off. (You can press
until the TV turns
to go back.)
9. When the TV turns off, you have found the right code. Press OK to
store this code.
There are over 200 TV and DVD codes. The most common codes
are tried first, but you may still need to press
over 200 times to find the
right code. If you reach the end of the list of codes, the entire remote will
flash twice and return to normal operation. You can exit programming at any
time by pressing Exit.
23
M.VEFIFF60153.Phase2.crw1
12/22/06
5:47 PM
Page 24
Switching Modes
Press a Device Key at the top of the remote to switch modes. For example,
to control your DVD player, press DVD. To return to your FiOS TV Set Top
Box (STB), press STB. Pressing the DVD, AUX or TV key is like picking up
the remote for that device.
The Channel Keys
CH+, CH- and Last control the STB, even after you press the DVD, AUX
or TV Device Key. This is the way most people will want the remote to work.
However, you can change the way the Channel Keys work, so that when you
press a Device Key, the Channel Keys will operate the selected device.
If you want the Channel Keys to control different devices…
1. Press and hold the STB key.
2. While holding down the STB key, press the OK key.
3. Release both keys. The Device Keys will blink twice.
4. Press 9 - 6 - 6. The STB key will blink twice.
5. Press OK. The STB key will blink three times to indicate success
in programming.
To return to controlling the channel via the STB only, press STB in step 5.
24
M.VEFIFF60153.Phase2.crw1
12/22/06
5:47 PM
Page 25
The Volume Keys
VOL+, VOL- and Mute always control the TV volume, even when you are in
STB or DVD modes. (However, the Volume Keys will always control the AUX
device, when in AUX mode.) This is the way most people will want the
remote to work. However, you can change how the Volume Keys work.
If you always want the Volume Keys to control the AUX device…
Some people may want to always adjust the volume using their AUX device
(typically a home theater receiver), regardless of the mode they are in.
1. Press and hold the STB key.
2. While holding down the STB key, press the OK key.
3. Release both keys. The Device Keys will blink twice.
4. Press 9 - 5 - 5. The STB key will blink twice.
5. Press AUX. The AUX key will blink three times to indicate success
in programming.
To return to controlling the volume via the TV, press TV in step 5. If you want
to control the volume through any device (by pressing a Device Key, then a
Volume Key), press OK in step 5.
25
M.VEFIFF60153.Phase2.crw1
12/22/06
5:47 PM
Page 26
The Power Key
Power turns on or off both your STB and TV when you are in STB mode. (If
you have a DVR STB, the DVR will continue to record scheduled programs
when off.) However, you can reprogram how the Power Key works.
If you want the Power Key to control multiple devices at once…
1. Press and hold the STB key.
2. While holding down the STB key, press OK.
3. Release both keys. The Device Keys will blink twice.
4. Press 9 - 7 - 7. The STB key will blink twice.
5. One after the other, press each Device Key you want the Power Key
to control, in the order you want them to turn on or off. Each selected
Device Key will blink twice after it is pressed.
6. Press OK when done. The STB key will blink three times to indicate
success in programming.
For example, to program the Power Key to turn on or off your TV, AUX
and STB, in that order, with one press of the Power Key, press [STB+OK],
[9 - 7 - 7], [TV], [AUX], [STB], [OK].
If you want the Power Key to control only one device at a time…
Some people want to press a Device Key, then the Power Key, to turn just
that one device on or off.
1. Press and hold the STB key.
2. While holding down the STB key, press OK.
3. Release both keys. The Device Keys will blink twice.
4. Press 9 - 7 - 7. The STB key will blink twice.
5. Press OK. The STB key will blink three times to indicate success
in programming.
26
M.VEFIFF60153.Phase2.crw1
12/22/06
5:47 PM
Page 27
Introducing Verizon FiOS Widgets
Get weather and traffic at the touch of a button.
We’ve added an exciting new feature
to your TV service. It’s called Verizon
FiOS Widgets. And it’s the easiest
way for you to instantly get local
weather and traffic updates, without
missing a second of your show.
Setting up Widgets is easy.
1. Press the
button on your remote to launch Widgets. You may also
choose ENHANCED TV from the menu, then choose WIDGETS.
The Widgets application will start with the ZIP Code screen displayed.
2. Enter your ZIP Code using the number keys on the remote and press OK.
The Widget will be displayed under your current TV program.
3. Once your ZIP Code is set, simply press the
on or off.
button to turn Widgets
To change the ZIP Code for Widgets, follow these steps:
1. Press the
button on your remote to launch Widgets. You may also
choose ENHANCED TV from the menu, then choose WIDGETS.
The Widgets application will start with the ZIP Code screen displayed.
2. Use the
or
ARROW keys to switch to the CHANGE LOCATION
Widget. Press OK. The Change Location screen will be displayed.
3. Enter the new ZIP Code using the number keys on the remote and
press OK. The Widget will be updated with the information for the
ZIP Code entered.
27
M.VEFIFF60153.Phase2.crw1
12/22/06
5:48 PM
Page 28
Troubleshooting
If your remote is not responding, try the following steps, in order:
1. Review the information in “Program Your Remote” (see page 21), to make
sure that the key you pressed is active for the device you are controlling.
2. Make sure you are controlling the device you think you are.
(See Program Your Remote on pages 21–26, for more information
on choosing a device to control.)
3. Make sure your batteries are good. If battery power is low, your remote
enters a Low Battery Condition, to conserve battery power for retaining
your settings. (See Install Batteries on page 20, for more information on
changing the batteries.)
4. If some of the buttons on the remote control do not operate your TV as you
would expect, make sure you try all codes in the list for your brand of TV, in
order to reprogram your remote. Also, please note that certain buttons on
this remote may vary from buttons on your TV, DVD and VCR remotes.
5. Reset all settings to the original factory defaults (all previous programming
will be lost).
To reset the remote to the original factory defaults:
• Press and hold the STB key.
• While holding down the STB key, press OK.
• Release both keys. The Device Keys will blink twice.
• Press 9 - 0 - 0. The STB key will blink 3 times to indicate success
in programming.
Some features may require additional equipment at an additional cost. Your use of FiOS TV will
require your acceptance of the Terms of Service, a copy of which will be given to you at the time of
installation. The Verizon FiOS TV remote control does not have any user-serviceable parts. Opening
the case, except for the battery cover, may cause permanent damage to your remote control. Other
terms and conditions apply.
28
M.VEFIFF60153.Phase2.crw1
12/22/06
5:48 PM
Page 29
29
M.VEFIFF60153.Phase2.crw1
Device Codes
Codes for Audio
Amplifiers
Bose 0701
12/22/06
5:48 PM
Capetronic 0558
Carver 1216, 0216
Polk Audio 0216,
1316
Denon 1387
Proscan 1281
Fisher 1828
RCA 1050, 1281,
0558, 1101, 1417,
1538
GE 0105
Harman Kardon
0137, 0216, 0918,
1331, 1333
Harman Kardon 0919
Hitachi 1828
Samsung 1322, 1527
JVC 0358
Integra 0162, 1325,
1347
Sansui 0216
JBL 0137, 1333
Sherwood 1104
JVC 1401, 1522
Sonic Blue 1896
Philips 0919
Kenwood 1340, 1597,
1596
Pioneer 0040, 0327
KLH 1417, 1455
Sony 1085, 1468,
1285, 1786, 1585,
1685, 1785, 1885
Polk Audio 0919
Koss 1393
Soundesign 0697
RCA 0327
LG 1320
Stereophonics 1050
Sony 0716
Linn 0216
Sunfire 1340
Soundesign 0105
Magnavox 1216,
1296, 0216, 0558,
1541
Teac 1101, 1417
Marantz 1216, 1296,
0216, 1316
Venturer 1417
Curtis Mathes 0327
Left Coast 0919
Marantz 0919
Optimus 0327
Victor 0358
Wards 0105, 0040
Yamaha 0381, 0160
Mitsubishi 1420
Codes for Audio
Receivers
ADC 0558
Aiwa 1432, 0216,
0148, 1415, 1668
Alco 1417
Amphion Media
Works 1590, 1642
Anam 1101
Apex Digital 1457
Audiotronic 1216
Audiovox 1417
Bose 1256, 0666,
1280, 1960
30
Page 30
Onkyo 0162, 0869,
1325, 1347, 1558
Optimus 1050, 0558,
0697, 1101
Rio 1896
Sanyo 1496, 1828
Technics 1335, 1545
Thorens 1216
Wards 0216, 0041
Yamaha 0203, 1203,
1303, 1358, 1402
Zenith 1320
Oritron 1393
Codes for Televisions
Panasonic 1335,
1545, 1315, 1343,
1575, 1660, 1790,
1791
Admiral 0120, 0490
Philips 1216, 1296,
0216, 1293
Pioneer 1050, 0041,
0177, 0558, 0657,
1411
Advent 0788, 0810,
0842, 0844, 0869
Aiko 0119
Akai 0839, 0729,
0057, 0699
Albatron 0727, 0870
America Action 0207
M.VEFIFF60153.Phase2.crw1
Ampro 0778
Anam 0207
AOC 0057
Apex Digital 0775,
0906, 0792, 0794
Audiovox 0478,
0207, 0119, 0650,
0829, 0902
12/22/06
5:48 PM
Daewoo 0478, 0119,
1688, 0650, 0688,
0699
Dell 1107, 1205
Denon 0172
Dumont 0044
Page 31
Hello Kitty 0478
Hisense 0775
Hitachi 1172, 0172
Hyundai 0876
Infinity 0081
Insignia 0198
Aventura 0198
Durabrand 0490,
0207, 0205, 0198,
1061
Bell & Howell 0181
Dwin 0747, 0801
JCB 0027
BenQ 1059
Electroband 0027
Bradford 0207
Electrograph 1782
Jensen 0788, 0842,
0844
Broksonic 0263,
0490
Emerson 0181, 0263,
0490, 0207, 0205,
0198, 0650
JVC 0080, 0758,
1280
Envision 0057, 0840
Kenwood 0057
Epson 0860, 0867
KLH 0792, 0794
ESA 0839, 0198
KTV 0207, 0057
Fisher 0181
LG 1292, 0205, 0727,
0883, 1205
Candle 0057
Carnivale 0057
Carver 0081
Celebrity 0027
Celera 0792
Changhong 0792
Fujitsu 0710, 0836,
0880
Citizen 0087, 0057,
0119
Funai 0207, 0198
Inteq 0044
JBL 0081
KEC 0207
LXI 0074, 0081, 0181,
0183, 0205
Gateway 1782, 1783
Magnavox 1481,
0081, 0057, 0733,
0829, 1281
GE 1474, 0074, 0078,
0478, 0205, 1374
Marantz 0081, 0057,
0731, 0882, 1181
Contec 0207
Gibralter 0044, 0057
Craig 0207
Go Video 0913
Matsushita 0277,
0677
Crosley 0081
GoldStar 0205, 0057
Maxent 1782
Crown 0207
Grunpy 0207
Megapower 0727
Curtis Mathes 0074,
0081, 0181, 0478,
0120, 0087, 0729,
0057, 0172, 0193,
0493, 1174, 1374
Haier 1061
Megatron 0205, 0172
Hallmark 0205
Memorex 0181, 0490,
0177, 0205
Clarion 0207
Commercial
Solutions
1474, 0074
CXC 0207
Futuretech 0207
Harman Kardon
0081
Harvard 0207
Havermy 0120
Helios 0892
MGA 0177, 0205,
0057
Midland 0074, 0044,
0078
31
M.VEFIFF60153.Phase2.crw1
5:48 PM
Page 32
Mitsubishi 0120,
1277, 0177, 0205,
0863, 0895
Prima 0788, 0810,
0842, 0844
Sony 1127, 0027,
0861
Princeton 0727, 0744
Monivision 0727,
0870
Prism 0078
Soundesign 0207,
0205
Proscan 1474, 0074,
1374
Squareview 0198
Motorola 0120
MTC 0087, 0057
Proton 0205, 0493
Starlite 0207
Multitech 0207
Pulsar 0044
NAD 0183, 0205,
0893
Quasar 0277, 0078,
0677
Studio Experience
0870
NEC 0057, 0524,
0909, 1731
RadioShack 0074,
0181, 0207, 0205,
0057
NetTV 1782
Nikko 0205, 0057,
0119
Norcent 0775, 0851
NTC 0119
RCA 1474, 0074,
0117, 0706, 1074,
1174, 1274, 1374,
1574
SSS 0207
Superscan 0120,
0891
Supreme 0027
SVA 0775, 0892
Sylvania 0081, 0057,
0198
Symphonic 0207,
0198
Onwa 0207
Realistic 0181, 0207,
0205, 0057
Optimus 0181, 0277,
0193, 0677
Runco 0044, 0057,
0524, 0630
Tatung 1783
Optoma 0914
Sampo 0057, 1782
Techview 0874
Optonica 0120
Samsung 0087,
0839, 0729, 0205,
0057, 0793, 0841,
1087
Techwood 0078
Orion 0263, 0490,
1490
Panasonic 0277,
0078, 0677, 1437
Sansui 0490
Penney 0074, 0183,
0078, 0087, 0205,
0057, 1374
Sanyo 0181, 0826,
0920
Philco 0081, 0057
Scott 0263, 0207,
0205
Philips 1481, 0081,
0717, 1181
Pilot 0057
Pioneer 0193, 0706,
0893
Polaroid 0792, 0892
Portland 0119
32
12/22/06
Scotch 0205
Sears 0074, 0081,
0181, 0183, 0205,
0198
Sharp 0120, 0518,
0715, 0716, 0878
Sheng Chia 0120
Tandy 0120
Technics 0277, 0078
Teknika 0081, 0207,
0177, 0087, 0119
Telefunken 0729
TMK 0205
TNCi 0044
Toshiba 0181, 1283,
0183, 1292, 0087,
0677, 0859, 0872,
1183, 1383, 1683,
1731
TVS 0490
Vector Research
0057
Victor 0080
Vidikron 0081
M.VEFIFF60153.Phase2.crw1
12/22/06
5:48 PM
Page 33
Vidtech 0205
DIRECTV 0766
LXI 0064
Viewsonic 0884,
0891, 0912, 1782
Durabrand 0066
Magnasonic 1305
Dynatech 0027
Vizio 0891, 0912,
1783
Electrohome 0064
Magnavox 0062,
0066, 0108, 0027,
1808
Wards 0081, 0205,
0057, 0893, 1183
Waycon 0183
Westinghouse 0912,
0916
Electrophonic 0064
Emerex 0059
Emerson 0064, 0211,
0027, 1305, 1506
Fisher 0074
Marantz 0062, 0108
Marta 0064
Matsushita 0062,
0189
White Westinghouse
0490, 0650
Fuji 0062, 0060
Media Center PC
1999
Funai 0027
MEI 0062
Yamaha 0057, 0796,
0860, 0866
Garrard 0027
Memorex 0062,
0189, 0064, 0075,
0066, 0074, 0027,
1264
Zenith 0044, 0490,
1292, 0205, 0119
Gateway 1999
GE 0087, 0062, 0834,
1062, 1087
GoldStar 0064, 1264
Codes for Video —
VCR
Gradiente 0027
ABS 1999
Harley Davidson
0027
Admiral 0075
Microsoft 1999
Mind 1999
Mitsubishi 0834
Motorola 0062, 0075
Harman Kardon
0108
MTC 0027
Nikko 0064
Alienware 1999
Hewlett Packard
1999
American High 0062
HI-Q 0074
Audiovox 0064
Hitachi 0027
Broksonic 0211, 1506
Howard Computers
1999
Adventura 0027
Aiwa 0064, 0027
Calix 0064
Multitech 0027
Niveus Media 1999
Northgate 1999
Olympus 0062
Optimus 1089, 0189,
0064, 0075
Canon 0062
Hughes Network
Systems 0766
Carver 0108
Humax 0766
Citizen 0064, 1305
Hush 1999
Craig 0064, 0074
iBUYPOWER 1999
Curtis Mathes 0087,
0062, 0189, 1062
KEC 0064
Penney 0062, 0064,
1062, 1264
Kodak 0062, 0064
Philco 0062
Linksys 1999
Philips 0062, 0108,
0645, 0766
CyberPower 1999
Daewoo 0072, 1305
Dell 1999
Lloyd’s 0027
Orion 0211, 1506
Panasonic 1089,
0062, 0189, 0252,
0643, 1062
33
M.VEFIFF60153.Phase2.crw1
12/22/06
5:48 PM
Pilot 0064
Technics 0062, 0189
Arrgo 1050
Polk Audio 0108
Audiovox 0817
Proscan 0087, 1087
Teknika 0062, 0064,
0027
Pulsar 0066
Thomas 0027
Blue Parade 0598
Quasar 0062, 0189,
1062
Tivo 0645, 0663,
0766, 2023
Broksonic 0722
RadioShack 0027
Radix 0064
Toshiba 0072, 0872,
1035, 1172, 1999,
2023
Randex 0064
Totevision 0064
RCA 0087, 0834,
0907, 1062, 1087
Touch 1999
Realistic 0062, 0064,
0075, 0074, 0027
ReplayTV 0641, 0643
Ricavision 1999
Runco 0066
Samsung 0072,
0766, 1041
Blaupunkt 0744
CineVision 0903,
0896
Curtis Mathes 1114
CyberHome 0843,
0901, 1050, 1156
Vector 0072
Daewoo 0811, 0896,
1196, 1199
Video Concepts
0072
Denon 0517, 0661
Videomagic 0064
Viewsonic 1999
Villain 0027
Voodoo 1999
Disney 0702, 1297
Durabrand 1154
DVD2000 0548
Emerson 0618, 0702,
0848, 1295
Enterprise 0618
Sansui 0027, 1506
Wards 0087, 0062,
0075, 0074, 0108,
0027
Sanyo 0074
XR-1000 0062, 0027
Fisher 0697
Scott 0211, 0072
Zenith 0066, 0060,
0027, 1506
Funai 0702, 1295
ZT Group 1999
GE 0549, 0744
Sonic Blue 0641,
0643
Codes for Video —
DVD
Go Video 0771, 0768,
0810, 0896, 1071,
1102, 1185, 1757
Sony 0062, 0059,
0060, 0027, 0663,
1259, 1999
Accurian 1443
GoldStar 0768
Aiwa 0668
Greenhill 0744
Stack 9 1999
Akai 0722, 0926
Sylvania 0062, 0108,
0027, 1808
Alco 0817
Harman Kardon
0729
Symphonic 0027
Apex Digital 0699,
0744, 0782, 0821,
0823, 0824, 0857,
1031, 1047, 1083,
1088, 1127
Sanky 0075, 0066
Sears 0062, 0064,
0074, 0027, 1264
Sharp 0075, 0834
Systemax 1999
Tagar Systems 1999
Teac 0027
34
Page 34
Allegro 0896
ESA 0848, 1295
Gateway 1185
Hitachi 0600, 0691,
1274
Hiteker 0699
iLo 1375
Initial 0744
M.VEFIFF60153.Phase2.crw1
12/22/06
5:48 PM
Insignia 1295
Onkyo 0530, 0654
Integra 0654
Oritron 0678
JBL 0729
Panasonic 0517,
0730, 1389, 1489,
1517, 1789
JVC 0585, 0650,
0894, 1191
Page 35
Sensory Science
1185
Sharp 0657, 0702,
0779, 1283
Shinsonic 0560, 0866
Kenwood 0517, 0561
Philips 0530, 0566,
0673, 0702, 0881,
1287, 1294, 1381
KLH 0744, 0817,
1047, 1176
Pioneer 0552, 0598,
0658
Koss 0678
Polaroid 1047, 1088
Lasonic 0825
Polk Audio 0566
Lenoxx 1154
Presidian 0702
Symphonic 0702,
0848
LG 0618, 0768, 0896
Proscan 0549
Teac 0817
LiteOn 1085, 1185,
1443, 1467
Qwestar 0678
Technics 0517, 0730
RCA 0549, 0598,
0744, 0817, 0849,
1049, 1159
Theta Digital 0598
Rio 0896
Rotel 0650
Urban Concepts
0530
Sampo 0779
US Logic 0866
Samsung 0517,
0600, 0847, 0926,
1071, 1102
Venturer 0817
Kawasaki 0817
Magnavox 0530,
0566, 0673, 0702,
0848, 1295
Marantz 0566
Memorex 0722, 1297
Microsoft 0549
Mintek 0866, 0744
Mitsubishi 1548,
0548
NAD 0768
Sonic Blue 0896
Sony 0560, 1560,
0891, 1060, 1458
Superscan 0848
Sylvania 0702, 0848,
1295
Toshiba 0530, 0722,
1072, 1181
Xbox 0549
Yamaha 0517, 0566,
0572
Sansui 0722
Sanyo 0697, 0722
Zenith 0530, 0618,
0768, 0896
Nesa 0744
Write your device codes here for future reference.
TV
DVD/VCR
AUX
35
M.VEFIFF60153.Phase2.crw1
12/22/06
5:49 PM
Page 36
Interactive
Programming
Guide
M.VEFIFF60153.Phase2.crw1
12/22/06
5:49 PM
Page 37
Introduction
Prepare to unleash the full potential of Verizon FiOS TV. This next-generation
TV service, with its Interactive Programming Guide, delivers more entertainment
choices to your TV screen than ever before. Flip through your favorite channels
with the click of a button. Or search by actor or title, in a flash.
But that’s just the beginning. With FiOS TV, you can enjoy advances in
entertainment like High Definition TV and Digital Video Recording.
FiOS TV is the latest technology. It’s exciting. And it’s easy to use. Just a few
clicks of the remote are all it takes to get started. Keep this Guide handy while
watching TV. It contains an overview of the most important features of the
FiOS TV IPG and remote control.
37
M.VEFIFF60153.Phase2.crw1
12/22/06
5:49 PM
Page 38
Use your remote control to move quickly and easily through the IPG’s many
features. Detailed descriptions of its functions are listed on the next page. Or
just remember these few simple rules:
• To use the IPG, turn on the Set Top Box by pressing the STB button on
the remote control. Then press the POWER button.
• Press GUIDE to go directly to program listings.
• The MENU button takes you to the Main Menu of the Verizon FiOS TV IPG.
• Any on-screen item highlighted in green can be selected by pressing the
OK button.
• Use the four ARROW buttons to move the highlight to the right, left, up
or down. Once the item you want is highlighted, press OK to select it.
• Press EXIT at any time, to exit the menu and return to watching TV.
38
M.VEFIFF60153.Phase2.crw1
12/22/06
5:49 PM
Page 39
GUIDE
POWER
displays program
listings.
turns the selected or
programmed devices
on or off.
MENU
STB
accesses the IPG
Main Menu when
the Set Top Box is
the selected device.
activates the remote
control of Set Top
Box functions.
OK
selects the item
highlighted in green.
INFO
displays a description
of the show you are
watching or have
selected in the IPG.
FAVORITES
MUTE
silences current
audio feed.
On Demand
provides access to
Video On Demand
programming.
VOLUME
raises or lowers
volume level.
displays your
Favorite Channels
list for selection
or modification.
CHANNEL
changes to the
next higher or
lower channel.
DVR
launches
the DVR menu.
A (Widgets)
provides instant access
to local weather, traffic
updates and more.
39
M.VEFIFF60153.Phase2.crw1
12/22/06
5:49 PM
Page 40
Main Menu
The Main Menu is the first menu
you’ll see when accessing your IPG.
Once you press POWER on the
remote to turn on the Set Top Box,
press MENU for a broad overview of
your entertainment choices. From
here, you can access all the features
and functions of the FiOS TV IPG.
Just highlight the menu option you
want and press OK.
Search
You can search the TV Listings for
a show by:
• Day and Time
• Program Title
• Actor or Topic
• Category (including Sports,
Pay Per View and HDTV)
You can search for a Program Title, Actor or Topic by using the on-screen
keyboard to enter a program title or keyword. Use the ARROW buttons on
your remote control to highlight the desired letter, press OK, then select the
next letter, and so on.
Once a show has been found, it can be selected for immediate viewing
(if available).* Or, you can set a Reminder** to watch it later.
If you have the Digital Video Recorder Set Top Box, you can schedule the
show for recording by selecting the show and pressing the REC button.
40
M.VEFIFF60153.Phase2.crw1
12/22/06
5:49 PM
Page 41
TV Listings
TV Listings displays a list of the
programs available to watch at the
present time, and for up to 14 days
thereafter. To access this list, press
the GUIDE button on your remote
control, or select TV LISTINGS from
the Main Menu.
1. Use the remote to navigate the
TV Listings while browsing
through the programs.
2. For a description of any program listed, select it and press the INFO
button on your remote control.
3. Use
4. Use
or
or
to move through the program listings by channel.
to change the time of day displayed.
5. Press and hold
to skip ahead rapidly to a later time.
6. Highlight the show you wish to watch and press OK on your remote
control. If the show is not scheduled to be broadcast until later, you
can set a Reminder** to watch it later.
7. If you have the Digital Video Recorder Set Top Box, you can schedule the
show for recording by selecting the show and pressing the REC button.
*When using the Search feature, the IPG may find programming on channels to which you are not subscribed.
**The DVR Set Top Box cannot set Reminders. See Quick Tips on page 46.
41
M.VEFIFF60153.Phase2.crw1
12/22/06
5:49 PM
Page 42
Video On Demand (VOD)
Video On Demand is programming
that is available for you to watch at
any time (and as many times as you
like) within a set rental period.
Simply press the On Demand button
or select ON DEMAND from the
Main Menu to see the VOD titles
that are currently available. Select
a program you want to watch and
follow the instructions to either complete your purchase or start watching the
free or subscription VOD program.
Mini-Guide
The Mini-Guide displays program
listings while allowing you to watch
TV at the same time. Navigate
through the Mini-Guide exactly as
you do in the TV Listings. You can
access the Mini-Guide through the
Main Menu or through the shortcuts
below with the Standard Definition
and High Definition STB.
• While watching TV, press
twice
to view a one-line version of the Mini-Guide. The Mini-Guide will display
information on the show you’re currently watching. Press
or
to
expand to four channels of listings.
• While watching TV, press
Mini-Guide.
42
twice to view a four-channel version of the
M.VEFIFF60153.Phase2.crw1
12/22/06
5:49 PM
Page 43
Help
If you have questions on using
Parental Controls, VOD or any of the
many features of the IPG, you can
go to the Help Menu for answers by
pressing the Options button. You’ll
find detailed information and
instructional videos to help you get
the most out of FiOS TV.
High Definition Television (HDTV)
Now you can enjoy the awesome
picture quality of HDTV via Verizon
FiOS TV (if you have an HD-ready
TV and either the High Definition or
DVR Set Top Box).
Easily search the TV Listings for
shows being offered in HDTV. They
are identified by an HD symbol at
the end of the program description,
and can easily be found using the
HDTV category in the Search Menu.
Digital Video Recorder (DVR)
With the DVR Set Top Box from
Verizon FiOS TV, you can record a
favorite show — or an entire series —
with just a couple of clicks on your
remote. You can also use your remote
to control live TV. That’s right: pause,
rewind, then fast-forward through the
show you’re watching.
43
M.VEFIFF60153.Phase2.crw1
12/22/06
5:49 PM
Page 44
DVR (continued)
The Verizon FiOS TV DVR has dual-tuner capability, so you can record two
programs at the same time, or watch one program while recording another.
Record an upcoming show by finding it in the TV Listings, highlighting it and
then pressing the REC button on your Remote Control. Recording takes
place automatically.
Smart SERIES RECORDING lets you record every episode of your favorite
series automatically — even if they’re shown at different times and on
different days.
View shows you’ve recorded by pressing the DVR button on your Remote
and selecting a show for viewing. Or select RECORDED TV from the Menu.
Not sure if you have the FiOS TV DVR? You’ll know that you do if
RECORDED TV appears on the Menu. (For a more complete description of
DVR features, see pages 51–57.)
Settings
The Settings Menu allows you to:
• Define your favorite channels,
which can be easily accessed
by pressing the
button on
the remote.
• Remove channels you don’t want
to see in your channel lineup.
• Choose a different language for
the TV Listings text and for TV audio.
• Receive messages from Verizon FiOS TV.
• Set up Parental Controls with a personalized PIN.
• Change audio output characteristics. (See Quick Tips on page 46.)
44
M.VEFIFF60153.Phase2.crw1
12/22/06
5:49 PM
Page 45
Parental Controls
The FiOS TV IPG provides the
ability to control and manage the
programs and content that come
into your home.
With Parental Controls, it’s easy to:
• Selectively block programming
by channel, rating or category.
• Selectively block Pay Per View
and VOD purchases.
• Set up two different user-defined
PINs (one for purchases and one
to block programs).
• Hide adult programming from
the TV Listings.
When programs with a particular
rating level are blocked, the IPG
automatically blocks the higher
ratings.
Also, if you have the DVR Set Top Box, programs recorded with a PIN
require the PIN to be entered, in order to play back the recorded program.
45
M.VEFIFF60153.Phase2.crw1
12/22/06
5:49 PM
Page 46
Quick Tips: How Do I...
Access Video on Demand (VOD)?
Video On Demand is programming that is available for you to watch anytime
(and as many times as you like) within a set rental period.
1. Push the On Demand button
(or choose Channel 900 from the
TV Listings) to see the VOD titles that are currently available.
2. To view a program, use
or
on the remote to highlight the
program you want to watch and press OK.
Purchase Pay Per View programs?
Pay Per View allows you to see the latest hit events in just a couple of easy
steps with your remote. To see what’s playing:
1. Select SEARCH from the Main Menu and then select PAY PER VIEW
(located under the SEARCH BY CATEGORY section).
2. Select NEW SEARCH and use
or
to scroll through the event list.
3. Use the ARROW buttons to highlight the program you want to watch
and press the OK button.
4. Select ORDER to order the program.
5. Select RENT NOW to confirm your order.
Use the Digital Video Recorder (DVR)?
If you have the DVR Set Top Box (STB) with your FiOS TV service, it’s a snap
to record a TV show or even an entire series — without tapes. The programs
are stored directly on your STB. You can rewind or pause live TV — making it
TV on your time.
You’ll know that you have DVR capability if RECORDED TV appears on the
Main Menu.
To record a show that is currently playing, press REC.
To play a recorded show:
1. Select RECORDED TV from the Main Menu.
2. Use
or
to highlight a program that you want to watch
from the list of recorded programs and press OK.
3. Select PLAY.
46
M.VEFIFF60153.Phase2.crw1
12/22/06
5:49 PM
Page 47
Use the DVR (continued)
To Pause/Rewind/Fast-Forward a recorded show:
Use the PAUSE, REW, FFWD, STOP and PLAY buttons on your remote to
control playback of a recorded program, exactly as you would with a VCR.
For a more complete description of DVR features, see pages 51–57 of your
Verizon FiOS TV User Guide.
Note: VOD programs cannot be recorded.
View a program in High Definition TV (HDTV)?
More and more people are entering the new era of High Definition Television —
and FiOS TV can be your gateway. If you have an HD-ready TV, and if you
chose either the High Definition or DVR Set Top Box, then you’re ready to
enjoy the incredible picture quality this new technology has to offer.
Shows being offered in HDTV are identified in the TV Listings by the HD
symbol at the end of the program description.
To find programs in HD:
Select SEARCH from the Main Menu and then select HDTV (located under
the SEARCH BY CATEGORY section) or refer to the channel lineup to see
where you can find the specially designated HD channels.
Channel surf?
With the IPG, you can zip through channels quickly. Just press and hold the
CH button on the remote until you see the title of a show you want to watch,
then release.
Block out material that’s not suitable for children?
Many parents are concerned about the programming their children watch.
Our Parental Controls feature lets you do something about it.
To get started:
1. Select SETTINGS from the Main Menu and then select
PARENTAL CONTROLS.
2. Create a Personal Identification Number (PIN) using the numeric
buttons on your remote. Press OK on the remote. This PIN is used
for unlocking blocked channels, ratings, programs or purchases.
3. Re-enter your PIN to confirm. Press OK.
47
M.VEFIFF60153.Phase2.crw1
12/22/06
5:49 PM
Page 48
Parental Controls (continued)
You can now block access to shows either by rating or by channel. You can
also block unauthorized Pay Per View and VOD purchases and choose to
hide or show adult titles.
1. Use the
or
want to block.
ARROW buttons to highlight each channel you
2. Press OK to add the lock
next to the channel. Only the channels
that have a lock will require a PIN to unlock.
3. Once you have selected the channel you would like to block,
highlight NEXT to block shows by rating.
4. Follow the on-screen prompts to complete the rest of the settings.
Set a Reminder?
Find a show you want to watch in the future using the TV Listings, the Mini-Guide
or any of the Search functions. Select the show and press OK. Then select
SET REMINDER and press OK. The IPG will remind you with an on-screen
message two minutes before the show begins. To cancel the Reminder,
select CLEAR REMINDER and press OK.
Shows for which Reminders have been set appear in the program listings
with the
symbol in front of their titles.
Note: Since the FiOS TV DVR gives you the ability to schedule a program to
record automatically, you won’t ever have to miss a show you want to watch.
Just highlight a show you want to watch in the future and press REC on your
remote control. You can then decide if you want to record the entire series,
and whether to add padding at the beginning or end of the show.
Create and use a list of my Favorite Channels?
1. Press
on the remote. You’ll see a program listing made up of all
available channels.
2. Use the
or
ARROW buttons to highlight each channel you want
included on your list.
3. Press OK to add a check mark next to it. Only the checked
channels appear in your Favorite Channels list.
48
M.VEFIFF60153.Phase2.crw1
12/22/06
5:49 PM
Page 49
Select one of my Favorite Channels?
What if you’d like to go directly to the channels you watch most often, rather
than scanning through ones you rarely, if ever, watch?
Here’s how to do that:
1. Press (Favorites button)
on the remote. You’ll see a program listing
made up of only your Favorite Channels.
2. Choose a program to watch by scrolling with the
ARROW buttons and pressing OK.
or
Edit my Favorite Channels list?
Press the
button on your remote. Choose MY FAVORITES and use the
or
ARROW buttons to highlight each channel in turn. Then press OK
to add (or delete) a check mark next to it. Only the checked channels appear
in the Favorites list.
Not all services and features may be available, and some may require additional equipment at an additional
cost. Your use of FiOS TV will require your acceptance of the Terms of Service, a copy of which will be given
to you at the time of installation. Other terms and conditions apply.
49
M.VEFIFF60153.Phase2.crw1
12/22/06
5:50 PM
Page 50
Digital Video
Recorder
M.VEFIFF60153.Phase2.crw1
12/22/06
5:50 PM
Page 51
Digital Video Recording lets you
control the show
Your FiOS TV Digital Video Recorder represents an entirely new way to
enjoy watching television. You can pause and rewind live TV — and even
record one show while watching another. It puts you in control of your TV
viewing schedule, enabling you to watch what you want, when you want.
LIVE TV
SKIP FORWARD
FFWD (Fast-Forward)
PLAY
RECORD
SKIP BACK
REW (Rewind)
STOP
PAUSE
51
M.VEFIFF60153.Phase2.crw1
12/22/06
5:50 PM
Page 52
Getting Started
Using the Remote Control
Your remote control has special buttons designed for managing all the
features of the DVR.
Use the remote control buttons (PLAY, STOP, PAUSE, REC, REW, FFWD) just
as you would on a VCR, to control digital recording and playback of
recorded programs and live TV.
Several other buttons (SKIP BACK, SKIP FORWARD, LIVE TV) have
exclusive DVR functions, which are described in this Guide.
Recording Capacity
Your DVR is designed to record up to 120 hours of standard definition digital
TV programming. Recording analog or HDTV programs will substantially
reduce this capacity (due to the format of analog programming and the much
larger amount of information in an HDTV broadcast stream).
Selecting an Item with the Remote Control
In this Section, “Select” means to highlight an on-screen item by moving to it
with the ARROW buttons and then pressing OK.
Recording TV
Record a Show That’s Currently Playing
Record the show you’re watching
by pressing REC on the remote. A
red indicator appears in the upperright corner of the screen for a few
seconds to let you know that
recording has started. Since the
DVR continuously stores in its
memory the channel that you’re
watching from the time you first
tune it in, the portion of the show
that you watched prior to pressing the REC button will also be recorded, up
to the limit of the internal memory. (Program limits: Standard Definition =
70 minutes; High Definition = 18 minutes)
52
M.VEFIFF60153.Phase2.crw1
12/22/06
5:50 PM
Page 53
Schedule Recording of an Upcoming Show or Series
Use the ARROW buttons to highlight the show you wish to record in the TV
Listings. Or use SEARCH to find and select a show. Press REC on your
remote. A red dot will appear after the show title in the listings.
Shrek 2
11/10 1 Hr 32 Min
example
If the show is part of a series, you can schedule recording of each episode
of the entire series by pressing REC a second time. With our smart
SERIES RECORDING feature, each show in the series will be automatically
recorded, even if its time slot or length is changed by the broadcaster.
Three red dots indicate that SERIES RECORDING has been scheduled
(pressing REC a third time will cancel the scheduled recording).
Desperate Housewives
11/10 1 Hr 0 Min
example
You can choose whether to record only first-run episodes, whether to add
padding at the beginning or end of a show, or whether to permanently save
a show.
In addition, a SERIES PRIORITY feature lets you rank the series you want
to record, so that the DVR automatically resolves schedule conflicts, before
they occur.
Review or Cancel Scheduled
Recordings of Shows or Series
Select RECORDED TV from
the MENU. The list of shows
scheduled to be recorded can
be seen under the heading
SCHEDULED. Or choose
SERIES MANAGER and then
SCHEDULED SERIES to see a
list of series that are scheduled for recording. You will also see a reminder
about how much recording capacity you have used.
To cancel a scheduled recording, select the show or series to be cancelled.
Select CANCEL RECORDING or CANCEL SERIES, depending on which you
choose to cancel. Press EXIT on your remote to resume watching live TV.
53
M.VEFIFF60153.Phase2.crw1
12/22/06
5:50 PM
Page 54
Recording TV (continued)
Play a Recorded Show
Select RECORDED TV from the Main Menu. Highlight a program that you
want to watch on the list of recorded programs, press the OK button and
select PLAY.
Pause/Rewind/Fast-Forward a Recorded Show
Use the PAUSE, REW, FFWD, SKIP BACK, SKIP
FORWARD, STOP and PLAY buttons on your
remote to control playback of a recorded program,
exactly as you would with a VCR. When you use
any of these buttons, the Progress Bar (see Progress
Bar on page 56) will always appear, to show you
exactly where you are in the program.
3x
3x
15x
15x
60x
60x
300x
300x
Multiple speeds of fast-forward and rewind can be accessed by pressing the
REW or FFWD buttons more than once. Press once for 3x speed, twice for
15x, three times for 60x and four times for 300x.
Keep or Delete a Recorded Show
Select RECORDED TV from the Main Menu. Highlight a program that you want
to delete from the list of DVR RECORDINGS and select ERASE RECORDING.
Once the recording space becomes full, the DVR will automatically delete the
oldest shows, to make space for new recordings. To prevent the DVR from
deleting a recording when it needs more space, select RECORDED TV from
the Main Menu, choose a program that you want to keep and then select the
SAVE UNTIL button.
Record High Definition TV Shows
Recording a show broadcast in HDTV is accomplished in the same way as
recording a normal TV show (see Recording TV on page 52). Note: Due to the
larger amount of information in an HDTV broadcast, your DVR will hold fewer
hours of HDTV programming.
54
M.VEFIFF60153.Phase2.crw1
12/22/06
5:50 PM
Page 55
Record Pay Per View Programs
A Pay Per View program can be recorded with the DVR for later viewing.
Simply press the REC button on your remote when the Pay Per View
program begins. You can also schedule future Pay Per View shows to be
automatically recorded. Just choose the PURCHASE AND RECORD option
when selecting a show. It will automatically be recorded and ready for you to
watch when you want.
Dual-tuner Feature
Your Verizon FiOS TV Set Top Box is equipped with dual tuners, so you can:
• Record two different shows at the same time, even while watching an
earlier recorded show.
• Record a show while watching a Video On Demand movie.
• Record one show while watching a different live show.
Controlling Live TV with the DVR
How the DVR Handles Live TV
Whenever you tune in to a channel on FiOS TV, the DVR instantly begins
storing the show in its internal memory and will continue to do so until you
tune to a different channel. At this point, it discards the previous channel’s
show and begins storing the new one. Once the internal memory is full,
the DVR will progressively store the most recent portion of that channel’s
programming, discarding the oldest. This memory technology allows you to
control live TV in the ways described below.
Pause or Resume Live TV; Frame Advance
Press PAUSE on your remote to “freeze” the TV show you’re
watching. Pressing the PAUSE button repeatedly will advance
the video one frame at a time. When you’re ready, press PLAY
to resume the show where you left off.
Rewind or Fast-Forward Live TV
Press REW on your remote to rewind the show you’re
watching to an earlier point in time. (The DVR continues to
store the live broadcast in its memory.) You can only rewind as
55
M.VEFIFF60153.Phase2.crw1
12/22/06
5:50 PM
Page 56
Controlling Live TV with the DVR (continued)
far back in time as when you first tuned in to this channel, up to the limit of
the internal memory. Press PLAY to resume watching from the desired point
in the show.
Press FFWD to fast-forward a previously paused
live TV show. Press PLAY to resume watching.
Pressing REW or FFWD up to four times allows
you to increase the speed at which you rewind or
fast-forward a program. Press once for 3x speed,
twice for 15x, three times for 60x and four times
for 300x.
3x
3x
15x
15x
60x
60x
300x
300x
Forward or Reverse
Press PAUSE, then FFWD or REW for playback
in slow-motion, fast-forward or rewind effect.
Replay Live TV
Press the SKIP BACK button on your Remote for an instant replay
of the last seven seconds of the show you’re watching, whether
it’s live TV or a previously recorded show.
Resume Watching Live TV
If you’re watching a program delayed by pausing or rewinding
live TV, pressing the FiOS TV button jumps the show forward to
the point currently being broadcast.
Progress Bar
The Progress Bar (shown below) appears whenever you pause, rewind or
fast-forward a live or recorded program. It shows how much of the current
show is stored in memory (orange bar), as well as what point of the show
you’re viewing now (white line) and how far behind the live broadcast you
are (end of orange bar).
56
M.VEFIFF60153.Phase2.crw1
12/22/06
5:51 PM
Page 57
Not all services are available in all areas. Acceptance of the Verizon FiOS TV Terms of Service is required in
order to use FiOS TV. The terms and conditions regarding your use of FiOS TV are subject to change.
Due to certain copyright restrictions, the Digital Video Recorder may not be able to record all programs.
Recording times are estimated. Verizon cannot guarantee the exact amount of programming that each
subscriber will be able to record. For a given hard drive capacity, approximate recording times depend
on the programming type. The customer is financially responsible for any damage to or misuse of any
equipment, or for the failure to return any equipment if service is terminated. Applicable franchise fees,
regulatory fees and taxes apply. Other terms and conditions apply.
57
M.VEFIFF60153.Phase2.crw1
12/22/06
5:51 PM
Page 58
Set Top Boxes
M.VEFIFF60153.Phase2.crw1
12/22/06
5:51 PM
Page 59
Your Gateway to Verizon FiOS T V
FiOS TV offers you a choice of three Set Top Boxes, all of which bring
you state-of-the-art features like digital displays, Interactive Programming
Guides and Video On Demand. Plus, if you use one of our more advanced
Set Top Boxes, you can enjoy the ultimate in high-tech benefits — including
High Definition and our revolutionary Digital Video Recorder.
59
M.VEFIFF60153.Phase2.crw1
12/22/06
5:51 PM
Page 60
Standard Definition
The state-of-the-art STB from Verizon FiOS TV brings you unsurpassed digital
audio and video quality. The Standard Definition box gives you access to the
FiOS TV IPG, letting you conveniently select and view programs, set parental
controls and take charge of your viewing experience. You can also order
shows and events on PPV or order movies from our extensive VOD library.
Please take a moment to review the features of the FiOS TV Standard
Definition STB.
1
2
7
8
4
3
9
10
5
6
11
1. CURSOR — Moves the cursor around menus and IPG screens.
2. MESSAGES — Lights to indicate that a message is present.
3. POWER INDICATOR — Lights when the unit is turned on.
4. DISPLAY — Displays current channel number or time of day.
5. REMOTE — Lights to indicate remote control is in use.
6. CHANNEL — Scrolls up or down through the channels.
7. SELECT — Selects menu options, PPV and VOD events and selects
channels from the IPG.
8. POWER — Turns the Standard Definition STB on and off.
9. MENU — Displays the main menu in the IPG.
10. INFO — Displays current channel and program information.
11. GUIDE — Displays TV Listings in the IPG.
60
M.VEFIFF60153.Phase2.crw1
12/22/06
5:52 PM
Page 61
12. RF IN — Connects to the FiOS TV video signal.
13. AUDIO OUT TO TV (R/L) — Connects to audio inputs of a TV.
14. AUDIO OUT TO VCR (R/L) — Connects to audio inputs of a VCR
(constant-level stereo outputs).
15. DATA — Serial data interface reserved for special applications.
Do not connect any device to this port.
16. SMART CARD — Supports electronic commerce using a Smart Card.
Currently not enabled.
13
12
18
14
19 20 21 22
15
23
24
16
17
25
17. AC SWITCHED OUTLET — Connects STB AC power cord and provides
a switched power outlet to connect another device, such as a TV or
Home Theater System (HTS).
18. To TV/VCR — Connects to a TV or VCR.
19. S-VIDEO — Connects to the S-Video input of a TV, VCR or HTS.
20. VIDEO — Connects to the composite video input of a TV, VCR or HTS.
21. DIGITAL AUDIO COAX — Connects to a TV, VCR or HTS to provide
Dolby Digital 5.1 audio.
22. DIGITAL AUDIO OPTICAL — Connects a Toslink connector to a TV,
VCR or HTS to provide Dolby Digital 5.1 audio.
23. USB — Connects to digital home devices, such as digital cameras.
Currently not enabled.
24. IR — Currently not enabled.
25. TV PASS CARD — Currently not enabled.
61
M.VEFIFF60153.Phase2.crw1
12/22/06
5:52 PM
Page 62
High Definition
The Verizon FiOS TV High Definition STB is one of our premium interactive
digital video receivers. The High Definition STB automatically gives you access
to HD content — letting you see the sharpest images possible. And it brings
you all the extraordinary features of FiOS TV, including programming options,
the IPG, VOD and access to commercial-free, CD-quality music. Please take a
moment to review the features of the FiOS TV High Definition STB.
12
8
1
2
3
4
5
6
7
9
10
11 13 14 15 16
1. USB — Connects to digital home devices, such as digital cameras.
Currently not enabled.
2. VIDEO IN — Accepts baseband video from a VCR, camcorder or other
video device. Currently not enabled.
3. AUDIO IN (L/R) — Accepts baseband L/R audio from a VCR,
camcorder or other audio device. Currently not enabled.
4. CURSOR — Moves the cursor around menus and IPG screens.
5. INFO — Displays current channel and program information.
6. MENU — Displays the main menu in the IPG.
7. POWER — Turns the High Definition STB on and off.
8. MESSAGES — Lights when a message is waiting.
9. POWER INDICATOR — Lights when unit is turned on.
10. DISPLAY — Displays current channel number and time of day.
11. REMOTE — Lights to indicate remote control is in use.
12. RECORD — Not applicable for HD STB.
13. OPTION — Reserved for future use.
14. SELECT — Selects menu options, Pay Per View (PPV) and VOD events,
and selects channels from the IPG.
62
M.VEFIFF60153.Phase2.crw1
12/22/06
5:52 PM
Page 63
15. GUIDE — Displays TV Listings in the IPG.
16. CHANNEL — Scrolls up or down through the channels.
17. RF IN — Connects to the FiOS TV video signal.
18. RF OUT — Connects to a TV or VCR.
19. IR — Currently not enabled.
20. SMART CARD — Supports electronic commerce using a Smart Card.
Currently not enabled.
21. SPDIF — Connects to a TV, VCR or Home Theater System (HTS) to
provide Dolby Digital 5.1 audio.
17
18
21 22 24 26 29
19
20
34
31
23 25 27 28 30 32
33
22. S-VIDEO — Connects to the S-Video input of a TV, VCR or HTS.
23. OPTICAL SPDIF — Connects to a TV, VCR or HTS to provide Dolby
Digital 5.1 audio.
24. VIDEO IN — Accepts baseband video from a VCR, camcorder or other
video device. Currently not enabled.
25. AUDIO IN (R/L aligned vertically) — Accepts baseband L/R audio
from a VCR, camcorder or other audio device. Currently not enabled.
26. VIDEO OUT — Delivers video to an external device, such as a TV or VCR.
27. AUDIO OUT (R/L aligned vertically) — Connects to audio inputs of a TV.
28. TV PASS CARD — Currently not enabled.
29. Y Pb Pr — Delivers component video.
30. HDMI — Connects to a High Definition Television (HDTV).
31. ETHERNET — Supports interactive applications and home networking.
32. USB — Connects to digital home devices, such as digital cameras.
Currently not enabled.
33. IEEE 1394 — Connects to compatible digital TV A/V ports.
34. AC SWITCHED OUTLET — Connects STB AC power cord and provides
a switched power outlet to connect another device, such as a TV or HTS.
Please note: A High Definition Television is required for HD content.
63
M.VEFIFF60153.Phase2.crw1
12/22/06
5:52 PM
Page 64
Digital Video Recorder
The Verizon FiOS TV DVR STB is our most advanced, interactive digital video
receiver. In addition to bringing you all the high-tech features of the High
Definition STB, like the FiOS TV IPG, VOD, digital music and the incredible
picture and sound quality of HDTV, the DVR STB will revolutionize the way
you watch television. The DVR feature allows you to pause and rewind live
TV — and even record one show while watching another. Please take a
moment to review the features of the FiOS TV DVR STB.
1
2
3
4
5
7
8
6
9
10
12
13
11
14
16
15
1. USB — Connects to digital home devices, such as digital cameras.
Currently not enabled.
2. VIDEO IN — Accepts baseband video from a VCR, camcorder or other
video device. Currently not enabled.
3. AUDIO IN (L/R) — Accepts baseband L/R audio from a VCR,
camcorder or other audio device. Currently not enabled.
4. CURSOR — Moves the cursor around menus and IPG screens.
5. MENU — Displays the main menu in the IPG.
6. POWER — Turns the DVR STB on and off.
7. INFO — Displays current channel and program information.
8. MESSAGES — Lights when a message is waiting.
9. POWER INDICATOR — Lights when unit is turned on.
10. DISPLAY — Displays current channel number and time of day.
11. REMOTE — Lights to indicate remote control is in use.
12. RECORD — Lights when DVR is recording.
13. OPTION — Reserved for future use.
14. SELECT — Selects menu options, Pay Per View and VOD events,
and selects channels from the IPG.
64
M.VEFIFF60153.Phase2.crw1
12/22/06
5:52 PM
Page 65
15. GUIDE — Displays TV Listings in the IPG.
16. CHANNEL — Scrolls up or down through the channels.
17. RF IN — Connects to the FiOS TV video signal.
18. IR — Currently not enabled.
19. SMART CARD — Supports electronic commerce using a Smart Card.
Currently not enabled.
20. SPDIF — Connects to a TV, VCR or Home Theater System (HTS) to
provide Dolby Digital 5.1 audio.
17
20 21 23 25 28
18
19
33
30
22 24 26 27 29 31
32
21. S-VIDEO — Connects to the S-Video input of a TV, VCR or HTS.
22. OPTICAL SPDIF — Connects to a TV, VCR or HTS to provide Dolby
Digital 5.1 audio.
23. VIDEO IN — Accepts baseband video from a VCR, camcorder or other
video device. Currently not enabled.
24. AUDIO IN (R/L aligned vertically) — Accepts baseband L/R audio
from a VCR, camcorder or other audio device. Currently not enabled.
25. VIDEO OUT — Delivers video to an external device, such as a TV or VCR.
26. AUDIO OUT (R/L aligned vertically) — Connects to audio inputs of a TV.
27. TV PASS CARD — Currently not enabled.
28. Y Pb Pr — Delivers component video.
29. HDMI — Connects to a High Definition Television (HDTV).
30. ETHERNET — Supports interactive applications and home networking.
31. USB — Connects to digital home devices, such as digital cameras.
Currently not enabled.
32. IEEE 1394 — Connects to compatible digital TV A/V ports.
33. AC SWITCHED OUTLET — Connects STB AC power cord and provides
a switched power outlet to connect another device, such as a TV or HTS.
Please note: A High Definition Television is required for HD content.
65
M.VEFIFF60153.Phase2.crw1
12/22/06
5:52 PM
Notes
Notes
66
Page 66
M.VEFIFF60153.Phase2.crw1
12/22/06
5:52 PM
Page 67
Notes
67
M.VEFIFF60153.Phase2.crw1
Notes
68
12/22/06
5:52 PM
Page 68