1
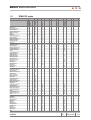
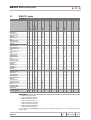
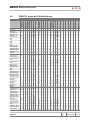
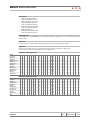
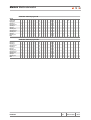
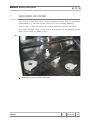
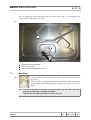
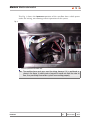
Merloni Elettrodomestici
Service Manual
Dishwashers Mark II
Language Issue/Edition
GB
2001-02-20/01
Page
1-52
Merloni Elettrodomestici
Service Manual
LVS Mark II
Language Issue/Edition
GB
2001-02-20/01
Page
2-52
Merloni Elettrodomestici
Contents
1
DIWA 126 TIMER SAFETY DEVICE MANAGEMENT
5
1.1
Alarms displayed and operations to be carried out
5
1.2
Types of alarms not displayed valid for all models of Electronic Dishwashers
8
1.3
Examples of programs available for Free Installation Machines with DIWA 126 Timer8
1.4
DIWA 126 cycles
1.5
Testing/Autotest procedure
11
2
DIWA 123 LCD TIMER
12
2.1
Description of Faults Displayed for Machines with
DIWA 123 LCD Timer and operations to be performed
10
Examples of available programs for the Free Installation Machines with
DIWA 123+LCD Timer
15
2.3
DIWA 123 cycles
19
2.4
DIWA 123 cycles with Turbidity Sensor
21
2.5
Testing/Autotest procedure
27
3
TOTAL EMBEDDING DISAPPEARANCE WITH DIWA 126 TIMER
28
3.1
Warnings
28
4
TOTAL EMBEDDING DISAPPEARANCE WITH DIWA 123 TIMER
29
4.1
Functioning
32
5
EMBEDDING WITH FRONTAL VIEW
36
5.1
Functioning
37
5.2
Entry in testing
38
5.3
Faults
39
5.4
Warnings
39
2.2
Service Manual
LVS Mark II
9
Language Issue/Edition
GB
2001-02-20/01
Page
3-52
Merloni Elettrodomestici
6
DISASSEMBLY OF MOTOR-SUMP UNIT
40
7
NEW OVERFLOW SYSTEM
43
7.1
New Float
44
8
NEW SYSTEM TO FIX MOTOR
46
9
NATURAL DRYING SYSTEM
48
10
ALTERNATE WASH MOTOR
50
10.1
Alternate Wash Motor Wiring Diagram
51
10.2
Sensing signal
51
Service Manual
LVS Mark II
Language Issue/Edition
GB
2001-02-20/01
Page
4-52
Merloni Elettrodomestici
1
DIWA 126 TIMER SAFETY DEVICE MANAGEMENT
N.B.
All the machines with four LEDS are equipped with a DIWA 126 Timer.
1.1
Alarms displayed and operations to be carried out
1.1.1
Acquastop Sensor Operation (overflow)
LED 1 activation
1
2
0
3
0
4
0
The control continually monitorises the status of the acquastop sensor switch.
If it is closed for more than 5", there is a permanent fault.
Machine performance
• Resets all active settings
• Deactivates all loads
• Drains until pressure switch empty +1'
Checks to be carried out
1. Empty the tray
2. Set a cycle
3. Check if there is a leak, through the two inspection openings located in
the lower part of the machine, behind the skirting.
If there is no leak check or replace:
• Pressure Switch
• Sump pressure drop (air trap)
• Solenoid valve jammed/higher capacity
• Lower/upper impeller blocked
• Levelling the Dishwasher
• Excessive loss of rinse aid
• Small pressure switch tube loose (air leak) or there is water inside
• Drain pump disconnected
Service Manual
LVS Mark II
Language Issue/Edition
GB
2001-02-20/01
Page
5-52
Merloni Elettrodomestici
1.1.2
NTC fault
LED 3 activation
1
0
2
0
3
4
0
The electronic control constantly checks the temperature sensor status; if it
is open or there is a short circuit, there is a fault.
Machine performance
• Resets all active settings
• Deactivates all loads
Checks to be carried out
• Short-circuited thermistor open
• Thermistor connector incorrectly joined to timer
• Thermistor fault
1.1.3
Timeout empty from Pressure switch during Draining
LED 1 + 2 alternating activation
1
2
3
0
4
0
During the draining phase the control waits for the empty pressure switch signal for max 3'20", after which a fault has occurred.
Machine performance
• Resets all active settings
• Deactivates all loads
• Drains until pressure switch empty +1'
Checks to be carried out
• Drain pump interrupted/faulty
• Air bubble in drain hose
• Drain hose obstructed/plugged
• Pressure switch stuck on full
• Electronic timer
• Water in small pressure switch tube
Service Manual
LVS Mark II
Language Issue/Edition
GB
2001-02-20/01
Page
6-52
Merloni Elettrodomestici
1.1.4
Pressure switch full timeout during water filling
LEDS 2 + 3 alternate activation
1
0
2
3
4
0
During the static filling phase (with washing pump deactivated) the control
waitsfor max 6', after which a fault has occurred.
Machine performance
• Resets all active settings
• Deactivates all loads
• Drains until pressure switch empty +1'
Checks to be carried out
• Water pressure not less than 0.2 bar (for correct operation is must be more
than or equal to 0.2 bar)
• Water supply tap closed
• Pressure switch stuck on empty
• Faulty solenoid valve
1.1.5
Water Heating Timeout
LED 4 activation
1
0
2
0
3
0
4
During the washing + heating phase, the control waits for the set temperature
to be reached for max 70', after which there is a fault.
Machine performance
• Resets all active settings
• Deactivates all loads
• Drains until pressure switch +1'
Checks to be carried out
• Thermistor support bracket
• Capsule contact with tank base
• Heater operation
Service Manual
LVS Mark II
Language Issue/Edition
GB
2001-02-20/01
Page
7-52
Merloni Elettrodomestici
1.2
Types of alarms not displayed valid for all models
of Electronic Dishwashers
1.2.1
Machine jammed (programming impossible)
1. Reset the dishwasher when it is operating, by turning the knob to “Reset”
or pressing the “Reset”
button. Open the door to allow program resetting.
2. Leakage, in this case the machine is blocked:
• invert position of the plug in the socket
• check plug earth
• if the fault continues, disconnect the earths of the motor, heater, filter
1.2.2
Condensate
Warning: Condensate can block the dishwasher, check the gasket seal and
machine levelling.
It is advisable to replace the timer, once the condensate has been eliminated.
Drying information
Warning: machines without fan motor hold the water in the tank for many minutes at
the end of the warm rinsing phase.
1.3
Examples of programs available for Free Installation Machines
with DIWA 126 Timer
INDESIT
1
2
3
4
5
6
7
Service Manual
LVS Mark II
Energic
Normal
Recently soiled
Delicate items
Rapid Drying
Rapid
Soak
ARISTON
Energic
Normal
Recently soiled
Glass
Rapid 55˚
Rapid 25˚
Soak
Language Issue/Edition
GB
2001-02-20/01
Page
8-52
Merloni Elettrodomestici
DIWA 126 cycles
Service Manual
LVS Mark II
6
7
X
X
X
X
P
40°
V
P
X
X
P
V
P
X
X
X
X
P
38°
50°
56°
68°
V
X
X
X
X
X
X
X
X
X
X
X
X
X
X
X
X
X
X
X
X
X
X
X
X
X
X
X
X
X
X
X
X
X
X
X
X
X
X
X
X
X
X
X
X
X
V
V
V
P
P
V
P
P
50°
68°
V
V
V
X
X
X
X
X
X
X
X
X
X
X
X
X
X
X
X
X
X
X
X
X
X
X
X
X
X
X
X
X
X
X
X
X
X
X
X
X
P
P
V
X
X
P
V
SOAK
5
RAPID 25
4
RAPID
DRYING 68˚
3
GLASS
2
NORMAL
V
P
1
DAILY
Pre-washes
Draining 16"
Static filling up to P
Filling time 20"
Dynam. filling up to P
Washing pump 8'
Heats
Drains+1'
Static filling up to P
Filling time 20"
Dynam. filling up to P
Washing pump 8'
Washing pump 7'
Draining 1'
Washes
Static filling up to P
Filling time 20"
Dynam. filling up to P
Pump+detergent 1'
Pump+regenerate 1'
Heats
Pump+detergent 1'
Heats+pump 8'
Heats+pump 5'
Washing pump 8'
Washing pump 8'
Heats+pump 5'
Min. temp. control
Filling time 15''
Draining 1'
Filling time 15''
Draining 1'
Filling time 15''
Draining 1'
Rinses
Static filling up to P
Filling time 20"
Dynam. filling up to P
Crystal load
Resis. impulses
Washing pump 8'
Draining 1'
Static filling up to P
Filling time 20"
Dynam. filling up to P
Washing pump 4'
Draining 1'
Static filling up to P
Filling time 20"
Dynam. filling up to P
Rinse aid reset 0.3''
Pump+regenerate 1'
Heats
Pump+detergent 1'
Pump+detergent 15''
Heats
Drying
Draining 1'
Drying 8.5''
Filling time 15''
Draining 1'
Drying 1'
Draining 30''
Filling time 15''
Draining 30''
Drying 1'
Draining 30''
Drying 5.5'
End
NTC
Pressure
switch status
No CYCLES
INTENSIVE
1.4
X
X
X
X
X
X
X
X
X
X
X
X
X
X
X
X
X
X
X
X
X
X
X
X
X
X
X
X
X
X
X
X
X
X
X
X
X
X
X
X
X
X
X
X
X
X
X
X
X
X
X
X
X
X
X
X
X
X
X
X
X
X
X
X
X
X
X
X
X
X
X
X
X
X
X
X
X
X
X
X
X
X
X
X
X
X
X
X
X
X
X
X
X
X
X
X
X
X
X
X
X
X
X
X
X
X
X
X
X
X
X
X
X
X
X
X
X
X
X
X
Language Issue/Edition
GB
2001-02-20/01
Page
9-52
Merloni Elettrodomestici
Service Manual
LVS Mark II
6
7
X
X
X
X
X
X
X
X
X
X
X
X
X
SOAK
5
RAPID 25
4
RAPID
DRYING 68˚
3
GLASS
P
2
NORMAL
V
P
1
DAILY
Pre-washes
Draining 16"
Static filling up to P
Filling time 20"
Dynam. filling up to P
Washing pump 8'
Washing pump 28'
Heats
Drains+1'
Static filling up to P
Filling time 20"
Dynam. filling up to P
Washing pump 4'
Heats
Washes
Static filling up to P
Filling time 20"
Dynam. filling up to P
Pump+detergent 1'
Pump+regenerate 1'
Heats+pump 8'
Washing pump 8'
Washing pump 8'
Washing pump 8'
Heats+pump 5'
Washing pump 8'
Heats+pump 5'
Min. temp. control
Filling time 15''
Draining 1'
Filling time 15''
Draining 1'
Filling time 15''
Draining 1'
Rinses
Static filling up to P
Filling time 20"
Dynam. filling up to P
Crystal load
Resis. impulses
Washing pump 8'
Draining 1'
Static filling up to P
Filling time 20"
Dynam. filling up to P
Washing pump 4'
Draining 1'
Static filling up to P
Filling time 20"
Dynam. filling up to P
Rinse aid reset 0.3''
Pump+regenerate 1'
Heats
Pump+detergent 1'
Pump+detergent 15''
Heats
Drying
Draining 1'
Drying 8.5''
Filling time 15''
Draining 1'
Drying 1'
Draining 30''
Filling time 15''
Draining 30''
Drying 1'
Draining 30''
Drying 5.5'
End
NTC
Pressure
switch status
No CYCLES
INTENSIVE
As from the beginning of January, 2001 the following new DIWA 126 cycles will
come into production
X
X
X
X
X
X
X
X
X
X
X
40°
V
P
X
X
P
V
P
X
X
X
X
P
48°
48°
X
68°
X
X
X
X
X
X
X
X
X
X
X
X
X
X
X
X
X
X
X
X
X
X
X
X
X
X
X
X
X
X
X
X
X
X
X
X
X
V
X
V
X
X
X
X
X
X
X
X
V
P
X
X
X
P
P
V
P
P
V
P
P
50°
68°
V
V
V
V
V
X
X
X
X
X
X
X
X
X
X
X
X
X
X
X
X
X
X
X
X
X
X
X
X
X
X
X
X
X
X
X
X
X
X
X
X
X
X
X
X
X
X
X
X
X
X
X
X
X
X
X
X
X
X
X
X
X
X
X
X
X
X
X
X
X
X
X
X
X
X
X
X
X
X
X
X
X
X
X
X
X
X
X
X
X
X
X
X
X
X
X
X
X
X
X
X
X
X
X
X
X
X
X
X
X
X
X
X
X
X
X
X
X
X
X
X
X
X
X
X
X
X
X
X
X
X
X
Language Issue/Edition
GB
2001-02-20/01
Page
10-52
Merloni Elettrodomestici
1.5
Testing/Autotest procedure
To start the procedure, follow the instructions below:
1. Reset the machine with the “Reset” button
2. Select OFF (machine shutdown)
3. Check that the appliance door is closed
4. Turn the selector to “2”
5. Select ON (machine operating) and then turn the selector from “2” to “1”
and vice versa, until the LEDS “1” - “4” start blinking
1
0
2
0
3
0
4
6. Switch the machine off and then on again.
7. Turn the knob from “1” to “2” and vice versa, until the LEDS “2” and “4”
remain alight
8. After about 4" the testing cycle will start, during which the LEDS “2” and
“3” will alternately blink
1.5.1
Starting Functional Testing
1. Fills up and washes up to the 2nd level
2. Washing motor + heater
5"
3. Washing motor
5"
4. Heater
5"
5. Dispenser
5"
6. Alternate wash
5"
7. Regenerate
10"
8. Drain pump
15"
9. Load solenoid valve
25"
To exit the testing cycle/autotest, turn the knob to “Reset”; after 4" the cycle will stop.
Service Manual
LVS Mark II
Language Issue/Edition
GB
2001-02-20/01
Page
11-52
Merloni Elettrodomestici
2
DIWA 123 LCD TIMER
N.B.
All the machines with a display are equipped with a DIWA 123 LCD Timer.
2.1
Description of Faults Displayed for Machines with
DIWA 123 LCD Timer and operations to be performed
2.1.1
Displays A01
Acquastop Sensor Operation
The control continually monitorises the status of the acquastop sensor switch.
If it is closed for more than 5", there is a fault.
Machine performance
• Resets all active settings
• Deactivates all loads
• Drains until acquatop empty +1'
Checks to be carried out
1. Empty the tray
2. Set a cycle
3. Check whether there is a leak by means of the two inspection openings located on the lower front part of the machine
If there is no leak check or replace:
• Pressure Switch
• Sump pressure drop (air trap)
• Solenoid jammed /higher capacity
• Lower/upper impeller blocked
• Levelling the Dishwasher
• Excessive loss of rinse aid
• Small pressure switch tube loose (air leak) or there is water inside
• Drain pump disconnected
Service Manual
LVS Mark II
Language Issue/Edition
GB
2001-02-20/01
Page
12-52
Merloni Elettrodomestici
2.1.2
Displays A02
Heater Relay in Closed Circuit - Open Circuit
All the time the drive relay of the heating element is idle with the door closed,
the electronic control checks that its contacts are actually open.
If the control contacts are erroneously closed, a fault has occurred.
Machine performance
• Resets all active settings
• Deactivates all loads
• Fills with water until pressure switch full
• Activates the washing pump indefinitely (if necessary, the water level is
topped up)
Checks to be carried out
• Electronic timer (Card) relay stuck
• heater interrupted
• Safety thermostat:
1) off setting
2) open/faulty
3) crimped thermostat support bracket bent
• Thermistor disconnected or thermal interface material missing (which activates the safety thermostat)
2.1.3
Displays A03
Probe Short-Circuited or Open (NTC)
The electronic control costantly checks the temperature sensor status; if it is
open or there is a short circuit, a fault has occurred.
Machine performance
• Resets all active settings
• Deactivates all loads
• Drains until pressure switch +1'
Checks to be carried out
• Check probe cables (red)
• Check probe connector on timer
• Faulty probe with C.C. or O.C.
Service Manual
LVS Mark II
Language Issue/Edition
GB
2001-02-20/01
Page
13-52
Merloni Elettrodomestici
2.1.4
Displays A04
Incorrect heating time
During the washing + heating phase, the control waits for the set temperature
to be reached for max 70', after which there is a fault.
Machine performance
• Resets all active settings
• Deactivates all loads
• Drains until pressure switch +1'
Checks to be carried out
• Thermistor support bracket (probably disconnected)
• Capsule contact with tank base
• heater operation
2.1.5
Displays A05
Incorrect time for Pressure switch Empty
During the draining phase, the control waits for the pressure switch empty
signal for max 3'20", after which a fault has occurred.
Machine performance
• Resets all active settings
• Deactivates all loads
• Drains until pressure switch empty +1'
Checks to be carried out
• Faulty drain pump
• Air bubble in drain hose
• Drain hose obstructed/plugged
• Pressure switch stuck on full
• Water in small pressure switch tube
Service Manual
LVS Mark II
Language Issue/Edition
GB
2001-02-20/01
Page
14-52
Merloni Elettrodomestici
2.1.6
Displays H2O
Incorrect Pressure switch Full time
During the static filling phase (with washing pump off) the control waits for
max 6', after which it is definitely faulty.
Checks to be carried out
• Water pressure not less than 0.2 bar (for correct operation is must be more
than or equal to 0.2 bar)
• Water supply tap closed
• Pressure switch stuck on empty
• Electric timer (Card) blocked
• Solenoid valve
2.1.7
Displays A07
Washing pump triac in Closed Circuit - Open Circuit
Checks to be carried out
• Drain pump disconnected
• Acquastop operation in case of water leak
2.1.8
Displays A08
Auxiliary winding pump triac with Closed Circuit - Open Circuit
Machine performance
• Draining until pressure switch empty +30"
Checks to be carried out
• Wash motor correct operation
Service Manual
LVS Mark II
Language Issue/Edition
GB
2001-02-20/01
Page
15-52
Merloni Elettrodomestici
2.1.9
Displays A09
Main winding pump triac with Closed Circuit - Open Circuit
Machine performance
• Drains until pressure switch empty +30"
Checks to be carried out
• Wash motor correct operation
2.1.10
Displays A10
Load solenoid valve triac with Closed Circuit - Open Circuit
Machine performance
• Drains until pressure switch empty +30"
Checks to be carried out
• Disconnected load solenoid valve correct operation
2.1.11
Displays A11
1/ load solenoid valve triac or alternating motor
2
Machine performance
• Drains until pressure switch empty +30"
Checks to be carried out
• Correct operation of solenoid valve and alternating motor
• Replace electrical timer (Card)
2.1.12
Displays A12
Heater relay with Open Circuit
Machine performance
• Drains until pressure switch empty +30"
Checks to be carried out
• Heater
• Electronic timer (Card)
Service Manual
LVS Mark II
Language Issue/Edition
GB
2001-02-20/01
Page
16-52
Merloni Elettrodomestici
2.1.13
Displays A13
Dispenser triac incorrect operation with Closed Circuit - Open Circuit
Machine performance
• The appliance continues the wash cycle, but the detergent compartment
lid does not function properly
Some machine faults which are not displayed change the washing performance required.
• Solenoid valve triac malfunction with Closed Circuit - Open Circuit
The appliance continues the wash cycle, but is not able to collect the salt to
soften the water
• Fan Triac + Heater malfunction with Closed Circuit - Open Circuit or disconnected cables
The appliance continues the wash cycle but does not dry properly
• Eeprom malfunction
The appliance finishes the wash before it is completed, then it stops
• Turbidity sensor fault
The appliance continues its wash cycle assuming a default turbidity
2.1.14
Displays A14
Pressure switch surveyed empty during washing phase
During the cycle the water is discharged from the tank through the discharge pipe.
This is a problem of incorrect installation.
This is what could have happened:
• the discharge pipe is below the water level in the tank (in this case the water will overflow from the tank)
• the discharge pipe does not siphon
• the discharge pipe is siphoning but is immersed into the water.
2.2
Examples of available programs for the Free Installation Machines
with DIWA 123+LCD Timer
1
2
3
4
5
6
7
Service Manual
LVS Mark II
INDESIT
Intensive
Normal
Recently soiled
Delicate items
Rapid
Warm rinse
Soak
ARISTON
Intensive
Normal
DuoWash
Glass
Rapid
Rinses
Soak
ARISTON with Sensor
Auto-Intensive
Auto-Normal
Auto-DuoWash
Glass
Rapid
Rinses
Soak
Language Issue/Edition
GB
2001-02-20/01
Page
17-52
Merloni Elettrodomestici
2.2.1
DuoWash
This cycle is extremely delicate on glass and strong and energic on heavily
soiled pots.
All inside the same washing load:
• The delicate dishes are washed with reduced pressure and only for 30% of
the total cycle time,
• The heavily soiled dishes are washed with maximum pressure and for 70%
of the total cycle time.
Wash performance
1. Alternate wash (first above and then below and vice versa)
2. When it is washing above, one of the two motor windings disconnects and
the jet is more delicate
3. The washing temperature is 50˚C instead of 55˚C
In the other cases the alternate wash takes place with both motor windings,
above and below.
Moreover, all the warm rinses of all cycles, are performed with one winding
only up to 50˚.
2.2.2
SensorSystem
The “turbidity sensor” reads the type of dish soil, establishing the best
washing strategy as regards cycle time, number of rinses and quantity of water
used.
In this way the best result is obtained with the minimum costs and minimum
pollution level.
Service Manual
LVS Mark II
Language Issue/Edition
GB
2001-02-20/01
Page
18-52
Merloni Elettrodomestici
45°
5
6
7
Soak
X
X
X
X
4
X
X
X
X
X
X
X
X
X
X
X
X
X
X
X
X
X
V
X
P
X
X
X
X
X
X
X
X
X
X
X
X
50°
X
X
X
X
X
X
X
X
X
X
X
X
38°
Hot Rinse
V
P
3
Rapid
Alternation
X
X
2
Crystal
V
P
1
After Dinner
Pre-washes
Draining 16''
Total static load
Washing pump 8'
Drains+1'
Total static load
Heats
Washing pump 4'
Washing pump 24'
Draining 1'
Washes
Total static load
Pump+detergent 1'
Pump+regenerate 1'
Heats
Pump+detergent 1'
Heats
Washing pump 8'
Heats+pump 5'
Washing pump 8'
Heats
Washing pump 24'
Min. temp. control
Filling time 15''
Draining 1'
Filling time 15''
Draining 1'
Filling time 15''
Draining 1'
Rinses
Total static load
Crystal load
Resis. impulses
Washing pump 8'
Washing pump 20'
Draining 1'
Total static load
Rinse aid reset 0.3''
Pump+regenerate 1'
Heats
Pump+rinse aid 1'
Pump+rinse aid 15'
Heat+2"pump
Drying
See: Drying Phases
NTC
Pressure switch status
No CYCLES
Daily
DIWA 123 cycles
Intensive
2.3
X
56°
X
X
X
70°
X
X
X
V
X
V
X
X
X
X
X
X
X
X
X
V
X
X
X
X
X
P
P
X
X
X
X
X
X
X
X
X
X
X
X
X
X
V
P
50°
70°
X
X
X
X
X
X
X
X
X
X
X
X
X
X
X
X
X
X
X
X
X
X
X
X
X
X
X
X
X
X
X
X
X
X
X
Drying phases
1.
2.
1.
2.
Dishwater with drying fan ON
In this case drying time will be 40'
Dishwasher with drying fan OFF.
In this case drying time will be 15'
Dishwasher without drying fan ON.
In this case drying time will be 15'
Dishwasher without drying fan OFF.
In this case drying time will be 0
In some models (see column Alternation), there is an alternate wash with a complete cycle of 4': 3' in the lower basket and 1' in
the upper basket.
Service Manual
LVS Mark II
Language Issue/Edition
GB
2001-02-20/01
Page
19-52
Merloni Elettrodomestici
In the first part of the ramp the auxiliary winding is disconnected so that only the upper basket is washed.
As shown in the line chart, there are two regenerate steps. The first is carried out by all the 15' drying cycles.
In the 40' cycles, the regenerate phase takes place when the drying starts.
Dishwasher with Drying Fan ON
Drying
Regenerate
Drying 13'+Vent.
Drying 27'
Draining 1'
Filling time 15"
Draining 1'
Drying 1'
Draining 30"
Filling time 15"
Draining 30"
Drying 1'
Draining 30"
End
V
V
V
V
V
X
X
X
X
X
X
X
X
X
X
X
X
X
X
X
X
X
X
X
X
X
X
X
X
X
X
X
X
X
X
X
X
X
X
X
X
X
X
X
X
X
X
X
X
X
X
X
X
X
X
X
X
X
X
X
X
X
X
X
X
X
X
X
X
X
X
X
X
X
X
X
X
X
X
X
X
X
X
X
X
X
X
X
X
X
X
X
X
X
X
X
X
X
X
X
X
X
X
X
X
X
X
X
X
X
X
X
X
X
X
X
X
X
X
X
X
X
X
X
X
X
X
X
X
X
X
X
X
X
X
X
X
X
X
X
X
X
X
X
X
X
X
X
X
X
X
X
X
X
X
X
X
X
X
X
X
X
X
X
X
X
X
X
X
X
X
X
X
X
X
X
X
X
X
X
X
X
X
X
X
X
X
X
X
X
X
X
X
X
X
X
X
X
X
X
X
X
X
X
X
X
X
X
X
X
X
X
X
X
X
X
X
X
X
Dishwasher with Drying Fan OFF
Drying
Drying 10'+Vent.
Drying 5'
Draining 1'
Filling time 15"
Draining 1'
Drying 1'
Draining 30"
Filling time 15"
Draining 30"
Drying 1'
Draining 30"
End
V
V
V
V
V
X
X
X
X
X
X
X
X
X
X
X
X
Dishwasher without Drying Fan ON
Drying
Regenerate
Drying 10'
Drying 5'
Draining 1'
Filling time 15"
Draining 1'
Drying 1'
Draining 30"
Filling time 15"
Draining 30"
Drying 1'
Draning 30"
End
V
V
V
V
V
X
X
X
X
X
X
X
X
X
X
X
X
X
X
Dishwasher without Drying Fan OFF
Drying
Draining 1'
Filling time 15"
Draining 1'
Drying 1'
Draining 30"
Filling time 15"
Draining 30"
Drying 1'
Draining 30"
End
Service Manual
LVS Mark II
V
V
V
V
V
X
X
X
X
X
X
X
X
X
X
Language Issue/Edition
GB
2001-02-20/01
Page
20-52
Merloni Elettrodomestici
Service Manual
LVS Mark II
V
P
30°
35°
40°
45°
50°
X
X
X
X
X
X
X
X
X
X
X
2
3
4
1
2
3
4
1
2
3
4
X
X
X
X
X
X
X
X
X
X
X
X
X
X
X
X
X
X
X
X
X
X
X
X
X
X
X
X
X
X
X
X
X
X
X
X
X
X
X
X
X
X
X
X
X
X
X
X
X
X
X
X
X
X
X
X
X
X
X
X
X
X
5
6
7
X
X
X
X
X
X
X
X
X
X
X
X
X
X
X
X
X
X
X
X
X
X
V
X
X
X
X
P
X
X
X
X
X
X
X
X
X
X
X
X
38°
Auto crystal&pot
DuoWash
Auto Normal
1
4
Hot Rinse
X
X
3
Rapid
V
P
2
Crystal
Level of turbidity
Pre-washes
Draining 16''
Total static load
Washing pump 8'
Drains+1'
Total static load
Heats
Heats
Heats
Heats
Heats
Washing pump 4'
Washing pump 8'
Washing pump 12'
Washing pump 16'
Washing pump 24'
Draining 1'
Washes
Total static load
Pump+detergent 1'
Pump+regenerate 1'
Heats
Pump+detergent 1'
Heats
Washing pump 8'
Heats+pump 5'
Washing pump 8'
Heats
Heats
Washing pump 12'
Washing pump 16'
Washing pump 20'
Washing pump 24'
Min. temp. control
Filling time 15''
Draining 1'
Filling time 15''
Draining 1'
Filling time 15''
Draining 1'
Rinses
Total static load
Crystal load
Resis. impulses
Washing pump 8'
Washing pump 12'
Washing pump 16'
Washing pump 20'
Draining 1'
Total static load
Rinse aid reset 0.3''
Pump+regenerate 1'
Heats
Pump+rinse aid 1'
Pump+rinse aid 15'
Heats+2"pump
Alternation
1
Pressure
switch status
NTC
No CYCLES
Soak
DIWA 123 cycles with Turbidity Sensor
Auto Intensive
2.4
50°
X
X
X
X
X
X
X
X
X
X
X
X
X
X
X
X
X
X
X
X
X
X
X
X
X
X
X
X
X
X
X
X
X
X
X
X
X
X
X
X
X
X
X
56°
X
X
X
65°
70°
X
X
X
X
X
X
X
X
X
X
X
X
X
X
X
X
X
X
X
X
X
X
X
X
X
X
X
X
X
X
X
X
X
X
X
X
X
X
X
X
X
X
X
X
X
V
X
X
X
X
X
X
X
X
X
V
V
X
X
P
P
X
X
X
X
X
X
X
X
X
X
X
X
X
X
X
X
X
X
X
X
X
X
V
P
X
50° X
70°
X
X
X
X
X
X
X
X
X
X
X
X
X
X
X
X
X
X
X
X
X
X
X
X
X
X
X
X
X
X
X
X
X
X
X
X
X
X
X
X
X
X
X
X
X
X
X
X
X
X
X
X
X
X
X
X
X
X
X
X
X
X
X
X
X
X
X
X
X
X
X
X
X
X
X
X
X
X
X
X
X
X
X
X
X
X
X
X
X
X
X
X
X
X
X
X
Language Issue/Edition
GB
2001-02-20/01
Page
21-52
Merloni Elettrodomestici
Drying phases
1.
2.
1.
2.
Dishwater with drying fan ON
In this case drying time will be 40'
Dishwasher with drying fan OFF.
In this case drying time will be 15'
Dishwasher without drying fan ON.
In this case drying time will be 15'
Dishwasher without drying fan OFF.
In this case drying time will be 0
Alternating steps
In some models (see column Alternation), there is an alternate wash with a complete cycle of 4': 3' in the lower basket and 1' in
the upper basket.
Warm rinse
In the first part of the ramp the auxiliary winding is disconnected so that only the upper basket is washed.
Regenerate
As shown in the line chart, there are two regenerate steps. The first is carried out by all the 15' drying cycles.
In the 40' cycles, the regenerate phase takes place when the drying starts.
Dishwasher with Drying Fan ON
Drying
Regenerate
Drying 13'+Vent.
Drying 27'
Draining 1'
Filling time 15"
Draining 1'
Drying 1'
Draining 30"
Filling time 15"
Draining 30"
Drying 1'
Draining 30"
End
V
V
V
V
V
X
X
X
X
X
X
X
X
X
X
X
X
X
X
X
X
X
X
X
X
X
X
X
X
X
X
X
X
X
X
X
X
X
X
X
X
X
X
X
X
X
X
X
X
X
X
X
X
X
X
X
X
X
X
X
X
X
X
X
X
X
X
X
X
X
X
X
X
X
X
X
X
X
X
X
X
X
X
X
X
X
X
X
X
X
X
X
X
X
X
X
X
X
X
X
X
X
X
X
X
X
X
X
X
X
X
X
X
X
X
X
X
X
X
X
X
X
X
X
X
X
X
X
X
X
X
X
X
X
X
X
X
X
X
X
X
X
X
X
X
X
X
X
X
X
X
X
X
X
X
X
X
X
X
X
X
X
X
X
X
X
X
X
X
X
X
X
X
X
X
X
X
X
X
X
X
X
X
X
X
X
X
X
X
X
X
X
X
X
X
X
X
X
X
X
X
X
X
X
X
X
X
X
X
X
X
X
X
X
X
X
X
X
X
X
X
X
X
X
X
X
X
X
X
X
X
X
X
X
X
X
X
X
X
X
X
X
X
X
X
X
X
X
X
X
X
X
X
X
X
X
X
X
X
X
X
X
X
X
X
X
X
X
X
X
X
X
X
X
X
X
X
X
X
X
X
X
X
X
X
X
X
X
X
X
X
X
X
X
X
X
X
X
X
X
X
X
X
X
X
X
X
X
X
X
X
X
Dishwasher with Drying Fan OFF
Drying
Drying 10'+Vent.
Drying 5'
Draining 1'
Filling time 15"
Draining 1'
Drying 1'
Draining 30"
Filling time 15"
Draining 30"
Drying 1'
Draining 30"
End
Service Manual
LVS Mark II
V
V
V
V
V
X
X
X
X
X
X
X
X
X
X
X
X
X
X
X
X
X
X
X
X
X
X
X
X
X
X
X
X
X
X
X
X
X
X
X
X
X
X
X
X
X
X
X
X
X
X
X
X
Language Issue/Edition
GB
2001-02-20/01
Page
22-52
Merloni Elettrodomestici
Dishwasher without Drying Fan ON
Drying
Regenerate
Drying 10'
Drying 5'
Draining 1'
Filling time 15"
Draining 1'
Drying 1'
Draining 30"
Filling time 15"
Draining 30"
Drying 1'
Draining 30"
End
V
V
V
V
V
X
X
X
X
X
X
X
X
X
X
X
X
X
X
X
X
X
X
X
X
X
X
X
X
X
X
X
X
X
X
X
X
X
X
X
X
X
X
X
X
X
X
X
X
X
X
X
X
X
X
X
X
X
X
X
X
X
X
X
X
X
X
X
X
X
X
X
X
X
X
X
X
X
X
X
X
X
X
X
X
X
X
X
X
X
X
X
X
X
X
X
X
X
X
X
X
X
X
X
X
X
X
X
X
X
X
X
X
X
X
X
X
X
X
X
X
X
X
X
X
X
X
X
X
X
X
X
X
X
X
X
X
X
X
X
X
X
X
X
X
X
X
X
X
X
X
X
X
X
X
X
X
X
X
X
X
X
X
X
X
X
X
X
X
X
X
X
X
X
X
X
X
X
X
X
X
X
X
X
X
X
X
X
X
X
X
X
X
X
X
X
X
X
X
X
X
X
X
X
X
X
X
X
X
X
X
X
X
X
X
X
X
X
X
X
X
X
X
X
X
X
X
X
X
X
X
X
X
X
X
X
X
X
X
X
X
X
X
X
X
X
X
X
X
X
X
X
X
X
X
X
X
X
X
X
X
X
X
X
X
X
X
X
X
X
X
X
X
X
X
X
X
X
X
X
X
X
X
X
X
X
X
X
X
X
X
X
Dishwasher without Drying Fan OFF
Drying
Draining 1'
Filling time 15"
Draining 1'
Drying 1'
Draining 30"
Filling time 15"
Draining 30"
Drying 1'
Draining 30"
End
Service Manual
LVS Mark II
V
V
V
V
V
X
X
X
X
X
X
X
X
X
X
X
X
X
X
X
X
X
X
X
X
X
X
X
X
X
X
X
X
X
X
X
X
X
X
X
X
X
X
X
X
Language Issue/Edition
GB
2001-02-20/01
Page
23-52
Merloni Elettrodomestici
Service Manual
LVS Mark II
30°
35°
40°
45°
50°
X
X
X
X
X
X
X
X
X
X
X
2
3
4
1
2
3
4
1
2
3
4
X
X
X
X
X
X
X
X
X
X
X
X
X
X
X
X
X
X
X
X
X
X
X
X
X
X
X
X
X
X
X
X
X
X
X
X
X
X
X
X
X
X
X
X
X
X
X
X
X
X
X
X
X
X
X
X
X
X
X
X
X
X
5
6
7
X
X
X
X
X
X
X
X
X
X
X
X
X
X
X
X
X
X
X
X
X
X
X
X
V
X
X
X
X
P
X
X
X
X
X
X
X
X
X
X
X
X
38°
Auto crystal&pot
Auto Normal
1
4
Hot Rinse
V
P
Auto Intensive
Alternation
X
X
X
3
Rapid
V
P
2
Crystal
Level of turbidity
Pre-washes
Draining 16''
Total static load
Washing pump 8'
Washing pump 28'
Drains+1'
Total static load
Heats
Heats
Heats
Heats
Heats
Washing pump 4'
Washing pump 8'
Washing pump 12'
Washing pump 16'
Washing pump 24'
Draining 1'
Washes
Total static load
Pump+detergent 1'
Pump+regenerate 1'
Heats
Pump+detergent 1'
Heats
Washing pump 8'
Heats+pump 5'
Washing pump 8'
Heats
Heats
Washing pump 12'
Washing pump 16'
Washing pump 20'
Washing pump 28'
Min. temp. control
Filling time 15''
Draining 1'
Filling time 15''
Draining 1'
Filling time 15''
Draining 1'
Rinses
Total static load
Crystal load
Resis. impulses
Washing pump 8'
Washing pump 12'
Washing pump 16'
Washing pump 20'
Draining 1'
Total static load
Rinse aid reset 0.3''
Pump+regenerate 1'
Heats
Pump+rinse aid 1'
Pump+rinse aid 15'
Heats+2"pump
Drying
See: Drying Phases
NTC
1
Pressure
switch status
No CYCLES
Soak
As from the end of January, 2001 the following new DIWA 123 cycles with Turbidity
Sensor will come into production:
48°
X
X
X
X
X
X
X
X
X
X
X
X
X
X
X
X
X
X
X
X
X
X
X
X
X
X
X
X
X
X
X
X
X
X
X
X
X
X
X
X
X
56°
X
X
X
65°
70°
X
X
X
X
X
X
X
X
X
X
V
X
X
X
X
X
X
X
X
X
X
V
X
X
X
X
X
X
X
X
X
X
X
X
X
X
X
X
X
X
X
X
X
X
X
X
X
X
X
X
X
X
X
X
X
X
V
X
X
P
P
X
X
X
X
X
V
P
X
50° X
66°
X
X
X
X
X
X
X
X
X
X
X
X
X
X
X
X
X
X
X
X
X
X
X
X
X
X
X
X
X
X
X
X
X
X
X
X
X
X
X
X
X
X
X
X
X
X
X
X
X
X
X
X
X
X
X
X
X
X
X
X
X
X
X
X
X
X
X
X
X
X
X
X
X
X
X
X
X
X
X
X
X
X
X
X
X
X
X
X
X
X
X
X
X
X
X
X
X
X
X
X
X
X
X
X
X
X
X
X
X
X
Language Issue/Edition
GB
2001-02-20/01
Page
24-52
Merloni Elettrodomestici
Drying phases
1.
2.
1.
2.
Dishwater with drying fan ON
In this case drying time will be 50'
Water discharge plus 10’ of the fan
Dishwasher with drying fan OFF.
In this case drying time will be 15'
Dishwasher without drying fan ON.
In this case drying time will be 60'
Water discharge plus 0’
Dishwasher without drying fan OFF.
In this case drying time will be 15'
Alternating steps
In some models (see column Alternation), there is an alternate wash with a complete cycle of 4': 3' in the lower basket and 1' in
the upper basket.
Warm rinse
In the first part of the ramp the auxiliary winding is disconnected so that only the upper basket is washed.
Regenerate
As shown in the line chart, there are two regenerate steps. The first is carried out by all the 15' drying cycles.
In the 40' cycles, the regenerate phase takes place when the drying starts.
Dishwasher with Drying Fan ON
Drying
Regenerate
Drying 50'
Draining 1'
Drying 10'+Vent.
Draining 1'
Filling time 15"
Draining 1'
Drying 1'
Draining 30"
Filling time 15"
Draining 30"
Drying 1'
Draining 30"
V
V
V
V
V
X
X
X
X
X
X
X
X
X
X
X
X
X
X
X
X
X
X
X
X
X
X
X
X
X
X
X
X
X
X
X
X
X
X
X
X
X
X
X
X
X
X
X
X
X
X
X
X
X
X
X
X
X
X
X
X
X
X
X
X
X
X
X
X
X
X
X
X
X
X
X
X
X
X
X
X
X
X
X
X
X
X
X
X
X
X
X
X
X
X
X
X
X
X
X
X
X
X
X
X
X
X
X
X
X
X
X
X
X
X
X
X
X
X
X
X
X
X
X
X
X
X
X
X
X
X
X
X
X
X
X
X
X
X
X
X
X
X
X
X
X
X
X
X
X
X
X
X
X
X
X
X
X
X
X
X
X
X
X
X
X
X
X
X
X
X
X
X
X
X
X
X
X
X
X
X
X
X
X
X
X
X
X
X
X
X
X
X
X
X
X
X
X
X
X
X
X
X
X
X
X
X
X
X
X
X
X
X
X
X
X
X
X
X
X
X
X
X
X
X
X
X
X
X
X
X
X
X
X
X
X
X
X
X
X
X
X
X
X
X
X
X
X
X
X
X
X
X
X
X
X
X
X
X
X
X
X
X
X
X
X
X
X
X
X
X
X
X
X
X
X
X
X
X
X
X
X
X
X
X
X
X
X
X
X
X
X
X
X
X
X
X
X
X
X
X
X
Dishwasher with Drying Fan OFF
Drying
Drying 15'
Draining 1'
Filling time 15"
Draining 1'
Drying 1'
Draining 30"
Filling time 15"
Draining 30"
Drying 1'
Draining 30"
End
Service Manual
LVS Mark II
V
V
V
V
V
X
X
X
X
X
X
X
X
X
X
X
X
X
X
X
X
X
X
X
X
X
X
X
X
X
X
X
X
X
X
X
X
X
X
X
X
X
X
X
X
X
X
X
X
Language Issue/Edition
GB
2001-02-20/01
Page
25-52
Merloni Elettrodomestici
Dishwasher without Drying Fan ON
Drying
Regenerate
Drying 60'
Draining 1'
Filling time 15"
Draining 1'
Drying 1'
Draining 30"
Filling time 15"
Draining 30"
Drying 1'
Draining 30"
End
V
V
V
V
V
X
X
X
X
X
X
X
X
X
X
X
X
X
X
X
X
X
X
X
X
X
X
X
X
X
X
X
X
X
X
X
X
X
X
X
X
X
X
X
X
X
X
X
X
X
X
X
X
X
X
X
X
X
X
X
X
X
X
X
X
X
X
X
X
X
X
X
X
X
X
X
X
X
X
X
X
X
X
X
X
X
X
X
X
X
X
X
X
X
X
X
X
X
X
X
X
X
X
X
X
X
X
X
X
X
X
X
X
X
X
X
X
X
X
X
X
X
X
X
X
X
X
X
X
X
X
X
X
X
X
X
X
X
X
X
X
X
X
X
X
X
X
X
X
X
X
X
X
X
X
X
X
X
X
X
X
X
X
X
X
X
X
X
X
X
X
X
X
X
X
X
X
X
X
X
X
X
X
X
X
X
X
X
X
X
X
X
X
X
X
X
X
X
X
X
X
X
X
X
X
X
X
X
X
X
X
X
X
X
X
X
X
X
X
X
X
X
X
X
X
X
X
X
X
X
X
X
X
X
X
X
X
X
X
X
X
X
X
X
X
X
X
X
X
X
X
X
X
X
X
X
X
X
X
X
X
X
X
X
X
X
X
X
X
X
X
X
X
X
X
X
X
X
X
X
X
X
X
X
X
X
X
X
Dishwasher without Drying Fan OFF
Drying
Drying 15'
Draining 1'
Filling time 15"
Draining 1'
Drying 1'
Draining 30"
Filling time 15"
Draining 30"
Drying 1'
Draining 30"
End
Service Manual
LVS Mark II
V
V
V
V
V
X
X
X
X
X
X
X
X
X
X
X
X
X
X
X
X
X
X
X
X
X
X
X
X
X
X
X
X
X
X
X
X
X
X
X
X
X
X
X
X
X
X
X
X
Language Issue/Edition
GB
2001-02-20/01
Page
26-52
Merloni Elettrodomestici
2.5
Testing/Autotest procedure
To start the procedure, follow the instructions below:
1. Reset the machine with the “Reset” button
2. Select OFF (machine shutdown)
3. Check that the appliance door is closed
4. Turn the selector to “Reset”
5. Press and hold the “Deley” button and select ON (switched on)
At this stage an acoustic signal will sound.
6. Always keeping the “Deley” button pressed, select OFF (switched off) and
then ON (switched on) again.
At this stage an acoustic signal will sound and “C 0” will appear on the
display.
7. After releasing the “Deley” button, repress it four times consecutively.
At this stage “C 4” will appear on the display.
8. Turn the selector to any position (not reset)
9. After about 4" the testing cycle will start
N.B.
In the L 83 Duo machines the push button to press is not the “Delay” but is the
“Select” button.
Starting Functional Testing
1. Fill as indicated in the program, plus 5" motor and heater
2. Washing motor
5"
3. heater
5"
4. Dispenser
5"
5. Regenerate
15"
6. Drying fan
5"
7. Half load
5"
If the machine is provided with the alternate wash:
• Only less than 5" from when the position is reached
• Only more than 5" from when the position is reached
8. Drain pump
9. Drying fan
10. Load solenoid valve
15"
5"
25"
To exit the testing cycle/autotest, turn the selector to “Reset”; after 4" the cycle will stop.
Service Manual
LVS Mark II
Language Issue/Edition
GB
2001-02-20/01
Page
27-52
Merloni Elettrodomestici
3
TOTAL EMBEDDING DISAPPEARANCE WITH DIWA 126 TIMER
3.1
Warnings
Led 1 Intensive Cycle
Led 2 Daily Cycle
Led 3 Crystal Cycle
Led 4 Rapid Cycle
Led 5 Soack Cycle
I
D
C
R
S
Overflow
NTC c.a. or in c.c.
Heating Timeout
Discharge Timeout
Pressure switch Timeout P.
Switching Led 1
Switching Led 3
Switching Led 4
Switching Led 1 - 2
Switching Led 2 - 3
SS
LD1 LD2 LD3 LD4 LD5
I
D
C
R
S
Service Manual
LVS Mark II
Intensive
Daily
Crystal
Rapid
Soack
Language Issue/Edition
GB
2001-02-20/01
Page
28-52
Merloni Elettrodomestici
4
TOTAL EMBEDDING DISAPPEARANCE WITH DIWA 123 TIMER
AS
I
D
C&P C
R
S
SS
SB
1/2
2h
4h
P
LD1 LD2 LD3 LD4 LD5 LD6 LD7
I
D
C&P
C
R
S
KS1
6h
D
LD8 LD9
LD10 KS2 LD11 LD12 LD13 KS3
Auto Intensive
Auto Daily
Auto Crystal & Pot.
Crystal
Rapid
Soack
Characteristics
• Alternate
• – load up
• Delay timer 2-4-6 hours
• Turbidity sensor
• Use of low speed in the Crystal & Pot programme when the machine
washes the upper basket
• Use of low speed in the Crystal programme both when the machine washes the upper basket and the lower basket.
N.B.
Service Manual
LVS Mark II
Auto means that in the cycle definition intervenes the turbidity measure, therefore, each Auto cycle is really constituted by four distinct cycles directed by the turbidity level.
Language Issue/Edition
GB
2001-02-20/01
Page
29-52
Merloni Elettrodomestici
I
D
C&P C
R
HR
S
SS
SB
1/2
2h
4h
P
LD1 LD2 LD3 LD4 LD5 LD6 LD7
I
D
C&P
C
R
HR
S
KS1
6h
D
LD8 LD9
LD10 KS2 LD11 LD12 LD13 KS3
Auto Intensive
Auto Daily
Auto Crystal & Pot.
Crystal
Rapid
Hot Rinse
Soack
Characteristics
• Alternate
• – load up
• Delay timer 2-4-6 hours
• Turbidity sensor
• Use of low speed in the Crystal & Pot programme when the machine
washes the upper basket
• Use of low speed in the Crystal programme both when the machine washes the upper basket and the lower basket.
N.B.
Service Manual
LVS Mark II
Auto means that in the cycle definition intervenes the turbidity measure, therefore, each Auto cycle is really constituted by four distinct cycles directed by the turbidity level.
Language Issue/Edition
GB
2001-02-20/01
Page
30-52
Merloni Elettrodomestici
I
D
C&P C
R
S
SS
SB
1/2
2h
4h
6h
P
LD2 LD3 LD4 LD5 LD6 LD7
I
D
C&P
C
R
S
KS1
D
LD8 LD9
LD10 KS2 LD11 LD12 LD13 KS3
Intensive
Daily
Crystal & Pot.
Crystal
Rapid
Soack
Characteristics
• Alternate
• – load up
• Delay timer 2-4-6 hours
• Turbidity sensor
• Use of low speed in the Crystal & Pot programme when the machine
washes the upper basket
• Use of low speed in the Crystal programme both when the machine washes the upper basket and the lower basket.
N.B.
I
Since the turbidity sensor is not present, the C&P programme assumes the cycle
corresponding to TorbLevel =1 (“after dinner” light cycle).
Since the turbidity sensor is not present, I and D programmes assume the cycle
corresponding to TorbLevel)=4.
D
R
S
SS
SB
P
LD4 LD5 LD6 LD7
I
D
R
S
KS1
LD8 LD9
Intensive
Daily
Rapid
Soack
Characteristics
• No _ load. ◊ control not operative on ev. _ load
• No alternate
• No delay timer
• No sensor ◊ assumption of default of the cycles corresponding to TorbLevel=4 for the Intensive and Daily programmes.
• No double speed for the pump ◊ control not operative on pump auxiliary winding.
Service Manual
LVS Mark II
Language Issue/Edition
GB
2001-02-20/01
Page
31-52
Merloni Elettrodomestici
4.1
Functioning
4.1.1
Machine in idle
• If the machine is not set the programming diodes are switched off. It is
possible that the salt spy and gloss spy will be “on”.
• All the setting carried out by the user must be done with the door open,
because the machine will not accept any commands if the door is closed
unless one wants to “enter” into one of the accessory cycles (Service and
Running-in).
4.1.2
Setting of delay timer
(only for machines with the delay timer setting key)
• Every time the delay timer setting key is pressed the machine produces a
beep sound and the diode relative to the set delay is switched on (2h or
4h or 6h).
4.1.3
Setting the washing on one basket only
(only for machines provided with the _ load push button, and in any case with reference to the upper
basket only even if the alternate washing is present)
• The defaults are selected for both baskets, the diode corresponding to the
setting of the upper basket is off, by pushing the basket setting key the
machine will produce a beep sound and the associated diode will switch
on, by pushing the basket setting key a second time the machine will produce a beep sound and the diode will switch off.
4.1.4
Setting a washing programme
• Every time the programming setting key is pressed the machine will produce a beep sound and the diode relating to the selected programme will
light up.
Instance in which the delay timer has not been set up:
• Upon shutting the door with a selected programme the selected washing
programme signalled by a beep sound will start.
Instance in which the delay timer has been set-up:
• If the delay timer were set at a value lower than 0 and a programme has
been set-up, upon shutting the door, the machine will produce a beep
sound and the count-down, highlighted by a flashing diode corresponding
to the delay set, will start.
Every time the door is opened the counting will stop, but the diode corresponding to the remaining hours for the programme to start, will continue
to flash.
Service Manual
LVS Mark II
Language Issue/Edition
GB
2001-02-20/01
Page
32-52
Merloni Elettrodomestici
The following scheme will apply:
a) if there are ≤ 2 hours left to the starting of the programme then the diode corresponding to 2h delay will flash
b) if there are ≤ 4 and > 2 hours left to go the diode corresponding to 4 h
delay will flash
c) there are ≤ 6 and > 4 hours left to go the diode corresponding to 6 h
delay will flash
Upon completion of the washing the diode, corresponding to the set programme, will continue to flash “softly” until the programmes setting key is
pressed; having pressed the said key the machine is ready for the setting of a
new cycle.
4.1.5
Resetting the setting-up
It is always possible to reset the washing cycle by pressing for 2" the programmes setting key, independently as to whether is opened or closed.
4.1.6
Entry in testing
1.
2.
3.
4.
5.
6.
7.
8.
Service Manual
LVS Mark II
Door shut.
Feeding the machine by keeping the programme setting key pressed.
The produces a beep sound.
Stop feeding and feed again the machine by keeping the programme setting key pressed.
The machine will produce a beep sound and diodes LD4, LD5, LD6, LD7
will light up.
Press three times to enter in running in (LD4 and LD5 off, LD6, and LD7
on) and four times to enter in service (LD4 and LD5 and LD6 off, LD7 on).
If the pressure configurations are valid, then the machine, after 2" from the
last pressure of the key will produce a beep sound and starts the chosen
accessory programme.
It is possible to exit from the running-in programme or service by pressing
for 2" the programme setting key.
Language Issue/Edition
GB
2001-02-20/01
Page
33-52
Merloni Elettrodomestici
Instance in which there has been a running-in entry:
During the entire running-in stage, consisting in heating and release of washing powder and subsequent discharge stage, the machine will keep the LD4,
LD5, LD6, LD7 programme diodes lit up; in the subsequent loading stage the
various steps indicated by the sequential activity of the LD4, LD5, LD6, LD7
diodes in the way as mentioned hereunder:
1)
2)
3)
4)
5)
6)
7)
8)
9)
10)
11)
12)
LD4
LD5
LD6
LD7
Ev. load
Off
Off
Off
On
Washing Pump
Off
Off
Off
Off
Resistance
Off
Off
On
On
Dispenser
Off
On
Off
Off
Ev. regenerate
Off
On
Off
On
Fan (full Pr.)
Off
On
On
Ev. _ load or alternate
Off
Off
Off
Discharge pump
On
Off
Off
On
Fan (Empty Pr.)
On
Off
On
Off
Ev. load
On
Off
On
On
End Sequence
The Leds LD4, LD5, LD6, LD7 flash
Press programmes setting-up key to exit from End Sequence stage and put the
machine back to the user programming mode.
The functioning is made up of the loading sequence only (steps 1)..11)).
N.B.
Service Manual
LVS Mark II
If the set programme is the running-in then the fault finding routine is not active.
If the set programme is functional then the faults finding routine is active.
Language Issue/Edition
GB
2001-02-20/01
Page
34-52
Merloni Elettrodomestici
4.1.7
Faults
<Type of fault>
4.1.8
intervention(1)
LD7
On
Off
On
Off
On
On
Off
On
Off
On
Off
On
Off
1)
2)
3)
4)
5)
6)
7)
8)
9)
10)
11)
12)
13)
Water-stop
Relay in c.c
Probe in c.c./c.a.
Temperature reaching time-out
Empty press. Reaching time-out
Discharge Triac pump in c.a.
Aux. avv. Triac pump in c.c./c.a.
Prin.avv. Triac pump in c.c./c.a.
Ev. load triac pump in c.c/c.a.
Ev._load or alt. Motor Triac.
Relay in c.a.
Triac dispenser in c.c./c.a.
Vacuum finding pressure switch during
washing stage after the restoring sequence.
(1)
Attention must be paid with scholtes machines (LVTI12-621 in case water stop intervention were to happen Led 01 (AS
“water-stop”) together with Led 07 (S “soack”) would light up.
Warnings
<Bit Pos.>
<Type of fault>
1
Ev. Triac restore in c.c./c.a.
3
Lack of water
6
7
(1)
Service Manual
LVS Mark II
LD4
Off
Off
Off
Off
Off
Off
On
On
On
On
On
On
On
<Visualized code>
LD5
LD6
Off
Off
Off
On
Off
On
On
Off
On
Off
On
On
Off
Off
Off
Off
Off
On
Off
On
On
Off
On
Off
On
On
Eeprom
Turbidity sensor
<Visualized code>
Nothing is visualized
With the door shut, it produces a beep
sound every 5" waiting full pressure
switch(1)
Nothing is visualized
Nothing is visualized
Upon reaching full pressure switch the beep sound stops.
Warning id given through the following procedure:
• Ev. load ON for 6” no full pressure switch
• Ev. load OFF 2'
• Ev. Load ON and warning lack of water, goes back to point 1.
Language Issue/Edition
GB
2001-02-20/01
Page
35-52
Merloni Elettrodomestici
5
EMBEDDING WITH FRONTAL VIEW
D
DG1 DG2
1/2
SS
SB
LD1
LD2
LD3
C&P
C
I
R
S
Reset
D
KS1
I
D
C&P
C
R
S
KS2
Intensive
Daily
Crystal & Pot.
Crystal
Rapid
Soack
Characteristics
• Alternate
• – load up
• Delay timer from 1 to 9 hours
• Turbidity sensor
• Use of low speed in the Crystal & Pot programme when the machine
washes the upper basket
• Use of low speed in the Crystal programme both when the machine washes the upper basket and the lower basket.
N.B.
Service Manual
LVS Mark II
Auto means that in the cycle definition intervenes the turbidity measure, therefore, each Auto cycle is really constituted by four distinct cycles directed by the turbidity level.
Language Issue/Edition
GB
2001-02-20/01
Page
36-52
Merloni Elettrodomestici
5.1
Functioning
5.1.1
Machine in idle
• If the machine is not set the 2 digits and relative diode for half load are off,
the salt and glossing spies are lit up.
5.1.2
Setting up of the delay timer
• Every time the delay timer setting-up key is pressed the machine will produce a beep sound and will show on the 2 digits the value of the delay
that has been set.
Example: for a setting-up of a 6 hours delay, the machine will show 6H.
5.1.3
Setting-up of washing into one basket only
• The defaults are selected in both baskets, the diode corresponding to the setting-up of the upper basket is off, by pressing the basket setting-up key the
machine will produce a beep sound and the relative diode well light-up.
By pressing the basket setting-up key a second time the machine will produce a beep sound and the relative diode will switch off returning to the
default setting-up.
5.1.4
Setting up a washing programme
• The setting up of one of the 6 programmes available to the user is possible
through the 7 positions selector.
Instance in which the delay timer has not been set-up
• The selector stays fixed for 4" on a position different from that of resetting,
after the door has been closed, the washing programme, signalled by a
beep sound will start, and the estimated time left to the of the cycle will be
visualized.
The time is shown in minutes, should it be more than or equal to 99 minutes the machine will flash “99”.
Instance in which the delay timer has been set:
• If the delay timer has been set for a value different from 0 and a programme has been set, after 4" from having shut the door the machine will
produce a beep sound and the count down will commence before the
washing cycle starts.
The proceeding of the count down is highlighted by the flashing of the diode
on digit 2 and by the hourly decreasing of the delay time. Every time the door
is opened the count down will stop and the diode will stop flashing.
At the end of the washing a soft flashing with the ‘00’ writing will appear on
machine until when the selector is not put on a resetting position. Once the
selector has been put on a reset position the writing ‘00’ will disappear and
the machine is ready for a new setting cycle.
Service Manual
LVS Mark II
Language Issue/Edition
GB
2001-02-20/01
Page
37-52
Merloni Elettrodomestici
5.1.5
Resetting the set-up
It is possible to reset the washing cycle by putting the selector on the resetting
position 4".
5.2
Entry in testing
1.
2.
3.
4.
5.
Door shut.
Selector in reset position.
Activate the machine by keeping delay setting key pressed.
The machine will produce a beep sound.
Deactivate and reactivate the machine by keeping delay setting key
pressed.
6. The machine will produce a beep sound and will show C0.
7. Press three times to enter into running-in (it shows C3) and 4 times to enter in to service (it shows C4).
8. If the configuration of the pressing action is one of the valid ones then the
machine, after 4" from the last key pressing will produce a beep sound and
the chosen accessory programme will start.
9. At this point there are 4" available to bring the selector in a different position from the reset one, if this happens then the programme is reset.
10. It is possible to exit from the running-in or the assistance programme by
bringing the selector back on the reset position.
Instance in which there is an entry in running-in:
During the entire running-in stage, consisting in heating with discharge of
washing powder and subsequent discharge phase until the pressure switch is
empty +10" the machine shows C3, in the subsequent loading phase the various steps are indicated by the visualization of the step carried out as mentioned hereunder:
1)
2)
3)
4)
5)
6)
7)
8)
9)
10)
11)
12)
Service Manual
LVS Mark II
Ev. load
00
Washing Pump
01
Resistance
02
Dispenser
03
Ev. regenerate
04
Fan (full Pr.)
05
Ev. _ load or alternate
07
Discharge pump
08
Fan (Empty Pr.)
09
Ev. load
10
End Sequence
00 flashes
Put the selector in the reset position to exit from End Sequence phase and put the
machine back in user’s programming mode.
Language Issue/Edition
GB
2001-02-20/01
Page
38-52
Merloni Elettrodomestici
The functioning is made up of the loading sequence only (steps 1)..11)).
N.B.
5.3
Faults
1)
2)
3)
4)
5)
6)
7)
8)
9)
10)
11)
12)
13)
5.4
If the set programme is the running-in then the fault finding routine is not active.
If the set programme is functional then the faults finding routine is active.
<Type of fault>
Water-stop intervention
Relay in c.c
Probe in c.c./c.a.
Temperature reaching time-out
Empty press. Reaching time-out
Discharge Triac pump in c.a.
Aux. avv. Triac pump in c.c./c.a.
Prin.avv. Triac pump in c.c./c.a.
Ev. load triac pump in c.c/c.a.
Ev._load or alt. Motor Triac.
Relay in c.a.
Triac dispenser in c.c./c.a.
Vacuum finding pressure switch during washing stage
after the restoring sequence.
Warnings
<Bit Pos.>
1
3
6
7
Service Manual
LVS Mark II
<Visualized code>
01
02
03
04
05
07
08
09
10
11
12
13
14
<Type of fault>
Ev. Triac restore in c.c./c.a.
Lack of water
Eeprom
Turbidity sensor
<Visualized code>
Nothing is visualized
H2 will flash until full Pr is not reached
Nothing is visualized
It doesn’t visualize anything, it assumes
the turbidity level to be equal to 4 for the
auto cycles
Language Issue/Edition
GB
2001-02-20/01
Page
39-52
Merloni Elettrodomestici
6
DISASSEMBLY OF MOTOR-SUMP UNIT
The overflow system is integral with the motor unit.
After releasing the impeller, to disassemble the motor it is necessary to unscrew the overflow head as shown in the Fig. 1 and then unscrew the lower
clearance ring.
Fig. 1
Service Manual
LVS Mark II
Language Issue/Edition
GB
2001-02-20/01
Page
40-52
Merloni Elettrodomestici
Fig. 2
Fig. 3
Service Manual
LVS Mark II
Language Issue/Edition
GB
2001-02-20/01
Page
41-52
Merloni Elettrodomestici
Fig. 4
1
1
Remove and replace band after operation
Fig. 5
1
2
3
1
2
3
Service Manual
LVS Mark II
Lower part of the overflow head, located above the motor with non barycentric spring.
Non barycentric spring fixed to motor
Overflow hose resting on tray
Language Issue/Edition
GB
2001-02-20/01
Page
42-52
Merloni Elettrodomestici
7
NEW OVERFLOW SYSTEM
The system is activated when a water overflow occurs, due to component
malfunction (e.g.: Pressure switch, Timer, etc.) thus avoiding flooding.
If more than 9.5 litres of water enter into the tank the system is activated.
The water overflow level in the tank is determined by the position of the
holes on the head, as shown in Fig. 6.
Fig. 6
1
1
Service Manual
LVS Mark II
Overflow drain system seen from inside of tank
Language Issue/Edition
GB
2001-02-20/01
Page
43-52
Merloni Elettrodomestici
The overflowing water flows through the drain hose (Fig. 7) and triggers the
micro switch with about 0.5 litres.
Fig. 7
1
2
3
1
2
3
7.1
Overflow tray under dishwasher
Float with microswitch
Correct position of overflow hose on tray
New Float
The new float which will replace the current one is shown in
the Fig. 8.
Fig. 8
The new float is designed to prevent dishwashers with an alternate
wash motor from obstructing the movement if there is an overflow.
N.B.
Service Manual
LVS Mark II
If the hose is positioned incorrectly, in case of overflow, the anti-flood system operation may be delayed or stopped completely.
The new float will replace the old one, but not vice versa.
Language Issue/Edition
GB
2001-02-20/01
Page
44-52
Merloni Elettrodomestici
The Fig. 9 shows the incorrect position of the overflow hose which passes
under the wiring, not allowing correct operation of the system.
Fig. 9
1
1
Incorrect position of overflow hose
N.B.
Service Manual
LVS Mark II
The overflow hose must pass over the wiring, because if it is positioned as
shown in the figure, it would create a loop which would not allow the water to
flow, thus preventing the overflow system from working properly.
Language Issue/Edition
GB
2001-02-20/01
Page
45-52
Merloni Elettrodomestici
8
NEW SYSTEM TO FIX MOTOR
The new system consists in a non-barycentric spring, locked on the right-hand
side of the motor and fixed to the base of the tank with the lower part of the
overflow head.
This allows motor suspension, thus reducing noise caused by vibrations.
Fig. 10
1
2
3
1
2
3
Service Manual
LVS Mark II
Lower part of overflow head located over the motor with non barycentric spring
Overflow hose
Non barycentric spring
Language Issue/Edition
GB
2001-02-20/01
Page
46-52
Merloni Elettrodomestici
The Fig. 11 shows how to proceed to disassemble the non barycentric spring.
Fig. 11
1
1
Service Manual
LVS Mark II
Non barycentric spring
Language Issue/Edition
GB
2001-02-20/01
Page
47-52
Merloni Elettrodomestici
9
NATURAL DRYING SYSTEM
This new airbrak, located above the tank, allows the steam produced during
the warm rinse (temperature reaches 66˚C/67˚C) to be released more easily.
Part of the steam will be eliminated through the airbrak and a smaller part will
condense.
Condensate will be eliminated by means of a lateral pocket connected to the
drain of the appliance.
Fig. 12
Service Manual
LVS Mark II
Language Issue/Edition
GB
2001-02-20/01
Page
48-52
Merloni Elettrodomestici
Fig. 13
1
1
Airbrak position
N.B.
Service Manual
LVS Mark II
The position of the airbrak is very important, as indicated in the Fig. 13, to prevent steam from leaking and damaging the machine top.
Language Issue/Edition
GB
2001-02-20/01
Page
49-52
Merloni Elettrodomestici
10
ALTERNATE WASH MOTOR
Fig. 14
1
2
1
2
Service Manual
LVS Mark II
Turbidity sensor
Alternate Wash Motor
Language Issue/Edition
GB
2001-02-20/01
Page
50-52
Merloni Elettrodomestici
10.1
Alternate Wash Motor Wiring Diagram
Fig. 15
M
2
3
5
1
4
4
1
2
3
10.2
Electronic timer
Motor
Common
4
5
Sensing
Driven actuator for alternate wash
Sensing signal
The sensing device determines the water flows on the upper and lower impeller, alternately, reducing wash noise.
Fig. 16
ON
OFF
1
2
3
1
A+B
A
B
A+B
T3
T1
T2
T3
3.05"
73°
4.05"
97°
7.9"
190°
15"
360°
1 Upper/lower sprayers open
2 Upper sprayer open
3 Lower sprayer open
A+B; A; BSTOP positions
N.B.
Service Manual
LVS Mark II
T1 1.75"
T2 3.15"
T3 7.05"
Every STOP position occurs 0.1" after contact opening.
Tolerance limit ±0.1".
Language Issue/Edition
GB
2001-02-20/01
Page
51-52
Merloni Elettrodomestici
Merloni Elettrodomestici spa
viale Aristide Merloni, 47 - 60044 Fabriano
tel. 0732/6611 - telex 560196 - fax 0732/662954
www.Merloni.com
Service Manual
LVS Mark II
Language Issue/Edition
GB
2001-02-20/01
Page
52-52