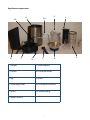
1
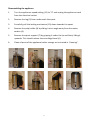
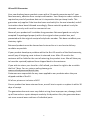
Power Juicer Please read the manual fully before using the appliance and keep the manual safe for future reference. 1 Contents page Safety guide Page 3 Appliance specific safety instructions Page 4 Positioning the appliance Page 4 Appliance components Page 5 Preparing the fruit and vegetables for juicing Page 6 Assembly Page 7 Using the appliance Page 9 Tips Page 10 Recipes Page 11-12 Disassembling the appliance Page 13 Storing and cleaning Page 14 Disposal of the appliance Page 14 UK & EU Guarantee Page 15 Electrical information Page 16 Contact details Page 17 2 Safety guide When using any electrical appliance, basic safety precautions should always be followed, including: This appliance can be used by children aged from 8 years and above and persons with reduced physical, sensory or mental capabilities or lack of experience and knowledge if they have been given supervision or instruction concerning use of the appliance in a safe way and understand the hazards involved. Children shall not play with the appliance. Cleaning and user maintenance shall not be made by children unless they are older than 8 and supervised. Keep the appliance and its cord out of reach of children less than 8 years old. Always ensure the voltage on the rating label corresponds to the voltage in your home. Check the power cord and plug regularly for any damage. If the cord or the plug is damaged, it must be replaced by a qualified electrician or a service repair centre. If in doubt please contact our customer service team. The appliance is intended for domestic use only. Industrial or commercial use will void the warranty. The supplier cannot be held responsible for injury or damage if the appliance has been used for anything other than its intended use. Incorrect operation and use can damage the appliance and cause injury to the user. Do not use the appliance if it has been dropped or damaged in any way. If the unit has been damaged take the unit for examination and or repair by an authorised service agent. Do not immerse or expose the motor assembly, plug or the power cord in water or any other liquid for any reason. If the supply cord is damaged, it must be replaced by the manufacturer or by someone who is suitably qualified to avoid a potential hazard. Do not let the cord hang over the edge of a table or counter. Ensure that the cord is not in a position where it can be pulled or tripped over accidentally. Do not allow the cord to touch hot surfaces and do not place the cord near hot gas, electric burners or in a heated oven. Use of an extension cord with this appliance is not recommended. However if it is necessary to use an extension cord, ensure that the extension cord is equal to or greater than the power consumption of the appliance to avoid overheating of the appliance and extension cord. Do not use any other appliance on the extension cord. Do not place the extension cord in a position where it can be pulled on by children or animals or be tripped over. Always operate the appliance on a smooth, even and stable surface. Do not 3 place the unit on a hot surface. Always remove the plug of the appliance safely. Do not pull on the appliances cord to remove the appliance plug from the electrical socket. Never handle or operate the appliance with wet hands. Appliance specific safety instructions The appliance is only to be connected to 220-240V, 50Hz only. Max locked power: 850W The motor section and the cord of the appliance must not be submerged in water or any other liquid for any reason. Never use your fingers, kitchen utensils or similar objects to push ingredients down the feed tube. Use the accompanying tamper. Never stick your fingers or other objects in the funnel or spout of the appliance. Never touch the moving parts of the appliance until it has come to a complete stop. The centrifuge bowl must be handled with care as it contains extremely sharp parts. Do not leave the appliance running non-stop for more than 1 minute at a time. If the appliance has been running continuously for 1 minute allow it to cool down for 5 minutes before using it again. Positioning the appliance Always place the appliance at the back of the kitchen counter. Do not place the appliance next to hot areas, for example gas rings and electric hotplates. 4 Appliance components 6. 11. 8. 7. 10. 9. 5. 3. 4. 1. Plunger 7. Spout support 2. Funnel 8. Fruit pulp holder 3. Jug 9. Spout 4. Centrifugal bowl 10. Locking mechanism 5. Brush 11. Speed setting 6. Motor section 5 1. 2. Preparing the fruit and vegetables for juicing Always wash your fruit and vegetables thoroughly before juicing. It is necessary to remove large seeds, pips or peels before using the appliance. Fruits with thick peels such as oranges and lemons must be peeled before juicing, as even small amounts of peel can affect the taste of the juice. It is also necessary to remove large pits (such as plums and apricot pits) to avoid damaging the appliance. Large fruits and vegetables should be cut into pieces so that they can fit into the funnel (2). Note: Before using the appliance for the first time or after prolonged storage without use, wash any parts that come into contact with food. 6 Assembly 1. Place the motor section (6) onto a flat stable surface. Make sure the speed dial (11) is facing towards you. 2. Fit the spout support (7) into the motor section (6). 3. Clip the centrifugal bowl (4) into the spout support (7). A click sound will signal it has been correctly assembled. 4. Carefully place the funnel (2) onto the top of the spout support (7). Ensure that the clips of the funnel (2) fit into the spout support (7) slots. 5. Raise the locking mechanism (10) and firmly lock it into place on the funnel (9). Please note: As a safety feature, the juicer will not switch on unless the lid is firmly locked into place. Please ensure the two black plastic stoppers on the locking bar mechanism are pushed as far in towards the centre of the machine as possible to ensure enough pressure is placed on the lid to allow the internal sensors to engage.’ 6. Attach the fruit pulp holder (8) under the lip of the funnel (2). Raise it at an angle then slide the bottom in place. 7. Place the jugs lid on top of the jug (3) and place it underneath the spout. 8. Plug the appliance power cord into the electrical socket. 9. Turn the appliances speed dial (11) to 1. 10. Place the ingredients into the funnel (2) and press the ingredients down into the centrifugal bowl using the plunger (1). Increase the speed to 2 if necessary. 7 Assembly of the appliance 8 Using the appliance Start the appliance by turning the on/off button to position 1 (low speed) or 2 (high speed). The low speed setting is suitable for juicing soft fruit and vegetables. The high speed setting is suitable for juicing harder fruits and vegetables. Feed the selected fruits/vegetables into the appliance through the funnel a little at a time, pushing them down using the tamper provided. Make sure that you turn the tamper so that the groove in the plunger fits into the funnel properly. Long vegetables such as carrots should be fed into the funnels pointed end first. Press the fruits/vegetables gently with the tamper, too much pressure can reduce the amount of juice extracted and can damage the appliance. Stop the appliance before removing the tamper to add more fruit/ vegetables in order to avoid any splashing. Always keep an eye on the fruit pulp holder and stop juicing before the holder becomes too full. Always turn the power off by pressing the on/off button to the “0” position before taking off the lid. Please note: The juicer is fitted with a thermal cut off switch which is designed to switch off the juicer if the motor becomes over-heated. If the juicer suddenly stops working, allow it too cool down for 5 minutes and try the juicer again. 9 Tips If you line the fruit pulp holder with a plastic bag before using the appliance, it will be easier to clean the appliance after use. Try and use fresh fruit/vegetables as they contain the most juice. Here are some ideal ingredients to juice: pineapple, apples, cucumbers, celery, carrots, spinach, melons, tomatoes and other varieties of citrus fruit. Different varieties of apples produce different tastes and flavours when juicing them. Experiment with different combinations to find your favourite juice. Leafy green vegetables such as cabbage and spinach can be juiced. Simply roll the leaves into cylinders of an appropriate size before feeding them into the funnel. Harder more fibrous fruit such as bananas, mangoes, papayas and avocados are not well-suited to juicing as the result is often of a puree-like consistency rather than juice. All types of juice should be consumed right after juicing, as fresh juice quickly loses important nutrients when exposed to the air. The taste can also be affected. Pure apple juice turns brown quickly when exposed to the air, to prevent discolouring serve the apple juice immediately after juicing or add a little lemon juice. Remember that fruit pulp can be used alternatively in cakes, vegetable lasagne, muffins etc. Run the pulp through the power juicer to ensure that all the liquid has been extracted from the fruit and vegetables. 10 Recipes St Clements Juice 8 oranges 1 lemon Sparkling water 1. Peel the oranges and lemons before placing into the power juicer. 2. Turn the juicer to speed 1. 3. Place the oranges into the funnel and press down using the plunger. 4. Place the lemon into the funnel and press down using the plunger. 5. Once all of the fruit has been juiced, turn off the juicer and pour the juice from the juicing jug. 6. Add a splash of sparkling water to the juice, to taste. Carrot, apple and ginger juice 8 large apples 2 carrots Ginger, 2cm cube peeled 1. Turn the juicer to speed 1 (increase if needed). 2. Place the apples into the power juicer funnel and push down with the plunger. 3. Place the ginger into the funnel and push down with the plunger. 4. Place the carrots into the funnel pointy end down, and press down using the plunger. 5. Once all of the fruit and vegetables have been juiced, turn off the juicer and pour the juice from the juicing jug. 11 Apple, strawberry and lime Juice 4 large apples 200g strawberries 1/2 lime 1. Turn the juicer to speed 1 (increase if needed). 2. Place the apples into the power juicer funnel and push down with the plunger. 3. Hull the strawberries and drop into the funnel followed by half a peeled lime. Push down with the plunger. 4. Pour into a tall glass, adding ice for a cool summer drink. 12 Disassembling the appliance 1. Turn the appliances speed setting (11) to “0” and unplug the appliances cord from the electrical socket. 2. Remove the Jug (3) from underneath the spout. 3. Forcefully pull the locking mechanism (10) down towards the spout. 4. Remove the pulp holder (8) by sliding it at an angle away from the motor section (6). 5. Remove the spout support (7) by gripping it under the lip and firmly lifting it upwards. This should release the centrifugal bowl (4). 6. Clean all parts of the appliance before storage as instructed in “cleaning”. 13 Storage and Cleaning Storing the appliance Ensure that the appliance is clean and dry before storing it. Cleaning the appliance Before cleaning always remove the plug from the wall socket and allow the product to cool. The best way to clean the motor section is with a slightly dampened cloth and if necessary using a little detergent. Never immerse the motor unit in liquid. The centrifuge bowl, fruit pulper, base and all other detachable parts can be washed by hand only. Be careful not to touch the sharp parts of the centrifuge bowl. Do not use any kind of strong or abrasive cleaning agents on the appliance or accessories. Do not use a scouring pad to clean the product as it is likely to scratch it. Before re-assembling the appliance make sure all parts are dry and clean. Disposal of the appliance Please note that this Andrew James product is marked with this Symbol: This means that this product must not be disposed of together with ordinary household waste, as electrical and electronic waste must be disposed of separately. In accordance with the WEEE directive, every member state must ensure correct collection, recovery, handling and recycling of electrical and electronic waste. Private households in the E.U. can take used equipment to special recycling stations free of charge. In certain member states used apparatus can be returned to the dealer where they were bought on the condition you buy new products. Contact your retailer, distributor or the municipal authorities for further information on what you should do with electrical and electronic waste. 14 UK and EU Guarantee Your new Andrew James product comes with a 24 month guarantee and a 2 year fixed warranty, effective from receipt confirmation. Your receipt or order number is required as proof of purchase date so it is imperative that you keep it safe. This guarantee only applies if the item has been used solely for the use intended, and all instructions have been followed accordingly. Please note this product is only for domestic use only and is not for commercial use. Abuse of your product will invalidate the guarantee. Returned goods can only be accepted if repackaged properly within the original colour product box, and presented with the original receipt of sale/order number. This does not affect your statutory rights. Returned products must be cleaned and returned to us in as close to delivery condition as possible. If your product develops a problem within the first 12 months of the fixed warranty, we will pay all shipping costs to have it returned to us. After 12 months the customer will be liable for the cost of returning the product to us. We will then pay to have the repaired/replaced item shipped back to the customer. If you wish to return your item for a full refund, you have the right to do so within the first 7 days. For our returns policy please go to www.andrewjamesworldwide.com Customers are responsible for any taxes applied to our products when they are shipped outside of the EU. All of our prices are inclusive of VAT. Once a product has been returned to us, we will aim to repair or replace it within 30 days of receipt. The guarantee does not cover any defect arising from improper use, damage, buildup of lime scale or repair attempts made by third-parties. Also, the guarantee does not cover normal wear and tear of individual parts. 15 Electrical information. Warning: If the appliance is double insulated, indicated by the double insulated symbol: It should not have an earth wire or earth connection. Plug: The plug must be protected by the correct AMP fuse—this will be indicated on the case of the plug. Only BSI or ASTA approved fuses should be used. When changing the fuse always replace it with a fuse that is of the same identical rating as the original. If you are unsure about which plug or fuse to use, always refer to a qualified electrician. Please note after replacing the fuse, ensure the cover is correctly fitted back onto the plug. Never attempt to run the appliance if the plug does not have a cover. If a moulded plug is fitted and has to be removed take great care in disposing of the plug and severed cable. It must be destroyed to prevent it from engaging into socket. If the supply cord is damaged it must be replaced by a service agent or a similarly qualified person in order to avoid a hazard. All of our electrical appliances conform to pre-existing EC Directives 2006/95/EC (Low Voltage Directive) and 2004/108/EC (EMC Directives). For further information please visit http://www.esc.org.uk/industry/productsafety/product-testing-screening/kitchen-appliances/ 16 Contact details Andrew James UK LTD Unit 1 P C Henderson Premises Bowburn North Industrial Estate Bowburn Co Durham DH6 5NG Customer Service / Technical Support- Telephone 0844 335 8464 Customer Service/ Technical Support Email: [email protected] Website: www.andrewjamesworldwide.com Copyright Andrew James 17