1
User’s Guide
Sybase IQ ETL
4.1
DOCUMENT ID: DC00608-01-0410-01
LAST REVISED: October 2006
Copyright © 2003-2006 by Sybase, Inc. All rights reserved.
This publication pertains to Sybase software and to any subsequent release until otherwise indicated in new editions or technical notes.
Information in this document is subject to change without notice. The software described herein is furnished under a license agreement,
and it may be used or copied only in accordance with the terms of that agreement.
To order additional documents, U.S. and Canadian customers should call Customer Fulfillment at (800) 685-8225, fax (617) 229-9845.
Customers in other countries with a U.S. license agreement may contact Customer Fulfillment via the above fax number. All other
international customers should contact their Sybase subsidiary or local distributor. Upgrades are provided only at regularly scheduled
software release dates. No part of this publication may be reproduced, transmitted, or translated in any form or by any means, electronic,
mechanical, manual, optical, or otherwise, without the prior written permission of Sybase, Inc.
Sybase, SYBASE (logo), ADA Workbench, Adaptable Windowing Environment, Adaptive Component Architecture, Adaptive Server, Adaptive Server
Anywhere, Adaptive Server Enterprise, Adaptive Server Enterprise Monitor, Adaptive Server Enterprise Replication, Adaptive Server Everywhere, Advantage
Database Server, Afaria, Answers Anywhere, Applied Meta, Applied Metacomputing, AppModeler, APT Workbench, APT-Build, APT-Edit, APT-Execute,
APT-Translator, APT-Library, ASEP, Avaki, Avaki (Arrow Design), Avaki Data Grid, AvantGo, Backup Server, BayCam, Beyond Connected, Bit-Wise,
BizTracker, Certified PowerBuilder Developer, Certified SYBASE Professional, Certified SYBASE Professional Logo, ClearConnect, Client-Library, Client
Services, CodeBank, Column Design, ComponentPack, Connection Manager, Convoy/DM, Copernicus, CSP, Data Pipeline, Data Workbench, DataArchitect,
Database Analyzer, DataExpress, DataServer, DataWindow, DataWindow .NET, DB-Library, dbQueue, Dejima, Dejima Direct, Developers Workbench,
DirectConnect Anywhere, DirectConnect, Distribution Director, Dynamic Mobility Model, e-ADK, E-Anywhere, e-Biz Integrator, E-Whatever, EC Gateway,
ECMAP, ECRTP, eFulfillment Accelerator, EII Plus, Electronic Case Management, Embedded SQL, EMS, Enterprise Application Studio, Enterprise Client/
Server, Enterprise Connect, Enterprise Data Studio, Enterprise Manager, Enterprise Portal (logo), Enterprise SQL Server Manager, Enterprise Work
Architecture, Enterprise Work Designer, Enterprise Work Modeler, eProcurement Accelerator, eremote, Everything Works Better When Everything Works
Together, EWA, ExtendedAssist, Extended Systems, ExtendedView, Financial Fusion, Financial Fusion (and design), Financial Fusion Server, Formula One,
Fusion Powered e-Finance, Fusion Powered Financial Destinations, Fusion Powered STP, Gateway Manager, GeoPoint, GlobalFIX, iAnywhere, iAnywhere
Solutions, ImpactNow, Industry Warehouse Studio, InfoMaker, Information Anywhere, Information Everywhere, InformationConnect, InstaHelp, Intelligent
Self-Care, InternetBuilder, iremote, iScript, Jaguar CTS, jConnect for JDBC, KnowledgeBase, Legion, Logical Memory Manager, lrLite, M2M Anywhere,
Mach Desktop, Mail Anywhere Studio, Mainframe Connect, Maintenance Express, Manage Anywhere Studio, MAP, M-Business Anywhere, M-Business
Channel, M-Business Network, M-Business Suite, MDI Access Server, MDI Database Gateway, media.splash, Message Anywhere Server, MetaWorks,
MethodSet, mFolio, Mirror Activator, ML Query, MobiCATS, MobileQ, MySupport, Net-Gateway, Net-Library, New Era of Networks, Next Generation
Learning, Next Generation Learning Studio, O DEVICE, OASiS, OASiS logo, ObjectConnect, ObjectCycle, OmniConnect, OmniQ, OmniSQL Access
Module, OmniSQL Toolkit, OneBridge, Open Biz, Open Business Interchange, Open Client, Open ClientConnect, Open Client/Server, Open Client/Server
Interfaces, Open Gateway, Open Server, Open ServerConnect, Open Solutions, Optima++, Partnerships that Work, PB-Gen, PC APT Execute, PC DB-Net, PC
Net Library, Pharma Anywhere, PhysicalArchitect, Pocket PowerBuilder, PocketBuilder, Power++, Power Through Knowledge, power.stop, PowerAMC,
PowerBuilder, PowerBuilder Foundation Class Library, PowerDesigner, PowerDimensions, PowerDynamo, Powering the New Economy, PowerScript,
PowerSite, PowerSocket, Powersoft, PowerStage, PowerStudio, PowerTips, Powersoft Portfolio, Powersoft Professional, PowerWare Desktop, PowerWare
Enterprise, ProcessAnalyst, Pylon, Pylon Anywhere, Pylon Application Server, Pylon Conduit, Pylon PIM Server, Pylon Pro, QAnywhere, Rapport, Relational
Beans, RemoteWare, RepConnector, Report Workbench, Report-Execute, Replication Agent, Replication Driver, Replication Server, Replication Server
Manager, Replication Toolkit, Resource Manager, RFID Anywhere, RW-DisplayLib, RW-Library, SAFE, SAFE/PRO, Sales Anywhere, Search Anywhere,
SDF, Search Anywhere, Secure SQL Server, Secure SQL Toolset, Security Guardian, ShareLink, ShareSpool, SKILS, smart.partners, smart.parts, smart.script,
SOA Anywhere Trademark,SQL Advantage, SQL Anywhere, SQL Anywhere Studio, SQL Code Checker, SQL Debug, SQL Edit, SQL Edit/TPU, SQL
Everywhere, SQL Modeler, SQL Remote, SQL Server, SQL Server Manager, SQL SMART, SQL Toolset, SQL Server/CFT, SQL Server/DBM, SQL Server
SNMP SubAgent, SQL Station, SQLJ, Stage III Engineering, Startup.Com, STEP, SupportNow, S.W.I.F.T. Message Format Libraries, Sybase Central, Sybase
Client/Server Interfaces, Sybase Development Framework, Sybase Financial Server, Sybase Gateways, Sybase Learning Connection, Sybase MPP, Sybase SQL
Desktop, Sybase SQL Lifecycle, Sybase SQL Workgroup, Sybase Synergy Program, Sybase Virtual Server Architecture, Sybase User Workbench,
SybaseWare, Syber Financial, SyberAssist, SybFlex, SybMD, SyBooks, System 10, System 11, System XI (logo), SystemTools, Tabular Data Stream, The
Enterprise Client/Server Company, The Extensible Software Platform, The Future Is Wide Open, The Learning Connection, The Model For Client/Server
Solutions, The Online Information Center, The Power of One, TotalFix, TradeForce, Transact-SQL, Translation Toolkit, Turning Imagination Into Reality,
UltraLite, UltraLite.NET, UNIBOM, Unilib, Uninull, Unisep, Unistring, URK Runtime Kit for UniCode, Viafone, Viewer, VisualWriter, VQL,
WarehouseArchitect, Warehouse Control Center, Warehouse Studio, Warehouse WORKS, Watcom, Watcom SQL, Watcom SQL Server, Web Deployment Kit,
Web.PB, Web.SQL, WebSights, WebViewer, WorkGroup SQL Server, XA-Library, XA-Server, XcelleNet, XP Server, XTNDAccess and XTNDConnect are
trademarks of Sybase, Inc. or its subsidiaries. 07/06
Unicode and the Unicode Logo are registered trademarks of Unicode, Inc.
All other company and product names used herein may be trademarks or registered trademarks of their respective companies.
Use, duplication, or disclosure by the government is subject to the restrictions set forth in subparagraph (c)(1)(ii) of DFARS 52.227-7013
for the DOD and as set forth in FAR 52.227-19(a)-(d) for civilian agencies.
Sybase, Inc., One Sybase Drive, Dublin, CA 94568.
Contents
About This Book ........................................................................................................................... ix
CHAPTER 1
CHAPTER 2
User’s Guide
Sybase IQ ETL .................................................................................
Sybase IQ ETL architecture .............................................................
Sybase IQ ETL Development....................................................
Sybase ETL Server ...................................................................
Projects and jobs..............................................................................
Component concepts .......................................................................
Stepping a component record-by-record ...................................
Component variables and ports ................................................
Adaptable port structure and mapping ......................................
Running a project ......................................................................
Customizing a project.......................................................................
Understanding repositories ..............................................................
Converting datatypes and data formats ...........................................
SQL ..................................................................................................
Tools ................................................................................................
Unicode support ...............................................................................
Expressions......................................................................................
Internal database .............................................................................
1
1
1
2
2
2
2
3
3
3
3
4
5
5
6
6
6
6
Sybase IQ ETL Development Desktop .......................................... 9
Desktop layout ................................................................................. 9
Using the Navigator........................................................................ 10
Administering the repository .................................................... 11
Navigating and browsing the repositories ............................... 12
Administering projects and jobs .............................................. 12
Administering user accounts ................................................... 13
Using the Properties section .......................................................... 14
Applying component variables ................................................ 14
Using the Design section ............................................................... 15
Adding components................................................................. 16
Deleting components from the Design section ........................ 16
iii
Contents
Using the pop-up menu to process commands....................... 16
Using the Component Store section .............................................. 16
Customizing preferences ............................................................... 17
CHAPTER 3
Getting Started............................................................................... 21
Starting Sybase IQ ETL Development ........................................... 21
Creating your first project ........................................................ 22
Adding a data provider ............................................................ 22
Adding a data sink................................................................... 23
Adding a data calculator.......................................................... 24
Simulating the project..................................................................... 25
CHAPTER 4
Projects and Jobs.......................................................................... 27
Managing projects.......................................................................... 27
Simulating and executing a project ................................................ 29
Viewing current mappings ....................................................... 31
Managing port attributes.......................................................... 32
Viewing a simulation flow ........................................................ 32
Controlling multiple data streams ............................................ 35
Managing jobs................................................................................ 36
Job components ...................................................................... 36
Executing a job........................................................................ 37
Monitoring the job execution process...................................... 37
Cancelling job execution ......................................................... 38
Creating Jobs .......................................................................... 38
Using templates to create projects and jobs .................................. 40
Building a migration template .................................................. 40
Managing a migration template ............................................... 43
CHAPTER 5
Advanced Concepts and Tools .................................................... 45
Content Explorer ............................................................................ 45
Opening Content Explorer....................................................... 46
Using the Design area............................................................. 46
Inspecting log file information......................................................... 49
Managing jobs and scheduled tasks .............................................. 49
Customizing SQL and transformation rules ................................... 51
Using expressions and procedures ......................................... 52
Including variables................................................................... 52
Using functions........................................................................ 53
Using Square Bracket Notation ............................................... 54
Entering SQL statements ........................................................ 54
Using the JavaScript Procedure Editor and Debugger............ 57
iv
Sybase IQ ETL 4.1
Contents
Using multiple engines to reduce job execution time .....................
Defining multi-engine jobs .......................................................
Executing multi-engine jobs ....................................................
Analyzing performance data ..........................................................
Performance data model and content .....................................
Example reports ......................................................................
CHAPTER 6
User’s Guide
61
63
63
63
64
65
Components .................................................................................. 69
Overview ........................................................................................ 69
Setting required properties ...................................................... 70
Setting up a component .......................................................... 71
Entering database connection parameters.............................. 71
Connecting to a SQLite database ........................................... 75
Providing descriptions for components ................................... 76
Adding component variables to a component ......................... 76
Evaluating SBN expressions ................................................... 77
Encrypting properties .............................................................. 77
Modifying components ............................................................ 78
Data blocks and visualization .................................................. 78
Stepping a component multiple times ..................................... 78
Managing port structures......................................................... 79
Source components ....................................................................... 81
DB Data Provider Full Load..................................................... 81
DB Data Provider Index Load.................................................. 83
Text Data Provider .................................................................. 85
XML via SQL Data Provider .................................................... 88
Transformation components .......................................................... 93
The Data Calculator ................................................................ 93
Character Mapper ................................................................... 99
Using Lookup components........................................................... 101
DB Lookup component .......................................................... 101
DB Lookup Dynamic component........................................... 104
Staging components .................................................................... 107
DB Staging component ......................................................... 107
Processing components............................................................... 109
Data Splitter component ........................................................ 109
Destination components............................................................... 110
DB Data Sink Insert component ............................................ 110
DB Data Sink Update component ......................................... 113
DB Data Sink Delete component........................................... 115
Text Data Sink....................................................................... 116
DB Bulk Load Sybase IQ component.................................... 119
Job components........................................................................... 121
Start component .................................................................... 121
v
Contents
APPENDIX A
vi
Project component ................................................................
Synchronizer component.......................................................
Multi-Project component........................................................
Finish component ..................................................................
Error component....................................................................
121
122
123
124
124
Function Reference .....................................................................
uAvg .............................................................................................
uMax ............................................................................................
uMin .............................................................................................
uBitAnd.........................................................................................
uBitOr ...........................................................................................
uBitXOr.........................................................................................
uBitNot .........................................................................................
uIsAscending................................................................................
ulsBoolean ...................................................................................
ulsDate .........................................................................................
ulsDescending..............................................................................
ulsInteger .....................................................................................
ulsFloat.........................................................................................
ulsNull ..........................................................................................
ulsNumber....................................................................................
uNot..............................................................................................
uBase64Decode...........................................................................
uBase64Encode...........................................................................
uConvertDate ...............................................................................
uFromHex ....................................................................................
uToHex.........................................................................................
uHexDecode ................................................................................
uHexEncode.................................................................................
uToUnicode..................................................................................
uURIDecode.................................................................................
uURIEncode.................................................................................
uDate............................................................................................
uDateTime....................................................................................
uDay.............................................................................................
uDayOfYear .................................................................................
uHour ...........................................................................................
uQuarter .......................................................................................
uIsoWeek .....................................................................................
uJuliandate...................................................................................
uMinute ........................................................................................
uMonth .........................................................................................
uMonthName................................................................................
126
126
126
127
127
128
128
128
129
129
130
130
131
131
131
132
132
133
133
135
135
135
136
136
136
137
140
141
141
142
142
142
143
144
144
145
145
125
Sybase IQ ETL 4.1
uMonthNameShort ....................................................................... 145
uSeconds...................................................................................... 146
uTimeDiffMs ................................................................................. 146
uWeek .......................................................................................... 147
uWeekday..................................................................................... 147
uWeekdayName ........................................................................... 148
uWeekdayNameShort .................................................................. 148
uYear ............................................................................................ 149
uError............................................................................................ 149
uErrortext...................................................................................... 150
uInfo.............................................................................................. 150
uWarning ...................................................................................... 150
uTrace .......................................................................................... 151
uTracelevel ................................................................................... 151
uFileInfo........................................................................................ 152
uFileRead ..................................................................................... 152
uFileWrite ..................................................................................... 153
uFormatDate................................................................................. 154
uGlob ............................................................................................ 156
uLike ............................................................................................. 156
uMatches ...................................................................................... 157
uChoice ........................................................................................ 157
uFirstDifferent ............................................................................... 158
uFirstNotNull................................................................................. 158
uElements..................................................................................... 159
uToken.......................................................................................... 159
uCommandLine ............................................................................ 160
uGetEnv........................................................................................ 160
uGuid ............................................................................................ 160
uMD5 ............................................................................................ 161
uScriptLoad .................................................................................. 161
uSetEnv ........................................................................................ 161
uSet Locale................................................................................... 162
uSleep .......................................................................................... 165
uSystemFolder ............................................................................. 165
uHostname ................................................................................... 171
uAbs ............................................................................................. 172
uCeil ............................................................................................. 172
uDiv .............................................................................................. 173
uExp ............................................................................................. 173
uFloor ........................................................................................... 173
uLn................................................................................................ 174
uLog.............................................................................................. 174
uMod............................................................................................. 174
User’s Guide
vii
uPow, uPower .............................................................................. 175
uRandom ...................................................................................... 175
uRound ......................................................................................... 175
uSgn ............................................................................................. 176
uSqrt ............................................................................................. 176
uEvaluate...................................................................................... 177
uAsc, uUnicode ............................................................................ 177
uChr, uUniChr............................................................................... 178
uCap ............................................................................................. 178
uConcat, uCon.............................................................................. 179
uJoin ............................................................................................. 179
uLeft.............................................................................................. 180
uLength, uLen............................................................................... 180
uSubstr, uMid ............................................................................... 180
uLPos ........................................................................................... 181
uLower, uLow ............................................................................... 181
uLStuff .......................................................................................... 182
uLTrim .......................................................................................... 182
uRepeat ........................................................................................ 182
uReplace ...................................................................................... 183
uReverse ...................................................................................... 183
uRight ........................................................................................... 184
uRPos........................................................................................... 184
uRStuff.......................................................................................... 184
uRTrim.......................................................................................... 185
uTrim ............................................................................................ 185
uUpper, uUpp ............................................................................... 186
uEQ .............................................................................................. 186
uNE............................................................................................... 186
uGT............................................................................................... 187
uGe............................................................................................... 187
uLT ............................................................................................... 188
uLE ............................................................................................... 188
uAcos............................................................................................ 188
uAsin............................................................................................. 189
uAtan ............................................................................................ 189
uCos ............................................................................................. 189
uSin .............................................................................................. 190
uTan ............................................................................................. 190
APPENDIX B
viii
Sybase ETL Server...................................................................... 191
GRID architecture......................................................................... 191
Communication...................................................................... 192
Using the server..................................................................... 192
Sybase IQ ETL 4.1
GRID Engine Server .............................................................. 192
GRID Engine Server as Windows System Service................ 193
Troubleshooting............................................................................ 194
Command line parameters ........................................................... 195
INI file settings .............................................................................. 196
Default.ini............................................................................... 197
GridNode.ini........................................................................... 197
APPENDIX C
Queuing and Executing Process Calls...................................... 199
Configuring ProcessQ calls .......................................................... 199
Controlling the appearance of a new process .............................. 201
Index............................................................................................................................................ 203
User’s Guide
ix
x
Sybase IQ ETL 4.1
About This Book
About This Book
Audience
This guide is for users of Sybase IQ ETL. Sybase IQ ETL provides extract,
transform, and load (ETL) capabilities that you can use to transform data from
data providers to data targets. Sybase IQ ETL supports a variety of
transformation capabilities and enables you to convert, cleanse, merge, and
split data streams. The resulting data stream can then insert, update, or delete
data in a given data target. You view the shape of your data at any step of the
data transformation process by using its unique “Step and See” technology.
How to use this
book
This book contains the following chapters:
User’s Guide
•
Chapter 1, “Sybase IQ ETL” gives you a brief overview of Sybase IQ
ETL, Sybase IQ ETL Development, Sybase IQ ETL Server, and the
feature set.
•
Chapter 2, “Sybase IQ ETL Development Desktop” helps you become
familiar with the design environment for Sybase IQ ETL projects and jobs.
This chapter explains all menus, the sections of the Sybase IQ ETL
Development desktop, toolbars, and general GUI functionality.
•
Chapter 3, “Getting Started” helps you get started with Sybase IQ ETL
Development.
•
Chapter 4, “Projects and Jobs” guide you through the process of creating,
simulating, and executing projects and jobs. It also provides valuable
insights related to simulation mode. It also shows you how to use
templates to create projects and jobs for special purposes.
•
Chapter 5, “Advanced Concepts and Tools” describes the set of built-in
tools that make your design work easier and faster. Familiarize yourself
with Sybase IQ ETL Development tools, such as Content Explorer or the
Query Designer, to speed up the design of your project work.
•
Chapter 6, “Components” describes Sybase IQ ETL component concepts
and all the information relevant to every component.
•
Appendix A, “Function Reference” describes the functional components
available in Sybase IQ ETL.
•
Appendix B, “Sybase ETL Server” describes installation, usage, and
architecture of the Sybase IQ ETL application.
xi
•
Sybase certifications
on the Web
Appendix C, “Queuing and Executing Process Calls”describes ProcessQ,
which is an application that can queue and execute process calls parallel
or in sequence.
Technical documentation at the Sybase Web site is updated frequently.
❖
❖
❖
Finding the latest information on product certifications
1
Point your Web browser to Technical Documents at
http://www.sybase.com/support/techdocs/.
2
Click Certification Report.
3
In the Certification Report filter, select a product, platform, and
timeframe, and then click Go.
4
Click a Certification Report title to display the report.
Finding the latest information on component certifications
1
Point your Web browser to Availability and Certification Reports at
http://certification.sybase.com/.
2
Either select the product family and product under Search by Base
Product, or select the platform and product under Search by Platform.
3
Select Search to display the availability and certification report for the
selection.
Creating a personalized view of the Sybase Web site (including support
pages)
Set up a MySybase profile. MySybase is a free service that allows you to create
a personalized view of Sybase Web pages.
1
Point your Web browser to Technical Documents at
http://www.sybase.com/support/techdocs/.
2
Click MySybase and create a MySybase profile.
Sybase EBFs and
software
maintenance
❖
xii
Finding the latest information on EBFs and software maintenance
1
Point your Web browser to the Sybase Support Page at
http://www.sybase.com/support.
2
Select EBFs/Maintenance. If prompted, enter your MySybase user name
and password.
Sybase IQ ETL 4.1
About This Book
3
Select a product.
4
Specify a time frame and click Go. A list of EBF/Maintenance releases is
displayed.
Padlock icons indicate that you do not have download authorization for
certain EBF/Maintenance releases because you are not registered as a
Technical Support Contact. If you have not registered but have valid
information provided by your Sybase representative or through your
support contract, click Edit Roles to add the “Technical Support Contact”
role to your MySybase profile.
5
Conventions
Click the Info icon to display the EBF/Maintenance report, or click the
product description to download the software.
The syntax conventions used in this manual are:
Key
commands and methods
variable
Definition
Command names, command option names,
utility names, utility flags, Java
methods/classes/packages, and other
keywords are in lowercase Arial font.
Italic font indicates:
• Program variables, such as myServer
• Parts of input text that must be substituted;
for example:
Server.log
File | Save
package 1
• File names
Menu names and menu items are displayed in
plain text. The vertical bar shows you how to
navigate menu selections. For example, File |
Save indicates “select Save from the File
menu.”
Monospace font indicates:
• Information that you enter in a GUI
interface, a command line, or as program
text
• Sample program fragments
• Sample output fragments
User’s Guide
xiii
If you need help
xiv
Each Sybase installation that has purchased a support contract has one or more
designated people who are authorized to contact Sybase Technical Support. If
you cannot resolve a problem using the manuals or online help, please have the
designated person contact Sybase Technical Support or the Sybase subsidiary
in your area.
Sybase IQ ETL 4.1
CH A PTE R
1
Sybase IQ ETL
Topic
Sybase IQ ETL architecture
Page
1
Projects and jobs
Component concepts
2
2
Running a project
Customizing a project
3
3
Understanding repositories
Converting datatypes and data formats
4
5
SQL
Tools
5
6
Unicode support
Expressions
6
6
Internal database
6
Sybase IQ ETL architecture
When you install Sybase IQ ETL on Windows, you install Sybase IQ ETL
Development and Sybase ETL Server. You can add multiple ETL Servers
on different operating systems to your installation.
Sybase IQ ETL Development
Sybase IQ ETL Development is divided into two major components:
User’s Guide
•
Sybase IQ ETL Development desktop — provides the graphical user
interface. Use the desktop to create and design data transformation
projects.
•
Sybase IQ ETL Development engine — controls the actual
processing, such as connecting to databases and executing
procedures.
1
Projects and jobs
Sybase ETL Server
The Sybase ETL Server provides the GRID engine service, which, by default,
processes desktop requests locally. The GRID engine is designed for massively
parallel transformation processing across operating system boundaries and
machines. To make GRID engines available for parallel execution, you must
register them in Engine Manager (see “Using multiple engines to reduce job
execution time” on page 61 for more information). The GRID engine leverages
JavaScript to extend the transformation framework across multiple operating
systems.
For more information about Sybase ETL Server and GRID engines, see
Appendix B, “Sybase ETL Server.”
Projects and jobs
A project is a collection of components, links, and transformation rules. Each
project contains one or more steps that are simulated or executed sequentially
when the project is run. When simulated or executed, the components connect
to the correct data sources where they read and transform data. A project
consists of various components that can be freely arranged on your project
desktop. You can add components to your project by simply dragging them
from a section of the Component Store onto your workspace.
Multiple projects can be run sequentially or parallel in a job. Jobs control the
order in which projects are being executed. Jobs can be scheduled and
monitored.
Component concepts
Stepping a component record-by-record
In simulation mode, many of the transformation components offer a convenient
way to step through the current set of data and visualize the result of any
applied transformation immediately.
2
Sybase IQ ETL 4.1
CHAPTER 1
Sybase IQ ETL
Component variables and ports
All data within a project flow through component ports called IN-ports and
OUT-ports. Each port owns the structure of the data flow. You can change the
mapping of port structures by applying a mapping on the link that connects two
components.
Adaptable port structure and mapping
When adding and connecting components to a project, Sybase IQ ETL
normally tries to create a standard mapping between an OUT-port and an INport, depending on the object definition of data providers and data sinks. You
can modify the mapping by adding attributes to the port structure that can be
referenced immediately inside the component.
Running a project
Use simulation and execution modes to run a project.
Simulation and execution perform all functions of the components included in
the simulated project, including the physical transfer of data into the respective
data targets (data sinks).
During simulation you can step through the project component by component.
The data flow is visible on any link and within any component included. From
simulation mode, you can inspect any component and modify mappings and
calculations. After making changes, you can re-initialize the component with
the new settings and step to the next component. There is no need to start the
simulation from the very beginning of the project after any of the components
have been changed.
Jobs can be executed from the desktop or as a scheduled task.
Customizing a project
You can create data transformation projects without manually entering a single
line of programming code or SQL statement, for example:
User’s Guide
3
Understanding repositories
•
To generate SELECT statements inside Queries, Lookup Definitions, Preand Post Processing SQL, use the Query Designer.
•
To freely map attributes between data sources and data sinks, use the data
mapping features of the links between the components.
•
To create temporary or persistent staging tables, use the built-in Create
Table from port command of the respective component.
•
To create tables in the destination database, use the built-in Create Table
from port command of the respective component.
•
To browse both schema information and data content of all connected data
sources, use the Content Explorer.
•
To read hierarchical XML documents and generate a relational structure
automatically, use the XML from the SQL component.
•
To schedule the execution of your projects, you can create Jobs within the
Sybase IQ ETL Development desktop.
To deal with complex data transformation requirements, familiarize yourself
with Sybase IQ ETL Development concepts.
For example, you can:
•
Use manually optimized SQL SELECT statements to adjust and fine-tune
your data extraction process.
•
Use SQL to apply data manipulation commands inside pre- and postprocessing commands.
•
Use JavaScript to write procedures, do complex calculations, or
manipulate objects in the operating system environment.
•
Use indirection in expressions (Square Bracket Notation) to dynamically
assign values to expressions to control your projects by using environment
or user variables.
Understanding repositories
The repository contains all data and information related to Sybase IQ ETL
objects, projects, and jobs.
4
Sybase IQ ETL 4.1
CHAPTER 1
Sybase IQ ETL
Multiple repositories are accessible in parallel during a session. Projects can be
copied and transferred between repositories, so you can separate your
production repository from the repository used for development purposes.
A repository usually belongs to a single client (such as a department or firm).
It is possible to have more than one client using the same repository, providing
a complete logical separation within a single physical repository. Each client
can support any number of client users. Each user within a client has a user
name and a password that controls the access to information.
Converting datatypes and data formats
Datatypes as originated in the data source are preserved during the
transformation process.
Internally, Sybase IQ ETL distinguishes string and numeric datatypes. The
Standardize Data Format option of the Data Providers or Data Sinks
automatically converts the data to a standard format that then is automatically
converted to a format the target database understands. Therefore, you do not
have to deal with the various date and number formats when working with
different databases.
This setting is activated by default. However, if you are experiencing problems
with date or number fields, you can disable this setting on the component that
causes trouble and convert the data manually.
SQL
Most of the data delivered by data providers is defined by using SQL stored in
the Query property. Sybase IQ ETL Development supports a modified set of the
SQL-92 standard.
If you do not want to get into the details of SQL-92, you can use the built-in
Query Designer to draw the query and have the SQL generated for you. If you
want to manually write SQL, or copy SQL from existing projects, you can
manually specify your SQL for the Query property.
User’s Guide
5
Tools
Tools
Structural and catalog information from all connected data sources is
accessible through Sybase IQ ETL Development tools, such as the Content
Explorer and the Query Designer. You can browse through schema
information, the data, or even create new database objects.
The Runtime Manager lets you create job schedules.
Unicode support
All components are designed to process and support virtually any
representation of data. Unicode-enabled transformation functions can be used
in calculations, scripts, and procedures.
Expressions
Square Bracket Notation (SBN) is a widely applicable indirection mechanism
within the Sybase IQ ETL environment. Square Bracket Notation can be
applied within expressions, SQL statements and filename specifications. Use
Square Bracket Notation to compute and assign values dynamically at runtime.
Internal database
Sybase IQ ETL technology includes a built-in, general purpose, relational
database to be used for temporary data storage and staging. It is based on
SQLite, a very fast, widely used, mostly SQL-92 compliant database. SQLite
is a small C library that implements a self-contained, embeddable, zeroconfiguration SQL database engine.
The features include:
6
•
Transactions are atomic, consistent, isolated, and durable (ACID) even
after system crashes and power failures.
•
Zero configuration - no setup or administration needed.
Sybase IQ ETL 4.1
CHAPTER 1
Sybase IQ ETL
•
Implements most of SQL92.
•
A complete database is stored in a single disk file.
•
Database files can be freely shared between machines with different byte
orders.
•
Supports databases up to 2 terabytes (241 bytes) in size.
•
Sizes of strings and BLOBs limited only by available memory.
•
Small code footprint: less than 30K lines of C code, less than 250KB code
space (gcc on i486).
•
Faster than popular client/server database engines for most common
operations.
•
Easy-to-use API.
•
TCL bindings included. Bindings for many other languages available
separately.
•
Well-commented source code with over 95% test coverage.
•
Self-contained: no external dependencies.
•
Sources are in the public domain and can be used for any purpose.
More information about SQLite can be found at www.sqlite.org.
User’s Guide
7
Internal database
8
Sybase IQ ETL 4.1
CH A PTE R
2
Sybase IQ ETL Development
Desktop
Topic
Desktop layout
Page
9
Using the Navigator
Using the Properties section
10
14
Using the Design section
Using the Component Store section
15
16
Customizing preferences
17
Desktop layout
The Sybase IQ ETL Development desktop consists of the following major
sections:
•
The Navigator section lets you select the repositories, projects or jobs
that you want to work on.
•
The Design section lets you design the project and job flow, drag
components onto it, connect them with each other, and to simulate the
data flow between them.
•
The Properties section lets you set properties of the component
currently selected in the Design section.
•
The Component Store contains all components that are installed and
available for designing projects. To add a component to the Design
section, you can double click it, drag it to the Design section, or rightclick and select Add from the pop-up menu.
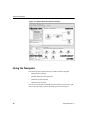
Figure 2-1 shows an example of the Sybase IQ ETL Development
desktop.
User’s Guide
9
Using the Navigator
Figure 2-1: Sybase IQ ETL Development desktop
Using the Navigator
The following objects and functions are available from the Navigator:
•
Administer the repository
•
Navigate and browse the repositories
•
Administer projects and jobs
•
Administer user accounts
You can access Navigator commands from the menu bar. You can also rightclick to open the pop-up menu on any desktop item in the Navigator.
10
Sybase IQ ETL 4.1
CHAPTER 2
Sybase IQ ETL Development Desktop
Administering the repository
A Sybase IQ ETL repository is a collection of tables that save and maintain all
data related to projects, jobs, and session parameters. Sybase IQ and Microsoft
Access can be used to store an Sybase IQ ETL repository.
Note Do not manually manipulate data in the repository tables. Sybase cannot
guarantee the functionality of a repository after it has been manually
manipulated. It can also make the repository unusable and your work might be
lost.
To access projects or jobs you must log in to the respective repository. To open
a repository, you must assign at least one client and one client user. A client can
have multiple client users.
Opening a repository
To open a repository, right-click the Repository root element. The Repository
dialog box opens. Select a repository from the list, or click Add to create a new
connection.
Closing a repository
connection
Closing a repository ends all user sessions currently connected to the
repository. To close a repository connection, right-click the repository name
and select Close Connection.
Closing a client user
session
To close a user session, right-click the session and select Close Client.
Adding a repository
You can use the Repository Logon dialog box to add a repository. The
Repository Logon dialog box opens automatically when you start the Sybase
IQ ETL Development desktop. During a session you can open the Repository
Logon dialog box by selecting Open Repository from the File Menu or by
right-clicking the root of the Navigation tree.
❖
To add a repository
1
From the Repository Logon dialog box, click Add.
2
Enter the parameters for your new connection. A message box asks
whether to create repository tables.
3
Click Yes. After the repository tables are created, save the results.
Before a new repository can be accessed, it requires at least one client and one
client user definition.
❖
To create a client and client user
1
User’s Guide
Enter a client name.
11
Using the Navigator
2
Enter a client user name.
3
Enter a password.
4
Select the Register New check box.
5
If the client user is entitled to see all existing projects within the client,
select the Show All Objects check box.
6
Click Logon and confirm the password.
Navigating and browsing the repositories
In the Navigator, the hierarchical tree list represents open repositories, client
user sessions to the open repositories, and objects stored in the repository, such
as projects, jobs, and templates.
A repository can be opened simultaneously by multiple client user sessions. A
client user is part of a client. Both client users and clients are registered when
they log on to the repository.
The following example shows the tree structure:
Repositories
-- <RepositoryName1>
---- <ClientUser1>.<Client1>.<Repository Name1>
------ Projects
-------- Project_1
-------- Project_2
-------- Project_N
------ Jobs
-------- Job_1
-------- Job_2
-------- Job_M
------ Templates
-------- Template_1
-------- Template_L
---- <ClientUser1>.<ClientM>.<Repository Name1>
---- <ClientUserN>.<Client1>.<Repository Name1>
-- <RepositoryName2>
Administering projects and jobs
From the Navigator, you can administer projects and jobs. See Chapter 4,
“Projects and Jobs” for detailed information.
12
Sybase IQ ETL 4.1
CHAPTER 2
Sybase IQ ETL Development Desktop
Administering user accounts
With the built-in user account administration in Sybase IQ ETL Development,
you can:
•
Create a user
•
Remove a user
•
Change password
•
Change visibility
Only a registered user (client user) has access to a repository. You can register
a client user in the Repository Logon dialog box or in the User Accounts dialog
box.
Creating a user
❖
Removing a user
To create a user
1
Open the User Accounts dialog box by right-clicking the open session in
the Navigator tree and selecting User Accounts.
2
Click Add User.
3
Enter a user name.
4
Enter a password.
5
Repeat the password.
6
Select the Show All check box to show objects belonging to other
repository users.
To remove a user, click the user line to be removed and select Remove User.
Changing passwords
❖
User’s Guide
To change a password
1
Click Change Password.
2
Click the user line.
3
Enter the old password.
4
Enter a new password.
5
Repeat the new password.
13
Using the Properties section
Using the Properties section
The Properties section contains information and functions that let you:
•
Review and modify all property items of the selected component
•
Identify mandatory items
•
Add component variables
•
Allow dynamic evaluation of property items
•
Encrypt property items
Whenever you select a component in the Design section, the property settings
of the selected component appear in the Properties section.
A property name displayed in bold indicates that the property is required for
the component to operate correctly. All other properties are optional and can be
used to fine-tune and configure the component.
Refer to Chapter 6, “Components,” for a detailed description of properties of
each component.
Applying component variables
You can add component variables to property items. Component variables let
you apply parameters to components. Those parameters can be referenced
inside user-defined procedures.
Adding a component
variable
❖
To add a component variable
1
Right-click in the Properties section to open a pop-up menu.
2
Select Add.
3
Enter a name for the variable (for example, MyParameter). Inside the
component, use the following notation to reference the variable:
REF.MyParameter
4
Enter a prompt and a description.
Editing a component
variable
❖
To edit a component variable
1
14
Click the line containing the variable.
Sybase IQ ETL 4.1
CHAPTER 2
Sybase IQ ETL Development Desktop
2
Right-click in the Properties section to open a pop-up menu.
3
Select Edit and enter the new settings.
Removing a
component variable
❖
Allowing dynamic
expressions
To remove a component variable
1
Click the line containing the variable.
2
Right-click in the Properties section to open a pop-up menu.
3
Select Remove.
Select the Evaluate option if you want to allow evaluation of dynamic, indirect
expressions (SBN expressions). Enter an SBN expression in the corresponding
field using the square bracket notation [ ]. The Evaluate option lets you
compute and evaluate dynamic property settings at runtime instead of
assigning static values at design time.
Some property items are pre-selected as Eval. Check boxes indicate the current
settings.
❖
Encrypting properties
To enable or to disable evaluation for a property
1
Right-click the property that you want to evaluate at runtime.
2
Select Evaluate to enable or disable evaluation.
Project and job data, as well as property values, are stored in the Sybase IQ
ETL repository. Most of the records in the Sybase IQ ETL repository are not
encrypted but are represented in a readable XML format.
❖
To encrypt property values
1
Right-click a property value.
2
Click Encrypt.
Refer to Chapter 6, “Components,” to find out about component specific
property settings.
Using the Design section
In the Design section you can:
•
User’s Guide
Create and modify projects and jobs
15
Using the Component Store section
•
Simulate and run projects
•
Run jobs
To create a project or job, you must add and connect components and then set
the component properties.
Adding components
To add a component, select the component in the Component Store and drag it
to the Design section. You can also right-click the component and select Add,
or double-click the component.
Deleting components from the Design section
To delete a component, right-click it in the Design section and select Delete
from the pop-up menu.
Using the pop-up menu to process commands
Right-click anywhere in the Design section to open the pop-up menu. When
you right-click an empty area, the general project pop-up menu opens. The
general project pop-up menu displays general commands, such as Close,
Compatibility, and Print. Right-click a component to open the Component popup menu. The Component pop-up menu displays component-specific
commands.
Using the Component Store section
The Component Store section consists of several sections that group the
components by general purpose.
❖
16
To add a component to the Design section
1
Select a component.
2
Add the component to the Design section. To do this, you can:
Sybase IQ ETL 4.1
CHAPTER 2
Sybase IQ ETL Development Desktop
•
Drag and drop the component to an empty spot or to an existing
connection in the Design section.
•
Right-click a component and select Add.
•
Double click a component.
•
Right-click a component to connect with a new component, select
Add Right Component or Add Left Component, and select a
component to add it to.
Customizing preferences
Use the Preferences window to customize the following groups of settings in
the Sybase IQ ETL Development environment:
❖
User’s Guide
•
Workbench
•
Engine
•
GRID Engine
•
Performance Log
To customize preferences
1
Select File | Preferences. The Preferences window appears.
2
From the Workbench list, select Appearance and set the following options:
•
Locale to be used for the user interface — select the locale language
for your environment. You can select _de (German), _en_US (US
English), or _en_GB (UK English). The default is _en_US.
•
Show assistant for creating projects — specify whether to show the
The Assistant, which contains information regarding the current state
of the open project. The Assistant helps guide you through the process
of completing a project. This option is selected by default.
•
Font for displaying source data — select the font that you want to use
for displaying source data. This setting is useful when you work with
non-western character sets, such as UNICODE character sets. The
default font is Tahoma.
17
Customizing preferences
3
4
5
18
•
Create new project on startup — specify whether to automatically
start a new project each time you start Sybase IQ ETL. This option is
selected by default.
•
Create new GRID projects — Not available.
•
Create automatic link when components are added — specify whether
to create a link to an existing component is automatically when
dragging a new component onto an empty spot within the project
Design section. This option is selected by default.
•
Display qualified transformation objects — specify whether the
names of projects and jobs in the Navigator section are displayed,
including the owner. This option is not selected by default.
•
Use unique object name — specify whether to enforce unique project
and job names on a repository connection. This option is not selected
by default.
Select Query Designer and set the following options:
•
Enable delete functionality of database objects — specify whether the
Truncate Object command on the right-click pop-up menu can be
selected to delete all records of a selected table. This option is not
selected by default.
•
Default amount of records to retrieve from Query Designer — specify
the number of data records retrieved by the Query Designer. The
default is 25.
•
Auto Join Generation — specify whether to automatically create joins
based on attribute names of the tables. This option is not selected by
default.
•
Use brackets in join generation — specify whether to use brackets
when creating joins. This option is selected by default.
Select Engine and set the following options:
•
Defaults to local engine operation — specify whether the UTL engine
starts when you start Sybase IQ ETL. This option is selected by
default.
•
Engine Monitor update delay (sec) — specify the number of seconds
to wait between two updates of the Engine Monitor. The default is five
seconds.
Select Grid Engine and set the following options:
Sybase IQ ETL 4.1
CHAPTER 2
6
7
Sybase IQ ETL Development Desktop
•
Grid Engine Server —specify the IP address of the primary GRID
engine server.
•
Grid Engine Port — specify the port address of the primary GRID
engine server.
•
Grid Default Port — specify the default port address of the primary
GRID engine server. The default is 5124.
•
Grid Engine Ping Timeout (sec) — specify the amount of time (in
seconds) allowed for accessing the GRID engine before restarting.
The default is 60 seconds.
•
Progress Monitor update delay (sec) — specify the number of seconds
to wait between two updates of the Progress Monitor for a job
execution. The default is five seconds.
Select Performance Log and specify the detail level for logging
performance data. The choices are:
•
0=no log
•
1=default level
Click Save.
A message that indicates some of the changes require you to restart Sybase
IQ ETL Development is displayed. To restart Sybase IQ ETL
Development, click Yes. Click No to continue working. The changes take
effect the next time you start Sybase IQ ETL Development.
User’s Guide
19
Customizing preferences
20
Sybase IQ ETL 4.1
CH A PTE R
Getting Started
3
Topic
Starting Sybase IQ ETL Development
Page
21
Creating your first project
Simulating the project
22
25
Starting Sybase IQ ETL Development
❖
To start Sybase IQ ETL Development
1
Double-click the Sybase IQ ETL Development icon or select it from
the Sybase product group on the Windows Start menu.
By default, the “Welcome to Sybase IQ ETL Development” page
appears. It provides information that explains Sybase IQ ETL
Development projects and jobs. To disable the page, clear the Show
on Startup check box.
2
Click Close.
The Repository login window is displayed. The default repository is
TRANSFORMER.
3
Click the Logon button to confirm the default logon data. The Sybase
IQ ETL Development desktop appears.
The Sybase IQ ETL Development desktop consists of the Navigator,
Properties, Design Section, and Components Store. See “Desktop
layout” for more information.
4
In the Navigator, click a repository folder and select the
TRANSFORMER client to open the list of available projects.
Note When you open the project list, it displays the demo projects
shipped with the product. Every demo project contains an example of
how to use a component or how to implement a scenario.
User’s Guide
21
Creating your first project
5
Select an existing project, or right-click on Projects to create a new project.
Creating your first project
This section describes how to create and simulate a sample project with sample
components. It does not explain all of the components, nor does it explain their
properties and features. For details about components, see Chapter 6,
“Components.”
A project usually contains one or more of the following:
•
Data providers that provide the data feeding the project data stream
•
Data transformers that transform or remap field values
•
Data sinks that write the transformed values to their target
Note The results of this section can be viewed in the “Demo Getting Started”
project shipped as a demo project within your default repository.
Adding a data provider
Use one of the following methods to add a data provider to your project:
•
Drag the component from the Component Store to the Design section.
•
Right-click the component that you want to add and select Add from the
pop-up menu.
•
Double click the component.
As soon as you add a component to the Design section, the component displays
its default configuration.
Note Properties shown in bold in any configuration window are required.
❖
To configure a data provider
1
22
Select ODBC from the Interface drop-down list. (See “Entering database
connection parameters” on page 71 for information about all of the
Interface types.)
Sybase IQ ETL 4.1
CHAPTER 3
2
Getting Started
Select ETLDEMO_US from the Host Name drop-down list.
After you confirm the initial component settings, the settings appear in the
Properties section.
3
To define what information should be retrieved from the data source, click
Edit on the Query property.
The Query window appears.
4
Enter a SQL Query or click Query Designer to generate the necessary
SQL.
The left section of the Query Designer window lets you navigate the table
catalog of the connected database.
5
To add one or more tables, drag the table name to the Design section, or
right-click the table name and select Add Object to Query.
6
Click the PRODUCTS table and drag it to the Design section.
7
Click Save to close the Query Designer. You return to the Query window.
The SELECT query has been generated automatically.
8
Click Execute the Query to run or test the query. You can also modify and
edit the query.
9
Click Save to close the Query Window.
Note When you have successfully configured a component, the color of
the ports associated with it change from red or yellow to green.
Adding a data sink
❖
User’s Guide
To add a data sink
1
In the Component Store, go to the Destination tab and select the DB Data
Sink Insert component by dragging it into the project.
2
Select ODBC from the Interface drop-down list.
3
Select ETLDEMO_US from the Host Name drop-down list.
4
Click the selection button of the Destination Table property and select
PRODUCTS from the table catalog.
5
Click Finish to confirm your settings.
23
Creating your first project
Your project should now consist of two components. The link between the
components had been created automatically (provided the setting Create
Automatic Link When Components Are Added has been activated in your
Sybase IQ ETL Development preferences). If the line has not been
automatically created, you can easily draw one by clicking on the output port
and dragging it onto the input port of the Data Sink.
The outgoing port (OUT-Port) of the DB Data Provider Full Load component
and the ingoing port (IN-Port) of the DB Data Sink Insert component are both
displayed in green. This indicates that both components have been completely
configured (in other words, all required information has been provided).
In the Property section for the DB Data Sink Insert component, you can review
and set all properties of the selected component.
❖
To review and set properties for a component
1
Right-click the connecting line (the Link) between the components. The
line changes to the color green and a pop-up menu appears.
2
Select the Mapping command.
The mapping between the data source and the target source has been created
automatically. To change mappings, select the connecting line and attach it to
another connection point.
Note You can only map to an unassigned target connection point. If all target
connection points are already assigned, you can easily free a target connection
point by selecting and deleting the mapping line that is currently linking to it.
Adding a data calculator
❖
To add a data calculator
1
Click the Transform tab in the Component Store.
2
Select the Data Calculator Java Script component and drop it onto the link
connecting the existing components. The color of the link changes to blue.
After releasing the Data Calculator component:
24
•
The Data Calculator component is linked with the components to the
right and to the left.
•
The Data Calculator window appears.
Sybase IQ ETL 4.1
CHAPTER 3
Getting Started
The Data Calculator window has a Tabular and Graph view:
3
•
Use the Tabular view to enter transformation rules.
•
Use the Graph view to visually define the mapping sequence
between the input port and the output port.
Click the Graph tab. Two sections IN and OUT represent the current
structure of the port attributes.
You are prompted to assign a default mapping by order.
4
Click Yes.
5
Click the Tabular tab to return to tabular view.
6
Change all incoming data for the PR_NAME attribute into uppercase
letters:
uUpper(IN.PR_NAME) ' OUT.PR_NAME
7
Enter uUpper(IN.NAME) in the Transformation Rule column of the
IN.PR_NAME attribute. Without any added function the IN.PR_NAME
value is forwarded to the OUT.PR_NAME attribute.
8
Click Save to confirm your settings. The green color of all ports in the
project indicate that all components have been successfully configured.
9
From the File Menu, select Save to save your project.
Simulating the project
❖
User’s Guide
To start the simulation
1
Click Start in the second-level toolbar to initialize all components.
2
Click Step to step through the project from component to component. At
any point during the simulation you can preview the current set of data.
For example, when the first step the data records are forwarded from the
source component to the Data Calculator. A number on the link indicates
the number of records transferred.
3
Right click the link and select Preview from the pop-up menu to preview
data on the link.
25
Simulating the project
26
Sybase IQ ETL 4.1
CH A PTE R
Projects and Jobs
4
Topic
Managing projects
Page
27
Simulating and executing a project
Managing jobs
29
36
Using templates to create projects and jobs
40
Managing projects
Projects are the working units of Sybase IQ ETL. A project consists of
components and links, which connect components through their ports.
There are basic operations that involve projects (such as creating, deleting,
renaming, saving) and there are complex operations like simulation.
A Sybase IQ ETL project starts with one or multiple source components
and ends with one or more destination components.
The following list summarizes the components:
•
A Data Provider component is usually connected to a
Transformation component, a Processing component, or a Data Sink
component.
•
Transformation components and Processing components have
input and output ports and can have adjacent components of any type.
•
If a Transformation component allows multiple input data streams,
multiple originating Source components are required.
•
If a Transformation component has more than a single output of data
streams, each data stream can be connected with a component.
Creating a project
❖
To create a project
1
User’s Guide
Select New | Project from the File menu. You can also right-click a
project, job, or template in the Navigator and select New | Project.
27
Managing projects
2
Drag components from the Component Store onto the Design section as
your project requires it.
Executing a project
To execute a project, right-click the project in the repository and select Execute
from the pop-up menu.
Modifying a project
To modify a project, double click the project name in the Navigator section.
The project opens and you can make changes.
Unlocking a project
If a project is locked by another user client, the project can generally be opened
in read-only mode. To make a project available for read/write access, select
Unlock.
Copying a project or
job
To copy a project or job, you can select it from the Navigator tree, right-click,
and select Save as or select Transfer. Then, select the target repository session.
If you select Save As, you create a copy of an existing project or job, leave the
original untouched, and store no reference to the originating project or job.
If you select Transfer, you copy the complete project from one repository to
another and reference the originating project. Select Transfer if you want to
move a project or job from a development repository to a test or production
repository. By storing the references to its origins, the transfer recognizes the
project or job the next time it is initiated and selectively replaces everything
related to the incoming object. Transferring a job also transfers all projects
related to the job.
Deleting a project
The Delete command deletes a project from a repository. To delete a project,
right-click it in the Navigator section and select Delete from the pop-up menu.
Renaming a project
Use the Rename command to rename the current project.
Resetting execution
properties
Resets the current value of the Load Index Value (DB Index Load component).
This is used for resetting loading options for incremental load.
28
Sybase IQ ETL 4.1
CHAPTER 4
Projects and Jobs
Simulating and executing a project
Simulating a project is a highly interactive process that lets you monitor and
validate your transformation process step by step. In contrast to executing a
project, you can view the data during a simulation at any stage of the
transformation process. During the final steps of a simulation, data is written
into the data sinks. Many transformation components (such as the Data
Calculator) allow you to change transformation rules and sample values onthe-fly to validate your rule base for all potential content.
Note A project can only be simulated after all components have been properly
initialized.
The basic functions of a simulation consist of the following high-level steps:
•
Start a simulation
•
Step through a component
•
View the data flow on the connecting Link or within the component
•
Modify and re-initialize the component to continue to simulate the data
flow
In simulation, at a more detailed level, you can:
❖
•
View data content on connecting links
•
View input data and output data inside a component
•
Modify properties or calculations on-the-fly, so that you can change
transformation rules and sample values to validate your rule base
•
Re-step a component after modifying a calculation or property
•
Perform “what-if” scenarios
•
Take multiple steps through the project
To simulate a project
1
User’s Guide
Click Start to start a simulation. When you click Start:
•
All components of the project become initialized.
•
All connections within the project are validated.
•
All pre-SQL statements in the projects are executed.
29
Simulating and executing a project
•
2
All data for all static Lookup components are retrieved and cached.
Any change of data in lookup tables that happens while the project is
simulated is not reflected in the simulation process.
Select a component and click Step to execute the component.
Stepping a component means to execute or process a single component
with the data that is currently available at its input ports. The data records
that are being processed during a single step are the records currently
populating the IN-port of the component.
If a component is stepped multiple times and no other components are
stepped in between, the number of records received or forwarded remains
constant. Many components can be stepped from both inside the
component and outside in the project view.
3
View the data flow on the connecting link or within the component.
To view data throughout the transformation process, you can examine the
link between components or the ports of a component. There are also
components with built-in preview capabilities, such as the Data Calculator
and the Data Splitter.
To view data on the link, right-click the connecting link and select Preview
from the pop-up menu.
To view data currently at the port, right-click the port and select Preview
from the pop-up menu.
Some components, such as the Data Calculator or the Data Splitter, allow
you to see the impact of transformation rules from within the component.
To view data from inside the component, double-click the component, or
click Rule in the Property section.
4
Modify and initialize the component.
After you modify a component and decide not to restart a complete
simulation for the current project, you can re-initialize the component to
continue simulating the data flow.
To modify and initialize a component:
30
a
Select the component and modify its properties.
b
Save the modifications.
c
Right-click the component and select Initialize from the pop-up
menu.
Sybase IQ ETL 4.1
CHAPTER 4
Projects and Jobs
Viewing current mappings
The Mapping Definition window shows the current mapping between
attributes of the adjacent IN- and OUT-structures. To open the Mapping
Definition window, right-click the connecting link and select Mappings from
the pop-up menu. Selecting Display Structure and values from the list box in
the toolbar displays the fields, as well as the current values.
Note This view shows the current content of the port connecting to the link. If
the port contains no data, only the port structure is shown in this window. You
can populate data in a port by stepping through your project until you reach the
port.
Applying automatic mappings
From the Mapping Definition toolbar, you can automatically create mappings
by selecting Create Mapping By Order or Create Mapping By Name.
If you select Create Mapping By Order, the port attributes of the IN- and OUT
structures are mapped according sequentially.
Note If the number of attributes is different on both sides, some of the port
attributes will not be mapped.
If you select Create Mapping By Name, the port attributes of the IN- and OUT
structures are mapped according their names.
Applying manual mappings
To manually create a single mapping, select a connection point and drag it to
the connection point of a port attribute.
You can also change existing mapping lines. If you want to change the current
mapping, select the mapping line at the connection point and drag the line to
an unmapped port attribute.
To delete a single mapping, select the mapping line and press the Delete key,
or right-click and select Delete from the pop-up menu. To delete all mappings
of a link, click Delete, or select Mapping | Remove All.
User’s Guide
31
Simulating and executing a project
Managing port attributes
The Structure Viewer is available at the port of a component. You can add and
delete port attributes, or modify the settings or existing attributes.
To open the Structure Viewer, right-click the port and select Edit Structure from
the pop-up menu.
❖
Modifying datatypes
To add an attribute to the port structure
1
Click the line number you want the attribute to be inserted. The current and
following attributes will be shifted downward.
2
Click Add Attribute, or select Actions | Add.
3
Enter a name for the attribute. The names for port attributes must start with
an alpha character and may contain only alphanumeric characters (A-Z, 09).
4
Enter a datatype.
5
Enter a size.
6
Enter additional specifications.
7
To delete an attribute from the current port structure, select an attribute line
number and click Delete, or select Actions | Remove.
When you modify datatypes of a record structure, you are modifying the
internal logical representation that Sybase IQ ETL uses for the record structure
during your transformation. This is not going to change the data structure
definition of the source or destination tables. You have to make sure that the
data structure of the final Data Sink is compatible with the content you are
generating. If you are using the Standardize Data Format option, make sure that
the datatype you are assigning to the port attribute matches the type of your
target attribute.
Viewing a simulation flow
After a simulation has been started, the flow of the simulation is made visible
through:
32
•
The green dotted box that indicates the active component and moves with
each step from one component to the next.
•
The number of records displayed on the link, which follows the box
movement.
Sybase IQ ETL 4.1
CHAPTER 4
Projects and Jobs
The number of records being processed within each single step is dependent on
the current value of Read Block Size of the previous component with a Read
Block Size property.
Selecting a small number is useful while performing a simulation. A large
number for Read Block Size can significantly enhance performance while a
project is executed.
Stepping from current and selected component
When a simulation is initially started, the component that will be executed with
the first step is being indicated with a green-dotted box.
When stepping through the project without modifications, the box moves from
component to component, eventually reaching the Data Sinks. Only the Data
Sink components will not cause a movement of the box, if they are stepped.
Instead of moving the active box, they will display successful or failure icons.
When moving from component to component the dotted box is highlighting the
respective component as current.
You can select a different component than the current component to inspect or
change its properties in the Property section. The selected component is
indicated by the green box.
The following example shows the Data Calculator as being current and the DB
Lookup Dynamic as being selected.
Figure 4-1: Example of current and selected components
The current component is the component that will be executed next when
selecting the Step button in the toolbar (or Run | Step). If you want to inspect
or change a component during the simulation process that is different from the
current component, then click it. The green box highlights the selected
component. You can resume the simulation after a component property
changes either from the selected or the current component.
User’s Guide
33
Simulating and executing a project
To resume simulation from the selected component, select Step from the popup menu. To resume simulation from the current component, select Step from
the toolbar.
Note Selecting Step from the pop-up menu for a component that has not been
processed yet forces all previous components to be stepped first.
Forwarding and backward-forwarding components
The visible flow of the simulation as indicated by the box is straight forward in
many projects. The box is moving from one component to the next. However,
the flow of a project simulation is not necessarily heading strictly into one
direction. The flow of simulation heavily depends on the components used
within the project.
There are forwarding components, which receive a number of records, apply
the transformation to those records, and forward those records (such as the
Data Calculator and the Character Mapper). The number of records that are
being processed in one single step is exclusively determined by the value of the
Read Block Size property of a preceding component.
There are other components that do override the previous Read Block Size
parameter. The Staging component is designed to work on the entire result set
of the data stream (as defined with the Query of the Data Source component).
The component will not process and forward any data records until the entire
result set has been delivered to the IN-port. The Staging component resizes the
amount of records forwarded with the next step by using its own Read Block
Size property. See Chapter 6, “Components” for an explanation of the behavior
of every component during the simulation.
Previewing data from multiple locations
The Preview command is available at every connecting link, every port, and
every component. The Preview command opens the Preview Content Browser
to display the data currently available at the selected location.
The Preview Content Browser window includes tabs, which allow you to
display multiple previews from multiple locations simultaneously. There are
occasions where it is extremely useful to preview the content of the IN-port and
OUT-port of a component in parallel tabs.
34
Sybase IQ ETL 4.1
CHAPTER 4
Projects and Jobs
Partial execution or initialization during simulation
It is extremely time consuming to start the entire simulation after making
modifications to a single component, especially when working with a large
amount of input records in a project that consists of dozens of components. On
the other hand, it can be frustrating to single step through a large project when
you are only interested in simulating a component somewhere in the middle of
a complex simulation flow. The commands Step through and Initialize through
provide an effective way of multi-stepping a project to your point of interest.
Simulating up to a certain component
To validate your current project by starting from a component somewhere in
the middle of a project, select the component, and then select Start Through
from the Run menu. The simulation starts the current project, processes all
components between the current and the selected component, and finally
processes the selected component.
Impact of Read/Write Block Size
The number you enter as the Read Block Size defines the number of records
fetched by the component during a single simulation step. You set the Write
Block Size to define the number of records to be written. Most Data Provider
components possess a Read Block Size property; most of the Data Sink
components offer to customize the Write Block Size. Transformation
components like the Staging component offer to customize values for both
reading and writing.
Note The Block Size property is evaluated during both project simulation and
project execution. A small number might be suitable for simulation purposes,
but will slow down execution time when you click Execute.
Controlling multiple data streams
While most projects will consist of a single stream of components connected
through links, it is technically possible to have multiple, not interconnected
data streams within a single project. Since Sybase IQ ETL is a parallel system,
there is no way to predict in which order the streams are processed.
User’s Guide
35
Managing jobs
If you have multiple data streams it is highly advisable to design a project for
each data stream so that all components within a project are connected to each
other. By following this design guideline, it is easy control the data streams by
connecting the projects to form a job process flow.
Managing jobs
A job lets you easily set up the powerful control flows for one or multiple
projects. Although Sybase IQ ETL projects require some kind of user
interaction during simulation or execution, a Sybase IQ ETL job can be
scheduled to run without any user interaction.
Depending on the success or failure of a project within a job, you can control
the job execution.
Job components
A job consists at least one of the following components:
•
A Start component
•
A Project component
•
A Success component
Figure 4-2 shows an example of a job with one Start component, one Project
component, and one Success component.
Figure 4-2: A Job with the minimum components
A job can be extended to include:
36
•
Multiple projects in sequential or parallel order
•
Multiple synchronizers
•
Multiple Success and Error components
Sybase IQ ETL 4.1
CHAPTER 4
Projects and Jobs
A Start component is always followed by one or multiple Project components.
Figure 4-3: A Job with multiple components
Executing a job
A job can be executed directly from the desktop or at specific time intervals as
a scheduled task of the operating system Task Manager. To schedule a job,
click Start Time in the Property section of the Job Start component. Or, you can
select Runtime Manager from the Tools menu.
Monitoring the job execution process
Once the job is started from the Navigator section, the Execution Monitor is
displayed. The upper part of the window displays information about the job
that is currently executed. The properties are:
•
Name: The job name.
•
State: The current job execution state.
•
Start: The start date and time.
•
Stop: The stop date and time.
•
Message: Error message.
The Projects list contains one line for every project in the job. The information
provided is:
User’s Guide
•
Name: The project name.
•
State: The current project execution state.
•
Start: The start date and time.
37
Managing jobs
•
Stop: The stop date and time.
•
Engine Name: The name of the executing engine.
•
Engine Host: The host of the executing engine.
•
Engine Port: The port of the executing engine.
•
Message: Error message.
Cancelling job execution
To cancel job execution, click Cancel Execution. The engines attempt to cancel
running projects. Projects still waiting for execution are not started.
Creating Jobs
To create a job, you can right-click the Jobs entry in the Navigator section and
select New | Job from the pop-up menu. The available job components are
displayed in the Component Store.
❖
To create a job with minimum components
1
Add the Start component from the Component Store to the Design section.
2
Add the Project component and connect it to the Start component.
3
Add the Finish component and connect it to the Project component.
4
Double-click on the Project component to open the project browser
window.
5
Select the project you want to make part of this job.
6
Close and save the job. The job is now ready to be executed in the Sybase
IQ ETL Development desktop or as a scheduled task.
From the Navigator section, you can directly display and access the projects
included in a job by opening the sub-branch.
Modifying a job
38
Double-click the job name in the Navigator section or select Open from the
pop-up menu.
Sybase IQ ETL 4.1
CHAPTER 4
Copying a job
Projects and Jobs
To copy a job to a specified destination, open it and select Save As from the
File menu.
Note You can copy a job into a different repository only when working with
multiple repositories.
Deleting a job
❖
To delete a job
1
Right-click the job in the Navigator.
2
Select Delete from the pop-up menu. The Confirm Job Delete dialog box
appears.
3
Click Delete. By default, only the job is deleted. You can also delete the
job and all included projects by selecting the Delete Included Projects
check box and then clicking Delete.
Note When using this option, be sure that related projects are not used in other
jobs as well, because this is not checked automatically. Projects that are
currently open for design (locked by any user) are not affected.
Renaming a job
Highlight the job listed in the Navigation tree, right-click, and select Rename.
Scheduling a job
❖
Controlling job
execution
To send a job to the Task Scheduler
1
Open the job.
2
Click the Start component.
3
In the Property section, click Edit Schedule Job of the Start Time property.
4
Enter the task parameters as described in the Runtime Manager section.
Job execution can be controlled as follows:
•
A synchronizer component that allows you to branch job execution based
on a project’s success or failure
•
Ignoring errors on each project
Refer to “Job components” on page 121 for more detail about job
configuration.
User’s Guide
39
Using templates to create projects and jobs
Using templates to create projects and jobs
Templates provide a way to automatically create projects and jobs for special
purposes. Currently, only Migration templates are available. This section
describes how to set up and use a template for migrating tables from one
database to Sybase IQ.
Building a migration template
❖
To build a migration template
1
Right-click the Templates entry in the Navigator section, and select New |
Template from the pop-up menu. The Template Assistant guides you
through the necessary steps to build a fully configured migration template.
To modify an existing template, select Open from the pop-up menu in the
Navigator section.
2
Follow the Template Assistant by first entering the details for the job to be
created. The Name value is used for the template object and, further
qualified, for the generated transformation objects.
The currently available Migration Type is DB to IQ.
3
Provide information about the source database and select the tables to
transfer:
•
Database connection properties — The database connection
properties are the same as for the DB components. The Advanced
option lets you set special database options. See “Entering database
connection parameters” on page 71 for more information.
•
Table properties — To get the table catalog for the specified database,
select Logon. The available tables are listed in the lower section of the
window. By default, each table is selected for transfer. To exclude
tables you can directly deactivate the Transfer check box or select
multiple tables and choose Exclude from the pop-up menu.
You can view additional information about the tables by clicking
Browse or Count on the pop-up menu. The Count All option displays
the record count for all tables.
4
40
Enter database connection properties for the destination database.
Sybase IQ ETL 4.1
CHAPTER 4
Projects and Jobs
Stage properties — Enter the general part for the Load Stage properties of
the DB Bulk Load IQ component into the Stage and Stage Server
properties, that is the paths to the staging files ended by the path delimiter
(for example C:\ETLStage\) or pipe:// for a named pipe. Refer to “DB
Bulk Load Sybase IQ component” on page 119 for a detailed description
of these properties.
5
Enter transfer settings.
Additional properties for each table to be transferred are provided.
a
Select source attributes.
By default all attributes of a table are selected for transfer. To change
the attribute selection, click Columns.
Deactivate the Transfer check box for every attribute to exclude from
transfer, or select multiple attributes and choose Exclude from the
pop-up menu.
b
Select destination tables.
It is assumed that source and destination table names should be equal.
To use different names, you must provide these for each source table
by either entering a new name into the Destination field or selecting
an existing table from the drop-down list.
c
Use the Prefix and Extension properties to qualify the file or pipe
names. It is not recommended to change the generated names in the
Stage and Stage Server columns of the Transfer List.
There are some additional options that can be switched on or off. To
change the value of an option you can either click a single check box
or select all lines you want to change and choose Activate or
Deactivate from the pop-up menu:
•
Data model options — Before the transfer can start, you must
verify that the destination tables exist. These options can help
you set up the destination data model. They do not affect
execution but they do affect the data model when it is created
from the template.
To create a non-existing destination table based on the selected
source attributes, select the Create Table option. If you want a
table to be re-created even if it exists, select Drop Table.
•
User’s Guide
Execution options — These options affect the execution on
project level.
41
Using templates to create projects and jobs
Select Truncate to remove all records from the destination table
before loading. This option corresponds to the Truncate Table
property of the target component.
The failure of a Critical project will cause the job to stop
execution and signal failure. This and the Ignore Errors options
correspond to the properties of the Multi-Project job component.
The Ignore Errors setting does not affect the projects generated
through this template.
6
Process migration template data.
The last screen in the wizard allows you to perform all desired tasks on the
collected data.
Except for Save, you can perform all tasks from the template pop-up menu
in the Navigator section:
7
42
•
Storing the Template — If you select Save Template, the template is
stored in the repository. For a stored template, all other tasks can also
be performed from the popup menu in the Navigator section. Storing
allows you to reuse the collected data for similar jobs.
•
Generating Transformation Objects — Select Build Transformations
to create one project for each source table and a migration job that
controls the execution of all these projects.
•
Creating the Destination Data Model — To set up the destination data
model according to the data model options you entered, select the
Create Data Model.
•
Executing the job — The Execute Job option is available only if Build
Transformations is activated. If you selected this option after the
migration template data has been processed, the generated job will be
executed.
Perform selected tasks.
Sybase IQ ETL 4.1
CHAPTER 4
Projects and Jobs
To finish collecting data and perform the selected tasks, click Finish.
Note Please ensure that you selected at least Save template or Build
Transformations. Otherwise the collected data will be lost.
Note Before you can execute the generated job, you must register engines
or open the job and deactivate the Multi Engine Execution option
(see“Using multiple engines to reduce job execution time” on page 61 for
a detailed description).
While processing the data you can view the current state and progress.
Managing a migration template
Creating a template
To create a template, right-click the Templates entry in the Navigator section
and select New | Template from the pop-up menu. The Template Assistant
guides you through the necessary steps to a fully configured migration
template.
Modifying a template
Double-click the template name in the Navigator section or select Open from
the pop-up menu. The Template Assistant guides you through the necessary
steps to a fully configured migration template.
Copying a template
Select Copy from the pop-up menu and enter a name for the new template. The
Copy command also allows you to copy a template into a different repository.
Deleting a template
Select Delete from the pop-up menu to remove a template from the repository.
Note Deleting a template does not affect jobs and projects that are based on
that template.
Renaming a template
Select Rename from the pop-up menu and enter a new name for the template.
Building a job from a
template
To create a migration job and all related projects based on a stored template,
select the Build command. To enforce unique names, a creation timestamp is
added to all object names.
Note You can modify the generated jobs and projects before execution like any
other object you created manually.
User’s Guide
43
Using templates to create projects and jobs
Creating a data model
from a template
44
To set up the destination data model according to the data model options stored
with the template, select Create Data Model from the pop-up menu.
Sybase IQ ETL 4.1
CH A PTE R
5
Advanced Concepts and Tools
Topic
Content Explorer
Page
51
Inspecting log file information
Managing jobs and scheduled tasks
49
49
Customizing SQL and transformation rules
Using multiple engines to reduce job execution time
51
61
Analyzing performance data
63
Content Explorer
Content Explorer consists of a menu, a toolbar, a SQL structure area, a
Navigation area, and the Design area. From the Content Explorer window,
you can customize the size of the areas. You can also control the structure
of the SELECT area by using the commands available in the Options
menu.
Use Content Explorer to do the following:
User’s Guide
•
Browse the table catalog of any connected database of the current
project in the Design section
•
Easily create SQL queries by using a powerful graphical user
interface
•
Review the generated SQL statement
•
Execute SQL queries against the database
•
Browse the data of a selected table or view
•
Create a table in the schema
•
Delete all records of a table
•
Count the number of records in a table of view
45
Content Explorer
The examples in this chapter open the project Demo Getting Started from the
Demo Repository.
Opening Content Explorer
To open Content Explorer, select Content Explorer from the Tools menu. The
Choose Data Source dialog box appears and lists all components currently
connected to data sources.
The names in the list of currently connected databases is a combination of a
user defined name and the generic name of the component type.
Double-click the line to open the Design window of the Content Explorer. The
examples in this chapter are based on the DB Data Provider - Full Load
component in the project Demo Getting Started from the Demo Repository.
In the Table Catalog on the left, you can directly browse the content of an
object selecting Browse from the pop-up menu.
Using the Design area
The Design area is part of a graphical user interface that enables you to
automatically generate SELECT statements that are more specific about the
records you are interested in.
From the Design area, you can:
46
•
Drag objects from the Navigation area into the Design area
•
Select attributes to be used in the SELECT/WHERE/GROUP/ORDER BY
clause
•
Graphically create joins between tables using SQL 92 join operators
Sybase IQ ETL 4.1
CHAPTER 5
Advanced Concepts and Tools
Creating queries
The Content Explorer allows you to create queries in a convenient graphical
environment. Little or no SQL knowledge is required.
Note You can only use the Content Explorer to generate ad hoc queries, which
cannot be saved to a file or to the repository. However, if you want to save the
generated SQL for other purposes, you can copy it from the Generated Query
window that can be opened by selecting Generated Query from the View menu.
To do so, select the part of the generated query and copy it to the clipboard.
❖
To create a simple query
The following procedure uses the PRODUCTS table to generate a simple query
that retrieves all attributes from the a table.
❖
1
Click the table or view name in the Navigation area.
2
Drag the selected object to the Design area.
3
Verify the results of the generated query by clicking View the Generated
Query.
To create a query using multiple tables
The following procedure uses the PRODUCTS and the SALES table to generate
a query that retrieves joined information from two tables.
❖
1
Click the table PRODUCTS and drag it onto the Design area.
2
Click the table SALES and drag it onto the Design area.
3
Create a join between the tables by drawing a link between the fields
PR_ID of both tables. The join can also be automatically created if you
select the Auto Join Generation option in the Preferences.
To use the Auto Join Generation option
Auto Join Generation is based on identical attribute names used within tables
or views. If there are identical names and the Auto Join Generation option is
selected, the Query Designer automatically creates a join based on those
attributes.
User’s Guide
1
Access the Preferences dialog box by selecting Preferences from the File
menu.
2
Select the Workbench | Query Designer | Auto Join Generation check box
in the Preferences dialog box.
47
Content Explorer
❖
To modify the default setting of a join
A join between two tables is indicated by a line that connects the joining fields.
The line is labeled with a join operator. The default is Equi Join.
1
Right-click the line connecting the two joining fields.
2
Select the Modify command.
3
Choose a join type from the list:
•
=
EQUI Join
•
+=
Left outer Join
•
=+ Right outer Join
•
+=+ Full outer Join
The default setting of the join changes to the type you selected.
❖
❖
❖
❖
To add one attribute to the SELECT clause
1
Drag the tables to the Design area (if they are not there already).
2
Click the attribute names you want to add.
3
Right-click and select Add Items to Selection.
To select more than one attribute to the SELECT clause
1
Drag the tables to the design area (if they are not there already).
2
Hold the Ctrl key and click the attributes that you want to add to the
SELECT clause.
3
Right-click and select the Add Items to Selection.
To select all attributes of a selected table to the SELECT clause
1
Click the header (name) of the table in the Design area.
2
Right-click and select Add Items to Select.
To view generated SQL statements
•
❖
48
To display the statement as currently generated by the Content Explorer,
click Generated Query or select Generated Query from the View menu.
To add functions to the SELECT attributes
1
Click the attribute and right-click to open the pop-up menu.
2
Select any of the available functions.
Sybase IQ ETL 4.1
CHAPTER 5
Advanced Concepts and Tools
Inspecting log file information
The File Log Inspector window allows you to inspect log file information
about job execution, fatal errors, and the system log. The log files are located
in the \log subdirectory of the installation directory. The log files are:
•
execution.log — captures all information regarding job execution errors.
•
fatal.log — captures low-level information that is written when the system
encounters serious unexpected behavior. This includes information from
fatal system exceptions when the system was no longer able to write to the
system log file.
•
system.log — captures all information about system activities, both
operational and exceptional events. The detail of data written to this file
depends on the Trace Level that is set in the default.ini file located in the
/etc directory. You can also change the Trace Level within a project or job
by using the uTracelevel(n) function in a JavaScript procedure.
A Trace Level of 0 (the default) only traces minimal processing
information. A Trace Level of 5 traces the maximum amount of
information about processing events and processing steps.
Note Even a Trace Level of 1 will considerably increase the amount of
logging information written to the system.log file and, as a result, will
impact the overall performance of the Sybase IQ ETL environment.
The function uTracelevel(n), where n is a value of 0 through 5, lets you set
the Trace Level from within a project or job. As a result, you can trace the
execution of a single component with maximum detail, while all other
components are only tracing at the default level. You can call the
uTracelevel function from within a JavaScript procedure.
Managing jobs and scheduled tasks
The Runtime Manager manages jobs and gives you an overview of your
currently scheduled job tasks. Using Runtime Manager, you can create, edit,
delete, execute, and terminate tasks.
Because Runtime Manager is based on Windows task scheduling manager, you
will find any scheduled task currently defined on the system.
User’s Guide
49
Managing jobs and scheduled tasks
To open Runtime Manager, select Tools | Runtime Manager.
❖
To create a new schedule
1
Create a new task by clicking Create a New Schedule on the toolbar or
select Actions | Create. The New Schedule window is displayed.
2
Select a Job in the New Schedule window.
3
Edit Name and Description.
4
Enter Username and Password for the Windows user account that will run
the job.
Note Because this is a separate task, Windows expects a valid username
and password. A password is required for the account. The user must have
read/write access to the IQ ETL user folders, which s can be the
installation directory or the Windows user directory, depending upon the
type of installation.
5
❖
❖
❖
❖
Click Create to confirm your settings.
To execute a job schedule
1
Select the scheduled job from the list.
2
Click Execute a Schedule, or select Actions | Execute.
To delete a job schedule
1
Select the scheduled job from the list.
2
Click Delete a Schedule, or select Actions | Delete.
To edit a job schedule
1
Select the scheduled job from the list.
2
Click Edit a Schedule, or select Actions | Edit.
To terminate a job schedule
1
Select the scheduled job from the list.
2
Click Terminate a Schedule, or select Actions | Terminate.
After it is scheduled, the job is executed under control of the Windows Task
Scheduler. In the Last Result column of the Task Scheduler, you can find the
execution state of the job.
50
Sybase IQ ETL 4.1
CHAPTER 5
Advanced Concepts and Tools
Job execution state codes in the Task Scheduler are shown in the following
table.
Table 5-1: Job execution state codes
Result
0
Type
Info
Description
Job execution successful
1
101
Warning
Warning
Job execution cancelled
No valid license
10001
10002
Error
Error
Unable to retrieve job data from repository
Unable to find initialization component for job
10003
10004
Error
Error
Unable to initialize external job settings
Initialization failed
10005
10101
Error
Error
Job execution failed
Connect to repository database failed
10102
10103
Error
Error
No valid repository found in connected database
Unable to open session on connected repository
Customizing SQL and transformation rules
Setting up a project or job includes a variety of tasks, some of which can be
customized:
•
Entering SQL queries to set up the source components
•
Entering SQL commands for pre-processing and post-processing tasks
•
Entering expressions, conditions, and procedures to manipulate the
transformation process
Although the format of the SQL commands is strongly dependent on the
database system that is connected to the component, the format of the
transformation language supported by Sybase IQ ETL (JavaScript) will not
change, no matter what source or target system you are using in your projects.
The JavaScript expressions can be included in Square Bracket Notations (SBN
expressions), which can considerably reduce your customization efforts. SBN
expressions can be part of component properties (if the Evaluate property is
activated for the specific property), SQL statements, or any pre- or post
processing commands. An SBN expression resides inside an opening and a
closing square bracket and is evaluated at “Runtime,” as opposed to constant
expressions that are defined at “Design Time.”
User’s Guide
51
Customizing SQL and transformation rules
Using expressions and procedures
An expression is a combination of identifiers and operators that can calculate
a single value. A simple expression can be a variable, a constant, an attribute,
or a scalar function. Operators can be used to join two or more simple
expressions into a complex expression.
Examples of expressions are:
'Miller'
uConcat("Time ", "goes by")
(uMid(SA_ORDERDATE, 1, 10) >= '1998-01-01')
[uTracelevel(3)]
A procedure is a programming unit that includes expressions, statements, and
control structures. A procedure can be written in JavaScript.
Examples of procedures are:
if (IN.PR_PRICE < 250)
OUT.PR_GROUP2 = 'low end' ;
else {
if (IN.PR_PRICE < 1000)
OUT.PR_GROUP2 = 'mid range';
else
OUT.PR_GROUP2 = 'high end';
}
Including variables
A variable is a symbolic name for a value. There are two basic properties of a
variable:
•
Scope
•
Datatype
The scope of a variable decides in which scope of the environment the variable
can be referenced.
There are:
52
•
Port variables
•
Component variables
Sybase IQ ETL 4.1
CHAPTER 5
Port variables
Advanced Concepts and Tools
The values of the port structure are referenced as Port variables within a
component. There are automatic Port variables for both IN-Port and OUT-Port.
Port variables are valid within the component and they inherit the name and
datatype of the port structure. The name of the variable is either prefixed with
IN. for the IN-Ports or OUT. for the OUT-Ports. IN-Port variables are readonly, OUT-Port variables can be written. The following example uses PORT
variables in an expression:
uUpper(IN.CU_NAME)
Using PORT variables in a procedure:
OUT.CU_NAME = uUpper(IN.CU_NAME);
Component variables
Component variables are created in the Property section of the component and
can be referenced inside the component. The Component Variable is only valid
inside the component. The name of the variable is prefixed by REF, for
example:
uIsNull(REF.myvariable)
Note To provide high flexibility in transformations, all port and component
variables internally use the datatype “string”. This may result in unexpected
behavior when using numeric values. If multiplied by 1, the numeric value of
a string variable will be used in a calculation:
IN.Margin="2", IN.Price="10"
IN.Margin>IN.Price - returns TRUE
To enforce a numeric comparison use
IN.Margin*1>IN.Price*1 - returns
FALSE
Using functions
Sybase IQ ETL provides a complete set of functions and operators based on a
design that integrates complete support for the Unicode character sets.
Sybase IQ ETL functions can be recognized by the prefix u, for example,
uConcat().
User’s Guide
53
Customizing SQL and transformation rules
Using Square Bracket Notation
Expressions and SQL statements can contain SBN expressions that are
evaluated before the expression or SQL statement is executed by the Sybase
ETL Server. An SBN expression is surrounded by square brackets [..]. The
notation SBN expression is used as a synonym for an indirect expression.
SBN expressions can be used in:
Examples
•
Expressions
•
SQL Queries
•
Pre-SQL and post-SQL statements
•
Transformation rules
•
File names
•
Path definitions
•
URLs
A literal is a string surrounded by quotes. If you use SBN in a literal, the SBN
is evaluated first.
‘[uConcat(‘Arrival Date: ‘, uDate(‘now’, ‘localtime’),'
Time: ‘, uTime(‘now’, ‘localtime’)]’
The following expression is used to specify the path of a file in the Text Data
Provider:
[uSystemFolder(‘APP DEMODATA’)]\PRODUCTS.XML
Note In the Property section of the components, the Eval column indicates
whether a value entered is evaluated to resolve SBN expressions. For many
property items, this is an optional value. To toggle the Eval check box, rightclick on the property item line and select Evaluate.
Entering SQL statements
SQL queries are used for all components that extract data, mainly the Data
Provider Components and the Staging Components. Queries are mandatory for
those components because they define OUT-Port structure.
To enter a query for the component, select the Query option of the Query
property.
54
Sybase IQ ETL 4.1
CHAPTER 5
Advanced Concepts and Tools
From the Query window you can:
•
Enter a query
•
Run a query
•
Save a query
•
Open the Query Designer
•
Look up the database schema
Entering queries
You can manually enter a SELECT statement into the Query field. You can use
any valid SQL notation of the connected database to build the query.
To open the Query Designer, click Query Designer.
To look up the database schema, click Lookup Schema.
To run the query, click Execute Query.
Note After you change an existing SELECT statement, always initialize the
component before executing another step with the component.
Validating queries
The query is immediately validated against the database system that is
connected to the component. Therefore, the query syntax must be compliant
with the native SQL dialect the connected database system is using. Using SQL
92 ANSI Standard queries allows switching to different database systems
without changing the SELECT statements.
Query designer
The Query Designer is embedded in the Content Explorer, which is explained
in detail “Content Explorer” on page 45.
Using SBN expressions in queries
The following examples show how to use SBN expressions in queries.
Examples
User’s Guide
A SELECT statement to retrieve a specific customer record might include a
constant customer record CU_NO for that record.
55
Customizing SQL and transformation rules
SELECT * FROM CUSTOMERS WHERE CU_NO = '12345678'
With SBN you can use a more flexible approach by assigning the constant
value of CU_NO to a component variable. Assuming that value ‘12345678’
was assigned to CustNo, the SELECT statement with the dynamic expression
would look like the following example:
SELECT * FROM CUSTOMERS WHERE CU_NO = '[REF.CustNo]'
You can use any of the Sybase IQ ETL functions inside the SBN. The following
statement returns the same record using a value of “1234” for CustNo1 and a
value of “4567” for CustNo2:
SELECT * FROM CUSTOMERS WHERE CU_NO = '[uConcat
(REF.CustNo1, REFCustNo2)'
Manipulating the TRACE level at the start of a query
To manipulate the TRACE level at the start of a query, SELECT * FROM
PRODUCT [uTracelevel(5)].
The function uTracelevel() returns no value; therefore, the SBN expression
[uTracelevel(5)] can coexist with the SQL statement. After the SBN expression
has been evaluated, the SQL statement to execute will be:
SELECT * FROM PRODUCT
You can even execute the following query:
[uTracelevel(0)]
Pre-processing and post-processing SQL
For any component with database connectivity you can enter pre-processing
and post-processing SQL statements in the Property section. Those properties
allow entering SQL statements that are executed during initialization (preprocessing) or after completion (post-processing) of the component.
Some considerations are:
56
•
The SQL statements will not return output after being executed.
•
Any SQL statement accepted by the connected database system is
allowed.
•
You can enter multiple SQL statement in the pre-processing or postprocessing SQL property by using a semicolon; as a statement delimiter.
•
SBN expressions are allowed in pre-processing and post-processing SQL.
Sybase IQ ETL 4.1
CHAPTER 5
Advanced Concepts and Tools
The following examples show pre-processing and post-processing SQL:
delete from products;
update customers
set cu_desc = 'valid';
Using the JavaScript Procedure Editor and Debugger
JavaScript is an object-oriented scripting language designed for embedding
into other products and applications. The language is divided into the core
JavaScript and client-side JavaScript. The client-side JavaScript is designed to
manipulate objects in Web browser, and the core language can be used in multipurpose environments.
Inside the Sybase IQ ETL Development environment, core JavaScript is
embedded to allow manipulation of objects to provide programmatic control
over them.
The core JavaScript functionality is enriched by grid functions, which enhance
the flexibility of the language. The JavaScript Editor and Debugger let you
interactively edit, debug, and execute JavaScript code.
Features
The JavaScript Editor and Debugger is mainly used (but not restricted) to set
up transformation rules on incoming data. Inside the JavaScript Editor and
Debugger, the scripts entered can be executed and tested using a single input
record.
The JavaScript Editor and Debugger offers the following features:
User’s Guide
•
Color-coded syntax for better readability
•
Watchlist to control the assigned values of variables and attributes when
running or stepping through the code
•
Multiple user-definable Breakpoints to stop code execution at any line
positions
•
User-definable Go points to arbitrarily choose the position from which a
code shall be executed
•
Step mode to execute the code line by line
•
Step-over during debugging
•
Evaluation of JavaScript expressions
•
Verify the result of code execution
57
Customizing SQL and transformation rules
Starting the JavaScript Editor and Debugger
Within the Data Calculator JavaScript component, click Edit to open the
JavaScript Editor and Debugger.
The JavaScript Editor contains the following areas:
Edit and Debug mode
•
Toolbar — consists of option buttons that you select to perform various
JavaScript Editor functions. Refer to the online help for details about the
toolbar.
•
Object Navigator — consists of the Variables tab and the JavaScript tab.
The Variable tab consists of input and output port variables, as well as
temporary and pre-defined variables. From the JavaScript tab, you can
access all functions, commands, and system variables that can be applied
within the procedure.
•
Edit/Debug — lets you edit the actual code. The area provides colorcoding of syntax structures.
•
Monitor — consists of the following tabs:
•
Tasks — contains the results of the validation after your procedure has
been compiled.
•
Watch List — displays selected variables and their (changing) values
while stepping through the code during debugging.
•
Input Records — displays the content of the current input record. To
synchronize Input and Output Record, click Simulate in the toolbar.
•
Output Record — displays the content of the current output record.
•
Expression — displays the result of the expression after you enter a
JavaScript expression and clicking the Evaluate button.
When launched, the JavaScript Editor and Debugger comes up in Edit mode.
To switch to Debug mode, you can:
•
Select Start from the Debug menu.
•
Click Compile.
A dark grey background of the edit area indicates Debug mode.To switch from
Debug mode to Edit mode, click Start Editing.
Editing and debugging JavaScript
A comment line starts with two forward slashes // at the beginning of the line.
58
Sybase IQ ETL 4.1
CHAPTER 5
Advanced Concepts and Tools
To validate JavaScript code, click Compile. The result of the validation is
displayed in the Tasks tab of the Monitor area at the bottom area of the
Procedure Editor.
The Editor offers some efficient features to trace the execution of a script. You
can step through a code line-by-line or step through from one Breakpoint to
another. At any time, you can check the current value of a variable.
❖
To step through the code
Note The JavaScript Editor and Debugger will work without having input data
at the input port of the component. However, in order to produce meaningful
results, it is best to populate the input port with data before using the debugging
features.
1
Before stepping through the script, either validate the script or switch to
Debug mode.
A green arrow, pointing initially to line 1, indicates the progress of the
execution while stepping.
2
Make sure, that the result message in the Task tab contains “successful
compilation.”
3
To move to the next line, click Step.
At any point during stepping you can inspect the current value of a
variable. To do this, double-click the variable to select it, and then rightclick to open the pop-up menu. The pop-up menu displays the variable
name and the current value.
❖
To add and remove Breakpoints
Rather than stepping through the procedure line-by-line, you can include
Breakpoints at selected lines.
❖
1
To include Breakpoints, click on the line where you want to set the
Breakpoint.
2
Right-click and select Add/Remove Breakpoint from the pop-up menu.
3
To remove a Breakpoint, right-click it and select Add/Remove from the
pop-up menu.
To step to a Breakpoint
1
User’s Guide
Click Go for each step.
59
Customizing SQL and transformation rules
2
Click Go on the last breakpoint to execute the rest of the script.
Inline inspection of variables
You can perform an inline inspection of the current value of a variable while
stepping through the code in Debug mode or after the code has been executed.
Right-click the variable to open the pop-up menu, which displays the variable
name and value.
Monitoring values in the Watch List
You can use the Watch List to monitor the changes of variable values during
the execution of the code. When stepping through the code you can see any
change that occurs to one or more variables in the Watch List.
❖
❖
To add a variable to the Watch List
1
Right-click the variable.
2
Select the Add to Watchlist from the pop-up menu.
To remove a variable form the Watch List
1
Right-click the variable in the Watch List tab of the Monitor area.
2
Select Remove <variable> from Watchlist from the pop-up menu.
Special JavaScript features
Interrupting execution
From inside the Editor, click the Interrupt button to interrupt a JavaScript
execution.
Creating user-defined
errors
Using the throw("xx") function, an error can be enforced to interrupt the
execution of the project. For example, stop execution if the name of a product
(PR_NAME) exceeds the length of 20 characters:
if (uLength(IN.PR_NAME) > 20) (
throw(“Product name exceeds maximum length”);
)
Creating user-defined
functions
Functions can be defined inside a script and functions can be nested. For
example, the following script results in a value 6 for variable b:
var a = 2;
var b = 20;
b = IncA(a);
// end
60
Sybase IQ ETL 4.1
CHAPTER 5
Advanced Concepts and Tools
function IncA (a)
{
var b = 3;
a = IncB(b) + a++;
return a;
function IncB(b)
{
b = b + 1;
return b;
}
}
Converting datatypes
All variables in the Sybase IQ ETL are represented as strings. This may result
in unexpected behavior when working with numeric values. The functions
parseInt() and parseFloat() can be used to convert a string to an integer or a float,
for example:
var a = "123";
var b = "22";
a > b
will return FALSE while
parseInt(a) > parseInt(b)
returns TRUE.
Including files
Use the uScriptLoad(“filename”) function to include external files into a script.
The external file can contain any valid JavaScript constructs, including
functions, thus allowing a kind of reusable code, for example:
uScriptLoad("C:\scripts\myfunc.js");
var a = 11;
var b = 2;
var c = 0;
b = gcd(a, b);
// gcd function defined in C:\scripts\myfunc.js
Using multiple engines to reduce job execution time
The GRID architecture reduces the job execution time by using parallel
execution of projects on multiple distributed engines.
To make use of this scalability you need to:
User’s Guide
61
Using multiple engines to reduce job execution time
Registering GRID
engines
•
Install multiple GRID engines
•
Register your GRID engines
•
Prepare jobs for multi-engine execution
Once you have GRID engines installed, you can register a subset or all of them
for a special repository. When executing a multi-engine job from that
repository all projects contained will be executed on those engines.
To register GRID engines, select the Engine Manager option from the Tools
menu. If you have open connections to more than one repository you will be
asked to select one of them. The Engine Manager window displays a list of
engines that have been previously registered for the selected repository.
The properties of a registered engine are:
•
Name: A user defined name for the engine.
•
Host: The name or IP address of the engine host.
•
Port: The number of the port the engine is listening on.
•
Base Rank: A user defined ranking for the engines. A job will always try
to execute the projects on the highest ranked engines.
•
Description: A free description for the engine.
You can register a GRID engine manually or you can register multiple engines.
❖
❖
❖
To manually register a GRID engine
1
Select Engine | New, or click Insert. The Edit Engine dialog box opens.
2
Enter the desired values.
3
Click OK. The new engine is added to the list of engines.
To register multiple engines
1
Select Engine | New Engines. The New Engines dialog box opens. For
each engine, registration and additional information are shown, as well as
the engine’s online state.
2
Select the engines to register.
3
Click Add. The new engines are added to the list.
To modify an engine registration
1
62
Select the engine in the list and choose Engine | Edit or click Edit. You can
also double-click the engine in the list. The Edit Engine dialog box
displays the current values of the registration properties.
Sybase IQ ETL 4.1
CHAPTER 5
❖
Advanced Concepts and Tools
2
Overwrite the current values with new values.
3
Click OK.
To delete an engine registration
•
Select the engine from the Select Engine | Delete menu, or click Delete.
Defining multi-engine jobs
You can run a job on multiple engines using the parallel Grid architecture. A
typical multi-engine job contains multiple projects with no or little
dependencies between them. Thus, the projects can be executed on multiple
engines at the same time.
To prepare a job for multi-engine execution, open the job in design mode and
select the Multi-engine Execution option from the pop-up menu.
When it executes, the job will now use the registered engines to distribute the
projects.
Executing multi-engine jobs
Like any other job, multi-engine jobs are executed by right-clicking one in the
Navigator section and selecting Execute from the pop-up menu, or by
scheduling it to run in Runtime Manager.
Analyzing performance data
While executing jobs and projects, Sybase IQ ETL collects performancerelevant data and stores it in a repository table. This section describes data
model and content. It also provides some examples of analytic reports based on
that data.
❖
User’s Guide
To collect performance data
1
To collect and store performance relevant data on executing jobs and
projects, select File | Preferences | Performance Log.
2
From the Logging Level list, select 1 to collect performance data.
63
Analyzing performance data
Performance data model and content
The performance data is stored in a single, de-normalized, repository table
named TRON_PERFORMANCE. This section describes the information
included.
Events
The performance log is based on events. For each event the starting time (in
three variations: a full timestamp, a date, and a time) and the duration (in ms)
is stored. The description of an event is made up by a class, a name and a text.
Some events have a result (like succeeded or failed). In addition you will find
information about the engine that reported an event.
The following list gives a short description of the reported events:
Class
control
Name
execute job
init
load job
Description
Total execution time of a job (1 record per job
execution, duration in attribute
PRF_JOB_DURATION (Job Duration in ms)).
Get job definition from repository.
process
process
prepare job
prepare project
Perform job pre-processing.
Perform pre-processing for a project within a job.
process
control
finish project
execute project
init
load project
Perform pre-processing for a project within a job.
Total execution time of a project (1 record per
project execution, duration in attribute
PRF_PRJ_DURATION [Project Duration in ms]).
Get project definition from repository.
init
init
create
configure
Create project and component instances.
Configure project and component instances.
perform
perform
prepare
process
Perform component pre-processing.
Perform component step.
perform
perform
finish
read
Perform component post-processing.
Get data to component input port.
perform
finish
write
close
Push data from component output port.
Close project and component instances.
Note Due to distributed, multi-threading the total project execution time can
be significantly lower than the sum of the execution time of all participating
components.
64
Sybase IQ ETL 4.1
CHAPTER 5
Advanced Concepts and Tools
General information
Each execution of project or job is identified by a global unique ID. You will
find the execution starting time in three variations: a full timestamp, a date, and
a time. Additional information is provided about the account that initiated the
execution and the repository the project or job is located in.
Job execution
information
For a job you will find the ID, the version (modification date), and the name.
A single job execution event will store the duration of a job (in minutes). The
components (projects) of a job are represented by their ID, class, and version.
Project execution
information (including
job projects)
For each executed project ID, version (modification date), name, and a global,
unique execution ID is provided. A single project execution event will store the
duration of a project (in minutes).
Project components are represented by ID, name, class, type, and version. The
process event will provide the number of steps and the amount of processed
records.
Port events provide the ID, name, class, type and the amount of input or output
blocks and records.
Example reports
This section shows some examples for analytic reports based on the collected
performance data.
Note You can use any appropriate analyzing tool for generating performance
reports. Not every tool might offer the functionality to build reports similar to
the examples shown.
If you want to generate your own reports based on the performance data, see
“Performance data model and content” on page 64 for a description of data
model and data.
User’s Guide
65
Analyzing performance data
Project execution history
Figure 5-1: Example of a project execution history report
66
Sybase IQ ETL 4.1
CHAPTER 5
Advanced Concepts and Tools
Project execution time and records moved
Tabular
Figure 5-2: Example of a tabular report capturing project execution time
and records moved
Graph
Figure 5-3: Example of graph report capturing project execution time
and records moved
User’s Guide
67
Analyzing performance data
68
Sybase IQ ETL 4.1
CH A PTE R
6
Components
Topic
Overview
Page
69
Source components
Transformation components
81
93
Using Lookup components
Staging components
101
107
Processing components
Destination components
109
110
Job components
121
Overview
The Sybase IQ ETL components are used to create projects and jobs. (See
Chapter 4, “Projects and Jobs.”) They are located in the Component Store.
Project components are divided into the following:
•
Source components
•
Transformation components
•
Lookup components
•
Staging components
•
Processing components
•
Destination components
•
Job components
Source components deliver data for a transformation stream. A project has
to start with one or multiple Source components. This component type has
no IN-port and one or more OUT-ports.
User’s Guide
69
Overview
Transformation components, Lookup components, and Staging components
have at least one IN-port and one OUT-port and apply specific transformations
to the data in the transformation stream.
Destination components (also called data sinks) write data to specific targets.
This component type has one IN-port and no OUT-port.
While different from a functional point of view, all components share common
concepts.
Setting required properties
Before a component is ready to be used within a project, you must set required
property items. When you add a component to the Design area, the window
requesting the setting of the required parameters is automatically opened.
Ports and links
A component has IN-ports to receive data and OUT-ports to pass the data after
it has processed it. When stepping a component, the data forwarded through the
OUT-port is delivered to the IN-port of the subsequent component.
Ports pass data through connecting links. Every link has the capability to map
the fields of the ports it connects to. Ports also indicate the status of a
component (green for “ready-to-use”, red for “missing or invalid mandatory
property settings”).
Data blocks and visualization
The data stream that is passed from component to component during a step-bystep simulation is adaptable and highly transparent. The number of records that
are being processed within a step can be configured. You can preview data at
any stage by previewing the content of a Link or by looking into the component
itself.
Repetitive stepping
During a simulation the component can be executed (stepped) separately from
its adjacent component. Repetitive steps will not increase the number of
records delivered to the downstream component.
70
Sybase IQ ETL 4.1
CHAPTER 6
Components
Setting up a component
Each component is dedicated to a specific task and therefore incorporates taskspecific features. However, all components that connect to database objects
follow the same procedure to set up the database connection parameters. This
chapter summarizes common characteristics that are available for most
components. When in doubt, refer to the detailed description of the specific
component later in this chapter.
Entering database connection parameters
When you add a component with database connection properties to the Design
section, the Database Configuration dialog box is opened. The dialog box gives
you a central place to enter the most common parameters to set up a
connection. More parameters are available in the Property section once the
Database Configuration dialog is completed. This section explains all
properties of a data provider component.
❖
To enter parameters
1
Click the Interface arrow to select one of the following types of database
interfaces:
•
Sybase
Note Sybase Open Client must be installed on the same machine as
Sybase IQ ETL Development desktop and the ETL Server must be
defined in the sql.ini file. If the component is to be sent to an ETL
Server, then the ETL Server must also have access to Open Client
libraries.
•
SQLite Persistent
Note Sybase IQ ETL ships with a built-in, general purpose, relational
database that is based on SQLite (www.sqlite.org).
•
User’s Guide
IBM DB/2
71
Overview
•
ODBC
Note The ODBC driver must be installed on the same machine as
Sybase IQ ETL Development desktop and a system data source name
(DSN) must be defined for the target. If the component is to be sent to
an ETL Server, then the ETL Server must also have access to the
proper ODBC drivers and DSN.
•
2
Oracle
Click the Host Name list and select one of the available host names.
If you are interfacing to a SQLite Persistent interface, you can enter a
database file name.
3
Enter a valid database user and password combination for your connection
if required.
The value provided for the password is encrypted and saved permanently
to avoid repetitive entry.
4
Click Query to open the Query dialog box. (Refer to Chapter 5,
“Advanced Concepts and Tools” for a detailed description of the Query
Designer/Content Explorer.)
5
In the Database field, enter a database name, if required.
6
In the Schema field, enter a database schema name, if required.
7
Activate the standardize data format option.
When you activate the Standardize Data Format in a Data Provider
component, incoming DATE and NUMBER information is automatically
converted into a standardized format (Date: CY-M-D H:N:S.s; Example:
2005-12-01 16:40:59.123; Numbers with a '.' as decimal separator). This
allows to automatically move and convert this format sensitive
information between systems using different DATE and NUMBER
information.
When activated in a Data Sink component, the component expects to
receive all data in attributes of the datatypes DATE or NUMBER in the
standardized data formats. The data sink component then automatically
converts from the standardized data format to the native format of the
connected database system.
8
72
Click Edit to open the Database Options dialog box and select the database
options.
Sybase IQ ETL 4.1
CHAPTER 6
Components
DB Option
Default
Description
Show error location
1
1 = yes 0 = no
0
Database errors will include the position of
the record within the result set, when Show
error location = 1.
Always use logon credentials.
Always use logon
credentials
Extended
connection option
Extended connection option.
Connect timeout
0
Stops trying to connect after Connect
timeout seconds. If set to 0, the connect will
not time out
Disconnect timeout
10
Enforces disconnect from the database, if
there was no reply from database n seconds
after trying to disconnect.
Treat numeric
values as character
0
1 = Treats numeric values as characters.
Always Unicode
Isolation Level
0
DEFAULT
Unicode will be forced (DB2).
Database specific.
Lock result set data
0
LOB truncate size
1024
Numeric Support
1
Query tables will be locked. This is used to
ensure that no data is written to the selected
record set while the process in working on
it. The selected record set is released when
the last record from that set was fetched.
This can be useful when dealing with data
integrity concerns.
LOB will be truncated when exceeding
LOB truncate size.
Support numeric values.
Execution timeout
0
Unicode support
0
Write rejected
records to file
Component will stop execution after a time
interval in seconds (0 = no timeout.)
Support Unicode operation.
File path for Reject Log.
This and the following options are used to
log records that have been rejected by the
database on loading
Note All other records of a data block will
be written to the database
User’s Guide
73
Overview
9
DB Option
Default
Description
Truncate reject log
1
Write error code to
reject log
1
Log will be truncated on database connect.
A value of 0 will append data to an existing
log file.
The database error code for each record
will be written to the log.
Write error text to
reject log
1
The database error text for each record will
be written to the log.
Write header to
reject log
0
If set to 1, a column header will be written
to the log.
Reject log column
delimiter
Tab
The columns will be delimited by this
character or string.
Set the Read Block Size.
The Read Block Size option defines the number of records retrieved by the
component within in a single step.
Use a fairly small number during simulations to accelerate the simulation
step. Increase the number before you execute the project. Executing a
project with a small number might have a negative effect on the overall
performance of the system.
10 Set the Write Block Size.
The Write Block Size option defines the number of records to be written
to the database in a single write operation. A component with a large Write
Block Size will be waiting to receive as many records as defined before
the data records are actually written to the database. To enforce writing
after a simulation step, the number for Write Block Size should be equal
or smaller than the Read Block Size of the previous component with a
Read Block Size property.
11 Set up pre-processing SQL.
One or more SQL statements can be executed during the initialization of a
component. Initialization is the first step each components passes when
starting a simulation or when executing a project. When the project is
initialized, all components of the project are initialized subsequently.
Note When using multiple statements, you can separate the statements by
using a semicolon.
12 Set up post-processing SQL.
74
Sybase IQ ETL 4.1
CHAPTER 6
Components
One or more SQL statements can be executed when all components
finished processing the project.
Note When using multiple statements, you can separate the statements by
using a semicolon.
Connecting to a SQLite database
A SQLite database is represented as a single file with the extension .db. The
database file can contain any number of tables.
❖
To connect to or to create a SQLite database
1
Select SQLite Persistent from the Interface drop-down list.
2
Enter a new or existing file name for the SQLite database in the Host
Name property. A new name will automatically create a new SQLite
database file with an extension .db. Do not enter the extension .db when
entering the name of an existing SQLite database.
For example, to create a new SQLite database file mySQLite.db or to connect
to an existing mySQLite.db database file:
•
Interface: SQLite Persistent
•
Host Name: mySQLite
The database file created is named mySQLite.db.
Creating a SQLite table
Use Content Explorer to manually enter attribute information for creating a
table. Right click a Staging component and select Add Staging table from input
or Add Staging table from port to automatically create a table matching the
conventions of the database connected to the component using the port
structure.
Extracting data from an existing SQLite table
Provide the proper connection parameters for the SQLite database file on a DB
Data Provider component or a Staging Component.
SQLite supported SQL commands can be used in the pre-processing or postprocessing SQL properties of components connected to databases.
User’s Guide
75
Overview
You can use the Content Explorer from the Tools menu to manipulate or
browse objects of the SQLite database connected to components in your
project. Also, use client applications from the at www.sqlite.org to connect to
SQLite database files.
Note Before using external client applications to connect to your SQLite
database files, become familiar with the locking strategy of SQLite.
Providing descriptions for components
You can assign a name and a description to a component. The Name appears at
the top of the component. The Description and the Name are displayed in a
tooltip.
❖
To provide a description for the component
1
Right-click the component to open the pop-up menu.
2
Select Description.
3
Enter a name.
4
Enter a description. You can use HTML formatting tags to format the
description.
Adding component variables to a component
In the Property section, you can add component variables to your component.
Component variables can be seen as parameters to the component. Those
variables can be accessed in expressions or procedures of the component for
further processing. The scope of the variables is local to the component.
❖
76
To add a component variable
1
Right-click the Property section to open the pop-up menu.
2
Select Add.
3
Enter the name of the variable. Inside the component, this variable is
referenced using the notation REF.<name of variable>.
4
Enter values for a prompt and a description.
Sybase IQ ETL 4.1
CHAPTER 6
❖
❖
Components
To edit a component variable
1
Right-click the component variable in the Property section to open the
pop-up menu.
2
Select Edit.
3
Apply any modifications to your current settings.
To remove a component variable
1
Right-click the Component variable in the Property section.
2
Select Remove.
Evaluating SBN expressions
Select the Evaluate command if you want to allow SBN expressions that are
evaluated prior to using the property value. Some property items are pre-set to
Eval.
❖
To select or clear the Evaluate property
1
Click the line of the property item you with to disable the evaluation for.
2
Right-click to open the pop-up menu.
3
Click Evaluate to toggle the current setting.
Encrypting properties
Property values are stored in the repository in XML format. However, most
entries in the Sybase IQ ETL repository are not encrypted but are represented
in a readable character set.
❖
User’s Guide
To save property values in an encrypted format
1
Click the line of the property.
2
Right-click to open the pop-up menu.
3
Click Encrypt to toggle the current setting.
77
Overview
Modifying components
To initialize a component, right-click it and select Initialize or select Initialize
and Step from the pop-up menu.
If you modify one of the existing property settings of a component during
simulation re-initialize the component prior to applying the next step.
Data blocks and visualization
When working in simulation mode, the entire result set of the data source (as
defined by a query in the source or staging component) can be divided into data
blocks. A data block contains a subset of records. The number of records in
each subset is related to the Read Block Size parameter in the Property section
of the component. Choose a small number for the Read Block Size parameter
to enhance the performance while stepping through the project.
❖
To preview the result of a transformation
1
Step through the project including the component you want to preview.
2
Right-click the component, port, or the connecting Link.
3
Select the Preview command. If a component has multiple ports, select the
port from the drop-down list.
Stepping a component multiple times
A component can be stepped multiple times during a simulation to allow you
to preview a component’s behavior with different property settings.
❖
78
To step through a component multiple times
1
Select the component.
2
Modify the transformation rules or property settings.
3
Initialize the component.
4
Step the component.
5
Return to step 2.
Sybase IQ ETL 4.1
CHAPTER 6
Components
When stepping the component repetitively, the same set of records at the INport are reprocessed in each step and forwarded to the output port without
increasing the number of the record set at the OUT-port. For many components,
the stepping can be done from inside the component window or by using the
pop-up menu from the desktop.
Managing port structures
When adding a new component to a project, Sybase IQ ETL assigns a port
structure to the newly added component based on the connecting link. Adding
a component to a project with no unconnected ports leaves the newly added
component without a port structure.
Additional attributes can be added to a port structure.
After you add a component to the project, the color of the component ports
indicates the status of the component:
•
Red — no port structure is defined, one or more mandatory properties are
not defined.
•
Yellow — port structure is defined, one or more mandatory properties are
not defined.
•
Green — component is properly configured.
Modifying a port structure
The structure of a port can be modified in the Structure Viewer window.
❖
To modify a port structure
1
Right-click the port.
2
Select Edit Structure to open the Structure Viewer.
Note The port structure of Source Components and Destination Components
cannot be changed.
❖
User’s Guide
To add an attribute to the port
1
Click Add.
2
Enter the attribute settings.
79
Overview
3
❖
❖
Copying port
structures from other
ports
Click Save to confirm.
To delete an attribute from the port
1
Click the line containing the attribute.
2
Click Delete.
3
Click Save to confirm.
To modify an attribute
1
Click on the line containing the attribute.
2
Modify the attribute settings.
3
Click Save to confirm.
A port structure can be assigned to a port based on any other available port in
the current project:
•
Click the port you want to assign a new structure to.
•
Right-click and select Assign Structure.
You can copy the port structure from other ports of the same component. You
can also copy any other port structure of the current project by selecting Copy
Structure.
If you select Copy Structure, a window displays an overview graph of the
current project. You can select any of the available ports in the project.
❖
Viewing and mapping
to ports
1
Click the port you want to use as a source. The attribute structure of the
selected port is displayed in the lower area of the window.
2
Click Apply.
A link is the connecting line between two component ports. A link can be used
to:
❖
80
To select a port that serves as the source for your new port structure
•
Change the mapping between the port structure of the adjacent ports
•
Preview the data (before mapping occurs)
To view the mapping of a link
1
Right-click the link. The color of the link turns green.
2
Select the Mapping command to open the Mapping Definition window.
Sybase IQ ETL 4.1
CHAPTER 6
Components
In Display structure mode, all attributes of the connected port and their current
mappings are shown. The Display structure and values mode displays the value
of the current record.
❖
To change a mapping
1
Click on a connecting line.
2
Remap it to a new port attribute by dragging the line end to a new
connection point. (See “Viewing current mappings” on page 31.)
Source components
DB Data Provider Full Load
The Data Provider Full Load component is one of the source components to
initiate the transformation process. Use this component whenever the source
database has a relational structure and is accessible through ODBC or Sybase
IQ ETL-provided native DB drivers (DB2, Oracle, Sybase).
This component retrieves data by issuing a query against the data source. The
structure of the (single) output port mirrors the structure of the query result set.
❖
To enter required properties
1
Enter the connection parameters as described in “Entering database
connection parameters” on page 71.
2
In the Property section, click Query to open the Enter Property window.
The Enter Property window allows you to enter and validate the query. The
skilled user might enter the SQL query directly into the Query field. The Query
Designer offers a graphical interface to create the SQL query.
Entering a query
To enter a query, enter the SELECT statement straight into the Query field. Any
valid SELECT statement based on the underlying database system and schema
is allowed. No delimiting character to mark the end of the statement is required,
for example:
SELECT * FROM CUSTOMERS
User’s Guide
81
Source components
SELECT A.CU_NO, A.CU_NAME, A.CU_CITY, B.SA_ORDERDATE,
B.SA_TOTAL
FROM CUSTOMERS A, SALES B
WHERE A.CU_NO = B.CU_ID
ORDER BY A.CU_NO
For database schema lookups, click Database Lookup.
Note The SELECT statement must be compliant with the SQL language
supported by the connected database system. Be especially aware of
differences regarding quote characters, date functions, and expressions. It is
good practice to use the SQL 92 ANSI standard for queries compatible
between different database systems.
Using Query Designer to enter a query
Click Query Designer to open the Query Designer. To learn more about this
tool, see “Query designer” on page 55.
Validating a query
Click Execute Query to run the query.
Modifying a connection
After modifying connection parameters, re-logon to the database to validate the
settings. To re-logon, right-click the component in the project and select
Logon.
Optional properties
The optional properties are:
•
Read Block Size — defines the number of records retrieved by the
component within a single simulation step.
•
Pre-processing SQL — defines one or more SQL statements to be
executed during initialization of the component.
•
Post-processing SQL — defines one or more SQL statements to be
executed after all components finished execution.
See “Entering database connection parameters” on page 71 for more
information about the optional properties and for more information about the
following properties:
82
Sybase IQ ETL 4.1
CHAPTER 6
•
Database
•
Schema
•
Database options
Components
Impact on simulation sequence
Read Block Size value impacts the number of records loaded in a single
simulation step.
Projects in DemoRepository and Help Flash movie:
•
Demo Transfer US Products
•
Demo Transfer German Sales
DB Data Provider Index Load
This component allows you to perform incremental data loads. Data records
already extracted by previous executions of the project will be skipped. The
incremental load is controlled by an attribute containing ascending values, the
Ascending Index.
During simulation of a project, you can manipulate the value of the Ascending
Index with the Load Index Value property.
The value of the Load Index is not updated within the Sybase IQ ETL
Development Repository when the project is executed during simulation.
Note To perform an incremental load using the stored value of the Ascending
Index, projects using this component must be executed within a job or
schedule.
Use this component if you need to track source changes on a regular basis. The
loading time can be significantly reduced only if the delta of the day has to be
transferred, instead of loading very large tables or views on a daily basis.
❖
User’s Guide
To enter required properties
1
Enter the Connection Parameters as described in “Entering database
connection parameters” on page 71.
2
Select the Ascending Index attribute from the list of database objects.
83
Source components
3
Select an attribute with values that increase whenever data is changed or
added to the source, such as an auto incremental ID or a modification date.
It is not required to have this attribute indexed on the database schema
level; however, for performance reasons Sybase recommends that you
create an index.
4
Enter a Query for the incremental load.
The selection criteria in the WHERE clause needs to be qualified using the
predefined variable LoadIndex. Enclose the LoadIndex with square brackets,
because it is evaluated before the query is sent to the database, for example:
SELECT * FROM SALES
WHERE SA_DELIVERYDATE > '[LoadIndex]'
ORDER BY SA_DELIVERYDATE
Note Quote characters differ between database systems. On Microsoft Access
databases, use # for datetime values.
Resetting the Ascending Index Value
You cannot directly manipulate the persistent value of the Load Index in the
Repository, but you can reset the value to the one stored in the Load Index
Value property.
❖
To reset the value of the persistent Load Index value
1
Select the project in the Navigator section.
2
Right-click and select Reset Execution Properties.
The optional properties are:
•
Load Index Value - The maximum value of the Ascending Index attribute
is automatically used and stored when executing a Sybase IQ ETL
Development job or schedule. The Load Index Value is used to simulate
the project with the specific value provided by the user, for example:
'2005-01-19'
100
84
•
Read Block Size — The Read Block Size defines the number of records
retrieved by the component within in a single simulation step.
•
Pre-processing SQL — defines one or more SQL statements to be
executed during initialization of the component.
Sybase IQ ETL 4.1
CHAPTER 6
•
Components
Post-processing SQL — One or more SQL statements to be executed after
all components finished execution.
See “Entering database connection parameters” on page 71 for more
information about the optional properties and for more information about the
following properties:
•
Database
•
Schema
•
Standardize Data Format
•
Database Options
Impact on simulation sequence
Read Block Size value impacts the number of records loaded in a single
simulation step.
Text Data Provider
The Text Data Provider is a component that reads and transforms data from a
text source with delimited or fixed length structure into a table structure. There
is a great variety of character sets available to deal with almost any character
representation, including Unicode character sets.
Use the Text Data Provider if you want to extract structured data from a text
file. The component is designed to extract data from text files with a regular
record structure with fields of either fixed length or delimited by a unique field
delimiter.
❖
To use the Text Data Provider
1
Add the component to the project. The component window and the Open
File dialog box open.
2
Select a file or close the window to enter a name in the Text Source field.
After select the file, you are prompted to select file description properties.
While reading the file, Sybase IQ ETL Development tries to make best
assumptions about the structure of the file, but any value can be modified.
3
User’s Guide
The following message appears “Do you want to generate the
column definition?”. Click Yes if you want to create columns based
on the current settings. Click No to create a single column.
85
Source components
Properties
Character Encoding
•
Select a character set from the list.
•
Press Enter to confirm.
Support Unicode
Activate this option when the text file contains unicode data.
Type
•
Specify the structure type of the input file.
•
Press Enter to confirm.
Delimited
The fields in the file are separated by a specific character or string.
Fixed (fixed Line)
The fields and lines in the file are of fixed length. There is no line delimiter.
Fixed (variable line)
The fields in the file are of fixed length. The lines are separated by a specific
character or string.
Line delimiter
•
Either select from the list or enter a value.
•
Press Enter to confirm.
•
Enter a number that matches the line length of a Fixed (Fixed Line) file.
•
Press Enter to confirm.
•
Either select from the list or enter a value.
Line length
Column delimiter
86
Sybase IQ ETL 4.1
CHAPTER 6
•
Components
Press Enter to confirm.
Read column names from row
•
Enter the number of the line containing the column headings.
•
Press Enter to confirm.
•
If any rows are to be skipped on reading (for instance lines containing
headings), provide the number of lines to be skipped.
•
Press Enter to confirm.
•
If field values in the source text file are quoted, provide the respective
character.
•
Press Enter to confirm.
•
Enter the character to replace a Null Byte (0x00 ASCII).
•
Press Enter to confirm.
Skip first rows
Quote characters
Null byte replacement
Modifying column names
❖
To modify column names
1
Right-click the current column name in the Output Port Content area and
select Edit.
2
Modify the Column Name. For a delimited file, no position parameters
will be displayed.
Removing columns
To remove columns, right-click the column name in the Output Port Content
area and select Remove.
User’s Guide
87
Source components
Working with fixed-length file type
When a file has been qualified as fixed-length, the Add Column option in the
Output Port Content area is activated. For each column to be added, click Add
Column and edit Column Name, From Position and To Position. Or, you can
select the range of the column to be specified in the upper File Content section.
Right-click and select Assign Position to Column. Then, enter the Column
Name. The position parameters are preset according to the position of the
selected area in the line.
Impact on Simulation sequence
There is no impact on Simulation sequence. For more information, view the
Help Demo Transfer German Customers.
XML via SQL Data Provider
The XML via SQL Data Provider loads the data from a hierarchical XML
document into a relational schema. This schema can be queried via SQL like a
relational database.
Figure 6-1: XML via SQL Data Provider
Using the built-in SQL-based XML Port Manager, you can define one or more
output data streams. To validate the XML source file, you can provide either a
XML Schema file or a DTD description file.
88
Sybase IQ ETL 4.1
CHAPTER 6
Components
You do not need to understand XML in detail to use this component. It is useful
for data-centric XML documents (such as, sales order, stock quotes, scientific
data) that are characterized by a regular hierarchical structure. Use this
component to represent the data from the XML document in a relational table
structure for further data transformation.
❖
To enter required properties
1
Select the XML Source file. This can be an HTTP, FTP, URL, or a file
name.
2
Click the XML button of the Data Output property to open the XML Port
Manager.
3
Specify SELECT statements based on the table structure created from the
XML document for each output port (see description of the XML Port
Manager below). There is one output port per default, but you can add
ports. To create the SELECT statement, you can use the Query Designer.
Optional properties
Document Schema
Enter the URL of an external schema or DTD for the XML document.
Namespace Schema
Enter the URL of an external schema for the namespace.
Validate Schema
Switch on or off schema/DTD validation.
XML Options
User’s Guide
•
Process namespace — Set this value to 0 if namespace specification shall
not be considered during parsing. The default value is 1.
•
Full schema check — Full schema constraint checking includes those
checking that may be time-consuming or memory intensive. Currently,
particle unique attribution constraint checking and particle derivation
restriction checking are controlled by this option. The default value is 0.
•
Ignore external DTD — Set this value to 1 to ignore an external DTD
referenced within the document. The default value is 0.
89
Source components
DB Schema
Select the file containing the database schema setup (create tables) script. Use
this option to enforce a fixed data model.
DB Schema Options
Customize the settings for tables and attributes being generated from the XML
structure, such as the prefixes for table and attribute names.
DB Options
These are advanced options to configure the underlying internal database.
Read Block Size
This option defines how many records are read from the query result set in one
step. It applies only to components with a single output port in the simulation.
With a value of 0 (default) all records are delivered in one output block.
Setting up the XML via SQL component
This section guides you through the three steps of the setup process for the
component using a simple example.
To follow the example, use the PRODUCTS.xml file as the XML source. It is
located in the Demodata subdirectory of the Sybase IQ ETL Development
installation directory.
XML source
The following XML document is a simple product structure. Each product is
described with an ID (PR_ID), a name (PR_NAME), a product group
(PR_GROUP1), and a price (PR_PRICE), for example:
<?xml version="1.0" encoding="UTF-8"?>
<dataroot xmlns:od="urn:schemas-solonde-com:demodata"
xmlns:xsi="http://www.w3.org/2001/XMLSchema-instance"
xsi:noNamespaceSchemaLocation="PRODUCTS.xsd"
generated="2005-01-24T16:13:26">
<PRODUCTS>
<PR_ID>435672</PR_ID>
<PR_NAME>24 CD Rom Drive</PR_NAME>
<PR_GROUP1>CD Rom</PR_GROUP1>
<PR_PRICE>134</PR_PRICE>
</PRODUCTS>
90
Sybase IQ ETL 4.1
CHAPTER 6
Components
<PRODUCTS>
<PR_ID>435673</PR_ID>
<PR_NAME>Notebook 235</PR_NAME>
<PR_GROUP1>Notebook</PR_GROUP1>
<PR_PRICE>1455</PR_PRICE>
</PRODUCTS>
</dataroot>
XML Port Manager
Click the XML button of the Data Output property to open the XML Port
Manager.
In the upper area of the window, you can view the source XML document. The
left section of the lower window contains two tabs:
•
The Data Model tab displays the generated relational schema.
•
The Reference tab displays the available component variables.
The right section of the lower window is the port area in which one or more
ports can be defined. Each port is described by a SELECT statement based on
the XML Data Model tables.
The Data Model
There is one table for the root element (TAB_dataroot) followed by one or
more tables for elements on level 1. In the example, only one element on this
level exists (TAB_PRODUCTS). On the next level, you find a table for each
element on level 2 (TAB_PR_ID, TAB_PR_NAME, TAB_PR_GROUP1,
TAB_PR_PRICE). There can be more nested levels in the XML document,
each level will create another set of table.
Note You can change the prefixes for the generated table names in the DB
Schema Options property.
User’s Guide
91
Source components
Root Level
Elements Level 1
Elements Level 2
TAB_PR_ID
ATT_ROW_ID
ATT_FK_PRODUCTS
ATT_PR_ID
TAB_dataroot
ATT_ROW_ID
ATT_FK_generated
ATT_xmlns_od
ATT_xsi_no
TAB_PRODUCTS
ATT_ROW_ID
ATT_FK_dataroot
TAB_PR_NAME
ATT_ROW_ID
ATT_FK_PRODUCTS
ATT_PR_NAME
TAB_PR_GROUP1
ATT_ROW_ID
ATT_FK_PRODUCTS
ATT_PR_GROUP1
TAB_PR_PRICE
ATT_ROW_ID
ATT_FK_PRODUCTS
ATT_PR_PRICE
The tables are linked through foreign keys. Table TAB_PRODUCTS is linked
to TAB_dataroot via attribute ATT_FK_dataroot. The tables on level 2 are
linked to table PRODUCTS via attribute ATT_FK_PRODUCTS. To create the
view containing the PRODUCTS records, the tables on Level 2 have to be
joined with the TAB_PRODUCTS table. The join is qualified by the
ATT_FK_PRODUCTS attribute of each Level 2 table and the ATT_ROW_ID
of TAB_PRODUCTS. The only selected attributes are the value attributes of
Level 2 tables: ATT_PR_ID, ATT_PR_NAME, ATT_PR_GROUP1 and
ATT_PR_PRICE.
SELECT TAB_PR_ID.ATT_PR_ID,
TAB_PR_NAME.ATT_PR_NAME, TAB_PR_GROUP1.ATT_PR_GROUP1,
TAB_PR_PRICE.ATT_PR_PRICE
FROM TAB_PRODUCTS, TAB_PR_ID, TAB_PR_NAME,
TAB_PR_GROUP1, TAB_PR_PRICE
WHERE TAB_PR_ID.ATT_FK_PRODUCTS =
TAB_PRODUCTS.ATT_ROW_ID AND
TAB_PR_NAME.ATT_FK_PRODUCTS = TAB_PRODUCTS.ATT_ROW_ID
AND TAB_PR_GROUP1.ATT_FK_PRODUCTS =
TAB_PRODUCTS.ATT_ROW_ID AND
TAB_PR_PRICE.ATT_FK_PRODUCTS =
TAB_PRODUCTS.ATT_ROW_ID
92
Sybase IQ ETL 4.1
CHAPTER 6
Components
Creating a SELECT statement
You can enter a SELECT statement for the port straight into the port field, or
you can open the Query Designer by clicking Query Designer.
Note To control the automatic join generation (enable/disable), go the File |
Preferences menu.
Adding and removing ports
Right-click on the port section and select Add port or Remove port.
An Info Port can be added to forward the XML document to the next
component. This port is visible after exiting the XML Port Manager.
There is no impact on the simulation sequence.
For more information, see the XML via SQL Customer Sales Transfer Projects
in the Demo Repository and Help Flash movie.
Transformation components
The Data Calculator
The Data Calculator component lets you perform transformations on every
record passed to this component. You can freely map and transform attributes
between the IN-port and OUT-port. While entering your transformation rules,
you can watch and verify the incoming content, the applied transformations,
and the outgoing content based on the proposed rule set.
Whenever you need to transform the content of one or more port attributes or
add rules for new attributes the Data Calculator is the perfect choice. If you
only need to remap attributes, you can use the mapping feature of a link without
having to use a Data Calculator.
After adding a component to the project, the component window is shown. You
have to create an initial mapping between the IN- and the OUT-Port of this
component.
User’s Guide
93
Transformation components
❖
To create a mapping
1
Select the Graph tab of the component window.
2
Map the IN-Port and Out-Port structures by either using pre-defined
mapping sequences or by connecting the IN-Port and OUT-Port attributes
individually.
The two most common mapping methods are available through the Create
mapping by order and Create mapping by name buttons.
After selecting a mapping sequence, the port color changes to green. The
component is now ready to be used and will forward records from the IN-Port
to the OUT-Port.
Displaying transformation results
One of the essential features of the Data Calculator is its capability to display
the result of transformation rules immediately. This powerful simulation
capability allows you to verify the incoming data, the transformation rules, and
their effect on the data output. By changing the Current Input Record you can
even enter your own test data for verifying your transformation rule.
The Data Calculator window consists of two tabbed section: Tabular and
Graph. When the Data Calculator window opens, it displays the tabular view
of the current simulation.
Tabular tab
There are four major areas in the Tabular tab:
•
Current Input Record
•
Transformation Rules
•
Current Output Record
•
Input/Output Port Content
Current input record
This area displays the content of the current record. You can freely change the
values of each attribute and verify the result in the Transformation Rules and
Current Output Record area. Manual modifications made in this area only
affect the data of the Input/Output Port buffer. This offers a convenient way to
create test cases for transformation rules.
94
Sybase IQ ETL 4.1
CHAPTER 6
❖
Components
To simulate a single attribute
1
Change the value of any attribute in the Current Input Record.
2
Press Enter.
The result of transformation based on the new field value is displayed in
the area to the right.
Transformation rules and current output record
In the Transformation Rule column, you can add, modify, or delete
transformation rules. You can also edit single-line functions by changing the
current attribute input field. Adding the function uUpper to the attribute
IN.PR_NAME would look like the following example:
You can use the Procedure Editor (see “Using the JavaScript Procedure Editor
and Debugger” on page 57) to create more complex procedural
transformations.
The attributes displayed after opening the Data Calculator window in the
Tabular view are related to attribute structure of the IN-port and the OUT-Port.
You can also add additional transformation rules. This is extremely helpful if
the number of OUT attributes does not match the number of IN attributes, or if
additional attributes have been added to the project at a later stage of
development.
Note The view in the Graph Tab mirrors the actual Port Structures. You cannot
add or delete attributes there.
❖
User’s Guide
To manually add transformation rules
1
Right-click anywhere in the Transformation Rule and Current Output Port
column.
2
Select the Insert command to add a line.
3
Click the added line.
95
Transformation components
4
Right-click and select OUT or TMP.
5
Select one of the attributes from the menu.
The added attribute can now be used for further assignments or calculations.
To delete transformation rules, right-click the desired line in the
Transformation Rule or Current Output Port column and select Remove.
To change the order of the transformation rules, right-click the desired line in
the Transformation Rule or Current Output Port column and select UP or
DOWN.
Sequence of processing transformation rules
The transformation rules are processed is sequential order. The processing
starts with the first transformation rule of the list. Consider the following
example:
In Line 3 you find a direct mapping between IN.PRICE and OUT.PRICE. Later
in line 7, there is a procedure that re-calculates the price and is thus overwriting
the assignment of the previous transformation rule.
Input Port Content area
Shows the current set of records available at the input port.
Output Port Content area
Shows the current set of records available at the output port.
Graph tab
The Graph tab shows the current mapping between the IN- and OUT-port
attributes.
96
Sybase IQ ETL 4.1
CHAPTER 6
Components
You can freely change the mapping by re-connecting the lines to the connection
points.
Note After you apply a transformation rule to an IN.attribute, the mapping line
between the IN.attribute and the OUT.attribute will no longer be displayed.
Simulating the Data Calculator
The Data Calculator is designed to visualize the changes applied to the data as
it moves through the transformation rules. This is particularly useful to answer
the question on how a change of a transformation rule would affect the
outgoing data. Depending on status of the Auto-Synchronization button, a
transformation rule will be immediately applied to the entire set of IN-Port
records after the rule had been entered.
Turn on and off
immediate
synchronization
If Auto Synchronization is turned on, all changes of the transformation rules
are applied immediately to the current set of records at the IN-Port.
To switch the current setting, click Auto-Synchronization. If Auto
Synchronization is turned off you can manually trigger the processing of the
IN-Port data by select the Step option.
Manually Apply all
transformation rules
To manually apply all transformation rules to all current records at the IN-Port,
click the component Step option.
Fetch another set of
records
To step through the next incoming data buffer set, click Fetch the Next Set of
Data.
Select a specific
record
To step through the current set of records at the IN-Port record-by-record, click
the appropriate option in the record control. Or, you can select a record from
the Input Port Content list.
Note The values shown on the Current Input Record area are changing as you
change the current record.
Search for keywords
in the transformation
rules
Click the Search the Content of Transformation Rules to search for a specific
keyword in the current transformation rules.
Highlight NULLValues and empty
values
For easy identification of NULL-values and empty values, click Highlight
NULL-Values and Empty Values.
User’s Guide
97
Transformation components
Using lookups in the Data Calculator
The Data Calculator can perform lookups on attribute level. The lookup data
has to be provided at special lookup ports.
Adding Lookup Ports
To add a lookup port to a Data Calculator component, connect the output port
of the data providing component with the Data Calculator component. Or, you
can select Add Input Port from the Data Calculator component menu and
connect the output port of the data providing component with the new port.
The number of lookup ports is unlimited.
Preparing the lookup data
Each lookup port must have at least two attributes. The first attribute represents
the key, all other attributes the return values.
If you need to lookup compound keys you have to concatenate the key values
within a preceding component and use the same kind of concatenation on the
key expression for the lookup.
Setting general lookup options
You can use the Lookup Options property to configure the lookup. The Enter
Property window will display a list of all lookup ports and its current option
values.
The properties are:
98
•
Lookup Name — The Lookup name is inherited from the associated port
and cannot be changed here. To change a name of a port, select Description
from the port menu.
•
Lookup Size — Enter the estimated number of lookup records to optimize
memory allocation and lookup performance (this option is described more
detail in “DB Lookup component” on page 101).
•
Lookup Empty / Null — Empty and Null are normally handled as
“unknown” keys, thus returning the lookup default value. If Empty or Null
values are valid keys for your lookup, you can enforce looking up the
values for these keys by activating the appropriate options.
Sybase IQ ETL 4.1
CHAPTER 6
Components
Building Lookup rules
To set up Lookup rules open the Tabular Tab of the Data Calculator window. If
Lookup ports are available an additional Lookup column is displayed.
You must provide the following information for each lookup rule:
•
Key Expression — This is the value to search for in the first column of the
lookup list. You enter the key expression (for example IN.PR_ID) as the
Transformation Rule.
•
Return Value — Since lookup lists can have more than one return value
columns you have to specify which value to return, if the key has been
found. This is done by selecting the associated port attribute from the popup menu on the Lookup column (for example
LOOKUP1>>LOOKUP1.PR_NAME).
Note Although the return values are selected and displayed by name, the
lookup internally uses the column number. This means you will need to
review your lookup rules whenever the lookup port structure is modified,
especially after adding or removing attributes.
Note The key column is always returned as Unicode.
•
Output Variable — The Lookup return value is assigned to this variable.
You can select a variable from the pop-up menu on the Output Port column
(for example, OUT>>OUT.PR_NAME).
•
Default Expression (optional) — A Lookup will return Null if the given
key value is not found. To return a different default value you can enter an
expression in the Lookup Options window (for example, “key not found”).
Without Lookups, there is no impact on a simulation sequence. With Lookups,
all data is read into the Lookup ports before the data at the Main port is
processed.
Character Mapper
Use the Character Mapper component to replace characters or strings in the
input record. The mapping of the replacement will be applied to all or selected
attributes, and mapping definitions can be saved into files.
Use this component for replacement of characters or strings (for example,
German Umlaut ä to ae or Unicode characters).
User’s Guide
99
Transformation components
❖
To set up required properties
1
Add the component to the project and connect the ports of the component
to adjacent components.
2
Open the Mapping window by clicking Mapping in the Properties section.
3
Enter at least one mapping.
The Character Mapper component is designed to visualize the result of a
character mapping immediately after the mapping has been entered. To switch
of this kind of automatic synchronization, click Auto Synchronization.
❖
To add a character mapping
1
Click Add Line in the toolbar.
2
Enter a character or string in the From columns.
3
Enter a character or string in the To column. If you do not enter a value,
the From value will be effectively removed without any replacement.
To delete a character mapping, select the line and click the Remove Line
button.
To save the current mapping to a file, click the Save File button.
To open a mapping from a file, click the Open File button.
Optional properties
In the Properties section, you can select the attributes to use the character
mapping previously defined. By default the mapping rules will be applied to all
attributes of the incoming data.
To customize the default setting, click Exclude and then select the attributes
that you want to exclude from the mapping.
Example values for a character mapping are:
From
Ä
To
ae
Description
Umlaut character mapping.
customer
<13><10>
kunde
String replacing.
(ASCII decimal)
Delete CR LF at the end of the line.
<xD><xA>
100
(ASCII hexadecimal)
Delete CR LF at the end of the line.
Sybase IQ ETL 4.1
CHAPTER 6
Components
From
To
Description
<u8356>
<u8364>
<0x20A4>
<ux20AC
>
(Unicode Decimal)
Replace the Lira currency symbol with Euro
currency symbol (€).
(Unicode Hexadecimal)
Replace the Lira currency symbol with Euro
currency symbol (€).
There is no impact on the simulation sequence.
Using Lookup components
In general, a Lookup operation looks up a value corresponding to a key in a
Lookup table containing a list of (key, value) pairs. A static Lookup table can
be cached during the execution of a project, or the Lookup can be performed
uncached and dynamically.
The Lookup components are:
•
The DB Lookup component performs a cached lookup in a database.
•
The DB Lookup Dynamic component performs an uncached, dynamic
lookup in a database.
DB Lookup component
This component allows to lookup values in a database. The lookup data is
specified by the result set of a query returning exactly two columns: the lookup
key and the lookup value. The value returned (lookup value) by the lookup can
be assigned to any attribute of the current record. The lookup table will be
cached during execution of the project. Changes applied to the underlying
database during project execution have no effect on the lookup result.
Use this component, when your lookup data can be retrieved directly from a
database.
Add the component to the project and connect the ports to adjacent
components.
User’s Guide
101
Using Lookup components
Required properties
Key Attribute
Select a Key Attribute from the list of IN-Port attributes. This attribute
corresponds to the first column of the lookup table.
Value Attribute
Select the attribute to receive the value returned by the lookup from the Value
attribute list. The lookup value returned will overwrite any existing value.
Both Key Attribute and Value Attribute might refer to the same attribute of the
record structure therefore allowing overwriting a key with its corresponding
value.
Enter the Connection Parameters as described in “Entering database
connection parameters” on page 71.
Query
To enter the query for the lookup, open the Query window.
The Lookup table (actually, it is a virtual view) is made of a SELECT query
with two columns (the key column and the value column). The key column
corresponds with the Key Attribute selected. The value column corresponds
with the Value Attribute.
To enter the query, enter a SELECT statement that returns the two-column
lookup table:
SELECT <key attribute>, <value attribute>
FROM <lookup table>
You can extend the SELECT command with a WHERE clause or any other valid
clause accepted by the underlying database.
Optional properties
Default Value
Specify a Default Value to assign to the value attribute, if a key value was not
found in the lookup table.
102
Sybase IQ ETL 4.1
CHAPTER 6
Components
Use Key Value
If Use Key Value is activated, the key value will be assigned to the value
attribute instead of the default, if the lookup does not find a match.
Lookup Empty/Null Keys
If activated, the lookup will also be performed for empty or NULL key values;
otherwise, the selected default method applies.
Lookup Size
Enter the estimated number of lookup records to optimize memory allocation
and lookup performance.
The entire result set is loaded into cache memory and remains unchanged until
the transformation process finishes. Choosing an appropriate value for Lookup
Size allows allocating memory in one piece while a low value will cause the
program to allocate memory incrementally.
For example, assume that you want to replace the product number used for
German products by the product number used in the U.S. The German products
are in the table PRODUKTE(PR_NUMMER, PR_NAME, PR_PREIS). The INPort of the DB Lookup component contains those three attributes.
The table to perform the lookup of the U.S. product number is table
LOOKUP_PRODUCTS(SOURCE, DESTINATION). The SOURCE column
contains the German product numbers and the DESTINATION column
contains the U.S. product number.
If no value for the German PR_NUMMER can be found in the
LOOKUP_PRODUCTS, the current PR_NUMMER will be replaced by the string
“INVALID”. A successful lookup will replace the German product number by
the corresponding U.S. number.
To set up the DB Lookup Component for this example, choose:
•
Key Attribute: IN.PR_NUMMER
•
Value Attribute: IN.PR_NUMMER
•
Default Value: “INVALID”
•
Query: SELECT SOURCE, DESTINATION FROM LOOKUP_PRODUCTS
Refer to “Entering database connection parameters” on page 71 for more
information on the previous and the following properties:
•
User’s Guide
Database
103
Using Lookup components
•
Schema
•
Standardize Data Format
•
Database Options
There is no impact on the simulation sequence.
View Projects in DemoRepository and Help Flash movie Demo DB Lookup.
DB Lookup Dynamic component
This component performs a dynamic lookup by using a query referencing the
key value in the WHERE clause. Unlike the DB Lookup component, the DB
Lookup Dynamic performs one SQL lookup for each record that passes the
component and caches no lookup information.
During execution of a project, the data of a lookup table might be modified by
concurrent database users (or even within the same project). In this case, a nondynamic database lookup would look up data that might be no longer valid. To
verify that the current value is looked up, use the DB Lookup Dynamic
component.
Another typical use for this component is a lookup table that exceeds the
memory available on the local machine. By using the DB Lookup Dynamic
component, the lookup is slower but requires no cache memory, because it
performs the lookup on a record-by-record basis.
Add the component to the project and connect the ports to adjacent
components.
Required properties
Select a Key Attribute from the list of IN-Port attributes. This attribute
corresponds to the first column of the lookup table.
Value Attribute
Select the attribute to receive the value returned by the lookup from the Value
attribute list. The lookup value returned will overwrite any existing value.
Both Key Attribute and Value Attribute might refer to the same attribute of the
record structure therefore allowing overwriting a key with its corresponding
value.
104
Sybase IQ ETL 4.1
CHAPTER 6
Components
Enter the Connection Parameters as described in “Entering database
connection parameters” on page 71.
Query
To open the Query window, click Query and enter the query for the lookup.
The Lookup is made of a SELECT query returning a single value that
corresponds with the Value Attribute.
The query required in the DB Lookup Dynamic component is slightly different
from the one used in the DB Lookup component. The query will return exactly
one single value, which is the value found for the corresponding Key Attribute.
The value of the Key Attribute is represented in a predefined variable named
LOOKUP, which is used as a placeholder in the WHERE clause of the query.
The notation for this placeholder is an SBN expression.
The basic structure of the query for the DB Lookup Dynamic component is:
SELECT <value attribute>
FROM <lookup table>
WHERE <key attribute> = '[LOOKUP]'
During execution of the query, the LOOKUP will be replaced by the current
value of the Key Attribute of the current record and the SBN will be evaluated.
If the Key Attribute is a character datatype, use quotes: '[LOOKUP]'. You can
use functions to apply formatting or calculations:
SELECT DESTINATION
FROM LOOKUP_PRODUCTS
WHERE SOURCE = '[uRTrim(LOOKUP)]'
Optional Properties
Default Value
Specify a Default Value to assign to the value attribute, in case the key value is
not found in the lookup table.
Use Key Value
If Use Key Value is activated, the key value will be assigned to the value
attribute instead of the default, if the lookup fails.
Lookup Empty/Null Keys
If activated, the lookup is performed even for empty or NULL key values.
Otherwise the selected default method applies.
User’s Guide
105
Using Lookup components
For example, assume you want to replace the product number used for German
products by the product number used in the U.S. The German products are in
the table PRODUKTE(PR_NUMMER, PR_NAME, PR_PREIS). Your IN-Port at
DB LOOKUP component therefore contains those three attributes.
The table to lookup the US product number is table
LOOKUP_PRODUCTS(SOURCE, DESTINATION). The SOURCE column
contains the German product numbers and the DESTINATION column
contains the U.S. product number.
If no value for the German PR_NUMMER can be found in the
LOOKUP_PRODUCTS, the current PR_NUMMER will be replaced by the
string “INVALID”. A successful lookup will replace the German product
number by the corresponding U.S. number.
To set up the DB Lookup Dynamic component for this example, choose:
•
Key Attribute: IN.PR_NUMMER
•
Value Attribute: IN.PR_NUMMER
•
Default Value: ‘INVALID’
•
Query: SELECT DESTINATION FROM LOOKUP_PRODUCTS, where
SOURCE = ‘[LOOKUP]’
Refer to the “Entering database connection parameters” on page 71 for more
information on the previous and the following properties:
•
Database
•
Schema
•
Standardize Data Format
•
Database Options
There is no impact on the simulation sequence.
View Projects in DemoRepository and Help Flash movie Demo DB Lookup
Dynamic.
106
Sybase IQ ETL 4.1
CHAPTER 6
Components
Staging components
DB Staging component
The DB Staging component loads the incoming data streams into a staging
area. The data is buffered until the incoming data stream has finished, Then an
outgoing data stream, which is the result set of a given SELECT statement, is
created. The staging tables can be created based on the output port structure of
the preceding component. Although many transformation components are
designed to work on a record-by-record basis, the staging component works in
two phases:
•
Phase 1: Collect ALL records from the preceding components.
•
Phase 2: Run the query and provide the records of the result set in blocks
of given size.
Use this component to stage your transformation data in a dedicated area to
perform aggregation or joins on data from heterogeneous sources.
You can use staging components to perform sorts or aggregations on formerly
unordered records by using ORDER BY or GROUP BY clauses in the Query
property.
You could also use this component for creating an intermediate image of the
transformation for further inspection or processing.
❖
User’s Guide
To use the staging component
1
Add the component to the project and connect the ports to adjacent
components.
2
To add input streams to the DB Staging component, you can drop
connections from the data providing component on the staging
component. The ports are automatically created by the component.
3
Enter the Connection Parameters as described in “Entering database
connection parameters” on page 71.
4
Create the staging tables. If the staging tables you are going to use already
exist, go to step 6.
107
Staging components
5
Right-click the component and select either Create Staging Table from
Input or Create Staging Table from Port. The commands let you create the
staging tables optionally based on the IN-port structure of the component
or the structure of any other port within the project. However, you can also
create the staging tables manually by using third party tools.
Staging options are defined by using the Stage Options window. This
window also lets you define the Truncate Table and the Write Block Size
for each staging table.
6
Open the Query window by clicking Query button, and enter the query that
selects the data from the staging area.
Optional properties
Read Block Size
The number of records forwarded to the next component within a single step is
based on the value of Read Block Size.
Pre-processing SQL
One or more SQL statements to be executed during the initialization of the
component. If you are using multiple statements, make sure you are separating
them with a semicolon (;).
Post-processing SQL
One or more SQL statements to be executed after all components have finished
execution. If you are using multiple statements, make sure you are separating
them with a semicolon (;).
See “Entering database connection parameters” on page 71 for more
information on the previous and the following properties:
108
•
Database
•
Schema
•
Standardize Data Format
•
Database Options
Sybase IQ ETL 4.1
CHAPTER 6
Components
The DB Staging component impacts the flow of the simulation by first
retrieving all data from the original data sources, then they act as a new data
source for subsequent components. Both components allow overwriting of
Read Block Size value of the original source components.
View Projects in DemoRepository and Help Flash movies Demo DB Staging
and Demo DB Staging Double.
Processing components
Data Splitter component
The Data Splitter allows splitting an incoming data stream into multiple
outgoing data streams. By default the component is configured with two OUTPorts. Additional ports can be added. The distribution of records is controlled
by port conditions. You can define overlapping port conditions that are not
mutually exclusive.
Note The number of records forwarded by the Data Splitter to the OUT-Ports
can be greater than the number of incoming records. If a single record matches
more than one port condition, it will be available on all of these ports.
Use Data Splitter to split up (or copy) a data stream of records according to user
defined conditions.
After adding the component to the project, the Data Splitter window comes up
with two default ports. The port conditions for the OUT1 and OUT2 port are
pre-set to 1. Because this condition is always true (regardless of the current
values if the IN port), it will copy all incoming records to both output ports.
The current set of input data is shown in the upper part of the component
window. Selecting a record in the upper window causes the lower portion of
the window to signal if the port conditions are met (green) or not (red).
To customize the Data Splitter, customize the port conditions and add ports.
User’s Guide
109
Destination components
Customizing port conditions
A condition can be assigned to each port. A condition consists of one ore more
expressions. Multiple expressions are concatenated by operators. The result of
a condition is either TRUE (1) or FALSE (0).
A condition consists of functions and logical operators.
❖
To modify a port condition
1
Click the port.
2
Click the Edit calculation button to open the Condition window.
3
Enter the condition in the right section of the window. The left area of the
window contains two tabs: Variables and Functions. In the Variables tab
all variables are listed that may be used in the condition. The Functions tab
lists all functions and operators.
To add a port, click the Add button. To remove a port, select the port and click
the Remove port button.
Special port conditions
Current record
conditions
The following are special port conditions:
•
1 — TRUE, all records will be forwarded to this port, including records
that concurrently match with any other port condition.
•
(empty) — A port with an empty condition collects all records that did not
match any other condition defined in the Data Splitter.
When you select a record of the input buffer in the upper part of the Data
Splitter window, the ports in the lower half of the window will be updated. If
the selected record matches a condition, the port light will turn into green. If
the selected report does not match the port, the port will turn into red.
There is no impact on the simulation sequence.
Destination components
DB Data Sink Insert component
This component adds records to a database table. It lets you control insertion
by excluding attributes or assigning default values.
110
Sybase IQ ETL 4.1
CHAPTER 6
Components
Use this component if you want to add all records from the IN-port of the
component to a database table.
❖
To use DB Data Sink Insert
1
Add the component to the project and connect the ports to adjacent
components.
2
Enter the Connection Parameters as described in “Entering database
connection parameters” on page 71.
3
Create a destination table. If the destination table you are going to use
already exists, continue with step 5.
4
Right-click the component and select either Add Destination Table from
Input, or Add Destination Table from Port. Optionally, the command lets
you create the destination table based on the IN-port structure of the
component or the structure of any other port within the project. However,
you might also create the destination table with your own toolset.
5
Click Destination Table, and select the table to be used from the list of
available tables.
Optional properties
Insert Options
Click Insert Options to open the Insert Options window. By default, all
attributes will be inserted. Deselect the attributes you want to exclude from
insertion. This is useful if, for example, an attribute is automatically defaulted
by the database system. You may specify a SQL INSERT value clause for each
attribute, overwriting the incoming value of the selected attribute.
An example of the SQL INSERT value clause is:
'valid'
'[uDate("now")]'
Truncate Table
Activate this option to remove all records from the destination table when
initializing the transformation process.
Write Block Size
The Write Block Size defines the number of records to be written to the
database in a single write operation.
User’s Guide
111
Destination components
Pre-processing SQL
This property provides one or more SQL statements to be executed during
initialization of the component.
Post-processing SQL
This property provides one or more SQL statements to be executed when all
components finished execution.
Opening Attribute Quote
The open quote (“x) character begins attribute names in SQL statements.
Closing Attribute Quote
The closing quote (x”) ends the attribute names in SQL statements.
Note If a record to be inserted violates any restrictions (for example:
constraints, referential integrity, unique index definition) of the underlying
table or object, an error message will occur. Rejected records are written to a
log file if you provide the reject log DB Options. When executing a project
from within a job the Continue on DB Write Errors option can be set to ignore
rejection errors.
See “Entering database connection parameters” on page 71 for more
information on the previous properties and the following properties:
•
Database
•
Schema
•
Standardize Data Format
•
Database Options
There is no impact on the simulation sequence.
View Projects in DemoRepository and Help Flash movie Demo Transfer
German Customers.
112
Sybase IQ ETL 4.1
CHAPTER 6
Components
DB Data Sink Update component
This component updates records in a destination table based on a selected key.
All records matching that key will be updated or overwritten. If no matching
record exists, no error messages appear.
Use this component to correct or overwrite records of an existing table but to
not insert new records.
Note If the update values violate any restrictions of the underlying table or
object (for example: constraints, referential integrity, unique index definition),
an error message occurs. The selected Key Value attribute is independent of
any existing index definitions.
❖
User’s Guide
To use the DB Data Sink Update component
1
Add the component to the project and connect the ports to adjacent
components.
2
Enter the Connection Parameters as described in “Entering database
connection parameters” on page 71
3
Create a destination table. If the destination table you are going to use
already exists, continue with step 5.
4
Right-click the component and select either Add Destination Table from
Input or Add Destination Table from Port. Optionally, the command lets
you create the destination table based on the IN-port structure of the
component or the structure of any other port within the project. However,
you might also create the destination table with your own toolset.
5
Click Destination Table and select the table to be used from the list of
available tables.
6
Select one or more attributes composing the key. This key will be used to
identify the records to be updated in the destination table. This is a logical
selection, not related to any underlying indexes in the database schema.
113
Destination components
Optional properties
Update options
Click Update Options to open the Update Options window. By default all
attributes (key attributes are not listed) are selected. Deselect those attributes
you want to exclude from the update. In the SQL UPDATE SET clause column,
you can overwrite the value of the incoming attribute with a new one. The new
value can be a constant or an expression.
Write Block Size
The Write Block Size defines the number of records to be written to the
database in a single write operation.
Pre-processing SQL
This property provides one or more SQL statements to be executed during
initialization of the project.
Post-processing SQL
This property provides one or more SQL statements to be executed when all
components finished execution.
Opening Attribute Quote
The open quote (“x) character begins the attribute names in SQL statements.
Closing Attribute Quote
The close quote (x”) character ends the attribute names in SQL statements.
See “Entering database connection parameters” on page 71 for more
information on the previous properties and the following properties:
•
Database
•
Schema
•
Standardize Data Format
•
Database Options
There is no impact on the simulation sequence.
View Projects in DemoRepository and Help Flash movie Demo.
114
Sybase IQ ETL 4.1
CHAPTER 6
Components
DB Data Sink Delete component
This component removes records from the destination table that match the
incoming values of a selected key. There will be no error message if no
matching record exists.
Use the component to clean your table from records no longer required.
❖
To use DB Datasink Delete
1
Add the component to the project and connect the ports to adjacent
components.
2
Enter the Connection Parameters as described in “Entering database
connection parameters” on page 71.
3
Create a destination table. If the destination table you are going to use
already exist, continue with step 5.
4
Right-click the component and select either Add Destination Table from
Input or Add Destination Table from Port. Optionally, the command lets
you create the destination table based on the IN-port structure of the
component or the structure of any other port within the project. However,
you might also create the destination table with your own toolset.
5
Click Destination Table and select the table to be used from the list of
available tables.
6
Select one or more attributes composing the key. This key is used to
identify the records to be removed from the destination table. This is a
logical selection, not related to any underlying indexes in the database
schema.
Optional properties
Write Block Size
The Write Block Size defines the number of records to be written to the
database in a single write operation.
Pre-processing SQL
This property provides one or more SQL statements to be executed during
initialization of the project.
User’s Guide
115
Destination components
Post-processing SQL
This property provides one or more SQL statements to be executed when all
components finished execution.
Opening Attribute Quote
The open quote (“x) character begins the attribute names in SQL statements.
Closing Attribute Quote
The close quote (x”) character ends the attribute names in SQL statements.
See section “Entering database connection parameters” on page 71 for more
information on the previous properties and the following properties:
•
Database
•
Schema
•
Standardize Data Format
•
Database Options
There is no impact on Simulation sequence.
Projects in DemoRepository and Help Flash movie: Demo DB Datasink
Delete.
Text Data Sink
The Text Data Sink component lets you write text data files in delimited or
fixed-length format.
Use this component to write transformation results to a text data file.
The properties of the Text Data Sink can be changed either from within the Text
Data Sink component window or by manipulating the items in the Property
section. Click Properties to open the component window from the Property
section.
❖
116
To add a Text Data Sink component to a project
1
Add the component.
2
Enter a file name for the destination file.
3
Describe the file structure: Type, Line Delimiter, Column Delimiter.
Sybase IQ ETL 4.1
CHAPTER 6
Components
4
Click Save to exit the component window.
5
Connect the component with the OUT-Port of an adjacent component.
6
Click Open to open the Text Data Sink component window and verify the
result. You may add or remove columns and reassign the port structure.
Exporting and importing File Definitions files
Use the Export command in the Properties menu to save your current settings
to a file definition file. Use the Import command in the Properties menu to load
an existing file definition file that has been previously created with the Export
command.
Modifying the port structure (delimited files)
When modifying the column structure within the Text Data Sink component
window you can recreate the current port structure or assign a new port
structure.
To select a new port structure, click the Assign Port Structure button.
To go back to the current IN-port structure, click the Regenerate Column
Definition button.
Working with fixed-length files
After selecting one of the fixed-length file types, you must create the columns
and provide the position parameters of each column.
❖
❖
User’s Guide
To add columns to the output
1
Click Open to open the Text Data Sink component window.
2
Click Insert a New Attribute. You may edit the name of the generated
column.
To remove columns from the output
1
Click the Open button to open the Text Data Sink component window.
2
Click Remove.
117
Destination components
Properties
Character Encoding
Select a character set from the drop-down list and press Enter to confirm.
Type
Specify the type of the input file and press Enter to confirm.
Delimited
The fields in the file will be separated by a specific character or string.
Fixed (Fixed Line)
The fields and lines in the file are of fixed length. There is no line delimiter.
Fixed (Variable Line)
The fields in the file are of fixed length. The lines are separated by a specific
character or string.
Line Delimiter
Either select from the list or enter a value, and then press Enter to confirm.
Line Length
Enter a number that matches the line length for a Fixed (Fixed Line) file and
press Enter to confirm.
Column Delimiter
Either select from the list or enter a value, and then press Enter to confirm.
Write Column Names
The column names will be written into the first line of the file. Press Enter to
confirm.
Quote characters
If the field values are quoted in the destination text file, provide the respective
character. Press Enter to confirm.
118
Sybase IQ ETL 4.1
CHAPTER 6
Components
Append
Activate this option to append the incoming data to an existing file.
Header
Enter text for a header to be written to the file before writing out the incoming
data. Expressions are allowed in Square Bracket Notation.
There is no impact on simulation sequence.
View Projects in DemoDatastore and Help Flash movie Demo Text Data Sink
Delimited/Fixed.
DB Bulk Load Sybase IQ component
The DB Bulk Load Sybase IQ component uses the Load Table utility to add
records to a Sybase IQ table.
Use this component if you want to add all records from the IN-port of the
component to a table in a Sybase IQ database.
❖
To use this component
1
Add the component to the project and connect the ports to adjacent
components.
2
Enter the Connection Parameters as described in “Entering database
connection parameters” on page 71.
3
Click Destination Table and select the table to be used from the list of
available tables.
4
Click Load Stage and select the file to be used as the temporary data file,
or enter a pipe name (syntax: pipe://<name>).
Note Using named pipes is only supported if both the ETL Server and the
target IQ database are running on the Windows operating system. For
performance reasons, it is recommended that you run both services on the
same machine; however, this is not required.
User’s Guide
119
Destination components
Optional properties
Truncate
Activate this option to remove all records from the destination index set when
initializing the transformation process.
Load Script
If the Load Script (SQL command performing the bulk load) property is empty,
it is generated on execution. To generate the script while designing the project,
use the Generate Load Script option of the component pop-up menu. To
customize the script, click the property option and modify the script.
Load Stage (Server)
If the Sybase IQ server needs to use a different path to the temporary data file
than specified in the Load Stage property, you must enter it here.
Note You must leave this field empty if you are using named pipes.
Write Block Size
The Write Block Size defines the number of records to be written to the loading
stage in a single-write operation.
Pre-processing SQL
This property defines one or more SQL statements to be executed during
initialization of the component.
Post-processing SQL
This property defines one or more SQL statements to be executed when all
components finished execution.
See “Entering database connection parameters” on page 71 for more
information on the previous properties and the following properties:
120
•
Database
•
Schema
•
Standardize Data Format
Sybase IQ ETL 4.1
CHAPTER 6
•
Components
Database Options
There is no impact on the simulation sequence.
There are no Projects in DemoRepository or Help Flash movies.
Job components
Start component
This component is the start component within any job. Use this component as
a starting component for a job. Add the component to the Design section after
you have created a new job. Optionally, you can enter the properties to
schedule the job.
❖
To schedule a job
1
Open the Create Schedule dialog box by clicking the left option of the Start
Time property.
2
Enter Name, Description, Username, and Password of the system account
that runs the job and confirm your settings.
3
In the Schedule window, enter the scheduling data.
Project component
This component is the visual representation of a project within the job.
Use this component when adding a project to a job.
❖
To use this component
1
Add the component to the job and connect it with its adjacent components.
2
Double-click the component and select a project from the list of projects.
Note Multiple projects can be connected to the Start Component.
User’s Guide
121
Job components
Optional properties
Continue on DB Write Errors
If you activate this option, project execution will continue even if an error
occurs on loading data into a database via a DB Data Sink component. If errors
have been ignored due to this option the project will be stated as 'failed'.
Combined with the Reject Log (see “Entering database connection
parameters” on page 71) this option lets you “post-process” rejected records.
View the following jobs in DemoDatastore:
•
Demo Transfer all German Data
•
Demo Transfer all US Data
•
Demo Transfer US Sales on an incremental basis
Synchronizer component
The Synchronizer component is an object to control the flow of the job
execution.
Use this component if you want to control the flow of the job depending on the
status of previously executed projects. You can define each single project as
critical or non-critical in the Property section of the component. The failure of
a critical project will cause the Synchronizer to signal failure.
❖
To use this component
1
Add the component to the job and connect it with all the projects that
signal their execution status to this component.
2
In the Property section click the Synchronize Options button to select
critical projects (optional).
View the following jobs in DemoDatastore:
122
•
Demo Transfer all German Data
•
Demo Transfer all US Data
•
Demo Transfer US Sales on an incremental basis
Sybase IQ ETL 4.1
CHAPTER 6
Components
Multi-Project component
This component is the visual representation of a project group within the job.
It combines properties of the Project and Synchronizer components.
Use this component when your job consists of a large amount of independent
projects, in other words, projects that can be executed in any order, even in
parallel when used in multi-engine jobs.
❖
To use this component
1
Add the component to the job and connect it with its adjacent component.
2
Click option for the Projects Execution property to open the project
selection window.
Project options
For each project to be executed the following options are available.
Continue on Error
This option corresponds to the Continue on DB Write Errors property of a
Project component. If you activate this option, project execution will continue,
even if an error occurs when loading data into a database.
Critical
You can define each single project as critical or non-critical. The failure of a
critical project causes the Multi-Project component to signal failure.
To add projects to the group, select the projects in the tree on the left-hand side
and select Add Project(s) from the pop-up menu.
Note A project group can contain only one instance of a project. Trying to add
a project multiple times will have no effect.
To remove projects from the group, select the projects in the list (or in the tree)
and select Remove Project(s) from the pop-up menu.
There are no jobs in DemoDatastore.
User’s Guide
123
Job components
Finish component
This component visually represents the end of a successful job execution. Use
it to mark the successful end of a job. Connect it with the previous component,
which is either a Synchronize, Project or a Multi-Project component.
View the following jobs in DemoDatastore:
•
Demo Transfer all German Data
•
Demo Transfer all US Data
•
Demo Transfer US Sales on an incremental basis
Error component
This component visually represents the end of a failed job execution. Use it to
mark the end of a failed job. Connect it with the previous component, which is
either a Synchronize, Project or a Multi-Project component.
View the following jobs in DemoDatastore:
124
•
Demo Transfer all German Data
•
Demo Transfer all US Data
•
Demo Transfer US Sales on an incremental basis
Sybase IQ ETL 4.1
A P PE N DI X
A
Function Reference
This appendix provides a reference for the Sybase IQ ETL functions.
Note Even if your original data is not coded in UNICODE, and you have
used one of the "u"-functions, the returned data has been converted to
UNICODE and needs to be handled accordingly.
User’s Guide
Topic
Page
Aggregation functions
Bit functions
126
127
Boolean functions
Conversion functions
128
132
Date and time functions
Errorhandling functions
137
149
File functions
Formatting functions
152
154
Fuzzy search functions
Lookup functions
156
157
Miscellaneous functions
Network functions
160
171
Numeric functions
Script functions
172
177
String functions
Operator functions
177
186
Trigonometric functions
188
125
uAvg
Aggregation functions
uAvg
Description
Calculates and returns the average value of all input values.
Syntax
real uAvg(value, ...);
Parameters
numeric value
A list of numeric arguments to calculate the average value over.
Examples
To calculate the average value:
uAvg(1,2,3,4,5) // returns 3
uMax
Description
Returns the highest value from a set of values. This function compares the
values depending on their datatype.
Syntax
uMax(value, ...)
Parameters
numeric value
A list of numeric arguments.
Examples
To find the highest value from a set of values:
uMax(1, 6, 4, -6) // returns 6
uMax("b", "A", "a") // returns "b"
uMax("2004-05_02", "2006-12-12", "1999-05-30") //
returns "2006-12-12"
uMin
Description
Returns the lowest value from a set of values.
Syntax
uMin(value, ...)
126
Sybase IQ ETL 4.1
APPENDIX A
Parameters
numeric value
A list of numeric arguments.
Examples
To find the highest value from a set of values:
Function Reference
uMin(1, 6, 4, -6) // returns -6
uMin("b", "A", "a") // returns "A"
uMin("2004-05_02", "2006-12-12", "1999-05-30") //
returns "1999-05-30"
Bit functions
uBitAnd
Description
Calculates the bitwise AND over all parameters given and returns the result.
Syntax
number uBitAnd(value, ...)
Parameters
numeric value
A list of numeric arguments.
Examples
uBitAnd(10, 3) // returns "2"
uBitOr
Description
Calculates the bitwise OR over all parameters given and returns the result.
Syntax
number uBitOr(value, ...)
Parameters
numeric value
A list of numeric arguments.
Examples
User’s Guide
uBitOR(10, 3) // returns "11"
127
uBitXOr
uBitXOr
Description
Calculates the bitwise Exclusive OR over all parameters given and returns the
result.
Syntax
number uBitXOr(value, ...)
Parameters
numeric value
A list of numeric arguments.
Examples
uBitXOr(10, 3) // returns "9"
uBitNot
Description
Calculates the bitwise NOT over all parameters given and returns the result.
Syntax
number uBitNot(value, ...);
Parameters
numeric value
A list of numeric arguments.
Examples
uBitNot(10) // returns "-11"
Boolean functions
uIsAscending
Description
Returns 1 if every parameter is equal to or greater than its predecessor.
Syntax
number uIsAscending(params, ...)
Parameters
param
A list of expressions or values of any datatype.
Examples
To check multiple values for an ascending order:
uIsAscending("A",
uIsAscending("A",
uIsAscending("A",
uIsAscending("1",
uIsAscending("3",
128
"B",
"A",
"C",
"2",
"2",
"C")
"C")
"B")
"3")
"2")
//
//
//
//
//
returns
returns
returns
returns
returns
1
1
0
1
0
Sybase IQ ETL 4.1
APPENDIX A
Function Reference
uIsAscending("2004-03-03", "2004-03-05", "2004-03-07")
// returns 1
uIsAscending("2004-03-03", "2004-03-07", "2004-03-05")
// returns 0
ulsBoolean
Description
Returns true if the parameter is either “1,” “true,” or “yes.”
Syntax
number uIsBoolean(params, ...)
Parameters
params
A list of expressions or values of any datatype.
Examples
To check for a Boolean value:
uIsBoolean("1")
// returns 1
uIsBoolean("yes") // returns 1
uIsBoolean("true") // returns 1
ulsDate
Description
Returns 1 if the parameter can be interpreted as a date. If the second parameter
is empty, the function attempts to apply one of the following formats:
•
y-M-D H:N:S.s
•
y-M-D H:N:S
•
y-M-D
•
H:N:S
Note For details about the format string, refer to the uConvertDate function.
Syntax
number uIsDate(datestring [, format])
Parameters
string datestring
The string to be checked.
User’s Guide
129
ulsDescending
string format(optional)
The format of the input date.
Note Omitting the format parameter can slow down the function execution
time.
Examples
To check for a valid date value:
uIsDate(“2004-02-29”) // returns 1
uIsDate(“2003-02-29”) // returns 0, because 2003 was not
a leap year
ulsDescending
Description
Returns 1 if every parameter is equal to or lower than its predecessor.
Syntax
number uIsDescending(params, ...)
Parameters
params
A list of expressions or values of any datatype.
Examples
To check multiple values for a decending order:
uIsDescending("C", "B", "A") // returns 1
uIsDescending("C", "C", "A") // returns 1
uIsDescending("A", "C", "B") // returns 0
uIsDescending("3", "2", "1") // returns 1
uIsDescending("3", "2", "3") // returns 0
uIsDescending("2004-03-20", "2004-03-15", "2004-0307") // returns 1
uIsDescending("2004-03-20", "2004-03-07", "2004-0315") // returns 0
ulsInteger
Description
Returns 1 if the parameter can be interpreted as an integer value.
Syntax
number uIsInteger(param)
130
Sybase IQ ETL 4.1
APPENDIX A
Parameters
Examples
Function Reference
param
An expression or value to investigate.
uIsInteger (“1”)
// returns 1
uIsInteger (“2.34”) // returns 0
uIsInteger (“ABC”) // returns 0
ulsFloat
Description
Returns 1 if the parameter can be interpreted as a floating point value.
Syntax
number ulsFloat (params)
Parameters
params
An expression or value to investigate.
Examples
uIsFloat(“1”) //returns 1
uIsFloat (“2.34”) //returns 1
uIsFloat (“ABC”) //returns 0
ulsNull
Description
Returns 1 if the parameter is null.
Syntax
number uIsNull (params)
Parameters
params
An expression or value to investigate.
Examples
To check for a null value:
uIsNull(“1”)
uIsNull(null)
// returns 0
// returns 1
ulsNumber
Description
User’s Guide
Returns 1 if the parameter can be interpreted as a number.
131
uNot
Syntax
number uIsNumber (params)
Parameters
params
An expression or value to investigate.
Examples
To check for a numeric value:
uIsNumber("1")
// returns 1
uIsNumber("2.34") // returns 1
uIsNumber("ABC") // returns 0
uNot
Description
Calculates the logical not from the input expression. This function is only used
in conjunction with the uIs-Functions, because the Boolean values returned are
not true and false, but are 0 and 1.
Syntax
number uNot(expression)
Parameters
expression
A numeric value that should be negated.
Examples
uNot(1) // returns 0
Conversion functions
uBase64Decode
Description
Decodes a string from a Base64 representation.
Syntax
string uBase64Decode(input)
Parameters
string input
The string to decode.
Examples
To encode a string from Base64:
uBase64Dcode("QQAgAHMAZQA=") ;; returns "A secret="
132
Sybase IQ ETL 4.1
APPENDIX A
Function Reference
uBase64Encode
Description
Decodes a string into a Base64 representation.
Syntax
string uBase64Encode(input)
Parameters
string input
The string to decode.
Examples
To encode a string into a Base64 representation:
uBase64DEncode("A secret") ;; returns "QQAgAHMAZQA="
uConvertDate
Description
Converts a date string into a different format using a source and a destination
format string: The first parameter is the date string to be converted; the second
parameter is a format string, specifying the date format of the input date string
(see the following table). The outputformat parameter is optional, and if it is
omitted, the date is converted in the format y-M-D H:N:S.
The function handles dates from 1582 to present day. If the date cannot be
converted, the result string will be empty.
User’s Guide
133
uConvertDate
Table 6-1: Date Conversion identifiers
Identifier
Y
Description
Year 2-digits (06)
y
C
Year 4-digits (2006)
Century (20)
M
m
Month (03)
Month (JUN)
D
H
Day (12)
Hour (00..23)
h
N
Hour (01..12)
Minutes
S
s
Seconds
Hundreths of seconds
t
A
Thousandth of seconds
AM/PM
d
D
Day of week (5)
Day of week (Friday)
E
G
Day of year (001..366)
Week of year (01..52)
F
Week of month (1..6)
Syntax
string uConvertDate(datestring, inputformat [,
outputformat])
Parameters
string datestring
The string to convert.
string inputformat
The date and time format of the input string.
string outputformat
(optional) The desired output format. If omitted, the default format is y-MD H:N:S.
Examples
To convert date strings into a different formats:
uConvertDate("2005-06-27 00:00:00","y-M-D H:N:S","D
mY") // returns "27 JUN 05"
uConvertDate("27 JUN 05", "D m Y") // returns "2005-0627 00:00:00"
134
Sybase IQ ETL 4.1
APPENDIX A
Function Reference
uFromHex
Description
Converts a string of hexadecimal numbers into an integer.
Syntax
integer uFromHex (input)
Parameters
string input
The string to convert.
Examples
Convert a hexadecimal string
uFromHex("A3F") // returns 2623
uFromHex("B") // returns 11
uToHex
Description
Converts an integer value into a hexadecimal string.
Syntax
string uToHex (input)
Parameters
integer input
The integer to convert.
Examples
To convert an integer:
uToHex(45) // returns “2D”
uHexDecode
Description
Composes a string from hexadecimal values.
Syntax
string uHexDecode(input)
Examples
To compose a string from hex values:
uHexDecode("313730") // returns "170"
uHexDecode(313730)
// returns "170"
User’s Guide
135
uHexEncode
uHexEncode
Description
Encodes every character of a string into its hexadecimal notation
Syntax
string uHexEncode(input)
Parameters
string input
The string to encode.
Examples
To convert a string to hex values:
uHexEncode("170") // returns "3313730"
uHexEncode(170) // returns "3313730"
uToUnicode
Description
Converts a string into Unicode.
Syntax
string uToUnicode (input , [codepage]
Parameters
string input
The input string.
uURIDecode
Description
Returns a decoded string replacing the escape sequences with their original
values.
Syntax
string uURIDecode(uri)
Parameters
string uri
The URI to decode.
Examples
To decode a URI:
uURIDecode("www.sybase.com/filename%20with%20spaces.tx
t") // returns "www.sybase.com/filename with
spaces.txt"
136
Sybase IQ ETL 4.1
APPENDIX A
Function Reference
uURIEncode
Description
Returns a new version of a complete URI, replacing each instance of certain
characters with escape sequences representing the UTF-8 encoding of the
characters.
Syntax
string uURIEncode(uri)
Parameters
string uri
The URI to encode.
Examples
To encode a URI:
uURIEncode("www.sybase.com/filename with spaces.txt")
// returns
"www.sybase.com/filename%20with%20spaces.txt”
Date and time functions
A time string can be in any of the following formats:
1
YYYY-MM-DD
2
YYYY-MM-DD HH:MM
3
YYYY-MM-DD HH:MM:SS
4
YYYY-MM-DD HH:MM:SS.SSS
5
HH:MM
6
HH:MM:SS
7
HH:MM:SS.SSS
8
now
9
DDDD.DDDD
Formats 5 through 7 that specify only a time assume a date of 2000-01-01.
Format 8 is converted into the current date and time, using Universal
Coordinated Time (UTC). Format 9 is the Julian day number expressed as a
floating point value.
Most of the Date and Time functions are derived from the uFormatDate
function. The only difference is that the other Date and Time functions only
return a special format or part of the date and they do not have the first format
parameter. Therefore, uDate() is equivalent to uFormatDate("%Y-%m-%d").
Getting the current time
User’s Guide
137
uURIEncode
If no date is given, the time string now is assumed and the date is set to the
current date and time.
uDate() // returns something like "2006-03-01"
uDate() is equivalent to uDate("now")
Getting a special date
IN.Date = uDate("2004-01-04 14:26:33") // returns the
date part "2004-01-04"
Modifiers
The time string can be followed by zero or modifiers that alter the date or alter
the interpretation of the date. The available modifiers are as follows:
1
NNN days
2
NNN hours
3
NNN minutes
4
NNN.NNNN seconds
5
NNN months (see #551 and [1163])
6
NNN years (see #551 and [1163])
7
Start of month
8
Start of year
9
Start of week (withdrawn -- will not be implemented)
10 Start of day
11 Weekday N (see #551 and [1163])
12 unixepoch
13 localtime
14 utc
15 Julian
16 Gregorian
The first size modifiers (1 through 6) simply add the specified amount of time
to the date specified by the preceding time string. The “start of” modifiers (7
through 10) shift the date backwards to the beginning of the current month,
year, or day. The “weekday” modifier advances the date forward to the next
date where the weekday number is N: Sunday is 0, Monday is 1, and so on.
138
Sybase IQ ETL 4.1
APPENDIX A
Function Reference
The “unixepoch” modifier (12) works only if it immediately follows a time
string in the DDDD.DDDDD format. This modifier causes the
DDDD.DDDDD to be interpreted not as a Julian day number as it normally
would be, but as the number of seconds since 1970. This modifier allows unixbased times to be converted to Julian day numbers easily. The “localtime”
modifier (13) adjusts the previous time string so that it displays the correct
local time. “utc” undoes this.
The “Julian” modifier (14) assumes that the time string is a Gregorian date and
converts the date into a Julian date: “Gregorian” undoes the work of “Julian.”
Date and time calculations
Compute the current date:
uDate('now')
Compute the last day of the current month.
uDate('now','start of month','+1 month','-1 day')
Compute the date and time given a UNIX timestamp 1092941466:
uDatetime(1092941466, 'unixepoch')
Compute the date and time given a UNIX timestamp 1092941466, and
compensate for your local timezone.
uDatetime(1092941466, 'unixepoch', ‘localtime’)
Compute the current UNIX timestamp:
strftime('%s','now')
Compute the number of days since the Battle of Hastings:
uJuliandate('now') - uJuliandate('1066-10-14','gregorian')
Compute the number of seconds between two dates:
julianday('now')*86400 - julianday('2004-01-01 02:34:56')*86400
Compute the date of the first Tuesday in October (January + 9) for the current
year:
date('now','start of year','+9 months','weekday 2')
Known limitations
•
User’s Guide
The computation of local time depends heavily on the whim of local
politicians and as a result, is difficult to get correct for all locales. In this
implementation, the standard C library function localtime() is used to assist
in the calculation of local time.
139
uDate
•
The localtime() C function normally only works for years between 1970
and 2037. For dates outside this range, you can attempt to map the year
into an equivalent year within this range, do the calculation, then map the
year back.
•
Date computations do not give correct results for dates before Julian day
number 0 (-4713-11-24 12:00:00).
•
All internal computations assume the Gregorian calendar system. When
you use the “julian” modifier, it does not convert the date into a real Julian
calendar date; instead, it shifts the Gregorian calendar date to align it with
the Julian calendar. This means that the “julian” modifier will not work
right for dates that exist in the Julian calendar but which do not exist in the
Gregorian calendar, for example, 1900-02-29.
uDate
Description
Returns the year, month, and day from a date in the format YYYY-MM-DD.
Note Refer to the “Working with Dates and Times” section for detailed
information about the possible modifier arguments.
Syntax
string uDate([modifiers])
Parameters
string modifiers (optional)
String specifying a date or date calculation. The default is the now modifier.
Examples
To get the date part out of a timestamp:
uDate("now") // returns current date in the form "YYYYMM-DD".
uDate("now", "start of year", "9 months", "weekday 2")
//returns the date of the first Tuesday in October of
this year.
140
Sybase IQ ETL 4.1
APPENDIX A
Function Reference
uDateTime
Description
Returns year, month, and day from a date in the format YYYY-MM-DD
HH:MM:SS.
Note Please refer to the “Working with Dates and Times” section for detailed
information about the possible modifier arguments.
Syntax
string uDateTime([modifiers])
Parameters
string modifiers (optional)
String specifying a date or date calculation. The default is the now modifier.
Examples
To get the datetime part out of a timestamp.
uDateTime("now") // returns current date in the form
"YYYY-MM-DD HH:MM:SS"
uDateTime("now", "start of month", "1 months", "-1 day")
// returns the date of the last day in this month
uDay
Description
Returns the day number of the date specified.
Note Refer to the “Working with Dates and Times” section for detailed
information about the possible modifier arguments.
Syntax
string uDay([modifiers])
Parameters
string modifiers (optional)
String specifying a date or date calculation. The default is the now modifier.
Examples
To get the day number out of a timestamp:
uDay("now") // returns current day number
uDay("1969-03-13 10:22:23.231")
// returns "13"
User’s Guide
141
uDayOfYear
uDayOfYear
Description
Returns the number of days since the beginning of the year.
Syntax
string uDayOfYear([modifiers])
Parameters
string modifiers (optional)
String specifying a date or date calculation. The default is the now modifier.
Examples
To get the day number out of a timestamp:
uDayOfYear("now") // returns how many day have already
passed this year
uDayOfYear("1969-03-13 10:22:23.231")
// returns "72"
uHour
Description
Returns the hour of the date specified.
Note Please refer to the “Working with Dates and Times” section for detailed
information about the possible modifier arguments.
Syntax
string uHour([modifiers])
Parameters
string modifiers (optional)
String specifying a date or date calculation. The default is the now modifier.
Examples
Get the hour from a date.
uHour("now") // returns current hour
uHour("1969-03-13 10:22:23.231")
// returns "10"
uQuarter
Description
Returns of the year in which a date occurs.
Syntax
string uQuarter([modifiers])
Parameters
string modifiers (optional)
String specifying a date or date calculation. The default is the now modifier.
Examples
To get the hour from a date:
142
Sybase IQ ETL 4.1
APPENDIX A
uHour("now")
Function Reference
// returns current quarter
uHour("1969-03-13 10:22:23.231")
// returns "10"
uIsoWeek
Description
Returns the week number as defined by ISO 8601.
The first week of a year is Number 01, which is defined as being the week
which contains the first Thursday of the calendar year, which implies that it is
also:
•
The first week which is mostly within the calendar year
•
The week containing January 4th
•
The week starting with the Monday nearest to January 1st
The last week of a year, Number 52 or 53, therefore is:
•
The week which contains the last Thursday of the Calendar year
•
The last week which is mostly within the Calendar year
•
The week containing December 28th
•
The week ending with the Sunday nearest to December 31st
Note Refer to the “Working with Dates and Times” section for detailed
information about the possible modifier arguments.
Syntax
number uIsoWeek([modifiers])
Parameters
string modifiers (optional)
String specifying a date or date calculation. The default is the now modifier.
Examples
To get the ISO week number from a date.
uIsoWeek("now")
User’s Guide
// returns current week number
143
uJuliandate
uJuliandate
Description
Returns the number of days since noon in Greenwich on November 24, 4714
B.C. in the format DDDD.DDDD. For date and time calculation, the juliandate
function is the best choice.
Syntax
string uJuliandate([modifiers])
Parameters
string modifiers (optional)
String specifying a date or date calculation. The default is the now modifier.
Examples
To convert a date into a numerical value for calculation.
uJuliandate(‘now’) // returns current date in the form
"DDDD.DDDD"
To compute the number of seconds between two dates:
uJuliandate(‘now’)*86400 - julianday('2004-01-01
02:34:56')*86400
To compute the number of days since the Battle of Hastings:
uJuliandate(‘now’) - uJuliandate('1066-1014','gregorian')
To compute the date and time given a UNIX timestamp 1092941466, and
compensate for your local time zone:
uJuliandate(1092941466, 'unixepoch', 'localtime');
uMinute
Description
Returns the minute of the date specified.
Syntax
string uMinute([modifiers])
Parameters
string modifiers (optional)
String specifying a date or date calculation. The default is the now modifier.
Examples
Get the minute from a date
uMinute("now") // returns current minute
uMinute("1969-03-13 10:22:23.231")
// returns "22"
144
Sybase IQ ETL 4.1
APPENDIX A
Function Reference
uMonth
Description
Returns the month of the date specified.
Syntax
string uMonth([modifiers])
Parameters
string modifiers (optional)
String specifying a date or date calculation. The default is the now modifier.
Examples
To get the month from a date:
uMonth("now") // returns current month
uMonth("1969-03-13 10:22:23.231")
// returns "03"
uMonthName
Description
Returns the name of month of the date specified in the current locale language.
Syntax
string uMonthName([modifiers])
Parameters
string modifiers (optional)
String specifying a date or date calculation. The default is the now modifier.
Examples
To get the name of month from a date:
uMonthName("now")
// returns current name of month
To set the locale to English:
uSetLocale("English")
uMonthName("1969-03-13 10:22:23.231")
"March"
// returns
To set the locale to German:
uSetLocale("German")
uMonthName("1969-03-13 10:22:23.231")
"März"
// returns
uMonthNameShort
Description
Returns the short form of the name of month of the date specified in the current
locale language.
Syntax
string uMonthNameShort([modifiers])
User’s Guide
145
uSeconds
Parameters
string modifiers (optional)
String specifying a date or date calculation. The default is the now modifier.
Examples
To get the short-form name of month from a date:
uMonthNameShort("now")
month.
// returns current name of
To set the locale to English:
uSetLocale("English")
uMonthNameShort("1969-03-13 10:22:23.231")
"Mar"
// returns
To set the locale to German:
uSetLocale("German")
uMonthNameShort("1969-03-13 10:22:23.231")
"Mär"
// returns
uSeconds
Description
Returns the second of the date specified.
Syntax
string uSeconds([modifiers])
Parameters
string modifiers (optional)
String specifying a date or date calculation. The default is the now modifier.
Examples
To get the second from a date:
uSeconds("now") // returns current second
uSeconds("1969-03-13 10:22:23.231")
// returns "23"
uTimeDiffMs
Description
Returns the difference between two dates in milliseconds.
Syntax
string uTimeDifMs(date1, date2)
Parameters
string date 1
The older date
string date 2
The more recent date
146
Sybase IQ ETL 4.1
APPENDIX A
Examples
Function Reference
uTimeDiffMs("18:34:20”, “18:34:21”) // returns 1000
uTimeDiffMs("18:34:20”, “18:34:21.200”) // returns 1200
uWeek
Description
Returns the week of the date specified.
Note Please refer to the “Working with Dates and Times” section for detailed
information about the possible modifier arguments.
Syntax
string uWeek([modifiers])
Parameters
string modifiers (optional)
String specifying a date or date calculation. The default is the now modifier.
Examples
To get the week from a date:
uWeek("now")
// returns current week
uWeek("1969-03-13 10:22:23.231")
// returns "10"
uWeekday
Description
Returns the week of the date specified. The returned values are from 0
(=sunday) to 6.
Note Refer to the “Working with Dates and Times” section for detailed
information about the possible modifier arguments.
Syntax
string uWeekday([modifiers])
Parameters
string modifiers (optional)
String specifying a date or date calculation. The default is the now modifier.
Examples
Get the weekday from a date
uWeekday("now")
// returns current weekday number
uWeekday("1969-03-13 10:22:23.231")
Thursday
User’s Guide
// returns "4" for
147
uWeekdayName
uWeekdayName
Description
Returns the week name of the date specified in the current locale language.
Note Refer to the “Working with Dates and Times” section for detailed
information about the possible modifier arguments.
Syntax
string uWeekdayName([modifiers])
Parameters
string modifiers (optional)
String specifying a date or date calculation. The default is the now modifier.
Examples
To get the weekday name from a date:
uWeekdayName("now")
// returns current weekname
To set the locale to English:
uSetLocale("English")
uWeekdayName("1969-03-13 10:22:23.231")
"Thursday"
// returns
To set the locale to German:
uSetLocale("German")
uWeekdayName("1969-03-13 10:22:23.231")
"Donnerstag"
// returns
uWeekdayNameShort
Description
Returns the short form of the weekname of the date specified in the current
locale language.
Note Refer to the “Working with Dates and Times” section for detailed
information about the possible modifier arguments.
Syntax
string uWeekdayNameShort([modifiers])
Parameters
string modifiers (optional)
String specifying a date or date calculation. The default is the now modifier.
Examples
To get the weekday name from a date:
uWeekdayNameShort("now")
148
// returns current weekname
Sybase IQ ETL 4.1
APPENDIX A
Function Reference
To set the locale to English:
uSetLocale("English")
uWeekdayNameShort("1969-03-13 10:22:23.231")
returns "Thu"
//
To set the locale to German:
uSetLocale("German")
uWeekdayNameShort("1969-03-13 10:22:23.231")
returns "Don"
//
uYear
Description
Returns the year of the date specified.
Syntax
string uYear([modifiers])
Parameters
string modifiers (optional)
String specifying a date or date calculation. The default is the now modifier.
Examples
Get the year from a date
uYear("now") // returns current year
uYear("1969-03-13 10:22:23.231")
// returns "1969"
Errorhandling functions
uError
Description
Writes error text into a log file and breaks from the current function or
programming context. The function returns the message written.
Syntax
string uError(errortext)
Parameters
string errortext
Text to write to log file.
Examples
To signal an error:
uError("'PP' is no valid country key.")
User’s Guide
149
uErrortext
uErrortext
Description
Returns the last error message. The error text will be internally cleared, so it
can only be read once.
Syntax
string uErrortext()
Examples
To retrieve the last errortext:
uErrortext() // returns last error text
uInfo
Description
Writes an informal message into the log file. The function returns the message
written.
Syntax
string uInfo(infotext)
Parameters
string infotext
Text to write to log file.
Examples
To log an informal message:
uInfo("21445 records selected.")
uWarning
Description
Writes a warning message into the log. The function returns the message
written.
Syntax
string uWarning(warningtext);
string errortext;
Parameters
string warningtext
Text to write to log file.
Examples
To log a warning message:
uWarning("The attribute for the customer name is null.")
150
Sybase IQ ETL 4.1
APPENDIX A
Function Reference
uTrace
Description
Writes a trace message into the log. The function returns the message written.
Syntax
string uTrace(tracetext)
Parameters
string tracetext
Text to write to log file.
Examples
To log a trace message:
uTrace("CUSTOMER_NAME = " + CUSTOMER_NAME)
uTracelevel
Description
Sets the detail level of trace messages in the log. The range of tracelevel is from
0 (no trace) to 5 (very verbose).
Note Heavy logging dramatically slows down performance.
Syntax
uTracelevel(tracelevel)
Parameters
integer tracelevel
Specifies the verbosity of trace messages (0=off, 5=very verbose).
Examples
To set the trace level:
uTracelevel(5) // sets the tracelevel to 'very verbose'
User’s Guide
151
uFileInfo
File functions
uFileInfo
Description
Returns information about a file. When uFileInfo is set to EXISTS the function
returns the whole path to the file if it exists or an empty string if it does not
exist. uFileInfo is set to SIZE the size of the file is returned or an empty string
if the file does not exist.
Note Be aware that you have to double the backslashes in JavaScript
environments because the backslash is used as escape sequence.
Syntax
string uFileInfo (file [, infotype])
Parameters
string file
The file to investigate.
string infotype (optional)
The type of information to retrieve. The default is EXISTS.
Examples
To retrieve file information in JavaScript Calculator:
uFileRead("C:\\windows\\notepad.exe") // returns
C:\windows\notepad.exe.
uFileRead("C:\\win\\notepad.exe") // returns
C:\windows\notepad.exe.
uFileRead("C:\\windows\\notepad.exe", “SIZE”) //
returns 68608.
uFileRead
Description
Returns the content of a file.
Syntax
string uFileRead(URL [, bytes] [, offset] [, encoding])
Parameters
string URL
The URL specifying the source to read
152
Sybase IQ ETL 4.1
APPENDIX A
Function Reference
integer bytes (optional)
The number of bytes to read. The default is 0, which means the whole file.
integer offset (optional)
The number of bytes to skip from the beginning of the file. The default is 0.
Examples
Example 1 To access local files:
uFileRead("c:\myFile.txt”)
uFileRead(“/home/testuser/myfile.txt”)
uFileRead(“file:///c:/myFile.txt”)
Example 2 To read files from a Windows share:
uFileRead(“\\fileserver\freeShare\testfile.txt”)
Example 3 To read content of a file from HTTP and HTTPS
uFileRead("http://http://www.google.com/search?hl=en&q
=pizza&btnG=Google+Search")
uFileRead("https://http://www.google.com/search?hl=en&
q=pizza&btnG=Google+Search")
Example 4 To read content of a file from FTP:
uFileRead("ftp://myUser:myPasswd@myServer/data/myFile.
txt")
uFileWrite
Description
Allows you to write data to a file. If no URL is given, the data is written to a
file write.log in the Sybase IQ ETL log directory.
Syntax
string uFileWrite(data [, URL] [, append] [, encoding])
Parameters
string data
The data to be written.
string URL (optional)
The URL for file access and location.
number append (optional)
Flag (0/1) indicating if the data should be appended or not.
string encoding (optional)
The encoding of the target file.
User’s Guide
153
uFormatDate
Examples
To write data to a file via CIFS:
uFileWrite("hello",
"//myServer/myShare/data/test.txt")
Formatting functions
uFormatDate
Description
The function uFormatDate returns a user-defined string with date information.
Special escape sequences in the format string will be replaced by the referring
date part.
The following table shows the format identifiers.
154
Sybase IQ ETL 4.1
APPENDIX A
Function Reference
Table 6-2: Format identifiers
Identifier
%A
Date part
Weekday name
%a
%B
Weekday name short
Month name
%b
%d
Month name short
Day of month
%f
%H
Fractional seconds SS.SSS
Hour 00-24
%j
%J
Day of year 000-366
Julian day number
%m
%M
Month
Minute
%s
%S
Seconds since 1970-01-01
Seconds 00-59
%w
%W
Day of week 0-6, 0=Sunday
Week of year
%Y
%%
Year 0000-9999
%
Note Refer to the “Working with Dates and Times” section for detailed
information about the possible modifier arguments.
Syntax
number uFormatDate(format, modifiers, ...)
Examples
To create a string from a date:
uFormatDate("Today is %A the %d of %B in %Y", "now") //
returns something like "Today is Thursday the 10 of
February in 2005"
User’s Guide
155
uGlob
Fuzzy search functions
uGlob
Description
Compares values case sensitive and similar to uLike but uses the UNIX file
globbing syntax for its wildcard characters.
Syntax
bool uGlob(pattern, text)
Parameters
string pattern
A string describing a match pattern.
string text
A string to investigate.
Examples
To compare values using UNIX file-globbing syntax:
uGlob("Mr. *", "Mr. Smith")
// returns 1, indicating
a match
uGlob("Mr. *", "Mrs. Clarke") // returns 0
uLike
Description
Performs a pattern-matching comparison. The first parameter contains the
pattern, and the second parameter contains the string to match against the
pattern. A percent symbol ( % ) in the pattern matches any sequence of zero or
more characters in the string. An underscore ( _ ) in the pattern matches any
single character in the string. Any other character matches itself or its
lowercase or uppercase equivalent (in other words, not case-sensitive
matching).
Note Currently uLike only understands uppercase and lowercase for 7-bit Latin
characters; thus the uLike is case sensitive for 8-bit iso8859 characters or UTF8 characters. For example:
uLike('a' ,'A') is 1
uLike('æ' ,'Æ') is 0
Syntax
156
number uLike(pattern, text)
Sybase IQ ETL 4.1
APPENDIX A
Parameters
Function Reference
string pattern
A string describing a match pattern.
string text
A string to investigate.
Examples
To compare values using pattern-matching:
uLike("% happy %", "A happy man.")
// returns 1
uLike("% happy %", "A sad man.")
// returns 0
uMatches
Description
Returns true if a given string matches a regular expression.
Syntax
number uMatches(input, regexpr)
Parameters
string text
A string to investigate.
string regexpr
Regular expression specification.
Examples
To verify that a string can be interpreted as a floating number:
uMatches("abc","[-+]?[0-9]*\.?[0-9]*")
uMatches("1.23","[-+]?[0-9]*\.?[0-9]*")
// return 0
// return 1
Lookup functions
uChoice
Description
Returns the Nth parameter value specified by index. The index value is zerobased, so an index of zero returns the second parameter
Syntax
string uChoice(index, values, ...)
Parameters
integer index
The index number referencing the return value. Zero based.
User’s Guide
157
uFirstDifferent
string values
List of values.
Examples
Example 1 IF construct:
uChoice(0, "A", "B") // returns "A"
uChoice(1, “A”, “B”) // returns “B”
Example 2 CASE constructs:
uChoice(2, "n.a.", "Jan", "Feb", "Mar") //returns "Feb"
Example 3 Simulate a lookup function where you want to replace a color ID
with a corresponding color name:
uChoice(IN.Color, “n.a.”, “Red”, “Blue”, “Green”)
uFirstDifferent
Description
Returns the first parameter value that is different from the first parameter.
Syntax
string uFirstDifferent(params, ... )
Parameters
params
A list of expressions or values of any data type.
Examples
To find the first different attribute in a list:
uFirstDifferent("2004-05-01", "2004-05-01", "2005-0104", "2005-11-24",) //returns "2005-01-04"
uFirstNotNull
Description
Returns the first non-null value in the list.
Syntax
string uFirstNotNull(params, ...)
Parameters
params
A list of expressions or values of any data type.
Examples
To merge four distinct attribute values:
uFirstNotNull(null, null , "A", "B")
158
// returns "A"
Sybase IQ ETL 4.1
APPENDIX A
Function Reference
uElements
Description
Returns the number of elements in a delimited string. If the second parameter
is omitted, a space (ASCII 32) will be taken as a delimiter.
Syntax
string uElements(text [, delimiter])
Parameters
string text
A string to investigate.
string delimiter(optional)
The delimiter to be used. The default delimiter is a space character.
Examples
To count tokens in a delimited string:
uElements("James T. Kirk")
// returns 3
uToken
Description
Returns the Nth element from a delimited string. The second parameter
specifies the token number. The index starts at 1. If the third parameter is
omitted, a space (ASCII 32) is taken as the delimiter.
Syntax
string uToken(text, index [, delimiter])
Parameters
string text
A string to investigate.
integer index
Number of tokens to be returned.
string delimiter (optional)
The delimiter to be used. The default delimiter is a space character.
Examples
To split a delimited string:
uToken("James T. Kirk", 1)
uToken("James T. Kirk", 2)
User’s Guide
// returns "James"
// returns "T."
159
uCommandLine
Miscellaneous functions
uCommandLine
Description
Returns the command line string of the current process.
Syntax
string uCommandLine()
Parameters
None
The name of the environment variable to read.
Examples
uGetEnv(“LOAD_MAX_VALUE”)
uGetEnv
Description
Returns the value of an environment variable.
Syntax
string uGetEnv(variable)
Parameters
string variable
The name of the string variable.
Examples
uCommandLine() // returns something like
"D:\Sybase\IQETL\win32\Engine.exe engineman.lbr"
uGuid
Description
Returns a Global Unique Identifier (GUI) in one of the following specified
formats:
•
numeric - digits only
•
base64 - base64 encoded
•
hex - hex format without hyphens
Syntax
string uGuid(format)
Parameters
string format
The format for the GUID value to be returned.
160
Sybase IQ ETL 4.1
APPENDIX A
Examples
Function Reference
To create a unique identifier:
uGuid() // returns for example A8A10D9F-963F-4914-8D6FC8527A50EF2A
uMD5
Description
Allows you to generate a checksum with a fixed length of 32 characters from
a given string.
Syntax
string uMD5(text)
Parameters
string text
The text to build a checksum on.
Examples
uMD5("Austin Powers") // returns
"C679A893E3DA2CC0741AC7F527B1D4EB"
uScriptLoad
Description
Loads and evaluates JavaScript and returns the result.
Syntax
string uScriptLoad(filelocation)
Parameters
string filelocation
The JavaScript file to load.
Examples
To load an external JavaScript file:
uScriptLoad("\\server3\myScripts\basicFunctions.js")
uSetEnv
Description
Writes a value to an environment variable
Syntax
string uSetEnv(variable, value)
Parameters
string variable
Name of the environment variable to set
User’s Guide
161
uSet Locale
string value
The value to set
Examples
uSetEnv(“LOAD_MAX_VALUE”, IN.Date)
uSet Locale
Description
Changes the current date and time settings to a different language.
Syntax
string uSetLocale([language] [, country] [, codepage])
Parameters
string language
The name of the language.
string country
The string for the country.
string codepage
The codepage string.
Examples
Usage
To retrieve month names in a different locale:
uSetLocale("English")
// switch to english
uMonthName("2005-03-22")
// returns "March"
uSetLocale("German")
// switch to german
uMonthName("2005-03-22")
// returns "März"
uSetLocale("C")
// switch back to default
Language Strings
The following language strings are recognized. uSetLocale does not accept any
language that is not supported by the operating system.
Note The three-letter language-string codes are valid only in Windows NT and
Windows 95.
Primary
Language
Chinese
Chinese
Chinese
162
Sub-language
Language String
Chinese
“chinese”
Chinese (simplified) “chinese-simplified” or “chs”
Chinese (traditional) “chinese-traditional” or “cht”
Sybase IQ ETL 4.1
APPENDIX A
Primary
Language
Czech
Danish
Dutch
User’s Guide
Sub-language
Czech
Danish
Dutch (Belgian)
Function Reference
Language String
“csy” or “czech”
“dan”or “danish”
“belgian”, “dutch-belgian”, or
“nlb”
“dutch” or “nld”
“australian”, “ena”, or “englishaus”
Dutch
English
Dutch (default)
English
(Australian)
English
English (Canadian)
English
English
English (default)
“english”
English (New Zealand) “english-nz” or “enz”
English
English
Engish (UK)
English (USA)
Finnish
Finnish
“eng”, “english-uk”, or “uk”
“english”, “american-english”,
“english-american”, “english-us”,
“english-usa”, “enu”, “us”, or “usa”
“fin” or “finnish”
French
French
French (Belgian)
French (Canadian)
“frb” or “french-belgian”
“frc” or “french-canadian”
French
French
French (default)
French (Swiss)
“fra” or “french”
“french-swiss” or “frs”
German
German
German (Austrian)
German (default)
“dea” or “german-austrian”
“deu” or “german”
German
Greek
German (Swiss)
Greek
“des”, “german-swiss”, or “swiss”
“ell” or “greek”
Hungarian
Icelandic
Hungarian
Icelandic
“hun” or “hungarian”
“icelandic” or “isl”
Italian
Italian
Italian (default)
Italian (Swiss)
“ita” or “italian”
“italian-swiss” or “its”
Japanese
Korean
Japanese
Korean
“japanese” or “jpn”
“kor” or “korean”
Norwegian
Norwegian
Norwegian (Bokmal)
Norwegian (default)
“nor” or “norwegian-bokmal”
“norwegian”
Norwegian
Polish
Norwegian (Nynorsk)
Polish
“non” or “norwegian-nynorsk”
“plk” or “polish”
Portuguese
Portuguese (Brazil)
“portuguese-brazilian” or “ptb”
“canadian”, “enc”, or “englishcan”
163
uSet Locale
Primary
Language
Sub-language
Language String
Portuguese
Portuguese (default)
“portuguese” or “ptg”
Russian
Slovak
Russian (default)
Slovak
“rus” or “russian”
“sky” or “slovak”
Spanish
Spanish
Spanish (default)
Spanish (Mexican)
“esp” or “spanish”
“esm” or “spanish-mexican”
Spanish
Spanish (modern)
“esn” or “spanish-modern”
Swedish
Turkish
Swedish
Turkish
“sve” or “swedish”
“trk” or “turkish”
Country/Region Strings
Following is a list of country/regions strings recognized by uSetLocale. The
uSetLocaleStrings function does not accept any countries or regions that are not
supported by the operating system. Three-letter country/region-name codes are
from ISO/IEC (International Organization for Standardization, International
Electrotechnical Commission), specification 3166.
164
Country/Region
Country/Region String
Australia
Austria
“aus” or “australia”
“austria” or “aut”
Belgium
Brazil
“bel” or “belgium”
“bra” or “brazil”
Canada
Czech Republic
“can” or “canada”
“cze” or “czech”
Denmark
Finland
“denmark” or “dnk”
“fin” or “finland”
France
Germany
“fra” or “france”
“deu” or “germany”
Greece
Hong Kong SAR
“grc” or “greece”
“hkg”, “hong kong”, or “hong-kong”
Hungary
Iceland
“hun” or “hungary”
“iceland” or “isl”
Ireland
Italy
“ireland” or “irl”
“ita” or “italy”
Japan
Korea
“japan” or “jpn”
“lor”, “korea”
Mexico
“mex” or “mexico”
Sybase IQ ETL 4.1
APPENDIX A
Function Reference
Country/Region
Country/Region String
Netherlands
New Zealand
“nld”, “holland” or “netherlands”
“newzealand”, “new-zealand”, “nz”, or “nzl”
Norway
People’s Republic of
China
Poland
“nor” or “norway”
“china”, “chn”, “pr china”, or “pr-china”
Portugal
Russia
“prt” or “portugal”
“rus” or “russia”
Singapore
Slovak Republic
“sgp” or “singapore”
“svk” or “slovak”
Spain
Sweden
“esp” or “spain”
“swe” or “sweden”
Switzerland
Taiwan
“che” or “switzerland”
“taiwan” or “twn”
Turkey
United Kingdom
“tur” or “turkey”
“britain”, “england”, “gbr”, “great britain”, “uk”,
“united kingdom”, or “united-kingdom”
“pol” or “poland”
United States of America “america”, “united states”, “united-states”, “us”, or
“usa”
uSleep
Description
Suspends the process for a specified amount of milliseconds.
Syntax
string uSleep(msecs)
Parameters
integer msecs
The number of milliseconds to suspend.
Examples
uSleep(1000) // suspends the process for one second
uSystemFolder
Description
Returns predefined application and system paths.
Syntax
string uSystemFolder([foldertype])
User’s Guide
165
uSystemFolder
Parameters
Examples
uSystemFolder(“APP LOG”) // returns the path to the log
directory
You can specify the folders listed in the following table.
Usage
166
string foldertype (optional)
Specifies the folder to return. The default is “System”.
Group
Application
Name
APP_MAIN
Description
The base application path. A typical path is
“c:\Program Files\Sybase\IQETL41”.
Shared library directory, typically in the “lib”
folder of the application’s directory.
Application
APP_LIB
Application
APP_LOG
Shared library directory, typically in the “lib”
folder of the application’s directory.
Application
APP_CONFIG
Config file directory, typically in the “etc”
folder of the application’s directory.
Application
APP_LICENSE
Application
APP_SCRIPT
Application
APP_GRAMMAR
Application
APP_LANGUAGE
License directory, typically in the “license”
folder of the application’s directory.
Script directory, typically in the “scripts” folder
of the application’s directory.
Grammar directory, typically in the “grammar”
folder of the application’s directory.
Language file directory, typically in the
“language” folder of the application’s directory.
Application
APP_DATABASE
Database directory, typically in the “database”
folder of the application’s directory.
Application
APP_TEMP
Temporary directory, typically in the “temp”
folder of the application’s directory.
Application
APP_DEMODATA
Demodata directory, typically in the
“demodata” folder of the application’s
directory.
Application
APP_USERDATA
Windows
ALTSTARTUP
Windows
APPDATA
Directory where user-spcecific files arestored.
The typical path is “C:\Documents and
Settings\username\Application
Data\Sybase\IQETL\41”.
The file system directory that corresponds to
the user’s nonlocalized startup program group.
The file system directory that serves as a
common repository for application-specific
data. A typical path is “C:\Documents and
Settings\username\Application Data”.
Windows
BITBUCKET
The virtual folder containing the objects in the
user’s Recycle Bin.
Sybase IQ ETL 4.1
APPENDIX A
Function Reference
Group
Name
Description
Windows
CDBURN_AREA
The file system directory acting as a staging
area for files waiting to be written to CD. A
typical path is “C:\Documents and
Settings\username\Local Settings\Application
Data\Microsoft\CD Burning”.
Windows
COMMON_ADMINTOOLS
The file system directory containing
administrative tools for all users of the
computer.
Windows
COMMON_ALTSTARTUP
Windows
COMMON_APPDATA
The file system directory that corresponds to
the nonlocalized Startup program group for all
users.Valid only for Microsoft Windows NT
systems.
The file system directory containing
application data for all users. A typical path is
“C:\Documents and Settings\All
Users\Application Data”.
Windows
COMMON_DESKTOPDIRECTORY
The file system directory that contains files and
folders that appear on the desktop for all users.
A typical path is “C:\Documents and
Settings\All Users\Desktop”. Valid only for
Windows NT systems.
Windows
COMMON_DOCUMENTS
Windows
COMMON_FAVORITES
The file system directory that contains
documents that are common to all users. A
typical path is “C:\Documents and Settings\All
Users\Documents”.
The file system directory that serves as a
common repository for favorite items common
to all users. Valid only for Windows NT
systems.
Windows
COMMON_MUSIC
Windows
COMMON_PICTURES
Windows
COMMON_PROGRAMS
User’s Guide
The file system directory that serves as a
repository for music files common to all users.
A typical path is “C:\Documents and
Settings\All Users\Documents\My Music”.
The file system directory that serves as a
repository for image files common to all users.
A typical path is “C:\Documents and
Settings\All Users\Documents\My Pictures”.
The file system directory that contains the
directories for the common program groups that
appear on the Start menu for all users. A typical
path is “C:\Documents and Settings\All
Users\Start Menu\Programs”. Valid only for
Windows NT systems.
167
uSystemFolder
168
Group
Name
Description
Windows
COMMON_STARTMENU
The file system directory that contains the
programs and folders that appear on the Start
menu for all users. A typical path is
“C:\Documents and Settings\All Users\Start
Menu”. Valid only for Windows NT systems.
Windows
COMMON-STARTUP
The file system directory that contains the
programs that appear in the Startup folder for
all users. A typical path is “C:\Documents and
Settings\All Users\Start
Menu\Programs\Startup”. Valid only for
Windows NT systems.
Windows
COMMON_TEMPLATES
The file system directory that contains the
templates that are available to all users. A
typical path is “C:\Documents and Settings\All
Users\Templates”. Valid only for Windows NT
systems.
Windows
COMMON_VIDEO
Windows
COOKIES
The file system directory that serves as a
repository for video files common to all users.
A typical path is “C:\Documents and
Settings\All Users\Documents\My Videos”.
The file system directory that serves as a
common repository for Internet cookies. A
typical path is “C:\Documents and
Settings\username\Cookies”.
Windows
DESKTOP
Windows
DESKTOPDIRECTORY
Windows
DRIVES
Windows
FAVORITES
Windows
FONTS
The virtual folder representing the Windows
desktop, the root of the namespace.
The file system directory used to physically
store file objects on the desktop (not to be
confused with the desktop folder itself). A
typical path is “C:\Documents and
Settings\username\Desktop”.
The virtual folder representing My Computer,
containing everything on the local computer:
storage devices, printers, and Control Panel.
The folder may also contain mapped network
drives.
The file system directory that serves as a
common repository for the user's favorite items.
A typical path is “C:\Documents and
Settings\username\Favorites”.
A virtual folder containing fonts. A typical path
is “C:\Windows\Fonts”.
Sybase IQ ETL 4.1
APPENDIX A
Function Reference
Group
Name
Description
Windows
HISTORY
The file system directory that serves as a
common repository for Internet history items.
Windows
INTERNET
A virtual folder for Internet Explorer (icon on
desktop).
Windows
INTERNET_CACHE
Windows
LOCAL_APPDATA
Windows
MYDOCUMENTS
The file system directory that serves as a
common repository for temporary Internet
files. A typical path is “C:\Documents and
Settings\username\Local Settings\Temporary
Internet Files”.
The file system directory that serves as a data
repository for local (nonroaming) applications.
A typical path is “C:\Documents and
Settings\username\Local Settings\Application
Data”.
Virtual folder representing the My Documents
desktop item.
Windows
MYMUSIC
Windows
MYPICTURES
Windows
MYVIDEO
Windows
NETHOOD
Windows
NETWORK
User’s Guide
The file system directory that serves as a
common repository for music files. A typical
path is C:\Documents and Settings\User\My
Documents\My Music.
The file system directory that serves as a
common repository for image files. A typical
path is “C:\Documents and
Settings\username\My Documents\My
Pictures”.
The file system directory that serves as a
common repository for video files. A typical
path is “C:\Documents and
Settings\username\My Documents\My
Videos”.
A file system directory containing the link
objects that may exist in the My Network
Places virtual folder. It is not the same as
CSIDL_NETWORK, which represents the
network namespace root. A typical path is
“C:\Documents and
Settings\username\NetHood”.
A virtual folder representing Network
Neighborhood, the root of the network
namespace hierarchy.
169
uSystemFolder
170
Group
Name
Description
Windows
PERSONAL
Windows
PRINTERS
The virtual folder representing the My
Documents desktop item. This is equivalent to
MYDOCUMENTS.
The virtual folder containing installed printers.
Windows
PRINTHOOD
Windows
PROFILE
Windows
PROGRAM_FILES
Windows
PROGRAM_FILES_COMMON
Windows
PROGRAMS
Windows
RECENT
Windows
SENDTO
The file system directory that contains Send To
menu items. A typical path is “C:\Documents
and Settings\username\SendTo”.
Windows
STARTMENU
The file system directory containing Start menu
items. A typical path is “C:\Documents and
Settings\username\Start Menu”.
The file system directory that contains the link
objects that can exist in the Printers virtual
folder. A typical path is “C:\Documents and
Settings\username\PrintHood”.
The user's profile folder. A typical path is
“C:\Documents and Settings\username”.
Applications should not create files or folders at
this level; they should put their data under the
locations referred to by APPDATA or
LOCAL_APPDATA.
The Program Files folder. A typical path is
“C:\Program Files”.
A folder for components that are shared across
applications. A typical path is “C:\Program
Files\Common”. Valid only for Windows NT,
Windows 2000, and Windows XP systems.
The file system directory that contains the
user's program groups (which are themselves
file system directories). A typical path is
“C:\Documents and Settings\username\Start
Menu\Programs”.
The file system directory that contains shortcuts
to the user's most recently used documents. A
typical path is “C:\Documents and
Settings\username\My Recent Documents”. To
create a shortcut in this folder, use
SHAddToRecentDocs. In addition to creating
the shortcut, this function updates the Shell's
list of recent documents and adds the shortcut to
the My Recent Documents submenu of the Start
menu.
Sybase IQ ETL 4.1
APPENDIX A
Function Reference
Group
Name
Description
Windows
STARTUP
Windows
SYSTEM
Windows
TEMPLATES
The file system directory that corresponds to
the user's Startup program group. The system
starts these programs whenever any user logs
onto Windows NT or starts Windows 95. A
typical path is “C:\Documents and
Settings\username\Start
Menu\Programs\Startup”.
The Windows System folder. A typical path is
“C:\Windows\System32”.
The file system directory that serves as a
common repository for document templates. A
typical path is “C:\Documents and
Settings\username\Templates”.
Windows
WINDOWS
The Windows directory or SYSROOT. This
corresponds to the %windir% or
%SYSTEMROOT% environment variables. A
typical path is “C:\Windows”.
Network functions
uHostname
Description
Returns the local network name.
Syntax
string uHostname()
Examples
User’s Guide
uHostname() // returns something like “pollux”
171
uAbs
Numeric functions
uAbs
Description
Returns the magnitude of a real number, ignoring its positive or negative sign.
Note This function can only calculate with numbers. In all other cases, it
returns zero.
Syntax
number uAbs(value)
Parameters
number value
A number to calculate on.
Examples
To calculate the absolute value:
uAbs(1522) // returns 1522
uAbs(‘-123.45’) // returns 123.45
uAbs(‘123ABC’) // returns 0
uCeil
Description
Returns the least integer greater than or equal to argument.
Syntax
number uCeil(value);
Parameters
number value
A number to calculate on.
Examples
To round up numbers:
uCeil(1523.1) // returns 1524
uCeil(1522.9) // returns 1524
172
Sybase IQ ETL 4.1
APPENDIX A
Function Reference
uDiv
Description
Returns the division integer.
Syntax
number uDiv(value)
Parameters
number value
A number to calculate on.
Examples
To calculate the integer:
uDiv(10, 3) // returns 3
uExp
Description
Returns the exponential, base e.
Syntax
number uExp(value)
Parameters
number value
A number to calculate on.
Examples
To calculate an exponential:
uExp(1) ;; returns "2.718281828459045"
uFloor
Description
Returns the greatest integer less than or equal to argument.
Syntax
number uFloor(value)
Parameters
number value
A number to calculate on.
Examples
To round up numbers:
uFloor(1523.1) ;; returns 1523
uFloor(1523.9) ;; returns 1523
User’s Guide
173
uLn
uLn
Description
Returns the natural logarithm (base E) of a number.
Syntax
number uLn(input);
Parameters
number value
A number to calculate on.
Examples
uLn(2.718281828) // returns 0.999999
uLog
Description
Returns the logarithm of a number. If the base parameter is omitted, a base of
10 is taken.
Syntax
number uLog(value [, base])
Parameters
number value
A number to calculate on.
number base
The base for the logarithm. If omitted, a base of 10 will be used.
Examples
uLog(100) // returns 3
uLog(16, 2) // returns 4
uMod
Description
Returns the modulo of a division.
Syntax
number uMod(value)
Parameters
number value
A number to calculate on.
Examples
To calculate the modulo:
uMod(10, 3) // returns 1
174
Sybase IQ ETL 4.1
APPENDIX A
Function Reference
uPow, uPower
Description
Returns the value of a base expression taken to a specified power.
Syntax
number uPow(value)
Parameters
number value
A number to calculate on.
Examples
uPow(10, 3) ;; returns "1000"
uRandom
Description
Returns a random number greater than or equal to zero and smaller than one.
Syntax
number uRandom(value)
Parameters
number input
A number to calculate on.
Examples
To return a random number:
uRandom()
// returns "0.696654639123727”
uRound
Description
Returns the rounded argument to nearest integer. If the second optional
parameter is set, uRound preserves the specified number of digits behind the
decimal point.
Syntax
number uRound(value, scale)
Parameters
number value
A number to calculate on.
number scale
Number of digits.
Examples
To round numbers:
uRound(10.1) // returns "10"
uRound(10.49) // returns "10"
uRound(10.5) // returns "11"
User’s Guide
175
uSgn
uRound(10.9) // returns "11"
uRound(1.235, 2) // returns "1.24"
uSgn
Description
Returns the sign of a given value
Syntax
number uSgn(value)
Parameters
number value
A number to calculate on.
Examples
To detecting the sign of a given value:
uSgn(-10.4)
uSgn(0)
uSgn(10.4)
uSgn(null)
//
//
//
//
returns
returns
returns
returns
-1
0
1
null
uSqrt
Description
Returns the square root of a given value.
Syntax
number uSqrt(value)
Parameters
number value
A number to calculate on.
Examples
To calculate a square root:
176
uSqrt(25)
// returns 5
uSqrt(0)
// returns 0
uSqrt(null)
// returns null
Sybase IQ ETL 4.1
APPENDIX A
Function Reference
Script functions
uEvaluate
Description
Evaluates a function or Java Script expression and returns the result.
Syntax
string uEvaluate(expression)
Parameters
number expression
JavaScript code to evaluate.
Examples
To evaluate functions and procedures:
uEvaluate(“if (IN.CUSTNO > 22) {return 22;} else {return
IN.CUSTNO;} )”) // Return IN.CUSTNO if IN.CUSTNO is
below 22 or return 22 if above.
You can also define your functions for later use. First, you evaluate the
following:
function myFunc(a ,b)
{ return a+b;
}
Then, call your function using uEvaluate:
uEvaluate("myFunc(3, 5)")
// Returns 8
String functions
uAsc, uUnicode
Description
Returns a Unicode character value of the first character. With the optional
parameter index, you can also return the code for a different character in the
string. The index parameter starts at 1.
Syntax
number uAsc(value, index)
User’s Guide
177
uChr, uUniChr
Parameters
string value
An input string.
number index
Character position for reading ASCII value.
Examples
To get a Unicode value from a string:
uAsc("Big Ben")
// returns 66
uAsc("Big Ben", 2)
// returns 105
uChr, uUniChr
Description
Similar to the common chr function but returns the Unicode character specified
by the number given. In addition you can also specify more than one character
and unicode escape sequences in order to create a string.
Syntax
string uChr(params, ...)
Parameters
params
A list of expressions or values.
Examples
To create a Unicode string from char values:
What you will see:
uChr(64) // returns "@"
uChr("\u0064\u006f\u0067")
uChr(65, "pple ")
// returns "dog"
// returns "apple"
uCap
Description
Returns the capitalized representation of a string. In other words, the first letter
of each and every word in the string is capitalized.
Syntax
string uCap(text )
Parameters
input text
The string to be capitalized.
Examples
To capitalize a string:
178
Sybase IQ ETL 4.1
APPENDIX A
Function Reference
uCap(‘fArmeR, ASTROnaut’) // returns ‘Farmer,
Astronaut’
uCap(‘the first weekend’) // returns ‘The First Weekend’
uConcat, uCon
Description
Returns the concatenation of all input parameters.
Syntax
string uConcat(params, ...)
Parameters
params
A list of expressions or values of any datatype.
Examples
To concatenate a string:
uConcat(“For “, 3, “ years.”) returns “For 3 years.”
uJoin
Description
Concatenates a delimited string respecting NULL values. All parameters are
concatenated using the value in the first parameter as delimiter. If the second
parameter is not zero, empty parameters are treated as normal; otherwise, they
are ignored.
Error codes: none
Syntax
string uJoin(delimiter, allowEmpty, params, ...)
Parameters
string delimiter
Delimiter to be used between all other string parts.
number allowEmpty
Flag (0/1) indicating if we allow empty fields.
string params
List of strings to concatenate.
Examples
To create a delimited string:
uJoin("-", 1, "James", "", "Tiberius", "Kirk") //
returns "James--Tiberius-Kirk"
uJoin("-", 0, "James", "", "Tiberius", "Kirk") //
User’s Guide
179
uLeft
returns "James-Tiberius-Kirk"
uLeft
Description
Returns the leftmost N characters from a string
Syntax
string uLeft(input, chars)
Parameters
string input
The input string.
number chars
The amount of characters to be retrieved.
Examples
To get the leftmost part of a string:
uLeft("James T. Kirk", 5)
// returns "James"
uLeft(null, 5) // returns null
uLength, uLen
Description
Returns the length of a string
Syntax
String uLength(input)
Parameters
string input
The input string.
Examples
To get the length of a string:
uLength("James T. Kirk")
// returns 13
uSubstr, uMid
Description
Returns a part of a string starting at a character position with a length of length.
Syntax
string uSubstr(input, position, length)
Parameters
string input
The input string.
180
Sybase IQ ETL 4.1
APPENDIX A
Function Reference
number position
The position where to start reading.
number length
The number of characters to read.
Examples
To get a substring out of a string:
uSubstr("James T. Kirk", 7, 2)
// returns "T."
uLPos
Description
Returns the position of a substring within a string. A result of zero indicates
that the substring has not been found
Syntax
string uLPos(input, substring)
Parameters
string input
The input string.
string substring
The substring to search.
Examples
To find the first occurrence of a substring:
uLPos("James T. Kirk", "T")
//returns 7
uLower, uLow
Description
Returns the input string in lowercase letters.
Syntax
string uLower(input);
string input;
Parameters
string input
The input string.
Examples
To convert a string into lowercase letters:
uLower(“James T. Kirk”) // returns “james t. kirk”
User’s Guide
181
uLStuff
uLStuff
Description
Fills the left side of a string up to a specified length. By default, the string is
stuffed with spaces (ASCII 32).
Syntax
string uLStuff(input, length, [ stuff)
Parameters
string input
The input string.
number length
New length of string.
string stuff(optional)
String to append, default is an empty space (ASCII 32).
Examples
To expand a string by filling its left side:
uLStuff(“3.5”, 5) // returns “ 3.5”
uLStuff(“3.5”, 5, 5, “0”) // returns “0003.5”
uLTrim
Description
Removes characters from the left side of the string. If the second parameter is
omitted, it defaults to space (ASCII 32).
Syntax
string uLTrim(input, trimstring)
Parameters
string input
The input string.
string trimstring
The string to trim.
Examples
To trim a string on the left side:
uLTrim("
3.5")
uLTrim("003.5", "0")
// returns "3.5"
// returns "3.5"
uRepeat
Description
182
Returns the given string repeated N times.
Sybase IQ ETL 4.1
APPENDIX A
Syntax
string uRepeat(input, repeats)
Parameters
string input
The string to be repeated.
Function Reference
number repeats
The number of times to repeat the input string.
Examples
To repeat a string multiple times:
uRepeat("Hello ", 4)
Hello "
// returns "Hello Hello Hello
uReplace
Description
Replaces parts of a string.
Syntax
string uReplace(input, search, replace)
Parameters
string input
The string to worked on.
string search
The pattern to be searched.
string replace
The string that will replace any match.
Examples
To search and replace patterns of a string:
uReplace("At four o' clock he became four", "four", "4")
// returns "At 4 o' clock he became 4"
uReverse
Description
Reverses a string.
Syntax
string uReverse(input)
Parameters
string input
The string to reverse.
Examples
To search and replace patterns of a string:
uReverse("Smith”)
User’s Guide
// returns "htimS”
183
uRight
uRight
Description
Returns the rightmost N characters from a string.
Syntax
string uRight(input, chars)
Parameters
string input
The input string.
number chars
The number of chars to be read.
Examples
To get the rightmost part of a string:
uRight("James T. Kirk", 4)
// returns "Kirk"
uRight(null, 5) / / returns null
uRPos
Description
Returns the position of a substring within a string. A result of zero indicates
that the substring has not been found.
Syntax
string uRPos(input, substring)
Parameters
string input
The input string.
string substring
The substring to find.
Examples
To find the last occurrence of a substring:
uRPos("James T. Kirk", "T")
//returns 7
uRStuff
Description
Fills the right side of a string up to specified length. By default, the string is
stuffed with spaces (ASCII 32).
Syntax
string uRStuff(input, length, stuffstring)
Parameters
string input
The input string.
184
Sybase IQ ETL 4.1
APPENDIX A
Function Reference
number length
The new length of the result string.
string stuffstring
The string to append.
Examples
To expand a string by filling its right side:
uRStuff("3.5", 5)
// returns "3.5
"
uRStuff("3.5", 5, "0")
// returns "3.500"
uRTrim
Description
Removes characters from the right side of the string. If the second parameter is
omitted, it defaults to spaces (ASCII 32).
Syntax
string uRTrim(input, trimstring)
Parameters
string input
The input string.
string trimstring
The string to trim.
Examples
To trim a string on the right side:
uRTrim("3.5
")
uRTrim("3.500", "0")
// returns "3.5"
// returns "3.5"
uTrim
Description
Removes characters from both sides of the string. If the second parameter is
omitted, it defaults to spaces (ASCII 32).
Syntax
string uTrim(input, trimstring)
Parameters
string input
The input string.
string trimstring
The string to trim.
Examples
User’s Guide
To trim a string on both sides:
185
uUpper, uUpp
uTrim("
3.5
") // returns "3.5"
uTrim("003.500", "0")
// returns "3.5"
uUpper, uUpp
Description
Returns the input string in uppercase letters
Syntax
string uUpper(input)
Parameters
string input
The input string.
Examples
To convert a string into uppercase letters:
uUpper("James T. Kirk")
// returns "JAMES T. KIRK"
Operator functions
uEQ
Description
Returns 1 if both parameters are equal and no parameter is NULL.
Syntax
number uEQ(value1, value2)
Parameters
value1, value 2
Numeric or string values to compare.
Examples
uEQ(1,2) // returns 0
uEQ(1,1) // returns 1
uEQ(null,1) // returns 0
uNE
Description
186
Returns 1 if both parameters are not equal and no parameter is NULL.
Sybase IQ ETL 4.1
APPENDIX A
Syntax
number uNE(value1, value2)
Parameters
value1, value 2
Numeric or string values to compare.
Examples
Function Reference
uNE(1,2) // returns 1
uNE(1,1) // returns 0
uNE(null,1) // returns 0
uGT
Description
Returns 1 if the first parameter is greater than the second parameter and no
parameter is NULL.
Syntax
number uGT(value1, value2)
Parameters
value1, value 2
Numeric or string values to compare.
Examples
uGT(1,2) // returns 1
uGT(1,2) // returns 0
uGT(1,1) // returns 0
uGT(null,1) // returns 0
uGe
Description
Returns 1 if the first parameter is greater than the second parameter and no
parameter is NULL.
Syntax
number uGE(value1, value2)
Parameters
value1, value 2
Numeric or string values to compare.
Examples
uGE(2,1) // returns 1
uGE(1,2) // returns 0
uGE(1,1) // returns 0
uGE(null,1) // returns 0
User’s Guide
187
uLT
uLT
Description
Returns 1 if the first parameter is less than the second parameter and no
parameter is NULL.
Syntax
number uLT(value1, value2)
Parameters
value1, value 2
Numeric or string values to compare.
Examples
uLT(1,2) // returns 0
uLT(1,2) // returns 1
uLT(1,1) // returns 0
uGT(null,1) // returns 0
uLE
Description
Returns 1 if the first parameter is greater than the second parameter and no
parameter is NULL.
Syntax
number uLE(value1, value2)
Parameters
value1, value 2
Numeric or string values to compare.
Examples
uLE(2,1) // returns 0
uLE(1,2) // returns 1
uLE(1,1) // returns 1
uLE(null,1) // returns 0
Trigonometric functions
uAcos
Description
188
Returns the arccosine (in radians) of a number.
Sybase IQ ETL 4.1
APPENDIX A
Syntax
number uAcos(value)
Parameters
number value
The input value.
Examples
Not available.
Function Reference
uAsin
Description
Returns the arcsine (in radians) of a number.
Syntax
number uAsin(value)
Parameters
number input
The input value.
Examples
Not available.
uAtan
Description
Returns the arctangent (in radians) of a number.
Syntax
number uAtan(value)
Parameters
number value
The input value.
Examples
Not available.
uCos
Description
Returns the cosine (in radians) of a number.
Syntax
number uCos(value)
Parameters
number value
The input value.
Examples
Not available.
User’s Guide
189
uSin
uSin
Description
Returns the sine (in radians) of a number.
Syntax
number uSin(value)
Parameters
number value
The input value.
Examples
Not available.
uTan
Description
Returns the tangent (in radians) of a number.
Syntax
number uTan(value)
Parameters
number value
The input value.
Examples
Not available.
190
Sybase IQ ETL 4.1
A P PE N DI X
B
Sybase ETL Server
Topic
Page
GRID architecture
Troubleshooting
191
194
Command line parameters
INI file settings
195
196
The Sybase ETL Server is part of the Sybase IQ ETL product suite. It is
the central component of the GRID architecture. This appendix describes
installation, usage, and architecture of the Sybase IQ ETL application.
The following terms are used:
•
Sybase ETL Server — The server application itself, which provides
several independent services.
•
GRID engine — Part of the server application, which actually
executes jobs or projects.
•
Server console — The console window used to interact with the
server application.
GRID architecture
The GRID architecture consists of several independent instances within a
network. Each instance exposes certain services to all other peer nodes.
Currently, the server is hosting the Engine Service that allows projects to
execute.
Sybase IQ ETL uses the GRID network nodes for parallel execution of
projects and jobs, which improves scalability of transformation speed.
User’s Guide
191
GRID architecture
Communication
The server instances are using UDP broadcasts in order to inform other nodes
about urgent events, such as start and stop, as well as system failure or crash
immediately.
The default port for communication is port 5124. You can change this in the
INI file or on the command line.
All communication between the nodes is done over TCP/IP on the same port.
Note Verify that you have no firewall blocking this port or change the port on
all server installations to a different number better matching your environment.
Using the server
The server application can behave in several different ways, depending on the
parameters provided.
•
GRID Engine Server — the GRID Engine with start in server mode,
waiting for execution requests.
•
GRID Engine System Service — the GRID Engine can be installed as a
Unix Daemon or Windows System Service and works as a GRID Engine
Server.
GRID Engine Server
A GRID engine running as a server is waiting for execution requests through
TCP/IP. The default port is 5124 and can be customized.
Start a server
Syntax
Windows:
GridNode
GridNode --port 5500
192
Sybase IQ ETL 4.1
APPENDIX B
Sybase ETL Server
Linux/Unix:
GridNode.sh
GridNode.sh --port 5500
Stop a server
You can stop a server from the console if it is a local or remote process. If the
process is currently executing projects, it will finish afterwards, so it may take
a while.
Syntax
Windows:
GridNode --shutdown
GridNode --shutdown --server [remotehost]
Linux/Unix:
GridNode.sh --shutdown
GridNode.sh --shutdown --server[remotehost]
GRID Engine Server as Windows System Service
The GRID engine server can also run as a Windows System Service. It will be
started after system start-up under the SYSTEM user account and has no
interaction with the GUI.
Note You must have special administrator privileges to install, remove, start,
and stop a System Service.
Install as a System Service
Syntax
GridNode.exe --install [additional parameters]
User’s Guide
193
Troubleshooting
Remove System Service
Syntax
GridNode.exe --remove
When running as System Service, basic events (failures, success messages, and
so on) are written to the Windows Event Log.
Troubleshooting
❖
To prepare the support contact
1
Check the error text.
2
Check the log file.
3
Run again with system trace switched on.
4
Check the version and revision number as well as your machine
identification.
Syntax:
GridNode --version
Output:
Sybase IQ ETL (4.1.0.676)
Copyright © Sybase, Inc. 2002-2006
Grid Node:
Machine ID: 9TuH/ioF6Wt/Gig=
5
Check the licenses available.
Syntax:
GridNode --licenses
Output:
Sybase IQ ETL (4.1.0.676)
Copyright (c) Sybase, Inc. 2002-2006
Grid Node:
Product ID: Sybase IQ ETL
194
Sybase IQ ETL 4.1
APPENDIX B
Sybase ETL Server
Machine ID: 9TuH/ioF6Wt/Gig=
File: custom
Product: Sybase IQ ETL
Version: 4.1
License: Enterprise Edition
Status: Valid
Expiration:
Command line parameters
This section describes all available parameters of the Sybase IQ ETL server.
For more detailed information on the usage of these parameters, refer to the
usage section.
You can always get an overview of the parameters available by typing
GridNode --help, or GridNode -h on the command line. The console output
will show you the long and the short form of each parameter, for example:
--version,
-V
Displays version information
Note The full parameter name is always prefixed by two minus signs, whereas
the short form has only one.
Table 6-3: Command line parameters
User’s Guide
Group
Full
Short
Unix
Win
Description
System Service
install
inst
yet
yes
System Service
remove
Rm
yes
yes
Installs the application as Unix
Daemon or Windows System
Service
Removes Daemon or System
Service start
System Service
setoptions
So
no
yes
System Service
getoptions
Go
no
yes
System Service
background
bg
yes
no
Sets the command line options to be
used when running as Windows
System Service
Prints the command line options to
be used when running as Windows
System Service
195
INI file settings
Group
Full
Short
Unix
Win
System Service
Logging
no_pidfile
console
nopid
con
yes
yes
no
yes
Description
Logging
tracelevel
tl
yes
yes
Communication
server
s
yes
yes
Communication
port
p
yes
yes
Identifies the port number to
operate on
Info
version
V
yes
yes
Identifies the application version
information
Info
help
h
yes
yes
Info
licenses
ll
yes
yes
Node
nodelist
nl
yes
yes
Identifies the short list of
parameters
Identifies the short information
about the licenses available and
their respective status
Lists known peer nodes
Node
shutdown
sh
yes
yes
Shuts down the node
Writes detailed error information
and trace messages on the console
Sets the tracelevel for debugging
from 0 (no trace) to 5 (very verbose)
Identifies the remote server to be
used
INI file settings
In the etc directory of the product installation you will find INI files which you
can use in order to setup some preferences permanently.
Every application is looking for its own INI file named [application name].ini.
If a certain key is not found, the Default.ini file will be searched.
196
Sybase IQ ETL 4.1
APPENDIX B
Sybase ETL Server
Default.ini
Group
Network
Key
proxy
Values
host:port
explorer
Default
explorer
Description
Sets the proxy for Internet access.
You can fine-tune the proxy for a certain
protocol (http, https, ftp, ftps) by using the
keys “http_proxy”, “https_proxy”,
“ftp_proxy”, or “ftps_proxy”.
The proxy value “explorer” takes the system
proxy in Windows environments.
Language
Logging
Default
Default
English_USA
1/0
English_USA
0
Logging
Logging
File
Tracelevel
1/0
0-5
1
0
Logging
Flushtime
1-n
1
Indicates seconds between the internal log
flashes.
GridNode.ini
User’s Guide
Group
Network
Key
GridDefaultPort
Values
1-65536
Default
5124
Description
The default GridNod port
Network
BroadcastAddress
Any IP
address
255.255.
255.255
The broadcast address for
GridNode UPD messages
Identification
NodeDomain
any
Global
(not used yet)
197
INI file settings
198
Sybase IQ ETL 4.1
A P PE N DI X
C
Queuing and Executing
Process Calls
Topic
Page
Configuring ProcessQ calls
Controlling the appearance of a new process
199
201
ProcessQ is an application that can queue and execute process calls
parallel or in sequence. The serialization is implemented with a mutex
(mutual exclusion) semaphore. The application uses an internal GUID to
name the mutex, so the exclusion is system-wide (over all products). It is
possible to set an own ID for special purposes. Both the state of being
locked by the mutex and the runtime of the queued process have an own
timeout mechanism. The windows style (hidden, normal, maximized,
minimized) of the application to call can be configured.
ProcessQ requires the SolBase.dll library.
Configuring ProcessQ calls
ProcessQ.exe can be configured with several parameters. Only -E is
required; all other parameters are optional.
-S
Serializes the process calls. The default is parallel execution.
-TP n
Timeout, the number of milliseconds before the RUNNING process will
stop. By default, no timeout occurs.
-TL n
Timeout, the number of milliseconds before the LOCKED process will
stop. By default, no timeout occurs.
User’s Guide
199
Configuring ProcessQ calls
-I
Customized ID for exclusion.
-W n
Window style; see “Controlling the appearance of a new process” on page 201.
-D
The working directory for the application.
-E
The executable and its command line parameters. If this value contains spaces,
it must be quoted with double quotes.
-P<ExtVar=Value>[,< ExtVar=Value>..,< ExtVar=Value>]
This option allows you to set parameters from the command line that can be
used by the job or project during execution. <ExtVar> is an environment
variable that you can access in a Sybase IQ ETL Development object during
execution with the uGetEnv() function. Multiple variables are separated by a
comma, the full string should be quoted using double quotes. Spaces within a
value can be quoted with single quotes. Spaces within the key are not allowed.
Examples
o processq -P "HOME=h:\" -E emacs.exe
o processq -W 0 -S -P Port=8080 -E "d:\tod\engine.exe d:\tod\engineman.lbr"
o processq -P "HOME='h:\BS test 1\BS test'; LANG=de" -E transform.exe
Errorcodes
All error messages during execution are written into a log file. The name of the
file will depend on the module name which raises the error, in this case
ProcessQ.log. The path is the current working directory and can be set by the
environment variable SOLONDE LOG DIR.
Code
1
200
2
Error
Invalid usage of command line. This also displays the
available options.
Error when parsing the command line.
3
4
Error setting the environment variable.
No executable given.
5
6
Creating mutex failed.
Mutex timed out.
7
Creating process (running the executable) failed.
Sybase IQ ETL 4.1
APPENDIX C
Queuing and Executing Process Calls
Code
Error
8
Terminating the process failed.
Controlling the appearance of a new process
By providing a Window Style with the -W option, you can control the
appearance of the new process.
User’s Guide
Value
Name
Meaning
0
HIDE
1
SHOWNORMAL
2
SHOWMINIMIZED
3
SHOWMAXIMIZED
Hides the window and activates another
window.
Activates and displays a window. If the
window is minimized or maximized, the
system restores it to its original size and
position. An application should specify this
flag when displaying the window for the first
time.
Activates the window and displays it as a
minimized window.
Maximizes the specified window.
4
SHOWNOACTIVATE
5
SHOW
6
MINIMIZE
7
SHOWMINNOACTIVE
8
SHOWNA
Displays the window in its current size and
position.
9
RESTORE
Activates and displays the window. If the
window is minimized or maximized, the
system restores it to its original size and
position. An application should specify this
flag when restoring a minimized window.
Displays a window in its most recent size and
position. This value is similar to
SHOWNORMAL, except the window is not
active.
Activates the window and displays it in its
current size and position.
Minimizes the specified window and
activates the next top-level window in the Z
order.
Displays the window as a minimized
window. This value is similar to
SHOWMINIMIZED, except the window is
not activated.
201
Controlling the appearance of a new process
202
Value
Name
Meaning
10
SHOWDEFAULT
11
FORCEMINIMIZE
Sets the show state based on the value
specified in the STARTUPINFO structure
passed to the CreateProcess function by the
program that started the application.
Windows 2000/XP: Minimizes a window,
even if the thread that owns the window is
hanging. This flag should be used only when
minimizing windows from a different thread.
Sybase IQ ETL 4.1
Index
A
adding a component 16
adding component variables 76
allowing dynamic expressions 15
applying component variables 14
Component Store 16
deleting a component 16
editing component variables 14
encrypting properties 15, 77
entering database connection parameters
evaluating SBN expressions 77
grouping components 16
port structure and mapping 3
providing descriptions 76
removing a component variable 15
setting required properties 70
setting up a component 71
stepping record-by-record 2
variables and ports 3
Content Explorer 45
creating queries 47
generating SELECT statements 46
modifying default setting of a join 48
opening 46
conversion functions
uBase64Decode 132
uBase64Encode 133
uConvertDate 133
uFromHex 135
uHexDecode 135
uHexEncode 136
uToHex 135
uToUnicode 136
uURIDecode 136
uURIEncode 137
aggregation functions
uAVg 126
uMax 126
uMin 126
architecture
GRID 191
IQ ETL 1
B
bit functions
uBitAnd 127
uBitNot 128
uBitOr 127
uBitXOr 128
boolean functions
ulsAscending 128
ulsBoolean 129
ulsDate 129
ulsDescending 130
ulsFloat 131
ulsInteger 130
ulsNull 131
ulsNumber 131
uNot 132
C
Character Mapper 99
client user session
closing 11
command line parameters for ETL Server
Component Store
Development desktop 16
grouping components 16
components
User’s Guide
71
195
D
Data Calculator
data calculator
93
203
Index
adding to a project 24
data formats
converting 5
data provider
adding to a project 22
data sink
adding to a project 23
setting properties 24
Data Splitter 109
data transformation projects
creating 3, 4
database connection
connecting to SQLite database 75
entering parameters 71
datatypes
converting 5
date and time functions
format of time strings 137
uDate 140
uDateTime 141
uDay 141
uDayOfYear 142
uHour 142
uIsoWeek 143
uJuliandate 144
uMinute 144
uMonth 145
uMonthName 145
uMonthNameShort 145
uQuarter 142
uSeconds 146
uTimeDiffMs 146
uWeek 147
uWeekday 147
uWeekdayName 148
uWeekdayNameShort 148
uYear 149
DB Bulk Load Sybase IQ 119
DB Data Provider Full Load 81
DB Data Provider Index Load 83
DB Data Sink Delete 115
DB Data Sink Insert 110
DB Data Sink Update 113
DB Lookup 101
DB Lookup Dynamic 104
DB Staging 107
204
Design section
creating queries 47
Development desktop 15
generating SELECT commands 46
destination components
DB Bulk Load Sybase IQ 119
DB Data Sink Delete 115
DB Data Sink Insert 110
DB Data Sink Update 113
Text Data Sink 116
Development desktop
Component Store 16
Content Explorer 45
customizing preferences 17
example of 9
generating SELECT commands 46
layout 9
opening Content Explorer 46
the Design section 15
the Navigator 10
the Properties section 14
E
error log 49
errorhandling functions
uError 149
uErrortext 150
uInfo 150
uTrace 151
uTracelevel 151
uWarning 150
ETL Server application
command line parameters 195
GRID architecture 191
GRID engine as a Windows System Service
INI file settings 196
overview 191
stopping a server 193
using the server 192
execution properties
resetting 28
execution.log 49
193
Sybase IQ ETL 4.1
Index
F
J
fatal.log 49
file functions
uFileInfo 152
uFileRead 152
uFileWrite 153
Finish component 124
formatting functions
uFormatDate 154
functions 53
function reference 125
fuzzy search functions
uGlob 156
uLike 156
uMatches 157
JavaScript Procedure Editor and Debugger 57
starting 58
switching modes 58
job component
Finish component 124
Job components
Synchronizer 122
job components
Error component 124
Project 121
Start 121
jobs
cancelling job execution 38
controlling job execution 39
copying a job 28, 39
creating jobs 38
defined 2
defining multi-engine jobs 63
deleting a job 39
excuting multi-engine jobs 63
executing a job 37
job execution state codes 51
list of components 36
managing 36
managing jobs and scheduled tasks 49
modifying jobs 38
monitoring job execution process 37
multi-engine jobs 63
renaming a job 39
Runtime Manager 49
scheduling a job 39
unlocking a job 28
join
modifying default setting 48
G
GRID architecture
GRID engine server 192
GRID engine system service 192
IQ ETL Server application 191
starting a server 192
using the server 192
GRID engine
registering GRID engines 62
using multiple engines 61
I
INI file settings 196
IQ ETL
architecture 1
desktop 1
Development components 1
Development tools overview 6
engine 1
overview ix
server 1, 2
starting the Development desktop
IQ ETL Development
desktop 9
starting 21
User’s Guide
L
21
log files
capturing all job execution error information
capturing low-level error information 49
capturing Trace Level details 49
inspecting the log files 49
lookup components
cached and uncached lookups 101
49
205
Index
DB Lookup 101
DB Lookup Dynamic
lookup functions
uChoice 157
uElements 159
uFirstDifferent 158
uFirstNotNull 158
uToken 159
O
M
migration template 40
miscellaneous functions
uCommandLine 160
uGetEnv 160
uGuid 160
uMD5 161
uScriptLoad 161
uSetEnv 161
uSetLocale 162
uSleep 165
uSystemFolder 165
multi-engine execution
define multi-engine jobs 63
reducing job execution time 61
registering GRID engines 62
N
Navigator
browsing repositories
Development desktop
network functions
uHostname 171
numeric functions
uAbs 172
uCeil 172
uDiv 173
uExp 173
uFloor 173
uLn 174
uLog 174
uMod 174
uPow, uPower 175
206
uRandom 175
uRound 175
uSgn 176
uSqrt 176
104
12
10
operator functions
uEQ 186
uGe 187
uGT 187
uLE 188
uLT 188
uNE 186
P
performance
example of reports 65
reports 63
port attributes
managing 32
Structure Viewer 32
port structures
copying 80
managing 79
modifying 79
viewing and mapping ports 80
preferences
customizing 17
process calls
configuring ProcessQ 199
controlling appearance of a new process
ProcessQ 199
queuing and executing 199
processing components
Data Splitter 109
ProcessQ
configuring calls 199
Project component 121
multi-project component 123
projects
adding a data calculator 24
adding a data provider 22
201
Sybase IQ ETL 4.1
Index
adding a data sink 23
controlling multiple data streams 35
copying a project 28
creating a project 27
creating data transformation projects 3
creating data transformation projects, complex
creating your first project 22
customizing a project 3
defined 2
deleting a project 28
executing a project 28
managing projects 27
mappings 31
modifying a project 28
renaming a project 28
resetting execution properties 28
running a project 3
simulating a project 3
simulating and executing a project 29
starting a simulation 25
unlocking a project 28
viewing simulation flow 32
Properties section
Development desktop 14
R
reports
analyzing performance data 63
examples 65
repositories
adding 11
administering 11
closing a repository connection 11
navigating 12
opening 11
overview 4
running a project 3
modes 3
Runtime Manager 49
S
SBN expressions
User’s Guide
77
4
scheduling tasks
managing job schedules 50
Runtime Manager 49
script functions
uEvaluate 177
server
components 191
ETL 191
GRID architecture 191
GRID engine as a Windows System Service 193
INI file settings 196
overview 2
simulating a project 3, 25
source components
DB Data Provider Full Load 81
DB Data Provider Index Load 83
Text Data Provider 85
XML via SQL Data Provider 88
SQL
customizing SQL and transformation rules 51
entering SQL statements 54
including variables 52
overview 5
Query Designer 55
using expressions and procedures 52
validating queries 55
Square Bracket Notation 54
example 54
staging components
DB Staging 107
Start component 121
starting IQ ETL Development 21
stepping a component
record-by-record 2
string functions
uAsc, uUniCode 177
uCap 178
uChr, uUniChr 178
uConcat, uCon 179
uJoin 179
uLeft 180
uLength, uLen 180
uLower, uLow 181
uLPos 181
uLStuff 182
uLTrim 182
207
Index
uRepeat 182
uReplace 183
uReverse 183
uRight 184
uRPos 184
uRStuff 184
uRTrim 185
uSubstr, uMid 180
uTrim 185
uUpper, uUpp 186
Structure Viewer 32
Synchronizer component
system.log 49
changing passwords 13
creating a user 13
removing a user 13
X
XML via SQL Data Provider
88
122
T
templates
building a job from a template 43
building a migration template 40
copying a template 43
creating a data model from a template 44
creating a template 43
creating projects and jobs from tempates 40
managing a migration template 43
modifying a template 43
renaming a template 43
Text Data Provider 85
Text Data Sink 116
transformation components
Character Mapper 99
Data Calculator 93
trigonometric functions
uAcos 188
uAsin 189
uAtan 189
uCos 189
uSin 190
uTan 190
U
Unicode support
user accounts
administering
208
6
13
Sybase IQ ETL 4.1