1
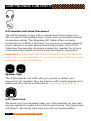
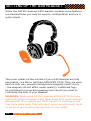
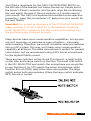
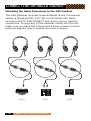
Contents
04
05
06
08
10
13
14
Introduction
about the A30 HEADSET
A30 PACKAGE CONTENTS
SETTING UP the a30
CONNECTING AN AUDIO SOURCE
BASIC Troubleshooting
Warranty INFORMATION
Contents
P3
Introduction
Congratulations on your purchase of an ASTRO Gaming A30
Headset! Whether you are a professional video gamer, a casual
player, or a hardcore hobbyist, we’d like to welcome you into
the ASTRO family of performance gaming accessories.
The A30 Headset is the result of countless hours of research
and development by audio industry experts, extremely
talented industrial designers, and an elite cadre of professional
video gamers.
While the A30 Headset is a standalone product in its own
right, it is just at home when paired with the ASTRO MixAmp
as part of an ASTRO Audio System. The A30 Headset comes
complete with audio cables that enable you to connect to
virtually any type of audio product or gaming device.
Underneath its svelte exterior, the A30 Headset contains
several features you haven’t seen before in a gaming headset.
Customization and versatility are the hallmarks of ASTRO
Gaming products, and this guide will show you how to set
up your headset the right way. Please keep it for reference
as it contains important warranty information, and a handy
troubleshooting guide.
P4
introduction
About the A30 headset
The A30 Headset was developed specifically for enhancing the
audio and communications experience of video gaming. Premium
36mm drivers combined with a removable uni-directional
microphone set the audio standard for gaming wherever you are.
Whether you’re gaming at home alone on a console or a PC,
socially with friends, or out on the road with a portable system,
the A30 Headset is the perfect audio solution.
Using the A30 with the ASTRO Audio System
A complete Audio System consists of either the A30 Headset
(described herein) or the A40 Headset and the ASTRO MixAmp™
(sold separately). All of our headsets and the MixAmp™ are
high-performance products on their own, but when combined
together they represent the ultimate gaming audio solution.
The MixAmp™ integrates the latest Dolby® Digital and Dolby®
Headphone surround technology, delivering up to 7.1 channel
surround sound to any set of stereo headphones while at the
same time integrating a private voice communication network
between you and your teammates via ASTRO’s patent-pending
daisy-chain mixing circuit.
About the a30
P5
A30 PACKAGE CONTENTS
A30 Headset and Quick Disconnect
The A30 Headset comes with a special Quick Disconnect (or
QD, for short) that enables easy connection of specialized audio
connection cables. The Standard QD Cable offers a simple
connection to ASTRO’s MixAmp™ or most any portable gaming/
music device or mobile phone with a 3.5mm jack. The PC QD
Cable has the requisite dual-jack connectors needed for all your
voice and audio needs on most tower and laptop computers.
Important: Always keep the Quick Disconnect fully inserted and
seated for proper operation. An incorrectly seated QD may cause
feedback or other interference.
Speaker Tags
The A30 Headset can shift with your mood or reflect your
personal style. Speaker Tags are held on with small magnets and
additional sets can be purchased at www.astrogaming.com
A30 Travel Case
We know you’ll occasionally take your A30 Headset on the road
and we wanted to make sure it had a good home. This travel case
will keep it safe along with the boom mic and extra cables.
P6
A30 package contents
Standard Quick Disconnect Cable
This cable connects to the A30’s upper Quick Disconnect
and provides a simple 3.5mm connection for use with
standard audio devices and the ASTRO MixAmp™. This 4-pole
connector also combines microphone with stereo audio and
its voice functionality is compatible with devices such as the
Apple iPhone, Sony PSP and most smart phones that feature a
3.5mm headset port.
PC Quick Disconnect Cable (with Volume Control)
This cable connects to the A30’s upper Quick Disconnect and
provides standard microphone and stereo audio connectors.
It also includes a volume control for easy adjustment. Use it to
connect directly to your PC.
WARNING: Always adjust the volume of the A30 Headset to a
safe level BEFORE putting it on! Permanent hearing loss may
occur if headphones or earbuds are used at a high volume for
an extended period of time. Reduce the volume or discontinue
use of the A30 Headset immediately if you experience any
discomfort, feel blood or bile oozing out of your eardrums, or
hear ringing in your ears.
Mobile Quick Disconnect Cable
This cable uses the same connections as our Standard QD but is
shorter in length and includes a call pick-up button ideal for using
with most smart phones that feature a 3.5mm headset port (like
the Apple iPhone and Blackberry Storm).
A30 package contents
P7
SETTING UP THE A30 HEADSET
While the ASTRO Gaming A30 Headset contains more features
in a headset than you may be used to, configuration and use is
quite simple.
The iconic plates on the outside of your A30 Headset are fully
removable – we like to call them SPEAKER TAGS. They are each
held on with very powerful neodymium magnets (don’t worry
– the magnets do not affect audio quality!). Additional Tags
be purchased on www.astrogaming.com should you want to
customize the look of your headset.
WARNING: While extra ASTRO Gaming SPEAKER TAGS make
great refrigerator magnets, keep them away from small children
and animals. The magnets are VERY harmful if swallowed (and
they taste really bad). They also don’t play nice with credit cards
so we don’t recommend placing them in your wallet.
P8
setting up the a30
You’ll find a receptacle for the A30’s MICROPHONE BOOM on
the left side of the headset just below the earcup. Simply insert
the boom’s 2.5mm connector into the jack, align the positioning
key, and adjust the end of the microphone so it resides near to
your mouth. The A30’s microphone has excellent noise-rejection
properties – keep the microphone 1-2” away from your mouth for
the best fidelity.
Important: For proper performance of the MICROPHONE BOOM,
make sure that it is FULLY SEATED in the headset receptacle.
Insert the BOOM’s connector into the socket while making sure
the positioning key is aligned properly.
Many devices have voice communication capabilities, but a boom
mic isn’t necessary or welcome in every situation -- especially
while traveling. Therefore, we’ve built a stealthy inline microphone
into our QD system. This way, you’ll have voice communication
capability at all times. The inline microphone is perfect for general
voice duties, but we recommend using A30’s boom microphone
for the highest fidelity sound.
There are two switches on the Quick Disconnect: a small switch
on the side, and a large switch on the face. The small A/B switch
is the MIC SELECTOR and selects the microphone you would like
to use. Position A (or UP) selects the boom microphone, while
Position B (or DOWN) selects the inline microphone. The large
switch mutes both microphones. When the large switch indicates
RED, the mic is muted.
setting up the a30
P9
connecting an audio source
Attaching the Quick Disconnect to the A30 Headset
The A30 Headset includes three different Quick Disconnect
cables, a Standard QD, a PC QD, and a Mobile QD. Each
include a QUICK DISCONNECT jack and a source specific
connection. To plug any of the headset cables into the QD,
make sure you have the 2.5mm and 3.5mm connector jacks
properly aligned (one is smaller and one is larger).
P10
connecting an audio source
Using the A30 Headset with the MixAmp™ (Fig. A)
Connect the Standard QD Cable with the single 3.5mm audio
jack to the A30 Headset’s Quick Disconnect. Make certain that
the two halves of the QD are fully inserted and seated. This
special 4-pole connector enables the A30 Headset to blend in
microphone functionality with a single connection when used
with the MixAmp™!
Using the A30 Headset with a PC (Fig. B)
Connect the PC QD Cable to the Quick Disconnect on the
A30. Plug the microphone and audio connectors into their
corresponding jacks on your PC. Usually pink (for microphone)
and green (for audio). Consult your PC’s motherboard/sound
card manual for further information.
The PC QD Cable contains a volume control on the Quick
Disconnect for easy control of the audio level without the
MixAmp™ or an external audio source.
Using the A30 Headset with Standard Audio Sources (Fig. C)
Connect the Standard QD Cable or the Mobile QD Cable to the
A30’s Quick Disconnect to use them with any device that has
a 3.5mm stereo output like mp3 players or portable gaming
systems.
Both QD’s combine microphone and stereo audio in a single
connector making its voice functionality fully compatible with
devices like the Apple iPhone, Sony PSP-3000 (and newer),
most smart phones that feature a 3.5mm headset port, and of
course, the ASTRO Gaming MixAmp™.
Important: This voice functionality won’t interfere with
your portable devices’ audio output (i.e. mp3 players and
portable gaming systems). Simply connect the 4-pole
jack to any 3.5mm socket to use the A30 Headset as
conventional headphones. (You might also want to remove
the MICROPHONE BOOM when you are out in public or on the
road, Commander).
connecting an audio source
P11
Using the A30 Headset with mobile phones
Connect the Mobile QD Cable to the A30’s Quick Disconnect.
You can now use the A30 with mobile devices that have a
3.5mm 4-pole connector for audio and voice. Some mobile
devices with 4-pole compatibility are: the Apple iPhone,
Blackberry Storm, and Sony PSP-3000. Consult your owner’s
manual for details on what kind of device you own. Use the
controls built into your device for adjusting the volume or to
make and receive calls.
For additional functionality with certain mobile phones,
the Mobile QD Cable has a single multifunction button. The
specific function of this button is determined by your device
but usually supports the answer/reject call function at a
minimum. Please consult your device’s manual for further
information.
P12
connecting an audio source
basic troubleshooting
If the A30 Headset has no sound, check…
• Are the Quick Disconnect ends firmly pushed together?
• Is your device’s volume level set to low or muted?
If you are connected to a PC with the PC Quick Disconnect:
• Are the microphone (pink) and audio (green) jacks properly
inserted into the corresponding jacks?
If the microphone does not operate properly, check…
• Are the Quick Disconnect ends firmly pushed together?
• Is the MUTE control on the Quick Disconnect engaged? (the
switch indicates RED when the mic is muted)
• Is the MICROPHONE BOOM properly inserted and seated?
(check the alignment of the positioning key, and firmly insert
the microphone boom)
• Is the Mic Selector Switch on the QD firmly in the A or B
position? If your boom microphone is not in place you must
set this switch to the B position to have an active microphone.
If you are connected to a PC with the PC Quick Disconnect:
• Are the microphone (pink) and audio (green) jacks properly
inserted into the corresponding jacks?
Make sure that the microphone is enabled in your PC settings,
and that output level is not set to minimum or muted
If sounds seem reversed using the A30 Headset, check…
Is the A30 Headset on backwards? If so: Turn A30 Headset
around so that your left ear is listening to the can indicated
with the ‘L’. Chuckle lightheartedly at self.
Support
If you have an issue and you need further help to resolve,
please contact us via the “Got A Question Form” at
http://www.astrogaming.com/support/
BASIC troubleshooting P13
warranty information
All products purchased directly from ASTRO Gaming carry a
one year warranty on defective parts or faulty workmanship.
No registration is required to activate this warranty. If you
purchased one of our products from a retailer other than
ASTRO Gaming, you’ll need to register your product with us in
order to authorize and activate your warranty.
There are additional benefits to registering your product with
ASTRO Gaming. For details, please visit:
www.astrogaming.com/register
What is covered
All defective parts or faulty workmanship.
What is not covered
The warranty does not cover damage caused by accident,
misuse, abuse, neglect, lightning, sharks, power surges, other
acts of nature/god(s), unauthorized product modification or
repairs, or failure to follow the instructions outlined in this
Setup Guide.
What we will do
We will repair or replace any defective parts within a
reasonable amount of time and free of charge at any time
within the warranty period. After service, we will ship your
product back to you at our expense.
P14
warranty information
What we ask from you
You will be responsible for shipping or transportation charges to
us. We recommend that you keep the original shipping materials,
as it is important that the product will not be damaged during
shipping. ASTRO Gaming cannot be responsible for damages
incurred during shipping due to poor packing, but should this
occur we hope that we can still be friends.
How to obtain ASTRO Gaming warranty service
If you have any questions about your warranty coverage, need
help, or you think you may need service, contact the Customer
Relations Team via the “Got A Question Form” at: http://www.
astrogaming.com/support/. We will do everything we can to
answer your questions and resolve any issues within 24 hours.
Exclusive remedy
This Limited Warranty is fully transferable provided that
the current owner furnishes the original proof of purchase.
THE MAXIMUM LIABILITY OF ASTRO GAMING SHALL NOT
EXCEED THE ACTUAL PURCHASE PRICE PAID BY YOU FOR
THE PRODUCT. IN NO EVENT SHALL ASTRO GAMING BE
LIABLE FOR SPECIAL, INCIDENTAL, CONSEQUENTIAL OR
INDIRECT DAMAGES OMG CAPS.
warranty information
P15
www.astrogaming.com
www.astrogaming.co.uk
www.astrogaming.com/support
© 2010 Astro Gaming, Inc. All rights reserved