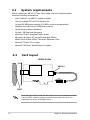
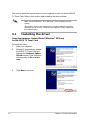
1
TV Tuner Card
U3000I
E3085
First Edition
February 2007
Copyright © 2007 ASUSTeK COMPUTER INC. All Rights Reserved.
No part of this manual, including the products and software described in it, may be reproduced,
transmitted, transcribed, stored in a retrieval system, or translated into any language in any form or by any
means, except documentation kept by the purchaser for backup purposes, without the express written
permission of ASUSTeK COMPUTER INC. (“ASUS”).
Product warranty or service will not be extended if: (1) the product is repaired, modified or altered, unless
such repair, modification of alteration is authorized in writing by ASUS; or (2) the serial number of the
product is defaced or missing.
ASUS PROVIDES THIS MANUAL “AS IS” WITHOUT WARRANTY OF ANY KIND, EITHER EXPRESS
OR IMPLIED, INCLUDING BUT NOT LIMITED TO THE IMPLIED WARRANTIES OR CONDITIONS OF
MERCHANTABILITY OR FITNESS FOR A PARTICULAR PURPOSE. IN NO EVENT SHALL ASUS, ITS
DIRECTORS, OFFICERS, EMPLOYEES OR AGENTS BE LIABLE FOR ANY INDIRECT, SPECIAL,
INCIDENTAL, OR CONSEQUENTIAL DAMAGES (INCLUDING DAMAGES FOR LOSS OF PROFITS,
LOSS OF BUSINESS, LOSS OF USE OR DATA, INTERRUPTION OF BUSINESS AND THE LIKE),
EVEN IF ASUS HAS BEEN ADVISED OF THE POSSIBILITY OF SUCH DAMAGES ARISING FROM ANY
DEFECT OR ERROR IN THIS MANUAL OR PRODUCT.
SPECIFICATIONS AND INFORMATION CONTAINED IN THIS MANUAL ARE FURNISHED FOR
INFORMATIONAL USE ONLY, AND ARE SUBJECT TO CHANGE AT ANY TIME WITHOUT NOTICE,
AND SHOULD NOT BE CONSTRUED AS A COMMITMENT BY ASUS. ASUS ASSUMES NO
RESPONSIBILITY OR LIABILITY FOR ANY ERRORS OR INACCURACIES THAT MAY APPEAR IN THIS
MANUAL, INCLUDING THE PRODUCTS AND SOFTWARE DESCRIBED IN IT.
Products and corporate names appearing in this manual may or may not be registered trademarks or
copyrights of their respective companies, and are used only for identification or explanation and to the
owners’ benefit, without intent to infringe.
ii
Contents
Notices...........................................................................................................iv
Safety information............................................................................................v
About this guide..............................................................................................vi
Chapter 1: Product introduction
1.1
1.2
Welcome!........................................................................................ 1-2
Special features.............................................................................. 1-2
Chapter 2: Hardware information
2.1
System requirements...................................................................... 2-2
2.3
Before you proceed......................................................................... 2-3
2.2
2.4
2.5
Card layout...................................................................................... 2-2
Installation....................................................................................... 2-3
Connecting cables and devices...................................................... 2-4
Chapter 3: Software information
3.1
Installing the driver.......................................................................... 3-2
iii
Notices
Federal Communications Commission Statement
This device complies with Part 15 of the FCC Rules. Operation is subject to
the following two conditions:
• This device may not cause harmful interference, and
• This device must accept any interference received including interference that
may cause undesired operation.
This equipment has been tested and found to comply with the limits for a
Class B digital device, pursuant to Part 15 of the FCC Rules. These limits
are designed to provide reasonable protection against harmful interference
in a residential installation. This equipment generates, uses and can radiate
radio frequency energy and, if not installed and used in accordance with
manufacturer’s instructions, may cause harmful interference to radio
communications. However, there is no guarantee that interference will
not occur in a particular installation. If this equipment does cause harmful
interference to radio or television reception, which can be determined by
turning the equipment off and on, the user is encouraged to try to correct
the interference by one or more of the following measures:
• Reorient or relocate the receiving antenna.
• Increase the separation between the equipment and receiver.
• Connect the equipment to an outlet on a circuit different from that to which the
receiver is connected.
• Consult the dealer or an experienced radio/TV technician for help.
The use of shielded cables for connection of the monitor to the graphics card is
required to assure compliance with FCC regulations. Changes or modifications
to this unit not expressly approved by the party responsible for compliance
could void the user’s authority to operate this equipment.
Canadian Department of Communications Statement
This digital apparatus does not exceed the Class B limits for radio noise
emissions from digital apparatus set out in the Radio Interference
Regulations of the Canadian Department of Communications.
This class B digital apparatus complies with Canadian
ICES-003.
iv
Safety information
Electrical safety
• To prevent electrical shock hazard, disconnect the power cable from the
electrical outlet before relocating the system.
• When adding or removing devices to or from the system, ensure that the power
cables for the devices are unplugged before the signal cables are connected. If
possible, disconnect all power cables from the existing system before you add
a device.
• Before connecting or removing signal cables from the motherboard, ensure
that all power cables are unplugged.
• Seek professional assistance before using an adpater or extension cord.
These devices could interrupt the grounding circuit.
• Make sure that your power supply is set to the correct voltage in your area. If
you are not sure about the voltage of the electrical outlet you are using, contact
your local power company.
• If the power supply is broken, do not try to fix it by yourself. Contact a qualified
service technician or your retailer.
Operation safety
• Before installing the motherboard and adding devices on it, carefully read all
the manuals that came with the package.
• Before using the product, make sure all cables are correctly connected and the
power cables are not damaged. If you detect any damage, contact your dealer
immediately.
• To avoid short circuits, keep paper clips, screws, and staples away from
connectors, slots, sockets and circuitry.
• Avoid dust, humidity, and temperature extremes. Do not place the product in
any area where it may become wet.
• Place the product on a stable surface.
• If you encounter technical problems with the product, contact a qualified
service technician or your retailer.
About this guide
This user guide contains the information you need when installing and configuring
the ASUS TV Tuner Card.
How this guide is organized
This user guide contains the following parts:
•
Chapter 1: Product introduction
This chapter describes the features of the ASUS TV Tuner Card.
•
Chapter 2: Hardware information
•
Chapter 3: Software information
This chapter lists the hardware setup procedures that you have to perform
when installing the ASUS TV Tuner Card.
This chapter gives information on how to install device drivers and
applications for the ASUS TV Tuner Card.
Where to find more information
Refer to the following sources for additional information and for product and
software updates.
1.
2.
vi
ASUS websites
The ASUS website provides updated information on ASUS hardware and
software products. Refer to the ASUS contact information.
Optional documentation
Your product package may include optional documentation, such as warranty
flyers, that may have been added by your dealer. These documents are not
part of the standard package.
Conventions used in this guide
To make sure that you perform certain tasks properly, take note of the following
symbols used throughout this manual.
DANGER/WARNING: Information to prevent injury to yourself
when trying to complete a task.
CAUTION: Information to prevent damage to the components
when trying to complete a task.
IMPORTANT: Instructions that you MUST follow to complete a
task.
NOTE: Tips and additional information to help you complete a
task.
Typography
Bold text
Italics
Indicates a menu or an item to select.
Used to emphasize a word or a phrase.
<Key> Keys enclosed in the less-than and greater-than
sign means that you must press the enclosed key.
Example: <Enter> means that you must press
the Enter or Return key.
<Key1+Key2+Key3>
If you must press two or more keys
simultaneously, the key names are linked with a
plus sign (+).
Example: <Ctrl+Alt+D>
vii
viii
This chapter describes the features of
the ASUS TV Tuner Card.
ASUS TV Tuner Card
Product introduction
Chapter 1
1.1
Welcome!
Thank you for buying an ASUS® TV Tuner Card!
The ASUS TV Tuner Card integrates several multimedia functions that allow you to
transform your PC into the ultimate entertainment center. With the ASUS TV Tuner
Card, you can watch or record live TV and capture or play back videos. The ASUS
TV Tuner Card offers performance, functionality, and enjoyment.
1.2
Special features
• Watch DVBT digital TV
1-
Watch DVBT digital TV allows you to watch or record your favorite digital TV
program.
Chapter 1: Product introduction
This chapter lists the hardware setup
procedures that you have to perform
when installing the ASUS TV Tuner
Card.
ASUS TV Tuner Card
Hardware information
Chapter 2
2.1
System requirements
Before installing the ASUS TV Tuner Card, make sure your computer system
meets the following requirements:
•
Intel® Pentium® 4 or AMD K7 system or higher
• One (1) available PCI slot/ PCI Express slot
• At least 256 MB system memory (512 MB or more is recommended)
• Graphics card with at least 32 MB video memory
• Optical drive for driver installation
• At least 1 GB free hard disk space
• Microsoft® DirectX-compatible audio device
• Microsoft® Windows® XP (Home/Professional Edition/
Media Center Edition 2005/) / Microsoft® Windows® Vista
• Microsoft® DirectX 9.0 or higher
• Microsoft® Windows® Media Player 9 or higher
2.2
Card layout
U3000I Profile
USB 2.0
USB
R
DVBT
Insert the 5-pin USB 2.0 cable into the USB 2.0 port on the motherboard. Make
sure the USB 2.0 cable is properly inserted into the upper five pins on the
motherboard as shown in the figure above.
2-
Chapter 2: Hardware information
2.3
Before you proceed
Take note of the following precautions before you install the ASUS TV Tuner Card.
2.4
•
Unplug the power cord from the wall socket before touching any
component.
•
Use a grounded wrist strap or touch a safely grounded object or
a metal object, such as the power supply case, before handling
components to avoid damaging them due to static electricity.
•
Hold components by the edges to avoid touching the ICs on them.
•
Keep all components, such as the host adapter, in their antistatic bag
until you are ready to install them. Likewise, whenever you uninstall any
component, place it on a grounded antistatic pad or in the bag that came
with it.
•
Before you install or remove any component, ensure
that the ATX power supply is switched off or the power cord is detached
from the power supply. Failure to do so may cause severe damage to the
motherboard, peripherals,
Installation
•
You can install the ASUS TV Tuner Card only on a motherboard with a PCI
slot.
•
Illustrations in this section are provided only for reference. Your system
chassis and configuration may differ from what is shown.
To install the ASUS TV Tuner Card:
1.
Unplug the power cord.
2.
Remove the system chassis cover. Refer to the documentation that came
with your system for detailed instructions.
3.
Locate the PCI bus expansion
slot. Make sure this slot is
unobstructed.
5
Remove the metal cover opposite
the slot that you intend to use.
Metal covers
4.
5.
Unlock the expansion card cover.
ASUS TV Tuner Card
2-
6.
Align the card connector with the
slot and press firmly until the card
is completely seated on the slot.
PCI card
7.
6
Replace the expansion card lock to
secure the card to the chassis.
7
2.5
Connecting cables and devices
There are various types of cable TV and antenna connections. Consult your
dealer for the type of adaptor, splitter, A/B switch, or combiner that may be
required when connecting the ASUS TV Tuner Card to devices.
The ASUS TV Tuner Card can receive up to 100 channels. If you do not have a
roof antenna, you may use an indoor or outdoor antenna that carries only VHF
channels, or only UHF channels, or VHF and UHF channels to connect to the
ASUS TV Tuner Card.
U3000I Profile
DVBT
2-
Chapter 2: Hardware information
This chapter gives information on
how to install device drivers and
applications for the ASUS TV Tuner
Card.
ASUS TV Tuner Card
Software information
Chapter 3
You need to install the device drivers to your computer so you can use the ASUS
TV Tuner Card. Refer to this section when installing the device drivers.
3.1
•
Make sure that Windows® XP or Windows® Vista is installed on your
system.
•
The screens shown in this section may not exactly match the contents
displayed on your screen. Contents of the support CD may change any
time without notice.
Installing the driver
Using the Hardware Update Wizard (Windows® XP/Vista)
for the ASUS TV Tuner Card
To install the driver:
1.
3-
Start your computer.
2.
Windows® automatically detects
the ASUS TV Tuner Card and
displays the Hardware Update
Wizard window. Click the button
corresponding to No, not this
time.
3.
Click Next to continue.
Chapter 3: Software information
4.
Click the button that corresponds
to Install from a list of specific
location (Advanced), then click
Next to continue.
5.
Browse the location of the driver
file to install, then click Next.
6.
After all necessary files have been
installed in your system, click
Finish to complete the installation
process.
ASUS TV Tuner Card
3-
3-
Chapter 3: Software information