1
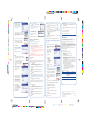
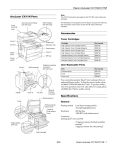
Start Here
9
®
1 Unpack
1
2
36.2 in. (920 mm)
b
10.2 in. (258 mm)
c
34.2 in. (868 mm)
d
3.9 in. (100 mm)
e
11.8 in. (300 mm)
5
Caution: Make sure the CX11N is turned on before installing the toner
cartridges. Do not install the photoconductor before installing the toner
cartridges.
1
Open cover A and remove the
tape and plastic insert.
2
In the LCD screen the message
Install [X] Toner Cartridge
appears, where [X] is one of
the following:
•
•
•
•
Raise the scanner unit, then open cover C
and pull out the insert.
Cover C
4
8
Use the
or
the
button.
button to select the desired language, then press
5 Load Paper/Verify Settings
1
Paper Out appears in the LCD screen. Open the MP Tray and place a
stack of up to 80 sheets of paper in the tray. Adjust the paper guide on
the right so that it is snug against the stack. Then close the cover.
2
Press the
Setup button.
Hold the tag and gently pull the toner seal
until it comes completely out.
Slide the toner cartridge into the tracks inside the printer. Push evenly on
both sides until the cartridge stops securely in its slot.
Caution: Don’t force the
cartridge into the printer
or force the lock lever
down, or you may damage
the printer.
6
Close the document cover.
7
Remove the photoconductor from its package
and pull off the protective sheet.
3
Caution: Do not touch the belt on the top
of the photoconductor or the blue roller beneath
it; otherwise, print quality may decrease.
While Printer Settings is
highlighted, press the
button.
4
While Information Menu is
highlighted, press the
button.
5
While Status Sheet is highlighted, press the
Avoid exposing the photoconductor to light any longer than necessary.
Do not touch any other components inside the CX11N.
5
Hold the photoconductor by
its handle and insert it into the
slots marked with blue arrows
inside the CX11N. Push it in
until it clicks into place.
6
If you have the CX11NF, place the Status Sheet face up on the Auto
Document Feeder.
If you have the CX11N, place the Status Sheet face down on the
document table.
Flip down the orange lever,
then close cover B.
7
Press the
8
Press the
Copy button on the control panel to enter the Copy mode.
B&W Start button.
The Status Sheet is copied.
6
Pull out the extension tray if necessary. Lower the scanner unit to its
original position.
6 Install Software
4 Set Fax/Printer Information
1
Select the Country: Press the
then press the
button.
2
Select the Language: Press the
button.
then press the
or
or
button to select the country,
Windows®
1 Make sure the CX11N is not
connected to your computer.
button to select the language,
3
Set the Date and Time: Press the
or
button to select the year,
month, day, hour, and minute. Press the
button after selecting each
item. The CX11NF then resets itself and reboots.
4
Turn off the CX11NF.
5
Connect an RJ-11 cord to
the telephone line interface
on the CX11NF and to the
RJ-11 jack on the wall.
Note: If you see a screen like this,
click Cancel and disconnect the
USB cable. You cannot install your
software that way.
2
Insert the Epson CD-ROM into the
CD drive of your computer.
3
Make sure you close all other
applications. When you see the
following screen, click Continue.
Note: An RJ-11 cord is not
included with the CX11NF.
4
Read the license agreement that
appears and click Agree.
Turn on the CX11NF.
5
For the type of installation,
select Local.
6
Note: The toner cartridge
is installed securely when
you cannot turn the lock
lever any further.
CX11N
1
CX11N as a Local Printer
See “CX11N as a Network Printer” for information on setting up the CX11N as
a network printer.
CX11NF
Push down the lever to
lock the toner cartridge.
Press the
Setup button.
The Setup light turns on and the LCD screen shows Setup Mode for a
few seconds, then changes to the Setup menu screen.
Close cover A and confirm the message in the LCD screen.
2
Press the ▼ button until Printer Settings is selected, then press the
button.
▲
The LCD screen will display the next cartridge that needs to be
installed. Open cover A and repeat steps 3 to 7 for each of the
remaining toner cartridges.
button.
A Status Sheet is printed.
4
Remove the toner cartridge from its
package and gently shake it.
If the cartridge doesn’t
seem to be installed fully,
remove it and reinstall it.
Open cover A and remove the foam
insert. Then close the cover.
Open the document cover and remove
the insert. Then unlock the carriage lock.
Y: Yellow
M: Magenta
C: Cyan
K: Black
Warning: Do not touch the toner. Keep
the toner away from your eyes. If toner
gets on your skin or clothes, wash it off
with soap and water immediately.
Cover A
7
Lift up cover B and raise the orange lever
inside, on the right.
2 Install Toner Cartridges
5
6
2
3
Remove all the packing tape from the outside of
the unit.
Close cover C and lower the scanner unit.
5
The Setup light turns on and the
LCD screen shows Setup Mode
for a few seconds, then changes
to the Setup menu screen.
3
4
Install Photoconductor appears in the LCD screen. Lift up the scanner.
Select a location for the CX11N. Make sure you allow enough space
around the product to ensure smooth operation.
a
With Lang = XXXX selected, press the button.
Push the power switch to On.
4 toner cartridges (Cyan, Magenta, Yellow, Black)
Photoconductor unit
USB cable
Power cord
Documentation: Basics Guide, Fax Guide (CX11NF only)
3 software CD-ROMs
The optional 500-Sheet Paper Cassette Unit adds
5.1 in. (130 mm) to the bottom of the CX11N.
3
10
1
Check that you have the following:
•
•
•
•
•
•
4
Caution: Make sure the CX11N is turned on and you have installed all the toner
cartridges, as described in the previous section.
Epson AcuLaser CX11N/CX11NF
Note: The illustrations show the CX11NF, but the instructions apply to both the
CX11N and CX11NF unless otherwise noted.
3 Install Photoconductor
Connect the power cord to the
CX11N and to an AC outlet.
3
▲
Press the ▼ button until Setup Menu is selected, then press the
button.
4105490
1-F
Rev.0
C
Turn over
4105490
1-F
Rev.0
M
4105490
1-F
Rev.0
Y
4105490
1-F
Rev.0
K
6
Click Install. The software is
installed. Wait for the installer to
install all the selected programs.
11
Note: If you are asked to restart your
computer, click No.
12
7
When you see this screen, connect the square end
of your USB cable to the back of the CX11N and the
flat end of the USB cable to your computer. (You can
connect to any open port.)
13
In OS X 10.4.x, select AL-CX11.
5
Press the
In OS X 10.2.x to 10.3.x, select EPSON USB
and AL-CX11.
6
Press the
button until Get IP Address is selected, then press
button.
the
Note: If AL-CX11 doesn’t appear, make sure it is
turned on and securely connected to
your Macintosh.
7
Press the
8
For each of the following settings, press the
then press the
button. Use the
and
When done press the
button.
Click the Add button. You see the
AL-CX11 in the Printer List.
button until Yes is selected, then press the
button.
button until Panel is selected, then press the
button.
button until it is selected,
buttons to set the numbers.
• IP Address
• Subnet Mask
• Gateway
Quit the Printer Setup Utility or
Print Center.
See the next section to install the software on each computer that will be using
the CX11N on the network.
8
Select your country or region, then click OK.
CX11N as a Network Printer
Install and Configure the Client Software (Windows Only)
9
When you are done installing the software,
the registration screen appears. Follow the
on-screen instructions to register your product.
Connect the CX11N
Note: For Mac OS X 10.2.4 or later, see the Basics Guide for information on
setting up a Macintosh computer to connect to the CX11N over a network.
Note: A network cable is not included with the CX11N.
Install Software
10
Click Restart Now.
Make sure that your printer is turned off.
2
Connect one end of the network cable to the RJ-45 connector on the
CX11N, and the other end to the network.
Note: If you see a message after
restarting your computer indicating
the Event Manager is blocked, click
Unblock.
Do not connect or disconnect the network cable while the printer is on.
Do not connect the CX11N and a computer directly. Be sure to use a hub
to connect the CX11N to the network.
You are ready to print, copy, and scan.
3
Macintosh
1 Connect the square end of your USB cable to the back
®
of the CX11N and the flat end of the USB cable to your
computer.
1
Insert the Epson CD-ROM into the CD drive of your computer.
2
Make sure you close all other applications.
When you see the following screen, click
Continue.
Caution: You must use a Category 5 shielded twisted-pair cable to
prevent malfunction.
3
4
Turn on the CX11N.
Caution: After turning off the printer, wait until the status lights go off before
turning it back on; otherwise the network interface may not work correctly.
5
6
Set the IP Address
1
4
Read the license agreement that
appears and click Agree.
2
Press the
button until Host/IF Settings is selected, then press
the
button.
5
For the type of installation,
select Local.
3
Press the
button until Network Menu is selected, then press
the
button.
5
7
8
9
10
Press the
button until Network Config is selected, then press
the
button.
Press the
button until Yes is selected, then press the
button.
Note: By default, Network Config is set to No. After it is set to Yes,
the next time the Network menu is viewed, the Network Config setting
reverts to No.
Click Install. The software is
installed. Wait for the installer to
install all the selected programs.
When you are done installing the
software, the registration screen
appears. Follow the on-screen
instructions to register your product.
Setup button.
The Setup light turns on and the LCD screen shows Setup Mode for a
few seconds, then changes to the Setup menu screen.
4
6
Press the
6
Press the
button until the IP Address is selected.
See “Install and Configure the Client Software (Windows Only)” to install the
software on each computer that will be using the CX11N on the network.
Static
Click Restart Now.
Open the Applications folder,
then open the Utilities folder and
double-click Printer Setup Utility
(OS X 10.3.x or 10.4.x) or
Print Center (OS X 10.2.x).
Click the Add button.
1
Press the
Select the IP address, then click Test.
4
Close the Epson Scan Settings.
Questions?
The Basics Guide tells you how to use your Epson AcuLaser CX11N and
contains maintenance and troubleshooting information.
For more detailed information about your product, see your on-screen
User’s Guide.
Epson Technical Support
Epson provides these technical support services:
•
World Wide Web
From the Internet, you can reach Epson Support at
http://support.epson.com.
•
To speak to a technical support representative, dial:
Toll-free: (800) 556-6025, 6 AM to 6 PM, Pacific Time, Monday through
Friday. An Epson Personal Identification Number is required; this can be
found on your PrivateLine® card.
EPSON Scan
Printer Driver
EPSON Status Monitor 3
User’s Guide
U.S.: (562) 276-4350, 6 AM to 6 PM, Pacific Time, Monday through Friday
and 7 AM to 4 PM, Saturday. (Toll or long distance charges may apply.)
Canada: (905) 709-2170, 6 AM to 6 PM, Pacific Time, Monday through
Friday. (Toll or long distance charges may apply.)
Please have the following information ready:
Follow the prompts to install
the software.
•
•
•
•
•
Note: If you are asked to restart your computer,
click No.
8
When the Epson Printer Utilities Window appears,
select EPSON AL-CX11 Advanced and click OK.
Product name (Epson AcuLaser CX11N or CX11NF)
Product serial number (located on the back of the printer)
Proof of purchase (such as a store receipt) and date of purchase
Computer configuration and operating system version
Description of the problem
Software Technical Support
9
When you see this screen, select Manual, then
select LPT1 as the printer port and click OK.
10
Select your country or region, then click OK.
11
When you are done installing the software, click
Exit and remove the CD from your computer’s
CD-ROM drive.
Software
Telephone/Fax*
Internet and E-mail
OfficeReady Essentials Tel: (617) 441-3171
www.kmt.com
8:30 AM–5:30 PM, Pacific [email protected]
Time, Monday–Friday
Fax: (617) 344-5992
Presto! BizCard®
Presto! PageManager®
Add Port
Tel: (510) 445-8616
Fax: (510) 445-8601
www.newsoftinc.com
[email protected]
* Toll or long distance charges may apply.
1
From the Windows Start menu, select Settings > Printers and Faxes.
2
Right-click EPSON AL-CX11 Advanced and select Properties.
3
Select the Ports tab, then click Add Port.
4
Select Standard TCP/IP, then click New Port.
Setup button.
The Setup light turns on and the LCD screen shows Setup Mode for a
few seconds, then changes to the Setup menu screen.
2
Press the
button until Host/IF Settings is selected, then press
the
button.
3
Press the
button until Network Menu is selected, then press
the
button.
4
7
3
Select the following:
Make sure you close all other applications.
When you see the following screen, click
Continue.
3
Set the connection to Network. The IP address of the CX11N appears in
the list.
Select Custom.
Then click Install.
Insert the Epson CD-ROM into the CD drive of your
computer. Double-click the EPSON icon.
2
If you have purchased the CX11NF, see your Fax Guide for details about
sending and receiving faxes.
For the type of installation,
select Local.
If DHCP is running on your network, an IP address is automatically assigned to
the printer once it is connected. Follow these steps to view the IP address:
2
From the Windows Start menu, select All Programs > Epson Scan >
Epson Scan Settings.
For more detailed information on configuring your product to work on a
network, see your on-screen Network Guide. You need to install this guide from
the Epson CD-ROM to your computer’s hard disk before referring to it. At the
main installation screen, select Install Network Utility, then select Network
Guide and follow the on-screen instructions.
Read the license agreement that
appears and click Agree.
•
•
•
•
Dynamic
1
You are now ready to print, copy, and scan.
You are now ready to print, copy, and scan.
1
Epson Scan Settings
Press the
button until Network Config is selected, then press
the
button.
The Add Standard TCP/IP Port Wizard appears.
5
Click Next.
6
Enter the IP Address that was assigned, then click Next.
7
Click Finish.
8
Select the IP address in the Ports list, then click Apply.
9
Restart your computer.
Epson and Epson AcuLaser are registered trademarks and Exceed Your Vision is a trademark of Seiko Epson
Corporation
PrivateLine is a registered trademark of Epson America, Inc.
General Notice: Other product names used herein are for identification purposes only and may be trademarks of
their respective owners. Epson disclaims any and all rights in those marks.
© 2006 Epson America, Inc. 3/06
CPD-21376
Printed in XXXXXX XX.XX-XX
4105490
1-B
Rev.0
C
4105490
1-B
Rev.0
M
4105490
1-B
Rev.0
Y
4105490
1-B
Rev.0
K