1
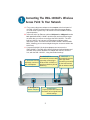
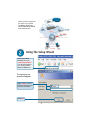
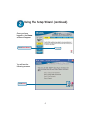
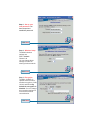
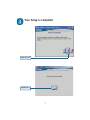
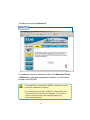
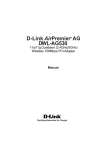
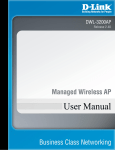
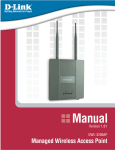
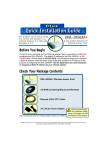
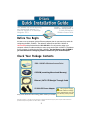
This product can be set up using
any current web browser, i.e.,
Internet Explorer 6 or Netscape
Navigator 6.2.3.
DWL-1000AP+
D-Link AirPremierTM
Wireless Access Point
Before You Begin
It’s best to use a computer (with an Ethernet adapter) that is connected to a switch for
configuring the DWL-1000AP+. The default IP address for the DWL-1000AP+ is
192.168.0.50 with a Subnet Mask of 255.255.255.0. You will need to assign your
computer a Static IP address within the same range as the DWL-1000AP+’s IP address
for the purpose of configuring the DWL-1000AP+. See the Manual on the CD-ROM if
you need assistance in assigning a Static IP address for your network adapter.
Check Your Package Contents
DWL-1000AP+ Wireless Access Point
CD-ROM (containing Manual and Warranty)
Ethernet (CAT5 UTP/Straight Through) Cable
5V 2.0A DC Power Adapter
If any of the above items are missing, please contact your reseller.
Using a power supply
with a different voltage
rating will damage and void
the warranty of this product.
©2002 D-Link Systems, Inc. All rights reserved. Trademarks or registered trademarks are the property of their respective holders. Software and
specifications subject to change without notice. DWL-1000AP+. 12062002
2
Connecting The DWL-1000AP+ Wireless
Access Point To Your Network
A. First, connect the power adapter to the receptor at the back panel of
the DWL-1000AP+ and then plug the other end of the power adapter
to a wall outlet or power strip. The Power LED will turn ON to indicate
proper operation.
B. Insert one end of an Ethernet cable to LAN port 1 or LAN port 2 on the
back panel of the DWL-1000AP+ and the other end to an Ethernet port
on switch that you will use to configure the DWL-1000AP+. The LED
light for LAN Port 1 or Lan port 2 will illuminate to indicate proper
connection. (Note: The LAN Ports on the DWL-1000AP+ are Auto-MDI/
MDIX. Meaning you can use a straight-through or crossover-cable to the
LAN Ports.)
C. Computers with 802.11b wireless adapters can connect to the
DWL-1000AP+. The DWL-650+ AirPlus Wireless Cardbus Adapter and
the DWL-520+ AirPlus Wireless PCI Adapter will connect, out of the
box, with the DWL-1000AP+, using their default settings.
B. LAN PORT 2
automatically senses cable
C. Antennas Used to type when connecting to
wirelessly connect to another DWL-1000AP+ to
802.11b adapters.
provide redundancy & load
balancing
A. Receptor for
Power Adapter.
B. LAN PORT 1
automatically senses
cable type when
connecting to a switch
on the local network
with an ethernet cable
Reset Button
Pressing this button restores
the Router to its original factory
default settings.
3
When you have completed
the steps in this Quick
Installation Guide, your
connected network should
look similar to this:
Using The Setup Wizard
Open your Web
browser and type
“http://192.168.0.50”
into the URL address
box. Then press the
Enter or Return key.
The logon pop-up
screen will appear.
Type “admin” for the
username and leave the
password field blank.
Click OK
4
Using The Setup Wizard (continued)
Once you have
logged in, the Home
screen will appear.
Click Run Wizard
You will see the
following screens.
Click Next
5
Step 1 - Set up your
new password. You
have the option to
establish a password.
Click Next
Step 2 - Wireless Setup
The default wireless
settings are:
SSID = default
Channel = 6
You can change these
settings to match an
existing wireless network.
Click Next
Step 3 - Encryption
The DWL-1000AP+ is
capable of three levels of
wireless encryption - 64-bit,
128-bit, and 256-bit. By
default the encryption is
disabled. You can change
the encryption settings for
more secure wireless
communication.
Click Next
6
Your Setup is Complete!
Click Restart
Click Close
7
You will be returned to the Home tab.
Click to Exit
For additional settings or information, refer to the Advanced, Tools,
or Status tabs on the web-management interface; or to the manual
located on the CD-ROM.
• To enable 802.1x on the DWL-1000AP+, please refer to the
manual for additional information
• For managing several DWL-1000AP+s, please utilize the
D-Link Air Premier Access Point Manager. For the latest
version of the firmware or AP manager please go to
http://support.dlink.com
8
Technical Support
You can find the most recent software and user documentation on the D-Link
website.
D-Link provides free technical support for customers within the United States
for the duration of the warranty period on this product.
U.S. customers can contact D-Link technical support through our web site or
by phone.
D-Link Technical Support over the Telephone:
(877) 453-5465
24 hours a day, seven days a week
D-Link Technical Support over the Internet:
http://support.dlink.com
9