1
EN GLI S H
INTENDED USE
Your chipping hammer has been designed for light
chipping, chiselling and demolition applications.
DO NOT use under wet conditions or in presence of
flammable liquids or gases.
These chipping hammers are professional power
tools.
DO NOT let children come into contact with the
tool. Supervision is required when inexperienced
operators use this tool.
Electrical Safety
The electric motor has been designed for one
voltage only. Always check that the power supply
corresponds to the voltage on the rating plate.
Your DEWALT tool is double insulated in
accordance with EN 60745; therefore no
earth wire is required.
WARNING: 115 V units have to
be operated via a fail-safe isolating
transformer with an earth screen
between the primary and secondary
winding.
If the supply cord is damaged, it must be replaced
by a specially prepared cord available through the
DEWALT service organization.
Mains Plug Replacement
(U.K. & Ireland Only)
If a new mains plug needs to be fitted:
WARNING: To reduce the risk of
injury, turn unit off and disconnect
machine from power source before
installing and removing accessories,
before adjusting or changing set-ups
or when making repairs. Be sure the
trigger switch is in the OFF position. An
accidental start-up can cause injury.
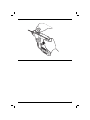
Inserting and Removing SDS Plus®
Accessories (fig. 2)
This tool uses SDS Plus® accessories (refer to the
inset in figure 2 for a cross-section of an SDS Plus®
bit shank). We recommend to use professional
accessories only.
1. Clean and grease the bit shank.
2. Insert the bit shank into the tool holder/locking
sleeve (d).
3. Push the bit down and turn it slightly until it fits
into the slots.
4. Pull on the bit to check if it is properly locked.
The hammering function requires the bit to be
able to move axially several centimetres when
locked in the tool holder/locking sleeve.
5. To remove a bit pull back the tool holder/locking
sleeve (d) and pull out the bit.
Indexing the Chisel Position (fig. 3)
The chisel can be indexed and locked into 12
different positions.
• Safely dispose of the old plug.
1. Insert the chisel as described above.
• Connect the brown lead to the live terminal in
the plug.
2. Rotate the collar (c) in the direction of the
arrowuntil the chisel is in the desired position.
• Connect the blue lead to the neutral terminal.
WARNING: No connection is to be
made to the earth terminal.
Follow the fitting instructions supplied with good
quality plugs. Recommended fuse: 13 A.
Using an Extension Cable
If an extension cable is required, use an approved
extension cable suitable for the power input of this
tool (see technical data).
The minimum conductor size is 1.5 mm2. When
using a cable reel, always unwind the cable
completely.
8
ASSEMBLY AND ADJUSTMENTS
Fitting the Side Handle (fig. 4)
The side handle (f) can be fitted to suit both RH- and
LH-users. Always use the tool with the side handle
properly assembled.
1. Loosen the side handle.
– For RH-users, slide the side handle clamp
over the collar behind the tool holder, handle
at the left.
– For LH-users, slide the side handle clamp
over the collar behind the tool holder/locking
sleeve, handle at the right.
2. Rotate the side handle to the desired position
and tighten the handle.