1
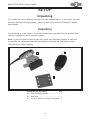
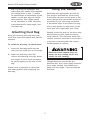
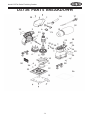
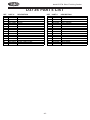
MODEL D3736
Palm Finishing Sander
OWNER'S MANUAL
Phone: (360) 734-3482 • Online Technical Support: [email protected]
COPYRIGHT © MARCH, 2008 BY WOODSTOCK INTERNATIONAL, INC.,
WARNING: NO PORTION OF THIS MANUAL MAY BE REPRODUCED IN ANY SHAPE OR FORM WITHOUT
THE WRITTEN APPROVAL OF WOODSTOCK INTERNATIONAL, INC.
#10536BL Printed in China
This manual provides critical safety instructions on the proper setup, operation,
maintenance, and service of this machine/equipment.
Failure to read, understand, and follow the instructions given in this manual may
result in serious personal injury, including amputation, electrocution, or death.
The owner of this machine/equipment is solely responsible for its safe use.
This responsibility includes, but is not limited to, proper installation in a safe
environment, personnel training and usage authorization, proper inspection
and maintenance, manual availability and comprehension, application of safety
devices, blade/cutter integrity, and the usage of personal protective equipment.
The manufacturer will not be held liable for injury or property damage from
negligence, improper training, machine modifications, or misuse.
Some dust created by power sanding, sawing, grinding, drilling, and other
construction activities contains chemicals known to the State of California to
cause cancer, birth defects, or other reproduction harm. Some examples of
these chemicals are:
• Lead from lead-based paints.
• Crystalline silica from bricks, cement, and other masonry products.
• Arsenic and chromium from chemically-treated lumber.
Your risk from these exposures varies, depending on how often you do this type
of work. To reduce your exposure to these chemicals: Work in a well ventilated
area, and work with approved safety equipment, such as those dust masks that
are specially designed to filter out microscopic particles.
Model D3736 Palm Finishing Sander
SAFETY
For Your Own Safety Read Instruction Manual
Before Operating This Equipment
The purpose of safety symbols is to attract your attention to possible hazardous
conditions. This manual uses a series of symbols and signal words which are intended
to convey the level of importance of the safety messages. The progression of
symbols is described below. Remember that safety messages by themselves do not
eliminate danger and are not a substitute for proper accident prevention measures.
Indicates an imminently hazardous situation which, if
not avoided, WILL result in death or serious injury.
Indicates a potentially hazardous situation which, if
not avoided, COULD result in death or serious injury.
Indicates a potentially hazardous situation which, if
not avoided, MAY result in minor or moderate injury.
It may also be used to alert against unsafe practices.
NOTICE
This symbol is used to alert the user to useful
information about proper operation of the
equipment.
Safety Instructions for Machinery
1. 2.
3.
4.
READ THROUGH THE ENTIRE
MANUAL
BEFORE STARTING
MACHINERY. Machinery presents
serious injury hazards to untrained
users.
ALWAYS USE ANSI APPROVED
SAFETY
GLASSES
WHEN
OPERATING MACHINERY. Everyday
eyeglasses only have impact resistant lenses, they are NOT safety
glasses.
ALWAYS WEAR A NIOSH APPROVED
RESPIRATOR WHEN OPERATING
MACHINERY THAT PRODUCES
DUST. Wood dust is a carcinogen
and can cause cancer and severe
respiratory illnesses.
5.
6.
-1-
ALWAYS
USE
HEARING
PROTECTION WHEN OPERATING
MACHINERY. Machinery noise can
cause permanent hearing damage.
WEAR PROPER APPAREL. DO NOT
wear loose clothing, gloves, neckties, rings, or jewelry which may
get caught in moving parts. Wear
protective hair covering to contain
long hair and wear non-slip footwear.
DO NOT USE UNDER INFLUENCE OF
DRUGS OR ALCOHOL.
Model D3736 Palm Finishing Sander
15.KEEP WORK AREA CLEAN AND
WELL LIT. Clutter and dark
shadows may cause accidents.
7. Only allow trained and
properly supervised
personnel to operate
machinery. Make sure operation
instructions are safe and clearly
understood.
16.REMOVE ADJUSTING KEYS AND
WRENCHES. Make a habit of
checking for keys and adjusting
wrenches before turning
machinery ON.
8. KEEP CHILDREN AND VISITORS
AWAY. Keep all children and
visitors a safe distance from the
work area.
17.CHECK FOR DAMAGED PARTS
BEFORE USING MACHINERY.
Check for binding and alignment
of parts, broken parts, part
mounting, loose bolts, and any
other conditions that may affect
machine operation. Repair or
replace damaged parts.
9. MAKE WORKSHOP CHILD PROOF.
Use padlocks, master switches,
and remove switch keys.
10.NEVER LEAVE WHEN MACHINE
IS RUNNING. Turn power off and
allow all moving parts to come to
a complete stop before leaving
machine unattended.
18.USE RECOMMENDED ACCESSORIES.
Refer to the instruction manual
for recommended accessories. The
use of improper accessories may
cause risk of injury.
11. DO NOT USE IN DANGEROUS
ENVIRONMENTS. DO NOT use
machinery in damp, wet locations,
or where any flammable or
noxious fumes may exist.
19.DO NOT FORCE MACHINERY.
Work at the speed for which
the machine or accessory was
designed.
12.USE A GROUNDED EXTENSION
CORD RATED FOR THE MACHINE
AMPERAGE. Undersized cords
overheat and lose power. Replace
extension cords if they become
damaged. DO NOT use extension
cords for 220V machinery.
20.SECURE WORKPIECE. Use clamps
or a vise to hold the workpiece
when practical. A secured
workpiece protects your hands and
frees both hands to operate the
machine.
13.ALWAYS DISCONNECT FROM
POWER SOURCE BEFORE
SERVICING MACHINERY. Make sure
switch is in OFF position before
reconnecting.
21.DO NOT OVERREACH. Keep proper
footing and balance at all times.
22. Be aware that certain woods
may cause an allergic reaction in
people and animals, especially
when exposed to fine dust. Make
sure you know what type of
wood dust you will be exposed
to and always wear an approved
respirator.
14.MAINTAIN MACHINERY WITH
CARE. Keep blades sharp
and clean for best and safest
performance. Follow instructions
for lubricating and changing
accessories.
-2-
Model D3736 Palm Finishing Sander
Additional Safety Instructions for the Palm
Finishing Sander
1. HAND PROTECTION. DO NOT place
hands near, or in contact with,
sanding base during operation.
Sandpaper has the capability of
removing skin.
4. TRANSPORTING: DO NOT carry a
plugged-in sander with your finger
on the ON/OFF switch. Do not carry
the sander by the power cord.
5. VIBRATION GENERATED INJURIES:
Limit prolonged exposure to this
tool and take regular breaks.
Prolonged exposure to vibrations
from hand-held tools may result
in a variety of neurological and
vascular disorders.
2. INSPECTING WORKPIECES.
Always inspect workpiece for
nails, staples, knots, and other
imperfections that could be
dislodged and tear the paper or
cause you to lose your grip on the
sander.
3. DRY SANDING: Only use this sander
for dry sanding. Serious personal
injury or death could result from
electrical shock if sander is used
for wet sanding!
-3-
Model D3736 Palm Finishing Sander
INTRODUCTION
Woodstock Technical
Support
Tool Data
Voltage.....................................110V
Amps............................................ 2
Vibrations Per Minute................. 10,000
Sandpaper Size......41⁄4" x 41⁄2" (1⁄4 Sheet)
Weight..................................31/2 lbs.
This Model D3736 Palm Finishing Sander
has been specially designed to provide
many years of trouble-free service. Close
attention to detail, ruggedly built parts
and a rigid quality control program assure
safe and reliable operation.
Woodstock International, Inc. is committed to customer satisfaction. Our intent
with this manual is to include the basic
information for safety, setup, operation,
maintenance, and service of this product.
We stand behind our tools! In the
event that questions arise about
your tool, please contact Woodstock
International Technical Support at
(360) 734-3482 or send e-mail to:
[email protected]. Our knowledgeable staff will help you troubleshoot
problems and process warranty claims.
Read the manual before operation.
Become familiar with this tool, its
safety instructions, and its operation
before beginning any work. Serious
personal injury may result if safety
or operational information is not
understood or followed.
If you need the latest edition of this
manual, you can download it from
http://www.shopfox.biz.
If you have comments about this
manual, please contact us at:
No list of safety guidelines can be
complete. Every shop environment
is different. Always consider safety
first, as it applies to your individual
working conditions. Use this and
other tools with caution and respect.
Failure to do so could result in serious
personal injury, damage to equipment
or poor work results.
Woodstock International, Inc.
Attn: Technical Documentation
Manager
P.O. Box 2309
Bellingham, WA 98227
Email: [email protected]
-4-
Model D3736 Palm Finishing Sander
SETUP
Unpacking
This sander has been carefully packaged for safe transportation. If you notice the tool
has been damaged during shipping, please contact your authorized Shop Fox dealer
immediately.
Inventory
The following is a description of the main components shipped with the Model D3736.
Lay the components out to inventory them.
Note: If you can't find an item on this list, check the mounting location on the tool
or examine the packaging materials carefully. Occasionally we pre-install certain
components for safer shipping.
B
A
C
Model D3736 Inventory
Qty
A. Palm Finishing Sander................... 1
B. Dust Bag................................... 1
C. 120 Grit Hook and Loop Sandpaper... 1
-5-
Model D3736 Palm Finishing Sander
OPERATIONS
Getting Started
To test the sander, do these steps:
Aluminum oxide and silicon carbide
abrasives are an excellent choice because
they last longer and are sharper than
natural abrasives.
1. Plug the cord into a 110V outlet.
2. Move the switch (located at the front
of the sander) to the “—” position to
turn the sander ON, and move the
switch to the “O” position to turn the
sander OFF.
The sander should run smoothly. Strange
or unusual noises should be investigated
and corrected before operating further.
If you cannot easily locate the source of
an unusual noise or vibration, contact
Technical Support for help.
Selecting Abrasives
The best results from your D3736 Palm
Finishing Sander will be accomplished
using the proper grit of coated abrasive.
As a general rule, start with a coarse grit
size and move through finer grit sizes
until you achieve your desired finish.
Use the list below to define paper grit
sizes:
•
•
•
•
•
•
•
Attaching Abrasives
If you have not read the safety
instructions in this manual, do not
operate the sander.
This palm sander is designed to use
1
⁄4 sheets of hook and loop sandpaper
measuring 41⁄4" x 41⁄2". You may purchase
41⁄2" x 51⁄2" sandpaper and cut it to size,
or cut standard 9" x 11" sanding sheets
into 4 pieces each measuring 41⁄4" x 41⁄2",
or cut sheets out of a 41⁄2" wide sanding
roll.
To attach the sandpaper, do these
steps:
1. UNPLUG THE SANDER FROM POWER
SOURCE!
2. Hold the sander upside down with its
top against a flat, stable surface.
3. Place the sandpaper over the base
and align the holes in the paper with
holes in the base (Figure 1).
Extra Coarse......................... 12-20
Very Coarse.......................... 24-36
Coarse................................ 40-50
Medium............................. 60-100
Fine................................ 120-180
Very Fine.......................... 220-280
Extra Fine......................... 320-400
Any time you are unsure about which grit
to begin with, experiment on a hidden
area of your project. Ideally, you want to
achieve the balance of removing defects
-6without damaging your work.
Figure 1. Sandpaper and base holes
aligned.
Model D3736 Palm Finishing Sander
Using the Sander
Tip: Try using the sandpaper that
came with your sander as a template
for cutting holes in new 1⁄4 sheets
to match those on the bottom of the
sander—so the dust bag can collect
dust particles. Use a paper punch
to cut the holes; or mark the holes,
score them with a sharp knife, and
cut them out.
Determine the appropriate grit size for
your project and sand the work evenly
in the same direction as the grain of the
wood. Always keep the sander moving so
the finish of your work stays consistent.
If the sander stays in one place too long,
then it may produce a depression in the
wood that will compromise your finish.
Attaching Dust Bag
Sanding across the grain of the wood may
be necessary in some cases to remove
rough defects. This should be done with
caution, however, because it can produce
cross-grain scratching that will require
further sanding to remove.
Using the dust bag will help keep your
work area clean and reduce dust particle
emission.
To install the dust bag, do these steps:
1. Insert the dust bag spout into the
dust port and make sure it fits snugly.
Electrical shock hazard! Only use
sander for dry sanding. Never use
sander for wet sanding!
2. When the dust bag is half full,
remove the dust bag from the sander
and empty it into a trash receptacle
by gently tapping on the side of the
bag.
Change sheets as soon as the grit
becomes dull. And, never apply excessive
force while sanding. Your sander and
paper will last longer if you let them do
the work.
Always wear a respirator or dust mask
and safety glasses when emptying the
dust bag.
-7-
Model D3736 Palm Finishing Sander
MAINTENANCE
General
Keeping Tool Clean
Regular periodic maintenance on your
Model D3736 Palm Finishing Sander will
ensure its optimum performance. Make
a habit of inspecting your sander each
time you use it. Check for the following
conditions and repair or replace when
necessary:
•
•
•
•
•
Your Model D3736 Palm Finishing Sander
will give you years of trouble free service
if you keep it clean and free of built-up
dust or grime. Ensure that no air passages
get blocked. If they do, blow them out
with compressed air.
CAUTION: Unprotected eyes can be
injured by dust particles propelled by
compressed air. ALWAYS wear safety
glasses and a dust mask when cleaning
the sander with compressed air.
Loose fasteners.
Worn switch.
Worn or damaged cords and plugs.
Worn or damaged sanding pad.
Any other condition that could
hamper the safe operation of this
tool.
Plastic parts can easily be cleaned with a
damp cloth, but never use water to clean
any electrical parts. Solvents should also
be avoided on plastic because of the
possibility of damage.
If possible, use a scraper to remove glue
or sap from your work; these elements
may hinder the effectiveness of the
abrasive sheets and cause unnecessary
build-up of grime on the sander.
-8-
Model D3736 Palm Finishing Sander
D3736 PARTS BREAKDOWN
(-
(
),
(.
(+
)
)0
(/
(0
-
(,
**
,
)*
. )))(
)'
/
+
*,
)+
*
0
*+
)0
)+
('
*'
((
)-
)/
()
**
*-
(*
).
-9-
Model D3736 Palm Finishing Sander
D3736 PARTS LIST
REF
PART #
DESCRIPTION
REF
PART #
DESCRIPTION
1
2
3
4
5
6
7
8
9
10
11
12
13
14
15
16
17
XD3736001
XD3736002
XD3736003
XD3736004
XD3736005
XP609
XP627
XD3736008
XP6000
XD3736010
XD3736011
XD3736012
XD3736013
XD3736014
XPSW07
XD3736016
XD3736017
TOP HOUSING COVER
LEFT HOUSING
RIGHT HOUSING
STATOR
ROTOR
BALL BEARING 609
BALL BEARING 627
ALUMINUM FAN
BALL BEARING 6000ZZ
PARTITION
SPACER
BASE PLATE
FOAM PLATE
TOGGLE BAR
SWITCH
POWER CORD GUARD
POWER CORD 18AWG X 3C
18
19
20
21
22
23
24
25
26
27
28
29
30
33
34
35
36
XD3736018
XD3736019
XD3736020
XD3736021
XD3736022
XPHTEK39M
XPHTEK6M
XPHTEK31M
XPHTEK39M
XPHTEK39M
XD3736028
XD3736029
XD3736030
XD3736033
XPHTEK11M
XD3736035
XD3736036
DUST BAG
DUST BAG BRACKET
BRUSH BOX
CARBON BRUSH
BRUSH HOLDER
TAP SCREW M4 X 12
TAP SCREW M4 X 16
TAP SCREW M4 X 14
TAP SCREW M4 X 12
TAP SCREW M4 X 12
BRACKET
MODEL NUMBER LABEL
DUST WARNING LABEL
RUBBER POLE
TAP SCREW M3 X 8
PRESS BOARD
120 GRIT SANDPAPER 4-1/4" X 4-1/2"
-10-
Model D3736 Palm Finishing Sander
Troubleshooting
Symptom
Possible Cause
Possible Solution
Reduced amount of
material removed
by sander, quality
of finish decreases,
sander slides easily
across workpiece.
1.Sandpaper clogged with paint
or glue.
2. Sandpaper grit dull.
1.Replace sandpaper.
Sander generates
excessive dust
particles.
1.Dust bag full.
2.Holes on sandpaper not
aligned with holes in sander
base.
3.Sandpaper lacks holes.
1.Empty dust bag.
2. Use abrasive paper with
pre-punched holes that
match holes on base.
3.Cut or punch holes in
sandpaper to match holes
on sander base.
4.Clean dust collection
holes in base with dry
compressed air.
4.Holes in sander base clogged.
2. Replace sandpaper
Sander runs slowly,
becomes hot, or
sanding efficiency
decreased.
1.Excessive pressure placed on
sander.
2.Brushes are at fault.
3.Motor is at fault.
1.Apply less pressure on
sander.
2.Replace brushes.
3.Replace motor.
Sander fails to
start.
1.Sander plug prongs loose in
wall outlet.
2.Switch clogged with dust.
1. Plug sander back into
outlet so they fit snugly.
2.Clean switch.
Repair
All quality tools will eventually wear from
normal use. Since this sander is encased
in an insulated plastic cover, leave
repair and service issues to a qualified
service technician. This includes brush
replacement, lubrication or any other
internal operation.
Disassembly and improper
reassembly of this device can
result in electrical shock. Always
have this device serviced by
a qualified electrical repair
technician to avoid serious injury.
See the Parts Breakdown on Page 9 for
replacement parts.
You can replace the rubber backing
pad that holds the abrasive sheet if it
becomes worn. Remove the four screws
that hold the backing plate to the
body of the sander and replace with
a new rubber backing piece, installing
the reverse of removal. Make sure
you tighten the rubber backing screws
sufficiently, so you don’t have problems
when you resume operations.
-11-
N8II8EKP8E;I<KLIEJ
Nff[jkfZb@ek\ieXk`feXc#@eZ%nXiiXekj`kjge\ldXk`Z\hl`gd\ekkfY\]i\\f][\]\Zkj
]ifdnfibdXej_`gXe[dXk\i`Xcj]fiXg\i`f[f](p\Xi]ifdk_\[Xk\f]fi`^`eXc
gliZ_Xj\%K_\c`XY`c`kple[\ik_`jnXiiXekpj_Xccefk\oZ\\[k_\gliZ_Xj\gi`Z\gX`[]fi
k_\gif[lZkjXe[`jc`d`k\[kfZi\[`k]fi#fii\gcXZ\d\ekf]k_\[\]\Zk`m\gXik%
N\[fefknXiiXekfii\gi\j\ekk_Xkk_\d\iZ_Xe[`j\Zfdgc`\jn`k_k_\gifm`j`fef]Xep
cXnfiXZkj#Xe[Ylp\iXjjld\jXcci`jbXe[c`XY`c`kpi\jlck`e^]ifdk_\lj\f]k_\^ff[j#
n_\k_\ilj`e^j`e^cpfi`eZfdY`eXk`fen`k_fk_\igif[lZkj%
K_`jnXiiXekp[f\jefkXggcpkf[\]\Zkjfi[XdX^\j[l\[`i\Zkcpfi`e[`i\Zkcp]ifd
d`jlj\#XYlj\#e\^c`^\eZ\#XZZ`[\ekj#i\gX`ijfiXck\iXk`fej#ficXZbf]dX`ek\eXeZ\f]
fligif[lZkj%N\j_Xcc`eef\m\ekY\c`XYc\]fi[\Xk_fi`eali`\jkfg\ijfejfigifg\ikp
fi]fi`eZ`[\ekXc#Zfek`e^\ek#jg\Z`XcfiZfej\hl\ek`Xc[XdX^\jXi`j`e^]ifdk_\lj\f]
fligif[lZkj%K_`j[`jZcX`d\iXggc`\jkfYfk_[li`e^Xe[X]k\ik_\k\idf]k_`jnXiiXekp%
8epc\^XcXZk`fejYifl^_kX^X`ejkNff[jkfZb@ek\ieXk`feXc#@eZ%j_XccY\ki`\[`ek_\
JkXk\f]NXj_`e^kfe#:flekpf]N_XkZfd%
Nff[jkfZb@ek\ieXk`feXc#@eZ%i\j\im\jk_\i`^_kkf`dgc\d\ekXepZ_Xe^\j`e
jg\Z`]`ZXk`fejfi[`jZfek`el\Xepgif[lZkjn`k_flkefk`Z\%
Warranty Registration
Name____________________________________________________________________________________
Street___________________________________________________________________________________
City__________________________ State____________________________Zip_________________________
Phone #_______________________ Email___________________________Invoice #____________________
Model #_________Serial #______________Dealer Name__________________Purchase Date___________
The following information is given on a voluntary basis. It will be used for marketing purposes to help us
develop better products and services. Of course, all information is strictly confidential.
CUT ALONG DOTTED LINE
1. How did you learn about us?
__
Advertisement
__
Mail Order Catalog
______ Friend
______ Website
_ ____ Local Store
_ ____ Other:
2._ How long have you been a woodworker/metalworker?
__
0-2 Years
______ 2-8 Years
_____ 8-20 Years ______ 20+ Years
3._ How many of your machines or tools are Shop Fox?
__
0-2
______ 3-5
_____ 6-9
______ 10+
4. Do you think your machine represents a good value?
______ Yes
_ ____ No
5. Would you recommend Shop Fox products to a friend?
______ Yes
_ ____ No
6._ What is your age group?
__
20-29
__
50-59
______ 30-39
______ 60-69
7._ What is your annual household income?
__
$20,000-$29,000
______ $30,000-$39,000
__
$50,000-$59,000
______ $60,000-$69,000
_ ____ 40-49
_ ____ 70+
_ ____ $40,000-$49,000
_ ____ $70,000+
8._ Which of the following magazines do you subscribe to?
____
____
____
____
____
____
____
____
____
____
Cabinet Maker
Family Handyman
Hand Loader
Handy
Home Shop Machinist
Journal of Light Cont.
Live Steam
Model Airplane News
Modeltec
Old House Journal
____
____
____
____
____
____
____
____
____
____
Popular Mechanics
Popular Science
Popular Woodworking
Practical Homeowner
Precision Shooter
Projects in Metal
RC Modeler
Rifle
Shop Notes
Shotgun News
____
____
____
____
____
____
____
____
____
Today’s Homeowner
Wood
Wooden Boat
Woodshop News
Woodsmith
Woodwork
Woodworker West
Woodworker’s Journal
Other:
9._ Comments:___________________________________________________________________
_ _____________________________________________________________________________
_ _____________________________________________________________________________
_ _____________________________________________________________________________
_ ___________________________________________________________________
_ ___________________________________________________________________
FOLD ALONG DOTTED LINE
Place
Stamp
Here
Woodstock international inc.
p.o. box 2309
bellingham, wa 98227-2309
FOLD ALONG DOTTED LINE
tape along edges--please do not staple