1
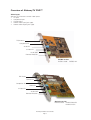
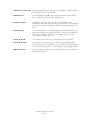
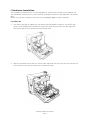
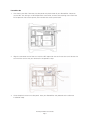
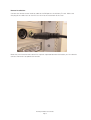
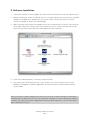
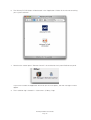
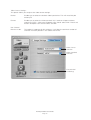
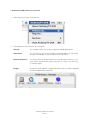
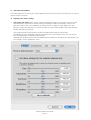
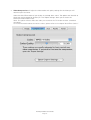
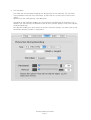
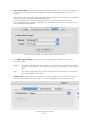
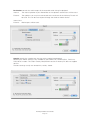
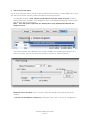
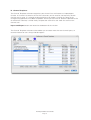
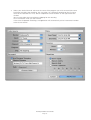
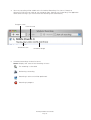
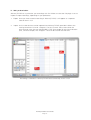
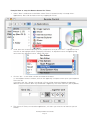
AlchemyTV DVR
User Guide
Revision 2.1
(c) 2003-2004, Miglia Technology Ltd
Table of contents
Introduction and Overview of AlchemyTV DVR . . . . . . . . . . . . . . . . . . . . . . . . . . . . . . . . . .1
Introduction and System requirements . . . . . . . . . . . . . . . . . . . . . . . . . . . . . . . . . . . . . . . . . . .2
Overview of AlchemyTV DVR . . . . . . . . . . . . . . . . . . . . . . . . . . . . . . . . . . . . . . . . . . . . . . . . . .3
Hardware and software installation . . . . . . . . . . . . . . . . . . . . . . . . . . . . . . . . . . . . . . . . . . .5
Hardware installation . . . . . . . . . . . . . . . . . . . . . . . . . . . . . . . . . . . . . . . . . . . . . . . . . . . . . . . . .6
Software installation . . . . . . . . . . . . . . . . . . . . . . . . . . . . . . . . . . . . . . . . . . . . . . . . . . . . . . . . . .7
Setting up the TV tuner for viewing and recording . . . . . . . . . . . . . . . . . . . . . . . . . . . . . . .11
Introduction . . . . . . . . . . . . . . . . . . . . . . . . . . . . . . . . . . . . . . . . . . . . . . . . . . . . . . . . . . . . . . . .12
Serial Number and Registration . . . . . . . . . . . . . . . . . . . . . . . . . . . . . . . . . . . . . . . . . . . . . . . . .12
Setting up AlchemyTV DVR for TV reception . . . . . . . . . . . . . . . . . . . . . . . . . . . . . . . . . . . . . .12
Using the AlchemyTV DVR Menus and Onscreen Remote . . . . . . . . . . . . . . . . . . . . . . . . .14
AlchemyTV DVR Menus . . . . . . . . . . . . . . . . . . . . . . . . . . . . . . . . . . . . . . . . . . . . . . . . . . . . . . .15
AlchemyTV DVR Onscreen Remote Control . . . . . . . . . . . . . . . . . . . . . . . . . . . . . . . . . . . . . . .17
Using the AlchemyTV DVR Preferences . . . . . . . . . . . . . . . . . . . . . . . . . . . . . . . . . . . . . . . .21
AlchemyTV DVR preferences overview . . . . . . . . . . . . . . . . . . . . . . . . . . . . . . . . . . . . . . . . . . .22
The Storage menu . . . . . . . . . . . . . . . . . . . . . . . . . . . . . . . . . . . . . . . . . . . . . . . . . . . . . . . . . . .23
The Video input menu . . . . . . . . . . . . . . . . . . . . . . . . . . . . . . . . . . . . . . . . . . . . . . . . . . . . . . . .24
The image sub-menu . . . . . . . . . . . . . . . . . . . . . . . . . . . . . . . . . . . . . . . . . . . . . . . . . . . . . .25
The Video compression sub-menu . . . . . . . . . . . . . . . . . . . . . . . . . . . . . . . . . . . . . . . . . . .26
The Video compression Expert settings . . . . . . . . . . . . . . . . . . . . . . . . . . . . . . . . . . . . . . .26
The Size sub-menu . . . . . . . . . . . . . . . . . . . . . . . . . . . . . . . . . . . . . . . . . . . . . . . . . . . . . . .27
The Audio sub-menu . . . . . . . . . . . . . . . . . . . . . . . . . . . . . . . . . . . . . . . . . . . . . . . . . . . . . .28
The Audio Expert settings . . . . . . . . . . . . . . . . . . . . . . . . . . . . . . . . . . . . . . . . . . . . . . . . . .28
The TV Tuner sub-menu . . . . . . . . . . . . . . . . . . . . . . . . . . . . . . . . . . . . . . . . . . . . . . . . . . .30
Channel Templates . . . . . . . . . . . . . . . . . . . . . . . . . . . . . . . . . . . . . . . . . . . . . . . . . . . . . . . . . . .31
The plugins menu . . . . . . . . . . . . . . . . . . . . . . . . . . . . . . . . . . . . . . . . . . . . . . . . . . . . . . . . . . .32
Schedule a recording with AlchemyTV DVR . . . . . . . . . . . . . . . . . . . . . . . . . . . . . . . . . . . .33
Schedule a recording with AlchemyTV DVR . . . . . . . . . . . . . . . . . . . . . . . . . . . . . . . . . . . . . . .34
iCal Synchronisation . . . . . . . . . . . . . . . . . . . . . . . . . . . . . . . . . . . . . . . . . . . . . . . . . . . . . . . . . .37
The infrared remote control . . . . . . . . . . . . . . . . . . . . . . . . . . . . . . . . . . . . . . . . . . . . . . . . . .38
The remote control settings . . . . . . . . . . . . . . . . . . . . . . . . . . . . . . . . . . . . . . . . . . . . . . . . . . . .39
QuickTime Codecs . . . . . . . . . . . . . . . . . . . . . . . . . . . . . . . . . . . . . . . . . . . . . . . . . . . . . . . . . .42
Recommended codecs . . . . . . . . . . . . . . . . . . . . . . . . . . . . . . . . . . . . . . . . . . . . . . . . . . . . . . .43
Third party codecs . . . . . . . . . . . . . . . . . . . . . . . . . . . . . . . . . . . . . . . . . . . . . . . . . . . . . . . . . . .43
License agreement . . . . . . . . . . . . . . . . . . . . . . . . . . . . . . . . . . . . . . . . . . . . . . . . . . . . . . . . . .44
Introduction and Overview
of AlchemyTV DVR
AlchemyTV DVR™ User Guide
Page 1
Introduction
Thank you for choosing AlchemyTV DVR™ from Miglia Technology. AlchemyTV DVR™ allows you to
watch TV on your PowerMac and enables you to record your favorite programmes onto your hard
drive in a supported QuickTime format of your choice.
System requirements:
• PowerMac G4 or G5 with a free PCI or PCI-X slot
• G4/400 MHz or higher processor
• 256 MB of RAM
• Mac OS X 10.2.8 or higher
• QuickTime 6.5 or higher
Package contents
• AlchemyTV™ card
• CD-ROM with software and installation guide
• Infrared remote control
• Infrared remote control receiver
• Warranty card
User Guide Overview
This User Guide will guide you through the hardware and software installation as well as explain the
functions and options of the AlchemyTV DVR™ software.
Technical Support
Should you ever have any questions regarding your product, please do not hesitate to contact Miglia
Technology:
Miglia Technology Ltd
Unit 1, The Old Silk Mill
Brook Street
Tring
HP23 5EF
United Kingdom
Tel: +44 870 747 2988
Fax: +44 870 747 2989
E-mail: [email protected], for general enquiries
[email protected], for technical enquiries
Web: http://www.miglia.com
AlchemyTV DVR™ User Guide
Page 2
Overview of AlchemyTV DVR™
Video inputs
AlchemyTV™ features several video inputs:
• TV input
• Composite input
• S-Video input
• Stereo audio input (jack type)
• Stereo audio output (jack type)
TV/Antenna
Composite IN
Audio IN
S-Video IN
Audio OUT
Remote Receiver
G4/G5 version
Product code: DVRPCI-SIL
FM Radio
TV/Antenna
Composite IN
Audio IN
S-Video IN
Audio OUT
Remote Receiver
G4-Only version
Product code: DVRPCI-PALSEC
DVRPCI-NTSC
AlchemyTV DVR™ User Guide
Page 3
•
TV/Antenna connection: This connector should be used for your analogue TV cable coming
from an RF antenna or a cable box.
•
FM Connector:
This connector is available solely with the G4-only version of the
card. It allows you to connect an FM antenna.
•
Composite input:
Composite is a widely used standard for connecting video
equipment. Note that the quality of this connection is not as good as
S-Video. This type of connector is often found on camcorders and
VCRs.
•
S-Video input:
This connection gives a better image quality than composite and is
generally found on mid-range camcorders, VCRs and DVD players. If
you intend to capture video from an analogue source, use this
connection whenever you can.
•
Stereo audio IN:
The AlchemyTV™ card uses a conventional stereo jack plug
•
Stereo audio OUT:
The AlchemyTV™ card uses a conventional stereo jack plug to
output audio to external speakers. This connector is a pass-through
only and cannot be used as an audio output with other applications.
•
Remote receiver:
This connector is used to connect the IR receiver for the AlchemyTV
DVR remote control.
AlchemyTV DVR™ User Guide
Page 4
Hardware and Software
Installation
AlchemyTV DVR™ User Guide
Page 5
I. Hardware Installation
The installation of AlchemyTV™ is a two step process starting with the hardware installation into
your PowerMac. AlchemyTV™ is a PCI card that should be installed in a free expansion slot of your
Mac.
Makes sure you are wearing an anti-static wrist wrap before beginning the installation.
PowerMac G4
1. Shut down your Mac and open the side door of your PowerMac. Locate an unused PCI slot.
Using a small Phillips-head screwdriver, remove the retaining screw from the PCI expansion
slots access panel, then remove the access panel itself.
2. Align the connector end of the card with the PCI expansion slot and insert the card. Secure the
card with the screw that you removed in the previous step.
AlchemyTV DVR™ User Guide
Page 6
PowerMac G5
1. Shut down your Mac. Remove the side panel and plastic door of your PowerMac. Locate an
unused PCI slot. Using a small Phillips-head screwdriver, remove the retaining screw from the
PCI expansion slots access panel, then remove the access panel itself.
2. Align the connector end of the card with the PCI expansion slot and insert the card. Secure the
card with the screw that you removed in the previous step.
3. Close the plastic cover and side panel. Start your PowerMac and proceed to the software
installation step.
AlchemyTV DVR™ User Guide
Page 7
Remote Installation:
Connect the remote control receiver cable to the RM port on the AlchemyTV card. Make sure
the plug of the cable rests on the PCI card and not the metalwork of the case.
Note that the infrared remote control has a plastic separator between the battery and the electric
contacts. Remove it to operate the remote.
AlchemyTV DVR™ User Guide
Page 8
II. Software Installation
1. Insert the Installation CD that shipped with your AlchemyTV DVR™ card into your CD/DVD drive.
2. Before installing the version available on the CD, it is recommended that you check any available
updates on the Miglia site. Double-click on the icon named ‘Click here to check if a newer
version is available’ to access the website page.
3. Open the folder AlchemyDVR and double-click on the ‘’Install AlchemyTV DVR™” icon to launch
the installer. Select the startup drive of your choice and click on ‘Install’. Note that you will be
asked for your administrator password when performing the installation.
4. Once the installation process is finished, restart your Mac.
5. If you are using two AlchemyTV cards in your system, you will need to launch the ‘Install
Multiple Card Support’ installation application. An enhanced driver will be installed into your
system folder.
Note: If you own a FireWire webcam and wish to use iChat AV, install the AlchemyTV ichat patch
located on the first level of the CD. This will avoid error messages in iChat rendering your webcam
unusable. The iChat patch requires Application Enhancer to be installed first. A link to a download
page is provided on the CD.
AlchemyTV DVR™ User Guide
Page 9
6. The AlchemyTV DVR folder will be located in the ‘Applications’ folder of the volume containing
your system software.
7. Note that the control panel “Remote Control’ is also added to the System Preferences panel.
If you have installed the Application Enhancer (for the iChat patch), the APE manager will also
appear.
8. The installation log is located in: <Username> / Library / Logs
AlchemyTV DVR™ User Guide
Page 10
Setting up AlchemyTV DVR
for viewing and recording
AlchemyTV DVR™ User Guide
Page 11
Introduction
This chapter will guide you through the initial setup of the AlchemyTV DVR card and software.
Before proceeding, make sure you have installed the PCI card and the software and connected your
video source via the composite or S-Video or coaxial connectors.
I.
Serial Number and Registration
1. Launch AlchemyTV DVR located in your Applications folder
2. You will be asked to enter your serial number located on the CD sleeve or the CD itself. Enter
the 32 digits serial number with the dashes as shown below:
XXXX-XXXX-XXXX-XXXX-XXXX-XXXX-XXXX-XXXX
II. Setting up AlchemyTV DVR for TV reception
1. The Setup Assistant will launch automatically on the first startup of the software. You can
access it at anytime via AlchemyTV DVR > Setup Assistant
2. The AlchemyTV DVR Setup Assistant will guide you through the set up process and create a list
of settings based on your choices and hardware configuration.
3. Start by selecting your country. If you reside in the USA or Canada, make sure that you select
the right option (cable or broadcast antenna) depending on what type of signal you are
receiving.
Then, click ‘Next’
4. The Setup Assistant will ask you to choose the type o f connection you are using.
If you connect your card directly to an antenna or a cable TV outlet, choose the ‘TV Tuner’
option.
If you are subscribing to a premium or digital cable service or digital satellite, it is recommended
that you make a connection via S-Video. This will ensure the best quality possible. Channels will
have to be switched via the remote control of your cable or satellite receiver.
If you are using AlchemyTV DVR for video capture from a VCR, camcorder or DVD player,
choose either composite or S-Video.
Then Click Next
5. Composite or S-Video Connection
If you have selected TV Tuner as the input, please skip to step 6.
Select the audio input based on your connection. You will most likely use the audio in on the
AlchemyTV™ card or built-into your PowerMac.
Click on Next and skip to step 7.
6. TV Tuner Connection:
Press the ‘Start Scan’ button to start the automatic channel search.
You will be given three options during the channel scan:
Get all Channels:
The software will scan and store all channels without interruption until the
process is complete. This option will not allow you to name individual
channels and some channels with poor reception may be stored. Naming
and deleting stations can be performed at a later stage in the preference
menu.
Ignore Channel:
When the software finds a channel, it will be displayed in the preview
window leaving you the decision to store or discard it. By clicking ignore,
you skip a channel and enable the scan to continue.
Next Channel:
Once a channel is found you can enter a name (this is optional) and press
‘Next Channel to store it and continue the scan. Repeat the operation until
all channels are found. The Assistant automatically moves to the next
screen.
AlchemyTV DVR™ User Guide
Page 12
7. Once this operation finished, the Setup Assistant will create video compression and display
settings based on the performance of your computer. These settings can be modified at a later
stage by using the Preferences submenu.
8. If you wish to view live TV, you can open the TV window via the View menu.
AlchemyTV DVR™ User Guide
Page 13
Using the AlchemyTV DVR
Menus and Onscreen Remote
AlchemyTV DVR™ User Guide
Page 14
I.
AlchemyTV DVR Menus
Various functions are accessible via the menu bar:
1. The AlchemyTV DVR Menu lets you access:
About box:
Displays about box with version number
Setup Assistant:
Launches the Setup Assistant
Register:
Open the Registration dialog
Software Update: Checks online if a new version is available. This check is also performed
automatically at launch if an internet connection is open.
Hide/Show/Quit:
Standard Hide, show and quit options.
2. The File menu enables you to close the foremost window.
3. The Edit menu contain the standard OS provided options and the remote control shortcuts.
Channel Up/Down:
Only applicable if you are using the TV tuner as the video input.
Switches one TV channel up
Volume UP/Down:
Increases or decreases the volume
Mute:
Mutes the audio
Record:
Records the video currently displayed
TV Snapshot:
Creates a snapshot of the video currently displayed in the TV window.
Delete Finished
Recording:
Deletes the completed recordings in the Scheduled Recording window
Clear Log:
Clears the recordings log.
AlchemyTV DVR™ User Guide
Page 15
The Edit Menu
4. The View Menu contains the video related commands.
Scheduled Recordings: Open the scheduled recordings window. Enables timed recordings.
Log Window:
The log window contains a report for each finished or aborted scheduled
recording.
TV Window:
Displays the live TV window
TV Window Size:
Contains 3 pre-defined sizes, quarter, half and full size. The Full Screen
option will hide all other applications and display the video in full screen
mode.
Remote Control:
Displays the onscreen remote control
FM Radio:
Open the FM radio remote. This option is only provided for backward
compatibility with older hardware models of the AlchemyTV DVR
(G4-only)
AlchemyTV DVR™ User Guide
Page 16
The View Menu
5. The Window menu contains a shortcut to the full screen mode (Zoom) and enables you to
switch between open windows.
6. The Help menu contains a link to the Miglia supportweb page and allows to open this manual.
II. AlchemyTV DVR Onscreen Remote Control
Technical Channel name
Channel
Volume level
Video Input List
Channel list
Channel up/down
Volume up/down
Record Video
Snapshot
Extended menu
AlchemyTV DVR™ User Guide
Page 17
1. Basic Remote Functions
Technical Channel:
Displays the technical channel number
Volume level:
Displays the volume level selected in the software
Channel List:
Shows a list of all stored/saved TV channels
Channel Up/Down:
Switches channels up and down
Snapshot:
Stores a snapshot of the picture currently displayed in the TV window
Channel:
Displays the channel number as per the TV tuner channel list
Video input list:
Displays the four possible video inputs. Enables easy switching between
video inputs (TV and composite for example). Note that Composite over SVideo is used for SCART-To-S-Video cables only.
Volume up/down:
Increases or decreases the output volume
Record Video:
Starts an instant record of the video currently displayed in the TV window
Extended menu:
Opens the extended remote control, which contains additional controls
2. Extended Remote Functions
The extended remote has two sections: Image Settings and Video Source.
Image Settings:
In this section, you can adjust the various image controls, eg. Hue, Saturation, Contrast, Brightness,
Sharpness. The setting for picture deinterlacing is also available with four options: None, Basic,
Normal, Best. Deinterlacing will affect the picture quality on fast moving footage. Note that you will
need a G4/1GHz or higher to use the ‘Best’ Setting.
Deinterlacing
setting
Image Settings
Reset Image
Settings
AlchemyTV DVR™ User Guide
Page 18
Video Source Settings:
This panels allows you to adjust the video source settings:
Device:
Enables you to select the desired video input device. This will most likely be
AlchemyTV
Format:
Enables you to select the video standard. US, Canada and Japan residents
should use ‘NTSC’, while most European users should select ‘PAL’. French and
Eastern European users should select ‘SECAM’.
Use Channel
Name as index:
This option is important for US residents. It will align the technical number of
channels with their position in the stored channel list.
Video Source
selection
Video Standard
selection
Use technical
numbering
AlchemyTV DVR™ User Guide
Page 19
Window Settings:
The Window pane enables you to activate three options:
Always in front:
The TV window will always be in front of all other applications.
Transparency:
Enables you to adjust the level of transparency for the TV window.
Clip edges:
The option to clip the edges enables you to reduced the viewable area of
the picture. This is helpful if you are watching a widescreen movie or the TV
picture displays a line at the top (due to closed captioning).
Four presets enable you a quick access to the most common settings. A
custom value can be entered by selecting ‘Custom’ in the presets.
AlchemyTV DVR™ User Guide
Page 20
Using the AlchemyTV DVR
Preferences
AlchemyTV DVR™ User Guide
Page 21
I. AlchemyTV DVR preferences overview
1. Select AlchemyTV DVR > Preferences
1. The preferences are divided in four categories:
Storage:
This category allows you to set the general storage preferences
Video Input:
This menu allows you to set all video and audio preferences. Advanced
settings are available via standard QuickTime sub-menus.
Channel Templates:
This menu contains the pre-defined and user defined channel lists. This
menu allows you to create custom channel lists, useful if you are living
in a border region.
Plugins:
AlchemyTV DVR supports a Plugins architecture for a smooth integration
with other applications or devices.
AlchemyTV DVR™ User Guide
Page 22
I.
The Storage Sub-menu
1. The Storage tab contains three important options:
Filename Templates:
Name templates used for your recorded video files
2. The Filename Template allows you to enter pre-defined values for the name of the file that will
be stored onto your hard drive.
<input>: This value will add the input type (AlchemyTV) to the filename
<channel>: This value will add the channel frequency to the filename
<name>: This will add the channel name to the filename
<program>: This will add a text string that can be chosen when adding a recording
Filename templates are useful when scheduling repeated recordings. If you could schedule a
recording every day of the week, the template will make sure that you do not erase the previous
day’s recording.
3. The capture destination menu enables you to select where you wish to store your recorded
video. Click the ‘Browse’ button to modifiy this location.
4. The disk space option allows you to keep a defined amount of space free on your hard drive.
Note:
This is very important if you are capturing to the hard drive where your System Folder is
located. Should your boot drive be full, you might not be able to startup your Mac.
This setting will override your scheduled recordings should the drive reach the defined free
space limit.
AlchemyTV DVR™ User Guide
Page 23
II. The Video Input Menu
The Video Input menu contains the most important controls you have over the video you will view or
record to your hard drive.
A. Adjusting the video settings
1. The image sub-menu allows you to control the brightness, lighting, saturation and hue of the
recorded video. Adjustments can be made by moving the sliders or entering a value on the
right hand side. If you wish to perform an adjustment on a single channel, display it in the
preview window by selecting it in the Tuner sub-menu and ticking the box ‘Use these settings
for the selected channel only’.
The image sub-menu also contains the Picture Optimization feature that controls
de-interlacing. This functionality reduces or removes the small interlace lines you may see on
fast moving footage (camera pan for example).
Although the Setup Assistant will have determined the optimum setting for your PowerMac, you
can change it via the drop-down menu.
AlchemyTV DVR™ User Guide
Page 24
2. Video Compression will adjust the video codec and quality settings for the video you will
record to your hard drive.
Select the QuickTime codec of your choice in the drop down menu. The options are identical to
those you would choose for AlchemyTV. The ‘Expert settings’ allow you to access the
QuickTime video motion menu.
Note: This option will also affect the video you record via the TV window and the scheduled
recordings.
For more information about the various codecs, please refer to the chapter”QuickTime Codecs”
AlchemyTV DVR™ User Guide
Page 25
3. The Video Compression Expert Settings menu may be familiar to you. It is a standard
QuickTime window you may have seen in other applications. It enables an advanced control over
the QuickTime codecs.
Some Codecs may have advanced settings available under the codec list. This is notably true for
MJPEG and some third-party codecs.
This codec list can be expanded by installing third party codecs like DivX and 3ivX. Note that no
third party codec is supported at the time of this writing, but DivX and 3ivX have produced some
good results in early testing. Please review http://www.miglia.com/Support/alchemytvdvr.html
for updated information.
Via the Motion sub-menu, you can select the number of frame per second that should be
recorded. The ‘Best’ option will automatically set the fps value at the maximum possible and is
recommended.
You can force the software to create a ‘key frame’ at a given value. Unlike normal frames, a key
frame is not based on the previous frame and will increase the overall quality of your video.
Having more key frames increases the size of the captured video.
It is possible to increase the compression rate of your video by limiting the data rate. Note that
picture quality will suffer if the value is set too low. This value affects only the video track, not
the audio track, there fore the final size of your movie will always exceed datarate x length of
recording
AlchemyTV DVR™ User Guide
Page 26
4. The Size Menu
The Video Size for scheduled recordings can be adjusted via this sub-menu. You can either
use a pre-defined size (Full size, Half-screen, quarter size) or a custom size via the list item
‘Other’.
Note that full size video requires a fast processor.
The option to clip the edges enables you to reduced the viewable area of the picture. This is
helpful if you are watching a widescreen movie or the TV picture displays a line at the top (due
to closed captioning).
Four presets enable you a quick access to the most common settings. A custom value can be
entered by selecting ‘Custom’ in the presets.
AlchemyTV DVR™ User Guide
Page 27
5. The audio settings enable you to control various audio settings of the video you will record to
your hard drive. These settings will be applied to bothscheduled recordings and the live TV
window.
The Device list let’s you select the desired input device, eg. AlchemyTV, the built-in motherboard
audio or any other compatible USB or FireWire device.
If you are capturing via the TV tuner, AlchemyTV and TV Tuner are the correct settings.
If you are capturing via S-Video or Composite, the ‘Audio-IN’ on AlchemyTV or the audio IN on
your motherboard are preferred.
The basic audio settings for capture in the video input menu.
6. The Audio Expert Settings will give you a wider range of audio options via a standard
QuickTime menu.
Speaker:
This will usually be turned off as AlchemyTV does not use QuickTime for live audio
playback. If the speaker is set to ON, the software will automatically revert it back to
OFF.
Gain:
This value can be adjusted to increase or decrease the audio volume on recordings.
Live level feedback is also given.
Compression will determine what audio codec to use to compress the audio track. Note that
with the current QuickTime version (6.5), it is recommended to leave this setting to none
AlchemyTV DVR™ User Guide
Page 28
Destination controls the audio output of the recorded audio during live playback.
Internal:
The internal speaker of your PowerMac or the speakers attached to it will be used
External:
The speakers you may have connected to the audio out of the AlchemyTV card will
be used. This can be used to pass-through the audio to another device.
Internal and
External:
Both outputs will be used.
Sample controls the sample rate, the size and the mode (mono/stereo).
Note that the 48KHz setting is only available on the DVRPCI-SIL, DVRPCI-NTSC, TVPCI-SIL,
TVPCI-NTSC models. The ‘older’ G4-only PAL/SECAM version of AlchemyTV does not support
48 KHz.
The best settings usually are: 48.000 kHz, 16 bits, Stereo.
AlchemyTV DVR™ User Guide
Page 29
8. The TV Tuner Sub-menu
The TV tuner sub-menu allows you to create and select channel layouts. It also enables you to scan
and fine-tune channels manually, without the help of the Setup Assistant.
It is possible to create a new channel setup without using the Setup Assistant. To Do so,
select‘Create from Template’ in the drop-down menu. The selected pre-defined channel list can
then be scanned and fine tuned.
Note: This will not be required if you already have setup AlchemyTV DVR with the
Setup Assistant.
The Finetune button at the bottom of the window enables you to modify the frequency of a
channel manually. You can also enter the frequency manually in “Base Frequency”.
Channels can be renamed in the TV Tuner window by clicking on the ‘Name’ part of the
window.
A channel can be added or removed by ticking the “Lock” box in the row it is displayed in.
AlchemyTV DVR™ User Guide
Page 30
III. Channel Templates
The Channel Templates sub-menu organises your channel lists and features an import/export
function. A Channel List contains the list of the channels you can receive, the frequency of each
channel and its name. It is strongly recommended that you export a Channel List once all the
tuning/naming operations have been completed. Should you ever have to delete the preference file
or reinstall the software, it will be handy to import the channel list and avoid thus avoid a new
channel scan.
Import and Export buttons are located at the bottom of the window.
The Channel Templates sub-menu also enables you to create more than one channel layout, an
essential feature for users living in border regions.
AlchemyTV DVR™ User Guide
Page 31
IV. The Plugins Menu
AlchemyTV DVR supports a Plugins architecture allowing a smooth integration with third-party
applications and devices.
The Device/hardware plugins will usually not have any options.
The current iCal plugin can however be adjusted to import or export recordings via the ‘Show
Settings’ button. The ‘Export’ function is activated by default.
You may want to check this menu with every update of the application, as plug-ins maybe added.
AlchemyTV DVR™ User Guide
Page 32
Schedule a recording with
AlchemyTV DVR
AlchemyTV DVR™ User Guide
Page 33
I. Schedule a recording with AlchemyTV DVR
1. Click on View > Show scheduled recordings.
2. In the ‘Scheduled Recordings’ window, click ‘Add’ to program a new recording.
The Scheduled Recordings window displays the various recordings you have programmed
AlchemyTV DVR™ User Guide
Page 34
3. Select your desired channel and enter the name of the program you wish to record (the name
itself does not affect the recording. You can either use a Filename template or give a unique
name to the recorded file. Time, date and repetition can be entered on the right side of the
window.
You can also select the level of picture clipping for the recoding
Click ‘Add record’ when you are finished.
In the case of repeated recordings, the application will automatically add an incremental number
at the end of the file.
AlchemyTV DVR™ User Guide
Page 35
4. Your new recording will be added to the ‘Scheduled Recordings’ list (see 2.). Note that
AlchemyTV DVR will not wake up your computer from sleep to start a recording. The application
needs to be running if you wish to have the recording start automatically.
Program name
Channel name
Scheduled start
Scheduled length
5. Scheduled recordings window list items:
Status: Displays the status of the recording via icons.
The recording is scheduled
Performing a recording
Recording is active and will be performed.
Recording in progress
AlchemyTV DVR™ User Guide
Page 36
II.. iCal synchronisation
AlchemyTV DVR can synchronise your recordings with iCal. Make sure that the iCal plugin is set to
import or export recordings, depending on your preference.
1. Export: Once you have created a recording in AlchemyTV DVR, it will appear as a separate
calendar item in iCal.
2. Import: An iCal calendar item can be imported into AlchemyTV DVR, provided it follows the
naming convention ‘Channel :: Program’. For the ‘Channel’ Value, enter either the
exact channel name that you defined (BBC1, ZDF, for example) or the channel location
(C26, C44 for example). The “Program” value will be used for the filename.
Recordings scheduled in AlchemyTV DVR are automatically shown in iCal
AlchemyTV DVR™ User Guide
Page 37
The infrared
remote control
AlchemyTV DVR™ User Guide
Page 38
I.
The Remote Control Settings
1. Open System Preferences > Remote. The ‘Remote’ item is located at the bootom of the Sytem
Preferences panel in the ‘other’ section.
2. The Remote Control software translates the key you press on the IR remote into key
combinations that are sent to the applications or operating system. The ‘key maps’ can be
customised for any given application via the control panel.
You will notice the ‘AlchemyTV’ item on the left side of the screen. By clicking on it, the
appropriate key combinations are displayed in the right column.
The Remote control panel allows you to set ‘key maps’ for a given application
AlchemyTV DVR™ User Guide
Page 39
3. You can control most applications that run on your Mac by adding a key map for them in the
control panel. Click on ‘New’ at the bottom of the screen, select the desired application and the
possible key mappings will appear on the right hand side of the screen.
4. By clicking on the ‘Set...’ button in the Action section, you can assign a specific key combination
to a button on the remote.
5. The ‘Global’ key mappings control the Finder.
6. Key mappings can be exported/imported using the ‘Export’ and ‘Import’ buttons at the bottom
of the screen.
AlchemyTV DVR™ User Guide
Page 40
Example: How to setup the Remote Control for iTunes
1. Select “New” and browse to the folder where iTunes is located (usually in Startup drive >
Applications). Press OK to create a new key mapping for iTunes.
2. Scroll down the window displaying the key assignments until you find ‘Vol +’. Highlight this line
and click on the highlight column (displaying ‘no action’). A drop down menu will appear giving
you access to a drop down menu. Select ‘Send key’
3. Click on ‘Set...’ in the Action window to create the shortcut.
In the keyboard shortcut window, click on the ‘Apple key’ and press arrow up on your keyboard.
Then click OK.
If you press the ‘Vol +’ button, the volume in iTunes will be increased. Repeat the operation
above to set the volume down key combination (‘Apple key’ and Arrow down on your keyboard).
4. The menus of iTunes, or most other applications, will show you what kind of shorcuts you can
choose.
AlchemyTV DVR™ User Guide
Page 41
QuickTime Codecs
AlchemyTV DVR™ User Guide
Page 42
I.
QuiickTime Codecs
AlchemyTV DVR relies on QuickTime to perform the encoding of your video footage. All codecs that
are accessible in QuickTime are accessible in AlchemyTV (export codecs are not included).
Some codecs should not be used with AlchemyTV, as they have been designed for other types of
applications, but many are useable.
The recommended codecs for capture with the AlchemyTV are Motion-JPEG and MPEG-4.
Motion JPEG: This codec has some fairly large space requirements, but has the advantage of
requiring less processing power to encode (eg. record) and remains editable in some
video applications. You can for example open a MJPEG video in Final Cut. You can
also do some basic editing (cut the adverts out of your recorded programme, for
example) with QuickTime Pro. There is no difference of any major consequence
between the two versions of MJPEG with regards to their use with AlchemyTV
DVR.
MPEG-4:
DV-NTSC
DV-PAL:
The MPEG-4 codec requires more processing power, but requires less hard drive
space to be recorded. Editing with MPEG-4 files is limited to cutting sequences.
MPEG-4 has a quality setting that will greatly influence the size of the resulting
video. It is recommended that you reduce the screen size to save additional drive
space.
DV-25 is the codec used by most Digital Cameras. AlchemyTV DVR does not feature
any DV-hardware encoder and may provide mixed results. This format is directly
readable by iMovie using the import function.
Cinepak:
Cinepak was the ‘native’ standard compression codec of QuickTime until release
3.0. Although fairly fast at encoding, it produces lower quality files with a
rather large size.
None:
No compression will be applied. This creates extremely large files.
You can attempt to use other codecs, but this might result in dropped frames or the inability to
record video at all.
Third party codecs include DivX and 3ivX, which are quite similar to MPEG-4.
DivX:
You can download a DivX codec installer from http://www.divx.com. DivX requires
an extremely fast processor (G4//1.25 GHz) to get good results with a half screen
size. The files will be very compact without affecting the quality. Full screen
recording is not possible even on a Dual 2GHz G5 (unless you have no
minimum expectations in terms of quality!)
It is essential to create a profile in the advanced settings of the DivX codec to
perform successful recordings.
3ivX:
You can download a 3ivX codec installer from http://www.3ivx.com. A Mac version
is also available. This codec uses less processing power than DivX and creates small
file size too. Full screen recording is an issue even on the fastest G5 processor.
The use of third-party codecs is not yet supported by Miglia Technology !
AlchemyTV DVR™ User Guide
Page 43
License Agreement
This license contract is part of the purchase contract. The conditions for the use of the Alchemytv™software are written down in the following license contract. With the use of the AlchemTV™software you agree to the conditions of the license contract for the use of the AlchemyTV™software. A special note to Miglia technology ltd or its traders is not necessary. If you do not agree
with the conditions of the license contract, do not use the software and immediately return the
package against full repayment to the place of purchase.
1. License Transfer
1.1 Miglia Technology Ltd(in the following Miglia) herewith gives you the right to use the
Alchemytv™-software including all updates (in the following software) and its documentation.
1.2 Miglia reserves all rights concerning the software, only the CD containing the software is
becoming your property.
1.3 The license software gives you the right for use on no more than one computer each as well as
the making of one copy of the software in machine readable form exclusively for safeguarding
purposes.
1.4 You are not entitled to sell the software to a third person or leave it otherwise in a third person’s
possession, except if this person promises Miglia in writing to observe the conditions of this license
contract. This also applies to the master copies.
1.5 You are obliged to refrain from using the software other than expressly mentioned in this
contract.
2. Restrictions
The software contains company secrets. To safeguard these secrets you are not allowed to
decompile, redevelop or disassemble the software or otherwise bring it into a form that is
recognisable by a person. You may not modify the software, adapt, translate or sell it or otherwise
leave it to be used by third persons for money or not or develop devices that are completely or
partly derived from the software. Finally, it is forbidden to electronically transfer the software onto
another computer.
3. Cancellation
This license automatically loses its effectiveness, without the need of a notice, if you offend against
one of the regulations of this contract. In this case you are obliged to destroy the software and all
copies. You can also cancel this license contract any time by destroying the software and all copies.
4. Export Ban
It is your liability to see to it that the software is only exported into an-other country under strict
observance of all applicable export regulations.
5. Guarantee
5.1 Errors in the software and the documentation belonging to it cannot be excluded. Miglia is liable
only within the limits of the legal regulations. Characteristics of the software that all copies of the
delivered ver-sion of the software have and which therefore are typical for the delivered version are
not included in the guarantee; especially a right to the delivery of a newer version cannot be
sustained by the existence of such charac-teristics.
5.2 Possible defects of the software – including material and production faults or the disks – as far
as being or becoming obvious have to be re-ported in writing to the authorized trader within two
weeks after noticing the defect, however no later than within the legal expiry date of six months.
AlchemyTV DVR™ User Guide
Page 44
5.3 Should the software be faulty, the original CD on which the software is memorized has to be
properly packed and returned to the authorized trader. In every case the complaint about the
software has to be made by including your name, address, telephone number and a description of
the defect and the system configuration.
5.4 Miglia reserves the right to decide if repairing or replacing the faulty software grants the possible
guarantee. If the repair and / or replacement are not successful, you can choose between a
deduction and a cancellation of the contract.
5.5 Unless an alteration, extension or damage is not the cause for the defect, no guarantee is
granted for software that has been altered, extended or damaged.
5.6 In the case of an unfounded complaint, you are obliged to refund to Miglia the expenses
resulting from the check-up.
6. Damages
6.1 A contractual or extra-contractual duty to pay for damages exists for Miglia or his representatives
only if
a) the damage is due to total negligence or the missing of a promised quality of the software or
deliberately caused,
b) a fundamental duty was at least slightly neglected by Miglia or
c) Miglia is liable due to compelling legal regulations based on the producers’ or product liability.
6.2 In the case of Miglia being liable, according to the former para-graph b) for slight negligence, the
following applies: Miglia’s liability for indirect damages and damages following a defect and missed
profits is excluded.
The liability is at least limited to the fortune disadvantage that Miglia should have foreseen as a
possible consequence of contract infringement when signing the contract under consideration of the
circumstances that Miglia had known or should have known. There is no guarantee for the loss of
data except if this loss could not have been avoided by regularly saving the data in machine-readable
form daily saving for business transactions. Furthermore, no liability is taken for damages that are
caused by other defects of the software that could have been avoided by a regular, timely check of
the processed work.
6.3 As long as damages do not expire earlier, according to the legal regula-tions they expire – with
the exception of claims resulting from illegal action and founded on the law of product liability – at
the latest after a pe-riod of two years after reception of the faulty device.
7. Final Regulations
This license contract and its interpretation are subject to German legisla-tion. This license contract
contains the complete agreement between the parties concerning the object of the contract.
Amendments and additions of this contract are only effective in written form. Ineffective regulations
are replaced by effective regulations that come closest to the desired economical success.
AlchemyTV DVR™ User Guide
Page 45