1
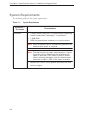
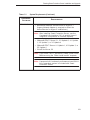
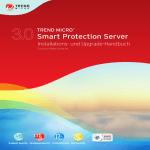
2.5
Smart Protection Server
Security Made Smarter
Installation and Upgrade Guide
e
Endpoint
d i tS
Security
m
Messaging
i S
Security
p
Protected
t t d Cloud
Cl
w
Web
W
b Security
S
it
Trend Micro Incorporated reserves the right to make changes to this document and to
the products described herein without notice. Before installing and using the software,
please review the readme files, release notes, and the latest version of the applicable user
documentation, which are available from the Trend Micro web site at:
http://docs.trendmicro.com/
Trend Micro, the Trend Micro t-ball logo, TrendLabs, and OfficeScan are trademarks or
registered trademarks of Trend Micro, Incorporated. All other product or company
names may be trademarks or registered trademarks of their owners.
Copyright© 2008 - 2013. Trend Micro Incorporated. All rights reserved.
Document Part No.: APEM84992/110727
Release Date: March 2013
Document Version No.: 1.3
Product Name and Version No.: Trend Micro™ Smart Protection Server 2.5
Protected by U.S. Patent No.: (Patents Pending)
The user documentation for Trend Micro™ Smart Protection Server is intended to
introduce the main features of the software and installation instructions for your
production environment. You should read through it prior to installing or using the
software.
Detailed information about how to use specific features within the software are available
in the online help file and the Knowledge Base at Trend Micro web site.
http://esupport.trendmicro.com
Trend Micro is always seeking to improve its documentation. Your feedback is always
welcome. Please evaluate this documentation on the following site:
http://www.trendmicro.com/download/documentation/rating.asp
Contents
Preface
Smart Protection Server Documentation .....................................................viii
Audience ............................................................................................................viii
Document Conventions ....................................................................................ix
Chapter 1: Planning Smart Protection Server Installation and
Upgrade
System Requirements ..................................................................................... 1-2
Planning for Deployment .............................................................................. 1-5
Best Practices .............................................................................................. 1-5
Deployment Guidelines ............................................................................ 1-6
Preparing to Install ......................................................................................... 1-6
Chapter 2: Upgrading and Installing Smart Protection Server
Performing a Fresh Installation .................................................................... 2-2
Upgrading to Smart Protection Server ...................................................... 2-16
Chapter 3: Post-Installation Tasks
Post-Installation .............................................................................................. 3-2
Initial Configuration ....................................................................................... 3-3
Chapter 4: Troubleshooting and Contact Information
Before Contacting Technical Support ......................................................... 4-2
Contacting Trend Micro ................................................................................ 4-2
v
Trend Micro™ Smart Protection Server 2.5 Installation and Upgrade Guide
TrendLabs .........................................................................................................4-3
Known Issues ...................................................................................................4-3
Frequently Asked Questions .........................................................................4-4
vi
Preface
Preface
Welcome to the Trend Micro™ Smart Protection Server Installation and Upgrade
Guide. This document contains information about product settings.
Topics include:
• Smart Protection Server Documentation on page viii
• Audience on page viii
• Document Conventions on page ix
vii
Trend Micro™ Smart Protection Server 2.5 Installation and Upgrade Guide
Smart Protection Server Documentation
The Smart Protection Server documentation consists of the following:
• Installation and Upgrade Guide: Helps you plan for installation and deployment.
• Administrator’s Guide: Helps you configure all product settings.
• Online Help: Provides detailed instructions on each field and how to configure all
features through the user interface.
• Readme File: Contains late-breaking product information that might not be found
in the other documentation. Topics include a description of features, installation
tips, known issues, and product release history.
The documentation is available at:
http://docs.trendmicro.com
Audience
The Smart Protection Server documentation is written for IT managers and
administrators. The documentation assumes that the reader has in-depth knowledge of
computer networks.
The documentation does not assume the reader has any knowledge of virus/malware
prevention or spam prevention technology.
viii
Preface
Document Conventions
To help you locate and interpret information easily, the Smart Protection Server
documentation uses the following conventions.
TABLE P-1.
Document conventions
C ONVENTION
D ESCRIPTION
ALL CAPITALS
Acronyms, abbreviations, and names of certain commands and keys on the keyboard
Bold
Menus and menu commands, command buttons,
tabs, options, and tasks
Italics
References to other documentation or new technology components
Monospace
Examples, sample command lines, program code,
web URL, file name, and program output
Configuration notes
Note:
Recommendations
Tip:
WARNING!
Reminders on actions or configurations that should
be avoided
ix
Trend Micro™ Smart Protection Server 2.5 Installation and Upgrade Guide
x
Chapter 1
Planning Smart Protection Server
Installation and Upgrade
This chapter includes information about planning for a fresh installation or upgrade of
Smart Protection Servers.
Topics include:
• System Requirements on page 1-2
• Planning for Deployment on page 1-5
• Preparing to Install on page 1-6
1-1
Trend Micro™ Smart Protection Server 2.5 Installation and Upgrade Guide
System Requirements
The following table lists the system requirements:
TABLE 1-1.
System Requirements
H ARDWARE /
S OFTWARE
Hardware
R EQUIREMENTS
• 2.0GHz Intel® Core2 Duo™ 64-bit processor supporting
Intel® Virtualization Technology™ or equivalent
• 1.5GB RAM
• 30GB disk space when installed on a virtual machine
Note: Smart Protection Server automatically partitions the
detected disk space as required.
Note: The Web Access log stops collecting data, if Smart
Protection Server detects that the available disk
space is less than 1GB. Smart Protection Server
starts collecting data again once the administrator
has made at least 1.5GB of disk space available.
• Monitor with 1024 x 768 or greater resolution with 256
colors or higher
1-2
Planning Smart Protection Server Installation and Upgrade
TABLE 1-1.
System Requirements (Continued)
H ARDWARE /
S OFTWARE
Virtualization
R EQUIREMENTS
• Microsoft® Windows Server® 2008 R2 Hyper-V™
(Legacy Network Adapter is required to detect the
network device for Hyper-V installations.)
Note: After installing Smart Protection Server, use the
Command Line Interface (CLI) to enable Hyper-V
Integration Components to increase capacity.
• VMware® ESXi™ Server 5.1, 5.0 Update 2, 4.1 Update
1, 4.0 Update 3, or 3.5 Update 4
• VMware® ESX™ Server 4.1 Update 1, 4.0 Update 3, or
3.5 Update 4
• Citrix® XenServer 5.6
Note: If you use a Citrix™ XenServer, create a new Virtual
Machine using the "Other install media" template.
Note: A purpose-built, hardened, performance-tuned 64-bit
Linux operating system is included with Smart
Protection Server.
1-3
Trend Micro™ Smart Protection Server 2.5 Installation and Upgrade Guide
TABLE 1-1.
System Requirements (Continued)
H ARDWARE /
S OFTWARE
Virtual Machine
R EQUIREMENTS
• CentOS 5 64-bit (Guest Operating System). If your
•
•
•
•
•
•
hypervisor does not support CentOS, use Red Hat®
Enterprise Linux® 5 64-bit.
1.5GB RAM
2.0GHz processor
30GB disk space when installed on a virtual machine
1 network device
2 virtual processors minimum (4 virtual processors
recommended)
Network Device
Note: The Smart Protection Server kernel module will
install the VMWare Tools module vmxnet3. This
means that VMWare Tools do not need to be
installed after installing Smart Protection Server.
During installation, the message "Minimum hardware
requirements were not met" might appear because
the vmxnet3 driver has not been installed at that
point. This message can be ignored and the
installation will proceed normally.
Note: If installing with minimum requirements, disable Web
Access Log from the Command Line Interface (CLI).
Web Console
• Microsoft® Internet Explorer® 7.0 or later with the latest
updates
• Mozilla® Firefox® 3.6.0 or later
• Adobe® Flash® Player 8.0 or above is required for
viewing graphs in widgets
• 1024 x 768 or greater resolution with 256 colors or
higher
1-4
Planning Smart Protection Server Installation and Upgrade
Planning for Deployment
The following section provides information on how to determine the type of
environment to configure when installing local Smart Protection Servers.
Best Practices
•
•
•
•
Avoid performing Manual scans and Scheduled scans simultaneously. Stagger the
scans in groups.
Avoid configuring all endpoints from performing Scan Now simultaneously. (For
example, the "Perform scan now after update" option.)
Install multiple Smart Protection Servers to ensure the continuity of protection in
the event that connection to a Smart Protection Server is unavailable.
Customize Smart Protection Server for slower network connections, about
512Kbps, by making changes to the ptngrowth.ini file.
Configure the following in ptngrowth.ini:
a. Open the ptngrowth.ini file in /var/tmcss/conf/.
b.
Modify the ptngrowth.ini file using the recommended values below:
[COOLDOWN]
ENABLE=1
MAX_UPDATE_CONNECTION=1
UPDATE_WAIT_SECOND=360
c.
Save the ptngrowth.ini file.
d. Restart the lighttpd service by typing the following command from the
Command Line Interface (CLI):
service lighttpd restart
1-5
Trend Micro™ Smart Protection Server 2.5 Installation and Upgrade Guide
Deployment Guidelines
Consider the following when setting up your local Smart Protection Server:
• Smart Protection Server is a CPU-bound application. This means that increasing
CPU resources increases the number of simultaneous requests handled.
• Network bandwidth may become a bottleneck depending on network infrastructure
and the number of simultaneous update requests or connections.
• Additional memory might be required if there is a large number of concurrent
connections between Smart Protection Servers and endpoints.
Preparing to Install
The Smart Protection Server installation process formats your existing system for
program installation. VMware or Hyper-V installation requires the creation of a virtual
machine before installation. After determining the number of Smart Protection Servers
to use for your network, you can begin the installation process.
Tip: Install multiple Smart Protection Servers to ensure the continuity of protection in the
event that connection to a Smart Protection Server is unavailable.
You need the following information for the installation:
• Proxy server information
• A virtual machine server that fulfills the requirements for your network
1-6
Chapter 2
Upgrading and Installing Smart
Protection Server
This chapter includes information about upgrading and installing Smart Protection
Server.
Topics include:
• Performing a Fresh Installation on page 2-2
• Upgrading to Smart Protection Server on page 2-16
2-1
Trend Micro™ Smart Protection Server 2.5 Installation and Upgrade Guide
Performing a Fresh Installation
After preparing the requirements for installation, run the installation program to begin
installation.
To install Smart Protection Server:
1.
Create a virtual machine on your VMware or Hyper-V server and specify the virtual
machine to boot from the Smart Protection Server ISO image. Refer to the Virtual
Machine section in Table 1-1. System Requirements for more information about the
type of virtual machine required for installation.
Note:
2-2
A Legacy Network Adapter is required to detect the network device for Hyper-V
installations.
Upgrading and Installing Smart Protection Server
2.
Power on the virtual machine. The Installation Menu displays with the following
options:
• Install Smart Protection Server: Select this option to install Smart Protection
Server to the new virtual machine.
• System Memory Test: Select this option to perform memory diagnostic tests
to rule out any memory issues.
• Exit Installation: Select this option to exit the installation process and to boot
from other media.
FIGURE 2-1.
Installation Menu screen
2-3
Trend Micro™ Smart Protection Server 2.5 Installation and Upgrade Guide
3.
Select Install Smart Protection Server. The Select language screen appears.
FIGURE 2-2.
Note:
4.
2-4
Select Language screen
From this screen on, you can access the readme from a button in the lower left
hand corner of the installation screen.
Select the language for this installation of Smart Protection Server and click Next.
The License Agreement screen appears.
Upgrading and Installing Smart Protection Server
FIGURE 2-3.
5.
License Agreement screen
Click Accept to continue. The Keyboard Selection screen appears.
2-5
Trend Micro™ Smart Protection Server 2.5 Installation and Upgrade Guide
FIGURE 2-4.
6.
2-6
Keyboard Selection screen
Select the keyboard language and click Next to continue. The Hardware
Components Summary screen appears.
Upgrading and Installing Smart Protection Server
FIGURE 2-5.
Hardware Components Summary screen
The installation program performs a scan to determine if the system specifications
have been met and displays the results. If the hardware contains components that
do not meet the system requirements, the installation program highlights those
components. Installation can proceed as long as there is a hard drive and network
device. If there is no hard drive or no network device, installation cannot continue.
2-7
Trend Micro™ Smart Protection Server 2.5 Installation and Upgrade Guide
7.
Click Next to continue. The Network Settings screen appears.
FIGURE 2-6.
Note:
Network Settings screen
To change the active on boot device after installation, log on to the Command
Line Interface (CLI).
If there are multiple network devices, configure settings for all devices. (Only one
device can be active on boot.)
2-8
Upgrading and Installing Smart Protection Server
8.
Specify the Active on Boot network devices, host name, and miscellaneous settings.
The Edit button allows you to configure IPv4 and IPv6 settings. The default setting
for IPv4 is Dynamic IP configuration (DHCP). The default setting for IPv6 is
DHCPv6.
9. Click Edit to select manual configuration and configure miscellaneous settings.
10. Click Next to continue. The Time Zone screen appears.
FIGURE 2-7.
Time Zone screen
2-9
Trend Micro™ Smart Protection Server 2.5 Installation and Upgrade Guide
11. Specify the time zone.
12. Click Next to continue. The Authentication screen appears.
FIGURE 2-8.
2-10
Authentication screen
Upgrading and Installing Smart Protection Server
13. Specify passwords. Smart Protection Server uses two different levels of
administrator types to secure the server.
a. Type the "root" and "admin" passwords. The password must be a minimum of
6 characters and a maximum of 32 characters.
Tip:
•
•
To design a secure password consider the following:
(1) Include both letters and numbers.
(2) Avoid words found in any dictionary (of any language).
(3) Intentionally misspell words.
(4) Use phrases or combine words.
(5) Use a combination of uppercase and lowercase letters.
(6) Use symbols.
Root account: This account is used to gain access to the operating system
shell and has all rights to the server. This account includes the most
privileges.
Admin account: This account is the default administration account used
to access the Smart Protection Server web and CLI product consoles. This
account includes all rights to the Smart Protection Server application, but
does not include access rights to the operating system shell.
2-11
Trend Micro™ Smart Protection Server 2.5 Installation and Upgrade Guide
14. Click Next to continue. The Installation Summary screen appears.
FIGURE 2-9.
2-12
Installation Summary screen
Upgrading and Installing Smart Protection Server
15. Confirm the summary information.
Note:
Continuing with the installation formats and partitions the necessary disk space
and installs the operating system and application. If there is any data on the hard
disk that cannot be erased, cancel the installation and back up the information
before proceeding.
If any of the information on this screen requires a different configuration, click
Back.
16. Click Next to continue and click Continue at the confirmation message. The
Installation Progress screen appears.
FIGURE 2-10. Installation Progress screen
2-13
Trend Micro™ Smart Protection Server 2.5 Installation and Upgrade Guide
17. A message appears when the installation completes. The installation log is saved in
the /root/install.log file for reference.
FIGURE 2-11. Installation Complete screen
2-14
Upgrading and Installing Smart Protection Server
18. Click Reboot to restart the virtual machine. The initial product Command Line
Interface (CLI) logon screen appears and displays the client connection addresses
and the web console URL.
Tip:
Trend Micro recommends disconnecting the CD ROM device from the virtual
machine after Smart Protection Server is installed.
19. Use admin to log on to the product CLI or the web console to manage Smart
Protection Server. Log on to the web console to perform post installation tasks
such as configuring proxy settings. Log on to the CLI shell if you need to perform
additional configuration, troubleshooting, or maintenance tasks.
Note:
Use root to log on to the operating system shell with full privileges.
FIGURE 2-12. CLI Log On screen
20. Perform post installation tasks. See Post-Installation Tasks on page 3-1.
2-15
Trend Micro™ Smart Protection Server 2.5 Installation and Upgrade Guide
Upgrading to Smart Protection Server
Upgrade to this version of Smart Protection Server from Smart Protection Server 2.1 or
2.0.
TABLE 2-2.
Version Upgrade Details
VERSION
R EQUIREMENTS
Upgrading to Smart
Protection Server 2.5
• Ensure that System Requirements are met before
installation. See System Requirements on page 1-2.
• Smart Protection Server 2.1or 2.0
• Clear the browsers temporary Internet files before
logging on to the web console.
The web service is disabled for about 5 minutes during the upgrade process. During this
time, endpoints will not be able to send queries to Smart Protection Server. Trend Micro
recommends redirecting endpoints to another Smart Protection Server for the duration
of the upgrade. If there is only one Smart Protection Server installed on your network,
Trend Micro recommends planning the upgrade for off-peak times. Suspicious files will
be logged and scanned immediately once connection to Smart Protection Server is
restored.
Note:
2-16
SOCKS4 proxy configuration has been removed from Smart Protection Server. After
upgrading to this version, if in the previous version SOCKS4 was configured for the
proxy settings, the proxy settings need to be re-configured.
Upgrading and Installing Smart Protection Server
To upgrade Smart Protection Server:
1.
2.
3.
4.
5.
6.
7.
Log on to the web console.
Click Updates from the main menu. A drop down menu appears.
Click Program. The Program screen appears.
Under Upload Component, click Browse. The Choose File to Upload screen
appears.
Select the upgrade file from the Choose File to Upload screen.
Click Open. The Choose File to Upload screen closes and the file name appears in
the Upload program package text box.
Click Update.
After upgrading Smart Protection Server, perform post installation tasks. See
Post-Installation Tasks on page 3-1
2-17
Trend Micro™ Smart Protection Server 2.5 Installation and Upgrade Guide
2-18
Chapter 3
Post-Installation Tasks
This chapter includes information about post installation tasks.
Topics include:
• Post-Installation on page 3-2
• Initial Configuration on page 3-3
3-1
Trend Micro™ Smart Protection Server 2.5 Installation and Upgrade Guide
Post-Installation
Trend Micro recommends performing the following post-installation tasks:
• After installing Smart Protection Server with Hyper-V, enable Hyper-V Integration
Components to increase capacity. Ensure that a Network Adapter is available before
enabling Hyper-V Integration Components. Enable Hyper-V Integration
Components from the Command Line Interface (CLI) with your admin account by
typing:
enable
enable hyperv-ic
•
If you installed with minimum system requirements, disable the Blocked Web
Access Log from the Command Line Interface (CLI) with your admin account by
typing:
enable
disable adhoc-query
•
•
Perform initial configuration. See Initial Configuration on page 3-3
Configure Smart Protection Server settings on other Trend Micro products that
support smart scan solutions.
Note:
The Real Time Status widget and Smart Protection Server CLI console display
Smart Protection Server addresses.
VMWare Tools do not need to be installed after installing Smart Protection
Server. The server kernel module contains the VMWare Tools module (vmxnet3)
Smart Protection Server requires.
3-2
Post-Installation Tasks
Initial Configuration
Perform the following tasks after installation:
1.
2.
Log on to the web console. The first time installation wizard appears.
Select the Enable File Reputation Service check box to use File reputation.
FIGURE 3-13. Configure File Reputation Settings
3-3
Trend Micro™ Smart Protection Server 2.5 Installation and Upgrade Guide
3.
4.
Click Next. The Web Reputation Service screen appears.
Select the Enable Web Reputation Service check box to enable Web Reputation.
FIGURE 3-14. Configure Web Reputation Settings
5.
3-4
(Optional) Click Advanced Settings to configure the filter priority. The filter
priority settings allow you to specify the filter order for URL queries.
Post-Installation Tasks
6.
Click Next. The Smart Feedback screen appears.
FIGURE 3-15. Smart Feedback
7.
Select to use Smart Feedback to help Trend Micro provide faster solutions for new
threats.
3-5
Trend Micro™ Smart Protection Server 2.5 Installation and Upgrade Guide
8.
Click Next. The Proxy Settings screen appears.
FIGURE 3-16. Proxy Settings
9. Specify proxy settings if your network uses a proxy server.
10. Click Finish to complete the initial configuration of Smart Protection Server. The
Summary screen of the web console displays.
Note:
3-6
Smart Protection Server will automatically update pattern files after initial
configuration.
Chapter 4
Troubleshooting and Contact
Information
Trend Micro is committed to providing service and support that exceeds our users’
expectations. This chapter contains information on how to get technical support.
Remember, you must register your product to be eligible for support.
Topics include:
• Before Contacting Technical Support on page 4-2
• Contacting Trend Micro on page 4-2
• TrendLabs on page 4-3
• Known Issues on page 4-3
• Frequently Asked Questions on page 4-4
4-1
Trend Micro™ Smart Protection Server 2.5 Installation and Upgrade Guide
Before Contacting Technical Support
Before contacting technical support, here are two things you can quickly do to try and
find a solution to your problem:
• Check your documentation: Search the product documentation to see if they
contain your solution.
• Visit the Trend Micro Technical Support Website: The Trend Micro Technical
Support website contains the latest information about all Trend Micro products.
The support web site has answers to previous user inquiries.
To search the Knowledge Base, visit
http://esupport.trendmicro.com/
Contacting Trend Micro
In addition to phone support, Trend Micro provides the following resources:
• Readme: late-breaking product news, installation instructions, known issues, and
version specific information
• Knowledge Base: technical information procedures provided by the Support team:
•
http://esupport.trendmicro.com/
Product updates and patches
•
http://www.trendmicro.com/download/
To locate the Trend Micro office nearest you, visit:
•
http://us.trendmicro.com/us/about-us/contact/index.html
Email support
[email protected]
To speed up the problem resolution, when you contact our staff please provide
as much of the following information as you can:
1.
2.
3.
4.
5.
4-2
Product build version
Virtualization platform (VMware™ or Hyper-V™) and version
Exact text of the error message, if any
Steps to reproduce the problem
Collect system information from the web console.
Troubleshooting and Contact Information
TrendLabs
Trend Micro TrendLabsSM is a global network of virus prevention and web threat
research and product support centers providing continuous 24/7 coverage to Trend
Micro customers worldwide.
Staffed by a team of more than 250 engineers and skilled support personnel, the
TrendLabs dedicated service centers worldwide ensure rapid response to any virus
outbreak or urgent customer support issue, anywhere in the world.
The TrendLabs modern headquarters has earned ISO 9002 certification for its quality
management procedures in 2000 - one of the first antivirus research and support
facilities to be so accredited. Trend Micro believes TrendLabs is the leading service and
support team in the antivirus industry.
For more information about TrendLabs, visit:
http://www.trendmicro.com/en/security/trendlabs/overview.htm
Known Issues
Known issues document unexpected product behavior that might require a temporary
work around. Trend Micro recommends always checking the Readme file for
information about system requirements and known issues that could affect installation
or performance. Readme files also contain a description of what’s new in a particular
release, and other helpful information.
The latest known issues and possible workarounds can also be found in the Trend Micro
Knowledge Base:
http://esupport.trendmicro.com
4-3
Trend Micro™ Smart Protection Server 2.5 Installation and Upgrade Guide
Frequently Asked Questions
How do I log on to the Command Line Interface (CLI)?
CLI commands allow administrators to perform configuration tasks and to perform
debugging and troubleshooting functions.
Administrators can log on to CLI through CLI or the SSH console.
To log on to the Command Line Interface (CLI):
•
Log on to the Command Line Interface (CLI) using the "admin" account through
the SSH connection.
Why Does the Smart Protection Server IP Address Disappear When I
Use the CLI to Enable Hyper-V Integration Components on a
Non-Hyper-V Machine?
Microsoft™ Hyper-V Integration Components should only be enabled on Microsoft™
Hyper-V machines. The Smart Protection Server IP address no longer appears if
Hyper-V Integration Components are enabled on a non-Hyper-V machine as illustrated
in Figure 4-1. If Hyper-V Integration Components are enabled on a non Hyper-V
machine, you will not be able to connect to Smart Protection Server through the
network.
4-4
Troubleshooting and Contact Information
FIGURE 4-1.
Note:
IP address no longer appears
On Microsoft™ Hyper-V machines, the IP address may disappear if a network
adapter is not connected.
To rollback the network setting:
1.
2.
Log on to the Command Line Interface (CLI) using admin.
Type the following commands:
enable
configure service interface eth0
Can Other Linux Software Be Installed on the Smart Protection Server?
Trend Micro does not recommend installing other Linux software on the Smart
Protection Server virtual environment. Installing other Linux software may adversely
affect the performance of the server and other applications might not work properly due
to security settings on the Smart Protection Server.
4-5
Trend Micro™ Smart Protection Server 2.5 Installation and Upgrade Guide
How Do I Change the Smart Protection Server IP Address?
To change an IPv4 address:
1.
2.
Log on to the Command Line Interface (CLI) using admin.
Type the following commands:
enable
configure ipv4 static <new ipv4 add> <subnet> <v4gateway>
3.
Verify the changes by typing the following command:
show ipv4 address
4.
Restart the machine.
To change an IPv6 address:
1.
2.
Log on to the Command Line Interface (CLI) using admin.
Type the following commands:
enable
configure ipv6 static <new ipv6 add> <prefix> <v6gateway>
3.
Verify the changes by typing the following command:
show ipv6 address
4.
4-6
Restart the machine.
Troubleshooting and Contact Information
How Do I Change the Smart Protection Server Hostname?
To change the hostname:
1.
2.
Log on to the Command Line Interface (CLI) using admin.
Type the following commands:
enable
configure hostname <hostname>
3.
Verify the changes by typing the following command:
show hostname
How Do I Perform an Upgrade If a Pattern is Updating?
Trend Micro recommends waiting until a pattern finishes updating before performing
an upgrade. To prevent an update from occurring while upgrading disable scheduled
updates.
To change the Pattern Update configuration:
1.
2.
3.
4.
Log on to the Smart Protection Server web management console using admin.
Click Updates > Pattern.
Disable scheduled updates.
Click Save.
Note:
After performing an upgrade, remember to enable the scheduled updates.
4-7
Trend Micro™ Smart Protection Server 2.5 Installation and Upgrade Guide
4-8
Index
A
M
admin 2-11
Audience P-viii
manual scan 1-5
memory 2-3
B
N
best practices 1-5
network bandwidth 1-6
network device 2-7–2-8
network infrastructure 1-6
C
CLI 2-8, 2-15
client computer 1-6
command line interface 2-15
continuity 1-5
CPU 1-6
P
product console 2-11, 2-15
proxy server 1-6
proxy settings 3-6
D
R
design a secure password 2-11
Document Conventions P-ix
documentation 4-2
Readme File 4-3
root 2-11
H
K
Scan Now 1-5
scheduled scan 1-5
server 1-6
Smart Scan Server 2-3, 2-11, 2-15
summary 2-13
support 4-2
system requirements 1-2
Knowledge Base 4-2–4-3
T
hardware system requirements 1-2
Hyper-V 1-3, 2-2
I
installation 1-6, 2-2–2-4, 2-14
L
license agreement 2-4
log on 2-15
S
technical support 4-2
time zone 2-9–2-10
TrendLabs 4-3
IX-1
Trend Micro™ Smart Protection Server 2.5 Installation and Upgrade Guide
U
upgrading 2-16
URL 3-4
V
virtual machine 2-2–2-3
virtual machine requirements 1-2
virtualization 1-3
VMware 1-3
VMware ESX 2-2
W
Web console 2-15
IX-2