1
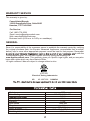
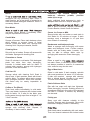
FRONT LOADING
SUPER COMBO
OWNER’S MANUAL
Warranty……………………………………………………………………………...1
…………………………………………………………………........2
Introduction ………………………………………………………………………….3
Important Safety Instructions ………………………………………………………4
Safety ..................................................……………………………………………5
Diagram of the Combo …………………………………………………………......6
Installation Instructions ………………………………………………………….....7
Electrical .....................……………………………………………………………..9
Plumbing .........................………………………………………………………….10
Ventilation Instructions
Program Selection Chart ………………………………………………………….15
Operating Instructions ...…………………………………………………………..16
Understanding Fabric Care Labels ……………………………………..............19
Winterizing your Combo ...……………………………………….……………… 19
Maintenance ......………………………………………………….……………… 20
Stain Removal Chart .…………………………………………….……………… 21
Troubleshooting .………………………………………………….……………… 23
new Combo Washer-Dryer
WARRANTY INFORMATION
Your appliance is protected by this warranty under
and limited commercial use (90 days),
WARRANTY
Consolidated Brands undertakes to the consumer-owner to repair or, at our option, to replace
to replace any part of this product which proves to be defective in workmanship or material
under normal personal, family or household use, in the USA and Canada, for a period of one
year from the date of original purchase. For commercial use, the product is warranted for a
period of 90 days. During this period, we will provide all labor and parts necessary to correct
such defect, free of charge, if the appliance has been installed and operated in accordance
with the written instructions with the appliance. Ready access to the appliance, for service, is
is the responsibility of the consumer-owner.
EXCLUSIONS
In no event shall Consolidated Brands be liable for incidental or consequential damages
or for damages resulting from external causes such as abuse, misuse, incorrect voltage or
acts of God. This warranty does not cover service calls which do not involve defective
costs for a service call which does not involve defective workmanship or materials will be the
responsibility of the consumer -owner.
Specifically, the following work is not covered under warranty and does not constitute
warranty work:
Installation – e.g. improper hook-up or leveling or non-removal of shipping rods
Maintenance – e.g. cleaning of air and/or water filter
Damage – e.g. replacing broken door handle
Most work is covered. The defining factor is, has the machine malfunctioned (Consolidated Brands is responsible) or has the customer omitted or done something to cause
machine to malfunction (customer is responsible). Some States do not allow the
exclusion or limitation of incidental or consequential damages, so the above limitation or
exclusion may not apply to you.
1
WARRANTY SERVICE
This warranty is given by:
Consolidated Brands
10216 Georgibelle Drive, Suite 900D
Houston, TX 77043-5249
For Service:
Call 1-800-776-3538
Email: [email protected]
Web: www.ApplianceDesk.com
Business hours (9:00 a.m. to 5:00 p.m. weekdays).
GENERAL
Since it is responsibility of the consumer-owner to establish the warranty period by verifying
the original purchase date, the Equator Advanced Appliances recommends that a receipt,
delivery slip or some other appropriate payment record be kept for that purpose. Remember
ts with the
Consolidated Brands. You can also register online by typing the following link
www.ApplianceDesk.com. This warranty gives you specific legal rights, and you may also
have other rights which vary from State to State.
All rights reserved. Manual subject to change without notice.
4007606
Electrical Testing Laboratories
US
N° 4007606
Model
Rated Voltage
CANADA
4000
110-120V /60Hz 13A
240 W
450 W
13 lbs.
1000 rpm
14
0.05-1(Mpa)
33.5 x 23.6 x 22 (inches)
161 lbs.
Spin input power
Capacity
Spin Speed
Programs
Dimensions (HxWxD)
Net Weight
2
INTRODUCTION
Congratulations on your new Super Combo. In addition to its contemporary design,
this is a highly sophisticated engineered product that will give you many years
of satisfaction.
Here are some of the best reasons for buying your Combo
1. Improved Operation
With a high spin speed, more water is extracted, allowing improved dry times.
2. Easy Operation
This appliance is simple to use as a washer or as a dryer – or it can go seamlessly from
wash to the dry functions.
3. Convenience
This appliance can be permanently installed and be made portable with the installation
of the portability kit (sold separately) where needed.
4. Placement Options
-
es it a perfect appliance for any Kitchen or
-Dryer perfect for placement on
each floor of your home.
5. Better Clothing Appearance
-Dryer has no agitator to damage your clothes so they look better and last
longer.
6.
This appliance uses very little water for washing and drying and far less than a
standard full-size top-loading washer.
7. Energy Savings
This appliance is engineered to provide valuable energy savings when compared to
other washer-dryers.
8. Maintenance
Since the machine has a self-cleaning pump, this appliance needs no cleaning of lint
after drying. Instead, there is a convenient coin trap.
9. Space Savings
By combining the two functions of washer and dryer in one unit, the space taken for the
second unit, i.e. separate dryer, is saved.
10. Flexible venting option
on the ideal dry system depending on availability of a venting outlet.
3
IMPORTANT SAFETY INSTRUCTIONS
Your safety and that of your children
Your Combo Washer-Dryer has been built in compliance with safety regulations,
WARNING – To reduce the risk of fire, electric shock, or injury to persons when
using your appliance, follow basic precautions, including the following:
1. Read all instructions before using the appliance.
2. Do not wash or dry articles that have been previously cleaned in, washed in, or spotted with
gasoline, dry-cleaning solvents, other flammable or explosive substances, as they emit vapors
that could ignite or explode.
3. Do not allow children to play on or in the appliance. Close supervision of children is necessary
when the appliance is used near children.
4. Before the appliance is removed from service or discarded, remove the door.
5. Do not reach into the appliance if the tub or drum is moving.
6. Do not install or store this appliance where it will be exposed to the weather.
7. Do not tamper with controls.
8. Do not repair or replace any part of the appliance or attempt any servicing unless specifically
recommended in the user-maintenance instructions or in published user-repair instructions that
you understand and have skills to carry out.
9. Do not add gasoline, dry-cleaning solvents, or other flammable or explosive substances to the
wash water. These substances give off vapors that could ignite or explode.
10. Under certain conditions, hydrogen gas may be produced in a hot water system that has not
been used for 2 weeks or more. HYDROGEN GAS IS EXPLOSIVE. If the hot water system has
not been used for such a period, before using a washing machine or combination washer-dryer,
turn on all hot water faucets and let the water flow from each for several minutes. This will
release any accumulated Hydrogen.
Do not use fabric softeners or products to reduce static unless recommended by the
manufacturers of the fabric softener product.
12. Do not use heat to dry articles containing foam rubber or similarly textured rubber-like
materials.
13. Check the Coin Trap every few months to remove any coins, buttons or similar size objects.
14. For vented washer-dryers keep the exhaust opening and surrounding areas free from
accumulation of lint, dust, and dirt.
15. Do not place items exposed to cooking oils in your dryer. Item contaminated with cooking oils
may contribute to a chemical reaction that could cause a load to catch fire.
SAVE THESE INSTRUCTIONS
4
SAFETY
CAUTION
RISK OF ELECTRIC SHOCK
DO NOT OPEN
ELECTRIC SHOCK, DO NOT REMOVE
COVER (OR BACK).
NO USER
PROFESSIONALS.
The model number of this product may be found on
the back of the unit; the serial number of the label
affixed to the back of the unit.
You should note the model and serial numbers of
this unit in the space provided. Retain this booklet
as a permanent record of your purchase to aid in
identification in the event of theft.
MODEL#
SERIAL#
HELPFUL HINTS FOR DRYER EFFICIENCY
1. Your Washer-Dryer spins at a high 1000 rpm spin speed, which will extract more water
especially from absorbent fabrics and reduce the degree of dampness as the machine goes into
the drying mode. This will cut down on your drying time.
2. FABRIC SOFTENER: After the wash cycle, the clothes can get stuck to the sides of the drum.
USING LIQUID FABRIC
AND TUMBLE IN THE DRY CYCLE. THIS HELPS DRY CLOTHES FASTER AND CAUSES LESS
WRINKLES.
3. OVERLOADING: The drum has a capacity of 13 lbs (1.72 cu. ft.) While this unit has one of the
largest drum available on any combination washer-dryer, it is smaller than a standard U.S. washer.
drum should not be overloaded. With too many clothes, airflow is reduced, increasing drying time.
The drum should be filled to a maximum 2/3 rd full.
4. OVER DRYING: The condensing dryer uses cold water is used to condense the moisture from
the hot air. Since there is no external exhaust system, the moisture remains in the machine.
Frequently, when it seems the clothes are damp, it is actually the remaining moisture (like dew). Take
clothes out and within a few minutes they will be dry. Do not over dry the clothes.
The exhaust system
uses air-dry.
5. USE HIGH EFFICIENCY (HE) DETERGENT: By using High Efficiency (HE) detergent, you are
preventing suds from entering the condensing chamber. When suds enter the condensing
chamber, tlhe particles can clog up the chamber and the fan blower. Over time, this reduces
drying efficiency and may require the fan blower (impeller) to be cleaned. For this and all other front
-loading/horizontal-axis units, High Efficiency (HE) detergents go a long way to improve the efficiency of
the units.
6. SORTING: When sorting laundry always take into consideration the quantity and type of fabric contained
in the load. Highly absorbent fabrics such as those used in towels or jeans will absorb more water
and become very heavy when saturated. If you notice that your clothes are taking longer than
usual to dry you may be overloading the machine, or washing too many highly absorbent articles
for a single load.
PRE-INSTALLATION
1. The unit must be installed on a strong level floor, and in protected, dry, and well-ventilated area
close to a power and water supply of sufficient capacity, and a sufficient outlet.
2.
• Carpets – place on light carpet only.
– brace floor with screws and place additional sheets of plywood before installation.
3. This unit’s installation and grounding should be done in accordance with local codes by a qualified
installer. “Installation Instructions” are included in this manual for the Installer’s reference.
4.
with minimum 15 Amps, It should not be controlled by a wall switch or pull cord which might be
turned off accidentally.
5
DIAGRAM OF THE COMBO WASHER-DRYER
Drain Hose
Power Cord
Control Panel
Drum
Detergent
Dispenser
Door
Shipping Rod
Adjustable Feet
Factory-supplied Parts
Inlet hose (2)
U-Connector for Drain hose
6
Cap for shipping rod hole (2)
!
DANGER
Factory-supplied equipment
!
Inside the drum there is a packet of accessory parts
supplied with your washer. Check that all the
accessory parts supplied for your model are there. If
any parts are missing contact your dealer.
Frozen hoses can tear/burst. Do not install the
washing machine outdoors or in an area exposed
to freezing condition.
Any residual moisture inside the drum is due to the
final testing which every washing machine
undergoes before leaving the factory.
If the washing machine is located in a room which
will be exposed to temperatures below freezing
point, or if it is located in a cabin that is being shut
down for the winter, any residual water in the pump
or water inlet hoses must be drained.
Installation area
Do not hold on to protruding parts (e.g. loading door)
when lifting.
!
The shipping package has protected your new
washing machine on its way to your home.
All packaging materials are non-polluting and
recyclable. Please contribute to a better
environment by disposing of packaging materials
in an environmentally conscious manner.
DANGER
!
Appliance stability is very important otherwise
the washing machine could “wander” during
the spin cycles.
Disposing of the packaging
!
DANGER
The installation area must be solid and even. Soft
floor surfaces, such as carpets or surfaces with
foam backing, are not suitable.
Removing the shipping rods
!
!
Keep children away from shipping carton and
packaging components. Danger of suffocation
from plastic foil and folding cartons.
CAUTION
!
The shipping rods must be removed before using
the appliance for the first time and must be
retained for any future transport(e.g. when
moving).
Disposing of your old appliance
Old appliances are not worthless trash! Valuable raw
materials can be recycled from old appliances.
To prevent children from locking themselves in the
appliance, disable the door lock or remove the door.
7
UNPACKING, LEVELING & POSITIONING
-Dryer is undamaged. If you have any doubt,
-Dryer and call Customer Service. Keep all packing parts (plastic bag,
foam rubber, screws, etc.) out of the reach of children since they could be dangerous.
Important
-Dryer consists of a free floating drum that is affixed
with shipping rods at the back of the cabinet (Fig.1) during transport. Before starting the
machine, remember to remove the shipping rods (Fig.2)
.
Close the holes left open by the rods
with the plastic caps provided (Fig. 3).
It is important for the machine to be perfectly level. For this reason, the machine is fitted with
adjustable feet used for leveling the machine before use (Fig.4).
Fig.2
Fig.1
1
2
Fig.3
Fig.4
8
ELECTRICAL
CONNECTION
Connect the plug to a power outlet – 110V/60Hz with minimum 15 Amps. Make sure that the
voltage and frequency available correspond with those stated on the serial number plate
located on the machine. Do not use adaptors or extension cords since they could result in
overheating and burn out.
POWER SUPPLY
CAUTION: NEVER USE AN EXTENSION CORD WITH THIS APPLIANCE.
This dryer must be connected to n individual circuit identical to the one specified on the rating plate of the
loading port protected by fuses or circuit breaker conforming to local codes.
GROUNDING INSTRUCTIONS
This appliance must be grounded. In the event of malfunction or breakdown grounding will reduce the risk of
electric shock by providing a path of least resistance for electric current. The plug must be plugged into an
appropriate outlet that is properly installed and grounded in accordance with all local codes and ordinances.
WARNING :
Improper connection of the equipment grounding conductor can result in a risk of electric shock. Check
with a qualified electrician or serviceman if you are in doubt as to whether the appliance is properly
grounded.
Do not modify the plug provided with the appliance-if it will not fit theoutlet; have a proper outlet installed by
a qualified electrician.
Note: if the electrical power supply does not meet the specifications listed below, call a licensed electrician.
GROUNDING
This appliance must be grounded. In the event of malfunction or breakdown, grounding will
reduce the risk of electric shock by providing a path of least resistance for electric current.
This appliance is equipped with a power cord having an equipment-grounding conductor and
a grounding plug. The plug must be plugged into an appropriate outlet that is properly
installed and grounded in accordance with all local codes and ordinances.
WARNINGS
-
-
Improper connection of the equipment-grounding conductor can result in a risk of electric
shock. Check with a qualified or service representative or personnel if you are in doubt
as to whether the appliance is properly grounded.
Do not modify the plug provided with the appliance: if it will not fit the outlet, have a
proper outlet installed by a qualified electrician.
9
PLUMBING
CONNECTING TO THE WATER FAUCET
Please read the following steps carefully
1. Connect the straight end of the hot-water hose to the hot-water faucet (Fig.5)
2. Connect the straight end of the cold-water hose to the cold-water faucet (Fig.5)
3. Connect the L-shaped end of the hot-water hose to the inlet valve marked “H” (Fig.6)
4. Connect the L-shaped end of cold-water hose to the inlet valve marked “C” (Fig.6).
CONNECTING THE DRAIN HOSE
Connect the drain hose to a drain duct (with internal diameter of at least 1.6 inches) or place
it for drainage in to a sink or a tub, ensuring that there are no kinks or bends. The free end
must be at a height of 24”-40” from the floor. The hose can be held in place using the black
plastic clamp on the upper part of the back panel (Fig.6)
Cold
water
faucet
Hot
water
faucet
C
H
(Fig.5)
(Fig.6)
Height difference between the installation location of
the washing machine and the drainage point:
Minimum 24”, and Maximum 40”.
- Attach water drain hose to U-Connector.
- Hook the U-Connector over the side or stand pipe (Fig 7.)
- When the water is being drained, check
that the water flow out of the hose is
adequate.
(Fig.7)
10
Connecting the dryer vent duct
For venting function, the machine vents the moist hot air out of
the unit and requires a vent duct to be installed.
1
connector 1(Fig.8).
2
INSTALLATION INSTRUCTIONS FOR EXHAUST
Fig.8
IMPORTANT: Installation and service must be performed by a qualified installer. Please have a
qualified service agent install your dryer.
NOTE: The WARNING and IMPORTANT instructions appearing in his manual are not meant to cover all
possible conditions and situations that may occur. It must be understood that common sense and being
careful are factors that CANNOT be built into the dryer. These factors MUST BE supplied by the persons
installing, maintaining, or operating the dryer. This dryer comes ready for top exhausting.
WARNINGS
DUE TO RISK OF FIRE USE ONLY METALLIC DUCT (RIGID OR FLEXIBLE).
Never use flexible duct inside the dryer.
Do not terminate exhaust in a chimney, range hood, gas vent, floor or attic. The combination of lint
and grease could create a fire hazard or damages.
Provide an access for inspection and cleaning the exhaust system at least once a year.
EXHAUST LENGTH
The MAXI
OWABLE length of the exhaust system depends on the type of exhaust hood
(wall cap), and all conditions noted below. The maximum allowable length for both rigid and flexible
metal duct is shown in the table 1 (next page). More than four 90° turns is not recommended.
EXHAUST SYSTEM CHECK LIST HOOD OR WALL CAP
Terminate in a manner to prevent back drain or entry of birds or other wildlife.
Termination should present minimal resistance to the exhaust air flow and should require little or no
maintenance to prevent clogging.
s must be installed at least 12” (30 cm) above ground level or any other obstruction with the
opening pointed down.
If roof vents or louvered plenums are used, they must be equivalent to a 4” (10 cm) dampened wall
cap in regard to resistance to air flow. Prevention of back drafts and regular maintenance are required
to prevent clogging.
11
SEPARATION OF TURNS
Separate all turns by at least 3ft. (1m) of straight duct, including distance between last turn and
dampened wall cap. If two turns must be closer than 3ft. (1m) deduct 10ft. (3m) from the maximum
lengths shown in the table for each occurrence.
TURNS OTHER THAN 90°
One turn of 45°or less may be ignored.
Two 45°turns should be treated as one 90°
Each turn over 45°should be treated as one 90°.
SEALING OF JOINTS
All joints should be tight to avoid leaks. The male end of each section of duct must point away from the
dryer.
Do not assemble the duct work with fasteners that extend into the duct. They will serve as a collection
point for lint.
Duct joints can be made air and moisture-tight by wrapping the overlapped joints with duct tape.
INSULATION
Duct work which runs through an unheated area or is near an air conditioning duct, should be
insulated to reduce condensation and lint build up and be sloped down toward outdoors.
NOTE: Never install screen inside exhaust duct.
WARNING: THIS MACHINES MUST BE EXHAUSTED OUTDOORS WHEN OPERATED IN THE
12
RECESSED, CLOSET AND ALCOVE INSTALLATION
The installation spacing is in inches and is the minimum acceptable.
Other installations must use the minimum dimension indicated.
Minimum clearances between dryer cabinet and adjacent walls are: 2″ either side and 3″ front and rear.
Minimum vertical space from floor to overhead cabinets, etc. is 52″ (132cm).
Closet door must be louvered or otherwise ventilated and must contain a minimum of 60 sq. in. of open
area equally distributed. If this closet contains both a washer and a dryer, doors must contain a minimum of
120 sq. in. of open area equally distributed.
No other fuel-burning appliance shall be installed in the same with closet with dryer.
★ Additional clearances for wall, door and floor molding may be required.
★★ Additional space is needed when an external exhaust elbow is used.
NOTE: If a door is installed that potentially encloses the unit while running, the door must
allow for a minimum of 20 square inches of free air movement. There must also be a 1”
Additional spacing should be considered for easy installation, servicing and compliance with
space in front of the unit to the closed door and 1” from the back of the unit to the wall.
applicable local, state, and federal codes.
For
Venting Use , see Fig 9,
For
Condensing Use, see Fig 10.
(Fig.9)
2"
2"
3"
3"
(Fig.10)
2"
2"
3"
3"
13
SPECIAL INSTALLATION REQUIREMENTS
M
Minimum clearances to combustible surfaces: 2’’ clearance both sides and 3’’ rear.
M
The dryer must be exhausted to the outdoors with the termination securely fastened to the mobile home
structure. (See EXHAUST INFORMATION section.)
The exhaust MUST NOT be terminated beneath the mobile home.
Provisions must be made for the introduction of outside air into the dryer. The free air opening shall not be
less than 12 sq. inches.
.
The exhaust duct material
The dryer must be attached to the floor following instructions available from the dealer.
Installation must comply with the current CAN / CSA Z240MH series Mobile Home Installation Codes.
NOTE
14
PROGRAM SELECTION CHART
Program
1 – Heavy
2 – Towels
Description of
Features
load
Suggested
Drying heat
and times
Thick cottons
(towels, jeans)
Mixed cottons
(t-shirts, jeans)
Hot water wash
1000 rpm spin
Hot water wash
1000 rpm spin
Full heat
60 minutes
Full heat
60 minutes
Full heat
60 minutes
Full heat
60 minutes
3 – NORMAL
Mixed cottons
4–
Cotton blends, light
fabrics
Warm water wash
1000 rpm spin
Cold water wash
1000 rpm spin
5 – Kids
Cotton blends, light
fabrics
Warm water wash
500 rpm spin
Half heat
60 minutes
6 – Delicate
Silks
Cold water wash
500 rpm spin
Half heat
60 minutes
Cold water wash
500 rpm spin
No heat
Tumble dry only
7 – Wool
DRYER HEAT
There is no heat in the wool cycle.
15
1. Make sure the Combo Washer-Dryer is turned off. (Power Indicator light should be off).
2. Separate clothes by type, color and degree of soiling.
3. Load clothes of the selected type loosely into the drum. If you are only washing clothes, you can
fill the drum. However, if you are washing and then drying, please don’t load clothes more than
2/3 full.
4. Close the Washer-Dryer door. You will hear a click when it is correctly closed.
5. Add detergent to Dispenser A. Use High Efficiency (HE) detergent about 1 table spoon. If desired,
you can add about 1 tablespoon. If desired, you can add pre - wash detergent and fabric softener
as shown in the diagram to Dispenser B and C.
Detergent Dispenser
C
B
Dispenser A
Detergent for main wash
Dispenser B
Fabric softener
Dispenser C
Detergent for pre-wash.
Note: concentrated fabric softener must be diluted with a little water before being
poured into the dispenser (prevents the overflow from becoming blocked).
A
Please don’t add detergent in Dispenser C, if the wash program without Prewash cycle
Control Panel
1
2
3
4
5
16
6
7
8
9
WASH FUNCTIONS
1 Prewash button Press this button to add pre wash cycle to the wash program, if the laundry to be
washed is heavy or dirty.
Water Level
2 button
Press this button to change the initial water level of the selected program.
Delay Start
3 button
Press this button to select the delay time options from 1 to 24 hours in one hour
increments.
If a change is to be made after the start time is set, turn the dial to “OFF” position, select the desired
program again, and then press this button.
Press this button
Graphic
4 Display
Display the selected program and its condition, such as the temperature, spin speed,
remaining time, rinse times, water level, and error messages.
DRY FUNCTIONS
Venting or
Condensing
5 selection
button
6
7
8
Press this selection button for 5 seconds to select either the venting dry cycle, or the
condensing dry cycle. The default condition is the condensing cycle, and if you select
the venting cycle, the symbol will be displayed.
Time - button
Press this button to decrease the dry time from the default start time of 60 minutes in
5 minutes increments.
Time + button
Press this button to increase the dry time from the initial condition of 60 minutes to
120 minutes in 5 minutes increments. The maximum time is 120 minutes.
Program Dial
Turn this dial to power on/off, and select one of the 14 available programs depending
on the laundry
Start/Pause
9 button
Press this button to start or interrupt the selected washing program.
The indicator light and the display will show the selected program.
Pressing the start button
will lock the door and
the wash cycle will start, until the whole program
is completed. In drying cycles, the door can be opened when the symbol displays on the screen. Please do not
try to force the door open. Breaking the door handle is not covered by warranty.
In the drying cycles, the door can be opened after spinning, the symbol
will be displayed on the screen.
17
Selecting the correct drying time, Use the following table as a guide:
Fabric
Cottons
Cottons
Mixed fabric
(cotton+ polyster)
Acrylics
Nylon
Max load
(lbs)
Drying Knob
Sector
(minutes)
8
Full Heat
120
Only terry towels
7
Full Heat
120
Sheets or shirts
5.5
Half Heat
80-90
4
Half Heat
60-70
4
Half Heat
40-50
Load
Laundry of
Pajamas. Socks
etc
Petticoats.
Stockings etc
Denim Alert:
Some overalls have straps with hooks that can damage the drum of your washing machine or
other garments during the wash. To minimize the risk, place hooks in the pocket and fasten with
safety pins.
Vacations: unplug the appliance:
It is recommended that you should unplug the machine from the socket and turn off the water
supply. Leave the door ajar to allow air circulation to the draw and the door gasket area. This will
prevent unpleasant odors.
18
The symbols on labels of your garments will help you in choosing the suitable wash
program, the right temperature, wash cycles, and ironing methods. Don’t forget to give a
glance to these useful indications!
Machine Wash
Cycle
Normal/
Cotton Heavy Duty
Water Temp.
Permanent Press/
wrinkle resistant
Hot
(50°C/120°F)
Warm
(40°C/105°F)
Hand wash
Delicate/
Gentle
Do not wash
Do not wring
Cold/Cool
(30°C/85°F)
Tumble
Dry
Dry
Normal/
Permt Press/
Cotton Heavy Duty wrinkle resistant
Delicate/
Gentle
Do not
tumble dry
Do not dry
Special
Instructions
Line dry/
Hang to dry
Drip dry
Dry flat
In the shade
Bleach
Symbols
Bleach
No-chlorine bleach
Do not bleach
To winterize your Washer -Dryer please, follow the instructions below to avoid damage
to your unit due to freezing:
1. With the unit off, remove coin trap. This will allow the water remaining in the pump and
drain hose to be evacuated. Replace coin trap.
2. Close the water faucets and disconnect the inlet
hoses. There should be no water in the hoses where they attach at the back of the
machine.
IF ANTIFREEZE IS BEING USED IN THE SYSTEM FOLLOW THESE INSTRUCTIONS:
(not necessary if the above drain procedure is followed)
1. When putting antifreeze into the water system of your coach, set the washer to th
wash setting and allow water to flow into unit until antifreeze is detected.
Set the washer knob to the “ Rinse” position and allow water to flow for 10
seconds.
ve the majority of the water from
the unit.
With the unit off, remove coin trap from the unit. This will allow the water
remaining in the pump and drain hose to be evacuated. Replace coin trap.
5. If you elect you may close the inlet shut-off valves (provided by installer) and disconnect the
inlet hoses.
6. Any water remaining in the unit should contain antifreeze and be protected from freezing.
Note: When placing unit into service allow unit to operate for one complete cycle before
doing laundry to ensure all antifreeze has been purged from the unit.
If you have any further questions pertaining to this matter please contact
19
MAINTENANCE
Your
-Dryer has been designed to operate with easy maintenance.
Follow these simple maintenance procedures to obtain optimum performance:
1. Ensure that your machine was installed according to the correct installation procedures
detailed in this Manual.
2. Do not use solvents either to clean the machine or to wash clothes.
3. Keep the inside of the detergent dispenser clean;
4.
-Dryer is a self-cleaning pump. It is therefore not
necessary to carry out cleaning and maintenance operations. However, objects (such as
buttons, coins, etc) may sometimes accidentally drop into the pump. Since these can’t be
expelled through the drain hose, please remove the cover panel at the bottom of the unit
by holding down on the small tab and pulling the cover down (Fig. 11), remove the pump
cover, and carefully inspect the inside. (Fig.12). Be sure to close the cover after cleaning.
The tab should be gently pulled up until you hear a click.
Cleaning the coin trap
-
Switch off the washing machine.
Open the service flap. (bottom right corner)(Fig. 11)
Carefully unscrew the coin-trap cover. A little residual water will flow out.(Fig. 12)
Remove foreign objects/fluff from inside and clean the interior.(Fig. 13)
The pump impeller wheel must be able to rotate. Remove detergent residue and fluff from the pump cover
thread and pump housing.
- Insert the coin-trap cover and screw tight.
(Fig.11)
(Fig.12)
(Fig.13)
Cleaning the Detergent drawer and Recess
-
Press the release lever on the inside of the drawer and pull it out.(Fig. 14)
Remove the cap from the compartment of softer.
Wash all of the parts under running water.
Clean the drawer recess with an old toothbrush.(Fig.15, Fig. 16)
Reinsert the cap (Pushing it firmly into place).
Push the drawer back into place.
Run a rinsing program without any laundry in the drum.
(Fig.14)
(Fig.15)
20
(Fig.16)
Blood
Cosmetics: eye shadow, lipstick, liquid
make-up, mascara, powder, pancake
make-up or rouge
Rin
detergent into any remaining stain. Rinse. If
stain persists, put a few drops of ammonia on
stain and repeat detergent treatment. Rinse. If
necessary bleach.
Apply undiluted liquid detergent to stain, or
dampen stain and rub in soap or detergent
stain is gone, rinse well. Repeat if necessary.
If color remains, bleach if safe for fabrics.
Burn Marks
into stain. Rinse. Bleach, if necessary. Stain
may be impossible to re move
Cream, Ice Cream or Milk
Sponge stain with cool water or soak stain in
cool water for 30 minutes or longer. If stain
remains, work a detergent in- to spot then
rinse. Bleach if necessary.
Candle Wax
Scrape off excess. Place stain between clean
white blotters or several layers of facial
tissues. Press with warm iron. Sponge with
cleaning fluid. If dye spot remains, bleach.
Deodorants and Antiperspirants
Rub with ice to harden. Scrape off excess with
dull blade. Sponge with cleaning fluid.
Wash or sponge stain thoroughly with warm
water and detergent; rinse. If stain remains,
bleach with hot sudsy water. Launder. You
may be able to restore fabric color by
sponging with ammonia. Rinse thoroughly.
Chocolate or Cocoa
Dye
Soak 15 minutes in cold water. Rub detergent
paste into stain, then rinse thoroughly.
Launder in hottest water safe for fabric. If
colored stain remains, sponge with hydrogen
peroxide, rinse and launder.
Rinse or soak in col
into stain. Rinse. If necessary, bleach. Stain is
not always possible to remove. A commercial
color remover may also be used.
Chewing Gum
Egg or Meat Juice
Cod liver Oil
Rinse in cold water. If stain remains, sprinkle
with meat tenderizer, let stand 15-20 minutes.
If stain still remains, sponge with cleaning
fluid or diluted bleach. Launder in hot water.
The use of hot water first may set stain.
Sponge article with cleaning fluid. Soak in
warm suds. If stain persists, wash with bleach
safe for fabric. To remove yellow stain, sponge
with hydrogen peroxide. Rinse and launder.
Old stains may be nearly impossible to
remove.
Fabric Softener Stain
Rub with bar soap until stain has lightened.
Rinse thoroughly. Launder. Rubbing alcohol is
sometimes effective in the color of the garment
can take it. Launder. If desired, dry cleaning
can be used.
Coffee or Tea (Black)
Soak fresh stains immediately in cold water.
Then use bleach treatment with hottest water
safe for fabric. Or if safe for the fabric pour
boiling water through spot from a height of 1 to
3 feet. Launder.
Felt tip pen
Spray spot with cleaners suitable to this
purpose. Sponge stain thoroughly. Rinse with
cold water. Reapply cleaner if necessary .
into stain. Rinse. Dry. If grease stain remains,
sponge with cleaning fluid. Repeat, if
necessary. If stain remains, bleach.
Soak fresh stains immediately with cool water.
Then use bleach treatment with hottest water
21
safe for fabrics, pour boiling water through
spot from a height of 1 to 3 feet. Launder.
frequently. Launder with water at temperature
suitable for fabric. Do not use acetone on
acetate, arnel, dynel or rayon.
Grass
Paint
denatured alcohol. Bleach, if necessary.
Sponge or soak in turpentine or solvent
recommended as a thinner on label. Launder.
Grease or Oil
Scrape away excess. Rub detergent paste or
a general purpose liquid household cleaner
into stain, rinse with hot water. If stain remains,
sponge thoroughly with a grease solvent. Dry.
Repeat if necessary. To rem ove yellow stain,
use a chlorine or oxygen bleach.
Perfume
Ink. Ball-point
Wash or sponge stain thoroughly with warm
water and detergent paste. If perspiration has
changed the color of the fabric, restore it by
treating with ammonia or vinegar. Apply
ammonia to fresh stains; rinse with water.
Apply vinegar to old stains; rinse with water.
Rinse in cold water. Rub undiluted liquid
detergent or a detergent paste into stain.
Rinse. If stain remains, bleach.
Perspiration
Same ball-point inks are set by water. First
test a scrap of cloth. Sponge stain repeatedly
with acetone, amyl acetate or rubbing alcohol.
Hair spray is effective. Launder. Bleach if
necessary. Use amyl acetate on triacetate,
arnel, dynel and verel. Use acetone on other
fabrics. NOTE: Some inks cannot be removed.
Rust and Iron
Apply commercial rust remover, according to
Equator Advanced Appliances’s directions.
Rinse. Or, if safe for fabric, boil stained article
in solution of 4 teaspoons of cream of tartar to
1 pint water.
Ketchup
Scrape of excess. Soak in cold water 30
minutes. Pre-treat with a detergent paste.
Launder.
Shoe Polish
Mildew
Brush off surface growth to keep mold spores
from spreading. Dip article into solution of ½
cup bleach per 1 gallon of cool sudsy water for
5 to 10 minutes. Rinse well. Launder.
Scrape off as much as possible. Pre-treat with
a detergent paste; rinse. If stain persists,
sponge with rubbing alcohol (1 part to 2 parts
water) or turpentine. Remove turpentine by
sponging again with warm detergent solution
or with alcohol. Bleach if necessary.
Mud
Let stain dry; then brush well. Rinse
repeatedly in cool water until mud comes out.
Launder. (Hot soaps suds set a red or yellow
clay stain).
Soft Drinks
Sponge with cold water, some stains are
invisible when they have dried, but turn brown
when heated and may be impossible to
remove.
Mustard
Soak in hot detergent water for several hours.
If stain remains, bleach.
Tar and Asphalt
Act quickly before stain is dry. Sponge with
grease solvent or turpentine. Launder.
Nail Polish
Treat while fresh, scraping or wiping off as
much as possible, before it dries. Place stain
face down on white paper towels. Sponge
back of stain acetone (nail polish remover) or
sponge with denatured alcohol and a few
drops of household ammonia. Sponge stain
Urine
Soak in cool water. If stain is dry, work a
detergent paste into the spot then rinse. If
necessary, bleach.
22
TROUBLESHOOTING
In most cases, when your washer-dryer fails to work, the problems arising can be easily solved
without having to call for a technician. Before calling for assistance, always check these points.
The washer-dryer fails to start
Is the plug correctly inserted into the socket?
Is there electricity in the house?
Is the door closed properly?
Is the start button pressed?
Is the Washer knob in the correct position for the cycle to start?
Is the water supply turned on?
The washer-dryer fails to fill with water
Is the hose correctly connected to the faucet?
Is there water supply?
Is there sufficient water pressure?
Is the faucet filter clean?
Is the inlet hose kinked?
The washer-dryer continuously fills and drains water
Is the drain hose positioned too low?
Check that the inlet hose is not connected at a height more than 40 inches above the floor.
Is the end of the outlet hose immersed in water?
The washer-dryer does not drain or spin
Does the selected program incorporate water draining?
Is the drain pump clogged?
Is the drain hose kinked?
There are too many suds in the drum
Is High Efficiency (HE) detergent being used? It is recommended to use HE detergent.
Is the correct amount of detergent being used?
The washer-dryer vibrates too much during the spin cycle
Have all shipping rods been removed during installation?
Has the machine been leveled correctly?
Is there space between the machine and adjacent units?
Is the machine loaded evenly?
Is the machine installed on carpet or on a wooden floor?
The washer-dryer leaks
Is the metal ring of the inlet hose properly attached?
Is the detergent dispenser obstructed?
Is the drain hose inserted correctly into the drain?
The washer-dryer is not drying
Is the plug correctly inserted into the power outlet?
Is the door properly closed?
Is the dryer knob in the correct position indicating minutes for drying?
23
TROUBLESHOOTING
The washer-dryer is not drying efficiently
Is the end of the drain hose under water?
Is the drain pump obstructed?
Is the drum overloaded?
Is the cold water faucet open?
Is low-sudsing detergent being used?
Is fabric softener being used?
24