1
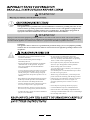
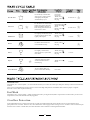
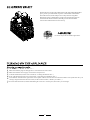
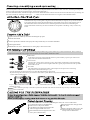
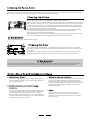
Owner's Manual
Model SB 77 & WB 77
SAVE THESE INSTRUCTIONS
. . . . . . . . . . . . . . . . . . .. . . . . . 1
Thank you for buying this product. As a home
appliances producer, we are proud of our quality
products and we are committed to providing dependable
service. We are able to utilize our global resources in
creating innovation that makes housework lighter and
easier, and provide a truly comfortable home for you to
relax and enjoy.
This manual contains sections of Safety
Instructions,Operating Instructions,
Installation Instructions and Troubleshooting
Tips etc. Carefully reading it before using the
dishwasher will help you to use and maintain
the dishwasher properly.
Control Panel . . . . . . . . . . . . . . . . . . . . . . . . . . . . . . . 2
Dishwasher Features . . . . . . . . . . . . . . . . . . . . . . . . 2
Wash Cycle Table . . . . . . . . . . . . . . . . . . . . . . . .. . . . 3
Detergent Dispenser . . . . . . . . . . . . . . . . . . . . . . . . . 4
Rinse Aid Dispenser. . . . . . . . . . . . . . . . . . . . . . . . . 4
Loading the Dishwasher Rack . . . . . . . . . . . . . . . 5,6
Turning On the Appliance . . . . . . . . . . . . . . . . . . . . .6
Filtering System . . . . . . . . . . . . . . . . . . . . . . . . . . . 7
Caring for the Dishwasher . . . . . . . . . . . . . . . . . .7,8
To review the section on Troubleshooting Tips
will help you to solve some common problems
by yourself and not need to ask for the help of
professional technicians.
If you can not solve the problems by yourself
after reading the section of Troubleshooting
Tips,please contact the professional
technicians of the service center.We are happy
to help you with your questions,24 hours a
day,7 days a week.
Before calling for service. . . . . . . . . . . . . . . . .9 ,10
When the dishwasher has an overflow. . . . . . . . 11
WARRANTY INFORMATION
Your Conserv appliance is protected by this warranty under normal,
personal, family or household use (1 Year), and limited commercial
use (90 days) in the USA and Canada.
WARRANTY
Conserv Appliances.undertakes to the consumer-owner
to repair or, at Conserv Appliances. option, to replace
any part of this product which proves to be defective in
workmanship or material under normal personal, family
or household use, in the USA and Canada, for a period
of one year from the date of original purchase.
WARRANTY SERVICE
This warranty is given by:
Conserv Appliances
10216 Georgibelle Drive, Suite 900D
Houston, TX 77043-2459
Tel: 800-935-1955
For commercial use, the product is warrantied for a
period of 90 days.
During this period, Conserv Appliances . will provide all
labor and parts necessary to correct such defect, free of
charge, if the appliance has been installed and operated
in accordance with Conserv Appliances . written in
structions with the appliance. Ready access to the
appliance, for service, is the responsibility of the con
sumer-owner.
EXCLUSIONS
In no event shall Conserv Appliances . be liable for
incidental or consequential damages or for damages
resulting from external causes such as abuse, misuse,
incorrect voltage or acts God.
This warranty does not cover service calls which do not
involve defective workmanship or materials covered by
this warranty. Accordingly, diagnosis and repair costs
for a service call which does not involve defective
workmanship or materials will be the responsibility of the
consumer-owner.
Specifically, the following work is not covered under
warranty and does not constitute warranty work:
. Installation -e.g. improper hook-up or leveling
. Maintenance - e.g. cleaning of air and/or water filter
. Damage - e.g. Replacing broken door handle
Service under this warranty must be obtained by the
following steps, in order:
Call an Conserv Appliances. Authorized Service Agent
(obtain number of nearest agent from your dealer or
by calling Conserv Service at 800-935-1955). Under
normal circumstances, Service will be provided during
regular business hours (9:00 a.m. to 5:00 p.m. weekdays).
GENERAL
Since it is responsibility of the consumer-owner to e
stablish the warranty period by verifying the original
purchase date, Conserv Appliances. recommends that a
receipt, delivery slip or some other appropriate payment
record be kept for that purpose.
Remember to send in your Warranty Registration Card
so that a proof of your purchase exists with Conserv.
This warranty gives you specific legal rights, and you
may also have other rights which vary from State to
State.
Corporate Office
Conserv Appliances
10216 Georgibelle Drive, Suite 900D
Houston, TX 77043-2459
Most work is covered. The defining factor is, has the
machine malfunctioned (Conserv appliances is
responsible) or has the customer omitted or done
something to cause machine to malfunction (customer
is responsible). Some States do not allow the exclusion
or limitation of incidental or consequential damages,
so the above limitation or exclusion may not apply to you.
Tel: 800-935-1955
WARNING!
Power Cord Models
This appliance must be grounded. In the event of a malfunction or breakdown, grounding will reduce the risk
of electric shock by providing a path of least resistance for electric current. This appliance is equipped with a
cord having an equipment -grounding conductor and a grounding plug. The plug must be plugged into an
appropriate outlet that is installed in an accordance with all local codes and ordinances.
WARNING!
Improper connection of the equipment-grounding conductor can result in a risk of electric shock .Check with a qualified
electrician or service representative if you are in doubt wether the appliance is properly grounded. Do you modify the plug
provided with the appliance; If it will not fit the outlet, have a proper outlet installed by a qualified electrician.
Cable Direct
This appliance must be connected to a grounded metal, permanent wiring system ,or an equipment-grounding
conductor must be run with the circuit conductors and connected to the equipment-grounding terminal or lead
on appliance.
n Do not abuse, sit on, or stand on the door or dish
rack of the dishwasher.
n Do not operate your dishwasher unless all
enclosure panels are properly inplace. Open the
door very carefully if the dishwasher is operating,
there is a risk of water squirting out.
n Do not touch the heating element during or
immediately after use.
n Do not wash plastic items unless they are marked
dishwasher safe or the equivalent. For plastic
items not so marked, check the manufactures
recommendations.
n Do not place any heavy objects of stand on the door
when it is open. The appliance could tip forward.
n When loading items to be washed:
n Use only detergent and rinse additives designed
for an automatic dishwasher. Never use soap ,
laundry detergent, or hand washing detergent
in your dishwasher. Keep these products out of
children.
n Keep child away from detergent and rinse aid, keep
child away from the open door of the dishwasher,
there could still be some detergent left inside.
n The door should not be left in the open position
1) Locate sharp items so that they are not likely to
damage the door seal;
2) Load sharp knives with the handles up to reduce
the risk of cut-type injuries.
n When using your dishwasher, you should prevent
plastic item from contacting with heating element.
n If the supply cord is damaged, it must be replaced
by the manufacturer or its service agent or a
similarly qualified person in order to avoid a
hazard.
since this could present a tripping hazards.
n Please dispose of packing materials properly.
n During installation, the power supply must not
n Use the dishwasher only for its intended function.
be excessively or dangerously bent or flattened.
n To reduce the risk os injure, do not allow children to
play in or on a dishwasher.
n Remove the door to the washing compartment when
removing an old dishwasher from service or discarding it.
n Do not tamper with controls.
1
P OW ER
ON
OFF
FA ST WAS H
Po ts & Pans
INTENSIVE RINSE AID
Ri nse & Hold
STOP
STO P
NORMAL
1
2
3
4
Stemware
5
6
1
2
3
STOP
Rin se
7
4
Power ON Light: To come on when the ON/OFF Button is
pressed down.
Intensive Button: Only used with cycle Pots & Pans " " .
5
Rinse Aid Warning Light: To come on when dispenser
needs to be refilled.
6
Door Handle: Pull it to open the door.
7
Washing Program Selector: Turn the knob clockwise
ON/OFF Button: To turn on/off the power supply.
Fast Was h Button: Only used with cycle Stemware " "
to select wash cycles.
6
1
2
3
7
4
8
5
9 10
13
Back View
11
12
Front View
Front View
1
2
3
4
Upper Rack
Spray Arms
Lower Rack
Main Filter
5
6
7
8
9 Rinse Aid Dispenser
10 Drain Hose
11 Inlet Valve
12 Junction Box
Detergent Dispenser
Cup Shelf
Silverware Basket
Coarse Filter
2
13 Leveling Leg
Pots & Pans
For normally soiled loads,
such as pots , plates,glasses
and lightly soiled pans.
standard daily cycle.
Pre-wash
Pre-wash
Wash (125.6 )
Rinse (158.0 )
Drying
Intensive
For the heaviest soiled loads,
such as pots,pans,casserole
dishes and dishes that have
been sitting with dried food
on them for a while.
Pre-wash
Pre-wash(125.6 )
Wash (140.0 )
Rinse
Rinse (158.0 )
Drying
NORMAL
For lightly soiled loads,such
as plates,glasses,bowls and
lightly soiled pans.
Wash (125.6 )
Rinse (158.0 )
Drying
Rinse
For dishes that need to be
rinsed and dried only.
Rinse (158.0
Drying
Glass
For lightly soiled loads,
such as glasses, crystal and
fine china.
Wash (125.6 )
Rinse (143.6 )
Drying
0.53 oz.
Rapid
A shorter wash for lightly
soiled loads that do not
need drying.
Wash (125.6
Rinse
0.53 oz.
Rinse & Hold
To rinse dishes that you
plan to wash later that day.
Pre-wash
0.18/0.88 oz.
0.18/0.78 oz.
0.78 oz.
)
)
Intensive
This button (see " Control panel " ) is used with the normal cycle in the case where pots and pans with dry caked-on food must be
washed.
This is not recommended for delicate items in so far as the high temperature could make their surfaces opaque or lighten
decorative colors after repeated washing.
Fast Wash
This button (see " Control panel " )when pressed with wash cycle 4(glassware)makes it possible to run the wash cycle at a lower
temperature (50 C) and eliminates the drying phase.
Overflow Protection
Your dishwasher has an overfill protection device which could automatically shuts off the inlet valve and starts the drain
pump if the water overflow. If this occurs, turn off the main water supply before calling a service. If there is water in the base pan
because of an overfill or small leak, the water should be removed before restarting the dishwasher.
3
YOU MAY NOT ADD TOO MUCH DETERGENT TO PREVENT THE FORMATION OF DEPOSITS BECAUSE YOUR DISHWASHERS
HAVE SPECIALLY-DESIGNED WATER SOFTENERS.
The dispenser must be refilled before the start of each wash cycle following the instructions provided in the" Wash Cycle
Table".Your dishwashers use less detergent and rinse aid than conventional dishwashers. Generally, only one tablespoon of
detergent is needed for a normal wash load. Also, more heavily soiled items need more detergent. Always add the detergent just
before starting dishwasher, otherwise it could get damp and will not dissolve properly.
IF THE WATER ISN'T TOO HARD, YOU MAY ALSO PREVENT THE FORMATION OF DEPOSITS B Y ADDING DETERGENT.
The amount of detergent needed can vary due to differences in water hardness. To determine the water hardness in your area,
contact your local water utility or area water softening company. The harder the water, the more detergent you may need.
Remember, you should adjust the amount of detergent you use by small amounts until you find the correct amount.
Button
To remove hard water spots, try the following:
Run di shes through a normal wash program.
Remove all metal dishware, such as cutlery, pans, etc.,
from the dishwasher.
Do not add detergent.
Pour two cups of vinegar into a bowl and set the bowl face
up on the lower rack of the dishwasher.
Run the dishwasher through a normal w ash program.
If this doesn't work, try the same process with 1 / 4 cup of
citric acid crystals instead of vinegar.
To open the wash cover, press the button and the cover
will flip back.
Use only detergent specifically made for use in dishwashers.
Keep your detergent fresh and dry. Don't put powder detergent
into the dispenser until You're ready to wash dishes.
Dishwasher detergent is corrosive! Take care to keep it out
of reach of children.
The rinse agent dispenser holds 3.5 oz. of rinse agent. Under normal
conditions, this will last approximately one month. Try to keep it full,
but do not overfill.
Indicator
Make sure the dishwasher door is fully open.
Turn the dispenser knob to the left and lift it out.
Add rinse agent until the indicator window looks full.
Clean up any spilled rinse agent with a damp cloth.
Replace the dispenser knob.
Adjustable setting
The amount of rinse agent released into the final wash can be adjusted.
The factory setting is at the midpoint. If there are rings of calcium
(hard water) spots on dishes, try a higher setting.
Dispenser cap
Remove the dispenser knob; then turn the adjuster counterclockwise
to increase the amount of rinse agent.
4
The upper rack is designed to hold more delicate and lighter dishware such as glasses, coffee and tea cup and saucers, as well
as plates, small bowls and shallow pans(as long as they are not too dirty).
Position the dishes and cookware so that they do not get moved by the spray of water.
The upper rack can be adjusted for height by putting wheels of different height into the rails.
1
2
3
4
5
6
7
Cups
Small serving bowl
Large serving bowl
Glasses
Saucers
Dish
Plates
We recommend that you place large items which are most difficult to clean into the lower rack: pots, pans, lids,
serving dishes and bowls, as shown in the figure to the right.
It is preferable to place serving dishes and lids on the side of the racks in order to avoid blocking the rotation of the
top spray arm.
Pots, serving bowls, etc, must always be placed top down.
Deep pots should be slanted to allow water to flow out.
The bottom rack feature fold down tine rows so that larger or more pots and pans can be loaded.
1
2
3
4
5
5
Oval platter
Dinner plates
Soup plates
Dessert dishes
Silverware basket
Put the flatware in the removable basket with fork and knife handles
up to protect your hands.Place spoons in the basket with handles
down.Mix knives,forks and spoons so they don't nest together.
Distribute evenly. Small plastic items,such as measuring spoons
and lids from small containers,should go in the bottom of the
silverware basket with silverware on top.
Do not let any item extend through bottom.
1
2
3
4
5
6
Make sure that the plug for the appliance is inserted into the wall socket.
Make sure that the water supply is turned on to full pressure.
Load the dishwasher(see the section entitled, " Loading the Dishwasher " ).
Pour in the detergent(see the section entitled, " Salt, Detergent and Rinse Aid " ).
Turn the knob located on the right of the control panel in the clockwise direction until the number or the symbol for the cycle
setting is aligned with the reference mark (see the section entitled, " Wash Cycle Table " ).
Press the ON/ OFF button, and the ON/OFF light will turn on. At this point, the wash cycle will begin.
6
Premise : A cycle that is underway can only be modified if it has only been running for a short time. Otherwise, the detergent may
have already been released, and the appliance may have already drained the wash water. If this is the case, the detergent dispenser
must be refilled (see the paragraph entitled " Loading the Detergent " ).
Press the ON/OFF button, and the ON light will turn off. Rotate the knob in the clockwise direction to the desired cycle setting (see
the section entitled, " Starting a wash cycle. . . " ). Then, turn the dishwasher back on using the on the ON/OFF button.
S TOP
STO P
When the knob stops turning and is aligned with a STOP mark(see figure), the cycle has finished .
Turn off the appliance using the ON/OFF button, shut off the water supply and open the door of
the dishwasher. Wait a few minutes before unloading the dish washer to avoid handling the
dishes and utensils while they are still hot and more susceptible to breakage. They will also dry
better.
STO P
A forgotten dish can be added any time before the detergent cup opens.
1 Pull the door handle.
2 Do not open the door until the water spray action stops. Steam may rise out of the dishwasher.
3 Add forgotten dishes.
4 Push the door to close it. When the door is close rightly a click will be sound.
For your convenience, we have placed the drain pump and filtering system within easy reach inside the tub. There are three
components of the filtering system: the main filter, the coarse filter, and the fine filter.
1 Main filter
Food and soil particles trapped by this filter are pulverized by a special jet on the lower
spray arm and washed down the drain.
2
2 Coarse filter
Larger items, such as pieces of bone or glass, that could clog the drain are trapped in the
coarse filter. To remove an item caught in this filter, gently squeeze the tabs on top of this
filter and lift it out.
1
3
3 Fine filter
This filter holds soil and food residue in the sump area and prevents it from being
redeposited on the dishes during a cycle.
- Inspect the filters for obstructions every time the dishwasher has been used.
- By unscrewing the coarse filter.you can remove the filter system.Remove any food remnants and clean the
filters under running water.
1
3
2
step1:contrarotate the C oarse filter,
a nd th en lift it u p;
step2: lift the Main filter up
step 3: lift the Fine filter up
NOTE:If do it from step1 to step 3, the filter system will be removed; while if do it from step3 to step 1, the filter system
will be installed.
If your dishwasher is left in an unheated place during the winter, ask a service technician to:
Cut off electrical power to the dishwasher.
Reconnect the water inlet pipe to the
Remove fuses or trip circuit breaker.
water valve.
Turn off the water supply and disconnect the
Remove the plastic sump cover in the
water inlet pipe from the water valve.
tub the bottom and use a sponge to
1
2
water from the inlet pipe and water valve.
3 Drain
(Use a pan to catch the water.)
7
4
5
soak up water in rubber boot.
It is necessary to clean the spray arms regularly for hard water chemicals will clog the spray arm jets and bearings. To remove the
spray arm, screw off the nut to take out the washer on top of the spray arm and remove the arm. Wash the arms in soapy and warm
water and use a soft brush to clean the jets. Replace them after rinsing them thoroughly.
Filter assembly
For best performance and results, the filter assembly must be cleaned.
The filter efficiently removes food particles from the wash water, allowing it to be recirculated
during the cycle. For this reason, it is a good idea to remove the larger food particles trapped in
the filter after each wash cycle by rinsing the semicircular filter and cup under running water.
To remove the filter assembly, pull on the cup handle in the upward direction. The entire filter
assembly should be cleaned at least once a month.
To clean the coarse filter and the fine filter, use a cleaning brush. Then, reassemble the filter
parts as shown in the figures left and reinsert the entire assembly in the dishwasher,
positioning in its seat and pressing downward.
The dishwasher must never be used without the filters. Improper replacement of the filter may
reduce the performance level of the appliance and damage dishes and utensils.
Never run the dishwasher without the filters in place.
To clean the edge around the door, you should use only a soft warm, damp rag. To prevent
penetration of water into the door lock and electrical components, do not use a spray cleaner
of any kind.
Also, never use abrasive cleaners or scouring pads on the outer surfaces because they will
scratch the finish. Some papers towels can also scratch or leave marks on the surface.
Never use a spray cleaner to clean the door panel for it could damage the door lock and electrical components. It is not allowed to
use the abrasive agent or some paper towel because of the risk of scratching or leaving spots on the stainless steel surface.
When you go on v acation, it is recommended that you run a
wash cycle with the dishwasher empty and then remove
the plug from the socket, turn off the water supply and
leave the door of the appliance slightly ajar. This will help
the seals last longer and prevent odors from forming
within the appliance.
After every wash, turn off the water supply to the appliance
and leave the door slightly ajar so that moisture and odors
are not trapped inside.
To clean the exterior and rubber parts of the dishwasher, do
not use solvents or abrasive cleaning products. Rather, use
only a cloth and warm soapy water. To remove spots or
stains from the surface of the interior, use a cloth dampened
with water and a little white vinegar, or a cleaning product
made specifically for dishwashers.
One of the factors that cause odors to form in the
dishwasher is food that remains trapped in the seals.
Periodic cleaning with a damp sponge will prevent this
from occurring.
8
'
'
Fuse blown, or the
circuit breaker acted
Replace fuse or reset circuit breaker. Remove any other
appliances sharing the same circuit with the dishwasher
Power supply is not
turned on
Make sure the dishwasher is turned on and the door is
closed securely.
Make sure the power cord is properly plugged into the
wall socket.
Water pressure is low
Check that the water supply is connected properly and
the water is turned on.
Overflow
The system is designed to detect an overflow. When it
does, it shuts off the circulation pump and turns on the
drain pump.
Some audible sounds are
normal
Sound from soft food shredding action and detergent cup
opening.
Utensils are not secure
To ensure everything is secured in the dishwasher.
in the baskets or something
small has dropped into
the basket
Motor hums
Dishwasher has not been used regularly. If you do not use it
often, remember to set it to fill and pump out every week,
which will help keep the seal moist.
Improper detergent
Use only the special dishwasher detergent to avoid suds.
If this occurs, open the dishwasher and let suds evaporate.
Add 1 gallon of cold water to the tub. Close and latch the
dishwasher, then drain out the water by slowly turning the
Dial until a drain period is reached. Repeat if necessary.
Spilled rinse agent
Always wipe up rinse agent
spills immediately.
Detergent with
colorant was used
Make sure that the detergent is the one without colorant.
Rinse agent dispenser
is empty
Make sure that the rinse agent dispense is filled.
Improper program
Select stronger program
Improper rack loading
Make sure that the action of the detergent dispenser and
spray arms are not blocked by large dishware.
Extremely hard water
Low inlet
temperature
Overloading the
dishwasher
Improper loading
Old or damp powder
detergent
Empty rinse agent
dispenser
Incorrect dosage of
detergent
To remove spots from glassware:
Take out all metal utensils out of the dishwasher.
Do not add detergent.
Choose the longest cycle.
Start the dishwasher and allow it to run for about
18 to 22 minutes, then it will be in the main wash.
Open the door to pour 2 cups of white vinegar
into the bottom of the dishwasher.
Close the door and let the dishwasher complete
the cycle. If the vinegar does not work: Repeat
as above, except use 1/4 cup (60 ml)of citric acid
crystals instead of vinegar.
9
Combination of soft
water and too much
detergent
Use less detergent if you have soft water and select a
shortest cycle to wash the glassware and to get them clean.
Tea or coffee stains
using a solution of 1/2 cup of bleach and 3 cups warm water
to remove the stains by hand.
You have to wait for 20 minutes after a cycle to let the heating
elements cool down before cleaning interior; otherwise, burns
will happen.
Iron deposits in water
You have to call a water softener company for a special filter.
can cause an overall film
'
Hard water minerals
To clean the interior, use a damp sponge with dishwasher
detergent and wear rubber gloves. Never use any other cleaner
than dishwasher detergent for the risk of foaming or suds.
Dishes block detergent
cups
Re-loading the dishes properly.
Normal phenomenon
There is some steam coming through the vent by the door
latch during drying and water draining.
Aluminum utensils have
rubbed against dishes
Use a mild abrasive cleaner to eliminate those marks.
This is normal
A small amount of clean water around the outlet on
the tub bottom at the back of the tub keeps the water
seal lubricated.
Drain is clogged
Make sure the kitchen sink is draining well.
If the dishwasher drains into a disposer, run it clear.
Overfill dispenser or rinse Be careful not to overfill the rinse aid dispenser.
aid spills
Spilled rinse aid could cause oversudsing and lead
to overflowing. Wipe away any spills with a damp cloth.
Dishwasher isn' t level
10
Make sure the dishwasher is level.
It is necessary to uninstall the dishwasher when it has an overflow. Before uninstall the dishwasher,
read the INSTALLATION INSTRUCTION carefully.
Remove the toekick.
Loose the countertop mounting brackets from the countertop of the cabinet.
Before uninstall the dishwasher, the power supply should be shut off. And the machine is not on operating.
After uninstall the dishwasher, pull it out of the cabinet carefully.
Pull out the plug from the float container.
Make the water in the float container let out, and with
a cup or an other container to keep the water.
Stuff the hole of the float container with the plug when
all of the water let out.
Float Container
Plug
The manufacturer, following a policy of constant development and up-datingof the product,
may make modifications without giving prior notice.
11
Conserv Appliances
10216 Georgibelle Drive, Suite 900D
Houston, TX 77043-2459
Tel: 800-935-1955