1
BELKIN
User Manual
Guide d'Utilisation
Manual del Usuario
TUNESTUDIO™
TABLE OF CONTENTS
WELCOME
Key Features
TUNESTUDIO BASICS
What You Can Do with Your TuneStudio
What You Can Connect to Your TuneStudio
WHAT'S IN THE BOX?
Cables You May Need
iPod, WINDOWS, AND Mac COMPATIBILITY
iPod
Windows
Macintosh
SETTING UP YOUR TUNESTUDIO
To set up your TuneStudio
TUNESTUDIO TOUR
TuneStudio Inputs and Outputs
SETTING THE RECORDING LEVEL
RECORDING WITH MICROPHONES
Types of Microphones
Recording with Multiple Microphones
RECORDING A PODCAST
Tips for Record ing a Pod cast
RECORDING LIVE MUSIC
Tips for Recording Acoustic Instruments
Tips for Recording Electrical Instruments
RECORDING A CHOIR
Tips for Record ing a Choir
RECORDING TO OR FROM A COMPUTER
Tips for Recording to or From a Computer
EQUALIZING (EQ) TIPS
MIXINGTIPS
LISTENING TO A RECORDING
Copying a Recording to Your Computer
1
1
2
2
2
3
3
4
4
4
4
5
5
6
7
10
11
11
11
12
13
14
15
15
16
16
17
18
19
20
21
21
TABLE OF CONTENTS
PROTECTING YOUR HEARING
TROUBLESHOOTING
If the Recording Menu button doesn't work
If your TuneStudio won't turn on
If you don't hear anything in the studio monitors or headphones
If the microphone volume is too low
If an instrument's volume is too low
If the sound is distorted
If you hear a "hum" sound in the recording
If your recordings are only in the left channel
If your computer doesn't see your TuneStudio
TUNESTUDIO SPECIFICATIONS
LEARNING MORE
GLOSSARY
Balance
Boost
Clipping
Cut
dB (decibel)
Distortion
Feedback
Gain
Monitor
Pan ("panorama")
RCA ("Radio Corporation of America")
TRS ("Tip-Ring-Sleeve")
USB ("Universal Serial Bus")
XLR
INFORMATION
NOTES
22
23
23
23
23
23
23
24
24
24
24
25
27
28
28
28
28
28
28
28
28
28
28
28
28
28
28
28
29
32
WELCOME
Thank you for purchasing a TuneStudio iPod recording studio.
We designed TuneStudio for a wide range of users, from novice pod casters to experienced musicians.
It's compact, portable, and sturdy enough to stand up to life in a rehearsal room. Its shape gives you easy
access to the controls and simplifies cable management. The iPod docking cradle keeps your iPod secured
in a position that allows convenient and comfortable access to the screen and click wheel.
Your TuneStudio will help you make the most of the high-quality recording capabilities of the iPod. You can
connect up to four instruments or audio sources. Each audio input channel includes equalization (EO), pan,
and level controls. Input channels 1 and 2 can also provide a gain control and optional phantom power
for microphones.
We are pleased that you chose to purchase a TuneStudio, and we have designed it to give you many years of
high-quality recording and mixing.
Have fun!
Key Features
• Record directly to your iPod in 16-bit, 44kHz digital audio quality
• Record to and from your PC or Mac computer using USB 1.1 or higher
• Instantly play back your recordings directly from your iPod
• Charge your iPod while recording
• 4-channel mixing console
• 3-band EO, pan/balance and level controls to perfectly mix and enhance each channel
• 2 microphone inputs with optional phantom power and up to 60 dB of gain
• High-quality stereo compressor with gain control to keep the audio levels within the recording limits
of the iPod and avoid clipping
()
TUNESTUDIO BASICS
Your TuneStudio combines multiple audio sources ("channels") into one stereo signal. You can use the following
controls to enhance each channel's sound before it is mixed with the other channels:
• Level control to set the volume
• Pan (or "balance" for stereo channels) control to move the sound to the left or right
• Low, mid, and high EQs ("equalizers") to fine-tune the sound
Your TuneStudio also includes a compressor that can be used to enhance your recordings and keep the volume
levels within the recording limits of the iPod.
What You Can Do with Your TuneStudio
• Record to or from an iPod
• Record to or from a computer
• Record from up to 5 audio sources
• Listen to your mix while recording, with studio monitors or headphones
• Play back your recordings from your iPod immediately after recording
What You Can Connect to Your TuneStudio
You can connect almost any instrument, microphone, or other audio device to your TuneStudio.
Your TuneStudio has inputs for four different types of cables: XLR, 1/4" TRS, RCA, and USB. With the right
cables or audio connector adapters, you should be able to connect almost any audio source, including:
• CD players
• Computers
• Drum machines
• Guitars and bass guitars
• Microphones
• Synthesizers and keyboards
WHAT'S IN THE BOX
The following items should be in your TuneStudio box:
• TuneStudio
• CD with recording software
• 1/8" (3.5mm) to 1/4" (6.35mm) headphone cable adapter
• AC power supply and power cable
• Adapter inserts for iPod
• Warranty card
• This user guide
Cables You May Need
You will need the following cables to connect microphones ("mics"), instruments, and other devices to
your TuneStudio:
Device
Cable Type
Electronic audio sources
(such as CD players)
RCA stereo
Example
)
Instruments
TRS 1/4"
Computers
USB
Microphones and
high-end professional
audio equipment
XLR
iPod, WINDOWS, AND Mac COMPATIBILITY
iPod
iPod classic
80GB 160GB
iPod nanD
3rd generation (video)
4GB 8GB
iPod
5th generation (video)
30GB 60GB 80GB
iPod nanD
2nd generation (aluminum)
2GB 4GB 8GB
Windows
Pentium® II 350MHz (Pentium III 500MHz or faster recommended)
64MB RAM (128MB recommended)
Windows® XP or Windows Vista™
CD drive
USB 1.1 or USB 2.0 port (USB 2.0 recommended)
Macintosh
83, G4, iMac, iBook, or PowerBook with native USB support
64MB RAM (128MB recommended)
CD drive
Mac OS X version 10.2.8 "Jaguar" or later
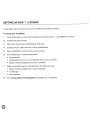
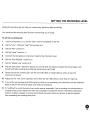
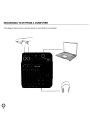
SETTING UP YOUR TUNESTUDIO
It only takes a few minutes to set up your TuneStudio and start recording.
To set up your TuneStudio:
1
Verify all devices are turned off and all level controls are set to
2
Connect the input sources.
3
Insert your iPod into your TuneStudio's iPod dock.
4
Connect the PC, studio monitors, and/or headphones.
5
Plug TuneStudio and other devices into AC power.
6
Turn everything on in the following order:
•
-00
Input sources
• TuneStudio (turning on your TuneStudio will turn on your iPod)
•
7
Studio monitors, headphones, and/or computer
When turning off, always turn off devices in the following order:
•
Studio monitors, headphones, and/or computer
• TuneStudio
•
8
Input sources
Go to www.belkin.com/registration to register your TuneStudio.
(completely to the left).
TUNESTUDIO TOUR
Take a few minutes to learn how to use the inputs and controls on your TuneStudio.
®
1/4" TRS
f1\
\V
o
0)
®
RCA
MONITOR
USB
INPUTS
OUT
AUDIO
XLR MIC - - - INPUTS
(j)
GAIN - - - -
HIGH - - - -
iPod PLAYBACK
@
LEFT & RIGHT
Q
RECORDING LEOs ®
MED - - - -
USB LEVEL INPUT
COMPRESSOR
@
@
LOW---AUDIO MIX IN RATIO
®
@
MASTER LEVEL
PAN - - - -
PEAK
INDICATORS - - - -
@
@
MONITOR
PLAYBACK LEVEL
~
@!
@
@LEVEL----
RECORDING
MENU BUTTON 17
@BALANCE
LHEADPHONES
HEADPHONES
PLAYBACK
@
®
•
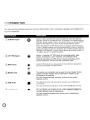
TUNESTUDIO TOUR
You can use the inputs and outputs to connect instruments, mics, computers, speakers, and headphones
to your TuneStudio.
Input/Output
Description
CD XLR Mic Inputs
Inputs 1 and 2 provide XLR cable microphone inputs with optional
phantom power for condenser mics. A condenser mic usually requires
phantom power unless it has its own power source, such as a battery.
Dynamic and ribbon mics don't usually require phantom power.
Note: The phantom power button turns on phantom power for inputs
1 and 2. Always connect your microphones before turning on phantom
power. Microphones are very sensitive, and a sudden power surge can
damage a microphone. It's also a good idea to set the level control to
-00 before you turn on phantom power.
® 1/4" TRS Inputs
Inputs 1-3 provide 1/4" TRS inputs for connecting guitars, bass
guitars, synthesizers, drum machines, and other instruments.
Channel 3 provides two TRS inputs. If you're connecting a mono
input to Channel 3, connect it to the "Left/Mono" input.
o
RCA Inputs
Input 4's RCA inputs can be used to connect electronic equipment
such as a CD player or another iPod.
o
Monitor Out
The monitor out connection can be used to connect studio monitor
speakers. Studio monitors should have built-in amplifiers or be
connected to an amplifier.
You can control the studio monitors' volume with the monitor
playback control.
@USBAUdiO
The USB connection can be used to connect your TuneStudio to
a computer.
You can control the computer's volume with the USB input control.
® Headphones
The headphones connection can be used to connect headphones.
You can use the 1/8" (3.5mm) to 1/4" (7mm) headphone adapter to
connect different types of headphones.
You can control the headphone's volume with the headphones
playback control.
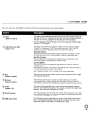
TUNESTUDIO TOUR
You can use your TuneStudio's controls to fine-tune and monitor your recordings.
Control
Description
(j)Gain
(inputs 1 and 2)
The gain control determines how much of the source signal is sent to
the rest of the mix. If the gain is too high, the sound will be distorted. If
the gain is too low, background hiss may be more noticeable.
You can add up to 60 dB of gain to the XLR inputs and 40 dB of gain
to the 1/4" TRS inputs.
® High, Mid, Low EQs
The high, mid, and low equalizers ("EOs") can be used to increase
("boost") or decrease ("cut") the volume by up to 12 dB. The EO
settings can have a dramatic effect, so use them carefully.
High EQ (12kHz)
The high EO can be increased to add crispness to cymbals, vocals,
and string instruments or decreased to reduce microphone hiss.
Mid EQ (2.5kHz)
The mid EO can be increased to make guitars, bass guitars, and
pianos stronger or decreased to soften vocals.
Low EQ (80Hz)
The low EO can be increased to add warmth to vocals or horns or
extra punch to
synthesizers, guitars, and drums. Decreasing the low EO can reduce
hum and add clarity to bass instruments.
See "Equalizing (EO) Tips" on page 19 for more information.
(inputs 1-4)
@Pan
(inputs 1 and 2)
The pan control can be used to move a mono input to the left or right
in the stereo spectrum.
@salance
(inputs 3 and 4)
The balance control can be used to control which part of a stereo
input signal (left or right) is louder than the other. If a mono source is
connected to input 3, then the balance control works like the pan control.
@Level
(inputs 1-4)
The level control specifies how much of the source signal is sent to
the mix. In the leftmost position, the volume is muted. In the rightmost
position, the volume is increased by 15 dB.
@ iPod Playback
The iPod playback control sets the volume when listening to your iPod.
In the leftmost position, the volume is muted. In the rightmost position,
the volume is increased by 15 dB.
@ USB Input Level
The USB level control specifies how much of the signal is sent to the
mix. In the leftmost position, the signal is not sent to the mix. In the
rightmost position, the signal is increased by 15 dB.
TUNESTUDIO TOUR
Control
Description
@ Compressor
The compressor can be used to enhance your recordings and keep
the volume levels within the recording limits of the iPod. With the
compressor, you can make softer sounds louder without making louder
sounds too loud. It is especially useful when recording vocals and
instruments together.
The three LEDs to the right of the compressor button indicate how
many decibels (dBs) of compression are being applied.
@.H..~~~qOes
~1~yba~lt_
@ Audio In Mix Ratio
@ Monito"PlaYba~k Level
The h~adphones'Playback control can be used to,s~tthe volume for
theheadphon~s,.. . ..... .'. . ..'. •
. . .. / > . ". ..•
···No~e;Tne.nea~PtJones input is on the side of your TuneStudi(>,under
the, heaqp~onesJ)layback controL
The audio in mix ratio specifies how signals from input sources 1-4
and the USB input are mixed together. For example, turning the control
to the left will increase the volume of input 1-4 sources and decrease
the volume of the USB source. Turning the control completely to the
left or right will mute the other source.
. The monitor playl5ackcontrol Ccurbeused to seUne volume of the
studio monitor speakers.
.
@ Master Level
The master level control sets the recording volume level to the iPod. In
the leftmost position, the volume is muted. In the rightmost position,
the volume is increased by 15 dB.
@.Recording Men.uButto"
The Recording Menu buttoncan be used to open the Recording menu
on the iPod5th generation (video) only. Note thatth;s button does not
work with the iPodnano 3rd'generation (video) 01" iPod classic.
@ Left and Right
The recording LED lights tell you if the volume is too low or too high.
You can adjust the volume using each input's level control or the full
mix using the master level control.
Recording LEOs
@ Peak 'ndicators
Each input channel. has a peak indicator near its level control. The
peak indicator lights up when the audio signal' level is too high and
may be causing distortion. If a peak indicator lights up, you should
adjust your settings until the peak indicator stays off. These are the
most likely solutions:
• For inputs 1 and 2, try turning down the gain control or moving your
microphone further away from the source.
• If you have any of the EO controls turned up high, turn them
down a little.
• Turn down the volume of the audio source.
SETTING THE RECORDING LEVEL
Setting the recording level will help you create clear, distortion-free recordings.
You should set the recording level for each channel that you're using.
To set the recording level:
1
If you're using input 1 or 2, set the "Gain" control completely to the left.
2
Set the "Low", "Mid", and "High" EO controls to O.
3
Set the "Pan" control to O.
4
Set the "Level" control to
5
Connect the microphone or instrument cable to the channel's input.
6
Set the "iPod Playback" control to O.
7
Set the "Master Level" control to O.
8
Play the instrument or electronic device at a normal level and slowly increase the channel's gain until
the left and right recording level LEOs are continuously red (0 dB).
9
Slowly reduce the channel's gain until the red 0 dB LEOs no longer light up when you play the
instrument or device.
-00.
10 Adjust the low, mid, and/or high EOs, then check the red 0 dB LEOs to verify they don't light up.
11
If any of the red recording level LEOs lights up while you're recording, your recording could be distorted.
Keep an eye on the LEOs and adjust your levels as necessary.
12 If it's difficult to control the level of your audio source, especially if you're working with microphones or
multiple audio sources, experiment with the compressor to keep the levels in check. The compressor
looks for sudden increases in volume and reduces the audio levels very qUickly to keep the signals
from exceeding the recording level limits.
•
RECORDING WITH MICROPHONES
Read on to learn how to select and place a mic when recording.
Using a well-placed microphone will drastically improve your sound quality. You should experiment with
microphone placement to find the best location.
Types of Microphones
There are two types of microphones: condenser and dynamic.
Condenser Microphones
Condenser (or "capacitor") microphones are usually used for live recordings. Unless they have their own
power supply, such as a battery, condenser mics use the phantom power from your TuneStudio to power their
amplifiers and impedance converters. There are many types of condenser mics, including headworn, lavalier,
probe, shotgun, and side-address.
Condenser mics are very sensitive, so they work well with distant or soft sources. They are often used to record
acoustic instruments and vocals.
Dynamic Microphones
Dynamic (or "moving-coil") microphones are usually less expensive and less sensitive than condenser
microphones. Because they don't have amplifiers, dynamic mics don't need phantom power. Phantom power
should not harm a dynamic mic, but you should turn off phantom power before connecting a dynamic mic.
Older dynamic mics have low sensitivities and require a high gain setting. Ribbon mics (a type of dynamic
microphone) normally have very low sensitivity and usually require a very high gain setting. They are often
used to record guitars and drums.
Recording with Multiple Microphones
Your TuneStudio can record up to four sources at a time, and input channels 1 and 2 can provide phantom
power for two mics. If you are recording with multiple mics, you should follow the 3:1 rule.
3:1 Microphone Placement Rule
When you record with multiple mics, sounds arrive at each mic at different times. Sounds farther from the mic
will have a slight delay. When you combine the close and distant sounds, some frequencies will cancel each
other out. The result is a "hollow" or filtered sound.
To avoid this problem, the distance between your mics should be three times the distance between the mics and
their source. For example, if your mics are one foot from the source, they should be placed at least three feet apart.
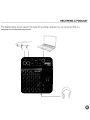
RECORDING A PODCAST
The diagram below shows a typical 2-mic setup for recording a podcast. You can connect an iPod or a
computer to include background music.
RECORDING A PODCAST
Tips for Recording a Podcast
You will become much more comfortable and adept at recording pod casts after you have done it a few times.
Here are some tips to help you get started:
• Test the recording level before recording. The left and right recording level LEOs should not b!3 constantly
red (0 dB). If the 0 dB LED is constantly lit, the "peaks" of the recording may be clipped and the sound quality
will usually be poor.
•
Use a well-placed, high-quality mic. Lavalier mics often work well for pod casts because they're small and
can be clipped to your clothing.
•
If you are not using a lavalier mic, be careful not to move too close to or far away from the mic.
•
Position your mic about six inches from your mouth (or at an angle) so that it doesn't capture your breathing.
Remember, you can connect headphones to your TuneStudio to test different mic positions and distances.
•
Speak in your normal voice at a conversational level. Don't be too self-conscious about your voice-most
people don't like the sound of their voice when they first hear it in a recording. Just be sure to speak clearly.
•
If you are recording an interview with one mic, try using a "figure eight" type mic and have your interviewee
sit directly across from you. A figure eight mic is two sided, so it can capture sounds directly in front and
directly behind.
•
Use the level controls to fade-in the beginning of your podcast and fade-out the end.
•
Include background music during the podcast, with several seconds of music at the beginning and end
of your pod cast. Make sure you have permission to use the music.
RECORDING LIVE MUSIC
The diagram below shows a typical setup for recording live music. You can connect different instruments as
needed. For example, you can connect a drum machine instead of a second mic.
9"'~c10
r-------
n
c6I
\e
.~JI\l~
·•.·.·.[I~
(~ ~
. '.·.·.'·.)
RECORDING LIVE MUSIC
Tips for Recording Acoustic Instruments
Acoustic instruments can be difficult to record. Here are a few tips to improve your acoustic guitar recordings:
• Record in a highly acoustic room, such as a room with a wooden or tile floor.
• Use a condenser microphone ("mic"). It can capture softer instruments better than a dynamic mic.
• Try positioning the mic about 24 inches from the instrument.
• Use multiple mics, and experiment with different angles and placements. For example, position two mics
at gO-degree angles and use the pan controls to move one mic to the left side of the mix and the other mic
to the right. This approach can create a very engaging stereo effect.
• For acoustic guitars, try placing one mic 1-6 inches from the sound hole. You will probably need to reduce
the low EQ control with this approach.
Tips for Recording Electrical Instruments
• Guitar - For a live sound, try recording with two mics. Point one mic directly into the guitar's monitor
speaker and the other mic about five or six feet from the speaker.
•
Bass Guitar - If possible, connect the bass guitar to a direct injection ("01") box and connect the 01 box
to your TuneStudio. A 01 box will eliminate hum in your recordings.
•
Keyboards - Record directly to your TuneStudio for clarity and with a mic (set to lower volume) for a
live sound.
RECORDING A CHOIR
The diagram below shows a typical setup for recording a choir. You can connect an iPod or CD player to include
background music.
Tips for Recording a Choir
• Use a condenser mic for recording vocalists. They usually work better than dynamic mics for vocals.
• Use multiple mics. If possible, place them above the choir and aimed down.
• Try positioning two mics in the middle and aim them toward the vocalists in the back corners.
Place the mics least three times the distance from each other as from the vocalists.
• Try using an omnidirectional mic. It will capture both the choir and the sound resonating in the room.
RECORDING TO OR FROM A COMPUTER
The diagram below shows a typical setup for recording to a computer.
RECORDING TO OR FROM A COMPUTER
Tips for Recording to or from a Computer
You'll need to select your TuneStudio as your input and output audio device to record audio to or from a Mac
computer or Windows PC.
To record to or from a Mac computer:
1
Connect your TuneStudio to your Mac computer's USB port.
2
Select "System Preferences" from the Apple menu.
3
Select the "Sound" preference pane.
4
Click the "Output" tab.
5
Select "USB Audio Codec" as your default input and output device.
To record to or from a Windows PC:
1
Connect your TuneStudio to your Windows USB port.
2
Select "Settings> Control Panel" from the Start menu.
3
Double-click "Sounds and Audio Devices".
4
Click the "Audio" tab.
5
Select your TuneStudio as the default "Sound playback" and "Sound recording" device.
6
For best audio quality, select the "Volume" tab and set the "Device volume" to "High."
EQUALIZING (EO) TIPS
The following EO tips will help you create high-quality recordings.
The high, mid, and low EOs can be used to increase or decrease the volume of your source inputs by up to 12
dB at the following levels:
Low:
80Hz
Mid:
2.5kHz
High: 12kHz
The following table provides tips for recording different instruments and vocals. These tips are recommended
starting points-you should experiment to find the best settings for your instrument and environment. If you
need to make large adjustments, try to adjust your microphones rather than the EO settings.
Note: "Boost" means to increase the setting, and "cut" means to decrease the setting.
Source
Low (80Hz)
Conversations
Slight cut
Mid (2.5kHz)
Vocals
High (12kHz)
Slight cut
Cymbals
Cut
Slight boost
Snare drums
Slight cut
Slight cut
Kick/bass drums
Slight boost
Slight cut
Toms
Cut
Bass guitars
Cut
Guitars
Cut
Pianos and keyboards
Cut
Boost
Slight boost
MIXING TIPS
The following tips will help you produce the best mix possible.
•
Listen to commercial recordings through your TuneStudio using a studio monitor or headphones to develop
a sound reference.
•
Don't pan kick drums or bass instruments to the left or right. These "high energy" sounds should be shared
equally between the speakers for best results.
•
Don't vary the level of drums or bass guitars. These instruments provide a foundation for other instruments.
•
If you record multiple inputs, make your final EO adjustments to the full mix. A single input will often sound
different when heard by itself.
• Avoid making large EO adjustments. Your recording will sound more natural if you adjust the mics rather
than the EO settings.
•
Experiment with the compressor setting. Set the compressor below 30 percent for subtle compression and
to smooth out some of the audio peaks. Try a higher compression setting to achieve higher "loudness" or
for an interesting audio effect.
•
Keep the studio monitor or headphone volume low or, at most, at a normal listening level. A high volume
can cause hearing damage, and you should always mix at the level you think the recording will be played.
If needed, you can check the mix at a higher volume for short periods.
• Check your mix on headphones and studio monitors. "Studio" headphones that completely isolate your ears
can help you find small distortions and clicks that you may not hear through speakers. Studio monitors can
help you fine-tune bass sounds.
•
Listen to your finished mix the day after you've finished it. Your perception is likely to change after resting
your ears overnight. Also, check the master recording on different sound systems to ensure it sounds OK.
LISTENING TO A RECORDING
Your recordings are saved as voice memos on your iPod. Each recording is an uncompressed WAV file, and the
file name is the recording's date and time.
To listen to a recording:
• Select "Extras> Voice Memos" on the iPod.
• Select the recording and press "Play".
Recordings that have been imported into iTunes (see below) can be found in the Voice Memos playlist on your
iPod. Select "Music> Playlists > Voice Memos".
Copying a Recording to Your Computer
If your iPod is set to automatically update (or "sync") songs and playlists, your recordings will be copied to your
computer when you connect your iPod. If iTunes is not set to sync songs and playlists with your iPod, iTunes will
ask you if you'd like to copy your new voice memos when you connect your iPod to your computer.
Keep in mind that your recent recordings will be moved from your Voice Memos menu on your iPod to the
Voice Memos playlist once you've imported them into iTunes. To open the Voice Memos playlist, select
"Music> Playlists > Voice Memos".
If you prefer the drag-and-drop approach, which may be more useful if you plan to work with your recordings
using other audio software, you must first choose to "Manually manage music and videos" for your iPod within
iTunes. This will also automatically "Enable disk use" for your iPod, which is what you want. Then, select "No"
when iTunes asks if you'd like it to import your recent voice memos each time you dock your iPod. Instead, you
can manage your recordings through Windows Explorer (PC) or Finder (Mac). Your recordings are regular WAV
files, so you can treat them as you would any other WAV file.
On a Windows PC, your iPod will appear in the list of drives when you click "My Computer" on your desktop.
On a Mac, your iPod should appear in the Finder or on your desktop. Your recordings will be in the "Recordings"
folder. Each recording's file name includes the date and time of the recording.
PROTECTING YOUR HEARING
As with any sound recording or listening device, you should be careful to protect your hearing when using
your TuneStudio.
Following these sound-level recommendations can minimize your risk of hearing damage.
Remember, the longer you listen, the lower the volume should be.
Hours per day
Max sound level (dB)
Sample sound
8
90
4
95
2
100
1
105
Typical portable stereo at maximum volume
0.5
110
Rock concert
<0.25
115
Typical portable stereo at half volume
This information is based on guidelines provided by the United States Occupational Safety & Health Administration
(OSHA) and the National Institute on Deafness and Other Communication Disorders.
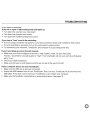
TROUBLESHOOTING
Most problems with your TuneStudio can be solved quickly by following the advice in this chapter.
If you continue to have trouble, contact Belkin Customer Service at 800-223-5546 ext. 2263 or on the
web at http://www.belkin.com/support.
If the Recording Menu button doesn't work:
• Make sure you're using an iPod 5th generation (video). This button does not work with the iPod classic.
• If you are using the iPod classic, simply navigate to the "Voice Memo" menu on the iPod itself.
If your TuneStudio won't turn on:
• Make sure you're using the supplied 12V 1.25A power adapter.
• Try using another power outlet.
If you don't hear anything in the studio monitors or headphones:
• Make sure your TuneStudio is plugged in and turned on.
• Make sure the cables are securely connected.
• Verify your source is playing.
• Turn up the level control(s).
If these suggestions don't help, you might have a bad cable. Check all of your cables and try replacing them
with known good ones.
If the microphone volume is too low:
• Make sure the cables are securely connected.
• If you are using a condenser mic, try turning on phantom power.
• If the microphone is connected to channel 1 or 2, turn up the gain control.
If an instrument's volume is too low:
• Make sure the cables are securely connected.
• Turn up the instrument's volume. If the volume is still too low, check the instrument by connecting your
headphones to the instrument.
• Adjust the channel's level control.
TROUBLESHOOTING
If the sound is distorted:
If the left or right +6 dB recording level LED lights up:
• Turn down the volume on your instrument.
• Turn down the channel's level control.
• Turn down the master recording level control.
If you hear a "hum" sound in the recording:
• If you're using a condenser microphone, try turning on phantom power and increase the level control.
• If you're recording an instrument, turn up the instrument's volume control.
• Try connecting your instrument, TuneStudio, and computer to a grounded power strip.
If your recordings are only in the left channel:
• Make sure your iPod is configured to record in "High Quality" mode. On your iPod, select
"Extras> Voice Memos" and set Quality to "High". Your TuneStudio will not work correctly with Quality
set to "Low".
• Check your cable connections.
• Make sure that your pan and balance controls are not set all the way to the left.
If your computer doesn't see your TuneStudio:
• Make sure the USB cable is securely connected.
• Unplug the USB cable and turn off your TuneStudio. Then, turn your TuneStudio on and reconnect the
USB cable. If this doesn't work, leave your TuneStudio on and restart your computer.
• Make sure the TuneStudio is selected as an audio output device. See page 18.
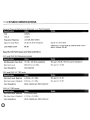
TUNESTUDIO SPECIFICATIONS
General Channel Performance (Channels 1-4, iPod Playback)
Specification
Value
Notes
THD
0.004%
THD+N
0.008%
Frequency Response
±0.5 dB, 20Hz-20kHz
Signal to Noise Ratio
90 dB, 92 dB (A-weighted)
Signal at 0 dB (0 dBV)
Level Fader Cutoff
80 dB
Difference in output level with channel level control
set to -inf then +15 dB
Specific I/O Performance and Characteristics
CH1 and CH2 XLR Microphone Inputs
Specification
Value
Notes
EIN (Equivalent Input Noise)
121 dB, -123 dB (A-weighted)
Mic gain +60 dB, 150-0hm source impedance
Max Input Level
600mVrms (-2.6 dBu)
Mic gain at +10 dB
Input Impedance
4kQ balanced
CH1 and CH2 1/4" TRS Inputs
Specification
Value
Notes
Max Input Level, Balanced
4.4Vrms (+15.1 dBu)
Mic gain at -10 dB
Max Input Level, Unbalanced
8.8Vrms (+21.1 dBu)
Mic gain at -10 dB
Input Impedance
20kQ unbalanced, 28kQ balanced
CH3 1/4" TSR Inputs
Specification
Value
Max Input Level, Balanced
2.1Vrms (+8.6 dBu)
Max Input Level, Unbalanced
4.2Vrms (+14.6 dBu)
Input Impedance
20kQ unbalanced, 40kQ balanced
Notes
TUNESTUDIO SPECIFICATIONS
CH4 RCA Inputs
Specification
Value
Max Input Level
5.4Vrms (+16.9 dBu)
Input Impedance
22kQ
Notes
USB Output (from TuneStudio to Computer)
Specification
Value
SNR, 44.1kHz, 16-bit
81 dB, 84 dB (A-weighed)
SNR, 48kHz, 16-bit
84 dB, 87 dB (A-weighted)
Stereo Separation
> 80 dB
THD+N
0.03%
Frequency Response
±1 dB, 20Hz-20kHz
Notes
USB Input (from Computer to TuneStudio)
Specification
Value
Notes
Signal to Noise Ratio
83 dB
USB mix control set to 100% USB
Stereo Separation
> 80 dB
THD+N
0.007%
Frequency Response
±1 dB, 20Hz-20kHz
Level Fader Cutoff
80 dB
Difference in output level with channel level control
set to ..:..inf then +15 dB
..
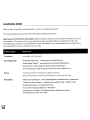
LEARNING MORE
Want to learn more about recording audio, mixing, or creating podcasts?
The following table provides some recommended websites and books.
References to Third-Party Information: Belkin provides references to third-party information for your
convenience. The inclusion of any such references does not imply Belkin's endorsement of the info.
The referenced media are not under Belkin's control and Belkin is not responsible for the content of any
such publication or any link contained in such site.
To learn about...
Check out...
TuneStudio
www.belkin.com/tunestudio
Recording Audio
"Audio Recording Tips" - www.pcmus.com/AudioTips.htm
"Audio Mixing Tutorial" - www.garritan.com/tutorial/AudioMixing.htm
Sound Advice on Recording and Mixing Vocals by Bill Gibson
101 Recording Tips: Stuff All the Pros Know and Use by Adam St. Jam
Mixing
The Mixing Engineer's Handbook by Bobby Owsinski
Mixing, Recording and Producing Techniques of the Pros by Rick Clark
Podcasting
"Make Your First Podcast" - www.podcastingnews.com/articles/How-to-Podcast.html
"Create Your Own Podcast" - reviews.cnet.com/4520-11293_7-6246557-1.html
Podcasting Tutorials - www.podcast411.com
Tricks of the Podcasting Masters by Rob Walch
Promoting Your Podcast: The Ultimate Guide to Building an Audience
of Raving Fans by Jason Van Orden
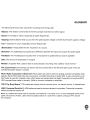
GLOSSARY
The following terms are often used when recording and mixing audio.
Balance: The relative volume levels of the left and right channels of a stereo signal.
Boost: An increase in volume, especially at higher frequencies.
Clipping: Severe distortion that occurs when the peak signal's voltage is limited by the power supply's voltage.
Cut: A reduction in volume, especially at lower frequencies.
dB (decibel): A measurement for the "loudness" of a sound.
Distortion: An undesired sound caused by a difference between the input and output of an audio signal.
Feedback: The "howling" sound caused when a microphone is positioned too close to a speaker.
Gain: The amount of amplification in a signal.
Monitor: A speaker that is used to listen to and evaluate a recording. Also called a "studio monitor."
Pan ("panorama"): Pan controls are used to set the sound levels for the left and right outputs. They are
sometimes called "balance" controls.
RCA ("Radio Corporation of America"): RCA cables are used to transmit analog audio and composite video
signals. Stereo RCA cables have two connectors: red (right) and white or black (left). A yellow connector on an
RCA cable is used for composite video. RCA cables are named after the Radio Corporation of America (RCA).
RCA invented these cables in the early 1940s to connect turntables to amplifiers.
TRS ("Tip-Ring-Sleeve"): TRS cables are usually used to connect mono, not stereo, sources, or headphones.
USB ("Universal Serial Bus"): USB cables are used to connect devices to computers. They can be connected
without turning the computer off.
XLR: XLR cables are usually used to connect a microphone. The name "XLR" is from the original name of the
cable, the Cannon X series. Later versions added a latch ("L") and then a rubber compound ("R") around
the contacts.
INFORMATION
FCC Statement
This equipment has been tested and found to comply with the limits for a Class 8 digital device, pursuant
to part 15 of the FCC Rules. These limits are designed to provide reasonable protection against harmful
interference in a residential installation. This equipment generates, uses, and can radiate radio frequency
energy and, if not installed and used in accordance with the instructions, may cause harmful interference to
radio communications. However, there is no guarantee that interference will not occur in a particular installation.
If this equipment does cause harmful interference to radio or television reception, which can be determined
by turning the equipment off and on, the user is encouraged to try to correct the interference by one of the
following measures:
• Reorient or relocate the receiving antenna.
• Increase the separation between the equipment and receiver.
• Connect the equipment into an outlet on a circuit different from that which the receiver is connected.
• Consult the dealer or an experienced radio/TV technician for help.
Canada-Industry Canada (I C)
The wireless radio of this device complies with RSS 139 & RSS 210 Industry Canada. This Class 8 digital
apparatus complies with Canadian ICES-003.
802184
INFORMATION
Belkin International, Inc., Limited 1-Year Product Warranty
What this warranty covers.
Belkin International, Inc. ("Belkin") warrants to the original purchaser of this Belkin product that the product shall
be free of defects in design, assembly, material, or workmanship.
What the period of coverage is.
Belkin warrants the Belkin product for one year.
What will we do to correct problems?
Product Warranty.
Belkin will repair or replace, at its option, any defective product free of charge (except for shipping charges for
the product).
What is not covered by this warranty?
All above warranties are null and void if the Belkin product is not provided to Belkin for inspection upon
Belkin's request at the sole expense of the purchaser, or if Belkin determines that the Belkin product has
been improperly installed, altered in any way, or tampered with. The Belkin Product Warranty does not
protect against acts of God such as flood, earthquake, lightning, war, vandalism, theft, normal-use wear and
tear, erosion, depletion, obsolescence, abuse, damage due to low voltage disturbances (i.e. brownouts or sags),
non-authorized program, or system equipment modification or alteration.
How to get service.
To get service for your Belkin product you must take the following steps:
1 Contact Belkin International, Inc., at 501 W. Walnut St., Compton CA 90220, Attn: Customer Service, or
call (800)-223-5546, within 15 days of the Occurrence. Be prepared to provide the following information:
• The part number of the Belkin product.
• Where you purchased the product.
• When you purchased the product.
• Copy of original receipt.
2
Your Belkin Customer Service Representative will then instruct you on how to forward your receipt and
Belkin product and how to proceed with your claim.
I!f\
...
~
INFORMATION
Belkin reserves the right to review the damaged Belkin product. All costs of shipping the Belkin product to
Belkin for inspection shall be borne solely by the purchaser. If Belkin determines, in its sole discretion,
that it is impractical to ship the damaged equipment to Belkin, Belkin may designate, in its sole discretion, an
equipment repair facility to inspect and estimate the cost to repair such equipment. The cost, if any, of shipping
the equipment to and from such repair facility and of such estimate shall be borne solely by the purchaser.
Damaged equipment must remain available for inspection until the claim is finalized. Whenever claims are
settled, Belkin reserves the right to be subrogated under any existing insurance policies the purchaser may have.
How state law relates to the warranty.
THIS WARRANTY CONTAINS THE SOLE WARRANTY OF BELKIN. THERE ARE NO OTHER WARRANTIES,
EXPRESSED OR, EXCEPT AS REQUIRED BY LAW, IMPLIED, INCLUDING THE IMPLIED WARRANTY OR
CONDITION OF QUALITY, MERCHANTABILITY OR FITNESS FOR A PARTICULAR PURPOSE, AND SUCH
IMPLIED WARRANTIES, IF ANY, ARE LIMITED IN DURATION TO THE TERM OF THIS WARRANTY.
Some states do not allow limitations on how long an implied warranty lasts, so the above limitations may not
apply to you.
IN NO EVENT SHALL BELKIN BE LIABLE FOR INCIDENTAL, SPECIAL, DIRECT, INDIRECT, CONSEQUENTIAL
OR MULTIPLE DAMAGES SUCH AS, BUT NOT LIMITED TO, LOST BUSINESS OR PROFITS ARISING OUT OF
THE SALE OR USE OF ANY BELKIN PRODUCT, EVEN IF ADVISED OF THE POSSIBILITY OF SUCH DAMAGES.
This warranty gives you specific legal rights, and you may also have other rights, which may vary from state to
state. Some states do not allow the exclusion or limitation of incidental, consequential, or other damages, so the
above limitations may not apply to you.
NOTES
Belkin Tech Support
US: 800-223-5546, ext. 2263
310-898-1100, ext. 2263
UK: 0845 607 77 87
Australia: 1800235546
New Zealand: 0800235546
Singapore: 65 64857620
Europe: www.belkin.com/support
Belkin International, Inc.
501 West Walnut
Los Angeles, CA
310-898-1100
310-898-1111 fax
a.lkin Ltd.
Express Business Park, Shipton Way
Rushden, NN10 6GL, United Kingdom
+44 (0) 1933 35 2000
+44 (0) 1933 31 2000 fax
Belkin B.V.
Boeing Avenue 333
1119 PH Schiphol-Rijk, The Netherlands
+31 (0) 20 654 7300
+31 (0) 20 654 7349 fax
Belkin Ltd.
4 Pioneer Avenue
Tuggerah Business Park
Tuggerah, NSW 2259, Australia
+61 (0) 2 4350 4600
+61 (0) 2 4350 4700 fax
belkin.com
Ci 2007 Belkin International, Inc. All rights reserved. All trade names are registered trademarks of respective manufacturers listed. iPod, iTunes, Mac, Macint
iMac, PowerBook, Apple, iBook, Mac OS are trademarks of Apple Inc., registered in the U.S. and other countries. Windows and Windows Vista are either regis
trademarks or trademarks of Microsoft Corporation in the United States and/or other countries.
© 2007 Belkin International, Inc. Tous droits rl~serves. Toutes les raisons commerciales sont des marques deposees de leurs fabricants respectifs. iPod, iTunes,
Mac, Macintosh, iMac, PowerBook, Apple, iBook, Mac OS sont des marques de commerce d'Apple Inc., deposees aux Etats-Unis et dans d'autres pays. Microsoft et
Windows Vista constituent solt des marques de commerce, soil des marques de commerce deposees de Microsoft Corporation aux Etats-Unis et dans d'autres pays.
e 2007 Belkin International, Inc. Todos los derechos reservados. Todos los nombres comerciales son marcas comerciales registradas de los respectivos fabricantes
enumerados. iPod, iTunes, Mac, Macintosh, iMac, PowerBook, Apple, iBook, Mac OS son marcas comerciales de Apple, Inc. registradas en EE.UU. y otros parses.
Windows y Windows Vista son ya sea marcas comerclales registradas 0 marcas comerciales de Microsoft Corporation en EE.UU. y/u otros parses.
P75236tl • F8Z109
BELKIN .
cakewalk.
Music Creator'" LE
Installation CD
TuneStudio™
BELKIN®
..
,'(-
cakewalk@
Music Creator™ LE
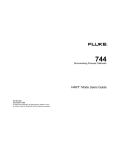
This CD contains your free copy of Cakewalk Music
Creator™ LE, to help you get started with recording and
editing your sound creations from your Belkin TuneStudio.
Simply insert this disk in your PC's CD drive, and follow
the on-screen instructions to install the software.
The disk also contains the software manual and
information about other Cakewalk® products.
© 2007 Belkin International, Inc. All rights reserved. All trade names are registered
trademarks of respective manufacturers listed. Cakewalk, Cakewalk Music Creator,
and the Cakewalk logo are either registered trademarks or trademarks of Twelve
Tone Systems, Inc.
P75612
F8Z109