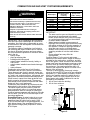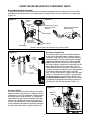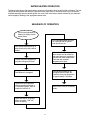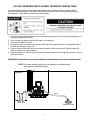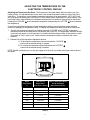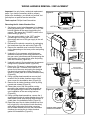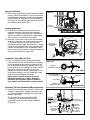
1
http://waterheatertimer.org/Review-AO-Smith-Effex-water-heater.html
SERVICE HANDBOOK FOR
STANDARD RESIDENTIAL
HIGH EFFICIENCY ATMOSPHERIC VENT
(FVIR) GAS WATER HEATERS
MODELS:
GAHH 40 100,
GP 6 40YPC T 100,
PCG6240T403NOV 100,
PCG2J4040T3NOV 100,
12 40GPC T 100,
PCG2J4040T3NOV 100,
GAHH 50 100,
GP 6 50YPC T 100,
PCG250T403NOV 100,
PCG2J5040T3NOV 100,
12 50GPC T 100,
PCG2J5040T3NOV 100
Printed in U.S.A. 10/10
318181-000
1
ALL TECHNICAL AND WARRANTY QUESTIONS
SHOULD BE DIRECTED TO THE LOCAL DEALER FROM WHOM THE WATER HEATER WAS PURCHASED.
IF YOU ARE UNSUCCESSFUL, CONTACT A. O. SMITH WATER HEATERS RESIDENTIAL TECHNICAL ASSISTANCE
AT 1-800-527-1953 OR WWW.HOTWATER.COM.
2
SERVICE HANDBOOK
Your safety and the safety of others is extremely important in the servicing of this water heater. Many
safety-related messages and instructions have been provided in this handbook and on the water heater
to warn you and others of a potential hazard. Read and obey all safety messages and instructions
throughout this handbook. It is very important that the meaning of each safety message is understood
by you and others who service this water heater.
The information contained in this handbook is designed to answer commonly faced situations encountered in the operation of the standard Residential Gas product line and is not meant to be all-inclusive.
If you are experiencing a problem not covered in this handbook, please contact the Technical Information Center listed on the back of this handbook for further assistance. Additional information is also
available on the web site listed on the back of this handbook. This handbook is intended for use by
licensed plumbing professionals and reference should be made to the Installation Instructions and Use
& Care Guide accompanying the product. This handbook contains supplemental information to the
Installation Instructions and Use & Care Guide.
When servicing residential water heaters, it is essential that you return the unit to a safe condition
before you leave the site. All original components must be re-installed and all safety measures must be
implemented. In addition, the recommended water temperature setting is 120° F.
IMPORTANT: It is recommend that on every service call an inspection & cleaning of the air
intake chamber screen and combustion chamber and air diverter assembly be performed. See
page 24.
Tools Required (for servicing gas models):
• phillips head screw driver
• 3/8, 7/16, & 3/4 inch open end wrenches
• 3/16 inch Allen wrench
• 1-1/16 inch – 6 point – socket – for anode removal
• 5/16” nut driver
• pliers
• electrical multimeter (with alligator leads)
• digital or analog manometer
• gas pressure gauge
• Teflon® tape
• hose – to drain tank
Digital manometer shown.
Teflon ® is a registered trademark of E.I. Du Pont De Numours and Company.
3
Breathing Hazard - Carbon Monoxide Gas
Install vent system in accordance with
codes.
Do not operate water heater if flood
damaged
Heater should not be installed for High
Altitude operation above 10,100 feet
(3,078 m).
Do not operate if soot buildup.
Fire or Explosion Harzard
Do not store or use gasoline or other flammable vapors and
liquids in the vicinity of this or any other appliance.
Avoid all ignition sources if you smell Natural or LP gas.
Do not expose water heater control to excessive gas
pressure.
Use only gas shown on rating plate.
Maintain required clearances to combustibles.
Keep ignition sources away from faucets after extended
period of non-use.
Do not obstruct water heater air intake
with insulating jacket.
Do not place chemical vapor emitting
products near water heater.
Gas and carbon monoxide detectors
are available.
Read instruction manual before
installing, using or servicing
water heater.
Breathing carbon monoxide can cause brain damage or death.
Always read and understand instruction manual.
Improper installation and use may result
in property damage.
Do not operate water heater if flood damaged.
Install in location with drainage.
Fill tank with water before operation.
Be alert for thermal expansion.
Refer to instruction manual for installation and service.
4
TABLE OF CONTENTS
INTRODUCTION:
Service Handbook Introduction ...........................................................................................................................3
Warnings and Cautions .......................................................................................................................................4
Table Of Contents ...............................................................................................................................................5
INSTALLATION / OPERATION:
Basic Installation & Operation .............................................................................................................................6
Combustion Air and Vent System Requirements .......................................................................................... 7-10
KNOW YOUR WATER HEATER:
Know the Water Heater’s Component Parts ................................................................................................11-13
Water Heater Operation ....................................................................................................................................14
Filling and Draining the Water Heater ...............................................................................................................15
Lighting Instructions ..........................................................................................................................................16
ADJUSTING TEMPERATURE CONTROL:
Adjusting the Temperature on the Electronic Control Display ...........................................................................17
Using the Electronic Control Display ........................................................................................................... 18-19
Electronic Control Display Troubleshooting ................................................................................................ 20-23
COMPONENTS REMOVAL / REPLACING:
External Inspection and Cleaning .....................................................................................................................24
Electronic Control Display Removal / Replacement .........................................................................................25
Powered Anode Removal / Replacement ................................................................................................... 26-27
Pressure Switch Removal / Replacement .........................................................................................................28
Transformer Removal / Replacement ......................................................................................................... 29-30
Air Intake Chamber Box Removal / Replacement ...................................................................................... 31-33
Wiring Harnesss Removal / Replacement .................................................................................................. 34-36
Air Intake Chamber Fan Removal / Replacement ...................................................................................... 37-38
Pressure Tubing Removal / Replacement .................................................................................................. 39-40
Inner Door/Manifold/Burner Assembly Removal / Replacement ................................................................. 41-42
Flame Sense/Hot Surface Igniter Removal / Replacement ..............................................................................43
Burner Removal / Replacement .................................................................................................................. 44-46
Burner Orifice Removal / Replacement ...................................................................................................... 47-49
Gas Control Valve/Thermostat Removal / Replacement............................................................................. 50-52
CHECKPOINTS / GENERAL INFORMATION:
Checking the Gas Supply Pressure ..................................................................................................................52
Gas Water Heater Sizing Guide -and- Leakage Checkpoints .........................................................................53
General Information .................................................................................................................................... 54-55
5
BASIC INSTALLATION & OPERATION
INSTALLATION OF RESIDENTIAL GAS WATER HEATER
See Labels and
Installation Instructions
and Use & Care Guide
for clearances.
Exhaust Vent to
Ouside of Building
Union
Use Draft Hood
supplied with unit
Union
Untempered
Hot Water
Gas
Supply
Cold
Water
Inlet
*Massachusett: Install
a vacuum relief in cold
water line per section
19 MGL 142.
Expansion Tank
Pressurize to Equal
Supply Water Pressure*
(Relieve water pressure
on the expansion tank
before adjusting air
pressure.)
To Fixtures - Hot
Tempered Water
To Fixtures
Water
Shut-Off
Valve
Water
Supply- Cold*
Control
Display
Temperature-Pressure Relief Valve
with discharge piped to an
adequate drain. Do not cap or plug.
Manual Gas Shut-off Valve
Air Intake Chamber
Air is drawn in for combustion.
Keep area clean and free from
flammables and flammable vapors.
Hot
Water
Outlet
Gas Control Valve/Thermostat
Recommended setting of 120°F.**
Mixing Valve
(Set to 120°F)
Do not cap or plug.
Follow the Mixing Valve
Manufacturer’s Instructions
6” Maximum Air Gap
NOTE: Local codes
may vary.
Union
Sediment Trap
(Drip Leg) 3” Minimum.
Drain
Electrical Plug
Metal Drain Pan piped to an adequate drain.
NOTE: Drain pan diameter must be at least
2 inches wider than the diameter of the
water heater.
FV Sensor
Bracket
The water heater must be installed according to all local and state codes or in the absence of local
and state codes, the “National Fuel Gas Code”’ ANSI Z223.1(NFPA 54)- current edition.
* NOTE: If on a well system the expansion tank should be set to the maximum pressure of the pump tank.
** White-Rodgers® gas control valve/thermostat shown in this figure.
Figure 1
6
COMBUSTION AIR AND VENT SYSTEM REQUIREMENTS
Combustion Air Requirements:
Table 1:
WARNING
BTUH Input
Carbon Monoxide Warning
30,000
45,000
60,000
75,000
90,000
105,000
120,000
135,000
Water heater must be vented to outdoors.
Vent must be installed by a qualified technician using
the local and state codes or, in the absence of local
and state codes, the National Fuel Gas Code,
ANSI Z223.1 (NFPA 54) - current edition, and/or the
installation instructions.
Examples of a qualified technican include: gas
technicians, authorized gas company personel, and
authorized service persons.
Minimum Square
Feet with
8’ Ceiling
188
281
375
469
563
657
750
844
Typical Room
with 8’ Ceiling
9 x 21
14 x 20
15 x 25
15 x 31
20 x 28
20 x 33
25 x 30
28 x 30
IMPORTANT:
• The area must be open and be able to provide
the proper air requirements to the water
heater. Areas that are being used for storage
or contain large objects may not be suitable
for water heater installation.
• Water heaters installed in open spaces in
buildings with unusually tight construction may
still require outdoor air to function properly. In
this situation, outside air openings should be
sized the same as for a confined space.
• Modern home construction usually requires
supplying outside air into the water heater
area.
• Room exhaust fans may effect air
requirements.
Confined Space: For the correct and proper
operation of this water heater, ample air must be
supplied for the combustion, ventilation, and dilution of flue gases. Small enclosures and confined
areas must have two permanent openings so that
sufficient fresh air can be drawn from outside of
the enclosure. One opening shall be within 12
inches of the top and one within 12 inches of the
bottom of the enclosure.
The size of each opening (free area) is determined by the total BTUH input of all gas utilization
equipment (i.e., water heaters, furnaces, clothes
dryers, etc.) and the method by which the air is
provided. The BTUH input can be found on the
water heater rating plate. Additional air can be
provided by two methods:
1. All air from inside the building.
2. All air from outdoors.
Failure to so do can result in death or carbon monoxide
poisoning.
IMPORTANT: Air for combustion and ventilation
must not come from a flammable or corrosive atmosphere. Any failure due to flammable or corrosive elements in the atmosphere is excluded from
warranty coverage.
The following types of installation (not limited to
the following) will require outdoor air for combustion due to chemical exposure and may reduce
but not eliminate the presence of corrosive chemicals in the air:
• beauty shops
• photo processing labs
• buildings with indoor pools
• water heaters installed in laundry, hobby, or
craft rooms
• water heaters installed near chemical storage
areas
• water softeners
Combustion air must be free of acid-forming
chemicals such as sulfur, fluorine, and chlorine.
These elements are found in aerosol sprays, detergents, bleaches, cleaning solvents, air fresheners, paint, and varnish removers, refrigerants, and
many other commercial and household products.
When burned, vapors from these products form
highly corrosive acid compounds. These products should not be stored or used near the water
heater, air inlet, or air intake path.
Combustion and ventilation air requirements are
determined by the location of the water heater.
The water heater may be located in either an
open (unconfined) area or in a confined area or
small enclosure such as a closet or small room.
Confined spaces are areas with less than 50 cubic
feet for each 1,000 BTUH of the total input for all
gas-using appliances.
Unconfined Space: A water heater in an unconfined space uses indoor air for combustion and
requires at least 50 cubic feet for each 1,000
BTUH of the total input for all gas appliances. The
table below shows a few examples of the minimum square footage (area) required for various
BTUH inputs.
12” MAXIMUM
CLOSET
OR
OTHER
CONFINED
SPACE
PERMANENT
OPENINGS TO
THE OUTSIDE OR
ADDITIONAL
ROOMS WITHIN
THE BUILDING
12” MAXIMUM
Figure 2.
7
COMBUSTION AIR AND VENT SYSTEM REQUIREMENTS
All Air from Inside the Building: When
additional air is to be provided to the confined
area from additional room(s) within the building,
the total volume of the room(s) must be of
sufficient size to properly provide the necessary
amount of fresh air to the water heater and other
gas utilization equipment in the area. Each of the
two openings shall have a minimum free area
of 1 square inch per 1,000 BTUH of the total
input rating of all gas utilization equipment in
the confined area, but not less than 100 square
inches for each opening.
Minimum Free Area of Permanent Openings for
Ventilation and Combustion Air Supply - All Air from
Outdoors Only.
Based on total BTUH input rating for all utilizing
equipment within the confined space.
Opening Source
Minimum Free Area
Per Opening (sq. in.)
Reference
Drawing
*Direct to outdoors
1 sq. in, per 4000 BTUH
Figure 4
Vertical Ducts
1 sq. in, per 4000 BTUH
Figure 5
Horizontal Ducts
1 sq. in, per 2000 BTUH
Figure 6
Single Opening
1 sq. in, per 3000 BTUH
Figure 7
Example: A water heater with an input rating of 50,000 BTUH
using horizontal ducts would require each opening to have a
minimum free area of 25 square inches.
CONFINED
SPACE
Minimum free area = 50,000 BTUH x 1 sq. in. / 2000 BTUH = 25
sq. in.
These openings connect directly with the outdoors
through a ventilated attic, a ventilated crawl space, or
through an outside wall.
Consult the local codes of your area for specific
ventilation and combustion air requirements
*
PERMANENT
OPENINGS
1 SQUARE
INCH/1000
BTUH
(MINIMUM
100 SQ. IN.
FOR EACH
OPENING)
ABLE VENT
TO OUTDOORS
INSTALL ABOVE
INSULATION
Figure 3.
All Air from Outdoors: Outdoor fresh air can be
provided to a confined area either directly or by
the use of vertical and horizontal ducts. The fresh
air can be taken from the outdoors or from crawl
or attic spaces that freely communicate with the
outdoors. Attic or crawl spaces cannot be closed
and must be properly ventilated to the outside.
Ductwork must be of the same cross-sectional
area as the free area of the opening to which
they connect. The minimum dimension of
rectangular air ducts cannot be less than three
inches. The size of each of the two openings is
determined by the method in which the air is to
be provided. Refer to the table below to calculate
the minimum free area for each opening.
CONFINED
SPACE
OUTLET
AIR TO
ATTIC 1 SQ.
INCH PER
4000 BTUH
INLET AIR FROM
THE CRAWL SPACE
ALTERNATE
AIR INLET
1 SQ. INCH PER
4000 BTUH
100 SQ. INCH MINIMUM (EACH)
OPEN
FOUNDATION
VENT
ALL AIR FROM OUTDOORS: INLET AIR FROM VENTILATED
CRAWL SPACE/OUTLET AIR TO VENTILATED ATTIC
Figure 4.
Louvers and Grilles: In calculating free
area for ventilation and combustion air supply
openings, consideration must be given to the
blocking effect of protection louvers, grilles, and
screens. These devices can reduce airflow, which
in turn may require larger openings to achieve the
required minimum free area. Screens must not be
smaller than 1/4” mesh. If the free area through
a particular design of louver or grille is known, it
should be used in calculating the specified free
area of the opening. If the design and free area
are not known, it can be assumed that most wood
louvers will allow 20 - 25% of free area while
metal louvers and grilles will allow 60 - 75% of
free area. Louvers and grilles must be locked
open or interconnected with the equipment so that
they are opened automatically during equipment
operation. Keep louvers and grilles clean and free
of debris or other obstructions.
GABLE VENT
TO OUTDOORS
INSTALL ABOVE
INSULATION
OUTLET AIR TO
ATTIC 1 SQ. INCH
PER 4000 BTUH 100 SQ. INCH MIN.
(EACH)
CONFINED
SPACE
INLET AIR DUCT
1 SQ. INCH PER
4000 BTUH - 100
SQ. INCH MIN.
(EACH)
12” MAXIMUM
ALL AIR FROM OUTDOORS THROUGH VENTILATED ATTIC
Figure 5.
8
COMBUSTION AIR AND VENT SYSTEM REQUIREMENTS
Vent Connectors:
1. Type B, Double wall, U.L. Listed Vent Pipe.
2. Single wall Vent Pipe.
1 SQ. INCH PER
2000 BTUH
100 SQ. INCH
MINIMUM (EACH)
CONFINED
SPACE
Maintain the manufacturer’s specified minimum
clearance from combustible materials when using
type B double wall vent pipe.
Vent connectors made of type B, double wall
vent pipe material may pass through walls or
partitions constructed of combustible material if
the minimum listed clearance is maintained.
Maintain a one inch minimum clearance from all
combustible materials when using single wall vent
pipe.
OUTLET
OUTDOOR
AIR DUCTS
INLET
1 SQ. INCH PER
2000 BTUH 100 SQ. INCH
MINIMUM (EACH)
ALL AIR FROM OUTDOORS USING HORIZONTAL DUCTS
IMPORTANT: Single wall vent pipe cannot be
used for water heaters located in attics and may
not pass through attic spaces, crawl spaces or
any confined or inaccessible location. A single wall
metal vent connector cannot pass through any
interior wall.
Figure 6.
ALTERNATIVE
OPENING
LOCATION
When installing a vent connector, please note the
following
• Install the vent connector avoiding
unnecessary bends, which create resistance
to the flow of vent gases.
• Install without dips or sags with an upward
slope of at least 1/4-inch per foot.
• Joints must be fastened by sheet metal
screws or other approved means. It must be
supported to maintain clearances and prevent
separation of joints and damage.
• The length of the vent connector cannot
exceed 75% of the vertical vent height.
• The vent connector must be accessible for
cleaning, inspection, and replacement.
• Vent connectors cannot pass through any
ceiling, floor, firewall, or fire partition.
• It is recommended (but not mandatory) that
a minimum 12 inches of vertical vent pipe be
installed on the draft hood prior to any elbow
in the vent system.
IMPORTANT: Existing vent systems must be
inspected for obstructions, corrosion, and proper
installation.
1 SQ. INCH
PER 3000 BTUH
100 SQ. INCH
MINIMUM (EACH)
CONFINED
SPACE
ALL AIR FROM OUTDOORS - USING A SINGLE PERMANENT OPENING
Figure 7.
Vent Pipe System: This water heater must be
properly vented for the removal of exhaust gases
to the outside atmosphere. Correct installation of
the vent pipe system is mandatory for the proper
and efficient operation of this water heater and is
an important factor in the life of the unit.
The vent pipe must be installed according to all
local and state codes or, in the absence of local
and state codes, the “National Fuel Gas Code”,
ANSI Z223.1(NFPA 54)-current edition. The vent
pipe installation must not be obstructed so as
to prevent the removal of exhaust gases to the
outside atmosphere.
Chimney Connection: IMPORTANT: Before
connecting a gas vent to a chimney, make sure
the chimney passageway is clear and free of
obstructions. The chimney must be cleaned if
previously used for venting solid fuel appliances
or fireplaces. Also consult local and state codes
for proper chimney sizing and application or, in the
absence of local and state codes, the “National Fuel
Gas Code”, ANSI Z223.1(NFPA 54)-current edition.
• The connector must be installed above the
extreme bottom of the chimney to prevent
potentially blocking the flue gases.
U.L. recognized fuel gas and carbon monoxide
(CO) detectors are recommended in all
applications and should be installed using the
manufacturer’s instructions and local codes, rules,
or regulations.
Vent Pipe Size: It is important that you follow the
guidelines in these instructions for sizing a vent
pipe system. If a transition to a larger vent size is
required, the vent transition connection must be
made at the draft hood outlet. DO NOT reduce
the vent size to less than the draft hood outlet
diameter.
9
COMBUSTION AIR AND VENT SYSTEM REQUIREMENTS
•
•
•
The following figures are examples of vent pipe
system installations and may or may not be typical
for your specific application. Consult the “National
Fuel Gas Code”, NFPA 54, ANSI Z223.1-current
edition and the guidelines set forth by prevailing
local codes.
The connector must be firmly attached and
sealed to prevent it from falling out.
To aid in removing the connector, a thimble or
slip joint may be used.
The connector must not extend beyond the
inner edge of the chimney as it may restrict
the space between it and the opposite wall of
the chimney
3 FT.
Minimum
3 FT.
Minimum
2 FT. Minimum Above Any Object
Within 10 FT. Horizontally
Support Strap
Vent
Connector
Type B Double
Wall Vent Pipe
Maintain
Clearance*
Support Strap
Maintain
Clearance*
2 FT. Minimum Above
Any Object Within
10 FT. Horizontally
Seal
Do Not Extend
Vent Beyond Edge
Of Chimney
Vent
Connector
Slope Up
1/4 Inch
Per Foot
Minimum
Slope Up
1/4 Inch
Per Foot
Minimum
**Maintain
Specified
Clearance
Venting Gas Vent System With Type B Double Wall Vent Pipe.
Figure 9.
Chimney Termination Vent System
Consult the table found in the “National Fuel Gas
Code”, NFPA 54, ANSI Z223.1-current edition to
determine the minimum height from roof to lowest
discharge opening.
Figure 8.
Do not reduce the vent to less than the draft
hood outlet diameter. Do not terminate the vent
connector in a chimney that has not been certified
for this purpose. Some local codes may prohibit
the termination of vent connectors in a masonry
chimney.
Vertical Exhaust Gas Vent: Vertical exhaust
gas vents must be installed with U.L. listed type
B vent pipe according to the vent manufacturer’s
instructions and the terms of its listing.
It must be connected to the water heater’s draft
hood by a listed vent connector or by directly
originating at the draft hood opening.
Vertical gas vents must terminate with a listed cap
or other roof assembly and be installed according to
their manufacturer’s instructions.
Gas vents must be supported to prevent damage,
joint separation, and maintain clearances to
combustible materials.
IMPORTANT: This gas vent must be terminated in a
vertical position to facilitate the removal of the burnt
gases.
An unused chimney flue or masonry enclosure
may be used as a passageway for the installation
of a gas vent. NOTE: The chimney flue or masonry
enclosure size may be too large to allow proper
venting.
Common (combined) venting is allowable with
vertical type B vent systems and lined masonry
chimneys as long as proper draft for the water
heater is established under all conditions of
operation. CAUTION: DO NOT common vent this
water heater with any power vented appliance.
Listed Vent Cap
Maintain Manufacturer’s
Specified Minimum Clearance
Support Strap
Maintain
Clearance*
Seal
Vent
Connector
Slope Up
1/4 Inch
Per Foot
Minimum
**Maintain
Specified
Clearance
Vent Connector
Unused Chimney
Flue Or Masonry
Enclosure
Venting Through Chimney With Type B Double Wall Vent Pipe.
Figure 10.
* Maintain vent pipe clearance requirements to local,
state and/or the “National Fuel Gas Code”, ANSI
Z223.1(NFPA 54)-current edition.
** NFPA 211, Standard for Chimneys, Fireplaces,
Vents, and Solid Fuel-Burning Appliances states
that these chimneys are intended to be installed
in accordance with the installation instructions
provided with each chimney support assembly.
Minimum air space clearance to combustible
materials should be maintained as marked on the
chimney sections.
10
KNOW THE WATER HEATER’S COMPONENT PARTS
Electronic Control Display (Upper Control)
The Electronic Control Display panel used on this water heater provides an easy-to-read, eye level display
for temperature adjustment, fault code diagnostics and recall, powered anode rod operation and setting the
temperature scale for either Fahrenheit (°F) or Celsius (°C).
Figure 11.
Electronic Control Display
(Upper Control)
Gas Control Valve/Thermostat (Lower Control)
The gas control valve/thermostat is where the incoming gas supply is connected to the water heater. It is
used in conjunction with the electronic control display to start or stop main burner operation. There is an
On/Off switch located on the right-hand side of the control. The gas control valve/thermostat is energized
by a 24 VAC power supply transformer and uses a temperature sensing probe to open or close the flow
of gas to the main burner. The gas control valve has an inlet filter built into its body to prevent impurities in
the gas system from contaminating the internal valves and a LED diagnostic light located in the lower right
hand corner of the valve to display any micro-computer fault experienced by the control. On the bottom of
the control is where electrical connections to the other component parts are attached along with the gas
supply (manifold tube) to the main burner. The gas control/valve thermostat of this water heater is suitable
for use on Natural gas only.
Figure 12.
Gas Control Valve/ Thermostat
On/Off Switch
located on
the right side.
Bottom View
Gas Supply- Inlet
Temperature Probe
/High Limit Probe
1 8 Pin Systems
Connector
2 5 Pin Communications
Connector
Manifold Tube
Power Supply 4
Transformer
Connector
3 3 Pin Ignitor
Pressure
1 Switch / Fan,
FV Sensor
Connector
3
Igniter/Flame
Sense
Connector
2
Control Display,
Anode Rod
Connector
11
Connector
4 2 Pin Power
Connector
KNOW THE WATER HEATER’S COMPONENT PARTS
Burner/Manifold Door Assembly
The burner/manifold door assembly consists of several components such as: main burner, burner orifice,
manifold tube and flame sense / hot surface igniter. See figure below for the complete list of components
(Figure 13).
Figure 13.
Main Burner
Manifold
Tube
Manifold
Door
View
Port
Scoop side to be placed
on the same side as
View Port.
Flame Sense / Hot Surface
Igniter Assembly
Burner Orifice*
Flame Sense/
Hot Surface
Igniter Assembly
Burner Screws
Door Gasket
*DO NOT operate the water heater without the burner orifices installed.
Figure 14.
Air Intake Chamber Fan
The small fan at the top of the air intake chamber
on the side of the water heater is used to draw in
necessary combustion air for the efficient operation
of the main burner. The fan pressurizes the sealed
combustion chamber which in turn allows the flue
baffle inside the center flue tube to slow down the
hot exhaust gases so heat can be extracted into the
water before exiting into the vent system. The air
intake chamber fan runs for about 5 seconds to prepurge the combustion chamber before the beginning
of an ignition sequence when there is a call for
heat. The fan will continue to operate while the main
burner is in operation and for about 5 seconds after
the temperature set point has been achieved. The
air intake chamber screen covering the fan should
be inspected and cleaned periodically to assure it is
not limiting air flow into the chamber (Figure 14).
Air intake
Chamber
Screen
Air intake
Chamber
Fan
Air intake
Chamber
Figure 15
Pressure Switch
A pressure switch in the control string of this water
heater is used to verify there is an adequate flow of
combustion air into the combustion chamber before
and during main burner operation. It is electrically
connected to the gas control valve/thermostat and
controls the opening and closing of the gas valve.
If there is an insufficient air supply being delivered
to the combustion chamber the pressure switch will
not allow the water heater to operate (Figure 15).
Pressure
Switch
12
KNOW THE WATER HEATER’S COMPONENT PARTS
Figure 16.
Flammable Vapor Cut Off Switch (FV Sensor)
The water heater is equipped with a FV sensor, for
detecting the presence of flammable vapors (e.g.
spilled gasoline). When the sensor detects those
vapors, the heater will shut down and not operate.
If flammable vapors are detected or the sensor
is inoperative, an icon will flash on the electronic
control display and the heater will go into a lockout
mode. The water heater will not function again until
the flammable vapors have been eliminated and the
control is manually reset using a special Flammable
Vapor sensor reset sequence. (Figure 16).
FV Sensor
Figure 17.
Power Anode Rod
To protect the glass-lined water tank from corrosion
through electrolysis, this water heater is equipped
with a non sacrificial powered anode rod. Unlike
conventional magnesium or aluminum anode rods
used in water heaters, the powered anode does
not deteriorate and is less likely to contribute to
the occurrence of “Smelly (Rotten Egg) Water”
(Figure 17).
Powered
Anode
Rod
HOW THE WATER HEATER’S COMPONENT PARTS ARE CONNECTED
Figure 18.
Air Intake
Chamber Fan
Gas Control
Valve / Thermostat
Anode
Rod
Pressure
Switch
Control Display
CAUTION:
DO NOT USE AN EXTENSION
CORD TO CONNECT THE
TRANSFORMER TO AN
ELECTRICAL OUTLET.
Igniter/Flame
Sense Connector
FV
Sensor
CAUTION:
LABEL ALL WIRES PRIOR TO
DISCONNECTION WHEN SERVICING
CONTROLS. WIRING ERRORS CAN CAUSE
IMPROPER AND DANGEROUS OPERATION.
VERIFY PROPER OPERATION AFTER SERVICING.
13
Power Supply
Transformer
WATER HEATER OPERATION
The figure below shows the water heater’s sequence of operation when a call for heat is initiated. The gas
control valve/thermostat will attempt to light the burner three times. If the flame sense rod in the burner/
manifold assembly does not detect ignition, the control will enter lockout mode indicated by the electronic
control display’s flashing of the appropriate status code.
SEQUENCE OF OPERATION
Call for heat indicated by
flashing of display screen
status codes.
Gas valve/thermostat will open
for 4 second trial for ignition
and fan will turn on.
Gas valve/thermostat will do a
relay check (relay clicks will be
heard).
Main burner flame is detected by
flame sense rod. Air intake fan
and main burner will continue to
operate until water temperature
inside the tank reaches
temperature set point.
Display will show temperature
set point during call for heat.
Gas valve/thermostat is deenergized and air intake fan
continues for a post purge time
of approximately 5 seconds.
Draft Blower is energized.
System will verify pressure
switch operation and start a
5 second pre-purge, then air
intake fan will turn off.
Water heater returns to standby
mode.
Ignitor will start a 12 second
warm up period. “IGN” will
show on display.
14
FILLING, DRAINING AND FLUSHING THE WATER HEATER TANK
It is recommended that the tank be drained and flushed every 6 months to remove sediment which
may build up during operation. The water heater should be drained if being shut down during freezing
temperatures. To drain the tank, perform the following steps:
1. Turn off the gas to the water heater at the manual gas shut-off valve and turn off the electrical power to
the gas control/thermostat valve.
2. Open a nearby hot water faucet until the water is no longer hot.
3. Close the cold water inlet valve.
4. Remove the outer door and connect a hose to the drain valve and terminate it to an adequate drain or
external to the building (Figure 19).
5. Open the water heater drain valve and allow all the water to drain from the tank. Flush the tank with
water as needed to remove sediment.
6. Close the drain valve, refill the tank, and restart the heater as directed in the lighting instructions on the
front of the heater.
IMPORTANT: Condensation may occur when refilling the tank and should not be confused with a tank leak.
NOTE: If the water heater is going to be shut down for an extended period,
the drain valve should be left open.
Figure 19.
Hose
Outer Door
Adequate Drain
15
LIGHTING INSTRUCTIONS
Read and understand these directions thoroughly before attempting to operate the water heater. Make sure
the view port is not missing or damaged. Make sure the tank is completely filled with water before operating
the water heater. The gas control valve/thermostat has an “On/Off Switch” and needs to be turned on
before the water heater is operational. Check the label on the front of the water heater near the gas control
valve/thermostat for the correct gas. Do not start this water heater with any gas other than the one listed on
the label. If you have any questions or doubts, consult the gas supplier or gas utility company. The following
Lighting Instruction label appears on the front of the water heater.
FOR YOUR SAFETY READ BEFORE OPERATING
WARNING: If you do not follow these instructions exactly, a fire or
explosion may result causing property damage, personal injury
or loss of life.
FLAMMABLE
BEFORE OPERATING: ENTIRE SYSTEM MUST BE FILLED WITH WATER AND AIR PURGED FROM ALL LINES.
If you cannot reach your gas supplier, call the
A. This appliance does not have a pilot. It is equipped with
an ignition device that will automatically light the
fire department.
burner. Do not try to light the burner by hand.
C. Use only your hand to push in the electronic display
buttons and gas control switch. Never use tools.
B. BEFORE OPERATING smell all around the appliance
If the control buttons will not push in, don't try to
area for gas. Be sure to smell next to the floor because
repair them, call a qualified service technician. Force
some gas is heavier than air and will settle on the floor.
or attempted repair may result in a fire or explosion.
WHAT TO DO IF YOU SMELL GAS:
Do not try to light any appliance.
D. Do not use this appliance if any part has been
Do not touch any electric switch;
under water. Immediately contact a qualified
do not use any phone in your building.
installer or service agency to replace a flooded
Immediately call your gas supplier from a neighbor’s water heater. Do not attempt to repair the unit.
phone. Follow the gas supplier’s instructions.
It must be replaced!
OPERATING INSTRUCTIONS
ON
OFF
ON/OFF
SWITCH
"GAS CONTROL"
"ELECTRONIC DISPLAY"
1.
STOP! Read the safety information
above on the label.
2. Turn on all electrical power to the appliance.
3. Set the ON/OFF switch on the gas control to the
"ON" position.
4. Set the Electronic Display to the lowest
setting by first pressing the COOLER
and
HOTTER
buttons together and holding for 1
second. Then press the COOLER
button to
the lowest setting.
5. Set the ON/OFF switch on the gas control to the
"OFF" position.
6. This appliance is equipped with a device
which automatically lights the burner.
DO NOT TRY TO LIGHT THE BURNER BY HAND.
clear out any gas.
7. Wait five (5) minutes to
STOP! Follow "B" in
If you then smell gas,
the safety information above on this label. If you
don't smell gas, go to the next step.
8. Set the ON/OFF switch on the gas control to the
"ON" postition.
9. Set the Electronic Display to the desired setting by first
pressing the COOLER
and HOTTER
buttons together and holding for 1 second. Then press
the HOTTER
button until the desired setting
is reached.
DANGER:
Hotter water increases the
risk of scald injury. Consult the instruction
manual before changing temperature.
10. If the appliance will not operate, follow the instructions "TO TURN OFF GAS TO APPLIANCE" and
call your technician or gas supplier.
WARNING: T U R N O F F A L L
ELECTRIC POWER BEFORE SERVICING.
TO TURN OFF GAS TO APPLIANCE
1. Set the Electronic Display to the lowest setting by first
pressing the COOLER
and HOTTER
buttons together and holding for 1 second. Then press
the COOLER
button to the lowest setting.
2. Set the ON/OFF switch on the gas control to the
"OFF" postition.
3. Turn off all electrical power to the appliance if
service is to be performed.
185741-000
Figure 20.
16
ADJUSTING THE TEMPERATURE ON THE
ELECTRONIC CONTROL DISPLAY
Adjusting the Temperature Set Point - The thermostat of this water heater has been factory set at its
lowest position. It is adjustable and must be reset to the desired temperature setting to reduce the risk of
scald injury. The electronic control display temperature should be set at approximately 120°F (49°C) and
this is the preferred starting point, see Figure 21 Some states have a requirement for a lower setting. If you
need hotter water, follow directions for temperature adjustment, but beware of the warnings in this section.
Pressing the “COOLER” button decreases temperature and pressing the “HOTTER” button increases
the temperature.
To avoid any unintentional changes in water temperature settings, the control has a tamper resistant
feature for changing the temperature setting. To change the temperature setting follow these instructions:
1. “Unlock” the temperature indicators by holding down both “COOLER” and “HOTTER” temperature
adjustment buttons at the same time for one second (See Figure 21). The temperature indicators will light
up and will only remain on for 30 seconds if no further buttons are pressed. After 30 seconds the control
will go back to “Lock” mode (“Lock” mode indicates a temperature setting is locked into the control
memory).
2. Release both of the temperature adjustment buttons.
A. To decrease the temperature press and release the “COOLER”
button until the desired setting is reached.
B. To increase the temperature press and release the “HOTTER”
button until the desired setting is reached.
NOTE: Should overheating occur or the gas supply fail to shut off, turn off the manual gas control valve to
the heater.
Figure 21.
Gas Control Valve/Thermostat Settings
COOLER
HOTTER
Electronic Control Display
Water
Temperature
°F
Time for 1st
Time for Permanent Burns
Degree Burn
2nd & 3rd Degree
(Less Severe Burns)
(Most Severe Burns)
110
(normal shower temp.)
116
(pain threshold)
116
35 minutes
45 minutes
122
1 minute
5 minutes
131
5 seconds
25 seconds
140
2 seconds
5 seconds
149
1 second
2 seconds
154
instantaneous
1 second
(U.S. Government Memorandum, C.P.S.C., Peter L. Armstrong, Sept. 15,1978)
Table 2
17
USING THE ELECTRONIC CONTROL DISPLAY
How to select or change the temperature scale from Fahrenheit (°F) to Celsius (°C).
Figure 22.
Gas Control Valve/Thermostat Settings
COOLER
HOTTER
Electronic Control Display
1. The temperature scale defaults to Fahrenheit (°F).
2. To change to Celsius (°C), press the two temperature adjustment buttons at the same time for more
than five (5) seconds but less than 10 seconds to enter the Temperature Scale Selection mode. In this
mode the currently active temperature scale indicator (°F or °C) will start to flash. When in this mode a
button press of either the red up arrow, or the blue down arrow button will cause the control to toggle
the temperature scale between °F and °C (Figure 22).
3. Once the selection has been made the user may exit this mode by again pressing the two temperature
adjustment buttons at the same time for more than two (2) seconds but less than five (5) seconds. The
control will also time out five (5) seconds after the last button press and return to the normal operational
mode.
Fault Code Diagnostics:
• The control system of this water heater monitors inputs and outputs.
• When the system determines a fault condition is present it will show the
fault on the display.
• Depending on the fault, the system may continue to operate or enter a
timed lockout.
• Lockout time varies depending on the fault.
• When the lockout time expires, if the fault has been corrected, the system
will attempt normal operation.
Fault Code Retrieval:
• The system will display the last eight (8) fault codes.
• The system will display how many days ago each fault occurred, up to 14 days.
Note: A “14” indicates that the fault occurred 14 or more days ago. Interrupting
the power restarts the date code at “00”.
• User must enter Field Service Mode to view information.
• Current water temperature, measured at gas valve/thermostat will also be
displayed in Field Service mode.
Entering Field Service Mode:
1. Press and hold both temperature adjust buttons (Figure 22).
2. Hold both buttons as control passes from the set point display to Temperature Scale Selection menu.
Continue to hold buttons until “CHECK” icon is displayed, then release buttons. This will take 10 to 15
seconds.
3. The display will show the current water temperature, “POWER” icon, “CHECK” icon and will flash any
current fault icons. The backlight will always be displayed while in the Field Service Mode.
18
USING THE ELECTRONIC CONTROL DISPLAY
Reviewing Fault Codes:
1. Press the red up arrow button one time.
2. The display will show either E0 or E1.
3. If E0 is shown, there are no faults. By pressing the up arrow button again the display will exit the Field
Service mode, or the control will exit automatically after no button is pressed for five (5) seconds.
4. If E1 is shown, the control will flash the icons of the most recent fault.
5. Pressing the red up arrow button again will shown how many days ago the fault occurred and continue to
flash the corresponding fault icons.
6. Interpreting the day of the fault occurrence is as follows...00 would be today, 01 would be yesterday, up to
14 which would be 14 or more days ago.
7. Continuing to press the up arrow button will scroll through all of the eight (8) most recent faults, if they exist,
and its days ago of occurrence.
8. After the last fault is reached the display will return to the first fault (E1) to allow for the faults to be reviewed
again.
Exiting Field Service Mode:
• There are three (3) methods to exit the Field Service Mode, Manual, Manual and Clear, and Timed Exit.
1. Manual exit is accomplished by pressing both the red up arrow and the blue down arrow buttons for
one (1) second, but less than five (5) seconds while in the Field Service Mode, or by pressing the red
up arrow button one (1) time after the “E0” is displayed during fault review while in the Field Service
Mode. These methods will return the control to the standard operating mode and retain any fault codes
stored in memory.
2. Manual exit and fault clear is accomplished by pressing the red up arrow and the blue down arrow
buttons for five (5) seconds while in the Field Service Mode. This method will return the control to the
standard operating mode and at the end of the five (5) seconds clear all faults stored in memory
and initiate a software reset indicated by all the LCD segments coming on for five (5) seconds. The
temperature setting and scale, etc. will not be altered using this method of exit.
3. Timed exit will occur while in the Field Service Mode if the control detects no button presses for a
period exceeding five (5) minutes. The control will automatically return to the normal operating mode
and keep all fault data retained in memory.
FV-Sense Reset Sequence:
Figure 23.
Flammable liquids (such as gasoline, solvents, adhesives, LP gases,
etc.) and other substances emit flammable vapors which can be
ignited by a gas water heater’s hot surface igniter or main burner. The
resulting flashback and fire can cause serious burns to anyone in the
area. This water heater is equipped with a FV sensor for detecting the
presence of flammable vapors. When the sensor detects those vapors,
the unit will shut down and not operate. Even though this water heater
is a flammable vapors ignition resistant water heater and designed to
reduce the chances of flammable vapors being ignited, gasoline and
FV Sensor
other flammable substances should never be stored or used in the
same vicinity or area containing a gas water heater or other open flame
or spark producing appliance.
Should the FV-Sensor of this water heater detect the presence of flammable vapors the following FV-Sense
Reset Sequence must be entered into the Electronic Control Display. NOTE: “BEFORE RESETTING THE
FVIR SENSE IN THE ELECTRONIC CONTROL DISPLAY, THOROUGHLY INSPECT THE AREA AND REMOVE
THE SOURCE OF THE FLAMMABLE VAPORS”.
1. Manual reset is accomplished by first turning off the power to the water heater for at least 10 seconds.
2. Then, while pressing the two temperature adjustment buttons on the display, turn the switch on the gas
control valve/thermostat to the on position. All the display icons will start to flash. Temporarily release
both temperature adjust buttons and within 2 seconds, press both temperatures adjust buttons again
until all the display icons are on steady. Release the two temperature adjust buttons. The system will
clear the fault, perform a reset, and normal operation will be restored.
19
ELECTRONIC CONTROL DISPLAY TROUBLESHOOTING
ELECTRONIC CONTROL DISPLAY
Please check guidelines below. For your safety, water heater service should be performed only by a qualified service person.
Read the GENERAL SAFETY INFORMATION supplied by the water heater manufacturer.
CONTROL DISPLAY STATUS
1.
“POWER” Flashing
PROBLEM
Communication Error
The system has detected a
communication error between the
upper and lower controls.
2.
3.
“HEATING” and “SHORT” Flashing
“HEATING” and “OPEN” Flashing
The self-diagnostic tests have
found a problem with an internal
circuit.
Ignition/flame failure.
The water heater has reached the
maximum number of retries and is
currently locked out for one hour.
Cycle the power to the water
heater off and on to reset.
SOLUTION
1. Check the 5-conductor data cable that
runs between the upper and lower
controls. Check that the wiring is not
broken, and the connectors on both ends
are properly seated in the mating
connectors.
2. Replace the upper control, if the error code
does not clear - cycle power to the water
heater “Off” and “On” to reset.
3. Replace the lower control if the problem persists.
1. Turn the power off for 10 to 20 seconds
then on again to clear the error code.
2. If the error code persists or cannot be
cleared, replace the lower control.
1. Gas supply is turned off – pressure too
low. Ensure supply and manifold gas
pressures are within requirements in the
installation manual. Manifold gas
pressure is non-adjustable, if pressure is
off by more than 0.3” W.C. (75 Pa)
replace the lower control.
2. Low supply voltage – should be 115 –
125 VAC.
3. Ensure flame sensor is making good
contact with the burner flame, ensure
flame is steady.
4. Ensure the flame sensor is clean – use
ultra fine steel wool or Scotch-BriteTM pad
to clean the flame sensor.
5. Ensure the hot surface ignitor is
positioned to provide consistent ignition.
6. Check for any cracks in the ignitor
assembly ceramic insulators – replace
ignitor assembly if damaged.
4.
5.
“HEATING”, “OPEN”, and “SHORT” Flashing
“ECO” and “OPEN” Flashing
Weak flame sensor current.
Water temperature in the tank has
exceeded 185°F (85°C) and has
activated the ECO.
20
7. Check resistance of the ignitor at room
temperature (77°F – 25°C) at the plug
end. Replace ignitor if the resistance is
not within 1.72 to 2.4 ohms at room
temperature.
1. Ensure flame sensor is making good
contact with the burner flame, ensure
flame is steady.
2. Ensure the flame sensor is clean – use
ultra fine steel wool or Scotch-Brite TM pad
to clean the flame sensor.
1. Turn the power off for 10 – 20 seconds
then on again to clear this error code.
2. Replace the lower control if the error
code persists.
CONTROL DISPLAY TROUBLESHOOTING
CONTROL DISPLAY STATUS
6.
“P-SW”, “OPEN”, and “CLEAN SCREEN” Flashing
SOLUTION
PROBLEM
The air pressure switch contacts
remain open longer than 11
seconds after the combustion fan
is energized.
1. Clean the screen on the combustion air
intake chamber. Turn the power “OFF” for
10 to 20 seconds then “ON” again to clear
the error code. If the problem persists:
2. Ensure the pressure switch sensing tube
is in good condition and securely
connected at both ends.
3. Ensure the inner door to the combustion
chamber is secure and the gasket is
properly sealing.
4. Check operation of the air intake chamber
fan and pressure switch.
A. Turn off power to the water heater.
B. Remove the tubing from the pressure
switch and the wires from both
terminals of the pressure switch.
C. Connect a digital manometer to the
open end of the tubing from the air
intake chamber. Turn on the power to
the water heater and when the fan turns
on, measure the pressure reading in the
tubing. If the pressure reading reaches
the .22” WC make point of the pressure
switch, turn off power to the water
heater and reconnect tubing to the
pressure switch. If pressure reading does
not reach the .22” WC make point, check
the system and tubing for restrictions
and cleanliness.
D. Attach leads of ohmmeter or continuity
tester to the terminals of the pressure
switch. Turn on power to the water
heater and when the air intake fan
comes on, check for continuity across
the pressure switch contacts. If switch
contacts remain open (no continuity)
while the fan is in operation - replace
the pressure switch.
1. Turn off power to the water heater.
7.
“P-SW” and “SHORT” Flashing
The air pressure switch contacts
remain closed for more than 5
seconds when they should be
open.
2. Locate the pressure switch wiring –
ensure pressure switch wiring is correct
and not jumped.
3. Remove wires to both terminals on
pressure switch.
4. Check pressure switch contacts with an
ohmmeter for continuity.
A.
B.
If pressure switch contacts show
continuity (closed circuit) replace
the pressure switch.
If pressure switch contacts show
open circuit and all wiring is correct
– replace the lower control.
1. Check all wiring to the hot surface ignitor.
8.
“IGN” Flashing
Open ignitor circuit
2. Check the 3 pin Molex ignitor assembly
plug and receptacle on the lower control
for a good connection. Repair or replace
parts if necessary.
3. Check resistance of the ignitor with an
ohmmeter on the ignitor assembly plug.
Replace ignitor if resistance is not within
1.72 and 2.40 ohms.
4. If above checks are good – turn off
power for 10 seconds and then back on.
If this error code will not clear and the
ignitor resistance is within specifications
– replace the lower control.
9.
“FV-SENSE” Flashing
Flammable Vapor Sensor has
detected the presence of
flammable vapors and is in lockout
1. Do not touch any electrical switch, do not use
any phone in the building and do not try to
light any appliance.
2. Smell around the water heater to ensure there
are no gas leaks at the gas control valve or in
the supply gas line or for any other type of
flammable vapors in the area.
3. Carefully inspect the area surrounding the
water heater for any substances such as gasoline, paint, paint thinners, varnish, or cleaners
that could emit flammable vapors. Remove
anything that can potentially emit flammable
vapors from the area and store it properly in a
different location.
~ continued next page ~
21
CONTROL DISPLAY TROUBLESHOOTING
CONTROL DISPLAY STATUS
9.
10.
11.
PROBLEM
“FV-SENSE” Flashing
(Continued from previous page)
“LDO-SW”, “OPEN”, and “CLEAN SCREEN”
Flashing
“FV-SENSE” and “OPEN” Flashing
SOLUTION
4. System must be manually reset by entering a
special FVS reset sequence into the Electronic
Control Display. See Electronic Control
Display - FV - Sense Reset Sequence for
instructions. It is also recommended that the
FV Sensor be replaced.
The air pressure switch contacts
remain open longer than 5
seconds after the combustion fan
is energized.
Flammable Vapor Sensor is open
1. Clean the screen on the combustion air
intake chamber, retest.
2. If the problem persists: Cycle power to the
water heater “OFF” and “ON” to reset.
1. Check all wiring to the flammable vapor
sensor.
2. Remove the connectors from the
flammable vapor sensor and measure
the resistance of the sensor with an
ohmmeter.
A. If the reading taken is more than
1.7 million ohms, replace the
flammable vapor sensor.
B. If the reading taken is less than 1.7
million ohms, and the wiring from
the control to the sensor is good,
replace the lower control.
12.
“FV-SENSE” and “SHORT” Flashing
Flammable Vapor Sensor is
shorted
1. Check all wiring to the flammable vapor
sensor.
2. Remove the connectors from the
flammable vapor sensor and measure
the resistance of the sensor with an
ohmmeter.
A. If the reading taken is less than
2000 ohms, replace the flammable
vapor sensor.
B. If the reading taken is more than
2000 ohms, and the wiring from the
control to the sensor is good,
replace the lower control.
13.
14.
“THMSTR” and “OPEN” Flashing
“THMSTR” and “SHORT” Flashing
The self-diagnostic test has
detected the temperature sensor
(thermistor) inside the immersion
probe is open.
The self-diagnostic test has
detected the temperature sensor
(thermistor) inside the immersion
probe is shorted.
15.
All Segments Flashing
The self-diagnostic check has
detected one or both of the
temperature adjustment buttons
are stuck.
16.
“P-ANODE” and “OPEN” Flashing
No current to Power Anode.
17.
“P-ANODE” Flashing
Power Anode circuit failure.
1. Turn power off for 10 to 20 seconds then
on again to clear this error code.
2. This part of the control cannot be
replaced or serviced. If the error code
cannot be cleared, the lower control must
be replaced.
1. Turn power off for 10 to 20 seconds then
on again to clear this error code.
2. This part of the control cannot be
replaced or serviced. If the error code
cannot be cleared, the lower control must
be replaced.
1. Press and release each of the
temperature adjustment buttons. If the
above action does not clear the error, the
control will continue to regulate the water
temperature at the last setting. However,
settings will no longer be adjustable – the
upper control should be replaced.
1. Check the wire that runs from the power
anode to the upper control. Check the
wire for damage, and to ensure that the
connectors are fully seated into the
mating connectors on both ends.
2. Check that the tank is full of water. Never
use this water heater unless it is
completely full of water. To prevent
damage to the tank, the tank must be
filled with water. Water must flow from
the hot water faucet before turning “ON”
gas to the water heater.
3. Cycle power to the water heater “OFF” and
“ON” to reset.
1. Turn the power off for 10 to 20 seconds
then on again to clear the error code.
2. If the error code persists or cannot be
cleared, replace the upper control.
22
TROUBLESHOOTING FLOWCHART
APPLY POWER TO
APPLIANCE
REQUEST
FOR HEAT
PRESENT?
NO
3 MINUTE
AUTOMATIC RESET
TIME DELAY
YES
IS
PRESSURE SWITCH
PROVEN OPEN WITHIN
NO
5 SECONDS?
WAIT FOR PRESSURE
SWITCH TO OPEN
DISPLAY ERROR
NUMBER
7
YES
COMBUSTION
FAN ON
IS
PRESSURE SWITCH
PROVEN OPEN WITHIN
NO
WAIT FOR PRESSURE
SWITCH TO OPEN
DISPLAY ERROR
5 SECONDS?
IS
PRESSURE SWITCH
PROVEN CLOSED
NO
WITHIN 11
SECONDS?
7
YES
WAIT FOR PRESSURE
SWITCH TO CLOSE
DISPLAY ERROR
NUMBER
NUMBER
6
ONE HOUR
AUTOMATIC RESTART
TIME DELAY
YES
PREPURGE
COMBUSTION FAN
OFF
IS
IGNITOR
OKAY?
NO
TURN OFF
COMBUSTION FAN,
DISPLAY ERROR CODE
NUMBER
8
YES
IGNITOR ON FOR
WARM-UP TIME
COMBUSTION
FAN OFF
GAS VALVE OPENS
DISPLAY ERROR
YES
WAIT FOR PRESSURE
SWITCH TO CLOSE
DISPLAY ERROR
COMBUSTION FAN
ON
NUMBER
MAIN
BURNER LIGHTS
AND IS SENSED
DURING TRIAL
FOR
IGNITION
TURN OFF
COMBUSTION FAN
AFTER POST-PURGE
NO
IS
PRESSURE SWITCH
PROVEN CLOSED
6
WITHIN 5
SECONDS?
YES
LESS
GAS VALVE CLOSES
NO
THAN 3 TRIES
FOR IGNITION?
INTERPURGE
NO
YES
IGNITOR TURNS OFF
IS
FLAME SENSE
LOST?
YES
NO
IS
PRESSURE SWITCH
PROVEN CLOSED
YES
LOST
GAS VALVE CLOSES
LESS THAN
TIMES?
4
NO
NO
WITHIN 5
SECONDS?
WAIT FOR PRESSURE
SWITCH TO CLOSE
DISPLAY ERROR
NUMBER
6
Please Note:
YES
NO
IS
REQUEST FOR HEAT
SATISFIED?
YES
GAS VALVE OFF
COMBUSTION FAN
OFF AFTER POSTPURGE DELAY
23
The control continually monitors
internal circuits and extern al sensors.
Error codes noted above, and those for
self-diagnostic faults can be found on
pages 20 through 22.
3
EXTERNAL INSPECTION AND CLEANING
Cleaning the Air Intake Chamber Screen:
Figure 24.
• At least twice annually the air intake chamber
screen should be inspected for any dust or
debris that may have accumulated on the
louvers.
NOTE: If the water heater is located in an area
that is subjected to lint, pet hair or dirt, it may be
necessary to check the air intake chamber screen
more frequently.
• Use a vacuum cleaner with a hose attachment
to remove any dust or debris that may have
accumulated on the screen.
Air Intake Chamber
Screen
Cleaning the Combustion Chamber and Air
Diverter Assembly:
Figure 25.
• Follow procedure outlined in “Removing Inner
Door/Manifold/Burner Assembly”, page 41.
• Use a vacuum cleaner/shop vac to remove
all loose debris in the combustion chamber.
Use compressed air to clear any dust or
debris that may have accumulated on the air
diverter assembly.
• Reassemble following the procedure under
“Installing Inner Door/Manifold/Burner
Assembly”, page 42.
INNER DOOR/
MANIFOLD/BURNER
ASSEMBLY
AIR DIVERTER
ASSEMBLY
L
L
TA
INS
VE
MO
RE
24
COMBUSTION
CHAMBER
ELECTRONIC CONTROL DISPLAY REMOVAL / REPLACEMENT
g
Important: Use only factory authorized replacement
parts. If you lack the necessary skills to properly
perform the installation, you should not proceed, but
get help from a qualified service technician.
Figure 26.
Removing the Electronic Control Display:
1. Set the gas control valve/thermostat to its lowest
setting by pressing the “COOLER” and “HOTTER”
buttons together at the same time holding for 1
second. Then press the “COOLER” button to the
lowest setting (Figure 26).
2. Turn gas control switch to the “OFF” position
(located right side of the gas control valve/
thermostat) and turn off the gas supply to the unit
(Figure 27).
3. Disconnect the electric connection by unplugging
the transformer from the wall outlet (Figure 27).
4. Remove the electronic control display by
squeezing in both sides of the display and
removing from the slots in the water heater’s front
(Figure 28).
5. Unplug the electronic control display electrical
connector from the back of the electronic control
display by depressing the locking snap and pulling
out of the electronic control display electrical
connection, also remove the power anode wire
connector by pulling it off of the power anode
control display terminal (Figure 29).
Installing the Electronic Control Display:
6. Plug the power anode electrical wire terminal onto
the power anode connector terminal (Figure 29).
7. Insert the electronic control display electrical
connector into the electronic control display
electrical connection by aligning the connector
pins (note orientation of the connector pins) and
pressing down ensuring the electrical connector
snap is locked into place (Figure 29).
8. Install the electronic control display onto the front
of the water heater by squeezing both sides of
the electronic control display inserting the prongs
into the water heater’s slots (please note the
orientation of the electronic control display and
the routing the wiring inside so as not be pinched
between the display and the water heater’s front)
(Figure 28).
9. Turn on the electrical and the gas supplies to the
water heater. Plug in the electric connection from
the transformer to the electric outlet (Figure 27).
10. Restart the water heater by following the directions
on the “Lighting and Operating Instructions” label
located on the front of the water heater.
COOLER
HOTTER
Electronic Control Display
Figure 27.
ON
OFF
ON/OFF
SWITCH
UNPLUGGED
Figure 28.
ELECTRONIC CONTROL DISPLAY
TO REMOVE OR TO INSTALL,
SQUEEZE BOTH SIDES OF THE
CONTROL DISPLAY.
Figure 29.
SLOT
SLOT
ELECTRONIC CONTROL
DISPLAY ELECTRICAL
CONNECTION
PRONG
POWER ANODE
CONTROL DISPLAY
TERMINAL
25
POWERED ANODE ROD REMOVAL / REPLACEMENT
g
Important: Use only factory authorized replacement
parts. If you lack the necessary skills to properly
perform the installation, you should not proceed, but
get help from a qualified service technician.
Tools required: Ratchet with 1-1/16” Socket, Pliers,
and Teflon® Tape or an approved pipe sealant.
Figure 30.
Removing the Powered Anode Rod:
1. Set the gas control valve/thermostat to its lowest
setting by pressing the “COOLER” and “HOTTER”
buttons together at the same time holding for 1
second. Then press the “COOLER” button to the
lowest setting (Figure 30).
2. Turn gas control switch to the “OFF” position
(located right side of the gas control valve/
thermostat) and turn off the gas supply to the unit
(Figure 31).
3. Disconnect the electric connection by unplugging
the transformer from the wall outlet (Figure 31).
4. Shut off the incoming water supply to the water
heater and open a nearby hot water faucet to
depressurize the water tank.
5. Remove the manifold cover outer door and
connect a hose to the drain valve and terminate it
to adequate drain or to the exterior of the building.
Open the drain valve and allow at least 5 gallons
of water from the tank to drain. Close drain and
remove hose.
6. Unplug the electrical connection on top of the
powered anode by pulling the wire connector
up and off of the powered anode rod electrical
connector (Figure 32).
7. Remove the powered anode rod by using a ratchet
and a 1-1/16” socket turning counterclockwise
(Figure 33). Note: Figure 33 is shown exploded,
if the socket used is short well you may have
to remove the top male connector first before
removing the powered anode rod.
COOLER
HOTTER
Electronic Control Display
Figure 31.
ON
OFF
ON/OFF
SWITCH
UNPLUGGED
Figure 32.
Powered
Anode
Rod
Figure 33.
Powered
Anode
Rod
26
Installing the Powered Anode Rod:
8. Use Teflon® tape or an approved pipe sealant on
threads of the new powered anode rod.
9. Prior to installing, it will be necessary to use pliers
to bend up approximately 90° the electrical male
connector on the top of the powered anode rod.
The electrical connector should be bent upward
in order to allow the 1-1/16” deep well socket to
pass over the connector. Note: if using a short well
socket the male connector must first be removed
(Figure 34 is shown exploded for clarity).
10. Place the powered anode rod in the spud (top
of the tank) and turn clockwise until the threads
are hand tight. Using a ratchet and 1-1/16” socket
tighten down water tight (Torque should be
between 65 to 120 foot pounds).
11. Open a nearby hot water faucet to purge air from
the water line. Fill water heater tank completely
(Note: to assure the water heater tank is full, keep
the hot water faucet open for 3 minutes after a
constant flow of water is obtained).
12. After turning off the hot water faucet, check for
water leaks around powered anode rod and
immediately correct any if found.
13. Upon determining there’s no water leak at the
newly installed powered anode rod, reconnect the
electrical plug connector to the top of the anode
male terminal.
14. Plug the electric transformer in the wall outlet and
turn the gas supply back on to the gas control
valve/thermostat.
15. Turn the gas control switch to the “ON” position
(located on the side of the gas control valve/
thermostat see Figure 35).
16. To restart the water heater, follow the directions
on the “Lighting and Operating Instructions” label
located on the front of the water heater near the
gas control valve/thermostat.
17. Upon verifying proper operation of the water
heater, replace the manifold cover outer door.
Figure 34.
Powered
Anode
Rod
Figure 35.
ON
OFF
ON/OFF
SWITCH
Teflon ® is a registered trademark of E.I. Du Pont De Numours and Company.
27
PRESSURE SWITCH REMOVAL / REPLACEMENT
g
Important: Use only factory authorized replacement
parts. If you lack the necessary skills to properly
perform the installation, you should not proceed, but
get help from a qualified service technician.
Tools required: Phillips Head Screwdriver.
Figure 36.
Removing the Pressure Switch:
1. Set the gas control valve/thermostat to its lowest
setting by pressing the “COOLER” and “HOTTER”
buttons together at the same time holding for 1
second. Then press the “COOLER” button to the
lowest setting (Figure 36).
2. Turn gas control switch to the “OFF” position
(located right side of the gas control valve/
thermostat) and turn off the gas supply to the unit
(Figure 37).
3. Disconnect the electric connection by unplugging
the transformer from the wall outlet (Figure 37).
4. Remove the manifold cover/ outer door from the
unit by depressing on the lower portion and pulling
outward.
5. Remove the air pressure tubing from the air
pressure switch by pulling downward on the
tubing at the connection to the air pressure switch
(Figure 38).
6. Remove the two (2) electrical flag terminals from
the switch by pulling outward and off of the switch
(Figure 39).
7. Using a phillips head screwdriver, remove the 2
screws securing the pressure switch to the water
heater’s side (keep these screws in a safe place
for reinstallation later) (Figure 39).
COOLER
HOTTER
Electronic Control Display
Figure 37.
ON
OFF
ON/OFF
SWITCH
UNPLUGGED
Figure 38.
PRESSURE SWITCH
TUBING CONNECTION
Installing the Pressure Switch:
8. Secure the new pressure switch to the water
heater’s side by reusing the 2 screws removed in
step 7 (Figure 39).
9. Reattach the two (2) electrical flag terminals
by pushing the flag terminals onto the switch
(Figure 39).
10. Reattach the air pressure tubing to the air
pressure switch by pushing the tubing onto the
connector until the end of the tubing pushes to the
shoulder of the connector (Figure 38).
11. Turn on the electrical and the gas supplies to the
water heater. Plug in the electric connection from
the transformer to the electric outlet (Figure 37).
12. Restart the water heater by following the
directions on the “Lighting and Operating
Instructions” label located on the front of the water
heater.
13. Upon verifying proper operation of the water
heater, replace the manifold cover/outer door.
Figure 39.
SCREW
PRESSURE
SWITCH
FLAG
TERMINALS
AIR PRESSURE
TUBING
28
TRANSFORMER REMOVAL / REPLACEMENT
g
Important: Use only factory authorized replacement parts.
If you lack the necessary skills to properly perform the
installation, you should not proceed, but get help from a
qualified service technician.
Tools required: Ratchet with 5/16” Socket or 5/16” Nut
Driver, Phillips Head Screwdriver.
Figure 40.
Removing the Transformer:
1. Set the gas control valve/thermostat to its lowest
setting by pressing the “COOLER” and “HOTTER”
buttons together at the same time holding for 1
second. Then press the “COOLER” button to the
lowest setting (Figure 40).
2. Turn gas control switch to the “OFF” position
(located right side of the gas control valve/
thermostat) and turn off the gas supply to the unit
(Figure 41).
3. Disconnect the electric connection by unplugging
the transformer from the wall outlet (Figure 41).
4. Remove the manifold cover outer door from the
heater by depressing on the lower portion and
pulling outward.
5. Unplug the power supply transformer connector
from the bottom of the gas control valve by
pressing the snap connector and pulling
downward (Figure 42). (NOTE: The transformer is
located inside the transformer box adjacent to the
gas control/thermostat valve).
6. Using a phillips head screwdriver, remove the
transformer box from the side of the water heater
by removing the single screw securing it to the
water heater’s side (Note: keep screw in a safe
place for reinstalling later).
7. Using a phillips head screwdriver remove the
ground screw from the inside of the transformer
box (Note: save the screw for reinstallation later)
(see Figure 43).
8. Take note of the position of the transformer, use
a 5/16” nut driver or a ratchet with a 5/16” socket
to remove the 2 hex head screws on the front of
the transformer box (Note: save the screws for
reinstallation later) (see Figure 43).
9. Unplug the two flag terminal electrical connections
on the transformer and pull the wiring and
connector through the wire protector (Figure 43).
COOLER
HOTTER
Electronic Control Display
Figure 41.
ON
OFF
ON/OFF
SWITCH
UNPLUGGED
Figure 43.
ELECTRICAL
FLAG TERMINALS
GROUND
SCREW
TRANSFORMER
BOX
TRANSFORMER
HEX HEAD
SCREWS
WIRE
PROTECTOR
POWER SUPPLY
TRANSFORMER
CONNECTOR
Figure 42.
GAS CONTROL
Gas Control
Valve/Thermostat
VALVE/THERMOSTAT
POWER SUPPLY
TRANSFORMER
CONNECTOR
GROUND
SCREW
GasSUPPLY
Valve
POWER
Wire Connector
TRANSFORMER
CONNECTOR
WIRE
PROTECTOR
29
ELECTRICAL
FLAG
TERMINALS
TRANSFORMER
Installing the New Transformer:
10. Insert the wiring connector that goes to the gas
control valve/thermostat through the wire protector
on the side of the transformer box (Figure 44).
11. Attach the two (2) flag terminal connectors to
the transformer by aligning and pressing down
(Figure 44).
12. Position the new transformer inside the
transformer box where the wiring connections are
nearest their exit points (Figure 44).
13. Align the holes of the transformer mounting
bracket to the hole of the transformer box and
attach using the 2 hex head screws (Note:
take care not to pinch any wiring between the
transformer and the transformer box) (see
Figure 44).
14. Insert the ground wire connector through the
ground screw and tighten in place with a phillips
head screwdriver (Figure 44).
15. Using the screw removed in step 6, reattach the
transformer box to the water heater’s side.
16. Reattach the power supply transformer connector
to the bottom of the gas control valve/thermostat
by aligning and pushing upward (Figure 42).
17. Plug the electric transformer in the wall outlet and
turn the gas supply back on to the gas control
valve/thermostat (Figure 41).
18. Turn the gas control switch to the “ON” position
(Figure 41).
19. To restart the water heater, follow the directions
on the “Lighting and Operating Instructions” label
located on the front of the water heater near the
gas control valve/thermostat.
20. Upon verifying proper operation of the water
heater, replace the manifold cover outer door.
Figure 44.
ELECTRICAL
FLAG TERMINALS
GROUND
SCREW
TRANSFORMER
BOX
TRANSFORMER
HEX HEAD
SCREWS
POWER SUPPLY
TRANSFORMER
CONNECTOR
GROUND
SCREW
WIRE
PROTECTOR
30
WIRE
PROTECTOR
POWER SUPPLY
TRANSFORMER
CONNECTOR
ELECTRICAL
FLAG
TERMINALS
TRANSFORMER
AIR INTAKE CHAMBER BOX REMOVAL / REPLACEMENT
g
Important: Use only factory authorized replacement
parts. If you lack the necessary skills to properly
perform the installation, you should not proceed, but
get help from a qualified service technician.
Tools required: Phillips Head Screwdriver.
Figure 45.
Removing the Air Intake Chamber Box:
1. Set the gas control valve/thermostat to its lowest
setting by pressing the “COOLER” and “HOTTER”
buttons together at the same time holding for 1
second. Then press the “COOLER” button to the
lowest setting (Figure 45).
2. Turn gas control switch to the “OFF” position
(located right side of the gas control valve/
thermostat) and turn off the gas supply to the unit
(Figure 46).
3. Disconnect the electric connection by unplugging
the transformer from the wall outlet (Figure 46).
4. Remove the manifold cover/ outer door from the
unit by depressing on the lower portion and pulling
outward.
5. Unplug the 3-wire pressure switch/fan/sensor
electrical connection of the wiring harness from
the gas control valve/thermostat by depressing the
lower portion of the snap clip to open and pulling
down the connector (Figure 47).
6. Using a phillips head screwdriver remove the 2
screws of the air intake chamber screen (Note:
save screws for reinstallation later) (Figure 48).
7. Remove the air intake chamber screen by lifting
upward and outward (Figure 48).
8. Please take note of the wire position routing
around the fan inside the air intake chamber as
this wire positioning will need to be duplicated
upon installation of the fan in the new intake
chamber box.
9. Remove the 2 screws securing the fan inside
the chamber (Note: save these screws for
reinstallation later) (Figure 48).
10. Lift the fan up and outward to remove from the air
intake chamber (Figure 48).
11. Locate the male to female electrical connection
with close pin lock on wiring harness (the
white connection approximately 12” from fan)
(Figure 48).
12. To separate the electrical connection of the fan
and wiring harness: press down on the back
portion of the close pin lock of the electrical
connection while pulling the connection in the
opposite directions.
13. Using a phillips head screwdriver, remove the 4
screws securing the air intake chamber box to the
water heater’s side (also keeping these screws in
a safe place for reinstallation later) (Figure 48).
COOLER
HOTTER
Electronic Control Display
Figure 46.
ON
OFF
ON/OFF
SWITCH
UNPLUGGED
Figure 47.
GAS CONTROL
VALVE/THERMOSTAT
PRESSURE
SWITCH/FAN,
FV SENSOR
CONNECTOR
Figure 48.
RUBBER WIRE
PROTECTOR
FAN
AIR INTAKE
CHAMBER BOX
31
SCREEN
14. Rotate the top of the air intake chamber box from
left to right (only a few inches in both directions)
while pulling outward at the bottom removing
the air intake chamber box from the combustion
chamber pipe saving the air intake chamber
gasket for reinstallation (Figure 49).
15. Unplug the air pressure tubing from the back of
the old air intake chamber box (Figure 50).
16. The wire harness goes through the rubber wire
protector in the back of the air intake chamber box
(Figure 50).
17. Reach inside the air intake chamber box and push
on the center of the rubber wire protector pushing
it and the wiring harness wires to the outside of
the air intake chamber box.
18. Remove the wiring harness from the wire
channeling in the back center of the air intake
chamber box. The old air intake chamber box is
now separated and can be discarded (Figure 50).
Figure 49.
AIR INTAKE
CHAMBER BOX
REMOVAL
ROTATE FROM
LEFT TO RIGHT
AND
PULL OUTWARD
CHAMBER GASKET
Figure 50.
RUBBER WIRE
PROTECTOR
WIRE HARNESS INSIDE
WIRE CHANNELING
Installing the Air Intake Chamber Box:
19. Insert the fan wiring harness wire through the
back and into the fan box compartment by
threading the connector through the opening and
insert in approximately 6 inches of wiring (up to
the rubber wire protector) (Figure 50).
20. Push the rubber wire protector into place in the
back of the air intake chamber box (Note: the
rubber wire protector must be positioned properly
and locked into place around both sides of the air
intake chamber box) (Figure 50).
21. Position the wiring harness wire in the wiring
channeling molded down the back center of the air
intake chamber box (Figure 50).
22. Connect the air pressure tubing to the fitting
on the air intake chamber box and route tubing
in molded inlaid of the air intake chamber box
(Figure 50).
23. Reinstall the air intake chamber gasket (removed
in step 14) on the back lower portion of the new air
intake chamber box (Figure 51).
24. Install the new air intake chamber box to the
combustion chamber pipe. Using a small amount
of soapy water will help. Do not get any water
or soapy water on any electrical connections or
gas control components (see Figure 52). (NOTE:
UNDUE PRESSURE OR SUDDEN FORCE
SUCH AS HAMMERING OR BEATING ON
THE AIR CHAMBER BOX WITH ANY OBJECT
INCLUDING YOUR HANDS WILL DAMAGE THE
AIR INTAKE CHAMBER BOX AND RESULT IN
FAILURE TO THE HEATER’S OPERATION.
REAR SIDE OF
THE AIR INTAKE
CHAMBER BOX
AIR PRESSURE TUBING
CONNECTION
Figure 51.
REINSTALL
CHAMBER GASKET
NEW AIR INTAKE
CHAMBER BOX
Figure 52.
AIR INTAKE
CHAMBER BOX
INSTALLATION
ROTATE FROM
LEFT TO RIGHT
AND
PUSH INWARD
32
25. Install the air intake chamber box by rotating
the top of the air intake chamber box from left to
right (only a few inches in both directions) while
pressing on the bottom portion of the air intake
chamber box. When properly installed the air
intake chamber box will be in place against the
water heater’s side aligning with the screw holes.
26. Secure the air intake chamber box to the water
heater’s side by reusing the 4 screws removed in
step 13 (Figure 53).
Figure 53.
SECURE WITH
SCREWS REMOVED
EARLIER
Figure 54.
Installing the Fan in the Air Intake Chamber Box:
27. Plug the electrical connections of the fan into the
wiring harness: Align the electrical connections in
such a position as to ensure the locking portions
of the connections are on the same side. Gently
push the electrical connectors together until the
snap lock on the wiring harness engages the
angular lock on the fan connector. Do Not use
undue force in pushing these connectors together
(Figure 54). (Note: Connectors are designed in
such a manner if the connection is not properly
aligned they will not lock together).
28. Replace the fan inside the air intake chamber
box. It is imperative that the square portion of the
fan air outlet be placed inside the raised square
portion of the air intake chamber fan compartment
(Figure 55).
29. Ensuring the fan is properly aligned in the air
intake chamber, secure the fan in place using the
2 screws removed in step 9 (Figure 55).
30. Route the wiring inside the fan box to the outer
edge of the fan in such a manner to ensure it will
not be pinched or damaged upon installation of
the air intake screen (Figure 55).
31. Install the air intake chamber screen, ensuring that
the prongs of the lower portion of the air intake
chamber screen are in place in the holding slots.
Using the 2 screws removed in step 6, secure the
air intake chamber screen (Figure 56).
32. Reattach the 3-wire wiring harness connector to
the gas control valve (Figure 47).
33. Check the air hose tubing connection to the
pressure switch to ensure the tubing has not
loosen up or pulled off.
34. Turn on the electrical and the gas supplies to the
water heater. Plug in the electric connection from
the transformer to the electric outlet (Figure 46).
35. Restart the water heater by following the
directions on the “Lighting and Operating
Instructions” label located on the front of the water
heater.
36. Upon verifying proper operation of the water
heater, replace the manifold cover/outer door.
FAN
GENTLY PUSH THE ELECTRICAL
CONNECTORS TOGETHER UNTIL
IT IS SNAP LOCKED.
Figure 55.
INSTALL THE FAN USING THE
TWO SCREWS REMOVED
EARLIER.
FAN
Figure 56.
INSTALL THE AIR INTAKE
CHAMBER SCREEN.
33
WIRING HARNESS REMOVAL / REPLACEMENT
g
Important: Use only factory authorized replacement
parts. If you lack the necessary skills to properly
perform the installation, you should not proceed, but
get help from a qualified service technician.
Figure 57.
Tools required: Phillips Head Screwdriver.
Removing the Air Intake Chamber Box:
1. Set the gas control valve/thermostat to its lowest
setting by pressing the “COOLER” and “HOTTER”
buttons together at the same time holding for 1
second. Then press the “COOLER” button to the
lowest setting (Figure 57).
2. Turn gas control switch to the “OFF” position
(located right side of the gas control valve/
thermostat) and turn off the gas supply to the unit
(Figure 58).
3. Disconnect the electric connection by unplugging
the transformer from the wall outlet (Figure 58).
4. Remove the manifold cover/ outer door from the
unit by depressing on the lower portion and pulling
outward.
5. Unplug the 3-wire pressure switch/fan/sensor
electrical connection of the wiring harness from
the gas control valve/thermostat by depressing the
lower portion of the snap clip to open and pulling
down the connector (Figure 59).
6. Unplug the electric flag terminals and air pressure
tubing from the pressure switch (Figure 60).
7. Remove the FV sensor by depressing the snap
lock to open the FV sensor cover, slide the FV
sensor out of the cover and unplug the electrical
flag terminals connections (Note: place the FV
sensor in a safe place as it will be reinstalled later)
(Figure 60).
8. Using a phillips head screwdriver remove the 2
screws of the air intake chamber screen (Note:
save screws for reinstallation later) (Figure 62).
9. Remove the air intake chamber screen by lifting
upward and outward (Figure 62).
10. Please take note of the wire position routing
around the fan inside the air intake chamber as
this wire positioning will need to be duplicated
upon installation of the new wiring harness
(Figure 62).
11. Using a phillips head screwdriver, remove the 4
screws securing the air intake chamber box to the
water heater’s side (also keeping these screws in
a safe place for reinstallation later) (Figure 61).
12. Rotate the top of the air intake chamber box from
left to right (only a few inches in both directions)
while pulling outward at the bottom removing
the air intake chamber box from the combustion
chamber pipe saving the air intake chamber
gasket for reinstallation (Figure 61).
COOLER
HOTTER
Electronic Control Display
Figure 58.
ON
OFF
ON/OFF
SWITCH
UNPLUGGED
Figure 59.
GAS CONTROL
VALVE/THERMOSTAT
PRESSURE
SWITCH/FAN,
FV SENSOR
CONNECTOR
Figure 60.
PRESSURE
SWITCH
PRESSURE TUBING & WIRING
HARNESS FLAG TERMINALS
FV SENSOR
34
Replacing the Wiring Harness:
13. Locate the male to female electrical connection
with close pin lock on wiring harness (located on
the right side of fan) (Figure 62).
14. To separate the electrical connection of the fan
and wiring harness: press down on the back
portion of the close pin lock of the electrical
connection while pulling the connection in the
opposite directions.
15. The wire harness goes through the rubber wire
protector in the back of the air intake chamber box
(Figure 62).
16. Reach inside the air intake chamber box and push
on the center of the rubber wire protector pushing
it and the wiring harness wires to the outside of
the air intake chamber box (Figure 62).
17. Remove the wiring harness from the wire
channeling in the back center of the air intake
chamber box (Figure 63).
18. The old wiring harness can now be discarded.
Installing the New Wiring Harness:
19. Route the multi-lead portion of the new wiring
harness through the opening at the bottom of the
water heater’s jacket (Figure 64).
20. Insert the fan wiring harness wire through the
back and into the fan box compartment by
threading the connector through the opening and
insert in approximately 6 inches of wiring (up to
the rubber wire protector) (Figure 62).
21. Push the rubber wire protector into place in the
back of the air intake chamber box (Note: The
rubber wire protector must be positioned properly
and locked into place around both sides of the air
intake chamber box) (Figure 63).
22. Position the wiring harness wire in the wiring
channeling molded down the back center of the air
intake chamber box (Figure 63).
23. Plug the electrical connections of the fan into the
wiring harness: Align the electrical connections in
such a position as to ensure the locking portions
of the connections are on the same side. Gently
push the electrical connectors together until the
snap lock on the wiring harness engages the
angular lock on the fan connector. Do Not use
undue force in pushing these connectors together
(Figure 62). (Note: Connectors are designed in
such a manner if the connection is not properly
aligned they will not lock together).
24. Route the wiring inside the fan box to the outer
edge of the fan in such a manner to ensure it will
not be pinched or damaged upon installation of
the air intake screen (Figure 62).
Figure 61.
AIR INTAKE
CHAMBER BOX
REMOVAL
REMOVE SCREWS
ROTATE FROM
LEFT TO RIGHT
AND
PULL OUTWARD
CHAMBER GASKET
Figure 62.
RUBBER WIRE
PROTECTOR
ELECTRICAL
CONNECTION
Figure 63.
AIR INTAKE
CHAMBER SCREEN.
RUBBER WIRE
PROTECTOR
WIRE HARNESS INSIDE
WIRE CHANNELING
REAR SIDE OF
THE AIR INTAKE
CHAMBER BOX
AIR PRESSURE TUBING
CONNECTION
Figure 64.
35
ROUTE WIRING HARNESS
THROUGH OPENING AT
BOTTOM OF JACKET.
25. Install the air intake chamber screen, ensuring that
the prongs of the lower portion of the air intake
chamber screen are in place in the holding slots.
Using the 2 screws removed in step 8, secure the
air intake chamber screen (Figure 65).
26. Check the air pressure tubing to the fitting on the
of the air intake chamber box and route tubing
in molded inlaid of the air intake chamber box
(Figure 63).
27. Reinstall the air intake chamber gasket (removed
in step 12) on the back lower portion of the new air
intake chamber box (Figure 66).
28. Install the new air intake chamber box to the
combustion chamber pipe. Using a small amount
of soapy water will help. Do not get any water
or soapy water on any electrical connections
or gas control components (Figure 67). NOTE:
UNDUE PRESSURE OR SUDDEN FORCE
SUCH AS HAMMERING OR BEATING ON
THE AIR CHAMBER BOX WITH ANY OBJECT
INCLUDING YOUR HANDS WILL DAMAGE THE
AIR INTAKE CHAMBER BOX AND RESULT IN
FAILURE TO THE HEATER’S OPERATION.
29. Install the air intake chamber box by rotating
the top of the air intake chamber box from left to
right (only a few inches in both directions) while
pressing on the bottom portion of the air intake
chamber box. When properly installed the air
intake chamber box will be in place against the
water heater’s side aligning with the screw holes
(Figure 67).
30. Secure the air intake chamber box to the water
heater’s side by reusing the 4 screws removed in
step 11 (Figure 67).
31. Plug in the electrical flag terminals into the air
pressure switch (Figure 60).
32. Reinstall the FV sensor removed in step 7, by
depressing the snap lock to open the FV sensor
cover, route wiring through sensor cover, plug the
electrical flag terminals connections to the FV
sensor and slide the FV sensor back inside and
close the cover (Figure 60).
33. Connect the air pressure tubing to the pressure
switch (Figure 60).
34. Attach the 3-wire wiring harness connector to the
gas control valve (Figure 59).
35. Check the air hose tubing connection to the
pressure switch to ensure the tubing has not
loosened up or pulled off (Figure 60).
36. Turn on the electrical and the gas supplies to the
water heater. Plug in the electric connection from
the transformer to the electric outlet (Figure 58).
37. Restart the water heater by following the
directions on the “Lighting and Operating
Instructions” label located on the front of the water
heater.
38. Upon verifying proper operation of the water
heater, replace the manifold cover/outer door.
Figure 65.
INSTALL THE AIR INTAKE
CHAMBER SCREEN.
Figure 66.
REINSTALL
CHAMBER GASKET
AIR INTAKE
CHAMBER BOX
Figure 67.
INSTALL SCREWS
ROTATE FROM
LEFT TO RIGHT
AND
PUSH INWARD
36
AIR INTAKE CHAMBER FAN REMOVAL / REPLACEMENT
g
Important: Use only factory authorized replacement
parts. If you lack the necessary skills to properly
perform the installation, you should not proceed, but
get help from a qualified service technician.
Tools required: Phillips Head Screwdriver.
Figure 68.
COOLER
HOTTER
Electronic Control Display
Removing the Fan from the Air Intake Chamber:
1. Set the gas control valve/thermostat to its lowest
setting by pressing the “COOLER” and “HOTTER”
buttons together at the same time holding for 1
second. Then press the “COOLER” button to the
lowest setting (Figure 68).
2. Turn gas control switch to the “OFF” position
(located right side of the gas control valve/
thermostat) and turn off the gas supply to the unit
(Figure 69).
3. Disconnect the electric connection by unplugging
the transformer from the wall outlet (Figure 69).
4. Using a phillips head screwdriver, remove the two
(2) screws at the air intake chamber screen (Note:
save screws for reinstallation later) (Figure 70).
5. Remove the air intake chamber screen by lifting
upward (Figure 70).
6. Take note of the wire position routing around
the fan inside of the air intake chamber as this
wire positioning will need to be duplicated upon
installation of the new fan inside the intake
chamber box.
7. Remove the 2 screws securing the old fan
inside the chamber (Note: save these screws for
reinstallation later) (Figure 70).
8. Lift the old fan up and outward to remove from the
air intake chamber (Figure 70).
9. Locate the male to female electrical connection
with close pin lock on wiring harness (the white
connection approximately 12” from fan).
10. To separate the electrical connection of the fan
and wiring harness: press down on the back
portion of the close pin lock of the electrical
connection while pulling the connection in the
opposite directions.
Figure 69.
ON
OFF
ON/OFF
SWITCH
UNPLUGGED
Figure 70.
SCREEN
FAN
AIR INTAKE
CHAMBER BOX
37
Installing the Fan in the Air Intake Chamber Box:
11. Plug the electrical connections of the new fan
into the wiring harness: Align the electrical
connections in such a position as to ensure the
locking portions of the connections are on the
same side. Gently push the electrical connectors
together until the snap lock on the wiring
harness engages the angular lock on the fan
connector. Do Not use undue force in pushing
these connectors together (Figure 71). (Note:
Connectors are designed in such a manner if the
connection is not properly aligned they will not
lock together).
12. Place the new fan inside the air intake chamber
box. It is imperative that the square portion of
the fan air outlet be placed inside the raised
square portion of the air intake chamber of the fan
compartment (Figure 72).
13. Ensuring the new fan is properly aligned in the air
intake chamber, secure the fan in place using the
2 screws removed in step 7 (Figure 72).
14. Route the wiring inside the fan box to the outer
edge of the fan in such a manner to ensure it will
not be pinched or damaged upon installation of
the air intake screen (Figure 72).
15. Install the air intake chamber screen, ensuring that
the prongs of the lower portion of the air intake
chamber screen are in place in the holding slots.
Using the 2 screws removed in step 4, secure the
air intake chamber screen (Figure 73).
16. Turn on the electrical and the gas supplies to the
water heater. Plug in the electric connection from
the transformer to the electric outlet (Figure 69).
17. Restart the water heater by following the
directions on the “Lighting and Operating
Instructions” label located on the front of the water
heater.
18. Upon verifying proper operation of the water
heater, replace the manifold cover/outer door.
Figure 71.
FAN
GENTLY PUSH THE ELECTRICAL
CONNECTORS TOGETHER UNTIL
IT IS SNAP LOCKED.
Figure 72.
INSTALL THE FAN USING THE
TWO SCREWS REMOVED
EARLIER.
FAN
Figure 73.
INSTALL THE AIR INTAKE
CHAMBER SCREEN.
38
PRESSURE TUBING REMOVAL / REPLACEMENT
g
Important: Use only factory authorized replacement
parts. If you lack the necessary skills to properly
perform the installation, you should not proceed, but
get help from a qualified service technician.
Tools required: Phillips Head Screwdriver.
Figure 74.
COOLER
HOTTER
Electronic Control Display
Removing the Air Intake Chamber Box:
1. Set the gas control valve/thermostat to its lowest
setting by pressing the “COOLER” and “HOTTER”
buttons together at the same time holding for 1
second. Then press the “COOLER” button to the
lowest setting (Figure 74).
2. Turn gas control switch to the “OFF” position
(located right side of the gas control valve/
thermostat) and turn off the gas supply to the unit
(Figure 75).
3. Disconnect the electric connection by unplugging
the transformer from the wall outlet (Figure 75).
4. Remove the manifold cover/ outer door from the
unit by depressing on the lower portion and pulling
outward.
5. Remove the air pressure tubing from the air
pressure switch by pulling downward on the
tubing at the connection to the air pressure switch
(Figure 76).
6. Using a phillips head screwdriver, remove the 4
screws securing the air intake chamber box to the
water heater’s side (Note: keep these screws in a
safe place for reinstallation later) (Figure 77).
7. Rotate the top of the air intake chamber box from
left to right (only a few inches in both directions)
while pulling outward at the bottom removing
the air intake chamber box from the combustion
chamber pipe saving the air intake chamber
gasket for reinstallation (Figure 77).
8. Upon removal of the air intake chamber box,
locate the air pressure tubing at the back of the air
intake chamber box and unplug the tubing. Note
the routing of the air pressure tubing through the
water heater’s opening near the bottom. Remove
the old air pressure tubing (Figures 76 & 77).
9. Connect the new air pressure tubing into the back
of the air intake chamber box by pushing it on the
connector (Figure 78).
10. Route the new air pressure tubing through the
water heater’s opening near the bottom (Note:
mirrors the position of the old tubing) (Figures 77).
Figure 75.
ON
OFF
ON/OFF
SWITCH
UNPLUGGED
Figure 76.
PRESSURE SWITCH
TUBING CONNECTION
Figure 77.
ROTATE FROM
LEFT TO RIGHT
SCREWS
AIR PRESSURE
TUBING
AND
PULL OUTWARD
CHAMBER GASKET
39
Installing the Air Intake Chamber Box:
11. Check the position the wiring harness wire in the
wiring channeling molded down the back center of
the air intake chamber box (Figure 78).
12. Connect the air pressure tubing to the fitting on
the bottom of the air intake chamber box and route
tubing in molded inlaid of the air intake chamber
box (Figure 78).
13. Reinstall the air intake chamber gasket (removed
in step 7) on the back lower portion of the air
intake chamber box (Figure 79).
14. Install the air intake chamber box to the
combustion chamber pipe. Using a small amount
of soapy water will help. Do not get any water
or soapy water on any electrical connections or
gas control components (see Figure 80), (NOTE:
UNDUE PRESSURE OR SUDDEN FORCE
SUCH AS HAMMERING OR BEATING ON
THE AIR CHAMBER BOX WITH ANY OBJECT
INCLUDING YOUR HANDS WILL DAMAGE THE
AIR INTAKE CHAMBER BOX AND RESULT IN
FAILURE OF THE HEATER’S OPERATION).
15. Install the air intake chamber box by rotating
the top of the air intake chamber box from left to
right (only a few inches in both directions) while
pressing on the bottom portion of the air intake
chamber box. When properly installed the air
intake chamber box will be in place against the
water heater’s side aligning with the screw holes
(Figure 80).
16. Secure the air intake chamber box to the water
heater’s side by reusing the 4 screws removed in
step 6 (Figure 80).
17. Reattach the air pressure tubing to the air
pressure switch by pushing the tubing onto the
connector until the end of the tubing pushes to the
shoulder of the connector.
18. Check the air hose tubing connection to the
pressure switch to ensure the tubing has not
loosened up or pulled off.
19. Turn on the electrical and the gas supplies to the
water heater. Plug in the electric connection from
the transformer to the electric outlet (Figure 75).
20. Restart the water heater by following the
directions on the “Lighting and Operating
Instructions” label located on the front of the water
heater.
21. Upon verifying proper operation of the water
heater, replace the manifold cover/outer door.
Figure 78.
RUBBER WIRE
PROTECTOR
WIRE HARNESS INSIDE
WIRE CHANNELING
REAR SIDE OF
THE AIR INTAKE
CHAMBER BOX
AIR PRESSURE TUBING
CONNECTION
Figure 79.
REINSTALL
CHAMBER GASKET
NEW AIR INTAKE
CHAMBER BOX
Figure 80.
ROTATE FROM
LEFT TO RIGHT
AND
PUSH INWARD
40
INNER DOOR/MANIFOLD/BURNER ASSEMBLY REMOVAL / REPLACEMENT
g
Important: Use only factory authorized replacement
parts. If you lack the necessary skills to properly
perform the installation, you should not proceed, but
get help from a qualified service technician.
Tools required: 3/4” Open-End Wrench or Crescent
Wrench, Phillips Head Screwdriver, Ratchet with 1/4”
socket or 1/4” Nut Driver.
Figure 81.
COOLER
HOTTER
Electronic Control Display
Figure 82.
Removing Old Inner Door/Manifold/Burner Assembly:
1. Set the gas control valve/thermostat to its lowest
setting by pressing the “COOLER” and “HOTTER”
buttons together at the same time holding for 1
second. Then press the “COOLER” button to the
lowest setting (Figure 81).
2. Turn gas control switch to the “OFF” position
(located right side of the gas control valve/
thermostat) and turn off the gas supply to the unit
(Figure 82).
3. Disconnect the electric connection by unplugging
the transformer from the wall outlet (Figure 82).
4. Remove the manifold cover/ outer door from the
unit by depressing on the lower portion and pulling
outward.
5. Unplug all the electrical connections from the
bottom of the gas control valve/thermostat
(Figure 83).
6. Disconnect the electrical flag terminals and air
pressure tubing to the pressure switch (Figure 84).
7. Using a 3/4” open end wrench or a crescent
wrench remove the manifold tube from the gas
control valve/thermostat (turning counterclockwise
-natural gas). Grasp the manifold tube and push
down slightly to free the manifold tube from the
gas control valve/thermostat (Figure 83).
8. Use a 1/4” nut driver or 1/4” socket & ratchet to
loosen the 2 hex head screws on the inner door
so the inner door/manifold/burner assembly can
be removed (Figure 85).
9. Remove inner door/manifold/burner assembly by
grasping the manifold and pulling straight back.
Care should be taken when inner door and burner
assembly passes through jacket opening that it
does not damage any of the electrical wiring or
the air pressure hose (Figure 86).
ON
OFF
ON/OFF
SWITCH
UNPLUGGED
Figure 83.
IMPORTANT:
WHEN BRUSHING ON AN
APPROVED NONCORROSIVE
LEAK DETECTION SOLUTION,
DO NOT SPLASH SOLUTION
ONTO ELECTRICAL CONNECTIONS.
GAS CONTROL
VALVE/THERMOSTAT
MANIFOLD TUBE
POWER SUPPLY
TRANSFORMER
CONNECTOR
IGNITER/
FLAME
SENSE
CONNECTOR
PRESSURE
SWITCH/FAN,
FV SENSOR
CONNECTOR
DISPLAY, ANODE
ROD CONNECTOR
Figure 84.
PRESSURE
SWITCH
MANIFOLD
TUBE
41
Installation Caution Must Be Taken:
10. Prior to installing the new inner door/manifold/
burner assembly, look inside the burner chamber
to fully understand the correct positioning of the
burner assembly and burner manifold tab. It may
be necessary to use a flashlight to ensure correct
placement. Care must be taken so as to not
damage any electrical wiring, components or the
air pressure tubing as you are installing the new
inner door/manifold/burner assembly.
Extra caution should be taken to ensure
that electrical wiring, air hose, fiberglass
insulation nor any other object is between
door gasket and combustion chamber shield.
Figure 85.
1/4” HEX
HEAD SCREW
Installing New Inner Door/Manifold/Burner Assembly
11. Insert the manifold/burner assembly in the burner
chamber compartment, making sure that the tip
of burner manifold tab engages in the slot of the
bracket (Figure 86).
The tip end of the burner manifold MUST
be placed in the slotted portion under the
condensation pan to obtain proper installation
(Figure 86).
12. After confirming no material of any type are
between door gasket and combustion chamber
shield, align the screws on the inner door with
the screw holes on the combustion chamber and
tighten with 1/4” nut driver or 1/4” socket & ratchet
(Figure 85). After tightening the inner door
screws, visually inspect area around door
gasket and skirt for spaces or gaps. The door
gasket MUST be sealed completely in order
for the water heater to perform properly.
DO NOT OPERATE THE WATER HEATER IF
THE DOOR GASKET DOES NOT CREATE
A SEAL BETWEEN MANIFOLD DOOR AND
COMBUSTION CHAMBER.
13. Reconnect the manifold tube to the gas control
valve/thermostat (Note: Do Not apply any thread
sealant at this connection). To prevent any cross
threading the manifold tube should be started
by hand (turn clockwise -natural gas). Upon
tightening with the fingers and confirming it has
not been cross threaded, tighten nut with an 3/4”
open end wrench or crescent wrench (Figure 87).
14. Reconnect all the electrical connections to the
bottom of the gas control valve/thermostat, gently
pushing each connector up snapping into place
(Figure 87).
15. Reconnect the electrical flag terminals and air
pressure tubing to pressure switch (Figure 88).
16. Turn on the electrical and the gas supplies to the
water heater. Plug in the electric connection from
the transformer to the electric outlet (Figure 82).
17. Restart the water heater by following the
directions on the “Lighting and Operating
Instructions” label located on the front of the water
heater. Test gas connections by brushing on an
approved nonconcorrosive leak detection solution.
18. Upon verifying proper operation of the water
heater, replace the manifold cover/outer door.
Figure 86.
INNER DOOR/
MANIFOLD/BURNER
ASSEMBLY
SLOT
BURNER’S
TIP END
TAB
L
L
TA
INS
VE
MO
RE
Figure 87.
IMPORTANT:
WHEN BRUSHING ON AN
APPROVED NONCORROSIVE
LEAK DETECTION SOLUTION,
DO NOT SPLASH SOLUTION
ONTO ELECTRICAL CONNECTIONS.
GAS CONTROL
VALVE/THERMOSTAT
MANIFOLD TUBE
POWER SUPPLY
TRANSFORMER
CONNECTOR
IGNITER/
FLAME
SENSE
CONNECTOR
PRESSURE
SWITCH/FAN,
FV SENSOR
CONNECTOR
DISPLAY, ANODE
ROD CONNECTOR
Figure 88.
PRESSURE
SWITCH
MANIFOLD
TUBE
42
FLAME SENSE/HOT SURFACE IGNITER REMOVAL / REPLACEMENT
g
Important: Use only factory authorized replacement
parts. If you lack the necessary skills to properly
perform the installation, you should not proceed, but
get help from a qualified service technician.
Tools required: 3/4” Open-End Wrench or Crescent
Wrench, Phillips Head Screwdriver, Ratchet with 1/4”
socket or 1/4” Nut Driver.
Figure 89.
COOLER
HOTTER
Replacing the Flame Sense/Hot Surface Igniter
Assembly:
1. Set the gas control valve/thermostat to its lowest
setting by pressing the “COOLER” and “HOTTER”
buttons together at the same time holding for 1
second. Then press the “COOLER” button to the
lowest setting (Figure 89).
2. Turn gas control switch to the “OFF” position
(located right side of the gas control valve/
thermostat) and turn off the gas supply to the unit
(Figure 90).
3. Disconnect the electric connection by unplugging
the transformer from the wall outlet (Figure 90).
4. Remove the manifold cover/ outer door from the
unit by depressing on the lower portion and
pulling outward.
5. Remove the inner door/manifold/burner assembly.
See Removing Inner Door/Manifold/Burner
Assembly, (page 41) (Figure 91).
6. Lift the retainer clip straight up from the back of
the manifold component block (using a flat-blade
screwdriver), then remove the manifold component
block from the manifold door (Figure 92).
7. Remove and keep the screw securing the flame
sense/hot surface igniter assembly (Figure 92).
8. Remove and discard the old flame sense/hot
surface igniter assembly.
9. Route the new flame sense/hot surface igniter
connector wire through manifold/burner door
opening as shown in figure 92. Secure the
assembly to the bracket ussing screw removed
earlier.
10. Reposition the manifold component block in the
manifold door opening and secure it with the
retainer clip.
11. Install inner door/manifold/burner assembly,
(see page 42).
12. Restart the water heater by following the
directions on the “Lighting and Operating
Instructions” label located on the front of the water
heater.
13. Upon verifying proper operation of the water
heater, replace the manifold cover/outer door.
Electronic Control Display
Figure 90.
ON
OFF
ON/OFF
SWITCH
UNPLUGGED
Figure 91
INNER DOOR/
MANIFOLD/BURNER
ASSEMBLY
SLOT
BURNER’S
TIP END
TAB
L
L
TA
INS
VE
MO
RE
Figure 92
Screw
Retainer Clip
Manifold Component
Block
43
Flame Sense/
Hot Surface
Igniter Assembly
BURNER REMOVAL / REPLACEMENT
g
Important: Use only factory authorized replacement
parts. If you lack the necessary skills to properly
perform the installation, you should not proceed, but
get help from a qualified service technician.
Tools required: 3/4” Open-End Wrench or Crescent
Wrench, Phillips Head Screwdriver, Ratchet with 1/4”
socket or 1/4” Nut Driver.
Figure 93.
COOLER
HOTTER
Removing the Inner Door/Manifold/Burner Assembly:
1. Set the gas control valve/thermostat to its lowest
setting by pressing the “COOLER” and “HOTTER”
buttons together at the same time holding for 1
second. Then press the “COOLER” button to the
lowest setting (Figure 93).
2. Turn gas control switch to the “OFF” position
(located right side of the gas control valve/
thermostat) and turn off the gas supply to the unit
(Figure 94).
3. Disconnect the electric connection by unplugging
the transformer from the wall outlet (Figure 94).
4. Remove the manifold cover/outer door from the
unit by depressing on the lower portion and pulling
outward.
5. Unplug all the electrical connections from the
bottom of the gas control valve/thermostat
(Figure 95).
6. Disconnect the electrical flag terminals and air
pressure tubing to the pressure switch (Figure 96).
7. Using a 3/4” open end wrench or a crescent
wrench remove the manifold tube from the gas
control valve/thermostat (turning counterclockwise
-natural gas). Grasp the manifold tube and push
down slightly to free the manifold tube from the
gas control valve/thermostat (Figure 95).
8. Use a 1/4” nut driver or 1/4” socket & ratchet to
loosen the 2 hex head screws on the inner door
so the inner door/manifold/burner assembly can
be removed (Figure 97).
9. Remove inner door/manifold/burner assembly by
grasping the manifold and pulling straight back.
Care should be taken when inner door and burner
assembly passes through jacket opening that it
does not damage any of the electrical wiring or
the air pressure hose (Figure 98).
10. Go to step 11.
Electronic Control Display
Figure 94.
ON
OFF
ON/OFF
SWITCH
UNPLUGGED
Figure 95.
IMPORTANT:
WHEN BRUSHING ON AN
APPROVED NONCORROSIVE
LEAK DETECTION SOLUTION,
DO NOT SPLASH SOLUTION
ONTO ELECTRICAL CONNECTIONS.
GAS CONTROL
VALVE/THERMOSTAT
MANIFOLD TUBE
POWER SUPPLY
TRANSFORMER
CONNECTOR
IGNITER/
FLAME
SENSE
CONNECTOR
PRESSURE
SWITCH/FAN,
FV SENSOR
CONNECTOR
DISPLAY, ANODE
ROD CONNECTOR
Figure 96.
PRESSURE
SWITCH
MANIFOLD
TUBE
44
Removing Old Burner :
11. After noting the position of the condensation drain
hole on the top of the burner. Turn the inner door/
manifold/burner assembly upside. Using a phillips
head screwdriver remove the 2 screws attaching
the burner to the manifold pipe (saving screws for
reinstallation later) (Figure 99).
Figure 97.
1/4” HEX
HEAD SCREW
Installing New Burner :
12. Care MUST be taken to ensure the burner is
installed correctly on the inner door/manifold
assembly. Position the new burner upside down
with the orientation of the burner’s condensation
drain as shown in illustration (Figure 99).
13. Align the screw holes on the inner door/manifold
assembly. Using the two screws removed in step
11, installed the new burner to the inner door/
manifold assembly (rotate the assembly to visually
check the top portion of the burner assembly and
confirm the orientation of the condensation drain
hole on the top of the burner is toward the back as
shown in the illustration) (Figure 99).
Figure 98.
INNER DOOR/
MANIFOLD/BURNER
ASSEMBLY
SLOT
BURNER’S
TIP END
TAB
L
L
TA
INS
VE
MO
RE
Installation Caution Must Be Taken:
14. Prior to installing the new inner door/manifold/
burner assembly, look inside the burner chamber
to fully understand the correct positioning of the
burner assembly and burner manifold tab. It may
be necessary to use a flashlight to ensure correct
placement. Care must be taken so as to not
damage any electrical wiring, components or the
air pressure tubing as you are installing the new
inner door/manifold/burner assembly.
Extra caution should be taken to ensure
that electrical wiring, air hose, fiberglass
insulation nor any other object is between
door gasket and combustion chamber shield.
Figure 99.
BURNER’S
CONDENSATION DRAIN
TOP VIEW
ORIENTATION OF SCOOP
TO BE ON THE SAME SIDE
AS THE VIEW PORT
VIEW PORT
TWO SCREWS
BURNER’S
CONDENSATION DRAIN
Reinstalling The Inner Door/Manifold/Burner Assembly
15. Insert the manifold/burner assembly in the burner
chamber compartment, making sure that the tip
of burner manifold tab engages in the slot of the
bracket (Figure 98).
The tip end of the burner manifold MUST
be placed in the slotted portion under the
condensation pan to obtain proper installation
(Figure 98).
BOTTOM VIEW
Figure 100.
IMPORTANT:
WHEN BRUSHING ON AN
APPROVED NONCORROSIVE
LEAK DETECTION SOLUTION,
DO NOT SPLASH SOLUTION
ONTO ELECTRICAL CONNECTIONS.
GAS CONTROL
VALVE/THERMOSTAT
MANIFOLD TUBE
POWER SUPPLY
TRANSFORMER
CONNECTOR
45
IGNITER/
FLAME
SENSE
CONNECTOR
PRESSURE
SWITCH/FAN,
FV SENSOR
CONNECTOR
DISPLAY, ANODE
ROD CONNECTOR
16. After confirming no material of any type are
between door gasket and combustion chamber
shield, align the screws on the inner door with
the screw holes on the combustion chamber and
tighten with 1/4” nut driver or 1/4” socket & ratchet
(Figure 97). After tightening the inner door
screws, visually inspect area around door
gasket and skirt for spaces or gaps. The door
gasket MUST be sealed completely in order
for the water heater to perform properly.
DO NOT OPERATE THE WATER HEATER IF
THE DOOR GASKET DOES NOT CREATE
A SEAL BETWEEN MANIFOLD DOOR AND
COMBUSTION CHAMBER.
Figure 101.
PRESSURE
SWITCH
MANIFOLD
TUBE
17. Reconnect the manifold tube to the gas control valve/
thermostat (Note: Do Not apply any thread sealant
at this connection). To prevent any cross threading
the manifold tube should be started by hand (turn
clockwise -natural gas). Upon tightening with the
fingers and confirming it has not been cross threaded,
tighten nut with an 3/4” open end wrench or crescent
wrench (Figure 100).
18. Reconnect all the electrical connections to the bottom
of the gas control valve/thermostat, gently pushing
each connector up snapping into place (Figure 100).
19. Reconnect the electrical flag terminals and air
pressure tubing to pressure switch (Figure 101).
20. Turn on the electrical and the gas supplies to the
water heater. Plug in the electric connection from the
transformer to the electric outlet (Figure 94).
21. Restart the water heater by following the directions on
the “Lighting and Operating Instructions” label located
on the front of the water heater.
22. As the burner is heating (view flames through
viewport), test the manifold tube connection at the gas
control valve/thermostat by brushing on an approved
noncorrosive leak detection solution (IMPORTANT:
Do Not splash any solution onto any electrical
connections) (Figure 100).
23. Upon verifying proper operation of the water heater,
replace the manifold cover/outer door.
46
BURNER ORIFICE REMOVAL / REPLACEMENT
g
Important: Use only factory authorized replacement
parts. If you lack the necessary skills to properly
perform the installation, you should not proceed, but
get help from a qualified service technician.
Tools required: 3/4” Open-End Wrench or Crescent
Wrench, Phillips Head Screwdriver, Ratchet with 1/4”
socket or 1/4” Nut Driver, Ratchet with 1/2” socket.
Figure 102.
COOLER
HOTTER
Electronic Control Display
Removing the Inner Door/Manifold/Burner Assembly:
1. Set the gas control valve/thermostat to its lowest
setting by pressing the “COOLER” and “HOTTER”
buttons together at the same time holding for 1
second. Then press the “COOLER” button to the
lowest setting (Figure 102).
2. Turn gas control switch to the “OFF” position
(located right side of the gas control valve/
thermostat) and turn off the gas supply to the unit
(Figure 103).
3. Disconnect the electric connection by unplugging
the transformer from the wall outlet (Figure 103).
4. Remove the manifold cover/outer door from the
unit by depressing on the lower portion and pulling
outward.
5. Unplug all the electrical connections from the
bottom of the gas control valve/thermostat
(Figure 104).
6. Disconnect the electrical flag terminals and
air pressure tubing to the pressure switch
(Figure 105).
7. Using a 3/4” open end wrench or a crescent
wrench remove the manifold tube from the gas
control valve/thermostat (turning counterclockwise
-natural gas). Grasp the manifold tube and push
down slightly to free the manifold tube from the
gas control valve/thermostat (Figure 104).
8. Use a 1/4” nut driver or 1/4” socket & ratchet to
loosen the 2 hex head screws on the inner door
so the inner door/manifold/burner assembly can
be removed (Figure 106).
9. Remove inner door/manifold/burner assembly by
grasping the manifold and pulling straight back.
Care should be taken when inner door and burner
assembly passes through jacket opening that it
does not damage any of the electrical wiring or
the air pressure hose (Figure 107).
Figure 103.
ON
OFF
ON/OFF
SWITCH
UNPLUGGED
Figure 104.
IMPORTANT:
WHEN BRUSHING ON AN
APPROVED NONCORROSIVE
LEAK DETECTION SOLUTION,
DO NOT SPLASH SOLUTION
ONTO ELECTRICAL CONNECTIONS.
GAS CONTROL
VALVE/THERMOSTAT
MANIFOLD TUBE
POWER SUPPLY
TRANSFORMER
CONNECTOR
IGNITER/
FLAME
SENSE
CONNECTOR
PRESSURE
SWITCH/FAN,
FV SENSOR
CONNECTOR
DISPLAY, ANODE
ROD CONNECTOR
Figure 105.
PRESSURE
SWITCH
MANIFOLD
TUBE
47
Removing Old Burner Orifice :
11. Burner may be hot, wait until burner has cooled
off. After noting the position of the condensation
drain hole on the top of the burner. Turn the inner
door/manifold/burner assembly upside. Using a
phillips head screwdriver remove the 2 screws
attaching the burner to the manifold pipe (saving
screws for reinstallation later) (Figure 108).
12. Using a ratchet with 1/2” socket, remove the
burner’s old orifice (Note: the burner orifices have
different threads dependent upon the gas type.
Right handed treads for natural gas (Figure 109).
Figure 106.
1/4” HEX
HEAD SCREW
Installing New Burner Orifice :
13. Using a ratchet with 1/2” socket, install the
new burner orifice (Note: the burner orifices
have different threads dependent upon the gas
type. Right handed treads for natural gas (turn
clockwise to install) and Left handed threads for
propane gas (turn counterclockwise to install)
(Figure 109).
14. Care MUST be taken to ensure the burner is
installed correctly on the inner door/manifold
assembly. Position the new burner upside down
with the orientation of the burner’s condensation
drain as shown in illustration (Figure 108).
15. Align the screw holes on the inner door/manifold
assembly. Using the two screws removed in step
11, installed the new burner to the inner door/
manifold assembly (rotate the assembly to visually
check the top portion of the burner assembly and
confirm the orientation of the condensation drain
hole on the top of the burner is toward the back as
shown in the illustration) (Figure 108).
Figure 107.
INNER DOOR/
MANIFOLD/BURNER
ASSEMBLY
SLOT
BURNER’S
TIP END
TAB
L
L
TA
INS
VE
MO
RE
Figure 108.
BURNER’S
CONDENSATION DRAIN
TOP VIEW
ORIENTATION OF SCOOP
TO BE ON THE SAME SIDE
AS THE VIEW PORT
Installation Caution Must Be Taken:
16. Prior to installing the new inner door/manifold/
burner assembly, look inside the burner chamber
to fully understand the correct positioning of the
burner assembly and burner manifold tab (Figure
107). It may be necessary to use a flashlight
to ensure correct placement. Care must be
taken so as to not damage any electrical wiring,
components or the air pressure tubing as you
are installing the new inner door/manifold/burner
assembly.
Extra caution should be taken to ensure
that electrical wiring, air hose, fiberglass
insulation nor any other object is between
door gasket and combustion chamber shield.
VIEW PORT
TWO SCREWS
BURNER’S
CONDENSATION DRAIN
BOTTOM VIEW
Figure 109.
BURNER
ORIFICE
SCREWS
48
Reinstalling The Inner Door/Manifold/Burner Assembly
17. Insert the manifold/burner assembly in the burner
chamber compartment, making sure that the tip
of burner manifold tab engages in the slot of the
bracket (Figure 107).
The tip end of the burner manifold MUST
be placed in the slotted portion under the
condensation pan to obtain proper installation
(Figure 107).
18. After confirming no material of any type are
between door gasket and combustion chamber
shield, align the screws on the inner door with
the screw holes on the combustion chamber and
tighten with 1/4” nut driver or 1/4” socket & ratchet
(Figure 106). After tightening the inner door
screws, visually inspect area around door
gasket and skirt for spaces or gaps. The door
gasket MUST be sealed completely in order
for the water heater to perform properly.
DO NOT OPERATE THE WATER HEATER IF
THE DOOR GASKET DOES NOT CREATE
A SEAL BETWEEN MANIFOLD DOOR AND
COMBUSTION CHAMBER.
19. Reconnect the manifold tube to the gas control
valve/thermostat (Note: Do Not apply any thread
sealant at this connection). To prevent any cross
threading the manifold tube should be started
by hand (turn clockwise -natural gas). Upon
tightening with the fingers and confirming it has
not been cross threaded, tighten nut with an 3/4”
open end wrench or crescent wrench (Figure 110).
20. Reconnect all the electrical connections to the
bottom of the gas control valve/thermostat, gently
pushing each connector up snapping into place
(Figure 110).
21. Reconnect the electrical flag terminals and air
pressure tubing to pressure switch (Figure 111).
22. Turn on the electrical and the gas supplies to the
water heater. Plug in the electric connection from
the transformer to the electric outlet (Figure 103).
23. Restart the water heater by following the
directions on the “Lighting and Operating
Instructions” label located on the front of the water
heater.
24. As the burner is heating (view flames through
viewport), test the manifold tube connection at
the gas control valve/thermostat by brushing on
an approved noncorrosive leak detection solution
(IMPORTANT: Do Not splash any solution onto
any electrical connections) (Figure 110).
25. Upon verifying proper operation of the water
heater, replace the manifold cover/outer door.
Figure 110.
IMPORTANT:
WHEN BRUSHING ON AN
APPROVED NONCORROSIVE
LEAK DETECTION SOLUTION,
DO NOT SPLASH SOLUTION
ONTO ELECTRICAL CONNECTIONS.
GAS CONTROL
VALVE/THERMOSTAT
MANIFOLD TUBE
POWER SUPPLY
TRANSFORMER
CONNECTOR
IGNITER/
FLAME
SENSE
CONNECTOR
PRESSURE
SWITCH/FAN,
FV SENSOR
CONNECTOR
DISPLAY, ANODE
ROD CONNECTOR
Figure 111.
PRESSURE
SWITCH
MANIFOLD
TUBE
49
GAS CONTROL VALVE/THERMOSTAT REMOVAL / REPLACEMENT
Important: Use only factory authorized replacement
parts. If you lack the necessary skills to properly
perform the installation, you should not proceed, but
get help from a qualified service technician.
Tools required: 3/4” Open-End Wrench or Crescent
Wrench, Phillips Head Screwdriver, a short length of
1/2” threaded Pipe.
g
Figure 112.
COOLER
HOTTER
Removing the Gas Control Valve/Thermostat:
1. Set the gas control valve/thermostat to its lowest
setting by pressing the “COOLER” and “HOTTER”
buttons together at the same time holding for 1
second. Then press the “COOLER” button to the
lowest setting (Figure 112).
2. Turn gas control switch to the “OFF” position
(located right side of the gas control valve/
thermostat) and turn off the gas supply to the unit
(Figure 113).
3. Disconnect the electric connection by unplugging
the transformer from the wall outlet (Figure 113).
4. Release water pressure by opening a nearby hot
water faucet, let run until water is cool to touch.
Turn off water supply to the water heater.
5. Remove the manifold cover/ outer door from the
unit by depressing on the lower portion and pulling
outward.
6. Connect a drain hose to the drain valve and run
it to an adequate drain or to the exterior of the
building. Open the water heater drain valve and
allow the water to drain from the tank.
7. Unplug all the electrical connections from the
bottom of the gas control valve/thermostat
(Figure 114).
8. Using a 3/4” open end wrench or a crescent
wrench remove the manifold tube from the gas
control valve/thermostat (turning counterclockwise
-natural gas). Grasp the manifold tube and push
down slightly to free the manifold tube from the
gas control valve/thermostat (Figure 114).
9. Using a phillips head screwdriver remove the
transformer box from the front of the water heater
by removing the one (1) screw at the top of the
transformer box (save screw for reinstallation
later) (Figure 115).
10. Disconnect the two (2) electrical flag connectors
from the pressure switch, also disconnect the air
pressure tubing. Using a phillips head screwdriver
remove the pressure switch from the water
heater’s front by removing the two (2) screws
securing it (save screws for reinstallation later)
(Figure 115).
Electronic Control Display
Figure 113.
ON
OFF
ON/OFF
SWITCH
UNPLUGGED
Figure 114.
IMPORTANT:
WHEN BRUSHING ON AN
APPROVED NONCORROSIVE
LEAK DETECTION SOLUTION,
DO NOT SPLASH SOLUTION
ONTO ELECTRICAL CONNECTIONS.
GAS CONTROL
VALVE/THERMOSTAT
MANIFOLD TUBE
POWER SUPPLY
TRANSFORMER
CONNECTOR
IGNITER/
FLAME
SENSE
CONNECTOR
PRESSURE
SWITCH/FAN,
FV SENSOR
CONNECTOR
DISPLAY, ANODE
ROD CONNECTOR
Figure 115.
PRESSURE
SWITCH
MANIFOLD
TUBE
SCREW AT
TRANSFORMER
BOX
50
11. Ensuring that the gas supply line is turned off,
disconnect the gas piping at the ground joint union,
then remove the gas piping from the gas control valve/
thermostat (Figure 116).
Figure 116.
GAS SHUT-OFF
12. Remove any other fittings that may be installed on
the threaded pipe to the gas control valve/thermostat
(Figure 116).
GROUND JOINT UNION
13. After ensuring the water heater is completely drained,
thread a short length of 1/2” threaded pipe into the
inlet connection of the gas control valve/thermostat
and use it to turn the gas control valve/thermostat
counterclockwise to remove (Figure 117).
GAS PIPING
ROTATE TO:
Installing the Gas Control Valve/Thermostat:
Figure 117.
14. Before installing, apply Teflon® tape or an approved
pipe sealant on the threads of the new gas control
valve/thermostat (only the threads that screw into
tank).
ROTATE TO:
GAS CONTROL VALVE /
THERMOSTAT
INSTALL
REMOVE
15. Thread a short length of 1/2” threaded pipe into
the inlet connection of the new gas control valve/
thermostat and use it to turn the gas control valve/
thermostat clockwise to tighten into place (Note: Do
Not over tighten or damage may result, but it needs to
be water tight (Min. 35 foot pounds) (Figure 117).
SHORT LENGTH OF
1/2” TREADED PIPE
16. Remove the 1/2” threaded pipe from the gas control
valve/thermostat.
17. Reconnect the gas piping to the gas control valve/
thermostat, use Teflon® tape or an approved pipe
sealant on threads of the piping (Figure 116).
Figure 118.
18. Close the drain valve and turn on the cold water supply
line filling the tank completely with water. Purge the
water lines of any excess air by opening a hot water
faucet allowing the water to flow for a minimum of 3
minutes, allowing the tank to fill completely.
PRESSURE
SWITCH
19. Using the two (2) phillips head screws removed earlier
in step 10, reattach the air pressure switch (orientation
with pressure tubing connector to the down side) to the
front of the water heater. Reattach the electrical flag
terminal to the pressure switch. Reattach the pressure
tubing (Figure 118).
MANIFOLD
TUBE
SCREW AT
TRANSFORMER
BOX
20. Reinstall the transformer box to the front of the
water heater by using the one (1) phillips head screw
removed earlier in step 9 (Figure 118).
Figure 119.
21. Reconnect the manifold tube to the gas control valve/
thermostat (Note: Do Not apply any thread sealant
at this connection). To prevent any cross threading
the manifold tube should be started by hand (turn
clockwise -natural gas). Upon tightening with the
fingers and confirming it has not been cross threaded,
tighten nut with an 3/4” open end wrench or crescent
wrench (Figure 119).
IMPORTANT:
WHEN BRUSHING ON AN
APPROVED NONCORROSIVE
LEAK DETECTION SOLUTION,
DO NOT SPLASH SOLUTION
ONTO ELECTRICAL CONNECTIONS.
22. Reconnect all the electrical connections to the bottom
of the gas control valve/thermostat, gently pushing
each connector up snapping into place (Figure 119).
GAS CONTROL
VALVE/THERMOSTAT
MANIFOLD TUBE
POWER SUPPLY
TRANSFORMER
CONNECTOR
Teflon ® is a registered trademark of E.I. Du Pont De Numours and Company.
51
IGNITER/
FLAME
SENSE
CONNECTOR
PRESSURE
SWITCH/FAN,
FV SENSOR
CONNECTOR
DISPLAY, ANODE
ROD CONNECTOR
23. Turn on the gas supply to the unit and test the gas
supply line and union connections by brushing on
an approved noncorrosive leak detection solution
(Figure 116).
24. Turn on the electrical and the gas supplies to the
water heater. Plug in the electric connection from
the transformer to the electric outlet (Figure 113).
25. Restart the water heater by following the
directions on the “Lighting and Operating
Instructions” label located on the front of the water
heater .
26. As the burner is heating (view flames through
viewport), test the manifold tube connection at
the gas control valve/thermostat by brushing on
an approved noncorrosive leak detection solution
(IMPORTANT: Do Not splash any solution onto
any electrical connections) (Figure 120).
27. Upon verifying proper operation of the water
heater, replace the manifold cover/outer door.
Figure 120.
IMPORTANT:
WHEN BRUSHING ON AN
APPROVED NONCORROSIVE
LEAK DETECTION SOLUTION,
DO NOT SPLASH SOLUTION
ONTO ELECTRICAL CONNECTIONS.
GAS CONTROL
VALVE/THERMOSTAT
MANIFOLD TUBE
POWER SUPPLY
TRANSFORMER
CONNECTOR
IGNITER/
FLAME
SENSE
CONNECTOR
PRESSURE
SWITCH/FAN,
FV SENSOR
CONNECTOR
DISPLAY, ANODE
ROD CONNECTOR
CHECKING THE GAS SUPPLY PRESSURE
Checking the Gas Supply Pressure
Gas pressure checks are done with flowing gas
using a gas pressure gauge capable of reading
pressure in inches of water column.
•
•
Supply gas pressure checks are measured
before the gas control valve/thermostat and
as close to the water heater as possible.
GAS CONTROL
VALVE/
THERMOSTAT
GAS CONTROL
VALVE/
THERMOSTAT
USE AN ALLEN
WRENCH TO REMOVE
AND REPLACE PLUG.
Manifold (main burner) gas pressure is
measured at the pressure tap on the side
of the gas control valve/thermostat. Use
an allen wrench to remove the plug then
attach the gas gauge.
GAS
PRESSURE
GAUGE
MANIFOLD GAS PRESSURE TEST
CONNECTED AT
PRESSURE TAP
SUPPLY GAS PRESSURE TEST
Figure 121
NOTE: Desired gas pressures will be noted on
the gas valve label located on the gas control
valve/thermostat.
IF . . .
. . . THEN
supply gas pressure is under desired pressure
requirement
supply gas pressure is over desired pressure
manifold gas pressure is more than +/- .3 inch
W.C. from values indicated on gas valve
52
•
increase supply gas pressure regulator setting
and,
•
increase supply gas piping size.
•
add gas pressure regulator.
•
reduce setting on existing regulator.
•
ensure there is adequate supply gas pressure
•
ensure the main burner orifice is the correct size
for the water heater model being tested.
•
if the above tests have been performed and the
results were correct replace the gas control valve.
GAS WATER HEATER SIZING GUIDE
Use the following information as a guide to approximate the correct size water heater for the residence:
• 40 gallon size (28 gallon draw) for two bath residence -or one bath with an automatic clothes washer.
• 50 gallon size (35 gallon draw) for three bath residence - or two baths with an automatic clothes
washer.
• When a whirlpool tub is part of the home equipment, it is suggested that the water heater storage
tank capacity be selected based on the needs of the whirlpool tub. This method of tank sizing, will in
most cases, cancel all statements above concerning tank sizing.
• High flow or multiple shower head installations must be sized for at least a 20 minute draw.
Table 2:
Tub Capacity to Overflow
Outlet at:
80 gal.
90 gal.
100 gal.
110 gal.
120 gal.
130 gal.
140 gal.
150 gal.
(120ºF Water) Min. Stored
Water Capacity**
80 gal.
90 gal.
100 gal.
110 gal.
120 gal.
130 gal.
140 gal.
150 gal.
(140ºF Water*) Min. Stored
Water Capacity**
65 gal.
71 gal.
80 gal.
89 gal.
98 gal.
108 gal.
117 gal.
125 gal.
(@ 160ºF Water*) Min.
Stored Water Capacity**
54 gal.
59 gal.
66 gal.
74 gal.
82 gal.
90 gal.
97 gal.
104 gal.
*A thermostatic mixing valve set for a maximum temperature of 120° F is recommended to be installed to prevent a scalding hazard.
**Based on tub water temperature of 105º
Note: Because the desired fill time is normally 10 minutes, recovery capacity is not used for this calculation. All water used is supplied
by storage.
NOTE: The draw efficiency of a gas or electric water heater storage tank is considered to be 70%.
LEAKAGE CHECKPOINTS
*
A. Water at the draft hood is water vapor which has
condensed out of the combustion products. This is
caused by a problem in the vent.
B. *Condensation may be seen on pipes in humid
weather or pipe connections may be leaking.
C. *The powered anode rod fitting may be leaking.
D. Small amounts of water from temperature-pressure
relief valve may be due to thermal expansion or
high water pressure in your area.
E. *The temperature-pressure relief valve may be
leaking at the tank fitting.
F. Water from a drain valve may be due to the valve
being slightly opened.
G. *The drain valve may be leaking at the tank fitting.
H. Combustion products contain water vapor which
can condense on the cooler surfaces of the tank.
Droplets form and drip onto the burner or run on
the floor. This is common at the time of start-up
after installation and when incoming water is cold.
I. Water in the water heater bottom or on the floor
may be from condensation, loose connections, or
the relief valve. DO NOT replace the water heater
until a full inspection of all possible water sources
is made and necessary corrective steps taken.
To check where threaded portion enters tank,
insert cotton swab between jacket opening and
fitting. If cotton is wet, follow draining instructions
in the “Draining the Water Heater” section and then
remove fitting. Put pipe dope or Teflon® tape on the
threads and replace. When you are finished, follow
the steps in “Filling the Water Heater” section.
A
C
B
E
D
G
H
F
6” (152.4 mm)
MAXIMUM AIR GAP
Leakage from other appliances, water lines, or ground
seepage should also be checked.
Figure 122
53
I
GENERAL INFORMATION
Draw efficiency is the quantity of hot water available to the consumer before the outlet water temperature decreases
25 degrees F. A 40 gallon water heater will typically provide 70% (28 gallons) of this “usable” hot water (60% is the
minimum). The burner or elements are allowed to operate during this test. Incoming, cold water mixes the remaining
stored water below this 25 degree limitation.
Energy Factor is an indicator of the combined thermal efficiency and standby efficiency of a water heater. The higher the
energy factor, the more efficient the water heater will be.
Minerals and gases will separate from water as temperature increases.
“R” Value is a measure of the resistance of a substance to heat flow.
Recovery rate is the amount of water that is heated to a set temperature, per hour. An example might be that a water
heater has a recovery rate of 30 gallons of water per hour at 80 degree F. (Fahrenheit) temperature rise.
Standby efficiency – the water heater’s ability to contain heat in the tank. A minimum of tank water heat loss per hour
is desired.
Sample: temperature change
“R” value
= Btu/h loss/ square foot of tank surface
Temperature rise is the increase in the temperature from its coldest “inlet” water temperature to the desired hot (outlet)
setting. Typically this is assumed to be 40 degrees entering water, 120 degrees desired stored water or 80 degrees
“temperature rise.”
Thermal efficiency is approximately the amount of generated BTU (British Thermal Units), which enters the water. A
percentage of the total BTU passes out through the vent piping.
Water cannot (for all practical purposes) be compressed.
Water expands when it is heated.
Formulas and Conversions:
BTU (British Thermal Unit) is the heat required to raise 1 pound of water 1°F
1 BTU = 252 cal = 0.252 kcal
1 cal = 4.187 Joules
BTU X 1.055 = Kilo Joules
BTU divided by 3,413 = Kilowatts
To convert from Fahrenheit to Centigrade: (° F – 32) times 5/9, or .556, equals degrees C.
One gallon of (120 ° F, 49 ° C) water weighs approximately 8.25 pounds.
Pounds X .45359 = Kilogram
Gallons X 3.7854 = Liters
% of Hot = (Mixed Temp. – Cold) divided by (Hot Temp. – Cold)
% Thermal Efficiency = (GPH X 8.25 X Temp. Rise X 1.0) divided by BTU/H Input
BTU Output = GPH X 8.25 X Temp. Rise X 1.0
GPH = (BTU/H Input X % Eff.) divided by (Temp. Rise X 8.25)
One cubic foot of Natural Gas contains about 1000 BTU of heat.
One “therm” is equal to 100,000 BTU
One cubic foot of Propane Gas contains about 2500 BTU of heat.
One gallon of Propane gas contains about 91,250 BTU of heat.
One pound of Propane gas contains about 21,600 BTU of heat.
54
GENERAL INFORMATION
One pound of gas pressure is equal to 27.7 inches water column pressure
Inches of Water Column X .036091 = PSI
Inches of Water Column X .073483 = Inches of Mercury (Hg.)
Centimeters = Inches X 2.54
MM (millimeters) =Inches X 25.4
Meters = Inches X .0254
Doubling the diameter of a pipe will increase its flow capacity (approximately) 5.3 times.
Construction:
Tank is constructed of steel.
The inside of the tank is constructed of a glass lining bonded to the steel. This prevents water to metal contact and
rusting of the tank.
An anode rod will be installed within the tank. The hex-head plug end of the anode is visible on the top of the water
heater. This metal rod offers secondary protection of the tank against corrosion where the application of glass is not
possible (threaded tank openings). These areas will have small areas of water to metal contact.
All water heaters will contain at least one thermostat (to operate the heater) and one high limit (to prevent water
temperatures approaching the “steam” level).
55
ALL TECHNICAL AND WARRANTY QUESTIONS SHOULD BE DIRECTED TO THE LOCAL DEALER FROM WHOM THE WATER HEATER WAS PURCHASED. IF
YOU ARE UNSUCCESSFUL, CONTACT A O SMITH WATER HEATERS RESIDENTIAL TECHNICAL ASSISTANCE AT 1-800-527-1953 OR WWW.HOTWATER.COM.
56