1
Adaptec SCSI RAID
2120S/2200S
Installation Guide
R
Copyright
© 2002 Adaptec, Inc. All rights reserved. No part of this publication may be
reproduced, stored in a retrieval system, or transmitted in any form or by any
means, electronic, mechanical, photocopying, recording or otherwise, without the
prior written consent of Adaptec, Inc., 691 South Milpitas Blvd., Milpitas, CA 95035.
Trademarks
Adaptec and the Adaptec logo are trademarks of Adaptec, Inc., which may be
registered in some jurisdictions.
Windows NT, Windows 2000, and Windows XP are trademarks of Microsoft
Corporation in the US and other countries, used under license.
Linux is trademarked by Linus Torvalds.
Red Hat® Linux® consists of hundreds of software modules, some developed by
Red Hat and many developed by other members of the open source community.
Those authors hold the copyrights in the modules or code they developed. At the
same time, the combined body of work that constitutes Red Hat® Linux® is a
collective work which has been organized by Red Hat, and Red Hat holds the
copyright in that collective work. Red Hat then permits others to copy, modify and
redistribute the collective work. To grant this permission Red Hat usually uses the
GNU General Public License ("GPL") version 2 and Red Hat's own End User License
Agreement. Although software licensed under the GPL is "open source software,"
Red Hat retains ownership of the copyright in its collective work.
Adobe, the Adobe logo, Acrobat, Acrobat Capture, and Distiller are trademarks of
Adobe Systems Incorporated.
Novell and NetWare are trademarks of Novell, Inc.
Open UNIX 8, UnixWare 7, and SCO OpenServer are trademarks of the SCO Group,
Inc.
All other trademarks are the property of their respective owners.
Changes
The material in this document is for information only and is subject to change
without notice. While reasonable efforts have been made in the preparation of this
document to assure its accuracy, Adaptec, Inc. assumes no liability resulting from
errors or omissions in this document, or from the use of the information contained
herein.
Adaptec reserves the right to make changes in the product design without
reservation and without notification to its users.
Disclaimer
IF THIS PRODUCT DIRECTS YOU TO COPY MATERIALS, YOU MUST HAVE
PERMISSION FROM THE COPYRIGHT OWNER OF THE MATERIALS TO AVOID
VIOLATING THE LAW WHICH COULD RESULT IN DAMAGES OR OTHER
REMEDIES.
ii
Contents
1
Introduction
Read this First 1-1
System Requirements 1-2
Storage Requirements for Drivers and Software 1-2
Motherboard Compatibility 1-2
SCSI Requirements 1-3
Kit Contents 1-3
Adaptec SCSI RAID Controller Features 1-4
About the Documentation 1-6
Using the Adaptec SCSI RAID Installation CD 1-6
Files and Folders 1-8
Product Documentation on CD 1-9
Errata and Release Notes 1-9
Installing the Adobe Acrobat Reader 1-10
Overview of the Installation Process 1-11
Adaptec Storage Manager Software Overview 1-12
Safety Information 1-13
Notes, Cautions, and Warnings 1-13
Electrostatic Discharge 1-14
2
Installing The Controller
Configuring SCSI Devices 2-1
LVD and SE Devices 2-2
Narrow and Wide SCSI Devices 2-2
Mixing Devices on a Channel 2-3
SCSI Cables 2-4
SCSI Device IDs 2-4
SCSI Termination 2-5
Installing the Controller 2-7
Determining the Booting Controller 2-7
Creating a RAID 5 Without an Operating System 2-9
Using the Adaptec RAID Configuration (ARC)
Utility 2-9
i
Adaptec SCSI RAID 2120S/2200S Installation Guide
Using the Adaptec Bootable CD 2-11
3
Installing the Driver
Driver Disks 3-2
A Note About CD Support 3-3
Creating the Driver Disk from the Bootable CD 3-3
Creating the Driver Disk on a Windows System 3-4
New Installations 3-5
Windows 2000 and XP 3-6
Installing the Driver in a New System 3-6
Adding the Controller to an Existing System 3-7
Windows NT 4.0 3-8
Installing the Driver in a New System 3-8
Adding the Controller to an Existing System 3-9
Linux 3-10
Red Hat Linux 3-11
SuSE Linux 3-13
Novell NetWare 3-14
Installing the Driver for a Boot Controller in a New
NetWare 5.1 or 6 Server 3-14
Installing the Driver in an Existing NetWare 5.1 or 6
Server 3-15
Loading the NetWare Drivers at Server Bootup 3-16
UNIX 3-17
SCO OpenServer 5 3-17
UnixWare 7 and OpenUNIX 8 3-19
ii
4
Installing
Adaptec Storage Manager-Browser Edition
About Adaptec Storage Manager-Browser Edition 4-1
Software Components 4-2
Using Custom or Minimal Installations 4-5
Installing Adaptec Storage Manager-Browser Edition 4-5
Windows System 4-5
User System Preparation Using Internet Explorer 4-7
User System Preparation Using Netscape Navigator 4-8
Linux system 4-9
UNIX Systems 4-10
A
Card and Module Diagrams
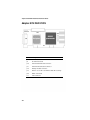
Adaptec SCSI RAID 2120S A-2
Adaptec SCSI RAID 2200S A-3
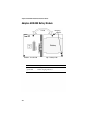
Adaptec ABM-300 Battery Module
B
A-4
Specifications
iii
1
Introduction
In this Chapter
Read this First
1-1
System Requirements
1-2
Kit Contents
1-3
Adaptec SCSI RAID Controller Features
1-4
About the Documentation
1-6
Using the Adaptec SCSI RAID Installation CD
1-6
Installing the Adobe Acrobat Reader
1-10
Overview of the Installation Process
1-11
Adaptec Storage Manager Software Overview
1-12
Safety Information
1-13
Read this First
Before you begin installing your new Adaptec SCSI RAID
controller, read this chapter. This chapter is an important guide to
the rest of the documentation and provides a summary of the
installation process.
1-1
Adaptec SCSI RAID 2120S/2200S Installation Guide
System Requirements
The following system requirements are discussed:
■
Storage requirements for drivers and software
■
Motherboard compatibility
■
SCSI requirements
Storage Requirements for Drivers and Software
Adaptec storage management software and device drivers will
require disk space of up to 20 MB.
Note: This information is provided as a guide for allocating
resources on your system. Space requirements may vary in
subsequent releases. Allocate more room on your hard disk
drive if in doubt. See page 1-13 for information about the
meaning of Notes.
A mouse and SVGA color monitor using a resolution of at least
800 x 600 with 16-bit color are also required.
Motherboard Compatibility
The Adaptec controller requires a motherboard BIOS that:
■
Complies with the PCI Local Bus Specification, Revision 2.2 and
higher.
■
Supports multifunction devices where one of the devices is a
PCI bridge.
■
Provides large memory-mapped address ranges.
Refer to the Readme file on the Adaptec SCSI RAID Installation CD
for information about motherboard compatibility and notable
comments about some motherboards that Adaptec has tested with
the Adaptec SCSI RAID controller.
1-2
Introduction
SCSI Requirements
While the Adaptec SCSI RAID 2120S/2200S are designed to work
with Ultra320 SCSI hard disk drives, they will operate, at a reduced
level of performance, with all Ultra 2 or higher SCSI devices. Use of
SCSI devices older than Ultra 2 is not suggested. Older devices will
adversely affect other devices attached to the same channel and
could cause a working Ultra 320 channel to become nonfunctional,
due to distance contraints inherent in using some of these older
devices.
More details about configuring and using SCSI devices are
available in Configuring SCSI Devices on page 2-1.
Kit Contents
Your Adaptec controller kit includes:
■
Adaptec SCSI RAID 2120S/2200S controller with 1 internal LVD
SCSI cable having a multimode terminator.
■
Low-profile bracket.
■
Warranty card.
■
Adaptec SCSI RAID 2120S/2200S CD; a bootable CD that
includes RAID management software, drivers, and
documentation.
1-3
Adaptec SCSI RAID 2120S/2200S Installation Guide
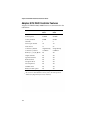
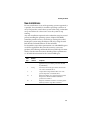
Adaptec SCSI RAID Controller Features
Adaptec SCSI RAID 2120S/2200S features are summarized in the
table below:
1
Adaptec
2120S
Adaptec
2200S
PCI bus width
64-bit
64-bit
PCI bus speed
66 MHz
66 MHz
Cache, standard
64 MB
64 MB
Channels
1
2
Devices per channel
151
151
Total devices
15
30
Connectors, internal
1 high density
2 high density
Connectors, external
1
RAID 0, 1, 5, 10, 50, JBOD
Yes
Yes
Simple Volumes
Yes
Yes
Spanned Volumes
Yes
Yes
RAID Volumes
Yes
Yes
Hot Spare drives
Yes
Yes
Hot swap drives
Yes
Yes
Audible alarm
Yes
Yes
Battery module option
Yes
Yes
VHDCI2
2 VHDCI2
SCSI RAID controllers support Ultra320 through Ultra 2 hard disk
drives and non-hard-disk-drive devices, such as CD and tape drives.
2 VHDCI (Very High Density Connector Interface).
1-4
Introduction
Adaptec SCSI RAID controllers support:
■
RAID levels 0, 1, 5, multilevel 10 and 50, and joining of available
space from connected drives into a logical volume.
■
Cache memory with Error Correcting Code (ECC).
■
PCI Local Bus Specification, Revision 2.2, with PCI clock speeds up
to 66 MHz.
■
Microsoft Windows® 2000, Windows® NT, Windows® XP,
Novell NetWare, SCO OpenServer, OpenUNIX, Red Hat Linux,
and SuSE Linux.
■
Operating system independent configuration and RAID
creation using Adaptec RAID Configuration (ARC).
■
Local and remote configuration, array status, and I/O
monitoring using Adaptec Storage Manager - Browser Edition.
■
Intelligent Hot Spares that automatically replace failed drives.
Hot Spares may be assigned to a specific array or globally. In the
event of a drive failure of a component of a redundant array,
that component will be rebuilt automatically onto a Hot Spare.
■
Flash ROM for easy upgrades of controller firmware.
■
Event logging and event mail notification.
■
RAID Level migration wherein a RAID may be changed from
one level to another without compromising the data.
■
Novell NetWare, Windows 2000, Windows NT, and Windows XP
only—Online Capacity Expansion (OCE) and extension during
normal operation on RAID 0, RAID 10, RAID 5, or RAID 50
arrays with the NTFS file system. Refer to the Adaptec SCSI
RAID Software User’s Guide for specific information.
■
Ultra 2 and above SCSI drives (including hard disk, tape,
CD-ROM, CD-RW, and Magneto-Optical drives) and jukeboxes.
See Mixing Devices on a Channel on page 2-3 for more details.
■
Multimode termination.
■
SAF-TE (SCSI Accessed Fault-Tolerant Enclosure) and SES
(SCSI Enclosure Services) enclosure support.
1-5
Adaptec SCSI RAID 2120S/2200S Installation Guide
About the Documentation
The complete documentation set for Adaptec SCSI RAID
controllers is supplied on the CD as electronically available
Portable Document Format (pdf) files. The set includes:
■
Installation Guide (this book)—Contains information that
helps you to configure and install your Adaptec SCSI RAID
controller and attached devices.
■
Adaptec SCSI RAID Software User’s Guide —Describes how to
use ARC, Adaptec Storage Manager -Browser Edition
software, and the Command Line Interface utility (CLI).
■
Adaptec SCSI RAID Software Reference Guide --- An in-depth
coverage of the commands available in the CLI, ACU DOS,
and AFU.
Adaptec Storage Manager-Browser Edition provides online help for
creating and managing RAIDs, including topical and pop-up help
displays. The documents listed above are included on the Adaptec
SCSI RAID Installation CD. Refer to page 1-9 for details.
Using the Adaptec SCSI RAID Installation CD
The Adaptec SCSI RAID Installation CD contains the Adaptec
Storage Manager-Browser Edition Software, ACU, CLI, device
drivers, and documentation needed to install and support your
Adaptec SCSI RAID Controller.
The Adaptec RAID Installation CD is a bootable disk, which means
you can use it to start a computer that has no operating system and
configure an array, provided your computer recognizes
bootable CDs.
Note: If your computer is not set for bootable CD support,
change the system BIOS so that the CD drive is used as a boot
device.
See page 1-13 for information about the meaning of Notes.
1-6
Introduction
If your computer has no operating system, the Adaptec RAID
Installation CD may be used to boot your computer, display a user
interface, and provide access to the following options:
■
Launch RAID configuration utility...—Starts Adaptec Storage
Manager-Browser Edition, which enables you to configure your
RAID and build disk arrays.
■
Create driver disk(s)...—Enables you to create a driver disk for
any supported operating system.
■
View documentation...—Displays a list of the available product
documents and the Readme file with the latest release notes.
Select a document name and click OK to view the information.
■
Start a command shell for UNIX or Linux users—This lets you
mount an additional device or enter other system commands
that might be required during the installation.
■
Reboot—Restarts the computer system. Before restarting, the
system will attempt to eject the CD. Please remove the CD.
If your computer is booted to a Windows operating system and
you insert the Adaptec SCSI RAID Installation CD in the drive, your
computer automatically reads the CD if it is set up to do so. If your
computer does not automatically read the CD, you can prompt it to
read the CD by clicking on autorun.exe from the root directory,
which presents the following options:
■
Install Adaptec Storage Manager - Browser Edition—Installs
Adaptec Storage Manager-Browser Edition software. For an
overview of the storage management software options, refer to
Adaptec Storage Manager Software Overview on page 1-12.
■
Install Adobe Acrobat Reader—Installs Adobe Acrobat Reader
for Windows to let you view the Adaptec documentation in
PDF format. Versions of Acrobat Reader for other platforms are
also included, refer to Installing the Adobe Acrobat Reader on
page 1-10.
■
View Release Notes—Displays release notes containing the
latest information for Adaptec SCSI RAID products and
software.
1-7
Adaptec SCSI RAID 2120S/2200S Installation Guide
■
View Documentation---Provides a quick means to access the
electronically stored documents, in PDF form, that are included
on the CD.
■
Create Driver Diskette---Enables you to create a driver disk for
any supported operating system.
Files and Folders
If your installation process requires you to directly access files on
the Adaptec SCSI RAID Installation CD, you can save time by
limiting your browsing to the following files and folders, available
at the root level:
■
Autorun executable—In Windows, click on autorun.exe if your
computer does not automatically execute it when you insert the
CD in the drive.
■
Readme text file—Contains additional technical information
about device compatibility, operating system support, and
drivers.
■
DOCS folder—Contains the user documentation PDF files.
■
PACKAGES folder (and subfolders)—Contains the
management software and device drivers.
■
SOURCES Folder (and subfolders)—Contains driver source
files and other components developed under the GNU General
Public License (GPL) agreement.
1-8
Introduction
Product Documentation on CD
The Adaptec SCSI RAID Installation CD contains the following
documents:
Subject
CD Location
Adaptec SCSI RAID 2120S/2200S
Installation Guide
/docs/RAID Install Gd 513217vAA.pdf
Adaptec SCSI RAID Software User’s
Guide
/docs/RAID SW Gd 513218vAA.pdf
Adaptec SCSI RAID Software
Reference Guide
/docs/RAID SW Ref 513399vAA.pdf
You can view these documents only if you have Acrobat Reader or
Viewer installed on your computer. For details, refer to Installing
the Adobe Acrobat Reader on page 1-10.
You can download these documents from the Adaptec Web site at
http://www.adaptec.com. The documents available from the Adaptec
Web site may be more recent versions than those on the CD.
Errata and Release Notes
Before beginning your installation, review the errata and release
notes associated with the Adaptec controller, software, and
documentation. To read this information, select Release Notes
from the View Documentation list or open the Readme file in the
root directory of the CD using a text editor.
Updates to the Release notes for this product may be posted on the
Adaptec web pages at www.adaptec.com.
1-9
Adaptec SCSI RAID 2120S/2200S Installation Guide
Installing the Adobe Acrobat Reader
Both Adobe Acrobat Reader and Viewer are provided on the
Adaptec SCSI RAID Installation CD. These applications enable you
to view the Portable Document Format (PDF) files on the Adaptec
SCSI RAID Installation CD. Acrobat Reader is also available from
Adobe as a free download. For details, go to http://www.adobe.com.
How you use Reader or Viewer varies by operating system, as
described below:
■
Windows—To install Acrobat Reader, choose the appropriate
option. If Autorun is disabled, click Autorun on the root to
enter.
■
UNIX—Use Acrobat Viewer because Reader is not available for
all operating systems. Your system must have Java Runtime
Environment 1.1.7B dated April 11, 2000 or later. The Viewer is
located on the Adaptec SCSI RAID Installation CD at <mountpoint>/Acrobat_Reader.
Note: You can download Java Virtual Machine (JVM) from
http://java.sun.com for all supported platforms.
See page 1-13 for information about the meaning of Notes.
■
NetWare—Acrobat Reader and Viewer are not available for this
operating system or any DOS environment. You need to use a
computer that supports Acrobat Reader or Acrobat Viewer.
■
Linux—Acrobat Reader is located on the Adaptec SCSI RAID
Installation CD at <CD mount location>/packages/Linux/RedHat/
apps/adobe. Be sure to use the full path when viewing this
location. If the path gets truncated, you may not see the correct
location.
1-10
Introduction
Overview of the Installation Process
The following steps provide an overview of the process of
installing and setting up the controller and configuring the RAID:
1 Read this entire chapter.
2 Verify that your motherboard is compatible with the controller.
For details, refer to Motherboard Compatibility on page 1-2.
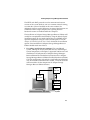
3 Gain familiarity with the features and functions of the Adaptec
SCSI RAID Installation CD. Refer to page 1-6 for details.
4 Install and configure your Adaptec SCSI RAID controller and
hard drives according to the instructions in Chapter 2. If you are
upgrading an existing system and will be using existing SCSI
drives as part of your array(s), back up all data.
5 If you will be starting your system from an array (sometimes
referred to as ‘booting’ the system), use the Adaptec RAID
Configuration utility (ARC) to set up the boot array. Another
approach would be to start your system using the Adaptec SCSI
RAID Installation CD, and create any arrays needed. Refer to
Creating a RAID 5 Without an Operating System on page 2-9 for
details, or review the information in the Adaptec SCSI RAID
Software User’s Guide.
6 Install the controller driver according to the instructions in
Chapter 3. If you are building a new system, installing the
driver involves installing the operating system, too.
Chapter 3 presents numerous scenarios for installing the driver.
Identify the scenario that applies to your system before
proceeding.
7 Optional—Install Adobe Acrobat Reader if you do not have
Acrobat installed on your computer. If you need to upgrade
Acrobat, do so now. You need Acrobat to view and print the
documentation on the Adaptec SCSI RAID Installation CD.
8 Install Adaptec Storage Manager-Browser Edition on your
system. For an overview, refer to Adaptec Storage Manager
Software Overview on page 1-12. Installation procedures are
described in Chapter 4.
1-11
Adaptec SCSI RAID 2120S/2200S Installation Guide
Adaptec Storage Manager Software Overview
Your Adaptec SCSI RAID controller includes the following
software tools to manage your storage subsystem:
■
Adaptec Storage Manager-Browser Edition—Browser based
storage management software that provides all of the creation,
management, data logging, messaging, and remote control
needed to manage arrays on your network. The Browser
Edition of Adaptec Storage Manager provides a great deal of
flexibility in how it may be set up and used (see Software
Components on page 4-2 for more details). Arrays may be
managed on systems using the following operating systems:
■
Windows 2000, Windows NT, Windows XP
■
SuSE Linux 7.3 and 8.0, Red Hat Linux 7.2 and 7.3
■
SCO UnixWare 7 and OpenServer 5
■
Open Unix 8
■
Novell NetWare 5.x and 6.x
The Web server portion of Adaptec Storage Manager-Browser
Edition may be installed on:
■
Windows 2000, Windows NT, Windows XP
■
SuSE Linux 7.3 and 8.0, Red Hat Linux 7.2 and 7.3
The Client portion of Adaptec Storage Manager-Browser
Edition may be set-up on any system using Internet Explorer 5.0
or higher or Netscape 6.0 and higher.
■
Command Line Interface utility (CLI)—Provides the same
functions as Adaptec Storage Manager in environments where a
Graphical User Interface (GUI) is not available or desired. It is
also scriptable, making it an invaluable companion RAID
configuration utility in environments where many similarlyconfigured RAID subsystems must be replicated quickly. For
details, refer to the Adaptec SCSI RAID Software User’s Guide.
1-12
Introduction
■
Adaptec RAID Configuration utility (ARC)— Part of the
controller’s built-in BIOS code. You can start ARC by pressing
Ctrl+A during BIOS startup. For details, refer to Determining the
Booting Controller on page 2-7 or see the related chapter in the
Adaptec SCSI RAID Software User’s Guide.
■
Array Configuration Utility (ACU)--- A DOS application used
to create, configure, and manage arrays.
Safety Information
Any device that uses electricity must be treated with caution. To
ensure general safety, follow these guidelines:
■
Keep your work area and the computer clean and clear of
debris. Eliminate hazards such as spills or bad wiring.
■
Before opening the system cabinet, unplug the power cord.
Notes, Cautions, and Warnings
This Installation Guide uses notes, cautions, and warnings that
emphasize important information, as described below:
Note: Emphasizes important information that, if ignored,
would not result in injury, property damage, or data loss.
!
Caution: Emphasizes important information that, if ignored,
could cause equipment failure or loss of data.
Warning: Indicates a hazard that could cause injury or property
damage.
1-13
Adaptec SCSI RAID 2120S/2200S Installation Guide
Electrostatic Discharge
Electrostatic discharge (ESD) is a natural by-product of human
activity. ESD is transmitted by materials that retain and accumulate
electrical charges.
!
Caution: ESD can damage electronic components when they
are improperly handled and can result in complete or
intermittent failures. Always follow ESD-prevention
procedures when removing and replacing components.
To prevent ESD damage, follow these guidelines:
■
Always use an ESD wrist or ankle strap and ensure that it
makes skin contact.
■
Connect the equipment end of the strap to an unpainted metal
chassis surface.
■
If no wrist strap is available, ground yourself by touching the
metal chassis.
■
When installing or removing a component, use any available
ejector levers or captive installation screws to properly seat the
bus connectors in the backplane or card slot. These devices
prevent accidental removal, provide proper grounding for the
system, and help to ensure that bus connectors are properly
seated.
■
Handle adapter cards by available handles or edges only. Avoid
touching the printed circuit boards or connectors.
■
Avoid contact between printed circuit boards and clothing. The
wrist strap only protects components from ESD voltages on the
body; ESD voltages on clothing can still cause damage.
■
Place a removed component board-side-up on an antistatic
surface or in an approved antistatic container.
■
If you plan to return the component to Adaptec, immediately
place it in a static-shielding container.
1-14
2
Installing The Controller
In this Chapter
Configuring SCSI Devices
2-1
Installing the Controller
2-7
Creating a RAID 5 Without an Operating System
2-9
Configuring SCSI Devices
When configuring devices for Adaptec SCSI RAID 2120S/2200S
controllers, you may need to:
■
Decide how to position drives on the SCSI channel.
■
Select cables.
■
Provide adapters for devices that need them.
■
Configure termination on devices that offer termination, as
required.
■
Set the controller for starting or booting the system.
■
Set the SCSI IDs.
In general, drives used in a RAID configuration should be as alike
as possible in terms of capacity and performance.
2-1
Adaptec SCSI RAID 2120S/2200S Installation Guide
LVD and SE Devices
Use of Ultra 2 or later drives is recommended. Ultra 2 was the first
SCSI specification using Low Voltage Differential (LVD) signaling,
use of LVD devices is recommended for creating arrays. Singleended (SE) devices function with the Adaptec SCSI RAID 2120S/
2200S controllers. If attached, however, an SE SCSI device will
cause the channel to slow to Ultra SCSI speed (20 MHz) or less for
all devices. Other limitations and configuration challenges may
ensue from use of SE devices.
When using the controller to create arrays, keep all of your high
performance devices on the same channel. See Mixing Devices on a
Channel later in this chapter for more information.
Narrow and Wide SCSI Devices
You can attach either narrow (8-bit) or wide (16-bit) SCSI devices to
your Adaptec SCSI controller. If using narrow and wide devices on
the same wide cable, use a cable with an attached terminator or put
one of the wide devices at the end of the cable. This ensures that the
16-bit signals are correctly terminated. See the following section for
more details and diagrams that may be helpful.
Note: To ensure proper termination, use the supplied cable or
one like it, having a multimode terminator built in, and
disable termination on all attached devices to that cable. LVD
devices do not offer termination and must be used with a
cable of this type.
Wide devices allow data to be transferred at twice the rate of
narrow devices of the same rating. The wide channel is backward
compatible with narrow devices, allowing both types of SCSI
devices to be used with the same controller. The narrow interface is
still used with some SCSI devices, such as tape and CD-ROM
drives.
2-2
Installing The Controller
Mixing Devices on a Channel
There are numerous types of SCSI devices on the market, and it
may be tempting to mix state-of-the-art devices with others that
may be available. While most combinations will work,
performance will be degraded. Adaptec Ultra320 RAID controllers
are meant to be used to construct arrays using Ultra320 drives and
Ultra320 cables. Mixing any other type of device or cable with
Ultra320 devices may reduce the performance on that channel.
The Adaptec SCSI RAID controllers may be used in LVD mode or
SE mode. To operate at their maximum designed rate, LVD devices
must be connected only with LVD devices on a channel. The cable
used with LVD devices must supply the termination, since LVD
devices do not provide termination. LVD devices will
automatically connect as SE if any SE only device is connected to
that channel.
!
Caution: If you have older SCSI-2 devices with a High Voltage
Differential (HVD) interface, DO NOT USE THEM with the
Adaptec SCSI RAID controller. Doing so will damage the
controller.
Use of Ultra 2 devices will reduce the performance dramatically!
Other LVD devices attached typically won’t impact the
performance of Ultra320 devices on the same channel, although the
maximum transfer rate of each LVD device will be limited to that
device’s native design speed.
If SCSI devices other than LVD interfaced hard disk drives (SE)
have to be attached to your system, they are best connected either
to a separate SCSI controller, or a channel of the RAID controller
not used by any arrays. This is due to the SE devices limiting the
transfer rate of all devices attached to that channel. SE
specifications allow for maximum connecting cable lengths of
either 1.5 m or 3 m, depending on transfer speed. This alone could
make the addition of an SE device to a working system not
function if the system was operating in LVD mode and using
longer cable lengths as allowed by later versions of SCSI.
2-3
Adaptec SCSI RAID 2120S/2200S Installation Guide
SCSI Cables
Adaptec recommends using Ultra 320 SCSI devices and good
quality (or better) LVD SCSI cables designed and rated for
Ultra 320 use. These can be purchased from Adaptec at
www.adaptec.com. Using cables not rated for Ultra 320 operation
may adversely impact the performance of your system.
SCSI Device IDs
The SCSI specification allows up to 16 devices (one has to be the
controller) to be connected to a SCSI channel. Narrow SCSI devices
only support a maximum of 8 devices, and may be attached using
appropriate convertors for each device. Be aware that narrow
devices are almost always SE.
All SCSI devices, including the controller, must be assigned a
unique SCSI ID. SCSI IDs, which are typically set using jumpers or
switches on peripheral devices, can be assigned any number from 0
to 7 for 8-bit SCSI devices or 0 to 15 for Wide SCSI devices.
Since devices used with the Adaptec SCSI RAID controller should
be LVD, the SCSI ID of each device will be a unique number
between 0 and 15. The Adaptec SCSI RAID controller is set to ID 7
by default (most SCSI controllers use ID 7). SCSI IDs can only be
duplicated on the same controller if the devices using the same ID
are not attached to the same controller channel.
SCSI enclosures, using SCSI drives with 80 pin SCA connectors,
typically assign the drive ID automatically when the drive is
inserted. No setting of the ID is necessary when using drives with
such an enclosure unless your enclosure requires it. Consult the
enclosure documentation if you need assistance.
The Adaptec SCSI RAID controller ID can be changed to any ID
from 0 through 7. Use ARC to change the controller SCSI ID.
Note: Unless changing the controller ID is essential to system
operation, it should be set to SCSI ID 7.
2-4
Installing The Controller
SCSI Termination
Proper termination of channels used with SCSI devices is critical in
having the system work properly. The basics of termination are:
■
Use SCSI cables certified for Ultra320 operation to allow the
system to work at full speed.
Note: The cable that came with your Adaptec SCSI
RAID 2120S/2200S controller has a built-in multimode
terminator on one end. This is meant to be located at the
opposite end of the cable from the attachment to the
controller. None of the devices attached to this cable
should be terminated. Like this cable, SCSI cables meant
for Ultra320 have multimode termination.
■
Enable termination on the physical end of a SCSI cable opposite
its connection to the controller (see the note above and the
following figure). If the controller is at one end of the SCSI
cable, leave the controller’s termination set to On for that
channel. Turn the controller’s termination setting Off only if
both internal and external cables and terminators are attached
to that channel. Any cables attached to a channel that doesn’t
have any devices or terminators attached should be
disconnected from the controller prior to starting the system.
■
If you are using multiple SCSI channels on a single controller, as
is possible on the Adaptec SCSI RAID 2200S, terminate each
channel separately.
SCSI termination for Adaptec SCSI RAID controllers is configured
through ARC. The controller has two possible termination settings:
Setting
Function
Auto (Default)
Used for most cabling conditions.
Disabled
Disables controller termination unconditionally.
2-5
Adaptec SCSI RAID 2120S/2200S Installation Guide
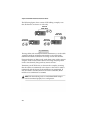
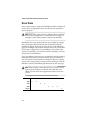
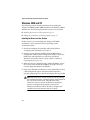
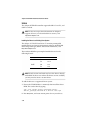
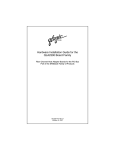
The following figure shows various SCSI cabling examples, note
that all channels are shown as wide only.
Internal
Wide SCSI
T
T
Internal
Wide SCSI
T
External
Wide SCSI
T
T
External
Wide SCSI
T
T = Terminated
If using cables with attached mutimode terminators, as in the cable
supplied, configure controller termination to auto unless both
internal and external connectors are being used on that channel.
If narrow devices are being used, attach them using wide to narrow
adapters. If SE or other slower devices are being used, keep them
on the same channel, along with any narrow devices.
Terminate your SCSI devices as shown in the examples, ensuring
that the cables are terminated, or the device at the end of a cable is
terminated, and the devices in the middle are not terminated. If
only one cable is attached, then one end is the controller, which
must have its termination set to auto.
Note: Each channel being used on a multichannel RAID adapter
must be terminated properly for its configuration.
2-6
Installing The Controller
Installing the Controller
To install the controller in the system cabinet:
1 If needed for your system, install the low-profile bracket
supplied in the kit that came with the controller.
2 Connect the computer’s disk activity LED cable to the
appropriate connector on the controller. See Appendix A for the
location of this connector for your controller model.
Ensure that the positive lead of the LED cable, usually a red
wire or a wire marked with a red stripe, is attached to pin 1 and
the negative lead, usually a black wire, is attached to pin 2.
3 Connect any internal drive cables now.
4 Install the controller in an available 32- or 64-bit PCI bus slot
and secure the controller bracket to the host system cabinet with
the screw provided with the system.
5 Connect any external cables to the controller.
Determining the Booting Controller
The Adaptec SCSI RAID 2120S/2200S are shipped configured to be
a bootable controller. The default setting of the controller and
system BIOS Setup usually will allow you to install and boot from
either a hard disk drive connected to the motherboard, or from a
drive or array connected to the controller.
If you already have an operating system installed on a hard disk
drive connected to the motherboard and you want to boot a second
operating system from the Adaptec SCSI RAID 2120S/2200S will
you have to modify the system’s BIOS settings.
In this case, enter the system BIOS Setup and look for the hard disk
boot sequence. Move the Adaptec SCSI RAID 2120S/2200S to the
top of the list.
2-7
Adaptec SCSI RAID 2120S/2200S Installation Guide
Controller Setup
On the controller setup you need to enable the following:
1 Enter the ARC utility by pressing Ctrl+A when the Adaptec
message appears.
2 Use the Disk Utilities menu item to examine the drives showing
as available to the system. If any seem to be missing, power the
system down and inspect the hardware connections.
3 Use the SCSISelect Utility menu item to inspect the hardware
configuration of the controller and the drives.
Verify that all peripheral devices and controllers are shown. If
any devices are missing from the display, exit the utility and
check your hardware connections.
4 If the boot device will be an array, create that array now. You
can create or modify other arrays later. See Creating a RAID 5
Without an Operating System on page 2-9 for more details.
5 Exit the Configuration Utility.
The system begins building newly created or modified arrays.
For large arrays using the Clear option, this process may take
several hours. When using the Build With Verify option, you
can perform other activities on the system while the build
operation continues. Perfromance of the array will be decreased
until the initialization is complete.
Use of the Quick (Quick Init) option will allow use of the new
array as soon as it has been created, but write performance on
RAID 5s and RAID 50s will be reduced. This will be true until a
Verify with Fix is performed on that array.
When the RAID has finished building proceed to install the
operating system to the bootable array.
2-8
Installing The Controller
Creating a RAID 5 Without an Operating System
This part of the Installation Guide provides a quick installation of a
RAID 5 system with the minimum three drives attached to
channel 0 of an Adaptec SCSI RAID 2200S controller. Details will
not be offered, and optional parameters or selections along the way
will not be explored. For more details, please consult the Adaptec
SCSI RAID Software User’s Guide included on the CD.
This quick installation also assumes that the controller card and
drives have been installed. Two installation scenarios will be
presented, one using the ARC utility that is embedded on the
controller card. When using ARC to construct an array, the system
will require a keyboard and display.
The other method will be to use the CD to construct the RAID 5 by
using the boot capability of the CD. This will also be done directly
on the Managed System using a keyboard, mouse, and display.
Using the Adaptec RAID Configuration (ARC) Utility
1 Start or restart the system. Press CTRL-A when the display
indicates the Adaptec SCSI RAID controller is being started by
displaying lines of text starting with:
Adaptec SCSI RAID. . .
2 A blue-background screen appears with the title Adaptec 2xx0S
RAID Controller SCSISelect Utility. Press Enter since the
desired Array Configuration Utility is highlighted by default.
Note: If more than one controller of the Adaptec SCSI
RAID 2120S/2200S family is installed, the first screen will
show the controllers present. Highlight the controller you
wish to use and press Enter to get to the screen in this step.
3 The Array Configuration Utility screen appears. Using the
arrow keys, highlight Initialize Drives, then Enter.
Note: All drives being used in an array or volume must be
initialized.
2-9
Adaptec SCSI RAID 2120S/2200S Installation Guide
4 Using the arrow keys again, highlight the three drives to be
used for the RAID 5, press Insert when a desired drive is
highlighted. Selected drives will be displayed in the box on the
right side of the display. When the desired three drives are on
the right side, press Enter to continue.
5 A red warning box appears. Press Y, then Enter to continue. The
system will initialize the selected drives, in a few seconds.
6 The Array Configuration Utility screen reappears. Using the
arrow keys, highlight Create Array, then Enter.
7 Using the arrow keys as in Step 4, highlight the three drives for
the RAID 5, press Insert when a desired drive is highlighted.
When the desired three drives are on the right side, press Enter
to continue.
8 On the next screen, most of the default entries will be used by
pressing Enter when they are highlighted. Make the following
selections and entries:
Property Line Displayed
Entry or Selection
Array Type
Select RAID 5, press Enter
Array Label
Type a suitable name in the space
provided, press Enter.
Array Size
Enter. Press Enter again to use
the default drive granularity of
GB.
Stripe Size
Enter
Read Caching
Enter
Write Caching
Enter
Create RAID via
Enter
[Done]
Enter
A Creating Array window appears briefly. Press Enter to
continue with the array configuration.
Note: The array will be usable immediately, but will
continue to build until finished, impacting performance
until it is done.
2-10
Installing The Controller
9 Press Esc until the Exit Utility window appears. Highlight Yes,
then press Enter. The system will restart. If an operating system
needs to be loaded, it may be loaded using the normal
installation instructions for that operating system onto the
RAID 5 as a single drive.
10 You will need to load the appropriate driver for the Adaptec
SCSI RAID controller card to support that operating system
once the operating system is installed.
Using the Adaptec Bootable CD
1 Insert the CD and start the system.
Note: During the system start, you may need to enter the
system’s BIOS settings and enable booting from the CD.
Other settings may be needed if this system has been
configured to operate without a display of input devices.
2 Select the appropriate language on the Language screen, press
Enter. Read the information on the Licenses screen, then press
Enter again.
3 After a number of seconds, the system will display the
Adaptec Bootable CD Main Menu. Select the option
Launch Configuration Utility.
4 The system will start Mozilla as a browser and launch Adaptec
Storage Manager-Browser Edition.
5 On the Storage Manager screen that appears, click on the
next to the drive icons shown on the left side of the screen. The
drive icons will now be shown one per line underneath one
another.
6 Click the Create button on the right side of the screen. The
display will expand to include a yellow Create area, starting
with step 1 of 3.
7 In step 1 of 3, click the RAID 5 button, then Next.
8 In step 2 of 3, click the three drives to be used in your RAID 5 on
the left side of the screen. Each selected drive will have a
checkmark. Click Next.
2-11
Adaptec SCSI RAID 2120S/2200S Installation Guide
9 On step 3 of 3, type the name you wish to assign to the RAID 5
you are creating, then click Finish.
A pop-up window appears, notifying you that the system is
creating the array in hardware. When it disappears, the display
will refresh. It will look the same as it did originally, with the
addition of showing the RAID 5 you’ve created appearing on the
right side of the display as a dynamic icon with a 5. You may use
the array immediately, but you may wish to allow the array to
finish building before restarting the system, especially if you are
going to install the operating system to the new array.
When you are ready to continue, close the Mozilla window that is
the active browser. You are back on the Main Menu. If desired, you
may wish to review other documentation before proceeding.
Click Reboot to restart your system. Remove the CD when the
system ejects it.
You may now use the system as you normally would, with the
three drive RAID 5 acting as a logical drive. You may install an
operating system to this drive, or use the RAID 5 as you would any
disk drive.
2-12
3
Installing the Driver
In this Chapter
Driver Disks
3-2
New Installations
3-5
Windows 2000 and XP
3-6
Windows NT 4.0
3-8
Linux
3-10
Novell NetWare
3-14
UNIX
3-17
This chapter presents several scenarios for installing the controller
driver. First, create any driver disk(s) you will be needing by
following the instructions in the next section. Then, identify the
appropriate operating system and installation scenario, read the
entire procedure and related explanations before proceeding.
3-1
Adaptec SCSI RAID 2120S/2200S Installation Guide
Driver Disks
Any system having an Adaptec SCSI RAID controller installed will
need to have an appropriate driver installed for the controller to
operate properly.
Note: When using Adaptec Storage Manager-Browser Edition
to create and manage arrays, a system that is not acting as a
managed system will not require a driver to be installed.
Installations are easier when the drivers are available on a floppy
disk. Creating this driver disk from the CD included with the
controller is simple. There are two ways shown on the following
pages for making the driver disk. The first starts your system from
the CD and is suggested if you are building a new system, if the
system isn’t running as you start this driver installation, or if your
system doesn’t run Windows.
If you are adding a new driver to a system that is already running,
starting from the CD may not be desirable. For those situations,
you can create the driver disk by inserting the CD into a running
system (or by using another system, since this technique works on
Windows systems) and following the directions on the next page.
Note: When creating a driver disk for Linux system use, four
types of processor types are offered; i386, i586, i686, and
Athlon. Use the driver that supports the processor on your
system.
Driver
i386
i586
i686
Athlon
3-2
386
486
x
x
P1
P2
x
x
P3
P4
x
x
K-6 Athlon
x
x
Installing the Driver
A Note About CD Support
If the CD-ROM reader device is attached to the controller card
included as part of this kit, the controller BIOS will need to be
configured to allow the CD reader to work. To configure the card
for this use, follow these steps:
1 While the system is starting, press Ctrl-A when the controller
card displays its message on the screen.
2 When the first SCSI Select Utility window appears, select the
option SCSI Select Utility.
3 Click Controller Configuration.
4 Use the arrow keys on your keyboard to position the cursor
over CD-ROM Boot Support, then Removable Media Devices
Support. Make both lines Enabled, if they aren’t already.
5 Press Esc until the Reboot window appears. Allow the system
to restart.
Creating the Driver Disk from the Bootable CD
These instructions cover creation of disks for Windows, Novell,
SCO Unix, and Linux. To create a driver disk:
1 Ensure your system BIOS is ready to boot from the CD-ROM
drive. See your system documentation if you need help. Insert
the CD that came with the controller, and start your system
from the CD. Follow instructions and respond to prompts as
necessary to get to the Adaptec Main Menu.
2 From the Main Menu, select Create Driver Disk(s). . .
3 Review the type of installation you are doing elsewhere in this
chapter to know what type of driver disk to create. Click on the
type of driver disk desired, then click OK.
4 When the screen prompts you to insert a disk and click OK, do
so. The system will format the disk, insert a file system, if
needed, and write the appropriate information onto it. When
finished, the screen will display another OK button.
5 Remove the driver disk and click OK. Label the disk to
represent the driver disk created.
3-3
Adaptec SCSI RAID 2120S/2200S Installation Guide
After creating the disk, keep it ready for the installation you will be
following later in this chapter.
Creating the Driver Disk on a Windows System
Use the CD to create the driver disk by inserting the CD into a
CD-ROM drive on a Windows system.
1 When the menu appears, select Create Driver Diskette.
2 Enter the number representing the operating system desired,
then press Enter.
3 Follow the prompts given. The driver disk will be formatted if
selected, then the desired information will be copied to it.
4 Remove and label the disk as a Driver Disk, note the operating
system supported.
3-4
Installing the Driver
New Installations
For new installations of any of the operating systems supported, it
is possible, if not desirable, to install the operating system on an
array. This provides a more robust system when using a redundant
array, since failure of a drive won’t cause the system to stop
running.
Any such installation requires that the redundant array be created
prior to installing the operating system. Adaptec SCSI RAID
controllers provide two ways to do this, by starting (also called
booting) the system using the Adaptec CD, or by using the tools
built into the on-board firmware on the controller.
It is beyond the scope of this presentation as to which RAID type to
use for this application. But, since the user may want some
guidance, the following condensed table may offer help. For more
details, consult external resources detailing relative performance
vs. desirable characteristics for the various RAID types.
RAID
Type
Minimum
Number
of Drives
Properties
0
2
Not redundant - do not use RAID 0 for this
application if you want the protection afforded
by redundancy.
1
2 only
Fast writes and reads, equivalent to the transfer
rate of the constituent drives.
5
3
Comparable read speed but rather slow write
speed compared to constituent drives.
10
4
Requires multiples of 2, starting with 4. Provides
the speed of a RAID 0 with the redundant
protection of a RAID 1.
50
6
Requires a minimum of 6 drives. Provides greater
efficiency in drive usage than a RAID 10.
3-5
Adaptec SCSI RAID 2120S/2200S Installation Guide
Windows 2000 and XP
The following sections describe procedures for installing the
Adaptec SCSI RAID 2120S/2200S controller with Windows 2000 or
Windows XP. The following installation scenarios are described:
■
Installing the Driver in a New System on page 3-6
■
Adding the Controller to an Existing System on page 3-7
Installing the Driver in a New System
In this scenario, you are installing the Adaptec SCSI RAID
controller in a new system that has no operating system.
To install the driver:
1 Install and configure the controller and hard disk drives
according to the instructions in Chapter 2.
2 Start the system, pressing Ctrl-A to enter the BIOS-based
configuration utility. Use the configuration utility to create the
RAID array and logical drive to which you will install
Windows. For details, refer to Creating a RAID 5 Without an
Operating System on page 2-9.
3 When the array has been built and is finished building, restart
the system. Insert the Windows 2000 or XP setup CD as you
restart to begin the Windows installation.
4 Early in the Windows installation, a screen with white text and
a blue background appears after the hardware detection
message, prompting you to install a third-party driver, press F6.
Note: You only have 5 seconds to press the F6 key during
the installation startup. A prompt appears at the bottom of
the screen when F6 is active. Press F6 at this time;
otherwise, you must restart the Windows installation
process to complete this procedure correctly. The
Windows installation will not be able to recognize the
controller and array until the driver is in place.
3-6
Installing the Driver
5 Insert the driver disk and wait until prompted to install a
driver. Press S to specify that the driver is on the floppy disk,
and press Enter. The installation process will read the disk
looking for a suitable driver.
6 When the Adaptec SCSI RAID driver is found, press Enter.
Follow the on-screen instructions, responding as needed to
complete the installation.
Adding the Controller to an Existing System
In this scenario, you are adding an Adaptec SCSI RAID 2120S/
2200S controller to a system that already has a Windows 2000 or XP
operating system.
To install the driver:
1 Install and configure your controller and hard disk drives
according to the instructions in Chapter 2.
2 Start Windows. Windows launches the Found New Hardware
Wizard, which searches for the controller driver.
3 Insert the driver disk you created at the beginning of this
chapter. Select the disk drive as the source, then click Next..
Since the driver is also on the installation CD, you may wish to
insert the installation CD and have Windows search it for the
driver. Windows will find multiple drivers, select the
appropriate one for the operating system being used.
4 Click Next in the succeeding two windows that appear and
follow the on-screen instructions to complete the controller
installation.
5 Remove the driver disk and restart the system.
3-7
Adaptec SCSI RAID 2120S/2200S Installation Guide
Windows NT 4.0
The following driver installation scenarios exist for
Windows NT 4.0:
■
Installing the Driver in a New System on page 3-8
■
Adding the Controller to an Existing System on page 3-9
Installing the Driver in a New System
In this scenario, you are installing an Adaptec SCSI RAID
controller and Windows NT 4.0 in a new system.
Note: If Windows NT is to coexist with another operating
system, the other operating system must be installed before
you install Windows NT.
To install the driver:
1 Install and configure your Adaptec SCSI RAID controller and
hard disk drives according to the instructions in Chapter 2.
2 Start the system, pressing Ctrl-A to enter the BIOS-based
configuration utility. Use the configuration utility to create the
RAID array and logical drive to which you will install
Windows. For details, refer to Creating a RAID 5 Without an
Operating System on page 2-9.
3 When the array has been built and is finished building, restart
the system. Insert the Windows NT setup CD or disk as you
restart to begin the Windows installation.
4 Early in the Windows installation, a screen with white text and
a blue background appears after the hardware detection
message, when it appears, press F6. If you miss pressing F6 in
time, you will need to restart the system.
Note: You only have 5 seconds to press the F6 key during the
installation startup. Press F6 at this time; otherwise, you
must restart the Windows installation process to complete
this procedure correctly. Windows will not be able to
recognize the controller and array without the driver.
3-8
Installing the Driver
5 Insert the driver disk you created at the beginning of this
chapter. Press S to specify that the driver is located on the
floppy disk, and press Enter. The installation process will read
the disk looking for a suitable driver.
6 When the Adaptec SCSI RAID driver is found, press Enter.
Follow the on-screen instructions, responding as needed to
complete the installation.
Adding the Controller to an Existing System
In this scenario, you are adding an Adaptec SCSI RAID controller
to an existing Windows NT system.
To install the driver:
1 Before adding the controller or shutting down the system, open
the Control Panel. Click the SCSI Adapters icon. Then select the
Drivers tab and click Add.
2 Insert the driver disk you created at the beginning of this
chapter, then click Have Disk. Since the driver is also on the
installation CD, you may wish to insert the installation CD and
have Windows search it for the driver. It would be located in a
driver folder at <drive letter of the CD>/packages/
Windows_NT.
3 Select Adaptec SCSI RAID 2xx0S Controller.
4 After the driver is loaded, shut down the system.
5 Insert the Adaptec SCSI RAID controller. For installation
details, refer to Chapter 2.
6 Start the system.
7 If you are removing an existing controller, you should also
remove the old driver. To do so, open the Control Panel, click
the SCSI Adapters icon, select the old driver, and click Remove.
3-9
Adaptec SCSI RAID 2120S/2200S Installation Guide
Linux
The Adaptec SCSI RAID controller supports Red Hat 7.2 and 7.3, and
SuSE 7.3 and 8.0.
Note: For the most up-to-date information on Adaptec’s
support of Linux, or to download driver sources, visit
http://linux.adaptec.com.
Installing the Driver to an Existing Linux System
The Adaptec SCSI RAID Installation CD contains precompiled
module drivers and storage management software in RPM (Red
Hat Package Manager) format. For current information, visit
http://linux.adaptec.com.
The 2.0 driver RPM has precompiled module drivers for the
following kernels:
Vendor
Version
Kernel Version
Red Hat
7.3
2.4.18-3
7.2
2.4.9-11
8.0
2.4.18
7.3
2.4.10
SuSE
Note: Kernel versions not listed may have the drivers already
embedded. In those cases where the drivers are not available,
you may need to create a custom driver.
To add the driver to a supported Linux system:
1 Ensure the CD-ROM drive is mounted, then install the driver
RPM. This can be done by typing:
rpm -Uvh <mount-point>/packages/Linux/
driver_package/aacraid-0.9.10-27D.i386.rpm
2 Run fdisk, mkfs, and create mount points for any new drives.
3-10
Installing the Driver
Red Hat Linux
Note: A SCSI CD-ROM drive attached to the controller cannot
be used in any installation of an Adaptec SCSI RAID 2120S/
2200S to a system that will be running Linux. This restriction
isn’t just for the installation of the driver or the operating
system, but generally. The Adaptec SCSI RAID 2120S/2200S
Linux driver will not operate with anything but hard disk
drives.
Installing the Driver in a New Red Hat 7.2 Linux System
In this scenario, you are installing the controller in a new Red Hat
Linux system.
Note: To install Red Hat to drives using an Adaptec SCSI
RAID 2120S/2200S, you need to download the updates disk
for the Anaconda Installer from www.redhat.com. A bug in
the Red Hat installer for 7.2 makes this necessary. This
updates disk will be used in the following installation steps.
To install the driver:
1 Install and configure your Adaptec SCSI RAID controller and
hard disk drives according to the instructions in Chapter 2.
2 Start the server. During startup, press Ctrl+A to start ARC. Use
ARC to create the RAID. For details, refer to Using the Adaptec
RAID Configuration (ARC) Utility on page 2-9.
3 Insert the Red Hat CD Disk 1 in the CD-ROM drive.
4 Start the system.
5 When the Red Hat welcome screen appears, type the following
at the boot prompt:
linux dd noprobe updates
6 When prompted, insert the driver disk you created at the
beginning of this chapter and select OK.
7 Insert the updates disk when prompted.
8 Follow the prompts to set up your preferred environment.
3-11
Adaptec SCSI RAID 2120S/2200S Installation Guide
9 If you intend to install other third-party devices, proceed with
the installation of those devices. Otherwise, select Done.
10 Continue with the Linux installation according to the Red Hat
documentation.
Installing the Driver in a New Red Hat 7.3 Linux System
In this scenario, you are installing the controller in a new Red Hat
7.3 Linux system.
To install the driver:
1 Install and configure your Adaptec SCSI RAID controller and
hard drives according to the instructions in Chapter 2.
2 Start the server. During startup, press Ctrl+A to start ARC. Use
ARC to create the RAID. For details, refer to Using the Adaptec
RAID Configuration (ARC) Utility on page 2-9.
3 Insert the Red Hat CD Disk 1 in the CD drive.
4 Start the system.
5 When the Red Hat welcome screen appears, type expert at the
boot prompt.
6 When prompted, insert the driver disk you created at the
beginning of this chapter and select OK.
7 Follow the prompts to set up your preferred environment.
8 If you intend to install other third-party devices, proceed with
the installation of those devices. Otherwise, select Done.
9 Continue with the Linux installation according to the Red Hat
documentation.
3-12
Installing the Driver
SuSE Linux
Installing the Driver in a New SuSE Linux System
In this scenario, you would be installing the controller in a new
SuSE Linux system.
As this document was being prepared for release, SuSE Linux does
not support using the Adaptec SCSI RAID 2120S/2200S controllers
as a primary controller. This prevents using any drives attached to
either of these controllers from acting as the boot device.
Adaptec is working on a solution to this problem. To find the latest
developments about using the Adaptec SCSI RAID controllers as a
primary with SuSE Linux, go to the web site linux.adaptec.com.
Installing the Driver in an Existing Linux System
The Adaptec SCSI RAID Installation CD contains precompiled
module drivers and storage management software in RPM format.
For current information, visit http://linux.adaptec.com.
To install the driver:
1 Insert and mount the Adaptec SCSI RAID Installation CD.
2 Install the aacraid.img driver file. This can be done by typing:
rpm -Uvh <mount point>/packages/Linux/
driver_package/aacraid-0.9.10-27D.i386.rpm
3 Run fdisk, mkfs, and create mount points for any new drives.
3-13
Adaptec SCSI RAID 2120S/2200S Installation Guide
Novell NetWare
The Adaptec SCSI RAID Installation CD contains device drivers for
NetWare 5.1 and 6.x. The following Novell support packs are the
minimum level required before installing Adaptec SCSI RAID
controller software and drivers:
NetWare Revision Level
Support Pack
5.1
5
6.0
2
After you have installed the drivers, you can use the normal
NetWare procedures for modifying disk partitions, applying hot
fixes, or performing volume maintenance.
Adaptec Storage Manager-Browser Edition will not run on a
NetWare system. Creating and managing arrays on a NetWare
system may be done using any of the following:
■
Using ARC during the starting of the system.
■
Using the managed system components installed on the
NetWare system, and a remote Windows or Linux system
running Adaptec Storage Manager-Browser Edition.
■
Using Command Line Interface on the NetWare system in DOS
mode.
Installing the Driver for a Boot Controller in a New NetWare 5.1
or 6 Server
In this scenario, you are installing the Adaptec SCSI RAID
controller as a boot controller in a new NetWare 5.x or 6.x server.
To install the driver:
1 Install the Adaptec SCSI RAID controller as the primary
controller and attach the disk drives.
2 Start the server. During restart, press Ctrl+A to start ARC. Use
ARC to create the RAID. For details, refer to Using the Adaptec
RAID Configuration (ARC) Utility on page 2-9.
3 Install and configure a secondary controller, if any.
3-14
Installing the Driver
4 Begin installing NetWare 5.1 on your server as instructed in
your NetWare documentation. Make sure that you have the
aacraid.ham and aacraid.ddi files available on the driver disk
created at the beginning of this chapter.
5 When the Device Types screen appears, check the Storage
adapters list and select Modify to add another driver.
6 Select the Storage adapters and press Enter. A list of recognized
controllers will be displayed. If AACRAID was detected, delete
it.
7 Press the Insert key to add another driver. The list of available
drivers will be displayed on this screen.
8 Press the Enter key to scan drive A for the driver. You have a
choice to press F3 and specify the path to the driver if it does not
reside on drive A.
9 Once the driver is selected, the installation process returns to
the parameter screen.
10 Verify the list of the loaded drivers and from the lower window
menu, select Continue and press Enter.
Note: If the driver installation process does not complete
successfully you will be taken back to the server console to
examine the cause of the failure.
Installing the Driver in an Existing NetWare 5.1 or 6 Server
In this scenario, you are integrating an Adaptec SCSI RAID
controller into an existing Novell NetWare 5.1 or 6 server as a
secondary controller.
To install the driver:
1 Upgrade your NetWare server to the minimum patch level
specified by Novell.
2 Make a backup copy of the driver.
3 Shutdown the server.
4 Install and configure the Adaptec SCSI RAID controller as a
secondary controller according to the instructions in Chapter 2.
3-15
Adaptec SCSI RAID 2120S/2200S Installation Guide
5 Start the server.
6 At the NetWare server console prompt, type
load nwconfig.nlm and press Enter.
7 Select Driver Options and press Enter.
8 Select Configure disk and storage device drivers and press
Enter.
9 Select Select an additional driver and press Enter.
10 Place the driver disk into the floppy disk drive and press the
Insert key. A list of available drivers will be presented. Press the
Insert key again to access the list of additional drivers.
11 Press Enter to scan for the drivers. Drive A will be scanned by
default, press F3 and specify the path if the driver is located in
another place.
12 Select Adaptec AdvancedRAID Controller and press Enter.
This will bring you to the aacraid Parameters screen.
13 Select Select/Modify driver Parameters and press Enter.
14 Select Save parameters and load driver.
15 At the prompt Do you want to select an additional disk driver?,
select No.
16 Press Esc to exit Nwconfig utility.
17 Create any arrays desired using the tools mentioned at the
beginning of this section on page 3-14.
Loading the NetWare Drivers at Server Bootup
To automatically load the aacraid.ham driver at server bootup, the
startup.ncf file (usually located in your server's startup directory)
must contain a load command line that specifies the location of the
driver and any appropriate command line options. For additional
information on the startup.ncf file, refer to your NetWare
documentation. The correct syntax to load the driver is:
load [pathname]aacraid.ham slot=number [options]
3-16
Installing the Driver
For example, the command line to load the driver from the
c:\nwserver directory, with the verbose= option on is:
load c:\nwserver\aacraid.ham slot=2 verbose=y
Command line options are not case sensitive. Placing commas
between command line options is optional. To modify the
startup.ncf file, follow these steps:
1 At the server console prompt type load nwconfig and press
Enter.
2 Select the NCF File Options menu and press Enter. Select the
Modify Startup.ncf option and press Enter.
3 Make the necessary changes. When you are done, press Esc.
Note: You can also use your DOS text editor to modify the
startup.ncf file, it resides on the DOS partition.
UNIX
Installing the drivers for any of the UNIX systems is designed to be
done only from the driver disk, the creation of which is detailed at
the beginning of this chapter.
SCO OpenServer 5
Installing the Driver on a New System
In this scenario, you are installing the controller and driver in a
new OpenServer 5.x system.
To install the controller and driver:
1 Install and configure your Adaptec controller and hard disk
drives according to the instructions in Chapter 2. Create the
RAID that will host the operating system using the BIOS-based
utility that is built into the controller. See Creating a RAID 5
Without an Operating System on page 2-9 for details.
2 Create the driver disk as shown at the beginning of this chapter.
When finished, remove the driver disk.
3-17
Adaptec SCSI RAID 2120S/2200S Installation Guide
3 Start the system and insert the installation CD for OpenServer 5.
Once the system starts loading from the CD, it will display a
Boot: prompt. When it does, insert the driver disk and type:
def bootstr link=aacraid
4 The system will continue the installation, using the driver
information from the driver disk. Continue the installation as
detailed in the instructions that came with OpenServer 5.
5 When the OpenServer installation completes, remove the driver
disk and reboot the system.
The boot driver installation process is complete.
Note: You can run the drive_config utility only once.
OpenServer's method of statically configuring each driver
into the kernel can cause confusion for the user. The difficulty
arises from OpenServer's convention for naming drives. The
drive_config utility overcomes this limitation by
automatically creating the appropriate kernel entries and then
rebuilding/relinking the kernel. The drive_config utility
automatically creates device special files in the /dev/rdsk and
/dev/dsk directories. These files are named in the c#t#d#s#
(controller number, target number, disk number, fdisk
partition number) format. On a boot array, the files c0t0d0
and c0t0d0s0 point to the entire disk.
For information on disk partitioning conventions, visit
http://www.sco.com.
Adding the Controller to an Existing System
In this scenario, you are adding an Adaptec SCSI RAID controller
to an existing SCO OpenServer 5.x system.
To install the driver:
1 Install and configure your Adaptec SCSI RAID controller and
hard disk drives according to the instructions in Chapter 2.
2 Create a driver disk, see the beginning of this chapter.
3 Boot the server.
4 After the OpenServer system has booted, insert the driver disk.
3-18
Installing the Driver
5 To run the installpkg utility, type installpkg -d disk/.
SCO UNIX reads the disk and prompts you to enter the package
name to be installed.
6 Type aacraid_tar.z and press Return.
7 After the package is installed, rebuild the kernel.
8 Restart the system.
9 Install the new kernel.
10 Add devices to the controller.
UnixWare 7 and OpenUNIX 8
Both UnixWare 7 and OpenUNIX 8 use the same procedures for
adding the driver to the system, whether an initial installation or
just adding to an existing system. The driver disk you create will be
specific to one operating system or the other. Once the driver disk
is created, there is no difference in the installation.
Installing the Driver on a New System
In this scenario, you are installing the controller and driver for a
system on which either OpenUNIX 8 or UNIXWare 7 is being
installed as the operating system. The operating system will be
installed on an Adaptec RAID controller-based RAID.
To install the driver:
1 Install and configure your Adaptec controller and hard disk
drives according to the instructions in Chapter 2.
2 Create the driver disk as shown at the beginning of this chapter.
3 Early in the operating system installation, you will be shown a
window labeled Choose One, insert the driver disk, select the
Install HBA diskette entry, then press F10. The driver will load
from the driver disk and return to the HBA screen. Select
Proceed with Installation and press F10.
4 Complete the installation as appropriate.
5 When the installation completes, remove the driver disk and
reboot the system.
The boot driver installation process is complete.
3-19
Adaptec SCSI RAID 2120S/2200S Installation Guide
Adding the Controller to an Existing System
In this scenario, you are adding an Adaptec SCSI RAID controller
to an existing UnixWare 7or OpenUNIX 8 system.
To install the driver:
1 Shut down the system. Install and configure your Adaptec SCSI
RAID controller and hard disk drives according to the
instructions in Chapter 2.
2 Create the driver disk as shown at the beginning of this chapter.
3 Boot the system. After the system has booted, insert the driver
disk.
4 To run the installpkg utility, type installpkg -d disk/.
UNIX reads the disk and prompts you to enter the package
name to be installed.
5 Type aacraid_tar.z.
6 After the package is installed, rebuild the kernel when you are
asked if you wish to rebuild.
7 Restart the system.
8 Add devices to the controller.
3-20
4
Installing
Adaptec Storage ManagerBrowser Edition
In this Chapter
About Adaptec Storage Manager-Browser Edition
4-1
Installing Adaptec Storage Manager-Browser Edition
4-5
About Adaptec Storage Manager-Browser
Edition
Adaptec has developed a new iteration of our RAID controller
software, part of the Adaptec Storage Manager Family. A more
detailed coverage of the installation and use of this application is
available on the CD that came with the Adaptec SCSI RAID
controller. Examine the electronic book Adaptec SCSI RAID Software
User’s Guide.
4-1
Adaptec SCSI RAID 2120S/2200S Installation Guide
Note: Adaptec Storage Manager-Browser Edition will operate
with Adaptec RAID controllers other than the Adaptec SCSI
RAID 2120S/2200S. To do so requires the installation of
Adaptec Storage Manager, an earlier version of the controller
software, available for installation on the CD that came with
the Adaptec RAID controllers. Storage Manager may be
installed before or after the Browser Edition.
Software Components
Some users may wish to understand how the software applications
supplied by Adaptec work. Understanding is helpful in knowing
what components to install when using networked computers to
host specific parts of the Adaptec RAID managing function.
The components of Adaptec Storage Manager-Browser Edition
may be distributed on separate computers - the User System, a Web
Service, and the Managed System(s) hosting the drive arrays.
Storage Manager
Software Components and Relationships
User
System
Web
Service
Managed
Systems
Internet Explorer
5 or Higher
or
Netscape 6.0
or Higher
Storage Manager
Installed Components
This was designed to provide flexibility in administering and
managing storage subsystems on a network. Each component of an
Adaptec Storage system may be located on a different system in a
network. There is no restriction on combining two or all three
components on one system.
4-2
Installing Adaptec Storage Manager-Browser Edition
The HTTP and ARCP protocols used to communicate between
sections of the system both are sent over common network wiring,
or within the system if installed on the same machine. No
additional wiring is needed. When two or more of the functions are
combined within a single computer, the signaling between
functional sections is handled within the computer.
The installation of Adaptec Storage Manager-Browser Edition will
usually be accomplished satisfactorily by using the default Typical
installation option. If your needs require the use of SNMP, install
optional components using the Custom install option, or see the
Adaptec SCSI RAID Software User’s Guide for details on installation
options. Your installation of Adaptec Storage Manager-Browser
Edition should match one of these:
1 Everything installed on one computer. This consolidated
system, running the User System, Web Service, and Managed
System components, will require a supported web browser and
installation of all components of Adaptec Storage ManagerBrowser EditionThe consolidated system must have Adaptec
Storage Manager-Browser Edition installed from the installation
CD. This configuration is handy for a small office or individual
user. If an internet connection isn’t needed, a TCP/IP stack will
still be needed to let the components of Adaptec Storage
Manager-Browser Edition function..
Web
Service
User
System
RAID #0
RAID #1
Managed
System
4-3
Adaptec SCSI RAID 2120S/2200S Installation Guide
Bear in mind, that because the User system portion requires a
supported browser to function, this type of installation can only
be done on supported Windows or Linux systems.
2 Installing to a Consolidated System
Set up the browser portion using either User System Preparation
Using Internet Explorer on page 4-7 or User System Preparation
Using Netscape Navigator on page 4-8. Then install Adaptec
Storage Manager-Browser Edition from the CD using the
Typical selection.
The remaining system setup configurations are presented for
your information. If you wish to pursue one of these alternative
configurations, see the Adaptec SCSI RAID Software User’s Guide
for more information.
a Each component installed on a separate networked
computer. User Systems attach to a system running the Web
Service using a web browser. The Managed System(s) may
be distributed about the enterprise as needed. This
configuration is most likely to be found in a corporate or
similar setting. The Managed Systems may be using any of
the supported operating systems.
b User System and Web Service on one computer. The
system(s) being used to manage the RAIDs all communicate
to the Managed System(s) through the Web Service installed
in one or more of the User Systems.
c Web Service and Managed System on one computer. User
System(s) all connect to a Managed System that has the Web
Service component included. Multiple User Systems may be
connected via network connections, and multiple Managed
Systems may be connected, as long as the Web Service
component is available.
In operation, Users will log-on to the Managed System
having the Web Service installed using normal network log
on protocol. In practice, especially when using the Typical
installation to install Adaptec Storage Manager-Browser
Edition, users will need to connect to one of the Managed
Systems to access all Managed Systems on the network.
4-4
Installing Adaptec Storage Manager-Browser Edition
Using Custom or Minimal Installations
Installing using the Minimal components is meant for creating a
managed system only, which will be controlled remotely. Install
using the Custom components if any of the following are needed.
Note that the first 3 are checked already, and are the components
installed when Typical is selected. Selected by checking the
appropriate box when displayed:
■
Managed System Components—Same as a Minimal
installation. Managed System components only are installed.
■
Adaptec Web Server—Installs components allowing Adaptec
managed systems to communicate with HTTP browsers.
■
Adaptec Storage Manager Notifier—installs messaging
elements providing email and broadcaster capabilities.
■
Adaptec SNMP—Installs components used by some thirdparty applications for messaging RAID information. Requires
Microsoft SNMP agents to be installed to function.
Installing Adaptec Storage Manager-Browser
Edition
Installation will differ slightly when installing to a supported
Windows system or to a Linux system.
Note: Some aspects of installing this application are covered in
Chapter 3 of the Adaptec SCSI RAID Software User’s Guide.
Look in the sections Login to Adaptec Storage Manager and
Installing a Security Certificate if help is needed.
Windows System
Windows systems must be Windows NT 4, Windows 2000, or
Windows XP. The file system used should be either FAT 32 or
NTFS. When installing on a FAT 32 file system, the folder being
installed will automatically be given the hidden attribute.
4-5
Adaptec SCSI RAID 2120S/2200S Installation Guide
To install the application on a Web Server or a Managed System:
1 Insert the CD into a CD-ROM drive. If it doesn’t start
automatically, click or start Autorun.exe to start the opening
screen.
2 Click Install Adaptec Storage Manager - Browser Edition.
3 The InstallShield Wizard will start by displaying a window in
the lower right corner of your display. In a few seconds it will
display a larger window in the middle of your screen. The
remaining installation windows will all occur in this window
named InstallShield Wizard. The screen names used will be
shown at the top of the InstallShield Wizard window.
4 Click Next in the Install Adaptec Storage Manager - Browser
Edition window.
5 Read the license information. If you agree to the terms of the
license, click Yes in the License Window. If you don’t, click No
and terminate the installation.
6 The Select a Setup Type window appears. In it, you have three
types of installations possible, Typical, Compact, and Custom.
Typical is the default and works for most of the scenarios
described earlier. Custom allows the expert user to select and
install specific components. Compact installs only the managed
system components, see Using Custom or Minimal Installations on
page 4-5.
7 Click Next on Destination Folder.
8 Click Next on Setup Information.
9 The Setup Status window shows the installation progression
using a scroll bar. Before the scroll bar shows the installation is
completed, another window will pop up indicating that a
security certificate has been generated. Click OK in that
window to complete the installation.
10 When the application is finished installing, another window
will display Yes, I want to restart my computer now or No, I will
restart my computer later. Yes is the default. Click Finish.
11 The system will restart to complete the installation. Extract the
CD before the system restarts.
4-6
Installing Adaptec Storage Manager-Browser Edition
The User system requires a web browser supporting JavaScript and
cookies only. Internet Explorer versions 5, 5.5, or 6 work well, as
does Netscape versions 6 and above. You will need to log on to
your system with administrator privileges for Storage Manager to
function properly. Following are ways to check and configure
appropriate versions of Internet Explorer and Netscape Navigator.
User System Preparation Using Internet Explorer
While the security settings used are up to the user, problems may
be caused when using the High security setting in Internet Explorer.
High security typically disables Javascript. When using high
security levels in a Web Browser the following Intranet settings
need to be manually enabled:
■
JavaScript
■
Cookies (not stored)
The following custom level security settings need to be enabled for
the Local Intranet in Internet Explorer 5 and 5.5. Look under
Tools | Internet Options... for these settings:
■
Active Scripting
■
Allow per session cookies (not stored)
Note: In Internet Explorer 6.0 there is not a security setting
for this. Cookie configuration was moved from under the
Privacy tab. There is no setting for blocking Intranet
cookies.
■
Bypass the proxy server for local addresses, if you are using
proxy servers.
■
Still in the Tools | Internet Options... area, click the
Connections tab.
■
Click the Lan Settings... button.
■
If the Use a proxy server box isn’t checked, exit by clicking
OK. You aren’t using a proxy server and needn’t worry
about this setting.
4-7
Adaptec SCSI RAID 2120S/2200S Installation Guide
■
■
If the Use a proxy server box is checked, make sure the
Bypass proxy server for local addresses box is checked, then
click the Advanced... button.
■
In the Exceptions window, enter localhost* as an entry.
When finished, click OK three times to enter the information
and close the Tools windows.
User System Preparation Using Netscape Navigator
Follow these steps to set up Netscape Navigator version 6 or
higher. You will need to be logged on to your system with root
privileges or rights to access Storage Manager.
Note: The following works with Netscape 6.0. Higher versions
may have these controls distributed differently.
1 From the main Netscape screen, select Edit -> Preferences.
2 On the Preferences window, click the
on the Privacy and
Security line. Ensure that either of the Enable cookies selections
is selected by clicking the radio button for that line.
3 Select the Advanced line. Ensure that Enable Javascript for
Navigator is checked.
4 Exit Navigator, then restart it. This enables any settings you
have modified.
5 You are now ready to use the information in the Adaptec SCSI
RAID Software User’s Guide.
4-8
Installing Adaptec Storage Manager-Browser Edition
Linux system
To install the application on a Linux-based Web Server or a
Managed System:
Note: Remember that Linux and Unix are both case sensitive.
1 Insert the CD into a CD-ROM drive.
2 Install the software by typing:
sh <mount-point>/install.sh.
<Mount-point> may change from one Linux system to the
next, depending on your settings, but often is /mnt/cdrom or
cdrom.
3 The Select a Setup Type window appears. In it, you have three
types of installations possible, Typical, Compact, and Custom.
Typical is the default and works for all the scenarios described
earlier. Custom allows the expert user to select and install
specific components, including communications agents not
loaded with the Typical setting. Compact installs only the
managed system components.
4 The installation will include a short cut to opening Adaptec
Storage Manager in the System tab.
5 Unless the driver was installed as part of the installation, it will
not be necessary to restart the system, but be sure to extract the
CD.
The User system requires only a web browser supporting
JavaScript and cookies. The installation of Adaptec Storage
Manager installs a version of Mozilla that will be launched if you
use the short cut link supplied at the System tab. You will need to
log on to your system with root privileges for Storage Manager to
function properly.
4-9
Adaptec SCSI RAID 2120S/2200S Installation Guide
UNIX Systems
Unix systems may only be used as a managed system. Thus, only
two of the installation options are usable. Compact, which installs
the managed system components. Or Advanced, in which you
would select the managed system components and may wish to
add the SNMP agent for remote communications.
Most installations will be made using the install script by running
sh by typing the following:
sh <mount-point>/install.sh
<Mount-point> may change from one Unix system to the next,
depending on your settings, but often is /mnt/cdrom or cdrom.
The install script interrogates the system to determine the type of
Unix installed. It then installs components needed for that
operating system. Remember that Unix is case sensitive.
4-10
A
Card and Module
Diagrams
In this Appendix
Adaptec SCSI RAID 2120S
A-2
Adaptec SCSI RAID 2200S
A-3
Adaptec ABM-300 Battery Module
A-4
A-1
Adaptec SCSI RAID 2120S/2200S Installation Guide
Adaptec SCSI RAID 2120S
J6 J5 J30 J18
J10
J12
J11
80302
processor
Adaptec
P1
A-2
Part
Description
J5
CLR - Reserved
J6
FLASH - Reserved
J10
Internal Ultra320 SCSI connector
J11
External Ultra320 SCSI connector
J12
Battery module connector
J18
BUSY - use to drive an LED for disk drive activity.
J30
MISC - Reserved
P1
PCI Connector
Card and Module Diagrams
Adaptec SCSI RAID 2200S
J6 J5 J30 J18
J10
J12
J15
(above)
J11
(below)
J14
80303
processor
Adaptec
P1
Part
Description
J5
CLR - Reserved
J6
FLASH - Reserved
J10
Internal Ultra320 SCSI connector for Channel A
J11
External Ultra320 SCSI connector for Channel A
J12
Battery module connector
J14
Internal Ultra320 SCSI connector for Channel B
J15
External Ultra320 SCSI connector for Channel B
J18
BUSY - use to drive an LED for disk drive activity.
J30
MISC - Reserved
P1
PCI Connector
A-3
Adaptec SCSI RAID 2120S/2200S Installation Guide
Adaptec ABM-300 Battery Module
Mounting
holes
FLIP
label area
green
LED
top - battery side
bottom - circuit side
A-4
Battery
Part
Description
J2
Battery connector to 2120S or 2200S
green LED
Trickle charging indicator
B
Specifications
DC Power Requirements
Voltage (all DC)
2120S/2200S
Ripple and noise
5V ± .5 V
50 mV peak-to-peak maximum
All other voltages used on the controller card are generated from
the 5V Vcc line on the controller.
Current Requirements
Adaptec 2120S
2.50 A maximum
Adaptec 2200S
2.72 A maximum
Environmental Specifications
Ambient temperature without battery
backup module
0 °C to 50 ° C
Relative humidity
10% to 90%, noncondensing
Altitude
up to 3,000 meters
Note: Forced airflow is recommended, but not required.
B-1
R
Adaptec, Inc.
691 South Milpitas Boulevard
Milpitas, CA 95035 USA
© 2002 Adaptec, Inc.
All rights reserved. Adaptec and the Adaptec logo
are trademarks of Adaptec, Inc. which may be
registered in some jurisdictions.
Stock Number: 513217-06 Rev. AA BD 10-02
Printed in Singapore