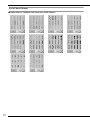
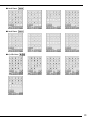
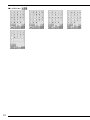
1
Innov-ís 4500D/4000D/4000
PREMIUM UPGRADE PACKAGE
Version 4.0 Upgrade Kit Operation Manual
Before using this upgrade kit, be sure to read this Operation Manual for
information on its correct use.
CONTENTS
Before You Start........................................................................................................................ 2
New Features............................................................................................................................ 2
Embroidering with the Border Embroidery Frame...................................................................... 3
Sample Projects Using the Border Embroidery Frame .......................................................... 3
Selecting a Pattern .............................................................................................................. 3
Hooping the Fabric in the Border Embroidery Frame .......................................................... 5
Attaching the Border Embroidery Frame to the Embroidery Unit ......................................... 7
Embroidering the First Pattern ............................................................................................. 8
Removing the Border Embroidery Frame ............................................................................. 8
Embroidering the Next Pattern ............................................................................................ 9
If the Bobbin Runs Out of Thread ..................................................................................... 11
Selecting a New Border Pattern .............................................................................................. 11
Creating an Appliqué Piece .................................................................................................... 12
Sample Projects Using Created Appliqué Pieces ............................................................... 12
Creating an Appliqué Piece .............................................................................................. 12
Using a Frame Pattern for the Outline ............................................................................... 15
Changing the Pointer Shape When a USB Mouse Is Used ....................................................... 17
Changing the Background Colors of the Embroidering Patterns............................................... 17
Basting Embroidery................................................................................................................. 18
Separating Combined Character Patterns ................................................................................ 19
Selecting a Small Font/Cyrillic Font......................................................................................... 21
List of New Patterns ................................................................................................................ 22
Border Patterns (Additions from Decorative Stitch Patterns) .............................................. 22
Small Fonts ...................................................................................................................... 23
Small Fonts ...................................................................................................................... 23
Cyrillic Fonts ................................................................................................................... 23
Cyrillic Fonts ................................................................................................................... 24
1
Before You Start
It is important to perform the upgrade according to the procedure described in the Installation Guide. The machine
can then be used as described in the Operation Manual. New machine features and benefits are described in this
guide.
New Features
The following features will be added with the upgrade to version 4.0.
• A border embroidery frame is included, allowing the fabric to easily be rehooped when embroidering
repeated patterns.
• 150 decorative stitch patterns have been added as border patterns. (
• Appliqué pieces can be created. (
or
)
)
• The pointer that appears when a USB mouse is used can be changed to one of three shapes.
• The background colors of the LCD screens can be changed to one of four colors, according to the color of the
pattern. (
or
)
• A basting function has been added for embroidering fabric that cannot have stabilizer material affixed with an
iron or adhesive. (
)
• Combined character patterns can be separated so that the character spacing can be freely adjusted. (
• Two additional small fonts have been added. (
• Two Cyrillic fonts have been added. (
2
or
or
)
)
)
Embroidering with the Border
Embroidery Frame
■ Selecting a Pattern
For this example, we will select an embroidery pattern
available on the CD-ROM.
Since the fabric can easily be repositioned and
rehooped if the border embroidery frame is used, this
frame is useful for embroidering repeated patterns while
sliding the fabric. An added feature of this frame is that
the pressure applied by the upper and lower frames
does not leave an indentation in the fabric. An area of
10 cm × 18 cm can be embroidered.
Memo
• Since it may take some time to recall a pattern from
the CD-ROM directly to the sewing machine, copy
the pattern from the CD-ROM to the computer,
transfer it to USB media or a removable disk, and
then recall it from the sewing machine.
CAUTION
• Do not leave the border embroidery frame within
the reach of children, otherwise injuries may result.
Note
• When the border embroidery frame is not being
used, unlock it before storing it.
■ Sample Projects Using the Border
Embroidery Frame
a
Copy the embroidery pattern from the CDROM to the computer.
b
Copy the pattern to be used to USB media or
a removable disk in your computer.
c
Install embroidery foot "W" and the
embroidery unit on the sewing machine.
d
Press
, and then recall the pattern from the
USB media or computer to the sewing machine.
e
Combine the patterns and use the border
function to repeat the pattern.
We recommend using the border embroidery frame
when embroidery repeated patterns at the edges of
items such as curtains, chair covers, bed covers,
tablecloths and blankets.
Memo
• For details on the border function, refer to
“Designing Repeated Patterns” in chapter 6 of the
Operation Manual for the sewing machine.
3
h
f
Press
g
From the embroidery frame display settings,
select one of the embroidery frame displays
for the border embroidery frame.
.
If necessary, add the thread mark. Since the
pattern will be repeatedly embroidered from
the top to the bottom, add the thread mark at
the lower center of the pattern. When you are
finished, press
.
* Of the 12 settings available, there are two for border
embroidery frames.
Note
a
b
a Border embroidery frame embroidering area
b Center line
4
• Do not add thread marks to character patterns.
• Add the thread mark to patterns that do not have a
point of alignment, such as rotated patterns or
patterns that are spaced apart. Patterns that can be
aligned visually can be embroidered cleanly without
the thread mark.
Memo
i
Press
.
• Select the location where the thread mark is to be
added according to the direction that the embroidery
is repeated.
■ Hooping the Fabric in the Border Embroidery
Frame
a
When repeated in a rotating direction
With a chalk pen, mark the fabric with a line
drawn down the center of the area to be
embroidered.
a Pattern
b Mark (line)
a First Pattern
b Second Pattern
c Thread mark
5
b
Affix stabilizer material to the fabric to be
embroidered.
e
Note
• When embroidering the edges of the fabric, affix
stabilizer material larger than the fabric, and then
firmly secure the fabric and excess part of the
stabilizer material within the border embroidery
frame (in the same way as when the normal
embroidery frame is used). Otherwise, misaligned
patterns may result.
Place the embroidery sheet in the upper
frame, align the guide line on the embroidery
sheet with the mark (line) on the fabric, and
then press down on the left and right locking
levers until they click into place.
a Locking levers
Memo
• The fabric can also be positioned in the border
embroidery frame by aligning the edge of the fabric
with the inner markings on the upper frame.
a Fabric
b Stabilizer
c
If the upper frame is locked down against the
lower frame, press the left and right lock
release buttons to unlock the upper frame.
Note
• If there is excess fabric after the center of the
embroidering area is aligned with the center of the
border embroidery frame, fold over the excess
fabric, place it on top of the upper frame, and then
press down on the levers. Be careful that the folded
excess fabric is not caught in the embroidering area.
a Lock release buttons
d
Lay the fabric between the upper and lower
frames.
f
6
Remove the embroidery sheet, and then pull
the four sides of the fabric to remove any
slack. Finally, check that the fabric is firmly
stretched.
■ Attaching the Border Embroidery Frame to
the Embroidery Unit
d
CAUTION
Slide the border embroidery frame into the
embroidery frame holder, making sure to
align the border embroidery frame's arrow
mark (U) with the embroidery frame holder's
arrow mark (U).
• After firmly hooping the fabric in the border
embroidery frame, attach the frame to the
embroidery unit. Otherwise, the needle may break
and cause injuries.
• Before attaching the border embroidery frame to
the embroidery unit, make sure that the needle and
presser foot have been raised. Otherwise, the
needle may break and cause injuries.
a
Note
• Before attaching the border embroidery frame, wind
the bobbin with thread and install it.
a
Make sure that the needle and presser foot
have been raised. If the needle has not been
raised, press the "Needle Position" button to
raise it. If the presser foot has not been raised,
press the "Presser Foot Lifter" button to raise
it.
b
Make sure that the embroidery unit carriage
has moved to its initial position.
c
Align the guide on the border embroidery
frame with the right edge of the embroidery
frame holder.
a
b
a Arrow marks
e
Lower the frame-securing lever so that it is
level with the border embroidery frame to
secure the border embroidery frame in the
embroidery frame holder.
a
a Frame-securing lever
CAUTION
• If the frame-securing lever is not lowered, the
pattern may not embroider correctly or the presser
foot may strike the border embroidery frame and
cause injuries.
a Embroidery frame holder
b Guide on border embroidery frame
7
■ Embroidering the First Pattern
a
■ Removing the Border Embroidery Frame
Note
Note
• When the border embroidery frame is used, the
embroidering time may be slightly longer than the
time that appears in the screen, depending on the
type of fabric and pattern that is used.
• Before removing the border embroidery frame from
the embroidery unit, make sure that the embroidery
unit carriage has moved to its initial position.
To check the embroidering area, press
.
a
Raise the frame-securing lever and pull the
border embroidery frame toward you.
CAUTION
• If the thread has become tangled and the
embroidery unit carriage does not move to its initial
position, even after the thread is cut, turn off the
machine, manually move the carriage, and then
remove the border embroidery frame.
• Only move the embroidery unit carriage when the
machine is turned off.
b
Thread the machine, and then start
embroidering.
CAUTION
• Do not touch the border embroidery frame while
embroidering.
→ When embroidering is finished, the thread mark is
sewn with the last thread color.
8
OFF
■ Embroidering the Next Pattern
a
Press both lock release buttons and slide the
fabric to align the embroidering area of the
next pattern, and rehoop the fabric in the
border embroidery frame.
Note
c
Use
to select the needle position that
will align with the thread mark at the end of
previous embroidery. For this example, align
the needle position with the upper center of
the next pattern. When you are finished, press
.
• Adjust the position of the fabric so that the
embroidering area for the next pattern is within the
embroidering area of the embroidery sheet.
a Pattern embroidered first
b Position of pattern to be embroidered next
c Embroidering area of embroidery sheet
b
Attach the border embroidery frame to the
embroidery unit, and then press
.
9
d
Use
to align the needle position with
the point of the thread mark.
f
Embroider the next pattern. To continue
embroidering a repeating pattern, repeat the
procedure starting with “Removing the
Border Embroidery Frame”.
CAUTION
• If the sewing machine is turned off, then turned on
again with the border embroidery frame attached or
if you try to select a stitch from the Utility Stitch
screen or the Character/Decorative Stitch screen
while the border embroidery frame is attached, the
following message appears. If the border
embroidery frame is not fully removed from the
embroidery unit at this time, the border embroidery
frame may be hit by the presser foot when the
carriage of the embroidery unit is moved. When the
following message appears, fully remove the border
embroidery frame.
a
a Needle position
Note
• After turning the handwheel to check the needle
position, press the "Needle Position" button to raise
the needle.
e
After aligning the needle position for the
beginning of embroidering, remove the
thread mark.
Note
• Remove the thread mark before starting to
embroider. Otherwise, the thread mark stitching may
be combined with the pattern stitching.
10
■ If the Bobbin Runs Out of Thread
If the bobbin runs out of thread while embroidering,
the machine stops and a message appears. Follow
the procedure described below to replace the
bobbin thread.
Memo
• For details, refer to “If the Bobbin Runs Out of
Thread” in chapter 5 of the Operation Manual for the
sewing machine.
a
Press
b
Press
.
Selecting a New Border Pattern
150 decorative stitch patterns have been added as
border patterns. For details on the patterns, refer to “List
of New Patterns” at the end of this guide. If the border
embroidery frame is used, repeated patterns can easily
be embroidered since the fabric can easily be
rehooped. The following procedure describes how to
select a pattern in embroidery edit mode.
a
Press
b
Press
c
Press the key of the desired pattern from the
new border patterns on P. 7 through P. 16.
d
If necessary, use the border function to repeat
the pattern.
.
.
.
→ The thread is automatically cut and the embroidery
unit carriage moves to its initial position.
c
Raise the frame-securing lever on the
embroidery unit, and then remove the border
embroidery frame.
d
Install the bobbin wound with thread.
e
Press
, and then attach the border
embroidery frame to the embroidery unit.
f
Press the "Start/Stop" button to return to the
position where embroidering was stopped,
and continue embroidering.
11
Creating an Appliqué Piece
Appliqué pieces can be created from the built-in
patterns and patterns on embroidery cards. This is
convenient for fabrics that cannot be embroidered or
when you wish to attach an appliqué to a garment.
a
Press
b
Select the pattern, and edit it if necessary.
.
■ Sample Projects Using Created Appliqué
Pieces
Appliqué pieces can be attached to items that you
already own, such as bags and clothes, to customize
them. When attached to denim, the appliqué pattern
really stands out. Animal and fruit appliqués can be
used as children's toys.
Note
• Finish editing the pattern before selecting the
appliqué setting. If the pattern is edited after
selecting the appliqué setting, the appliqué stitching
and pattern may become misaligned.
• Since an outline is added, the pattern for an
appliqué piece (when the appliqué setting is
selected) will be larger than the original pattern.
First, adjust the size and position of the pattern as
shown below.
■ Creating an Appliqué Piece
As an example, the following pattern will be used to
create an appliqué piece.
a Embroidering area
b Approx. 1 cm
c Pattern size
Note
• Felt or denim fabrics are recommended to make the
appliqué piece. Depending on the pattern and fabric
used, lighter weight fabrics may cause the stitching
to appear smaller.
• For best results, be sure to use stabilizer material for
embroidering.
• Select a frame that matches the pattern size. Frame
options are displayed on the LCD screen.
• When making appliqué pieces, do not use the
border embroidery frame. Depending on the pattern
density and fabric used, shrinkage of the stitching
may occur.
12
c
Press
, and then display P. 6 of the
settings screen.
d
Use
to specify the distance between
the pattern and the appliqué outline.
f
Press
to select the appliqué setting.
Memo
• To cancel the setting, press
.
• If no pattern is selected, the key appears gray and
cannot be selected.
Memo
• Three settings are available: 1 (narrow), 2 (normal)
and 3 (wide).
→ The steps for creating the appliqué piece are added
to the sewing order.
Memo
• Three steps are added to the sewing order: appliqué
cutting line, position of pattern placement on the
garment, and appliqué stitching.
• The setting remains selected even if the machine is
turned off.
e
Press
to return to the previous screen.
a Cutting line for appliqué
b Position of pattern placement on garment
c Appliqué stitching
13
k
Note
• An appliqué piece cannot be created if the pattern is
too large or too complicated or a combined pattern
is separated. Even if the selected pattern fits within
the embroidering area, the entire appliqué pattern
may exceed the embroidering area when the outline
is added. If an error message appears, select a
different pattern or edit it.
g
Press
h
Fuse or stick a piece of stabilizer to the back
of the felt or denim fabric to be used as the
appliqué piece.
Remove the appliqué material from the
embroidery frame, and then carefully cut
along the stitching. After cutting, carefully
remove all of the cutting line thread.
fif
.
Note
Note
• For best results, be sure to use stabilizer material for
embroidering.
• Depending on the pattern density and fabric used,
there may be shrinking of the pattern or the appliqué
may be misaligned with the placement line. We
recommend cutting slightly outside of the cutting
line.
• When using patterns that are vertically and
horizontally symmetrical, use a chalk pen to indicate
the pattern orientation before cutting it out.
• Carefully cut out the pattern on the outline you just
sewed. Do not cut inside the cutting line, otherwise
the appliqué fabric will not be caught by the appliqué
stitch.
i
Hoop the appliqué fabric in the embroidery
frame, attach the embroidery frame to the
machine, and then start embroidering.
j
After the pattern is embroidered, thread the
machine with the thread for the cutting line,
and then sew the cutting line (APPLIQUE
MATERIAL).
l
Use two layers of adhesive water-soluble
stabilizer material with their sticky sides
together, and then hoop them in the
embroidery frame.
a Cutting line for appliqué
Memo
• We recommend using thread for the cutting line that
is closest to the color of the fabric.
Note
• If water-soluble stabilizer is used, it is not necessary
to remove the stabilizer material after sewing the
appliqué outline. To reduce shrinkage of the pattern,
we recommend using water-soluble stabilizer.
• Put together two layers of water-soluble stabilizer,
otherwise the stabilizer material may tear during
embroidering.
14
m
Thread the machine with the thread for the
outline from step o, and then sew the
placement line for the appliqué position
(APPLIQUE POSITION).
q
Use scissors to cut the excess water-soluble
stabilizer from outside the appliqué outline.
r
Soak the appliqué piece in water to dissolve
the water-soluble stabilizer.
fi
s
a Pattern placement line
n
Lightly apply glue or spray adhesive, and
paste the appliqué piece so that it aligns with
the placement line.
Dry the appliqué piece, and then iron it if
necessary.
Note
• Do not apply a strong force when ironing, otherwise
the stitching may be damaged.
■ Using a Frame Pattern for the Outline
Using a frame pattern, the desired shape can be
added as the outline of the appliqué.
Note
• Before pasting the appliqué piece down, make sure
the appliqué piece is positioned correctly within the
placement line.
o
With the machine threaded using the thread
for the outline from step m, sew the outline
(APPLIQUE).
a
Perform the operations described in steps a
through e of “Creating an Appliqué Piece”.
b
Select the desired frame shape and pattern,
and add it to the appliqué pattern.
a Outline of appliqué piece
Memo
• The outline is sewn using satin stitching.
• Some glue may get onto the presser foot, needle,
and needle plate at this time. Finish embroidering
the appliqué pattern, and then clean off the glue.
p
After embroidering is finished, remove the
stabilizer material from the embroidery
frame.
15
c
Edit the frame pattern to fit the size of the
appliqué pattern.
f
Use
to select the frame pattern,
and then press
d
Press
to select the appliqué piece
.
→ The frame pattern is deleted.
setting.
fif
e
16
Press
g
Press
h
Continue with step h of “Creating an
Appliqué Piece” to complete the appliqué
piece.
, and then press
.
.
Changing the Pointer Shape When a
USB Mouse Is Used
Changing the Background Colors of
the Embroidering Patterns
In the settings screen, the shape can be selected for the
pointer that appears when a USB mouse is connected.
Depending on the background color, select the desired
shape from the three that are available.
Memo
• For details on changing the background color, refer
to “Changing the Background Colors of the
Embroidering Patterns” on this page.
a
Press
b
Display P. 3 of the settings screen.
c
Use
Press
a
Press
or
b
Press
.
c
Display P. 6 of the settings screen.
.
.
to select the pointer shape from
the three settings available (
d
In the settings screen, the background colors can be
changed for the embroidery pattern and pattern
thumbnails. Depending on the pattern color, select the
desired background color from the four that are
available. Different background colors can be selected
for the embroidery pattern and pattern thumbnails.
,
and
).
to return to the previous screen.
Memo
• The setting remains selected even if the machine is
turned off.
17
d
Use
to select the background color
from the four settings available (
and
).
,
,
Basting Embroidery
Before embroidering, basting stitches can be sewn
along the outline of the pattern. This is useful for
embroidering fabric that cannot have stabilizer material
affixed with an iron or adhesive. By attaching stabilizer
material to the fabric, shrinkage of the stitching or
misaligned pattern can be prevented.
a
b
a
Press
b
Select the pattern, and edit it if necessary.
.
Note
• Finish editing the pattern before selecting the
basting setting. If the pattern is edited after selecting
the basting setting, the basting and pattern may
become misaligned, and the basting stitches may be
difficult to remove after embroidering is complete.
c
Press
, and then display P. 6 of the
settings screen.
a Embroidery pattern background
b Pattern thumbnails background
e
Press
d
Use
to specify the distance from the
pattern to the basting stitching.
to return to the previous screen.
Memo
Memo
• The setting remains selected even if the machine is
turned off.
18
• The higher the setting, the farther the basting is from
the pattern.
• The setting remains selected even if the machine is
turned off.
e
Press
f
Press
to return to the previous screen.
to select the basting setting.
Separating Combined Character
Patterns
Combined character patterns can be separated to adjust
the character spacing or to separately edit the patterns
after all characters have been entered.
a
Press
b
Press
c
Combine the characters, and then press
d
Press
.
, and then select the font.
.
Memo
• To cancel the setting, press
.
• If no pattern is selected, the key appears gray and
cannot be selected.
→ Basting is added to the beginning of the sewing
order.
g
Press
h
When embroidering is finished, remove the
basting stitching.
to start embroidering.
.
19
e
Press
.
g
Use
to select a pattern, and
then use
to adjust the character
spacing.
→ The key appears as
f
Use
.
to select where the pattern is to
be separated, and then press
to separate
it. For this example, the pattern will be
separated between “T” and “a”.
Note
• A separated character pattern cannot be combined
again.
20
h
Press
.
d
Selecting a Small Font/Cyrillic Font
Enter the characters.
Two small fonts and two Cyrillic fonts have been
added. For details on the patterns, refer to “List of New
Patterns” at the end of this guide. The following
procedure describes how to select patterns in
embroidery edit mode.
a
Press
b
In the pattern selection screen, press
.
.
Note
• For best results when sewing small font patterns,
- Reduce the thread tension to less than what is
used when embroidering normal designs
- Sew at a speed slower that what is used when
embroidering normal designs.
- Decrease the size of the thread to size 80 or 100
weight thread.
c
Select the desired font from the small fonts
and Cyrillic fonts on P. 2.
a
b
a Small fonts
b Cyrillic fonts
21
List of New Patterns
■ Border Patterns (Additions from Decorative Stitch Patterns)
22
■ Small Fonts
■ Small Fonts
■ Cyrillic Fonts
23
■ Cyrillic Fonts
24
English
111-001