1
/ECLIPSE"
I
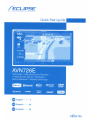
Quick Start guide
•
English·
2
Espanal
28
G Fran~ais
•••• 54
e
cP
FUJITSU TEN
I
For the safe usage of this device
We appreciate your purchase of this main unit.
Please read through this manual for correct operation.
We suggest that after reading it you keep this manual in a safe place for future
reference.
The symbols described below are found in this instruction manual as well as on
the device itself to insure its proper and safe usage and to prevent injury or
damage to property. Make sure you understand the meaning of these symbols
before reading the rest of this manual.
e
This sign indicates a situation in which incorrect handling through
disregard of a sign might result in death or serious personal injury.
Warning
Caution
This sign indicates a situation in which incorrect handling through
disregard of a sign might result in personal injury or may result solely
in damage to property.
The following symbols will precede information useful for preventing damage to
the main unit as well as for its smooth operation.
Follow this advice to prevent malfunctions or damage to the main unit.
Perform the indicated action in the event of a malfunction.
ADVICE
Useful information for smooth operation.
Facts to keep in mind when operating.
• Please read all materials such as manuals and warranties that have come with the product.
• ECLIPSE will not be responsible for unsatisfactory product performance due to failure to follow
these instructions
• Changes to product specifications may result in differences between content of the manual
and features of the product.
Please use care in handling the manual.
Forcefully spreading or pulling on pages may result in pages falling out of the binding.
Use the manual carefully.
2 .
Table of Contents
1.
Safety precautions
4
2.
Names and Major Functions of Each Component
7
3.
Operations from the Navigation Screen
9
4.
Setting a Destination
11
5.
How to switch the audio source (mode)
12
6.
Removing and inserting discs
13
7.
Rad io mode operations
8.
DISC mode operations
16
9.
Bluetooth Audio Operation
18
'
14
10. USB mode operations
20
11. iPod® mode operations
21
12. Setting sound quality
22
13. Bluetooth hands-free Operation
23
14. How to use ESN
25
15. REFERENCE
27
•
1. Safety precautions
Warning
• Do not modify this system for use other than that specified herein. Also, do not
deviate from the installation procedures described herein; ECLIPSE will not be held
liable for damages including, but not limited to serious injury, death or property
damage resulting from installations that enable unintended operation.
• Some devices require the use of batteries. Never place devices requiring batteries
where young children can get access to the batteries. If a battery is swallowed, seek
immediate medical attention.
• When the vehicle is in motion, never take your eyes off the road to make adjustments
to the main unit. You must pay attention to the road to avoid accidents, do not let the
operation or adjustment of the main unit distract you from proper vehicle operation.
• The driver should not look at the screen while driving. Accidents may occur as a
result of not paying attention to your driving.
.
• Do not place foreign objects in the disc insertion slot or USB input terminal. Fires or
shocks may result.
• Do not disassemble or alter this main unit. Accidents, fires or shocks may result.
• Do not let water or foreign objects enter the internal parts of this main unit. Smoke,
fires or shocks may result.
• Do not use when main unit is malfunctioning (the screen is not lit or no sound comes
out). Accidents, fires or shocks may result.
• Always replace fuses with fuses of identical capacity and characteristics. Never use
a higher capacity fuse than the original. Using the wrong type of fuse may cause a
fire or severe damage.
• If foreign objects or water enters the main unit, smoke comes out, or there is a
strange odor, stop using it immediately, and contact your dealer. Accidents, fires, or
shocks may result if you continue to use it in these conditions.
• The driver should not change the disc or USB device or use the iPod while driving.
As accidents may occur as a result of not paying attention to your driving, you must
first stop or park your car in a safe location and then proceed to remove or insert the
disc and/or USB as well as controlling the iPod.
• Plastic bags and wrappings may cause suffocation and death. Keep away from
babies and children. Never place bags or wrappings over anyone's head or mouth.
• Make sure to park the vehicle in a safe place and set the parking brake before
watching DVDs or videos. For safety reasons, only the sound of DVDs or videos will
be emitted while the vehicle is in motion.
LAMP(S) INSIDE THIS PRODUCT CONTAIN MERCURY
AND MUST BE RECYCLED OR DISPOSED OF AS HAZARDOUS WASTE ACCORDING TO LOCAL, STATE, OR
FEDERAL LAWS APPLICABLE TO YOU.
DO NOT
PLACE IN THE TRASH.
ADVICE
• When there is frequent vibration - when driving on a bad road for example - the main
unit may become unable to operate normally because it cannot read data from the
disc.
• Condensation may accumulate on the lens, with the function requiring reading of
CDs and DVDs, immediately after turning ON the heater in cold temperatures. Wait
about 1 hour for the condensation to evaporate and the main unit will operate
normally. Contact the store of purchase if normal operation does not resume after
several hours.
• If using this main unit immediately after having purchased it or after having stored it
disconnected from the vehicle battery, the present location may not be accurately
displayed. Wait a moment and the GPS positioning will correct the displayed
position.
• This main unit is precision equipment and the information that you record on it after
purchase can be lost as a result of static electricity, electrical noise, vibration and
other influences. You are recommended to keep a separate record of the information
you store in the main unit.
• Note that the following events are not covered by the warranty.
1) Corruption or loss of the data stored in the main unit by the purchaser resulting
from failure or incorrect operation of the main unit or trouble with it, or due to the
effects of electrical noise or other influences.
2) Corruption of loss of the data stored in the main unit by the purchaser resulting
from misuse of the main unit by the purchaser or a third party.
3) Corruption or loss of the data stored in the main unit by the purchaser resulting
from failure / repair of the main unit.
* Please note that by installing or using the main unit, you are regarded as having
consented to the points above.
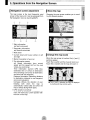
You can operate this receiver by pressing the panel buttons (panel switches) or by touching the
switches displayed on the screen (touch switches).
I Panel buttons
Press the panel buttons to operate the device.
Press to switch to hands-free mode.
Press to adjust the audio volume.
Press to display the audio operation screens.
Press to adjust the screen image quality or screen brightness. (Press for 1 second or more)
Press to display the navigation menu screen.
Press to display the (audio/info) menu screen.
For radio mode:
Press to select station manually.
Press to select station automatically. (Press for 1 second or more)
For CD, MP3IWMA, USB, and iPod mode:
Press to select a track or music file.
Press to fast forward or fast reverse track or music file. (Press for 1 second or more)
For DVD, DivX, and iPod-video mode:
Press to select videos and chapters.
Press to fast forward and fast reverse videos and chapters. (Press for 1 second or more)
Em]
Press to temporarily mute the audio.
Press to display the TILT/EJECT screen.
I Touch switches
The main unit can be operated by touching switches on screen.
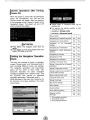
Screen Operations after Turning
Power ON
When the engine is turned ON, the DVD/audio
power will automatically turn ON and the
Caution screen will appear. After the selection
of the language, touch [I Agree] to switch to the
Navigation screen. The power will turn OFF
when turning off the engine.
• "Simple mode" or "Advanced mode" can be
switched later.
• The features and settings available in each
mode are as follows:
CD Available in Simple mode
® Available in Advanced mode
CD
®
Navigating to a selected map point
Yes
Yes
Navigating to a street address
Yes
Yes
Yes
Yes
Navigating to an intersection
Yes
Yes
Navigating to recent destinations
(History)
Yes
Yes
Navigating to Favorites
Yes
Yes
Navigating to a POI
Yes
Yes
Navigating to coordinates
No
Yes
Creating a multi-point route
No
Yes
Saving a map point as a Favorite
destination
Yes
Yes
Saving a map point as a POI
No
Yes
Saving a map point as a location of
a Road Safety Camera
No
Yes
Mark a map point with a Pin
No
Yes
Saving the active route
No
Yes
Saving Track Logs
No
Yes
Map Screen settings
No
Yes
Menu settings
Yes'1
Yes
Sound settings
Yes'2
Yes
Yes
Yes
Yes'3
Yes
No
Yes
Type of action
8ATTENTION
•
•
Press [NAVI] if the navigation screen does not
appear.
Press [MENU] and then touch [AUDIO OFF] if the
audio or DVD does not turn ON.
Setting the Navigation Operation
Mode
The main unit provides a choice of operation
modes ("Simple mode" and "Advanced mode"),
each providing different menus and settings.
The navigation operations and map-screen
layout are the same in each mode. This
document describes the basic navigation
operations available from "Simple mode." See
the ECLIPSE web manual for advanced
navigation operations ("Advanced mode").
When the power of the main unit is turned on for
the first time, the screen switches in the order
shown below.
Navigating
address
to
an
incomplete
Route Planning options
Regional settings
Warnings
*1: Only background picture
*2: Only Master volume
*3: Only language selection
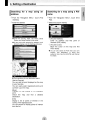
r~~:~perations from the Navigation Screen
I Navigation screen adjustment
I Move the map
The map screen is the most frequently used
screen of the main unit. It can be accessed from
the Navigation menu by touching [MAP].
Dragging the map screen enables you to scroll
to your desired position.
CD Main information
ex) Next route event
® Secondary information
ex) Second route event
® Next street
@ Current street and house number on left
and right
® Marks the position of your car
® Trip Information screen
ex) Speed information (your current
speed and the speed limit on the road
where you are driving)
Time information (current GPS time;
estimated time of arrival at destination;
time remaining until arrival at destination;
and time until next waypoint)
Distance information (remaining distance
to destination; distance to next waypoint;
and current elevation)
Compass (Shows the direction of your
heading both when the map is
automatically rotated (3D) and when the
map is always facing North (20).)
(j) GPS reception sensitivity:
When your GPS position is available, the
main unit marks your current position with
the icon on the map.
I Change the map scale
When the map screen is touched, the [+] and [-]
switches appear.
Touch the [-] switch and the map will zoom out.
Touch the [+] switch and the map will zoom in.
• The [+] and [-] switches can also be displayed
by touching the map control switch.
I Change the orientation of the map
J: Touch
the touch viewing modes switch to
switch the map display.
: Always display the map so that
north is on top, regardless of the
direction in which the car is
traveling.
: Always display the map so the
direction in which the car is
traveling is on top.
: Display a 3D view of the map.
The 3D view displays a headingup, front-wide view.
.. Navigation
Operation
Menu"
Screen
CD [Find Address]:
By entering an address, the map
corresponding to that point (or area) can
be displayed.
® [History]:
The map of the vicinity of a previously set
destination can be displayed.
@ [Find POI]:
By entering the name of a POI, the map
corresponding to that POI's vicinity of can
be displayed. Also, enter the name of an
address to display the map of that area.
@ [Favorites]:
The map of the vicinity of a favorite point
can be displayed.
® [Settings]:
Change the navigation settings. In
"Simple mode," you can change the
language of the navigation screen, the
language of the voice guidance, and the
screen background. You can also check
map and license information.
I Entering Text
Enter text and numbers to find addresses and
POI Names.
The text-entry screen differs depending on the
function.
Press [Menu] to display the "Navigation Menu"
screen. In the "Navigation Menu" screen, the
menu screens for Navigation and settings can
be displayed.
®[ .. ]:
Delete one character from the entered
text.
@[aA]:
Switch
between
uppercase
and
lowercase.
@[@/!]:
Switch to symbol-input mode.
® Switch language:
Select the text-entry language. The
language for entering characters can be
selected from the displayed list. The
layout of the keyboard changes according
to the language selected.
®[Done]:
Find the entered text.
4. Setting a Destination
Searching for a map using an
address
Searching for a map using a POI
name
From the "Navigation Menu", touch [Find
Address].
From the "Navigation Menu", touch [Find
POI].
Enter the address
Select the search method.
• Enter the Country, State, City Name, Street
Name, and House Number in that order.
G) [Around Address]:
• At any point while entering the address, touch
[Done] to display a list of matching addresses.
Enter an address and find point of
interests (POI) nearby.
CD [Around Cursor]:
Move the cursor on the map and find
POls nearby.
• You can also search for POls near your car's
location, your destination, or along your
guidance route. See the ECLIPSE web manual
for details.
• When entry is complete, a map appears.
• Route guidance to your destination begins.
[Add to Favorite]:
You can add the point displayed on the map
to your favorites.
You can easily select registered points and
call them up on the map.
[Map]:
Change the map display for the displayed
point.
Check the map and find a detailed
destination.
[Info]:
Display a list of points of interest in the
vicinity of the displayed point.
You can search for nearby points of interest
from the list.
I
5. How to switch the audio source (mode)
I Switching the audio mode
Bluetooth Audio
U
l'
Press [MENU].
•
.~,
...
.1
,."
CD
Select the desired audio mode.
MP3IWMA
.
,
• The mode switches to the selected audio mode.
I Displaying operation screens
-""""'-
~<'P\'.
:"""
.<l
~~
~ .. tl",
---~
"
.~
DVD
Press [AV].
DivX
• The operation screen will appear.
•
Operation screens list
-
AM radio
~
....,-
~-
-->J-~-
-
~-
•
r
:
VTR
4 "'f-----,,-
-~~--~
~.
_"h~
FM radio
---
.-
,'''w
J
iPod (optional)
.l'<
-----,-
-
B"J
----
-- -
~
~-
---
~
,
-
'I"
HD Radio (optional)
~
• ,
''''
"fOfF'Wl
t'
•
1><
f
,
;::;~;
•
\
1,
hI
h
I
-
"lo>
~"':.
"".
USB
1
I'
~~
~;~
... v
"
'
",
Satellite radio (XM) (optional)
<'
i/OJ
""'10
.....
I Stopping the audio mode
Satellite radio (SIRIUS) (optional)
~
~
•
'
,
:.
Vmt~
-----I
I
,I
--- - - - f
•
I'
I
,.
'Jfi
• Touch [Audio off) again to restart the broadcast
station reception, song playback, or video
playback from before the audio mode was
stopped.
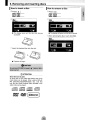
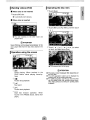
6. Removing and inserting discs
I How to remove a disc
I How to insert a disc
v Press
[~
~t Press [ ~ ].
].
• The display opens and the disc slots become
accessible.
1.1.> Insert the desired disc into the slot.
• Playback will begin.
"'ATTENTION
-----_._.-._--------------'-,-----~
Discs that can be used
An audio disc or DVD video disc bearing one of the
marks below can be played. When using a DVD±R/
RW (DVD±Recordable/ReWritable) disc, note that
only the disc whose contents were recorded in the
video mode can be played.
r£lCOMPACT
(Q]Do~@
DIGITAL AUDIO
I
r£lCOMPACT
r£lCOMPACT
LlliO~@ D~G1TALAUDIO LlliO~@
LlliO~@I
Iji$;·!'·f$ltid I
TEXT
I
ReWritable
• The display will open and the disc is ejected.
I'
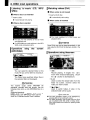
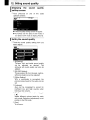
7. Radio mode operations
I Listening to AM/FM radio
If the optional HD Radio tuner unit is connected,
terrestrial digital broadcasts can be received.
I.:.ll!I
-,
..
.'.'
I Listening to HD Radio
~
CD [AM]:
The mode switches to the AM radio
mode.
®[FM]:
The mode switches to the FM radio mode.
@IIATTENTION
When th--e-H-O-R-a-d-io tuner is con-nectec[HD Radio
has reception priority, and "OIGITAL" is displayed on
the screen.
CD [AM]:
The mode switches to the AM (HD) radio
mode.
®[FM]:
The mode switches to the FM (HD) radio
mode.
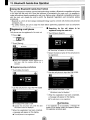
I Operations using the screen
I Operations using the screen
i£~:'V,
~
®~
the
song
being
CD Preset switches:
Stored broadcast stations can be
received.
® [AUTO.P]:
Broadcast stations are temporarily stored
in the preset switches automatically if the
touch switches are pressed and held.
stations
can
be
I Listening to satellite radio
If the optional (XM/ SIRIUS) satellite radio tuner
unit is connected, satellite radio broadcasts can
be received.
CD [XM]:
The mode switches to the XM radio
mode.
® [SIRIUS]:
The mode switches to the SIRIUS radio
mode.
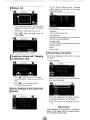
I Operations using the screen
The operation procedure for the XM satellite
radio is the same as that for the SIRIUS.
-
(lj-@-®
CD Preset switches:
Touch to receive stored channels.
® [BAND]:
Each time this switch is touched, the
SIRIUS band will be changed in the order
shown below..
[SIRIUS1] ~ [SIRIUS2] ~ [SIRIUS3] ~
[SIRIUS4] .. ~ return to [SIRIUS1]
® [Direct]:
Select a channel by inputting the channel
number directly.
@ [Category]:
Select the desired category from the
category list screen, and select the
channel you want to listen to.
I'
8. DISC mode operations
Listening to music (CD, MP31
WMA)
•
•
When a disc is not inserted
When a disc is not inserted
Insert a DivX disc.
Insert a disc.
• It automatically starts playing.
• It automatically starts playing.
•
I Watching videos (DivX)
•
When a disc is inserted
When a disc is inserted
• For CDs, the mode switches to the CD mode
and playback starts.
• For MP3IWMAs, the mode switches to the MP31
WMA mode and playback starts.
Operations
(MP3/WMA)
using
the
screen
• The mode switches to the DivX mode and
playback starts.
JTENTION
-::::::-~---:-;._~---;-~---_._-----_.
Some DivXs may not be played automatically. In this
case, play the DivX from the disc menu stored in the
DivX.
I Operations using the screen
OJ
CD [List]:
You can select the desired folder or the
music file you want to listen to and play it.
® [.... ]/[.~]:
The folder can be switched. Music files in
the selected folder will be played.
ATTENTION
This receiver accepts certain MP3IWMA file
standards, recorded media and formats. Use the
following notes when you write MP3IWMA files on a
disc.
Supported standards:
MPEG Audio layer 3 (=MPEG1 Audio layer III,
MPEG2 Audio layer III, MPEG2.5 Audio layer III)
WMA Ver. 9 Standard Decoder Class 3 satisfied
[g] "
CD [ II ]:
Pauses playing. It changes into [~]
mark while temporarily stopping. (Touch
the [ ~ ] button to start playback.)
® [List]:
Used to select the desired folder from the
folder list screen, and then select the
video you want to watch.
(3) [.... ]/[.~]:
Used to switch folders. A video in the
selected folder will be played.
4)ATTENTION
-=--=:----:::-:-:--;-----:-;--_.
-----
• The DivX operation screen can be displayed by
pressing [AV] or by touching the screen.
• For safety purposes, only the audio from the DivX
can be played while the vehicle is being driven.
(Not while parked and without the parking brake
engaged)
I Watching videos (DVD)
•
When a disc is not inserted
I Operating the disc menu
fllTouch [Next] .
~ Insert a DVD disc.
• It automatically starts playing.
•
tW
When a disc is inserted
""",,,,==-~--::-"---'---~~--r"'"""T'""T""--'-""""""~
t~
~~Touch
[
-:.
[Menu] or [Top Menu], and then touch
].
• The mode switches to the DVD mode and
playback starts.
ATTENTION
Some DVDs may not be played automatically. In this
case, play the DVD from the disc menu stored in the
DVD.
I Operations using the screen
~iTouch [ • ], [ t ], [ .. ], or [ .. ] to select
an item, and then touch [Enter].
ATTENTION
playing. When touched in the
status, starts playing frame-by-
®[.]:
Touch to stop playback.
@[ ... ]:
Fast rewind
@[ ~ ]:
Touch to start playback.
®[~ ]:
Starts fast forward operation. When
touched in the PAUSE status, starts slow
playing.
• The menu screen displayed differs depending on
the DVD disc.
• The DVD operation screen can be displayed by
pressing [AV] or by touching the screen.
• For safety purposes, only the audio from the DVD
can be played while the vehicle is being driven.
(Not while parked and without the parking brake
engaged)
_
9. Bluetooth Audio Operation
I Using Bluetooth Audio
The use of Bluetooth wireless communication technology enables a Bluetooth-compatible portable
audio player (henceforth "portable device") to be used as the main unit's audio source. Before using
a Bluetooth-compatible portable device with the main unit, please be sure to perform the Bluetooth
registration and connection setting procedures.
• Bluetooth is a form of short-range wireless technology used to connect cell phones and personal
computers, etc.
I Registering a portable device
When the registration has been completed,
a message will appear on the display.
Portable devices can be registered in the main
unit.
Press[MENU].
• The portable device is now registered.
•
Searching for the portable device to be
registered using the main unit
1;!'Touch [Device Search].
• "Searching ... " will appear on the display.
Select the device name of the portable
device to be registered .
•
Registering using a portable device
'<I'Touch [Allow Connect].
Use the portable device to input the PIN
CODE.
Use the portable device to input the PIN
CODE.
• The default PIN CODE is 1234.
• Operate the portable device only while the
device information screen is displayed.
When the registration has been completed,
a message will appear on the display.
• The portable device is now registered.
ATIENTION
• The default PIN CODE is 1234.
• Operate the portable device only while the
device information screen is displayed.
If the registration is not successful, a message will
appear on the display. When this happens, perform
the registration procedure again.
I Connecting the portable device
A portable device registered in the main unit
can be connected.
OTouch [Connect].
~P]
"
.ATTENTION
If the registration is not successful, a message will
appear on the display. When this happens, perform
the registration procedure again.
I Listening to the portable device
111$- "
"""1:illI
~Mer1u',,,,
®[. ]:
Touch to stop playback.
• Press [ ~ ] to restart playback.
(fj)ATTENTION
If the portable device does not start playing, even after
you have touched [ ~ j, press the Play button on the
portable device.
II
10. USB mode operations
This receiver can play a music file stored in a
USB memory.
I Disconnecting the USB memory
I Listening to music
Disconnect the USB memory parallel to the
USB connector.
Connect the USB memory to the USB
connector.
•
• The mode switches to the USB mode and
playback starts.
I Operations using the screen
~
,,".Il
CD [List]:
Select the desired folder from the folder
list screen, and select the music file you
want to listen to.
C?> [.... ]/[.~]:
The folder can be switched. Music files in
the selected folder will be played.
-:::------c:--
~ATTENTION
_.
-----._----
Do not disconnect the USB memory during
playback.
• Playable MP3IWMA File Standards
• MP3
Supported standards:
MPEG-1, MPEG-2, and MPEG-2.5
Supported sampling frequencies:
MPEG-1: 32, 44.1
MPEG-2: 16, 22.05, 24
MPEG-2.5: 8, 11.025, 12
Supported bit rates:
MPEG-1 :32 to 320 K bps
MPEG-2: 8 to 160 K bps
MPEG-2.5: 8 to 160 K bps
• Supported VBR (8 to 320K bps)
• Does not support free format.
Supported channel modes:
Monaural, Stereo, Joint Stereo, Dual-Channel
• WMA
Supported standards:
WMA Ver. 7,8,9
Supported sampling frequencies:
8, 11.025, 12, 22.05, 32, 44.1, 48 (kHz)
Supported bit rates:
8 to 320K bps
• Supported VBR (64 to 320K bps)
• Does not support free format.
Supported channel modes:
Monaural, Stereo
I:
11. i Pod® mode operations
Once an iPod is connected, you can play iPod
music or video files.
• Use the optional iPod interface cable (iPC109) to connect the iPod to the main unit.
• For the functions of the iPod, refer to the iPod
User's Guide.
• For the specific details of the iPod operation
and connection, refer to the Instruction
Manual of the optional iPod interface cable
(iPC-109).
Listening to/watching videos on
the iPod
•
Watching videos
'*,
H
Touch [Menu].
<:;';Touch [Video].
Touch [iPod] while the iPod is connected to
the main unit.
• The mode switches to the iPod mode, and
playback starts automatically.
I Operations using the screen
•
Listening to music
(g)
III·····
(Touch
CD [List]:
A list screen which includes the song
currently being played is displayed.
From the list, select the song you want to
listen to.
®[MENU]:
Select a category from Playlist, Artist,
Album, Podcast, and Genre on the menu
screen, and then select the song you
want to listen to. (After selecting the
desired category, continue the selection
procedure until you have selected the
song you want to listen to/podcast.)
(itATTENTION
When the iPod is connected using the optional iPod
interface cable, "ECLIPSE" will be displayed on the
iPod. While "ECLIPSE" is displayed, the iPod cannot
be operated directly.
112.
Setting sound quality
Displaying the
settings screen
sound
quality
.~
-:'Touch [PSound] on one of the audio
operation screens.
• The sound quality settings screen will appear.
• Touch [Next] and then [Set] (in DVD mode) or
touch [Set] (in DivX mode) to display [PSound].
I Setting the sound quality
Touch the sound quality setting item you
want to adjust.
CD [EO Setting]:
The bass, mid, and treble sound quality
can be adjusted as desired. The
previously set sound quality can also be
adjusted.
® [BAUFAD Setting]:
The set position for front-to-back, right-toleft volume balance can be adjusted.
@ [Woofer Setting]:
When a sub-woofer is connected, the
preferred output level for the audio can be
set.
@) [Loudness]:
Audio can be modulated to correct for
insufficient low and high sounds when
listening at low volume.
(§) SVC (Source Volume Control) level [ .A ]/
[ T ]:
Adjusts different volume levels for each
audio mode. Selection (adjustment) is not
possible in the FM mode.
® [Done]:
To exit menu.
I Using the Bluetooth hands-free function
The use of Bluetooth wireless communication technology enables a Bluetooth-compatible cell phone
to be used with the main unit. Once the cell phone is connected to the main unit, it is possible to
make calls without directly operating the cell phone. Before using a Bluetooth-compatible cell phone
with the main unit, please be sure to perform the Bluetooth registration and connection setting
procedures.
• Bluetooth is a form of short-range wireless technology used to connect cell phones and personal
computers, etc.
• For safety reasons, be sure to stop the vehicle before performing operations such as cell phone
registration or making calls.
I Registering a cell phone
Cell phones can be registered in the main unit.
Press
•
Searching for the cell phone to be
registered using the main unit
1""'~
'*'Touch [Device Search].
[~].
D
t~!Touch [Pairing].
• "Searching" will appear on the display.
o Select the device name of the cell phone to
be registered.
• When the registration screen appears for the
first time, only the pairing setting can be
selected.
•
Registering using a cell phone
Touch [Allow Connect].
Use the cell phone to input the PIN CODE.
• The default PIN CODE is 1234.
• Operate the cell phone only while the device
information screen is displayed.
(,j. When the registration has been completed,
a message will appear on the display.
• The cell phone is now registered.
• The default PIN CODE is 1234.
• Operate the cell phone only while the device
information screen is displayed.
When the registration has been completed,
a message will appear on the display.
• The cell phone is now registered.
(jJtATTENTION
If the registration is not successful, a message will
appear on the display. When this happens, perform
the registration procedure again.
I Making a call
On the Phone Setting screen, touch the
setting switch for each item to perform the
following settings.
Auto Answer:
Automatic call answering can be set.
Ringtone:
The ring tone can be set.
Auto Connect:
Registered cell phones can be connected to
the main unit automatically.
Change Code :
The PIN CODE can be changed by touching
[Change Code].
Done:
To exit menu.
• The input phone number is dialed.
Answering a phone callI Hanging
up (Refusing a call)
I Connecting a cell phone
Cell phones registered in the main unit can be
connected.
Select the cell phone to be connected and
then touch [Connect].
Various settings of the hands-free
function
,;~When the registration has been completed,
a message will appear on the display.
• The cell phone is now connected to the main
unit.
fij)ATIENTION
. _ - - , - - , - - - - _ . ---".
__.._-----------
If the registration is not successful, a message will
appear on the display. When this happens, perform
the connection procedure again.
I
14. How to use ESN
The main unit is equipped with ESN (ECLIPSE
Security Network). A music CD (Key CD) which
has been registered in the main unit, is
necessary for ESN. Without it, none of the
functions will operate, even when the battery is
reconnected after it has been disconnected for
maintenance, or the ignition switch is turned to
ACC or ON after it has been turned to OFF (if
constant power to the main unit has been
disconnected or interrupted).
OATTENTION
You cannot use a CD-RW, a CCCD (copy control CD),
or an MP3 or WMA CD as the key CD.
Canceling registration of the key
CD
&Touch [Info].
I Registration of the key CD
Register one of the CDs in your collection as
the key CD for the main unit.
;~I~Touch [Info].
';"'Touch [ESN].
Insert the music CD, then touch [Set up].
Touch [YES] to accept or [NO] to cancel this
procedure.
':./ Touch [YES] to accept or [NO] to cancel this
procedure.
• "Canceling" will be displayed, followed by
"Security was canceled" indicating that
registration of the key CD has been canceled .
• "Now setting SEC" will be displayed, followed by
"Security was set" indicating that registration of
the key CD has been completed.
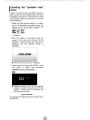
Canceling the "operation lock"
status
If power is disconnected while ESN security is
active (a Key CD was programmed), operation
is disabled until power is restored and the main
unit unlocked. Follow this procedure to resume
normal operation.
':~'While the ESN security setting is in effect,
and in the operation lock status (when the
ignition key is at the OFF position), the
indicator on the device flashes in red.
CD indicator
After the battery is connected, when the
power to the main unit is turned ON the
program is read (provided the map disc is
inserted), and the opening screen is
displayed.
• After that, the security screen is displayed.
g~ Insert the key CD and touch [YES] to verify
and [NO] to cancel this procedure
(operation lock is not canceled) .
• "Verifying security code" will be displayed,
followed by "Confirmed security code. Security
disabled" indicating that the operation lock
status has been canceled.
fiilATTENTION
-----The operation lock status cannot be canceled with a
duplicate CD.
-----,-:---;--;---:-.
- ,"1 ---------------------------------------"-<,~"-;;{.,,.:
'.',., )f"::
15. REFERENCE
•
About the Bluetooth
·0 Bluetooth®
Bluetooth® is a registered trademark of Bluetooth SIG, Inc.
• This device complies with part 15 of the FCC Rules and RSS- Gen of the IC Rules. Operation is subject to the
following two conditions: (1) This device may not cause harmful interference, and (2) this device must accept
any interference received, including interference that may cause undesired operation.
FCC WARNING
Changes or modifications not expressly approved by the party responsible for compliance could void the user's
authority to operate the equipment.
FCC ID: BABFT0005A
IC:2024B-FT0005A
•
About the DVD
This product incorporates copyright protection technology that is protected by method claims of certain U.S.
patents and other intellectual property rights owned by Macrovision Corporation and other rights owners. Use of
this copyright protection technology must be authorized by Macrovision Corporation, and is intended for home
and other limited viewing uses only unless otherwise authorized by Macrovision Corporation. Reverse
engineering or disassembly is prohibited.
•
About the DivX
• DivX, DivX Certified, and associated logos are trademarks of DivX, Inc. and are used under license,
·About DivX
DivX is a popular media technology created by DivX, Inc. DivX media files contain highly compressed video
with high visual quality that maintains a relatively small file size. DivX files can also include advanced media
features like menus, subtitles, and alternate audio tracks. Many DivX media files are available for download
online, and you can create your own using your personal content and easy-to-use tools from DivX.com.
• About DivX Certified
DivX Certified products are officially tested by the creators of DivX and guaranteed to play all versions of DivX
video, including DivX 6. Certified products qualify for one of several DivX Profiles that designate the type of
video the product supports, from compact portable video to high-definition video.
•
About the iPod
·iPod is a trademark of Apple Inc., registered in the U.S. and other countries.
• "Made for iPod" means that an electronic accessory has been designed to connect specifically to iPod and has
been certified by the developer to meet Apple performance standards.
• Apple is not responsible for the operation of this device or its compliance.
•
About HD Radio
H2)~~~1(r
The HD Radio Ready logo is a proprietary trademark of iBiquity Digital Corp.
•
Copyright note
The product and the information contained herein is subject to change without prior notification.
This manual may not, in whole or in part, be reproduced or transmitted in any form either electronically or
mechanically, including photocopying and recording, without the express written consent of Nav N Go Kft.
© 2008 Nav N Go Kft
All rights reserved,
CUSTOMER NOTICE
Please retain this booklet and write in the serial number of your AVN726E for dentification.
The serial number is labeled or stamped on the chassis.
AVISO AL CLiENTE
Guarde este folleto y apunte el numero de serie de su AVN726E para identificarlo.
EI numero de serie aparece como etiqueta 0 sello en el chasis.
NOTIFICATION CLIENT
Veuillez conserver ce manuel et y inscrire Ie numero de serie du modele AVN726E pour
identification.
Le numero de serie est appose ou grave sur Ie chassis.
Serial No.
FUJITSU TEN LIMITED
Contact FUJITSU TEN CORP OF AMERICA
19600 So Vermont Avenue, Torrance, CA 90502
Call: 1-800-55-ECLIPSE (Dealer Locator)
.1-800-233-2216 (Information)
www.eclipse-web.com/us/index.htmI
DVD-Video / USB Multi-Source Receiver /7" Wide Screen Monitor / Navigation /Buill-in Bluetooth® wireless technology
r
DVl}'v~eo /USB Multi-Source R~er I W~e Screen Monitoc I Navigation IRDS·lMC (SUNA GPS Traffle Updates~) ISuitt·in B1uetooth® wireless tedmokY:jy
En lish
INSTALLATION MANUAL
, Be sun; i6:readthis irlslal1atklii"manual,
Espanal
MANUAL DE INSTALACION
l1
Profession8I insb1IlatIOn Is I1!QIlitlId
sure
installed at your retailer, Be
to keep
this manUal after installation for later
reference,
'
The customer should keep, this-manual for
future reference.
Ip
;-
When installing the main unit, some
vehicle models may require the use of
items that need to be obtained separately
such as a power supply adaptor, radio
antenna adaptor wire or mounting
bracket
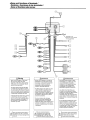
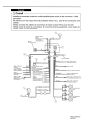
Main unit
®
Interconnecting wires
(Power and speaker wires) (16P)
x1
Interconnecting wires
@ (Sub-woofer, line out, USB, etc,)
(20P)
x1
Interconnecting wires
® (parking brake, reverse and steering
remote control, etc.) (16P)
x1
® Hexagonal head bolt (Red:M5x8) x4
x8
® Flat head screw (Red:M5x8)
(j) GPS antenna
x1
x1
® Ground plate
x1
® Microphone
@ Panel
x1
~c onseJo
CD
Unidad principal
®
Cables de interconexi6n (Cables de
alimentaci6n y parlantes) (16P)
x1
x1
®
®
Placa de conexi6n a tierra
Micr6fono
@ Panel
~~
d
.
Mns ce manuellf"lOstalatiOn. vous vous
eXllQS8l8z a des accidents au a des
bles8ures,
COnfiez rinstallalion deo systllme
ce
a,des professionnels. ECLIPSE vous
recommandEl. dEl faire installer ce
systllme par votre revelideur. VeilleZ a
, CO!!server ce manuel aprlls avoir ~ffectull
'rinstallation afin de, pouvoir. vous y rllfllrer ,liltllrieurement.
.. ",
' •
,~
L~ c1i~t,dOit conserver ~ in<!nuel po,f/r
poUXOir s'y rllfllrer ultllrieUrement
"
x 1
x1
x4
x8
x 1
x1
x1
x1
Para modelosde EE,UU, I
Modeles pour les Etats-Unis
~
FUJITSU TEN
~c onsel0'
Lors de I'installation de I'unite principale,
il pourra etre necessaire, sur certains
modeles de vehicules, d'utiliser des articles
vendus separement tels qu'un adaptateur
d'alimentation electrique, un fiI d'adaptateur
d'antenne de radio ou un support de
montage,
CD
Unite principale
®
Cable d'interconnexion (Fils de
haut-parleur et d'alimentation) (16P) x 1
x1
Cables d'interconnexion
@) For U.S. models I
®
eO
e
@ (Subwoofer, sortie de ligne, USB.
Qtros accesorios (Manual de instalaci6n,
manual del usuario, otras documentaci6n)
@
WUlez a Ii~ ;nti~8meiitill'fpr'sent
\, mahueldlinstal\ati.Ori,a'iant dEl ~F
8uX tra'Yaux d'instaltatioil:Si vous utifisez
"~-inllthodelnl'instatlallOnau des.pi8ees
, non:standElrd qui ne son! pas ~ .
r-'
Cables de interconexi6n
@ (Sub-woofer, conector de salida y
USB, etc,) (20P)
Cables de interconexi6n (freno de
® estacionamiento, marcha atras y del
control remata de direcci6n. etc.) (16P)
® Perno de cabeza hexagonal (Roja:M5x8)
® Tornillo de cabeza plana (Rojo:M5x8)
(j) Antena del GPS
Other accessories (Installation manual, user's
manual, other documentation)
~6*
~
AI instalar la unidad principal, algunos
modelos de vehiculos pueden necesitar
el uso de items que deben ser obtenidos
pOI' separado como un adaptador de
suministro de alimentaci6n, un cable
adaptador de antena de radio 0 una
mEmsula de montaje,
x1
®
. ':','
m'todOs '
to install this syllla!!," ECLIPSE '
re<XlI1lIllElii you to haVe the sYstem
CD
;;'::,'0~~
lkivar
;;'-;i;1i1ti6n
'are
r-
'''&1'1
'Asegurese de leer completemente:este ..
". manuai .de jnl!taI8ci6rt· antes.dEl
,a .
'c8bo Ie Inst818cl6n.SI fl8 utlItz8n
,de, "instalaci6n \:) plazas no estilndares
que no se detallan en este manual-de
'ii1StalacI6n podiIan produclr8e ecciilenteS
o lesiones.• Se]eCOinienda que.quien
•instale este lIistema sea un' profesiOnal.
ECLrpSE Ie rec;omiendEl que Ie instalen
. 81 sistema en su negoclo minorista,
Asegure~e ,de guardar. ,!ste manual
despulls, de instalarlo para consultas
futures,
_
,"EI.consumkior debe guardar este m-.nual
para futures consultas.
!hnrnlll1hly:.prior to instal\8ilon;!f ~ ••,.: "" '
rilethods'ar nonstandard partS
not spepIfI8d in this instaIl8tiOn TIllII1U8I
used, aCcideiils or iniUtYmaYresutt
Franc;ais
MANUEL D'INSTALLATION
etc,) (20P)
Cables d'interconnexion (frein de
® stationnement. marche arriere et
telecommande de direction. etc,) (16P)
® Bouian a tete hexagonale (Rauge:M5x8)
® Vis a tete plate (Rouge:M5x8)
(j) Antenne GPS
®
®
Plaque de masse
Microphone
@ Ponneau
Autres accessoires (manuel d'installation,
manuel d'utilisation, autres documents)
@) For AUS models I
Para modelos de AUS I
Modeles pour l'Australie
x1
x1
x4
x8
x1
x1
x1
x1
MRIII1]'~.IIrSllilt{Jr iillllSii8t!lJ!Iie! ~ #'
IP'tBI;t; SlIII SlEIPlfiiJIJBJIIalllI1/i/IGirellsiiJrIIBRaJII
SialIfiIiijJiIKIlfIIIrUlIIIJliisIJi_ .~.
~Warning
~Advertencia
· Do not install this main unit in locations where
it may obstruct the driver's view, or where
it may endanger passengers in the vehicle,
otherwise an accident or injury may result.
· No instale este producto en lugares donde
pueda obstruir la visi6n del conductor 0 donde
pueda poner en peligro a los pasajeros del
vehiculo, de 10 contrario, podria producirse un
accidente 0 lesiones.
· To prevent damage to the vehicle, confirm
the locations of hoses, electrical wiring, and
the fuel tank prior to drilling holes to install
this main unit. Also, take precautions so that
the main unit does not interfere, nor come in
contact with them, otherwise a fire may result.
· When installing this main unit, never use the
existing nuts or bolts that secure parts of the
fuel tank, or the steering, or braking systems,
otherwise improper steering or braking or a
fire may result.
· To prevent a short circuit from occurring,
disconnect the battery's negative terminal
before installing this main unit, otherwise, an
electric shock or injury may result.
· When using an existing nut and/or boll from
the vehicle to ground this main unit, do not
use any that secure parts of the steering or
braking systems, otherwise, an accident may
result.
· Para prevenir daiios en el vehiculo, verifique
la ubicaci6n de las mangueras, el cableado
electrico y el tanque de combustible antes de
perforar agujeros para instalar este producto.
Ademas, acttle con precauci6n para que el
producto no interfiera ni este en contacto con
ellos, de 10 contrario, se puede ocasionar un
incendio.
· Cuando instale este producto, nunca utilice
las tuercas ni los pernos que aseguran
las partes del tanque de combustible 0
los sistemas de direcci6n 0 frenado, de 10
contrario, podria producirse el funcionamiento
incorrecto de la direcci6n 0 de los frenos, 0 un
incendio.
· Para prevenir un cortocircuito, desconecte
el terminal negativa de la bateria antes de
instalar este producto. De 10 contrario, podria
producirse una descarga electrica 0 lesiones.
· Bundle wires and harnesses with electrical
tape or wire ties to prevent them from
interfering with moving parts. If they should
entangle with the steering wheel, shift lever,
or brake pedal, an accident may result.
· Cuando utilice una tuerca y/o perno existente
en el vehiculo para conectar a tierra este
producto, no utilice ninguno que asegure
partes de los sistemas de direcci6n 0
frenado, de 10 contrario, podria producirse un
accidente.
· Never supply power to another electrical
appliance by splicing or tapping into this
main unit's power wire, otherwise the current
capacity of the wire will be exceeded,
resulting in a fire or electric shock.
· Ate los cables y arneses con cinta aislante 0
sujetacables para evitar que interfieran con
partes en movlmiento. Si se enredaran con el
volante, la palanca de cambios 0 el pedal de
frenos, pod ria producirse un accidente.
· Never attempt to disassemble or modify the
main unit, otherwise an accident, fire, or
electric shock may result.
· Nunca suministre energia a otro dispositivo
electrico uniendolo 0 conectandolo a la linea
de alimentaci6n (cable) de este producto, de
10 contrario, se excedera la capacidad actual
del cable, 10 que ocasionara un incendio 0
descarga electrica.
· When installing the main unit into a vehicle
with a passenger side air bag, do not secure
it to the air bag's cover or in places where it
may impede air bag deployment, otherwise
proper air bag operation may not be ensured
in the event of an accident, causing injury or
death.
· When making holes (example: drilling) be
sure to wear protective eyewear, otherwise
an injury such as loss of eyesight may result.
· Exposed wires must be insulated with
electrical tape, otherwise a short circuit, fire,
or electric shock may result.
· Do not modify this system for use other than
that specified herein. Also, do not deviate
from the installation procedures described
herein; ECLIPSE will not be held liable for
damages including, but not limited to serious
injury, death, or property damage resulting
from installations that enable unintended
operation.
· Nunca intente desarrnar ni modificar el
producto, de 10 contrario, podria producirse un
accidente, incendio 0 una descarga electrica.
· Cuando instale el producto en un vehiculo
con bolsa de aire en el asiento del
acompaiiante, no 10 asegure a la tapa de
la bolsa de aire 0 en lugares donde pueda
impedir el despliegue de la bolsa de aire, de
10 contrario, no se podra garantizar el correcto
funcionamiento de la bolsa de aire en caso
de un accidente, 10 que causara lesiones 0 la
muerte.
~ Avertissement
· N'installez pas cette unite principale a des
endroits ou elle risque d'obstruer Ie champ
de vision du conducteur, ou de presenter un
danger pour les passagers du vehicule, sinon
un accident ou des blessures risqueraient de
s'ensuivre.
· Pour eviter d'endommager Ie vehicule,
verifiez I'emplacement des tuyaux, des fils
electriques et du reservoir de carburant
avant de percer les orifices pour I'installation
de cette unite principale. Prenez aussi les
precautions necessaires pour que I'unite
principale n'entre pas en contact avec ces
composants, sinon un incendie risquerait de
s'ensuivre.
· Lorsque vous installez cette unite principale,
n'ulilisez jamais les boulons ou les ecrous
existants qui fixent les pieces du reservoir
d'essence, du systeme de direction ou de
freinage, sinon des anomalies de la direction
ou du freinage ou un incendie risqueraient de
s'ensuivre.
· Pour eviter de causer un court-circuil,
debranchez la borne negative de la batterie
avant d'installer cette unite principale,
sinon une electrocution ou des blessures
rlsqueraient de s'ensuivre.
· Lorsque vous utilisez un ecrou et/ou un
boulon existant du vehicule pour mettre cette
unite principale a la masse, veillez a ne pas
utiliser d'ecrou ou de boulon qui fixe des
composants des systemes de direction ou
de freinage, sinon un accident risqueralt de
s'ensuivre.
· Regroupez les cables et les faisceaux de fils
a I'aide de ruban isolant ou de serre-fils afin
d'eviter qu'i1s genent les pieces mobiles. S'i1s
sont pris dans Ie volant, Ie levier de vitesses
ou la pedale de frein, un accident risquera de
s'ensuivre.
· N'etablissez pas I'alimentation electrique a
un autre appareil electrique en raccordant
ou en captant Ie courant du conducteur (fiI)
d'alimentation du produit, sinon la capacite
electrique du fil sera depassee, ce qui
risquerait de causer un incendie ou une
electrocution.
· Ne tentez jamais de demonter ou de modifier
I'unite principale, sinon un accident, un
incendie ou une electrocution risquerait de
s'ensuivre.
· AI hacer agujeros (por ejemplo:
perforaciones) asegurese de utilizar
protectores de ojos, de 10 contrario, pod ria
producirse una lesi6n como la perdida de la
vista.
· Lorsque vous installez I'unite principale dans
un vehicule equipe d'un sac gonflable lateral
du passager, ne Ie fixez pas sur Ie couvercle
du sac gonflable ou a des endroits ou il
risquerait de gener Ie deploiement du sac
gonflable, sinon Ie sac gonflable risquerait
de mal fonctionner en cas d'accident, ce qui
pourrait causer des blessures ou un deces.
· Los cables expuestos deben aislarse
con cinta aislante, de 10 contrario, podria
producirse un cortocircuito, incendio 0 una
descarga electrica.
· Lorsque vous percez des trous (exemple:
per9age), veillez a mettre des lunettes de
protection, sinon vous risqueriez de vous
blesser et de perdre la vue.
· No modifique este sistema para otro uso
distinto del que aqui se detalla. Tampoco se
desvie de los procedimientos de instalaci6n
aqui descritos. ECLIPSE no se hara
responsable por danos, los que incluyen,
pero no se Iimitan a, lesiones graves, muerte
o daiios a la propiedad debido a instalaciones
que ocasionan un funcionamiento no
intencionado.
· Les fils denudes doivent etre isoles avec
du ruban isolant, sinon un court-circuit, un
incendie ou une electrocution risquerait de
s'ensuivre.
· Ne modifiez pas ce systeme pour I'utiliser
d'une fa90n autre que celie indiquee dans ce
manuel. N'utilisez pas non plus de procedures
d'installation autres que celles indiquees
dans ce manuel. ECLIPSE decline toute
responsabilite en cas de dommages tels que,
mais non Iimites a, des blessures graves, des
deces ou des dommages materiels resultant
d'installations incorrectes.
~Warninq
· This main unit is intended for operation in
12-volt DC. negative-grounded vehicles
only. Never use it in 24-volt vehicles such as
heavy trucks or diesel vehicle with cold-region
specifications.
· Do not place the vinyl storage bag over
a person's head. It may cause a serious
accident or death by suffocation.
· Do not disassemble or rebuild this main unit.
Doing so may cause an accident, fire, or
electrical shock.
· When it is necessary to replace the fuse,
always use a fuse of the correct rating
(number of amperes). Use of fuses with
higher amperage ratings may cause a fire.
· Do not operate the main unit in a
malfunctioning condition, for instance, when
the audio does not play. Doing so may result
in an accident, fire, or electrical shock.
· If an abnormal situation occurs, such as
foreign matter entering or liquid splashing
on the main unit, or smoke or a strange odor
emitting from the main unit, shut off the main
unit immediately and consult the dealer from
whom you purchased it. Continued operation
may cause an accident, fire, or electrical
shock.
~Advertencia
~ Avertissement
· Esta unidad esta pensada para funcionar
s610 en vehiculos con conexi6n a tierra
negativa de CC de 12 voltios. Nunca la utilice
en vehiculos de 24 voltios como camiones
de gran tonelaje 0 autom6viles diesel con
especificaciones para regiones frias.
· Cette unite a ete con9ue pour fonctionner
dans des vehicules sous 12 volts CC avec
mise a la masse negative. Ne I'utilisez jamais
dans des vehicules sous 24 volts tels que
des camions lourds ou des vehicules diesel a
specifications pour pays froids.
· No coloque la bolsa de almacenamiento de
vinilo sobre la cabeza de una persona. Podria
producir un serio accidente 0 muerte por
asfixia.
· Ne placez pas Ie sac de rangement en vinyle
sur la tete d'une personne. Ceci risquerait de
causer un accident grave ou un deces par
suffocation.
· No desarme ni reconstruya este producto.
Hacer esto podria producir un accidente,
incendio 0 descarga electrica.
· Ne demontez pas ou ne reconstruisez pas
cette unite principale. Sinon, un accident, un
incendie ou une electrocution risquerait de
s'ensuivre.
· Cuando sea necesario reemplazar el fusible,
siempre utilice un fusible con la clasificaci6n
correcta (ntimero de amperes). EI uso de
fusibles con un amperaje mayor pod ria
provocar un incendio.
· No haga funcionar el producto si esta en
malas condiciones, por ejemplo, cuando el
audio no funciona.
Hacer esto podria producir un accidente,
incendio 0 descarga electrica.
· Si se produjera una situaci6n anormal,
como el ingreso de un material extraiio 0
salpicadura de Iiquido en el producto, 0
humo u olor que sale de la unidad, apague el
producto inmediatamente y comuniquese con
el comerciante al que se 10 compr6 Continuar
con el funcionamiento pod ria producir un
accidente, incendio 0 descarga electrica.
· S'i1 est necessaire de remplacer Ie fusible,
utilisez toujours un fusible de capacite
nominaIe correcte (nombre d'amperes).
Si vous utilisez des fusibles a capacite
d'amperage plus grande, un incendie risquera
de s'ensuivre.
· N'utilisez pas I'unite principale si elle
fonctionne anormalement, par exemple si elle
n'emet aucun son.
Sinon, un accident, un incendie ou une
electrocution risquerait de s'ensuivre.
· Si une anomalie se produit, par exemple si
des corps etrangers penetrent dans I'unite
principale ou que du liquide se repand sur
celle-ci, ou si I'unite principale emet de la
fumee ou des odeurs suspectes, eteignez
I'unite principale immediatement et consultez
votre revendeur. Si vous continuez a utiliser
I'unite principale dans cet etat, un accident,
un incendie ou une electrocution risquera de
s'ensuivre.
LtCaution
· For best results, this main unit should be
installed by a professional installer.
Contact the dealer whom you purchased the
main unit for an appointment.
· When installing this main unit, be sure to use
the supplied mounting hardware. If parts other
than those supplied are used, the main unit
may be damaged internally, or may not be
held in place securely and become dislodged.
· Avoid installing this main unit in places where
it may get wet, such as near windows, or in
places that are moist or dusty. Presence of
liquid, moisture, or dust inside this main unit
can cause short circuiting resulting in smoke
or fire.
· If this main unit is not connected properly, a
short circuit, fire, or accident may occur.
· When routing wires, use precautions to
prevent contact of sharp metal parts such
as brackets or screw tips, otherwise a short
circuit, electric shock, fire, or accident may
result.
· Play the audio at a moderate volume level
that permits you to hear sounds from outside
the vehicle. Driving without being able to hear
outside sounds may result in an accident.
· This main unit must be operated only as an
on-board main unit, or it may cause electrical
shock or injury.
· Do not play distorted sounds for long periods
of time; the speakers may overheat and cause
a fire.
· Once installation and wiring have been
completed, return the brakes and electrical
equipment such as lights, horn, hazard
warning lights and turn signal lights to their
original places, and check that they operate
correctly. If you use the vehicle while any of
this equipment is not working correctly, fire,
electric shocks or accidents may occur.
· Use supplied wire harness with this main unit.
Other manufacturers may use a similar wire
harness connector but pin configurations are
incorrect for use with ECLIPSE main units and
can damage the main unit. Prior to powering
up the main unit, make sure the main unit is
properly grounded with the vehicle chassis. If
no ground is available to the chassis, add a
ground strap from the main unit to the vehicle
chassis to improve the ground.
· Do not use with speakers having 1 to 3 ohms
impedance. This main unit is designed to be
used with high-powered speakers rated above
50 W with impedance rating between 4 and 8
ohms.
Lt Precauci6n
· Para obtener mejores resultados, un
instalador profesional deberia instalar este
producto.
Comuniquese con el comerciante al que Ie
compr el producto para programar una cita.
· Cuando instale este producto, asegurese
de utilizar el equipamiento de montaje
incluido. Si se utilizan otras partes distintas
de las incluidas, la unidad podria danarse
internamente 0 podria no quedar bien sujeta y
desplazarse.
· Evite instalar este producto en lugares donde
pueda mojarse, como cerca de ventanas 0 en
lugares que estan humedos 0 lIenos de polvo.
La presencia de liquidos, humedad 0 polvo
dentro de este producto puede producir un
corto circuito que origine humo 0 incendio.
· Si no se conecta correctamente este
producto, podria producirse un cortocircuito,
incendio 0 accidente.
· Cuando guie los cables, actue con precauci6n
para evitar el contacto de partes filosas
de metal como abrazaderas 0 puntas de
tornillos, de 10 contrario, podria producirse un
cortocircuito, descarga electrica, incendio 0
accidente.
· Reproduzca el audio en un nivel moderado de
volumen que Ie permita escuchar los sonidos
fuera del autom6vil.
Conducir sin poder escuchar los sonidos
exteriores puede causar un accidente.
· Se debe operar este producto s610 como un
equipo abordo 0 puede producir descargas
electricas 0 lesiones.
· No reproduzca sonidos distorsionados
por largos periodos; los parlantes podrian
sobrecalentarse y causar un incendio.
· Una vez que haya completado la instalaci6n
y el cableado, vueIva a colocar los frenos
y componentes electricos como las luces,
la bocina, las luces de advertencia y luces
de giro en sus correspondientes lugares y
asegurese de que funcionen correctamente.
Si utiliza este vehiculo mientras alguno de los
equipos no funciona correctamente, pod ria
ocasionar un incendio, descargas electricas 0
accidentes.
· Uti lice el arnes de cables suministrado con
la unidad. Otros fabricantes pueden utilizar
un conector del arnes de cables similar pero
las configuraciones de las clavijas no son
las correctas para utilizar con los productos
ECLIPSE y puede danar las unidades. Antes
de encender la unidad asegurese de que
este conectada a tierra correctamente con
el chasis del vehiculo. Si no esta disponible
la conexi6n a tierra del chasis, agregue una
correa de conexi6n a tierra desde la unidad al
chasis del vehiculo para mejorar la conexi6n a
tierra.
· No la uti lice con los parlantes que tienen una
impedancia de 1 a 3 ohmios. Esta unidad
esta disenada para utilizarse con parlantes
de alta potencia superior a 50 W, con una
impedancia de entre 4 y 8 ohmios.
Lt
Precaution
· Pour obtenir les meilleurs resultats, celle unite
principale doit etre installee par un installateur
professionnel. Prenez rendez-vous avec votre
revendeur.
· Lorsque vous installez celle unite principale,
veillez a utiliser I'equipement de montage
fourni. Si vous utilisez des pieces autres que
les pieces fournies, I'unite principale risquera
des subir des dommages internes ou d'etre
mal fixee et de tomber.
· Eitez d'installer celle unite principale a des
endroits ou elle pourrait etre mouillee, tels
qu'a proximite des fenetres, ou a des endroits
humides ou poussiereux.
Si des liquides, de I'humidite ou de la
poussiere penetrent dans I'unite principale,
ceci pourrait causer un court-circuit resultant
en I'emission de fumee ou de f1ammes.
· Si celle unite principale n'est pas connectee
correctement, un court-circuit, un incendie ou
un accident risquera de s'ensuivre.
· Lorsque vous acheminez les cables, prenez
soin d'eviter tout contact entre les pieces
metalliques coupantes telles que les supports
ou les pointes de vis, sinon un court-circuit,
une electrocution, un incendie ou un accident
risquerait de s'ensuivre.
· Effectuez la lecture audio a niveau de volume
modere qui vous permelle d'entendre les sons
provenant de I'exterieur du vehicule.
Si vous conduisez sans pouvoir entendre les
sons provenant de I'exterieur du vehicule, un
accident risquera de s'ensuivre.
· Celle unite principale ne doit etre utilisee que
comme un equipement de bord, sinon une
electrocution ou des blessures risqueraient de
s'ensuivre.
· N'effectuez pas la lecture de sons deformes
pendant de longues periodes; les hautparleurs risqueraient de surchauffer et de
causer un incendie.
· Une fois I'installation etle cablage termines,
remellez les freins etles equipements
electriques tels que les feux, I'avertisseur
sonore, les feux de detresse et les clignotants
a leur emplacement d'origine, et verifiez s'i1s
fonctionnent correctement. Si vous utilisez Ie
vehicule alors qu'un de ces equipements ne
fonctionne pas correctement, un incendie,
une electrocution ou un accident risquera de
s'ensuivre.
· Utilisez Ie faisceau de fils fourni avec I'unite
principale. Les autres fabricants peuvent
utiliser un connecteur de faisceaux de fils
similaire, mais les configurations des broches
ne conviendront pas a I'utilisation avec les
unites principales ECLIPSE et risqueront
d'endommager I'unite Avant d'allumer
I'unite principale, veillez a ce que I'unite soit
correctement mise a la masse avec Ie chassis
du vehicule. Si aucune masse n'est disponible
sur Ie chassis, ajoutez une bride de masse
de I'unite principale sur Ie chassis du vehicule
pour ameliorer la masse.
· N'utilisez pas de haut-parleurs possedant
une impedance de 1 a 3 ohms. Celle unite
principale doit etre utilisee avec des hautparleurs d'une puissance nominale superieure
a 50 W et une impedance comprise entre 4 et
8 ohms.
MiItRJ!IIlliIg. . . .iJIJ llllllii//I
lh1tJJIaIiBd_ • !JIlllllllii1llllrllpiilBdi/IBII /I
liJnBIiiTIlli1/iilIm. U1JuIi1lpiilBdi/lSle
o
f:J
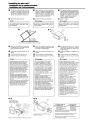
To maintain proper function, the main
unit must be mounted at less than 30
degrees. If the angle is in excess of
30 degrees, CDIDVD skipping and
improper CDIDVD ejection may occur.
0
Para mantener el funcionamiento
correcto, la unidad principal debe estar
instalada a menos de 30 grados. Si el
angulo es mayor a 30 grados, podria
saltar el CD/DVD 0 podria producirse la
eyecci6n incorrecta del CD/DVD.
Remove the shipping bracket.
f:J
Desmonte la mensula de transporte.
~Tip - - - - - - - , .
The hexagonal head bolts (Red) which
are removed may be used again later
when reinstalling.
o
f:J
~Consejo - - - - - -____
Pour pouvoir fonctionner correctement,
I'unite principale doit etre montee avec un
angle de moins de 30 degres. Si I'angle
est superieur a 30 degres, des sautes de
CD/DVD et des ejections incorrectes de
CD/DVD risqueront de se produire.
Retirez Ie support d'expedition.
Retirez Ie support.
~ Conseil
Los pernos de cabeza hexagonal (Rojos)
desmontados se pueden volver a usar al
volver a instalar.
Lors de la reinstallation, iI est possible de
reutiliser les boulons a tete hexagonale
(Rouges) retires.
o
Level (reference) I Nivel (referencia) I Niveau (reference)
IJ
Remove the pocket and any other
accessories from the center cluster to
make room for the main unit.
Quite la cavidad y cualquier otro
accesorio del grupo central para hacer
lugar para la unidad principal.
Remove the mounting brackets for the
pocket.
Quite los soportes de montaje de la
cavidad.
Retirez la poche et les autres
accessoires du panneau combine
central pour degager de j'espace pour
I'unite principale.
Retirez les supports de montage de la
poche.
Attach the brackets to the main unit.
Fije los soportes a la unidad principal.
Fixez les supports sur I'unite principale.
Install the main unit in the vehicle.
Instale la unidad principal en el vehiculo.
Installez I'unite principale dans Ie
vehicule.
~ Conseil
~Consejo - - - - - _ _ .
· Carefully bind any excess length of wire
that is connected to the main unit and
secure it to an area of empty space in
the vehicle so that it does not dislodge or
interfere with the main unit or vehicle-side
equipment. If the wires are not handled
correctly, operating problems or shortcircuits may occur, and this may result in
the danger of fire or other accidents.
· Connect all wires before installing the
main unit.
· Be sure to use the supplied accessory
mounting screws (Red: M5 x 8) as the
mounting screws. If any other screws are
used, they may damage the inside of the
main unit.
· If using hexagonal head bolts (Red:M5x8),
use the four hexagonal headbolts (Red:
M5x8) which were used to install the
shipping brackets and the four accessory
hexagonal head bolts (Red:M5x8).
· Ate cuidadosamente todo exceso
de cable conectado a la unidad
principal y asegurelo a un area de
espacio vacio en el vehiculo para
que no se desplace ni interfiera con
la unidad principal ni con el equipo
lateral del vehiculo. Si no manipula
correctamente los cables, pueden
ocasionarse problemas operativos
o cortocircuitos que podrian
generar peligros de incendio u otros
accidentes.
· Conecte todos los cables antes de
instalar la unidad principal.
· Asegurese de utilizar los tornillos de
montaje adicionales incluidos (Rojos:
M5 x 8) como los tornillos de montaje. Si
utiliza cualquier otro tornillo, podria danar
el interior de la unidad principal.
· Si usa pernos de cabeza hexagonal
(Rojos: M5x8), use los cuatro pernos de
cabeza hexagonal (Rojos: M5x8) que
fueron usados para instalar la mensula de
transporte y los cuatro pernos de cabeza
hexagonal accesorios (Rojos: M5x8).
· Attachez soigneusement toute
longueur excessive de cordon connect
I'unit principale, et fixez-Ia dans une
zone d'espace libre dans Ie vehicule,
afin que Ie cordon ne se detache pas
ou ne gene pas I'unite principale ou
I'equipement du cote vehicule. Si
vous ne manipulez pas correctement
les cordons, des anomalies de
fonctionnement ou des court-circuits
risqueront de se produire, ce qui
pourrait causer un incendie ou
d'autres accidents.
· Connectez tous les cables avant
d'installer I'unite principale.
· Veillez a utiliser les vis de montage
d'accessoires fournies (Rouges: M5
x 8) comme vis de montage. Si vous
utilisez d'autres vis, elles risqueront
d'endommager I'interieur de I'unite
principale.
· Si vous utilisez des boulons a tete
hexagonale (Rouges: M5 x 8), servezvous des quatre boulons a tete
hexagonale (Rouges: M5x8) qui etaient
utilises pour installer les supports
d'expedition et les quatre boulons a tete
hexagonale (Rouges: M5x8) fournis avec
les accessoires.
f
'
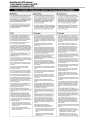
Hexagonal head bolt
~6 Flat head screw
(Red:M5 x 8) x 8
(Red:M5x8) x 8
Perno de cabeza hexagonal
Tornillo de cabeza plana
(Rojo:M5x8) x 8
(Rojo:M5x8) x 8
Sou/on a tete hexagonale
Ll'is a (tHe plate
(Rouge:M5x8) x 8
(Rouge:M5x8) x 8
Select the screws in accordance with the shapes of the
screw holes in the mounting bracket.
Seleccione los tomillas de acuerdo con las formas de los
agujeros para tornillos en el soporte de montaje.
Mounting bolts I Pernos de montaje I Boulons de montage
Selectionnez les vis correspondant aux formes des trous
de vis du support de montage.
~Tip - - - - - - - - - - .
· Be careful not to press hard on the main
unit display or the buttons when installing
the main unit to the vehicle, otherwise
the display and buttons may become
damaged.
~ Consejo - - - - - - " ' " '
· Tenga cuidado de no presionar
demasiado fuerte en la pantalla de la
unidad principal al instalar la unidad
principal en el vehiculo, de 10 contrario la
pantalla y los botones se podrian dai'iar.
~ Conseil - - - - - - " ' " '
· Veillez a ne pas appuyer trop fort sur
I'affichage de I'unite principale ou sur
les touches lorsque vous installez I'unite
principale sur Ie vehicule, car vous
risqueriez d'endommager I'affichage et les
touches.
1)~I~ll~
~Tip - - - - - - _ _ _ _ .
· Do not peel off this protective label
before finishing installation and checking
operations.
~Consejo - - - - - - - . .
· No retire esta hoja de protecci6n antes
de terminar la instalaci6n y de realizar las
operaciones de verificaci6n.
~ Conseil - - - - - - " " '
· Ne retirez pas cette feuille de protection
avant d'avoir termine !'installation et verifie
Ie fonctionnement.
(ATTENTION)
~
~~~~:
Installing the microphone
~Tip
· Install the microphone and the
microphone wire where they will not be
obstacles while driving.
· Do not install the microphone in places
where it will prevent vehicle switches
from being operated or cause any other
obstruction while driving.
· If installing the microphone and the
microphone wire to a vehicle which is
equipped with air bags, make absolutely
sure to install them so that they will not
obstruct air bag operation.
o
o
Install the microphone to a place such
as a su n visor.
Route the microphone cable to the
installation position for the main unit
while securing the cable with tape.
o
Clip I
~
~
Instalacion del microfono
Installation du microphone
~Consejo- - - - - - " " '
· Instale el micr6fono y el cable del
micr6fono donde no obstacuJice al
conducir.
· No instale el micr6fono en lugares
donde impida usar los interruptores
del vehiculo 0 cause obstrucciones al
conducir.
· Si instala el micr6fono y el cable del
micr6fono en un vehiculo equipado
con bolsas de aire, asegurese
completamente de instarlos de
manera que no obstaculice el
funcionamiento de las bolsas de aire.
o
o
Instale el micr6fono en un lugar como
una visera.
Rutee el cable del micr6fono que sale
de la unidad principal a la posicion de
instalacion del microfono asegurandolo
con cinta.
~ Conseil - - - - - -.....
· Installez Ie microphone et Ie fil du
microphone a des endroits ou ils ne
generont pas la conduite.
· N'installez pas Ie microphone a des
endroits ou il empechera d'actionner
les interrupteurs du vehicule ou ou il
genera la conduite.
· Si vous installez Ie microphone
et Ie fil du microphone sur un
vehicule equipe de sacs gonflables,
veillez absolument a les installer
de maniere qu'ils ne genent pas Ie
fonctionnement des sacs gonflables.
o
o
Installez Ie microphone
qu'un pare-solei!.
a un endroit tel
Acheminez Ie fil du microphone vers
la position d'installation de I'unite
principale tout en Ie fixant avec du
ruban adhesif.
HRsla1l11JT{J1tllJe (GIfTS aI1teR1JTa1#
Oit!Re iiITstaliDrliIJamleRaJ 41/ SPS#
Itrsttallizlii!llm eltan:l!e1iT/1llll (GIPS'
Notes on installation I Notas sobre la instalaci6n I Remarques concernant I'installation
Lt,WaminQ
· The wires should be bound together with tape
or a similar securing method (example: wire
ties) so that they do not interfere with driving. If
they become wound or entangled around parts
such as the steering wheel, shifting lever, or
brake pedal, accidents may result.
· Do not install the GPS antenna where it will
obstruct the driver's vision or where it will be
an obstacle while driving, otherwise traffic
accidents may result.
~Tip
· If the vehicle glass is a special type of glass such as
Lt,Advertencia
· Les cables doivent etre lies ensemble avec
du ruban ou une methode de fixation similaire
(par exemple: serre-fils) pour eviter toute
gene pendant la conduite. S'ils s'enroulent ou
s'emmelent autour de composants tels que Ie
volant, Ie levier de vitesses ou la pedale de
frein, un accident risquera de s'ensuivre.
· No instale la antena del GPS donde obstruya
la vision del conductor 0 donde se convierta en
un obstaculo mientras maneja; de 10 contrario
podrian producirse accidentes de transito.
· N'installez pas I'antenne GPS dans Ie champ
de vision du conducteur ou a un endroit
pouvant gener la conduite, sinon un accident
risquera de s'ensuivre.
~Consejo
~ Conseil
· Si elvidrio del vehiculo as un tipo especial de vidrio
· 5i les vitres du vehicule sont en verre special, tel que
du verre reflechissant la chaleur ou du verre pareballes, veillez a installer I'antenna GPS a I'exterieur du
vehicule. Si vaus installez I'antenna GPS I'interieur
du vehicule, la sensibilite de reception sera gravement
amoindrie, et la precision des mesures de position
sera faussee.
heat-reflective glass or bullet-proof glass, be sure
to install the GPS antenna outside the vehicle. If
como vidrio reflector de calor 0 vidrio a prueba de
balas, asegurese de instalar la antana del GPS fuera
the GPS antenna is installed inside the vehicle, the
reception sensitivity will severely drop and will affect
the accuracy of the position measurement.
del vehiculo. Si se instala la antena del GPS dentro
del vehiculo, la sensibilidad de la recepci6n disminuira
severa mente y esto afectara la precision de la medida
de posicion.
· If installing the GPS antenna inside the vehicle, be
sure it is mounted on the ground plate.
· If installing the GPS antenna inside the vehicle, the
location and the slope of the vehicle's windshield will
determine the accuracy of the GPS antenna to receive
the GPS signal. If the GPS antenna location inside the
vehicle is hindering the accuracy of the GPS antenna,
then you may want to install the antenna outside the
vehicle.
· The materials used in front and rear vehicle windows
can cause GPS reception sensitivity to drop
significantly. If this happens, install the GPS antenna
outside the vehicle.
· If the attachment surface is a non-plastic surface such
as genuine leather, wood panel, or cloth, attaching the
antenna may damage the surface finish. Do not attach
the ground plate to such surfaces.
· Si instala la antena del GPS dentro del vehiculo,
asegurese de que este instalada en la placa de
conexion a tierra.
· Si instala la antena del GPS dentro dei vehiculo, la
ubicaci6n y la pendiente del parabrisas del vehiculo
determinaran la precision de la antena del GPS para
recibir la selial GPS. Si la ubicaci6n de la antena del
GPS dentro dei vehiculo obstaculiza la precisi6n de
la antena del GPS, probablemente desee entonces
instalar la antena fuera del vehiculo.
· Los materiales utilizados en las ventanas delanteras
y traseras de los vehiculos pueden hacer que
la sensibilidad de la recepci6n GPS dlsminuya
significativamente. Si esto ocurre, instale la antena del
GPS fuera del vehiculo.
· Wipe the installation surface thoroughly so that it is
clear of any dirt, moisture, or grease before installing
the antenna.
· Si la superficie donde S8 sujetara la antena no es
plastica como, cuero autentico, panel de madera 0
pario, adherir la unidad puede dariar el acabado de la
superficie. No adhiera la placa de conexi6n a tierra a
otras superficies.
· Do not apply any coatings to the GPS antenna,
otherwise it may cause a drop in the reception
sensitivity of the antenna.
· Antes de instalar la antena, limpie bien la superficie de
instalacion para que no tenga suciedad, humedad ni
grasa.
· Route the GPS antenna wire as far away as possible
from TV and radio antennas, and wires, otherwise it
may cause interference with video and audio signals.
· No aplique ningun revestimiento a la antena del GPS;
de 10 contrario pod ria disminuir la sensibilidad de la
recepcion de la antena.
· Do not install the antenna in places (such as front
pillars and roof panel) that are shielded from the sky.
· Guie los cables de la antena del GPS 10 mas lejos
posible de las antenas y cables de TV y radio; de 10
contra rio podria causar interferencia con senales de
video y audio.
· The main GPS antenna unit should be installed in a
level position where the signals will be as unobstructed
as much as possible, such as on the vehicle's roof.
Satellite signals cannot be received if the antenna is
obscured or obstructed.
· If installing the GPS antenna unit outside the vehicle.
remove the antenna unit if leaving the vehicle
unattended for long periods in order to prevent theft or
malicious damage to the antenna.
· Hold the GPS antenna unit when removing the
antenna. Do not pull on the GPS wire, otherwise it may
become damaged and resuit in problems with correct
operation.
· If installing the GPS antenna outside the vehicle,
remove the GPS antenna unit when washing the
vehicle. (If you wash the vehicle with the antenna unit
still attached, avoid spraying the wire section directly
with water so that no water gets inside the vehicle.)
· The magnet that is attached to the GPS antenna unit
is extremely strong. Be sure to note the following when
installing the antenna.
. Do not put the antenna down onto the ground or
onto dirty or dusty surfaces. If iron filings become
attached to the magnet. they may cause damage to
the vehicle's body.
. Keep the antenna away from watches and
magnetic cards, otherwise they may be damaged
and/or rendered unusable.
Lt, Avertissement
· Los cables deberian estar atados juntos con
cinta 0 algun metodo de seguridad similar (por
ejemplo: sujeta cables) para que no interfieran
cuando maneja. Si se danan 0 se enredan
cerca de piezas como el volante, la palanca
de cambios 0 el pedal de freno, podrian
producirse accidentes.
· No instale la antena en lugares (como pilares
delanteros y panel del techo) que esten escondidos
del cielo.
· Se deberia instalar la antena principal del GPS en
una posicion nivelada donde la serial este 10 menos
bloqueada posible, como en el techo del vehiculo.
No se pueden recibir senales satelitales si la antena
esta bloqueada u obstaculizada.
· Si instala la antena del GPS fuera del vehiculo, quite
la unidad de la antena si deja el vehiculo solo por
largos ratos para evitar el robo 0 danos malignos a la
antena.
a
· Si vous installez I'antenne GPS a I'interieur du
vehicule, veillez a la monter sur la plaque de masse.
a
· Si vous installez I'antenne GPS I'interieur du
vehicule, l'emplacement et I'inclinaison du pare-brise
du vehicule determinera la precision de reception
du signal de I'antenne GPS. Si "emplacement de
I'antenne GPS a I'interieur du vehicule gene la
precision de I'antenne GPS, il faut installer I'antenne a
I'exterieur du vehicule.
· Les materiaux utilises dans les vitres avant et arriere
du vehicule peuvent amoindrir considerablement la
sensibilite de la reception GPS. Dans ce cas, installez
I'antenne GPS a I'exterieur du vehicule.
· Si la surface de fixation n'est pas en matiere plastique,
par exemple en cuir veritable, en bois ou en tissu,
vous risquerez d'endommager la finition de la surface
en fixant I'antenne. Ne fixez pas la plaque de masse
sur de telles surfaces.
· Essuyez soigneusement la surface d'installation afin
qu'il n'y ait plus de saletes, d'humidite ou de graisse
avant d'installer I'antenne.
· N'appliquez aucun revetement sur I'antenne GPS,
sinon la sensibilite de reception de I'antenne GPS
risquera d'etre amoindrie.
· Acheminez Ie cable de I'antenne GPS Ie plus loin
possible des cables et des antennes de television et
de radio, sinon les signaux video et audio risquerent
d'etre brouilles.
· N'installez pas I'antenne a des endroits faisant ecran
au ciel (tels que des montants avant et des panneaux
de pavilion).
· L'unit principale de I'antenne GPS doit etre installee
a un endroit horizontal au les signaux sont aussi peu
obstrues que possible, par exemple sur Ie pavilion
du vehicule. Si des objets font ecran ou obstruent
I'antenne, les signaux satellite ne pourront pas etre
reltus.
· Si vous installez ['antenne GPS a I'exterieur du
vehicule, deposez I'antenne si vous laissez Ie vehicule
sans surveillance pendant longtemps, afin d'eviter tout
vol ou endommagement malveillant de I'antenne.
· Sostenga la antena del GPS cuando quite la antena.
No jale del cable, de 10 contrario podria dariar y
acasionar problemas en el correcto funcionamiento.
· Lorsque vous deposez I'antenne, saisissez I'antenne
GPS elle-meme. Ne tirez pas sur Ie cable du GPS,
car vous risqueriez de I'endommager et de causer des
anomalies de fonctionnement.
· Si instala la antena del GPS fuera del vehiculo,
quite la unidad de antena del GPS cuando lave ei
vehiculo. (Si lava el vehiculo con la unidad de la
antena adherida, evite rociar directamente con agua
la secci6n del cable para que no entre agua en el
vehlculo.)
· Si vous installez I'antenne GPS a I'exterieur du
vehicule, deposez I'antenne GPS lorsque vous lavez
Ie vehicule. (Si vous lavez Ie vehicule en laissant
I'antenne fixee, evitez de mouiller directement la
section du cable afin d'eviter toute penetration d'eau
dans Ie vehicule.)
· EI iman sujeto a la antena del GPS es
extremadamente potente. Asegurese de tener en
cuenta 10 siguiente cuando instale la antena.
· L'aimant fixe a I'antenne GPS est tres puissant. Veillez
a bien noter les points suivants lorsque vous installez
I'antenne.
. No coloque la antena sobre el piso 0 en superficies
sucias 0 polvorientas. Si limaduras de hierro se
pegan al iman, podrian dariar la carroceria del
vehiculo.
. Ne posez pas I'antenne sur Ie sol ou sur des
surfaces sales ou poussiereuses. Si des parcelles
metalliques se fixent I'aimant, ils risqueront
d'endommager la carrosserie du vehicule.
. Mantenga la antena lejos de relojes y tarjetas
magneticas, de 10 contrario pueden daiiarse y/o
quedar inservibles.
. N'approchez pas de montres ou de cartes
magnetiques de I'antenne, car elles risqueraient
d'etre endommagees et/ou rendues inutili sables.
a
o
Choose an installation location on the
dashboard which is flat and has a clear
view of the sky.
o
fA
Install the ground plate to the
dashboard.
m Install the GPS antenna to the ground
plate.
. Seleccione un lugar que este a por 10
menos 20 pulgadas de distancia de la
unidad principal. Si no se hace esto, se
reducira la precision de la medida GPS.
. Asegurese de utilizar la placa de conexion
a tierra cuando instale la antena del GPS.
Si no se utiliza la placa de conexion a
tierra, la sensibilidad de la recepcion
disminuir y esto afectar la precision de la
medida de posicion.
fA
U
e
Secure the GPS antenna.
Route the GPS antenna wire along the
crevice between the front windshield
and the dashboard.
~Tip
If the GPS antenna wire protrudes from
the dashboard, wind tape around it so
that it stays securely fixed in the crevice
between the front windshield and the
dashboard.
CD
Route the GPS antenna wire to the main
unit's installation location.
Instale la placa de conexion a tierra en
el tablero de instrumentos.
m
~Tip
If installing the GPS antenna inside the
vehicle, the installation location and the
shape of the vehicle's body will determine
GPS accuracy. Accuracy is usually lower
when the GPS antenna is installed inside
the vehicle.
o
~Consejo - - - - - - - -
~Tip
. Select a location that is at least 20 in.
away from the main unit. If this is not
done, the GPS measurement precision
will drop.
. Be sure to use the ground plate when
installing the GPS antenna. If the ground
plate is not used, the reception sensitivity
will drop and will affect the accuracy of the
position measurement.
Elija un lugar para la instalacion en el
tablero de instrumentos que sea plano y
tenga una vista despejada del cielo.
Instale la antena del GPS en la placa de
conexion a tierra.
~ Conseil
. Choisissez un endroit se trouvant a
au moins 50 cm (20 pouces) de I'unite
principale. Sinon, la precision des
mesures GPS sera amoindrie.
. Veillez a uliliser la plaque de masse
lorsque vous installez I'antenne GPS. Si
vous n'ulilisez pas la plaque de masse, la
sensibilite de reception sera amoindrie, et
ceci affectera la precision des mesures de
position.
f)
U
e
Asegure el cable de la antena del GPS.
Guie el cable de la antena del GPS a
traves de la grieta entre el parabrisas
delantero y el tablero de instrumentos.
CD
Guie el cable de la antena del GPS a
la posicion de instalacion de la unidad
principal.
Installez I'antenne GPS sur la plaque
de masse.
~ Conseil ---------..
Si vous installez I'antenne GPS a
I'interieur du vehicule, I'emplacement
d'installation et la forme de ia carrosserie
du vehicule determinera la precision
du systeme GPS. La precision est
generalement amoindrie lorsque
I'antenne GPS est installee a I'interieur du
vehicule.
U
Fixez Ie cable de I'antenne GPS.
(:J Acheminez Ie cable de I'antenne GPS
Ie long de la rainure situee entre Ie
pare-brise avant et Ie tableau de bordo
~Consejo - - - - - - - . .
Si el cable de la antena del GPS sobresale
del tablero de instrumentos, enrolle cinta
alrededor del mismo para que quede bien
sujeto en la grieta entre el parabrisas
delantero y el tablero de instrumentos.
Installez la plaque de masse sur Ie
tableau de bord.
m
~Consejo - - - - - - - - - . .
Si instala la antena del GPS dentro
del vehiculo, el lugar de instalacion y
la forma de la carroceria del vehiculo
determinaran la precision del GPS. La
precision es generalmente inferior si
se instala la antena del GPS dentro del
vehiculo.
Choisissez un emplacement
d'installation sur Ie tableau de bord, qui
soit bien plat et expose clairement au
ciel.
~ Conseil-------..
Si Ie cable de I'antenne GPS depasse du
tableau de bord, enrobez-Ie de ruban afin
qu'il reste solidement fixe dans la rainure
situee entre Ie pare-brise avant et Ie
tableau de bordo
CD
Acheminez Ie cable de I'antenne GPS
vers I'emplacement d'installation de
I'unite principale.
Tape I Cinta I Ruban
fPBI!II'i. ~Z1IIlI/f ~ wiif&;/I
t::4tntaIiifiJ6J ,*!JrJ5 tt:alltl1Is tJIiBIfl1Brt:lJ. &IIiBd__ami6lJT/lrJJJf llelllli1lfda atIif;iis/l
DDmIlBti_ .liRBitfJ llesllilli~e#fJIIIs tdlkIlIs lieIIIli111de amliiitte
~. fIje
Connecting point for
the parking brake signal
(example)
U
fA
Use a splicing connector to connect
the parking brake signal wire (red/
white) coming from the main unit to the
parking brake signal wire of the vehicle.
Punto de conexi6n para
la sefial de freno de
estacionamiento (ejemplo)
U Utilice un conector de empalme para
Point de connexion pour
Ie signal de frein de
statlonnement (exemple)
U Utilisez un connecteur de raccordement
fA
fA
conectar el cable de la senal del freno
de mano (rojo/blanco) proveniente de
la unidad principal al cable de la senal
del freno de mano en el vehiculo.
Route the parking brake signal wire to
the main unit.
pour connecter Ie cable de signal de
frein de stationnement (rouge/blanc)
provenant de I'unite principale au cable
de signal de frein de stationnement du
vehicule.
Guie el cable de la senal del freno de
mano hacia la unidad principal.
Attach a splicing connector at this location. I
En asta lugar, fije un conector de empalme. I
Fixez un connecteur de raccordement a cet endroit.
Acheminez Ie cable de signal de frein
de stationnement vers I'unit principale.
Parking brake signal wire I
Freno de mano Cable de la senall
Cable de signal de Irein de stationnement
~~
Parking brake signal wire I
Cable de la senal del freno de mana I
Cable de signal de trein de stationnement
~
Foot-operated parking brake I
Freno de estacionamiento activado con el pi I
Frein de stationnement actionn au pied
Connecting point for the
reverse signal (example)
~Tip - - - - - - - . .
. Be sure to connect the reverse signal
wire. If it is not connected, the vehicle
position may be incorrect when the
vehicle is reversed.
. Use a circuit tester to confirm that a
sensing voltage of 6 V or higher is
generated when the vehicle is reversed.
Punto de conexi6n para
la sefial de marcha atras
(ejemplo)
~Consejo------ .....
Point de connexion pour
Ie siflnal de marche
arriere (exemple)
. Asegurese de conectar el cable de
la senal de marcha atras. 5i no esta
conectado, la posicion del vehiculo podria
ser incorrecta cuando el vehiculo este
dando marcha atras.
. Utilice un probador de circuitos para
confirmar que se genera un voltaje
sensible de 6 V 0 mayor cuando el
vehiculo esta dando marcha atras.
. Veillez a connecter Ie cable de signal de
marche arriere. 5i vous ne Ie connectez
pas, la position du vehicule risquera
d'etre incorrecte lorsque vous reculerez Ie
vehicule.
. Utilisez un testeur de circuit pour
confirmer qu'une tension de detection
de 6 V ou plus est produite lorsque vous
reculez Ie vehicule.
~ Conseil
U
Use a splicing connector to connect the
reverse signal wire (green) coming from
the main unit to the reverse signal wire
of the vehicle.
U
Utilice un conector de empalme para
conectar el cable de la senal de
marcha atras (verde) proveniente de la
unidad principal al cable de la senal de
marcha atras en el vehiculo.
U
Utilisez un connecteur de raccordement
pour connecter Ie cable de signal de
marche arriere (vert) provenant de
I'unite principale au cable de signal de
marche arriere du vehicule.
fA
Route the reverse signal wire to the
main unit.
fA
Guie el cable de la senal de la marcha
atras hacia la unidad principal.
fA
Acheminez Ie cable de signal de
marche arriere vers I'unite principale.
Attach a splicing connector at this location. I
En esta lugar, fije un conector de empalme. I
~
Fixez un connecteur de raccordement a eet endroit.
Reverselampl
Lampara de marcha atras I
~
-0
I
Feu de marche arriere
~~
;)~\
Reverse signal wire I
Cable de la senal de marcha atras I
Cable de signal de marche arriere
Reverse signal wire I
Cable de la senal de marcha atras I
Cable de signal de marche arriere
Notes on installation / Notas sobre la instalaci6n / Remarques concernant I'installation
.!tWaminQ
.!t Avertissement
.!tAdvertencia
· Check the parking brake signal, and
reverse signal carefully before making the
connections. If the wires are incorrectly
connected, accidents or problems with correct
operation may result.
. Verifique la senal de freno de mano y senal
de marcha atras cuidadosamente antes de
realizar las conexiones. Si los cables no estan
bien conectados, pueden ocurrir accidentes 0
problemas.
· The locations of the parking brake signal wire,
and reverse wire may vary depending on the
vehicle model and grade. Ask the car dealer
or your nearest ECLIPSE dealer for details.
. Las ubicaciones de los cables de senal de
freno de rnano y cable de marcha atras
pueden variar dependiendo del modelo
y version del vehiculo. Consulte con el
concesionario del automovil 0 el comerciante
ECLIPSE mas proximo por detalles.
~. tiJfIIIb1tiIIIiDm iIIIJBriinJiliilllJilliiDmIf
. Verifiez soigneusement Ie signal de frein
de stalionnement et Ie signal de marche
arriere avant d'effectuer les connexions.
Si les cables ne sont pas correctement
connectes, des accidents ou des problemes
de fonctionnement risqueront de survenir.
. Les emplacements des cable de signal de
frein de stationnement et du cable de marche
arriere pourront varier selon la classe et Ie
modele du vehicule. Pour plus de details,
consultez votre revendeur ou un revendeur
ECLIPSE.
'*
."..JliciBl:iiIiIJ fJIIIIIlblnditJnaniiBRIrD . . . .es
iinJiliilliBr If
IliJiJlicJtiiDm ttIJIilillmt:l/irstmlBlll!1llll: tijfJiIIis; IIfinJiliilllJilliitlm
o
Insert the ignition key into the vehicle
and start the engine.
o
f}
Check the connection status for each
signal in a place where they are easy to
. No gire la lIave de encendido a ACC
OFF ni haga funcionar la unidad
principal hasta que aparezca la
pantalla de navegacion.
. Verifique que la posicion de cambio
sea correcta y que el area alrededor
del veh iculo est libre antes de
arrancar el motor.
a
Press the "MENU" button and then
touch "INFO"
Touch "SYSTEM CHECK" and check the
connection status for each signal.
Inserez la cle de contact dans Ie
vehicule et demarrez Ie moteur.
~ Conseil - - - - - - _ _ . ,
. Ne mettez pas la cle de contact sur la
position ACC OFF ou n'actionnez pas
I'unite principale avant que I'ecran de
navigation apparaisse.
. Assurez-vous que la position du
changement de vitesses est correcte
et que la zone environnant Ie vehicule
est bien sOre avant de demarrer Ie
moteur.
f}
Verifique el estado de la conexion para
cada senal en un lugar donde sean
faciles de ver.
f)
Verifiez I'etat de connexion de chacun
des signaux a un endroit 0 ils sont
facilement visibles.
D
Presione el boton "MENU" y luego toque
"INFO".
D
Appuyez sur la touche "MENU" puis
pressez "INFO".
see.
D
o
~Consejo - - - - - - " " " "
~Tip
· Do not turn the ignition key to ACC OFF or
operate the main unit until the navigation
screen appears.
· Check that the shift position is correct and
that the area around the vehicle is safe
before starting the engine.
Inserte la lIave de encendido en el
vehiculo y arranque el motor.
a
Toque "SYSTEM CHECK" y verifique et
estado de la conexion para cada senal.
a
Pressez "SYSTEM CHECK" et verifiez
I'etat de connexion de chacun des
signaux.
*Nilme amtIfi;n;rJ&tiSIffSi (fJfftimNiiflll/s Ii
IflbJmJiJtJo;Y fif1mdi1m65 flIe'iI5ltm1Bioalesl'
Ni:tms erJ fiJJ1tldi1il11!fS tilEs Jlmmss
o
·0
·0
~
@]·[======::!il
.~
EE).--DIl!_lI====!J
=
13P
·0
·0
1t========:c==~·0
~~[§3.0
LhWaminq
· Never cut the insulation on the power
wire or use it to power any other
equipment. If the rated current capacity
of the power wire is exceeded, fire and
electric shocks may result.
· The wires should be secured with tape
or a similar securing method to prevent
any obstructions while driving. If they get
wound or entangled around components
such as the steering wheel, shifting lever,
or brake pedal, accidents may result.
· If removing the end of the wire to connect
to another wire, be sure to wrap PVC
tape or a similar wire insulating material
around the connection to insulate it. If
the connection is not insulated, fire or
accidents may result.
Caullon
Never connect the power supply to
the speaker wires (No.7 and No.8),
otherwise it will cause damage to the
main unit.
,-------.-----------."
· Nunca corte el aislante en el cable de
alimentaci6n ni 10 utilice para accionar
otro equipo. Si se excede la capacidad
nominal de corriente del cable de
alimentaci6n, pod ria producirse un
incendio 0 descargas electricas.
· Se deben asegurar los cables con cinta
o algun metodo de seguridad similar
para evitar obstrucciones mientras
maneja. Si se daiian 0 enredan cerca de
componentes como el volante, palanca
de cambios 0 pedal de freno, podrian
producirse accidentes.
· Si quita el extremo del cable para
conectar a otro cable, asegurese de
enrollar cinta de PVC 0 un material
aislante de cables similar alrededor de la
conexi6n para aislarla. Si no se aisla la
conexi6n, se pod ria producir un incendio
o accidentes.
Pret,lllCiOn
Nunca conecte la fuente de
alimentaci6n en las tomas de
conexi6n de los cables de los
parlantes (No.7 y No.8), de 10
contra rio daiiara la unidad principal.
Lh Avertissement
· Ne coupez jamais I'isolant du cable
d'alimentation, ou n'utilisez pas celuici pour I'alimentation d'un autre
equipement. Si la capacite electrique
nominaIe du cable d'alimentation
est depassee, un incendie ou une
electrocution risquera de s'ensuivre.
· Les cables doivent etre fixes avec
du ruban ou une methode de fixation
similaire pour eviter toute gene pendant
la conduite. S'ils s'enroulent ou
s'emmelent autour de composants tels
que Ie volant, Ie levier de vitesses ou la
pedale de frein, un accident risquera de
s'ensuivre.
· Si vous denudez I'extremite du cordon
pour Ie connecter a un autre cordon,
veillez a enrober la connexion de ruban
PVC ou d'un materiau d'isolation des
fils similaire pour I'isoler. Si la connexion
n'est pas isolee, un incendie ou un
accident risquera de s'ensuivre.
Prmution
Ne connectez jamais I'alimentation
electrique aux fils de haut-parleurs
(No.7 et No.8), sinon I'unite
principale sera endommagee.
<>
Wire colors and connection points for
connection wires ® , @ and 0
¢ Colores de las cables y puntas de conexi6n
para los cables de conexion @ , @ y 0
ITJB+ (Yellow)
Connect where power is constantly
available, regardless of the ignition
key's position.
ITJB+ (Amarillo)
Conecte donde haya energia
constantemente, sin importar la
posicion de la IIave de encendido.
[gJGround (Black)
Connect where good body grounding is
available.
[gJConexi6n a tierra (Negro)
Conectelo donde haya buena conexi6n
a tierra con el chasis.
~ACC (Red)
Connect where the power comes on
when the ignition is in the ACC position.
~CC(Rojo)
Conecte donde haya energ ia cuando la
IIave de encendido este en la posici6n
ACC.
[iJlllumination power supply
(OrangelWhite)
Connect to where power comes on
when the vehicle light switch is turned
on.
IIDAntenna power supply (Blue)
Connect to the power antenna control
terminal of the vehicle.
lIDRemote turn-on (BluelWhite)
Connect to the control terminal for the
external amplifier, etc.
[l]Front speaker output wires
Connect to the front speakers.
White:
Left +
White/Black:
Left Gray:
Right +
Gray/Black:
Right [IDRear speaker output wires
Connect to the rear speakers.
Green:
Left +
Green/Black:
Left Purple:
Right +
Purple/Black:
Right [IDParking brake signal wire
(RedlWhite)
Connect to the parking brake signal
terminal.
[iJ5uministro de energia para iluminaci6n
(Naranja/Blanco)
Conecte donde aparezca energia
cuando se pulsa el interruptor de las
luces del vehiculo.
lID Suministro de energia de la
antena (Azul)
Conecte alterminal de control de
energia de antena del vehiculo.
lID Activaci6n remota (Azul/Blanco)
Conecte elterminal de control del
amplificador externo, etc.
[l] Conductor de salida del parlante
delantero
Conectelo a los parlantes delanteros.
Blanco:
Izquierda +
Blanco/Negro: IzquierdaGris:
Derecha +
Gris/Negro:
Derecha [IDConductor de salida del parlante
trasero
Conectelo a los parlantes traseros.
Verde:
Izquierda +
Verde/Negro: Izquierda Purpura:
Derecha +
Purpura/Negro: Derecha -
IillI Reverse signal wire (Green)
[ID Cable de la senal del freno de
mano (Rojo/Blanco)
Conectar alterminal de la senal del
freno de mano.
ITIJ Genuine factory steering remote
IillI
Connect the reverse signal output of the
vehicle to this terminal.
control terminals
Connect to the vehicle steering remote
control.
* Compatible vehicle models for
installation: Vehicles with voltage
detection-type steering
remote control.
Ask your dealer for details.
~ Microphone for hands-free
talking
Microphone for hands-free
talking when using a BluetoothO
compatible mobile phone.
CID VTR output terminals
Connect to the monitor with video
input.
ITIJ
Cable de la senal de marcha
atnis (Verde)
Conecte la senal de salida de la marcha
atras del vehiculo a este terminal.
Terminal de fabrica para el
autentico control remoto de la
direcci6n
Conectelo al control remoto de la
direcci6n del vehiculo.
Modelos de vehiculos
compatibles para la instalaci6n:
Vehiculos con control remoto de
direcci6n que detecta el vollaje.
Hable con su comerciante para
obtener detalles.
'*
<:ID Micr6fono para hablar con
manos libres .
Micr6fono para hablar can manos
libres cuando use un telefono
compatible con Bluetootho.
CD Line-out terminals
(Front)
Connect to the RCA connector of
an external amplifier.
<fm:> Terminales de salida VTR
¢ Couleur des cables et points de raccordement
des cables d'interconnexion @ , @ et @)
ITJB+ (Jaune)
Effectuez la connexion a un emplacement
ou Ie courant est toujours disponible,
quelque soit la position de la cle de
contact.
[gJMasse (Noir)
Effectuez la connexion a un emplacement
ou une bonne masse de carrosserie est
disponible.
~CC(Rouge)
Effectuez la connexion a un emplacement
ou I'alimentation electrique est etablie
lorsque la cle de contact est sur la
position ACC
[!]Alimentation electrique
d'eclairage (Orange/Blanc)
Effectuez la connexion a un emplacement
ou I'alimentation electrique est etablie
lorsque I'interrupteur d'eclairage du
vehicule est sur la position de marche.
IIDAlimentation electrique de
I'antenne (Bleu)
Effectuez la connexion a la borne de
commande d'antenne motorisee du
vehicule.
lIDMise sous tension par
telecommande (Bleu/Blanc)
Effectuez la connexion a la bome de
commande de I'amplificateur exleneur, etc.
[l]Fils de sortie des haut-parleurs avant
Effectuez la connexion aux haut-parleurs
avant.
Blanc:
Gauche +
Blanc/Noir: Gauche Gris:
Droit +
Gris/Noir: Droit[IDFils de sortie des haut-parleurs arriere
Effectuez la connexion aux haut-parleurs
arriara.
Vert:
Vert/Noir:
Violet:
VioleUNoir:
[IDFil de signal de frein de
stationnement (Rouge/Blanc)
Effectuez la connexion a la borne de
signal de frein de stationnement.
IillI
Fil de signal de marche arriere
(Vert)
Effectuez la connexion de la sortie de signal
de marche arriere du vehicule a cette borne.
ITIJ
Bornes de telecommande de
direction d'origine
Effectuez la connexion a la
telecommande de direction du vehicule.
Modeles de vehicules compatibles
pour I'installation:
Vehicules avec telecommande de
direction de type a detection. Pour
plus de details, consullez votre
revendeur.
'*
~ Microphone pour parler
avec les mains libres
Microphone pour parler avec les
mains libres lorsque vous utilisez
un telephone mobile compatible
avec Bluetootho.
Conecte al monitor con entrada
de video.
(£:)
Terminales de salida de linea
(Frontal)
Conectelo al conector RCA de un
amplificador externo.
Gauche +
Gauche Droit +
Droit-
(;gi)
Bornes de sortie VTR
Effectuez la connexion au
moniteur avec entree video.
c:::ID Bornes de sortie de ligne
(avant)
Effectuez la connexion
au connecteur RCA d'un
amplificateur exterieur.
Line-out terminals
(Rear)
Terminales de salida de linea
(Trasera)
Connect to the RCA connector of
an external amplifier.
Bornes de sortie de Iigne
(arriere)
Conectelo al conector RCA de un
amplificador externo.
Line-out terminals
(Non fader)
Effectuez la connexion
au connecteur RCA d'un
amplificateur exterieur.
Terminales de salida de
linea (Sin atenuador)
Connect to the RCA input
connectors of an equalizer, or to
the RCA input connectors of a
woofer amplifier.
Bornes de sortie de ligne
(Sans attenuateur)
Conecte a los conectores de
entrada RCA de un ecualizador 0
a los conectores de entrada RCA
de un amplificador para sonidos
graves.
Branchez aux connecteurs
d'entree RCA d'un egaliseur, ou
aux connecteurs d'entree RCA
d'un amplificateur de caisson de
graves.
AV input terminals
Connect to the output wire of
external video equipmenUdevice
such as a VTR.
Yellow
: Video signal
White
: Audio (left) signal
Red
: Audio (right) signal
When the iPod cable is connected, the
Terminales de entrada AV
*
~ USB connection terminal
E-LAN terminal (13P)
Effectuez la connexion aux
bornes de sortie d'un appareill
equipement video exterieur tel
qu'un magnetoscope.
Jaune : Signal video
Blanc: Signal audio (gauche)
Rouge: Signal audio (droit).
Lorsque Ie cable iPod est
connecte il est impossible
de connecter Ie cable du
magnetoscope.
'*
VTR cable cannot be connected.
Connect to a USB device such
as a flash drive or digital audio
player.
Connect to iPod connection cable
(sold separately).
Bornes entree AN
Conectar el cable de salida
del equipo/dispositivo de video
externo como un VTR.
Amarillo: Senal de video
Blanco : Senal de audio (izquierda)
Rojo
: Senal de audio (derecha)
Cuando se conecta el cable
iPod, no se puede conectar el
cable VTR.
'*
~ Terminal de conexi6n USB
Conecte a un dispositivo
USB como un flash drive 0 un
reproductor de audio digital.
Conecte el cable de conexion
iPod (en venta por separado).
Connect to the E-LAN terminal of
the SIRIUS/HD tuner, etc.
(U.S. models only)
Borne de connexion USB
Branchez a un dispositif USB tel
qu'un lecteur flash ou un lecteur
audio numerique.
Branchez a un cable de
connexion iPod (vendu
separement).
Terminal E-LAN (13P)
Conectelo alterminal E-LAN del
sintonizador SIRIUS/HD, etc.
(Solo en los modelos de EE.UU.)
Borne E-LAN (13P)
Effectuez la connexion a la borne
E-LAN du tuner SIRIUS/HD, etc.
(Modeles pour les Etats-Unis
seulement)
~Tip
· iPod is a trademark of Apple Inc.,
registered in the U.S. and other countries.
· "Made for iPod" means that an electronic
accessory has been designed to connect
specifically to iPod and has been
certified by the developer to meet Apple
performance standards.
· Apple is not responsible for the operation
of this device or its compliance with safety
and regulatory standards.
· The Bluetooth~ word mark and logos
are registered trademarks of Bluetooth
SIG, Inc., and any use of such marks by
FUJITSU TEN LIMITED is under license.
Other trademarks and trade names are
those of their respective owners.
¢
Main unit connections
~ SIRIUS connection terminal
(5P)
Connect to the SIRIUS Tuner
to activate the SIRIUS traffic
function. (Sold separately U.S.
only)
~
Back-eye camera external
input terminal (4P)
Used with the ECLIPSE back-eye
camera (sold separately).
~Tip - - - - - - - - . .
"SIRIUS" and related marks are
trademarks of SIRIUS Satellite Inc.
HD Radio is a trademark of iBiquity Digital
Corporation.
~ Conseil
~Consejo------.......
· iPod es una marca de Apple Inc.,
registrada en los EE.UU. y otros paises.
· "Made for iPod" significa que el accesorio
electronico fue disenado para conectar
especificamente al iPod y ha sido
certificado por el desarrollador para
cumplir con los estandares de rendimiento
de Apple.
· Apple no es responsible por el
funcionamiento de este dispositivo 0
su cumplimiento con estandares de
seguridad y reglamentaciones.
· La palabra y el logo Bluetooth~ son
marcas registradas de Bluetooth SIG,
Inc., y el uso de esas marcas por parte
de FUJITSU TEN LIMITED es realizado
bajo licencia.Otras marcas comerciales
y registradas son propiedad de sus
respectivos duenos.
Conexiones de 13 unidad principal
<£K) Terminal de conexi6n
¢
SIRIUS (5P)
Conectelo al sintonizador
SIRIUS para activar la funcion de
transito de SIRIUS (en venta por
separado solo en los EE.UU.).
CD Terminal de entrada externa
de la camara trasera (4P)
Utilizado solo con la camara
trasera ECLIPSE (se vende por
separado).
~Consejo - - - - - -.........
"SIRIUS" Y las marcas relacionadas son
marcas registradas de SIRIUS Satellite
Inc.
HD Radio es una marca registrada de
iBiquity Digital Corporation.
· iPod est une marque commerciale de
Apple Inc., deposee aux Etats-Unis et
dans d'autres pays.
· "Fabrique pour I'iPod" signifie que
I'accessoire electronique a ete con<;:u pour
etre connecte specifiquement l'iPod
et qu'il est certifie par Ie developpeur
comme etant conforme aux normes de
fonctionnement de Apple.
· Apple decline toute responsabilite
concernant Ie fonctionnement de cet
appareil ou sa conformite aux normes de
securite et de regulation.
· La marque et les logos Bluetooth~ sont
des marques deposees de Bluetooth
SIG, Inc. dontl'utilisation par FUJITSU
TEN LIMITED s'effectue sous Iicence.Les
autres marques et noms de marque sont
la propriete de leurs detenteurs respectifs.
a
¢
Connexions de I'unite principale
Borne de connexion SIRIUS
(5P)
Effectuez la connexion au tuner
SIRIUS pour activer la fonction
de circulation de SIRIUS.
(Vendu separement aux EtatsUnis seulemenl.)
(][) Borne d'entree externe de
camera Backeye (4P)
Utilisee avec la camera Backeye
ECLIPSE (vendue separement).
~ Conseil - - - - - -.........
"SIRIUS" et les marques connexes sont
des marques commerciales de SIRIUS
Satellite Inc.
HD Radio est une marque commerciale
de iBiquity Digital Corporation.
~ arnnRlBd!iiD.1!TJ eJS1Rf/le
/I
EjjBnfpIiI». fDI1llIe.ii5NJ ttIEIJsiSttBna /I
EiltBnfJliIJ tr.rilIIiI1ffIliiimJ 8' qs:Iiffme
'*
En lish
~Tip
Install and connect all of the peripheral units before connecting them to the main unit.
Do not remove any of the protective caps (RCA, etc.) unless the connectors are in use.
Be sure to wrap the connection wires with tape (PVC tape) to insulate them.
Be sure to grip the connector's body. Rough tugging may result in broken wires or
harnesses.
TO SIRIUS TUNER
(U.S. models only.
sold separately)
BEC108
0----..
J~1:
:r'"
f:==Oi =
. 'fl
®
~\
~fC:P"
G'l
f
-<v9
GJ1I~' ~,::~ 'S"~:GMTI,",.'"
(Permanent Supply)
Black
TO PARKING
BRAKE SIGNAL
RedlWhit€
TO REVERSE
SIGNAL
Green
Brown
TO STEERING
{
REMOTE CONTROL
TO SIRIUSXM
TUNER etc.
(U.S. models only)
1P
~
~
Brown/Black
-
13P
TO EXTERNAL VIDEO
EQUIPMENT
(Remove caps when using
external video equipment)
Red
TO ACC (Power Supply)
TO SUB-WOOFER
{
(Remove caps when using
external SUb-woofer)
'"0"
REAR
(Remove caps when using
external amplifier)
[
Oran elWhite
Blue
BluelWhite
iPod
~
~
TO GROUND
Yellow
11===atE!I::P ..
II==DIt1EII::J::> ..
.
TO HEAD LIGHT SWITCH
(Illumination (+))
=
TO POWER ANTENNA RELAY
(Supply)
=
TO REMOTE TURN-ON
(Amplifiers. etc.)
Espanal
~Consejo-----------------------..
Instale y conecte todas las unidades perifericas antes de conectarlas a la unidad
principal.
No quite ninguno de los tapones protectores (RCA, etc.) a menos que los conectores
esten en uso.
Asegurese de enrollar los cables de conexi6n con cinta (cinta de PVC) para aislarlos.
Asegurese de sostener el cuerpo del conector. Si tira fuerte resultarc~ en cables 0
mazos de conductores rotos.
~J'J!J
AL SINTONIZADOR SIRIUS
(~~OU~.IOS modelos de
~~
se vende par separado)
BEC108
J~"
~I
)ijt16P
l==Oi::L=n
~
~~
Raja/
Blanco
HACIA LA SE6L DEL
FRENO DE MANO
HACIA LA SE6L DE LA
MARCHAATRAs
Verde
crl
.
AL SINTONIZADOR
SIRIUS XM, etc.
Cllf-~===::dJ
(s610 en los modelos de..............
EE.UU.)
13P
=N=e=g=ro===~~
~
~
~
iPC709
(se vende por separado)
II===aOE!I:p ..
II===aOE!I:p ..
HACIA CONEXI A TIERRA
::::::R:::OjO======= HACIAACC (Fuente de alimentaci6n)
C[]ED!IJ:=
Naran'a/Blanco
HACIA EL INTERRUPTOR DE LA
= = = = = = = = = LUZ DELANTERA (liuminaci6n (+))
Azul
HACIA EL REL DE LAANTENA
========€=2J ELt:CTRiCA (Suministro)
cn:::]S:m~~1II
ClIJ8J11F=:di1l
iPod
~
HACIALA BATE RiA + 12V
= = C = J = = = (Suministro permanente)
{
PARTE DELANTERA
PARTE TRASERA
(quite las tapas cuando utilice
un amplificador externo)
t·
0P~' 1mQ,=,," "C"S~~IT~
AL EQUIPO DE VIDEO
EXTERNO
(quite las tapas cuando utilice
el EQUIPO DE VIDEO externo)
HACIA EL SUB-WOOFER [
Cafe
A CONTROL REMOTO[ ======d.111 (quite las tapas cuando utilice
DE LA DIRECCI
Cafe/Negro
un Sub-woofer external
!WI'
1I!!==Az::=UI::/B=la::nc::o==I§=m AACTIVACI REMOTA
III
(Amplificadores, etc.)
Fran(fais
~ Conseil
a
Installez et connectez toutes les unites peripheriques avant de les connecter I'unite
principale.
Ne retirez aucun des capuchons de protection (RCA, etc.), sauf si les connecteurs sont
utilises.
Veillez enrober les cables de connexion de ruban (ruban PVC) pour les isoler.
Veillez saisir Ie corps du connecteur. Si vous tirez trop brusquement, vous risquez de
casser des fils ou des faisceaux.
a
a
VERS LE TUNER
SIRIUS
J~L
F==O--r::J:==e
---TI
.....
,
'
"
-
~
~:
Unis seulement.
vendu separement)
BEC108
(4\
1P
Gf1I'"
®
E:]
~
\It'" ,,:s~"'"
t-
~;.c::=..
VERS LE SIGNAL DE
FREIN DE
STATIONNEMENT
VERS LE SIGNAL DE
MARCHE ARRIERE
VERSLA
{
TELECOMMANDE DE
DIRECTION
Rouge/
Blanc
Vert
Marron
Marron/Noir
====:dll
VERS LE TUNER
SIRIUS XM, etc.
(Modeles pour les Etats13P
Unis seulement)
VERS L'EQUIPEMENT VIDEO
EXTERIEUR
(Retirez les couvercles lorsque
vous utilisez un EQUIPEMENT
VIDEO EXTERIEUR)
VERS L'SUBWOOFER {
(Retirez les couvercles
lorsque vaus utilisez un
Jaune
Jaune
=N:o::ir=====Il::i~ VERS LA MASSE
cn:::JEDm====
Rouge
========~VERS ACC (alimentation electrique)
IJ[]Er:m==
~i:~~~[cn: :]Er:m=~ 1I
amplificateur exterieur.)
Orange/Blanc
VERS LE COMMUTATEUR DE
= = = = = = = = = > PHARES (eclairage (+))
=
=B:::le=u=====:::(§2]VERS LA MISE SOUS TENSION PAR
""" TELECOMMANDE (amplificateurs, etc.)
Bleu/Blanc
~
iPC709
(vendu separement)
~
~=CJ==!J
} HAUT-PARLEURS
~
1I====al11LP ..
1F===aLE!l:p ..
1F===fl ..
VERS LE RELAIS D'ANTENNE
1I~=======I§"""2] MOTORISEE (alimentation)
iPod
~
~
'''_''''00 oo~"M.'
VERS LA BATTERIE+12V
\'"====~}
rdJ=G)
AVANT
HAUT:PARLEURS
ARRIERE
CD
090003-30850700
0902 (eN)
ADDENDUM
Please be sure to disconnect or turn off any external devices
such as iPod USB memory when turning the vehicle off.
Otherwise, the AVN726EE, AVN726EA, AVN726E, AVN76D
may not recognize these devices when the vehicle is turned
back on.
If this does happen, please disconnect and reconnect the
device to start playback.
The clock displayed on the unit is synchronized with a GPS signal.
A different time may be displayed when the unit is not receiving good GPS
reception.
The correct time will be displayed once the GPS reception returns
Depending on the version of Bluetooth, some Bluetooth devices may not be
able to communicate with the main unit.
Some Bluetooth devices may not be compatible with the main unit.
Fujitsu Ten Corp. of America
Garantie limitee du consommateur
Garantie valable uniquement aux
E.U.
et au Canada
Cette garantie limitee fournie par Fujitsu Ten Corp. of America ("Eclipse") couvre, sous utilisation normale, toutes defectuosites materielle et main
d'ceuvre de votre nouveau produit Eclipse achete chez un detaillant agree Eclipse aux E.U. ou au Canada, pendant une duree de une (1) annee a
compter de la date d'achat d'origine. Cette garantie limitee est valable seulement pour I'acheteur consommateur initial du produit Eclipse qui doit
resider aux E.U. ou au Canada, elle NE peut PAS etre transferee.
Les re~us ou autres preuves admissibles d'achat montrant la date de I'achat initial sont requis pour la garantie de ce produit. Eclipse
pourrait vous facturer ou refuser de vous rendre Ie service pour Ie produit Eclipse sans preuve d'achat valable.
CE QUI EST COUVERT
Si Ie produit devient defectueux au point de vue materiel ou main d'ceuvre la suite d'une utilisation normale au cours de la periode d'un (1) an
partir de la date d'achat initiale, Eclipse reparera votre produit Eclipse, a sa discretion et ce sans frais, avec des composantes ou pieces neuves ou
recyclees ou remplacera Ie produit par un produit recycle identique ou un modele fonctionnellement equivalent. Eclipse conserve sa propriete sur
toutes les pieces engagees ou produits remplaces sur la base d'une substitution. Eclipse vous reexpediera I'element et couvrira les frais d'expedition.
a
a
CE QUI N'EST PAS COUVERT
1. Cette garantie limitee ne couvre aucun produit repare par un individu, un detaillant ou un centre de service non agree, ni aucun produit achete
aupres d'un detaillant non agree.
2. Cette garantie limitee ne couvre aucun produit ayant fait I'objet de mauvais traitement, d'un mauvais usage, de negligence, d'un accident, de
modifications, de mauvaise connexion avec des peripheriques, d'une tentative de vol, de surtension electrique, de dommages par un liquide,
d'inondation, de dommages par la foudre ou autres actes de la nature, qui ont ete utilises de maniere autre que selon les instructions fournies par
Eclipse ou en dehors des limites de specifications ou ayant un numero de serie altere, degrade ou enleve.
3. Cette garantie limitee ne couvre pas I'elimination de I'electricite statique de la voiture, Ie bruit du moteur ou les autres interferences electriques, les
corrections de problemes decoulant de media inappropries tels que CD, DVD ou carte memoire, Ie systeme d'antenne du vehicule et son
installation defectueuse et la desactivation du code de securite pour les produits contenant la fonction Numero de serie electronique (NSE).
4. Cette garantie limitee ne couvre pas les dommages cosmetiques y compris aux panneaux frontaux et aux affichages de type LCD ou TFT, I'usure
normale, Ie remplacement de la batterie ou la maintenance reguliere.
5. Cette garantie limitee ne couvre pas les dommages causes par les produits Eclipse aux media tels que CD, DVD ou autres, y compris leur contenu.
6. Cette garantie limitee ne couvre aucune de vos depenses acquittees ou contractees en rapport avec cette garantie. Vous etes, par exemple,
responsable de I'enlevement et de I'installation du produit ainsi que I'expedition vers Eclipse, les frais d'expeditions et tout dommage pendant
I'expedition.
7. Cette garantie limitee ne s'applique pas lorsque les produits sont utilises dans un commerce, une entreprise ou toute application industrielle ou
commerciale.
COMMENT OBTENIR LE SERVICE ASSOCIE A LA GARANTIE
Certaines instructions de produits Eclipse fournissent des procedures de diagnostic pour determiner si votre produit necessite Ie service. La
solution la plus rapide peut etre trouvee dans les instructions. Veuillez d'abords regarder ici.
Si vos HAUT-PARLEURS DE VOITURE Eclipse requiert un service, veuillez contacter, pour Ie service, Ie detaillant ou vous avez achete ce produit.
Pour d'autres produits Eclipse, contactez votre detaillant ou vous avez achete ce produit pour verifier que Ie produit requiert un service. En cas de
besoin de service, veuillez appeler ou visiter notre site Web ci-dessous pour obtenir un numero de reclamation. Vous devez suivre les
instructions de reexpedition fournies sur obtention du numero de reclamation. Eclipse N'ACCEPTERA aucun produit sans numero de reclamation.
Centre agree de service apres-vente de Eclipse
1-800-233-2216 pour les consommateurs des E.U. SEULEMENT /1-888-557-8278 pour les consommateurs du Canada SEULEMENT
ou www.eclipsediamondservice-web.com
AVIS DE NON-RESPONSABILITE POUR LOGICIEL DE SYSTEME DE NAVIGATION ET DE STOCKAGE DE DONNEES
Tout logiciel de systeme de navigation fourni avec les produits Eclipse est fourni « tel quel ", avec tous ses defauts et sans garantie quelconque. Les
logiciels de systeme de navigation peuvent contenir des bogues ou erreurs et peuvent donner des directions erronees. Eclipse ou ses marchands
n'auront aucune responsabilite envers vous en rapport avec I'utilisation ou Ie mauvais usage ou de la dependance au logiciel de systeme de navigation.
Eclipse ne sera responsable d'aucun logiciel, d'aucune donnee ou autre information stockee ou utilisee sur quelque produit retourne a Eclipse que ce
soit, dans Ie cadre de la garantie, y compris les coOts de retablissement de tels programmes informatiques ou de telles donnees. Si pendant la
periode du service de la garantie du produit, Ie contenu du disque dur ou tout autre media de stockage de donnees est altere, efface, modifie ou
egare, Eclipse n'est pas responsable.
NON·RESPONSABILITE ET LIMITATION DE RESPONSABILITE DE LA GARANTIE
CETTE DECLARATION DE GARANTIE POUR LE PRODUIT ET LE LOGICIEL VAUT POUR TOUTES
LES GARANTIES FORMELLES, TACITES OU LEGALES, Y COMPRIS MAIS NON L1MITEES AUX
GARANTIES TACITES DE QUALITE MARCHANDE OU D'APTITUDE POUR LA REALISATION D'UN
BUT PARTICULIER DU PRODUIT ECLIPSE. TOUTES LES GARANTIES TACITES OU LEGALES, DANS
LA MESURE OU ELLES NE PEUVENT PAS ETRE EXCLUES, SONT L1MITEES A LA DUREE
EFFECTIVE DE LA GARANTIE FORMELLE TELLE QUE PRESENTEE CI-DESSUS. SI LE PRODUIT
EST DEFECTUEUX AU POINT DE VUE MATERIEL OU MAIN D'OEUVRE, VOTRE RECOURS UNIQUE
ET EXCLUSIF SERA LA REPARATION OU LE REMPLACEMENT TEL QUE STIPULE CI-DESSUS.
CEPENDANT, SI CE RECOURS NE REMPLIT PAS SON OBJECTIF ESSENTIEL, ECLIPSE SE
RESERVE LE DROIT DE REMBOURSER LE PRIX D'ACHAT DU PRODUIT A L'ACHETEUR EN
ECHANGE DU RETOUR DU PRODUIT. ECLIPSE NE SERA PAS PASSIBLE DE DOMMAGES ET
INTERETS Y COMPRIS MAIS NON L1MITES AUX DOMMAGES DIRECTS, INDIRECTS, ACCESSOIRES
OU CONSECUTIFS, PERTE D'UTILISATION DE DONNEES, PERTE DE PROFITS OU INTERRUPTION
DE L'EXPLOITATION, QUE CES DOMMAGES SOIENT BASES SUR LA GARANTIE, LE PREJUDICE (Y
COMPRIS LA NEGLIGENCE ET LA RESPONSABILITE ABSOLUE, MAIS EXCLUANT L'ATTEINTE A LA
PERSONNEl. LE CONTRAT OU L'INDEMNITE.
LES DROITS DANS VOTRE ETAT
CERTAINS ETATS N'AUTORISANT PAS DE LIMITATIONS DE DUREE POUR UNE GARANTIE TACITE
NI L'EXCLUSION OU LA LIMITATION DE DOMMAGES ACCESSOIRES OU CONSECUTIFS, CE TYPE
DE LIMITATION OU D'EXCLUSION PEUT NE PAS S'APPLIQUER A VOUS. CETTE GARANTIE VOUS
ACCORDE DES DROITS LEGAUX PRECIS, VOUS POUVEZ AUSSI DISPOSER D'AUTRES DROITS
QUI VARIENT D'UN ETAT A UN AUTRE.
090000-01340700
0604MTCN)
Fujitsu Ten Corp. of America
Consumer Limited Warranty
Warranty valid only in the U.S.A. and Canada
This limited warranty provided by Fujitsu Ten Corp. of America ("Eclipse") covers all defects in materials or workmanship under normal use in your new
Eclipse Product purchased from an authorized Eclipse retailer in the U.S.A. or Canada for a period of one (1) year from the date of original consumer
purchase. This limited warranty is valid only for the original consumer purchaser of Eclipse Product who must reside in either the U.S.A. or Canada
and is NOT transferable.
Sales receipt or other valid proof of purchase showing the date of original purchase is required for warranty service of this Product.
Eclipse may charge you or refuse service for the Eclipse Product without valid proof of purchase.
WHAT IS COVERED
If the Product becomes defective in material or workmanship that may arise under normal use during the period of one (1) year from the date of
original consumer purchase. Eclipse will, at its option and without charge, repair your Eclipse Product with new or reconditioned components or parts,
or replace the Product with a reconditioned product of the same or functionally equivalent model. Eclipse retains as its property any retained parts or
product that is replaced on an exchange basis. Eclipse will return ship the unit to you and cover shipping charges.
WHAT IS NOT COVERED
1. This limited warranty does not cover any Product which is repaired by any non-authorized individual, retailer or service center, or any Product
purchased from a non-authorized retailer.
2. This limited warranty does not cover any Product which has been subject to abuse. misuse, neglect, accident, Product modifications, improper
connection with peripherals. attempted theft. electrical power surge. liquid damage. flood, lightening, or other acts of nature, which has been used
other than in accordance with the instructions furnished by Eclipse or over the specification range. or which its serial number has been altered.
defaced or removed.
3. This limited warranty does not cover elimination of car static. motor noise or other electrical interference. correction of problems resulting from
improper media such as CD, DVD or memory stick, vehicle s antenna system, and faulty installation, and de-activation of security code for the
Products containing ESN function.
4. This limited warranty does not cover cosmetic damage including face panels and displays such as LCD or TFT. normal wear and tear. battery
replacement or periodic maintenance.
5. This limited warranty does not cover any CD. DVD or other media damage including its contents caused by Eclipse products.
6. This limited warranty does not cover any expenses paid or incurred by you in relation to this warranty. For example, you are responsible for removal
and installation of the Product as well as shipping to Eclipse, shipping charges and any damage during shipping.
7. This limited warranty does not apply when Product is used in a trade or business or in any industrial or commercial application.
HOW TO OBTAIN WARRANTY SERVICE
Some Eclipse Product instructions provide troubleshooting procedures to determine if your Product needs service. The fastest solution may be
found in the instructions. Please look here first.
Should your Eclipse CAR SPEAKER require service, please contact the retailer where you purchased this Product for service. For other Eclipse
Products, please contact your retailer where you purchased this Product to verify that the Product requires service. If service is needed, please call
or visit our website below to obtain a claim number. You must follow the return shipping instructions provided when you obtain the claim number.
Eclipse will NOT ACCEPT any Product without a claim number.
Eclipse Authorized Service Center:
1-800-233-2216 For U.S.A. Consumers ONLY / 1-888-557-8278 For Canada Consumers ONLY
or www.eclipsediamondservice-web.com
DISCLAIMER FOR NAVIGATION SYSTEM SOFTWARE AND DATA STORAGE
Any navigation system software provided with the Eclipse Product is provided "as is". with all faults and with no warranties whatsoever. Navigation
system software may have bugs and errors. and may provide incorrect directions. Under no circumstances shall Eclipse or its LICENSORS be liable
to you on account of use or misuse of, or reliance on, any navigation system software.
Eclipse shall not be responsible for any software programs. data or other information stored or used on any Product returned to Eclipse for warranty
service. including the costs of recovering such programs or data. If during the warranty service of the Product, the contents of the hard drive or any
other data storage media are altered, deleted, modified or lost, Eclipse is not responsible.
WARRANTY DISCLAIMER AND LIMITATION
THIS WARRANTY STATEMENT FOR THE PRODUCT AND THE SOFTWARE IS IN LIEU OF ALL
WARRANTIES, EXPRESS, IMPLIED OR STATUTORY INCLUDING BUT NOT LIMITED TO ANY
IMPLIED WARRANTIES OF MERCHANTABILITY OR FITNESS FOR A PARTICULAR PURPOSE
ON THE ECLIPSE PRODUCT. ALL IMPLIED OR STATUTORY WARRANTIES, TO THE EXTENT
THAT THEY CANNOT BE EXCLUDED, ARE LIMITED TO THE EFFECTIVE PERIOD OF THE
EXPRESS WARRANTY SET FORTH HEREIN. IF THE PRODUCT IS DEFECTIVE IN MATERIALS
OR WORKMANSHIP, YOUR SOLE AND EXCLUSIVE REMEDY SHALL BE REPAIR OR
REPLACEMENT AS PROVIDED ABOVE.
HOWEVER IF THAT REMEDY FAILS OF ITS
ESSENTIAL PURPOSE, ECLIPSE RESERVES THE RIGHT TO REFUND THE PURCHASE PRICE
OF THE PRODUCT TO THE PURCHASER IN EXCHANGE FOR THE RETURN OF THE
PRODUCT. ECLIPSE SHALL NOT BE LIABLE FOR ANY DAMAGES INCLUDING. BUT NOT
LIMITED TO, DIRECT. INDIRECT. INCIDENTAL OR CONSEQUENTIAL DAMAGES. LOSS OF
USE OR DATA, LOSS OF PROFITS OR INTERRUPTION OF BUSINESS, WHETHER SUCH
ALLEGED DAMAGES ARE BASED IN WARRANTY. TORT (INCLUDING NEGLIGENCE AND
STRICT LIABILITY. BUT EXCLUDING PERSONAL INJURY). CONTRACT, OR INDEMNITY.
YOUR STATE LAW RIGHTS
SOME STATES DO NOT ALLOW LIMITATIONS ON HOW LONG AN IMPLIED WARRANTY LASTS
OR THE EXCLUSION OR LIMITATION OF INCIDENTAL OR CONSEQUENTIAL DAMAGES. SO
SUCH LIMITATIONS OR EXCLUSIONS MAY NOT APPLY TO YOU. THIS WARRANTY GIVES
YOU SPECIFIC LEGAL RIGHTS, AND YOU MAY ALSO HAVE OTHER RIGHTS WHICH VARY
FROM STATE TO STATE.
...................................................................
AVN726E
...................................................................
090000-01340700 0604MT(N)