1
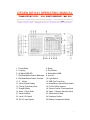
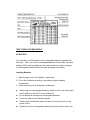
DEGEN DE1103 OPERATING MANUAL
TRANSLATED BY LIYPN – © ALL RIGHTS RESERVED – MAY 2004
(We are the copyright holder of this manual in English. Please do NOT distribute this
manual in any form nor post this manual on any web sites or radio groups without our
written consent, e-mail: [email protected]. Thank you for your cooperation.)
1 . Power/Sleep
3 . Lock Key
2. Reset
4. Time/Delete
5 . St./Mono/SSB LED
7 . FM Band/Station Search Backward
6. Stereo/Mono/SSB
8. Line Out
9 . FM Band/Station Search Forward
11. 0….9 Keys
10. Light Switch
12. SSB Fine Tune Knob
13. Liquid Crystal Display
15. Tuning (Functions) Knob
14. News/Music, Narrow/Wide Switch
16. Pull Out Whip Antenna
17. Support (Back)
19. Alarm 2, Store Knob
18. Volume Control / Recharge Knob
20. Alarm 1, Memory Selection Knob
21. Hand Held Belt
23. Local / DX Switch
22. AM Antenna Socket
24. Earphone Socket
25. DC 6V. Input Socket
26. Battery Compartment (Back)
1
TWO TYPES OF POWER SUPPLY
BY BATTERY
You may either use AA batteries or the rechargeable batteries supplied with
this radio. When you use the rechargeable batteries for this radio, the power
adaptor (220V.) that is supplied with this radio can also be used to recharge
the rechargeable batteries inside the radio (see page 4 for details).
Installing Batteries
1. Open the back cover of the battery compartment;
2. Put in the 4 batteries according to the polarity inside the battery
compartment,
3. Close the back cover of the battery compartment.
When using non-rechargeable batteries, please do not connect the plug of
the AC adaptor to the DC 6V. Input Socket (26)
Do not attempt to recharge non-rechargeable batteries.
Do not use new and old batteries together.
Please remove all batteries when the radio is not to be used for a long
period of time.
Please do not store rechargeable batteries with other items such as coin
2
or metal to avoid shorting the rechargeable batteries.
If leakage is found on the batteries, clean the battery compartment with
tissue to prevent further corrosions of other radio parts.
Replacing Batteries
1. When the batteries are nearly exhausted, the BATTERY SIGN on the LCD
will flash and then disappear. The radio will be turned off automatically.
If you are using non-rechargeable batteries, please replace with new ones.
If you are using rechargeable batteries, please recharge the batteries.
2. When the radio is completely cut off from supply of electricity, the memory
presets stored in the radio are permanent which will not be affected by the
cut off of electricity. However, you will need to re-adjust the clock.
3. If you do not want to lose the memory of the clock, please connect the radio
to the AC adaptor or replace the batteries in not more than 3 minutes.
BY USING THE AC ADAPTOR
1. As the AC Adaptor (DC06) supplied with the radio run in 220V. only, you will
need to have a 110V. input 220V. output step-up power transformer to be
used with the AC Adaptor (DC06). Plug the step-up transformer into the
AC mains socket, then plug the AC Adaptor (DC06) into the output socket
of the step-up transformer.
2. Connect the other end of the AC Adaptor (DC06) into the DC 6V. Input
Socket (25).
When using the AC Adaptor (DC06), it is normal that it will become slightly
warm after a period of use.
When using the AC Adaptor (DC06), battery connection inside the radio
will be cut off automatically.
When not using the AC Adaptor (DC06), please remove it and the step-up
transformer from the AC mains.
When using the AC Adaptor (DC06) to supply electricity to the radio, the
backlight of the radio will be lit continuously.
It is better to remove the non-rechargeable battery outside the battery
compartment if the AC Adaptor (DC06) is to be used for a certain long
period of time.
The AC Adaptor (DC06) is specially designed for the DE1103 radio with a
3
steady voltage and 300 ma current, please do not use it with other
appliances.
Please do not use any other AC adaptor with the DE1103 as this may
damage the rechargeable function of the radio.
You can check the battery level when the radio is first turned on, one of the
following ladder signs will display. The ladder sign will disappear when the
radio is in normal use. However, you may wish to press the “VOL” (18) knob
slightly to view the battery level signs again when the radio is in normal use:
If the radio is automatically turned off after turning it on when using
non-rechargeable batteries, the batteries are exhausted. You should
replace all batteries to prevent leakage of battery fluids.
If you are using rechargeable batteries, you should recharge the batteries
when the “Battery Low” sign is displayed.
BATTERY RECHARGE
When the rechargeable batteries, AC Adaptor (DC06) and the step-up
transformer are properly installed, you may start to recharge the rechargeable
batteries inside the battery compartment.
RECHARGE PROCEDURES
1. Put the rechargeable batteries inside the battery compartment of the radio.
3. Plug the step-up transformer into the AC mains socket, then plug the 220V.
AC Adaptor (DC06) into the output socket of the step-up transformer.
2. Connect the other end of the AC Adaptor (DC06) into the DC 6V. Input
4
Socket (25).
3. Turn the radio off, press the “VOL” button (18) with one hand and rotate the
“TUNE” knob (15) with another hand to set the recharge time. The
recharge time can be set from 1 to 23 hours. When the “VOL” button is
released, recharge of batteries will start.
4. When recharge of batteries is taking place, you will be able to observe the
movements of the battery level ladder signs from short to tall.
5. The recharge process will terminate at the time that you set.
PRECAUTIONS
1. It is not possible to recharge batteries when the radio is turned on.
However, it is possible to turn on the radio during the recharge process,
reception will not be affected.
2. If you turn on the radio during the recharge process, it will not have any
adverse effect on the recharging batteries.
3. The drain of current for this radio is about 100 mA, the recharge time can
be calculated as follows: recharge time (hours) = capacity of battery (mAH)
divided by 100 (mA). It the batteries to be recharged are not fully
exhausted, the recharging time should be reduced accordingly.
4. When the radio is in turn off mode, pressing the “VOL” button (18) for a
longer period of time will be able to see the remaining time in hours for the
recharge process.
5. The recharge process will be terminated automatically when the set
recharge time is reached.
6. Do not re-recharge batteries that are fully recharged already.
7. The AC Adaptor (DC06) will have no effect on the batteries before the
recharging process is started.
8. The capacity of the rechargeable batteries will decrease with the increase
of time and usage. Replace with new ones when this occurs.
9. Please give priority to using Ni-MH rechargeable batteries.
HINTS
When the radio is turned on during the recharging process, the BATTERY
SIGN will be displayed on the LCD panel.
Please use good quality rechargeable batteries for the recharging process,
recharge may terminate before the set time for using bad or poor contacts
5
batteries.
When recharging new or stored batteries, please exhaust the batteries
before recharging.
Do not mix new and old batteries for recharging.
Avoid recharging batteries that will not used for a certain period of time, it
would deteriorate the life of the batteries.
NEVER recharge non-rechargeable batteries, which may cause leakage
of fluid or explosions.
SETTING THE CLOCK
TIME DISPLAY
1. When the radio is in turn off mode, the LCD displays the time.
2. Turn off the radio, press the “TIME” button (4) once. The display will
display time instead of frequency for about 5 seconds.
ADJUSTING THE CLOCK
The default time for the radio clock is 00:00, to adjust the time, the radio must
be turned off.
1. Pressing the “TIME” button (4) for about 2 seconds will enter into the hour
mode, the hour digits will flash for about 30 seconds.
2. While the digits are flashing, rotating the “TUNE” knob (15) to set to the
appropriate hour.
3. After the hour is set, press the “TIME” knob (4) will enter into the minute
mode, the minute digits will flash for above 30 seconds.
4. Rotate the “TUNE” knob (15) to adjust the time in minutes.
5. When adjustment is done, press the “TIME” knob (4) to confirm.
Please note that you should complete each of the above steps in 30 minutes,
otherwise, it would not be possible to adjust the time.
TURNING THE RADIO ON/OFF
This radio contains memory and is able to tune to the last tuned station when
turning it on again.
6
POWER ON/OFF
Press the “SLEEP” button (1) once to turn on the radio, press it again to turn
off the radio.
ALARMS
You can set two alarms within 24 hours: Alarm 1 and Alarm 2. You can set to
any desired turn on time, station preset, volume and turn off time as you like.
When the set alarm time is reached, the radio will be turned on and turned off
automatically according to the set alarm time.
VOLUME CONTROL
The radio has 64 steps (0 – 63) of volume control. The default volume is set
to 40. The LCD panel will show the volume control steps during adjustment of
volume.
Method 1: When the radio is in turn on mode, press the “VOL” button (15), the
VOL sign on the LCD panel will flash for about 3 seconds. Rotate the “TUNE”
knob (15) to adjust the volume of the radio.
Method 2: Press the numeric keys then press the “VOL” button (15) quickly,
the volume level will be adjusted to your input level,
e.g.
setting the volume level to 30:
press (3) (0) “VOL”
(each step should be executed within 3 seconds)
USING THE DX/LOCAL SWITCH
When tuning to SW or MW bands, you can use the DX/LOCAL (23) switch to
enhance reception.
In normal situations, this switch should be set to the DX position. If you are
listening to local station or station with a strong signal, this switch should be set
to the LO position.
7
BAND SELECTION
After turning on the radio, press the “BAND+” (9) or the “BAND-“ (7) button will
be able to change to the desired band for listening. Please note the frame
changes of the selected band on the LCD panel.
SETTING SLEEP TIME
The sleeping turn off time can be set no matter when the radio is turn on or
turned off. Your can set the sleeping turn off time from 1 to 99 minutes.
Method 1:
1. Press the numerical buttons to set the sleeping turn off time. For example,
to set the sleeping turn off time to 60 minutes, press (6)(0), and the LCD
panel will display 60 for 5 seconds.
2. Then press the “SLEEP” button (1)
3. The LCD panel will display the word “SLEEP”, the radio is now turned on
and will be turned off after 60 minutes.
Method 2:
1. Hold the “SLEEP” button (1)
with one hand, rotate the “TUNE” knob (15)
to select the sleeping turn off time.
2. The radio will be turned on with the word “SLEEP” displayed on the LCD
panel.
SETTING THE ALARMS
You can set two alarms within 24 hours: Alarm 1 and Alarm 2. You can set to
any desired turn on time, station preset, volume and turn off time as you like.
When the set alarm time is reached, the radio will be turned on and turned off
automatically according to the set alarm time.
SETTING ALARM 1
1. Turn off the radio, press the “M/F” button (20) for 3 seconds to enable
8
Alarm 1. The hour digits on the LCD panel will flash.
2. Rotate the “TUNE” knob (15) to adjust the hour, then press the “M/F” button
(20) again, the minute digits on the LCD panel will flash.
3. Rotate the “TUNE” knob (15) to adjust the minute, then press the “M/F”
button (20) again, the station presets will flash.
4. Rotate the “TUNE” knob (15) to select the station preset, then press the
“M/F” button (20) again, the volume level will flash.
5. Rotate the “TUNE” knob (15) to select the then press the “M/F” button (20)
again.
6. Select the duration of Alarm 1 (from 5 to 99 minutes).
7. Finally, press the “M/F” button (20) to confirm. The “Alarm 1” sign will be
displayed on the LCD panel, indicating that Alarm 1 is activated, the radio
will turn on/off according to the particulars of the Alarm 1 settings.
NOTE: When setting the Alarm, if there is no change in the default settings,
you can just press the “M/F” button (20) or the “STORE” (19) button to skip for
faster operation.
SETTING ALARM 2
1. Turn off the radio, press the “STORE” button (19) for 3 seconds to enable
Alarm 1. The hour digits on the LCD panel will flash.
2. Following the similar procedures for setting the Alarm 1 except that the
“M/F” button should be changed to the “STORE” button (19). When these
steps are finished, the “Alarm 1” sign will be displayed on the LCD panel,
indicating that Alarm 2 is activated, the radio will turn on/off according to the
particulars of the Alarm 2 settings.
If there are conflicts in the two alarm settings, the alarm settings with the
later time will replace the alarm settings of an earlier time.
The settings of alarm(s) is/are always valid unless the alarm(s) is/are
deactivated.
DEACTIVATING THE ALARMS
Deactivating Alarm 1
Turn off the radio, press “M/F” button (20) once, the “Alarm 1” sign will
9
disappear from the LCD panel, Alarm 1 settings are deactivated.
Deactivating Alarm 2
Turn off the radio, press “STORE” button (19) once, the “Alarm 2” sign will
disappear from the LCD panel, Alarm 2 settings are deactivated.
TUNING TO STATIONS
There are 4 methods of tuning to stations with this radio. When receiving
stations in the AM and SW bands, please note the changes of the ladder style
signal level indicator. The more ladders indicate the stronger the signal or
vice versa.
TUNING BY ROTATING THE FLYING KNOB
Using the “TUNE” knob (15).
1. Turn on the radio, select the desired band.
2. Use one finger to touch on the rough surface of “TUNE” knob (15) for fast
tuning.
3. When nearer to the frequency, use two fingers to grip on the adjacent sides
of the “TUNE” knob (15) for slower and fine-tuning.
desired frequency is reached.
Stop tuning when the
When tuning with the “TUNE” knob (15), FM step is 25 KHz., AM (LW, MW
and SW) step is 1 KHz.
The fastest speed for flying know tuning is 80 steps per cycle.
TUNING BY DIRECT INPUT OF FREQUENCY
When the frequency of a station is know, you can input the frequency for
fastest tuning. You can even input any frequencies across the bands.
1. Turn the radio on, press the numerical buttons according to the frequency
2. Press the appropriate confirm button:
FM – “BAND-“ button (7)
MW & SW – “BAND+” button (9).
10
Example 1: FM 89.80 MHz.
(8)(9)(8)”BAND-“
(no need to enter 0 after the decimal place for FM)
Example 2: MW 810 KHz.
(8)(1)(0)”BAND+”
Example 3: LW 120 KHz.
(1)(2)(0)”BAND+”
Example 4: SW 15340 KHz.
(1)(5)(3) (4) (0)”BAND+”
Please input all the numerical buttons by not longer than 3 seconds.
When inputting a frequency that is out of range of the radio, the error
message of “Err” will be displayed on the LCD panel.
The smallest steps for inputting frequencies: AM: 1 KHz.; FM: 100 KHz.
TUNING BY AUTOMATIC SCANNING
You can use the “BAND-“ (7) and “BAND+” (9) buttons to automatic searching
and scanning of stations.
1. Turn on the radio, select the appropriate meter band.
2. Press the “BAND-“ (7) or “BAND+” (9) buttons to automatically search for
stations. When a station is found, scanning will ceased for about 3
seconds for trial listening, scanning will continue after 3 seconds if there is
no action.
3. You may wish to use the “TUNE” knob to fine tune a station that is
successfully searched.
4. Pressing any button on the radio panel would terminate automatic
scanning.
Tuning steps for automatic scanning: FM 100 KHz.; MW 1 KHz.; SW 5
KHz.
Automatic scanning will search for stations in the selected meter bands
continuously.
11
TUNING BY RECALLING MEMOERY PRESETS
1. Turn on the radio, press the “M/F” button (20), the “MEM” sign will be
displayed on the LCD panel.
2. Rotate the “TUNE” knob (15) will in turn list the stored station memory
presets.
3. If you remember the memory preset number of a particular station, you can
input the preset number by pressing the numerical keys, followed by
pressing the “M/F” button (20) to retrieve the relevant station quickly.
The unregistered preset number will be skipped when rotating the
“TUNE” knob (15).
When inputting an unregistered preset number, the error message of
“Err” will be displayed on the display panel.
STORING MEMORY PRESETS
This radio has 268 memory presets, of which 12 presets are used internally for
the bands. The references of the remaining 256 memory presets of station
frequencies are as follows:
PAGE 0 00 01 02 03 04 05 06 07 08 09 0A 0B 0C 0D 0E 0F
PAGE 1 10 11 12 13 14 15 16 17 18 19 1A 1B 1C 1D 1E 1F
PAGE 2 20 21 22 23 24 25 26 27 28 29 2A 2B 2C 2D 2E 2F
PAGE 3 30 31 32 33 34 35 36 37 38 39 3A 3B 3C 3D 3E 3F
PAGE 4 40 41 42 43 44 45 46 47 48 49 4A 4B 4C 4D 4E 4F
PAGE 5 50 51 52 53 54 55 56 57 58 59 5A 5B 5C 5D 5E 5F
PAGE 6 60 61 62 63 64 65 66 67 68 69 6A 6B 6C 6D 6E 6F
PAGE 7 70 71 72 73 74 75 76 77 78 79 7A 7B 7C 7D 7E 7F
PAGE 8 80 81 82 83 84 85 86 87 88 89 8A 8B 8C 8D 8E 8F
12
PAGE 9 90 91 92 93 94 95 96 97 98 99 9A 9B 9C 9D 9E 9F
PAGE A A0 A1 A2 A3 A4 A5 A6 A7 A8 A9 AA AB AC AD AE AF
PAGE b b0 b1 b2 b3 b4 b5 b6 b7 b8 b9 bA bB bC bD bE bF
PAGE C C0 C1 C2 C3 C4 C5 C6 C7 C8 C9 CA CB CC CD CE CF
PAGE d d0 d1 d2 d3 d4 d5 d6 d7 d8 d9 dA dB dC dD dE dF
PAGE E E0 E1 E2 E3 E4 E5 E6 E7 E8 E9 EA EB EC ED EE EF
PAGE F F0 F1 F2 F3 F4 F5 F6 F7 F8 F9 FA FB FC FD FE FF
Method 1:
1. Turn on the radio, tune to the station to be stored to the memory presets.
Hold the “STORE” button (19) to enter into the memory-preset mode, the
“MEM” sign will flash on the LCD panel.
2. Rotate the “TUNE” knob (15) to assign a memory preset reference.
3. Press the “STORE” button (19) once to save the present station frequency
to the memory preset.
Method 2:
Using this method can store up to 100 station frequencies only, i.e. memory
preset references from 1 to 99.
1. Turn on the radio, tune to the station to be stored to the memory presets.
2. Press the numeric keys for the desired memory preset reference (1 to 99),
then press the “STORE” button (19) to check, press the “STORE” button
(19) again to save.
DELETING MEMORY PRESETS
To Delete One Memory Only
13
1. Turn the radio on, while holding down the “STORE” button (19), rotate the
“TUNE” knob (15) and observe the frequency changes on the LCD panel,
the “MEM” sign will flash.
2. Locate the station frequency to be deleted.
3. While holding the “STORE” button (19), press the “TIME” button (4). The
memory preset reference will become blank, the “MEM” sign on the LCD
display will disappear. Instead, the “VOL” sign will appear on the LCD
display.
4. You have successfully deleted a memory preset.
To Delete All Memories
While pressing these fours keys all at the same time, all the memory presets
stored in the radio will be completely erased: “SLEEP”, “HOLD”, “TIME” and
“RESET”.
USING THE LOCK FUNCTION
To prevent accidental operations of the radio, the lock function will help to keep
the radio to stay at its current condition.
1. Press the “HOLD” button (3), the lock sign will appear on the LCD panel.
At this time, no other keys can function except the “HOLD” button (3) to
release the lock. However, if the radio is turned on before using this lock
function, pressing the “SLEEP” button (1) can turn off the radio.
2. To cancel the lock function, press the “HOLD” button (3) for more than 1
second, the lock sign will disappear from the LCD panel, all the other
buttons will become functioning again.
BACKLIGHTING
There are three backlighting modes for this radio: normal backlight, continuous
backlight, and no backlight.
1. Normal backlight: When pressing the buttons during operation, the orange
lights on the LCD and the buttons will light up. It will be turned off
automatically after 15 seconds if no other buttons are pressed.
14
2. Continuous backlight: When using the AC Adaptor with the radio, the
backlights will be on continuously.
3. No backlight: Push the backlight switch to the “OFF” position.
TONE SELECTION
FM STEREO / MONO (ST/MO)
Stereo mode is good for listening FM music programs with strong transmission
signals. Press the “SSB” (6) button will switch from Mono to Stereo or vice
versa. Mono mode should be used for listening to weak signal stations.
NEWS / MUSIC
When listening to musical programs, set the News/Music Switch (14) to
“MUSIC”, or set the switch to “NEWS” when listening to news.
NARROW / WIDE BANDWIDTH
When listening to MW, SW and LW stations, using the appropriate bandwidth
could enhance reception results. This radio is a dual conversion radio, the
first IF is 55.845 MHz., and the second IF is 450 KHz.
Use the Narrow/Wide Switch (14) to select the most suitable bandwidth for
listening:
Wide: bandwidth is 6 KHz., better sound quality but selectivity is ordinary
Narrow: bandwidth is 4 KHz., sound is dull but selectivity is good.
RESET FUNCTION
The IC inside the radio may be affected by outside interference, resulting in the
radio not operating properly. When this occurs, use a sharp and thin object to
press the Reset Hole (2). The radio will be back to normal, all memory
presets are still there, but you will have to re-set the clock.
LINE OUT
15
This radio can provide good audio signals to outside amplifiers. The sound
quality when connected in this way is much better than the sound from the
speaker of the radio. The line output signal of this radio is unaffected by the
tone and volume controls on the radio.
EARPHONE
A good quality stereo earphone is supplied with the radio. When using the
earphone, the speaker on the radio will be disconnected. You can listen to
quality FM stereo programs by using the earphone with this radio.
SSB/CW RECEPTION
1. The SSB function is applicable from 100 – 29999 KHz. on this radio.
2. Press the SSB button (6), tune the SSB fine tune knob to set the BFO
signal to zero beat.
3. Rotate the “TUNE” knob (15) to search for the SSB signal.
4. When the SSB signal is received, tune the SSB fine tune knob (12) to the
position where the SSB signal is the clearest.
Most SSB and CW signals are often found in these frequencies:
7000 – 7100 KHz. (LSB)
13107 – 13179 KHz. (USB)
14000 – 14305 KHz. (USB)
21000 – 21405 KHz. (USB)
Specifications of DEGEN DE-1103 Radio:
1. Frequency range
FM: 76.00 – 108.00 MHz.
AM: 100 – 29999 KHz.
SW: 1710 – 29999 KHz. (11 m. to 90 m.)
2. Selectivity
FM: better than 10 uv.
MW: better than 1 mv/m
SW: better than 20 uv.
16
3. Shortwave selectivity: Wide – better than 40 dB,
Narrow – better than 50 dB
4. Second IF for AM: Wide – less than 6 KHz., Narrow – less than 4 KHz.
5. Line out is not affect by volume and tone controls of the radio.
6. Power:
Battery: 4 x AA size battery
DC : 8 V., 300 mA
Recharge time: 1 – 23 hours
7. 3 inch internal speaker
8. FM stereo possible through the earphone
9. Dimensions: 165 x 105 x 29 mm / 6.5 x 4 x 1 inch, approximately
10. Weight: 300 gram / 11 oz. (not including battery).
PLEASE VISIT THE RADIO SECTION OF OUR EBAY SHOP FROM TIME TO
TIME TO FIND MORE UPDATED & INTERSETING ITEMS:
http://stores.ebay.com/V-COM-COLLECTIONS_W0QQcolZ2QQdirZQ2d1QQd
ptZ1QQsclZallQQsotimedisplayZ2QQtZkm
17


![[S3062PT-CPE] User`s Manual(Third Edition): CPE62PUE](http://vs1.manualzilla.com/store/data/005693507_1-69a1045bbc5cf41449359b406d2a53f2-150x150.png)