1
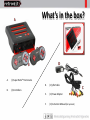
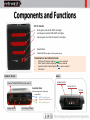
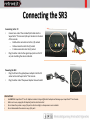
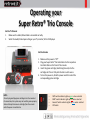
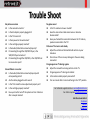
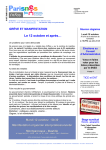
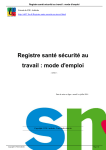
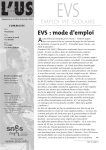
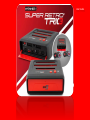
User Guide Contents • Safety Instructions • What do you get? • Parts and Functions • Connecting the SR3 • Operating the SR3 • Trouble Shoot Safety Instructions Warning For owners of projection televisions: Still pictures or images may cause permanent picture tube damage or mark phosphor of the CRT. Avoid repeated or extended use of video games on large-screen projection televisions. Caution Before you or your children play video games, be sure to observe the following: • Take intermittent 15 minute breaks, at least once an hour, when playing for extensive periods at a time. • Refrain from playing if you are drowsy or fatigued. • Play in a well-lit room • Sit or stand at a relatively far distance from the TV when playing video games. Safety Instructions Read carefully before operating your Super Retro Trio® console This product has been designed with the highest concern for safety. However, if used improperly any electrical device has the potential to cause damage or harm to others: • Observe all warnings, precautions and instructions. • Stop use and unplug the AC power cord from the electrical outlet immediately if the device acts odd or produces a strange smell • Contact customer support for the Super Retro Trio® console at [email protected] if the device is not working properly after troubleshooting. • Do not take apart the console. • Do not use the console near water. • Keep out of reach of small children. • Do not touch the plug of the AC power cord with wet hands. • Do not touch the console or connected accessories during an electrical storm. • Do not touch the console or AC adapter for too long during use to avoid possible burns. • Do not place the console and connected accessories where somebody may trip on them • Do not pull out the game cartridge during use What’s in the box? A. B. (1) Super Retro® Trio Console D. (1) S/AV Cable E. (1) Power Adapter F. (1) Instruction Manual (Not pictured) (2) Controllers Components and Functions TOP OF THE SR3 1. 8- bit game card slot for NES® cartridges 2. 16- bit game card slot FOR SNES® cartridges 3. Genesis game card slot for Genesis® cartridges 4. 5. Reset Button Power Switch (see light indicator guide below) POWER SWITCH LIGHT INDICATOR GUIDE o NES® switch indicator Lights up green when selected o SNES® switch indicator Lights up red when selected o Genesis® switch indicator Lights up blue when selected o OFF Switch FRONT OF THE SR3 BACK S-video Port (S) Genesis® & SNES®/NES®Controller switch AV Port (V L R) Controller Ports (Connect original or third party controllers) • SNES® controller port • Genesis® controller port • NES® controller port Region Switch Controller port door DC Port Connecting the SR3 Connecting to the TV • Connect one end of the included S/AV cable into the Super Retro® Trio Console S/AV port located on the back of the console: – Red & white connection into the (L R) sockets – Yellow connection into the (V) socket – S-Video connection into the (S) socket • Plug the other end into the signal input ports on the TV set, also matching the colors indicated. Powering the SR3 • Plug the DC end of supplied power adapter into the DC socket on back of Super Retro® Trio Console • Plug the other end of the power adapter into wall outlet PRECAUTIONS • Use ONLY the Super Retro® Trio AC Adapter included. Using a different AC adapter will damage your Super Retro® Trio Console. • When not in use, unplug the AC adapter from the electrical outlet. • Do not leave the system or any of its parts in direct sunlight, in damp areas or near a heater • Do not disassemble the console or any of its parts Operating your Super Retro® Trio Console Set the TV Channel 1. Make sure the Audio/Video Cable is connected correctly. 2. Select the Audio/Video Input setting on your TV, monitor, VCR or DVD player. Set the Console 1. Make sure the power is “Off” 2. Plug your Super Retro® Trio Controllers into the respective Controller Slots on the front of the console. 3. Insert the game cartridge, label facing forward, into the cartridge slot. Press it fully into the slot or until secure. 4. To turn the power on, Slide the power switch to select the corresponding game cartridge. NOTE: •Do not plug multiple game cartridges into the console at the same time, the system may not read the game properly. •Never attempt to remove a cartridge from the console while the power is switched on. o o o o NES® switch indicator Lights up green when selected SNES® switch indicator Lights up red when selected Genesis® switch indicator Lights up blue when selected OFF Switch Trouble Shoot No picture on screen Is the console turned on? Is the AC adapter properly plugged in? Is the TV turned on? Is there power to the wall socket? Is the cartridge properly inserted? Is the Audio/Video Cable connected properly? If connecting through the VCR/DVD Player, is the VCR/DVD Player turned on? If connecting through the VCR/DVD, is the VCR/DVD set to receive line input? Screen flickers or no color Is the Audio/Video Cable connected properly with corresponding colors? Are the cables plugged in until secure? Is the TV channel fine tune adjustment properly set? Is the cartridge properly inserted? Have you tried to turn off the system and turn it back on after a couple minutes? No game sound Is the TV volume too low or muted? Have the connection cables come loose or become disconnected? Have you checked the connection between the TV and any speakers connected to the TV? Picture on TV screen is not steady Adjust the vertical and horizontal hold controls on your television. Check to see if there are any damages to the wires being connected. Fringes appear on TV during a game Adjust the manual fine-tuning controls on the TV. Fringes appear on TV during a broadcast Is the antenna cable properly connected? Turn on console after 1 minute of being in the “off” position. For technical support email us: [email protected] For other inquiries: [email protected] Join the conversation! Facebook Twitter Instagram