1
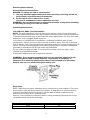
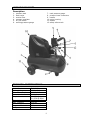
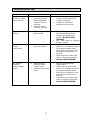
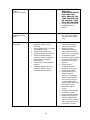
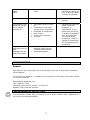
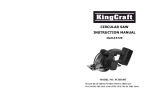
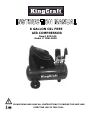
8 GALLON OIL FREE AIR COMPRESSOR Item# 6923-05 Model # TAW-2030 PLEASE READ AND SAVE ALL INSTRUCTIONS TO ENSURE THE SAFE AND EFFECTIVE USE OF THIS TOOL. TABLE OF CONTENTS Index P. 1 Important Safety Instructions P. 2-5 Electrical Requirements P. 6 General Safety Rules P. 7,8 List of Main Parts, Tech. Specifications P. 9 Contents of Packaging, Installation P. 10 Operation P. 11- 13 Maintenance P. 14 Trouble Shooting P. 15-17 Service Center P. 17 Warranty Information P. 18 Warranty Card P. 20 1 IMPORTANT SAFETY INSTRUCTIONS PLEASE READ THESE INSTRUCTIONS CAREFULLY TO ENSURE THE SAFE AND EFFECTIVE USE OF THIS TOOL. Before working with this air compressor read and understand this instruction manual and safety instructions carefully. In case you notice any transport damage, when unpacking the air compressor, you must not start to work with it! The air compressor has to be checked and repaired by an authorized service station. WARNING: TO REDUCE THE RISK OF ELECTRIC SHOCK OR ELECTROCUTION Serious injury or death could occur if the air compressor is not properly grounded. Your air compressor is powered by electricity and may cause electric shock or electrocution if not used properly. Electrical shock may occur from electrical cord. Serious injury or death may occur if electrical repairs are attempted by unqualified persons. PREVENTION Make sure the air compressor is plugged into a properly grounded outlet which provides correct voltage (120 V) and adequate fuse protection. Check power cord for signs of crushing, cutting or heat damage. Replace faulty cord before use. Keep all connections dry and off the ground. Do not allow electrical cords to rest in water or in such a position where water could come in contact with them. Do not touch plug with wet hands. Do not pull on the electrical cord to disconnect from the outlet. Never operate air compressor in wet conditions or outdoors when it is raining. Never operate air compressor with safety guards/covers removed or damaged. Any electrical wiring or repairs performed on this air compressor should be done by Authorized Service Personnel in accordance with national and local electrical codes. Before opening any electrical enclosure, always shut off the air compressor, relieve pressure and unplug the air compressor from the power source. Allow air compressor to cool down. Never assume the air compressor is safe to work on just because it is not operating. It could restart at any time! SAVE THESE INSTRUCTIONS! 2 SAFETY WARNINGS READ ALL SAFETY WARNINGS BEFORE USING AIR COMPRESSOR! WARNING: TO REDUCE THE RISK OF EXPLOSION OR FIRE OR BURSTING Serious injury or death may occur from normal electrical sparks in motor and pressure switch. Serious injury may occur if any air compressor ventilation openings are restricted, causing air compressor to overheat and possibly ignite a fire. Serious injury or death may occur from an air tank explosion if air tanks are not properly maintained. Serious injury may occur from an air compressor malfunction or exploding accessories if incorrect system components, attachments, and accessories are used. PREVENTION Always operate air compressor in a well ventilated area free of flammable vapors, combustible dust, gases or other combustible materials. If spraying flammable material, locate the air compressor at least 20 feet away from the spray area. (An additional hose may be required.) Never place objects against or on top of air compressor. Operate air compressor at least 12 inches away from any wall or obstruction that would restrict proper ventilation. Drain air tank daily or after each use to prevent moisture buildup in the air tank. If air tank develops a leak, replace the air tank immediately. Never repair, weld or make modifications to the air tank or its attachments. Never make adjustments to the factory set pressures. Never exceed manufacturer’s maximum allowable pressure rating of attachments. Never use air compressor to inflate small, low pressure objects such as toys. INTENDED USE This compressor is intended to generate compressed air required for the operation of air tools. Any use for food processing or medical purposes is not permitted. Explosives, combustibles or gases detrimental to health may not be compressed. Do not use compressor in hazardous locations. Children are not allowed to operate this compressor and any air tools connected to it. For any other use the compressor is not intended. Unintended use, any change on the compressor or use of not approved air tools may cause unforeseen damages or injuries. 3 WARNING: TO REDUCE THE RISK TO BREATHING, OF BURNS AND FLYING OBJECTS Serious injury or death could occur from inhaling compressed air. The air stream may contain carbon monoxide, toxic vapors or solid particles. Sprayed materials such as paint, paint solvents, paint remover, insecticides, weed killers, etc., contain harmful vapors and poisons. Serious injury could occur from touching exposed metal parts. These areas can remain hot for some time even after the air compressor is shutdown. Serious injury can occur from loose debris being propelled at a high speed from the compressed air stream. PREVENTION Never inhale air from the air compressor either directly or from a breathing device connected to the air compressor. Operate air compressor only in a well ventilated area. Follow all safety instructions provided with the materials you are spraying. Use of a respirator may be required when working with some materials. Never allow any part of your body or other materials to make contact with any exposed metal parts on the air compressor. Always wear safety glasses to shield the eyes from flying debris. Never point the air stream at any part of your body, anyone else or animals. Never leave pressurized air compressor unattended. Shut off air compressor and relieve pressure before attempting maintenance, attaching tools or accessories. Always maintain a safe distance from people and animals while operating the air compressor. Do not move the air compressor while air tank is under pressure. Do not attempt to move the air compressor by pulling on the hose. Additional safety guidelines for compressors In order to avoid any danger for persons or damage of the compressor, you must stick to the following safety guidelines. If using the air compressor on a worksite please also follow the instructions of the employer’s liability insurance association and the regulations for prevention of accidents, when working with compressors and air-tools. Always wear ear protection and safety goggles. During dust generating jobs, you have to wear a dust mask. Always wear suitable work clothes. During outdoor work, it is recommended to wear non slipping shoes. Never direct connected air tools against any persons or animals. Be sure that the air tools are really designed for the working pressure of the compressor or that they are supplied via a pressure regulator. Pay attention when disconnecting the quick coupler. The compressed air inside the pressure hose will escape all of a sudden. Please hold the air hose firmly, when disconnecting from the compressor. Make sure that all screw connections are adequately tightened at any time. Do not repair the compressor by yourself! All repairs on compressor and air tools must be done by authorized and trained service stations. Risk of Burning! Let the compressor cool down, before doing any maintenance job. 4 Do not use the compressor without installed guards. Please note that the compressor will start automatically, when the pressure falls to the minimum designated pressure. Make sure the compressor is switched off and disconnected from the power supply before starting it. Check the compressor and the accessories carefully and follow their instructions for maintenance. Check the compressor for possible damages before any use. All safety and protection devices or slightly damaged parts must be inspected for proper function before any use. Check to see that all of the moving parts are working properly and are not jammed. All parts have to be mounted correctly and have to meet all conditions for proper operation of the compressor. All damaged protection parts have to be repaired or replaced by an authorized service station. Damaged switches have to be replaced by an authorized service-center. Do not operate the compressor, in case the switch cannot switch “ON” or “OFF”. Keep handles dry and free from oil or grease. SAVE THESE INSTRUCTIONS! 5 Electrical Requirements General Electrical Connections DANGER: To reduce the risk of electrocution: 1. Use only identical replacement parts when servicing. Servicing should be performed by a qualified service technician. 2. Do not use in rain or where floor is wet. This tool is intended for indoor residential use only. WARNING: Do not permit fingers to touch the terminals of plug when installing or removing the plug to or from the outlet. Grounding Instructions 110-120 Volt, 60Hz. Tool Information NOTE: The plug supplied on your tool may not fit into the outlet you are planning to use. Your local electrical code may require slightly different power cord plug connections. If these differences exist refer to and make the proper adjustments per your local code before your tool is plugged in and turned on. In the event of a malfunction or breakdown, grounding provides a path of least resistance for electric current to reduce the risk of electric shock. This tool is equipped with an electric cord having an equipment grounding conductor and a grounding plug, as shown. The plug must be plugged into a matching outlet that is properly installed and grounded in accordance with all local codes and ordinances. Do not modify the plug provided. If it will not fit the outlet, have the proper outlet installed by a qualified electrician. A temporary adapter may not be used with this item. WARNING: If not properly grounded, this tool can cause an electrical shock, particularly when used in damp locations, in proximity to plumbing, or outdoors. If an electrical shock occurs there is the potential of a secondary hazard, such as your hands hitting the cutting tool. Wire Sizes NOTE: Make sure the proper extension cord is used and is in good condition. The use of any extension cord will cause some loss of power. To keep this to a minimum and to prevent overheating and motor burnout, use the table as below to determine the minimum wire size (A.W.G.) extension cord. Use only 3-wire extension cords which have 3-prong grounding type plugs and 3-pole receptacles which accept the tools plug. Extension Cord Length 0-25 25-50 Gauge (A.W.G.) 12 10 6 GENERAL SAFETY RULES WARNING! Read, understand and save all instructions. Failure to follow all instructions listed below may result in electric shock, fire or serious personal injury. The warnings, cautions, and instructions discussed in this instruction manual cannot cover all possible conditions and situations that may occur. It must be understood by the operator that common sense and caution are a factor which cannot be built into this product, but must be supplied by the operator. SAVE ALL INSTRUCTIONS! WORK AREA 1. Keep your work area clean and well organized. Cluttered benches and dark areas invite accidents. 2. Do not operate power tools in explosive atmospheres, such as in the presence of flammable liquids, gases, or dust. Power tools create sparks which may ignite the dust or fumes. 3. Keep bystanders, children and visitors away while operating a power tool. Distractions can cause you to lose concentration. ELECTRICAL SAFETY Do not abuse the cord. Never use the cord to carry the tool. Keep cord away from heat, oil, sharp edges or moving parts. Replace damaged cords immediately. Damaged cords may create a risk of fire. PERSONAL SAFETY 1. Stay alert, watch what you are doing and use common sense when operating a power tool. Do not use tool while tired or under the influence of drugs, alcohol or medication. A moment of inattention while operating power tools may result in serious personal injury. 2. Dress properly. Do not wear loose clothing or jewelry. Contain long hair. Keep your hair, clothing and gloves away from moving parts. Wear protective goggles when operating the machine. It is recommended to wear protective goggles, gloves, sturdy non-slipping shoes and an apron. 3. Avoid accidental starting. Be sure switch is in OFF position before connecting to a power outlet. Carrying tools with your finger on the switch when the switch is ON invites accidents. Disconnect tool from power outlet before carrying out any work on the machine. 4. Remove adjusting wrench before turning the tool on. A wrench or a key that is left attached to a rotating part of the tool may result in personal injury 5. Do not overreach. Keep proper footing and balance at all times. Proper footing and balance enables better control of the tool in unexpected situations. 6. Use safety equipment. Always wear eye protection. Dust mask, non-skid safety shoes, hard hat, or hearing protection must be used for appropriate conditions. TOOL USE AND CARE 1. Use clamps or other practical way to secure and support the work piece to a stable platform. Holding the work by hand or against your body is unstable and may lead to loss of control. 2. Do not force tool. Use the correct tool for your application. The correct tool will do the job better and safer at the rate for which it is designed. 7 3. Do not use tool if switch does not turn ON or OFF. Any tool that cannot be controlled with a switch is dangerous and must be repaired. 4. Place the switch in locked or OFF position before making any adjustments, changing accessories or storing the tool. Such preventive safety measures reduce the risk of starting the tool accidentally. 5. Store idle tools out of reach of children and other untrained persons. Tools are dangerous in the hands of untrained users. They should be kept away from work area. 6. Maintain tools with care. Keep cutting tools sharp and clean. Properly maintained tools, with sharp cutting edges are less likely to bind and are easier to control. 7. Check for misalignment or binding of moving parts, breakage of parts and any other condition that may affect the tools operation. If damaged, have the tool serviced before using. Many accidents are caused by poorly maintained tools. 8. Use only accessories that are recommended by the manufacturer for your model. Accessories that may be suitable for one tool may become hazardous when used on another tool. SERVICE 1. Tool service must be performed only by qualified repair personnel. Service or maintenance performed by unqualified personnel could result in a risk of injury. 2. When servicing a tool, use only identical replacement parts. Follow instructions in the maintenance section of this manual. Use of unauthorized parts or failure to follow Maintenance Instructions may create a risk of electric shock or injury. SAVE THESE INSTRUCTIONS! 8 LIST OF MAIN PARTS Description 1. 2. 3. 4. 5. 6. pressure tank drain valve suction filter pressure regulator on-/off-switch working pressure gauge 7. 8. 9. 10. 11. 12. TECHNICAL SPECIFICATIONS: Model Number Rating Voltage Power Consumption Motor speed Displacement Tank Volume Max. Pressure Protection Class Degree of Protection Weight TAW-2030 120V, 60 Hz 1.5 KW/2HP 3400min 3.9 CFM @ 40psi 3.0 CFM @ 90psi 8 Gallons 115 PSI F IP20 60 Lbs 9 tank pressure gauge pressure hose connectors handle motor housing wheels safety relieve vale CONTENTS OF PACKAGING a. b. c. d. e. f. g. Air compressor 25’ coiled air hose with female and male quick connector 2 brass quick female connectors 2 wheels 2 wheel bolts 2 lock nuts 2 screw nuts If any of the above items are missing, please contact our service department at 1-888367-7373 (http://wwwk.wk-usa.com) for replacement. INSTALLATION 1. Place wheel bolt through wheel. 2. Attach wheel bolt to mounting bracket 3. Slide lock nut on the wheel bolt 4. Screw nut on the wheel bolt 5. Repeat to install second wheel. 10 OPERATION Before each use CAUTION: Serious injury or death may occur if electrical sparks from motor and pressure switch come in contact with flammable vapors, combustible dust, gases or other combustible materials. When using the air compressor for spray painting, place the air compressor as far away from the work area as possible. Use extra air hoses instead of extension cords. CAUTION: In order to avoid damaging the air compressor, do not incline the air compressor transversely or longitudinally more than 10°. Pre-Start Checklist • • • Check pressure-hose for damages and replace, if necessary. Check all screwed connections for tightness and tighten, if necessary. Check power-cable for damages and have it replaced by service-station, if necessary. The compressor must operate only in dry environment. Place air compressor at least 12 inches away from obstacles that may prevent proper ventilation. Place the power-cable in a way that it does not interfere your work and that it is not damaged. Before connecting the compressor to the power supply, always check the switch is in position “OFF”. (see FIG. 1) Protect the power-cable against heat, oil or sharp edges. Always switch off the compressor by using the main-switch and do not stop by unplugging. After having finished your job, switch the compressor off and disconnect from the power- supply Start up (see FIG. 4 on page 12) 1. Check the switch is in the “OFF” Position. 2. Plug the power cord into the grounded outlet. (see FIG. 1) FIG. 1 3. Switch the compressor “ON” (pull switch up) and wait; until the maximum tank pressure is reached at 115 psi. (The motor will stop automatically). The tank-pressure is indicated on the tank pressure gauge. 11 4. Set the pressure regulator to the required working pressure. (see FIG. 2) FIG. 2 5. Connect the air-hose to the pressure-hose connector (8). (see FIG. 3) 6. Connect the air-tool with the air-hose. 7. If you will not start to work immediately, switch the compressor off and disconnect from the power-supply. FIG.3 FIG. 4 CAUTION: The regulated pressure may not exceed the maximum working pressure of your connected air-tool! If you notice any unusual noise or vibration, stop the air compressor and refer to “troubleshooting” 12 Shutdown 1. Switch the compressor “OFF” (press switch down) never stop the air compressor by unplugging it from the power source. This could result in risk of electrocution. (see FIG. 1) 2. Drain air from the air tank by releasing air with an attached air tool or by pulling on the safety relieve vale ring. (see FIG. 5) 3. Allow the air compressor to cool down. FIG. 5 Storing the compressor Switch off the compressor and disconnect from the power-supply. Before storing the compressor and the accessories, they have to be free of compressor air. Open drain valve at bottom of air tank and drain all water before storing. (see FIG.6) The compressor has to be stored in a dry and safe please, so that it is out of reach of children or other unauthorized person. FIG. 6 CAUTION: Do not store outdoors or under high humidity. Do not position the compressor on its side for any reason. 13 MAINTENANCE CAUTION: Before starting any maintenance or cleaning jobs, the compressor has to be switched off and disconnected from the power supply! Make sure the compressor accessories and air tools are relieved from pressure. Be sure that all safety and protection devices are operational after having finishing maintenance or cleaning jobs. Take care to remove all service tools from the compressor before starting to work again. Other maintenance jobs than described in this manual have to be done by an authorized service center. After approx. 30 hours operating time: Drain pressure tank. Turn drain valve at the bottom of the tank counterclockwise, until compressed air will escape. Any condensed water will be exhausted at the same time. Inspect air filter and air vents. Remove any material that my have gotten stuck in the are vents. Clean the exterior of the compressor. Wipe off any dirt or dust that has accumulated on the air tank and housing. Every month Check the safety valve for leaks or dirt. If necessary clean or replace. Every 2 months Clean air filter. First take off the motor housing from the air compressor. This is done by unscrewing the 2 hex bolts on the top of the housing. Then screw the air filter off the compressor using a wrench # ½ “. (see FIG. 7 and FIG. 8) Rinse the air filter in AIR TOOL OIL, than blow out any dust that may still remain and dry thoroughly. Replace filter in reverse order. FIG. 8 FIG. 7 14 TROUBLE SHOOTING Problem Excessive tank pressure - safety valve pops off. Air leaks at fittings. Cause • Pressure switch does not shut off motor when compressor reaches “cut-out” pressure. • Pressure switch “cut-out” too high. • Tube fittings are not tight enough. Solution • Switch the compressor “OFF” If the unit doesn’t shut off, unplug compressor. • Contact an authorized qualified service center. • • Air leaks at or inside check valve. • Malfunctioning or dirty check valve. • • Air leaks at pressure switch release valve. • • Malfunctioning pressure switch release valve. Malfunctioning check valve. • • • 15 Tighten fittings where air can be heard escaping. Check fittings with soapy water solution. DO NOT OVERTIGHTEN. Use Teflon tape to improve fittings of tubes. A malfunctioning check valve results in a constant air leak at the pressure release valve when there is pressure in the tank and the compressor is shut off. Drain tank then remove and clean or replace check valve. DO NOT OVERTIGHTEN. Remove and replace the release valve. Malfunctioning check valve results in a constant air leak at the pressure release valve when there is pressure in the tank and the compressor is shut off. Drain tank then remove and clean or replace check valve. DO NOT OVERTIGHTEN. Air leaks in air tank or at air tank welds. • Damaged air tank. • • DO NOT DRILL INTO, WELD OR OTHERWISE MODIFY AIR TANK OR IT WILL WEAKEN. THE TANK CAN RUPTURE OR EXPLODE. TANK MUST BE REPLACED. Contact an authorized qualified service center. Air leaks between head and valve plate. • Leaking ring. • Torque head screws to 8 ft. lbs. If this does not stop leak, replace ring. Motor will not run or restart. • Tank pressure exceeds pressure switch “cut-in” pressure. Wrong gauge wire or length of extension cord. Check valve stuck open. Loose electrical connections. Possible malfunctioning motor or starting capacitor. Paint spray on internal motor parts. Fuse blown, circuit breaker tripped. Pressure release valve on pressure switch has not unloaded head pressure. • Let motor cool off and overload switch will automatically reset. Motor will start automatically when tank pressure drops below “cut-in” pressure of pressure switch. Check for proper gauge wire and cord length. Remove and clean, or replace. Check wiring connection inside pressure switch and terminal box area. Check fuse box for blown fuse and replace, if necessary. Reset circuit breaker. Do not use a fuse or circuit breaker with higher rating than that specified for your particular branch circuit. Check for low voltage conditions and/or proper extension cord. Disconnect the other electrical appliances from circuit or operate the compressor on its own branch circuit. • • • • • • • • • • • • • • • 16 Air leak from safety valve. • Possible defect in safety valve. • Operate safety valve manually by pulling on ring. If valve still leaks, it should be replaced. Knocking Noise. • Malfunctioning check valve. • Remove and clean, or replace. Compressor is not supplying enough air to operate accessories. • Prolonged excessive use of air. Compressor is not large enough for air requirement. Restricted air intake filter. Hole in hose. Check valve restricted. Air leaks. • Regulator knob has continuous air leak. Regulator will not shut off air outlet. • Pressure release valve on pressure switch has not unloaded head pressure. Damaged regulator. • Decrease amount of air usage. Check the accessory air requirement. If it is higher than the SCFM or pressure supplied by your air compressor, you need a larger compressor. Clean or replace air intake filter. Do not operate the air compressor Replace regulator. • • • • • • SERVICE CENTER Repairs Any repair on your compressor has to be carried out only by an authorized or qualified service-station! If you have any question in regards to the operation of this power tool please contact our service center at: Wachsmuth & Krogmann, Inc. Tel: 1-888-367-7373 (Business hours Mon-Fri 9:00am - 4:00pm CT) Website: http://www.wk-usa.com ENVIRONMENTAL PROTECTION If the tool should no longer work at all, please make sure that it is disposed in an environmentally friendly way, by handing it into a public collection point. Please do not put it with your household waste. 17 LIMITED WARRANTY The warranty is void if the defect is due to accidental damage, misuse, abuse, neglect, improper repair or alteration by unauthorized persons or failure to follow operation instructions provided with the product. This warranty does not apply to commercial use. The warranty is non-transferable and applies only to the original purchase and does not extend to subsequent owners of the product. Liability under this warranty is limited to repair, replacement or refund. In no event shall liability exceed the purchase price paid by the purchaser of the product. Under no circumstances shall there be liability for any loss, direct, indirect, incidental, special or consequential damage arising out of in connection with use of this product. This warranty is valid only in the United States of America. This Warranty gives you specific legal rights. However you may have other rights that vary from state to state. Some states do not allow limitation on implied warranties or exclusion of consequential damages therefore these restrictions may not apply to you. In case you find the product to be defective please send it within the warranty period to our service center. To avoid transport damages please send the product in the original packaging. In return you will either receive your repaired item, a new product or a refund. Please fill out the Warranty Card and send it together with the product and purchase receipt To arrange pick-up of the defective item please call our service center: Wachsmuth & Krogmann Inc. Tel: 1-888-367-7373 (Business hours Mon-Fri 9:00am-4:00 pm CT) Website: http://www.wk-usa.com 123 Sivert Court, Bensenville,IL 60106, USA 18 WARRANTY INFORMATION Thank you for purchasing a top quality KingCraft product. This Oil Free Air Compressor item #6923-05 was tested and meets our stringent quality standards. This product is warranted to be free from manufacturing defects in original materials, including original parts, and workmanship until June 13th, 2006 or 1 year with proof of purchase. 19 WARRANTY CARD In case you find this product to be defective please send it within the warranty period to our service center. To avoid transport damages please send the product in the original packaging. In return you will receive your repaired item, a new product or a refund. This product is warranted to be free from manufacturing defects in original materials, including original parts, and workmanship until June 13th, 2006 or 1 year with proof of purchase. Please fill in your details below and send it together with the product and purchase receipt. Please read the Limited Warranty conditions mentioned in this instruction manual. Customer Name Street City State ZIP Code Purchase Date Description of Defect : To arrange pick-up of the defective item please call our service center: Wachsmuth & Krogmann Inc. Tel: 1-888-367-7373 (Business hours Mon-Fri 9:00am-4:00 pm CT) Website: http://www.wk-usa.com 123 Sivert Court, Bensenville,IL 60106, USA 20 WARRANTY CARD PLEASE DETACH THIS SECTION AND RETURN IT WITH YOUR PRODUCT KingCraft Oil Free Air Compressor, item # 6923-05 , model # TAW-2030