1
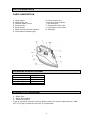
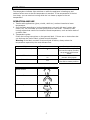
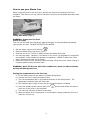
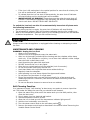
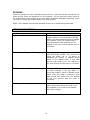
STEAM IRON MODEL ES-139B ITEM# 1996-05 PLEASE READ THESE AND SAVE ALL INSTRUCTIONS TO ENSURE THE SAFE AND EFFECTIVE USE OF THIS APPLIANCE. TABLE OF CONTENTS Index P. 1 Important Safety Instructions P. 2 General Safety Instructions P. 3 List of Main Parts, Tech. Specifications, Contents of Packaging P. 4 Operation and Use P. 5 - 8 Maintenance P. 8 Self- Cleaning P. 8 – 9 Removing Variable Steam Control Knob P. 9 - 10 Trouble Shooting P. 10 Service Center P. 11 Warranty Information P. 12 Warranty Card P. 13 1 IMPORTANT SAFETY INSTRUCTIONS INTRODUCTION Thank you for purchasing our Crofton Steam Iron. Each iron has been manufactured to ensure safety and reliability. Before using for the first time, please read the instructions carefully, and keep them for further reference. WARNING! READ AND SAVE THESE INSTRUCTIONS. Failure to follow all the instructions listed below may result in electric shock, fire and/or serious personal injury. IMPORTANT SAFEGUARDS • • • • • • • • • • • • • • • • • • • Please read these instructions in conjunction with the illustrations before using the appliance. Before using for the first time, check if the voltage rating on the rating plate corresponds to the voltage in your home. Never use the appliance if it is damaged in any way. Before use for the first time remove any sticker or protective foil from the soleplate and clean the soleplate with a soft cloth. When you have finished ironing, and also when leaving the iron even for a short while: o Set the steam control to off position o Remove the power plug from the wall socket Take care that children cannot touch the iron while it is hot and that they cannot pull the power cord. DANGER OF BURNS! Burns can occur from touching hot metal parts, hot water or steam. Use caution when you turn iron upside down – there may be hot water in the water tank. Unplug from the wall socket before filling the iron with water or pouring out the remaining water after use. Do not unplug the iron by pulling on the power supply cord. Never immerse the iron in water. Some parts of the iron have been slightly greased and as a result the iron may slightly smoke when switched on for the first time. If this (harmless) effect does occur it will cease after a short while. Do not put vinegar or other descaling agents into water tank. Do not use chemically descaled water. The power cord should not be allowed to touch the soleplate when it is hot. Let iron cool completely before putting away. Loop cord loosely around iron when storing. Regularly check if the power cord is still in a good and safe condition. The ejected steam is hot and therefore hazardous. Never direct the steam towards people. This appliance is not intended for use by young children. The user must not leave the iron unattended while it is connected to the power supply. Young children should be supervised to ensure that they do not play with the appliance. SAVE THESE INSTRUCTIONS! 2 SPECIAL INSTRUCTIONS • • • • To avoid a circuit overload, do not operate another high wattage appliance on the same circuit. If an extension cord is absolutely necessary a 10amp cord should be used. Cords rated for less amps may overheat. Care should be taken to arrange the cord so that it can not be pulled or tripped over. If the power cord is damaged, it must be replaced by the manufacturer or its service agent or a similarly qualified person in order to avoid a hazard. WARNING RISK OF BURNING: Please be aware that when the auto shut-off function is activated the soleplate is still extremely hot and will need adequate time to cool down. DO NOT TOUCH HOT SOLEPLATE! SAVE THESE INSTRUCTIONS GENERAL SAFETY INSTRUCTIONS WARNING! Read and understand all instructions. Failure to follow all instructions listed below may result in electric shock, fire or serious personal injury. The warnings, cautions, and instruction discussed in this instruction manual cannot cover all possible conditions and situations that may occur. It must be understood by the operator that common sense and caution are a factor which cannot be built into this product, but must be supplied by the operator. SAVE ALL INSTRUCTIONS! CAUTION: A short power supply cord is provided to reduce the risk of personal injury resulting from becoming entangled in or tripping over a longer cord. Extension cords are available from local hardware stores and may be used if care is exercised in their use. If an extension cord is required, special care and caution is necessary. Also the cord must be: (1) marked with an electrical rating of 125 V, and at least 13 A., 1625 W., and (2) the cord must be arranged so that it will not drape over the countertop or tabletop where it can be pulled on by children or tripped over accidentally. ELECTRIC POWER If electric circuit is overloaded with other appliances, your appliances may not operate properly. The appliances should be operated on a separate electrical circuit from other operating appliances. POLARIZED PLUG This appliance has a polarized plug (one blade is wider than the other). As a safety feature to reduce the risk of electrical shock, this plug is intended to fit in a polarized outlet only one way. If the plug does not fit fully in the outlet, reverse the plug. If it still does not fit, contact a qualified electrician. Do not attempt to defeat this safety feature. SAFETY WARNING Although your appliance is easy to operate, for your safety, the below warnings must be followed: 1. Do not place the appliance near a heat source. 2. Never leave the appliance unattended while connected to the electrical outlet. 3. To avoid any accidental burns, never put a hand over a steam outlet when the appliance is in operation. 4. Use the appliance on a stable surface away from water. 5. Do not unplug from the socket by pulling on the power cord. 6. The appliance must be unplugged: A. Before either filling or emptying C. After Use B. Before any cleaning or maintenance D. If it appears to be faulty THIS PRODUCT IS INTENDED FOR HOUSEHOLD USE ONLY. 3 LIST OF MAIN PARTS PARTS DESCRIPTION A. Spray nozzle B. Water filling inlet C. Variable steam control D. Steam button E. Spray button F. Power on/Auto shut-off indicator G. Temperature indicator light H. Power supply cord I. Swiveling cord protector J. Soft hand grip K. Transparent water tank L. Temperature control dial M. Soleplate TECHNICAL SPECIFICATIONS: Model Number Item # Rating Voltage Rating Wattage Water Tank ES-139B 1996-05 110-120 volt 1200 watt 9.15 Ounce CONTENTS OF PACKAGING a. Steam Iron b. Water filling beaker c. Instruction manual If any of the above items are missing, please contact our service department at 1-888367-7373 (http://wwwk.wk-usa.com) for replacement. 4 OPERATION The temperature indicator light switches on while the appliance is heating up and switches off as soon as the set temperature is reached. If the temperature of the hot iron drops, you can continue ironing while the iron heats up again to the set temperature. OPERATION AND USE 1. Textiles with applications (gloss, crinkle, relief etc.) are best ironed at a lower temperature. 2. Sort the fabric according to ironing temperature; put wool with wool, cotton with cotton, etc. The iron heats up more quickly than it cools down. Therefore, start ironing articles that need to be ironed at lowest temperature, such as those made of synthetic fiber. 3. Temperature guide: Follow the ironing instructions on the garment label. If there are no instructions but you do know the kind of fabric, please consult the table. Warning: If the fabric consists of various kinds of fabrics, always select the temperature required by the most delicate fiber. Fabric Synthetic fibers nylon Temperature control Silk wool .. … Cotton linen Positions Normal Steam . Variable Steam Control Maximum Steam Self cleaning Steam OFF 5 Ironing methods Iron the reverse side. Do not use the spray function, as spraying could cause stains Iron the reverse side to prevent shiny spots. It is recommended to set the dial to steam position. How to use your Steam Iron When using your iron for the first time, remove any stickers or protective foil from soleplate. Test the iron on any piece of old fabric to ensure the soleplate and water tank are clean. Filling with water (Fig. 1) WARNING: Unplug the iron first! Choice of water This iron can be filled with normal tap water although it is recommended that bottled spring water be used. DO NOT USE DISTILLED WATER. 1. 2. 3. 4. Set the steam control to off position. Open the water filling inlet cover (Fig.1). Hold the iron at 10°, and fill in water through the water filling inlet. Use only tap water. However, if the water is very hard, it is advisable to use bottled spring water. Other liquids will damage the appliance. NEVER fill above the “Max” mark, otherwise the tank will overflow! 5. Make sure that you have securely closed the water filling inlet cover. When ironing is complete please empty the water tank. WARNING: Never fill the iron with fabric conditioner, starch or other solutions, as they will damage the iron. Setting the temperature for the first time a) Fill the water tank with tap water or bottled spring water. b) Connect the iron to electrical power outlet. c) Turn the temperature dial in a clockwise direction to the MAX position. The temperature indicator light will illuminate. d) The indicator light will go off once the pre-set temperature is reached. position and steam will start to e) Move the variable steam control dial to the come out of the holes in the soleplate. f) Iron onto the old piece of fabric to test heat. g) When the water tank is empty and no more steam is being produced, the iron is ready for normal use. 6 Spraying (Fig. 2) Spraying Water At any temperature by pushing on the spray button a couple of times, the laundry can be damped down. Ensure that there is enough water in the water tank (Fig. 2). Shot of steam By pressing steam button, an intense shot of steam is emitted from the soleplate. This is ideal for removing stubborn wrinkles and creases. The shot of steam feature can be used only while ironing with high ironing temperature. Do not overuse the burst of steam. Allow several seconds in between each burst (Fig. 3). Shot of Steam (Fig.3) Vertical Steam Press and release the surge of steam button to produce a powerful surge of vertical steam. This feature is ideal for steaming curtains and hanging suits. Place iron in a vertical position. By pressing the steam button at intervals you can also iron vertically (curtains, hung garments, etc). The steam function can only be used at high temperatures. Never vertical steam a garment put on a person, only steam when garment is on a hanger. Ironing without steam For ironing without steam proceed as described for steam ironing. However, the steam control should remain in position for no steam output. Auto Shut- off Indicator (automatic safety shut-off) Please note: If the iron is left motionless in the horizontal position for 30 seconds the iron will be switched off automatically. 7 If the iron is left motionless in the vertical position for more than 8 minutes, the iron will be switched off, automatically. To indicate that the iron has shut off automatically, the auto shut-off indicator will start blinking and six sound signals will be audible. WARNING RISK OF BURNING: Please be aware that when the auto shut-off indicator is activated the soleplate is still extremely hot and will need adequate time to cool down. DO NOT TOUCH HOT SOLEPLATE! To switch the iron back on after it has automatically been shut off please note the following instructions: • When picking up the iron again, the auto shut-off indicator will stop blinking. • The temperature indicator light will illuminate indicating that the iron is heating up. • Wait for the temperature indicator light to go off indicating that the iron has reached its desired temperature. Then you can resume ironing. MAINTENANCE CAUTION: Always be sure that the appliance is unplugged before cleaning or attempting to store the item. MAINTENANCE AND CLEANING WARNING: Unplug the iron first! Allow to cool completely. Hold the iron at an angle and empty the water tank. After iron is thoroughly cooled wipe the housing and the soleplate with a damp cloth only. If the soleplate is very dirty, iron a linen cloth soaked in white vinegar then wipe with a clean damp cloth. Avoid scratching the plate with steel wool. DO NOT immerse the iron in any liquid. Store the iron upright and not on the soleplate (risk of corrosion). Do not wind power cord tightly around iron. Avoid hard water with impurities that cause residue build-up. Regularly clean the soleplate. Avoid pressing iron over sharp objects like zippers and buttons. Do not place iron face down on rough areas. Empty the tank after each use and hold horizontally for a few seconds until remaining moisture is removed. (Use caution as steam and boiling water can cause burns). Do not use abrasive cleaners to remove burnt-on residues. Self Cleaning Function It is important to apply “self-cleaning” at least every two weeks to remove impurities etc. The harder the water the more the iron should be self-cleaned. 1. Open the water filling inlet and fill the water tank up to the MAX position, then close the inlet cover. 2. Plug in steam iron into electrical wall socket. 3. Set the temperature control to MAX. 4. Allow the iron to heat up until the temperature indicator light goes off. 5. Hold the iron horizontally over the sink. . 6. Turn the steam control knob to the self-clean position 7. Remove the steam control knob as described in the section below “Removing the Variable Steam Control Knob” 8 8. Boiling water and steam will now be ejected from the holes in soleplate. Impurities are washed away with it. Move the iron forward and backward over the sink during this process. 9. When the water tank has become empty, reinsert the steam control knob and set . the steam control to “no steam” position 10. If necessary repeat self cleaning to be sure all impurities have been washed out. 11. Move the iron over a (preferably) old piece of fabric. This is to ensure that the soleplate will be dry during shortage. 12. Set the temperature control dial to “OFF”, unplug the power supply cord and allow the iron to cool down before storing it. WARNING: Take care not to scald yourself during the cleaning process. Removing the Variable Steam Control Knob The Variable Steam Control Knob will need to be removed prior to self cleaning. Review the following instructions to remove the Variable Steam Control Knob properly. Change the steam control to self-clean position. Variable Steam Control Knob will pop up. Grasp the Variable Steam Control Knob and remove. Variable Steam Control Knob. Please note notch on steam iron and 2 tabs on the Variable Steam Control Knob. These will help you insert the control knob properly when self-cleaning is complete. To reinsert slide the control knob into the opening of the steam iron. Push the knob all the way down. The twist clockwise to engage knob. 9 STORING Allow the appliance to cool completely before storing. Loop cord loosely around the iron when storing. Store the appliance in a dry location. Do not place any heavy items on top of appliance during storage as this may result in possible damage of appliance. Store the cord in a clean, dry location away from metal objects. NOTE: The soleplate may become damaged if the iron is stored facing downward. TROUBLE SHOOTING Problem The iron emits a brown substance Solution The brown substance may be caused by organic matter or iron minerals in the tap water. We recommend switching to bottled spring water. Once you change water it may take several uses before your iron adjusts to the new mixture and the issue is corrected. The iron is spitting and leaking First, check the water you use. DO NOT USE DISTILLED WATER. We recommend using tap water (up to 12 grains of hardness per gallon) or bottled spring water. If you change water, it may take several uses before your iron adjusts to the new mixture and the issue is corrected The iron emits white flakes The white flakes can be caused by calcium or other minerals in the tap water. To solve this problem, switch to bottled spring water. Once the water is changed it may take several uses before your iron adjusts to the new mixture and the issue is corrected. Build-up on the soleplate During normal use, a sticky film caused by starch and melted fibers can build up on the soleplate. Iron a linen cloth soaked with white vinegar. 10 SERVICE CENTER If you have any question in regards to the operation of this appliance or are in need of a spare part please contact our service center at: Wachsmuth & Krogmann, Inc. Tel: 1-888-367-7373 (Business hours Mon-Fri 9:00am - 4:00pm CT) Website: http://www.wk-usa.com ENVIRONMENTAL PROTECTION If the appliance should no longer work at all, please make sure that it is disposed in an environmentally friendly way, by handing it into a public collection point. Please do not put it with your household waste. 11 LIMITED WARRANTY The warranty is void if the defect is due to accidental damage, misuse, abuse, neglect, improper repair or alteration by unauthorized persons or failure to follow operation instructions provided with the product. This warranty does not apply to commercial use. The warranty is non-transferable and applies only to the original purchase and does not extend to subsequent owners of the product. Liability under this warranty is limited to repair, replacement or refund. In no event shall liability exceed the purchase price paid by the purchaser of the product. Under no circumstances shall there be liability for any loss, direct, indirect, incidental, special or consequential damage arising out of in connection with use of this product. This warranty is valid only in the United States of America. This Warranty gives you specific legal rights. However you may have other rights that vary from state to state. Some states do not allow limitation on implied warranties or exclusion of consequential damages therefore these restrictions may not apply to you. In case you find the product to be defective please send it within the warranty period to our service center. To avoid transport damages please send the product in the original packaging. In return you will either receive your repaired item, a new product or a refund. Please fill out the Warranty Card and send it together with the product and purchase receipt To arrange pick-up of the defective item please call our service center: Wachsmuth & Krogmann Inc. Tel: 1-888-367-7373 (Business hours Mon-Fri 9:00am-4:00 pm CT) Website: http://www.wk-usa.com 1800 Nicholas Blvd, Elk Grove, IL 60007, USA 12 WARRANTY INFORMATION Thank you for purchasing a top quality Crofton product. This Steam Iron item #1996-05 was tested and meets our stringent quality standards. This product is warranted to be free from manufacturing defects in original materials, including original parts, and workmanship until August 22, 2007 or 2 year with proof of purchase. WARRANTY CARD In case you find this product to be defective please send it within the warranty period to our service center. To avoid transport damages please send the product in the original packaging. In return you will receive your repaired item, a new product or a refund. This Crofton Steam Iron was tested and meets our stringent quality standards. This product is warranted to be free from manufacturing defects in original materials, including original parts, and workmanship until August 22, 2007 or 2 year with proof of purchase. Please fill in your details below and send it together with the product and purchase receipt. Please read the Limited Warranty conditions mentioned in this instruction manual. Customer Name Street City State ZIP Code Purchase Date Description of Defect : To arrange pick-up of the defective item please call our service center: Wachsmuth & Krogmann Inc. Tel: 1-888-367-7373 (Business hours Mon-Fri 9:00am-4:00 pm CT) Website: http://www.wk-usa.com 1800 Nicholas Blvd, Elk Grove, IL 60007, USA 13 WARRANTY CARD PLEASE DETACH THIS SECTION AND RETURN IT WITH YOUR PRODUCT Crofton Steam Iron, Item # 1996-05, Model # ES-139B