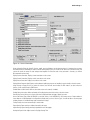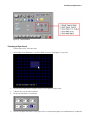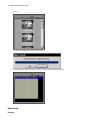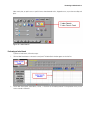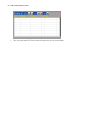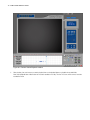
1
X-Series
Digital Video Recorders
EDR-X04
EDR-X109
EDR-X116
EDR-X216
EDR-X416
User Manual for Server and Remote
Version 2003G
Toll Free: 1 800 947 3566
http://www.elmousa.com/
1
ELMO DVR User Manual 2003G V2.07
Published 05/31/2004
Copyright © 2004 ELMO Manufacturing Corp.
All rights reserved. No part of this manual may be reproduced or trasmitted in any form or by any means, electronic or mechanical, including photocopying, recording, or by
any information storage or retrieval system, without the prior written permission of the copyright owner and the publisher.
Table of Contents
ELMO DVR Server and ELMO DVR Remote ......................................................................................................... 1
INTRODUCTION ................................................................................................................................. 2
Welcome ................................................................................................................................ 2
Limited Warranty ....................................................................................................................... 2
General .................................................................................................................................. 2
Precautions .............................................................................................................................. 3
Unpacking ............................................................................................................................... 3
ELMO DVR Back View ................................................................................................................. 5
Connecting the Serial Cable .......................................................................................................... 6
ELMO DVR SERVER ............................................................................................................................ 7
Starting your ELMO DVR Server ...................................................................................................... 7
Understanding the Main Screen ..................................................................................................... 7
CONFIGURING YOUR SERVER ............................................................................................................... 10
Camera Setup .......................................................................................................................... 10
Sensor Setup ........................................................................................................................... 11
Control Setup .......................................................................................................................... 12
External Monitor Setup ............................................................................................................... 13
Motion Detection ...................................................................................................................... 13
Managing Users ....................................................................................................................... 15
Schedule Setup ........................................................................................................................ 16
Screen Division ........................................................................................................................ 18
Communication ........................................................................................................................ 18
Server Information .................................................................................................................... 20
Audio Settings ......................................................................................................................... 22
System Setup .......................................................................................................................... 22
Intelli-Zone™ ........................................................................................................................... 24
Storage Structure ..................................................................................................................... 25
E-Map ................................................................................................................................... 27
View Log Records ..................................................................................................................... 28
Intelli-guard™ .......................................................................................................................... 29
Email .................................................................................................................................... 30
Virtual Ruler ............................................................................................................................ 32
Importing and Exporting Setup Information ........................................................................................ 33
BACKING UP RECORDED VIDEOS ........................................................................................................... 35
Quick Backup ........................................................................................................................... 35
Encrypted, AVI, or Email Backup .................................................................................................... 35
Performing a Snapshot Backup ...................................................................................................... 37
Setting up Backup Schedules ........................................................................................................ 39
K-Remote Backup Server ............................................................................................................. 44
SEARCHING SAVED VIDEOS ................................................................................................................. 45
Search Mode ........................................................................................................................... 45
Searching by Date and Time ......................................................................................................... 45
The Timeline Bar ...................................................................................................................... 46
Bookmarks .............................................................................................................................. 47
Search Mode Control Panel .......................................................................................................... 48
Performing an Object Search ........................................................................................................ 50
Index Search ........................................................................................................................... 52
PAC INTEGRATION ............................................................................................................................ 55
Setting up PAC Text Overlay ......................................................................................................... 55
ELMO DVR REMOTE .......................................................................................................................... 57
Introduction to your Remote Software ............................................................................................. 57
Managing your Servers ............................................................................................................... 58
Connecting to Servers ................................................................................................................ 60
Viewing Cameras ...................................................................................................................... 61
Multiple Server Connections ......................................................................................................... 63
vi - ELMO USER MANUAL 2003G
BACKING UP RECORDED VIDEOS LOCALLY ............................................................................................... 65
Backup Media Types .................................................................................................................. 65
Automatic Backup ..................................................................................................................... 65
Manual Remote Backup .............................................................................................................. 66
K-Remote Backup Server ............................................................................................................. 68
SEARCHING RECORDED VIDEOS ............................................................................................................ 69
Searching Videos Stored on a Local Drive ......................................................................................... 69
Connected Server ..................................................................................................................... 71
PERFORMING A LOCAL SETUP .............................................................................................................. 73
Setup Configuration ................................................................................................................... 73
Communications Setup ............................................................................................................... 73
Other .................................................................................................................................... 74
List of Figures
Required Items .......................................................................................................................................... 4
ELMO DVR Rear View ................................................................................................................................. 5
Serial Cable Warning .................................................................................................................................. 6
Keyboard ................................................................................................................................................ 7
ELMO DVR Server Main Screen ...................................................................................................................... 8
Camera Setup .......................................................................................................................................... 10
Sensor Setup ........................................................................................................................................... 11
Control Setup .......................................................................................................................................... 12
External Monitor ....................................................................................................................................... 13
Motion Detection ...................................................................................................................................... 14
Schedule Setup ........................................................................................................................................ 16
Copy To ................................................................................................................................................. 16
Custom Configuration ................................................................................................................................. 17
Screen Division ........................................................................................................................................ 18
Communication ........................................................................................................................................ 19
Server Information .................................................................................................................................... 21
Audio Settings ......................................................................................................................................... 22
System Settings ....................................................................................................................................... 23
Intelli-Zone™ Setup ................................................................................................................................... 25
Storage Setup .......................................................................................................................................... 26
Storage Structure ..................................................................................................................................... 26
File System Types ..................................................................................................................................... 27
E-Map ................................................................................................................................................... 28
View Log Records ..................................................................................................................................... 29
Intelli-guard ............................................................................................................................................ 30
Email .................................................................................................................................................... 31
Virtual Ruler ............................................................................................................................................ 32
Search Mode Quick Backup .......................................................................................................................... 35
Backup Screen ......................................................................................................................................... 37
Backup Dialog window ............................................................................................................................... 39
Setup Backup Schedule .............................................................................................................................. 40
Add Schedule .......................................................................................................................................... 41
K-Remote Backup Server ............................................................................................................................. 44
Search Mode ........................................................................................................................................... 45
Timeline Bar ............................................................................................................................................ 46
Bookmark Window .................................................................................................................................... 48
Object Search .......................................................................................................................................... 51
Index Search ........................................................................................................................................... 53
PAC Text Overlay ...................................................................................................................................... 55
ELMO DVR Remote Main Screen .................................................................................................................... 57
Server Connect Window .............................................................................................................................. 59
Creating a New Site .................................................................................................................................. 59
Server Connection - Lan Window ................................................................................................................... 61
Connecting server progress window ................................................................................................................ 61
Remote Software Main Screen ...................................................................................................................... 62
No camera selected prompt. ......................................................................................................................... 62
Connecting Server progress window ............................................................................................................... 63
Multi-Site selection tool .............................................................................................................................. 63
Multi-Site selection too. .............................................................................................................................. 63
Disconnecting from a server. ........................................................................................................................ 64
Search mode select window - Displays local drives to search from and backup types. ..................................................... 65
Remote video recording options ..................................................................................................................... 66
Search Mode- Backup button ........................................................................................................................ 67
K-Remote Backup Server ............................................................................................................................. 67
K-Remote Backup Server ............................................................................................................................. 68
Disconnecting a K-Remote Backup process. ....................................................................................................... 68
viii - ELMO USER MANUAL 2003G
Search Mode Select window. ....................................................................................................................... 69
Search Mode Select window - Showing previous backup data. ................................................................................ 70
Local Video Search/Playback window .............................................................................................................. 71
Remote Search/Playback window .................................................................................................................. 72
Local Setup Configuration ............................................................................................................................ 73
Local Communication Setup ......................................................................................................................... 74
Local setup - Other Tab ............................................................................................................................... 74
Network Port Settings window ...................................................................................................................... 75
List of Tables
Required Items .......................................................................................................................................... 3
ELMO DVR Server Main Screen Features ........................................................................................................... 9
ELMO DVR Remote Main Screen Features ........................................................................................................ 58
Insert to New Site Window Features ............................................................................................................... 60
ELMO DVR Server and ELMO DVR Remote
2 - ELMO USER MANUAL 2003G
Thank you for purchasing our ELMO X-Series Digital Video Recorder (DVR). ELMO Manufacturing Corp. is a registered trademark
of ELMO Company LTD.
This manual will guide you through the usage of ELMO DVR Server and ELMO DVR Remote software. If you have any questions
or concerns, please visit our website at http://www.elmousa.com or contact our technical support team.
ELMO warrants this product to be in compliance with its own plans and specifications, and to be free from defects in materials
and workmanship under normal use and service for all parts, excluding the Hard Drives, for a period (or the equivalent) of three
(3) years after the original purchase date. During this period, ELMO will replace parts at no charge; however, labor costs will be
charged after one (1) year.
Hard Drive: Parts + Labor = 1 year warranty
Other Parts: Parts + Labor = 1st year only*
Parts: 2nd and 3rd year only
* N.B.: Compact (CP) units are warranted for only one (1) year, parts and labor.
This warranty excludes costs for initial technical adjustments (setup) which are the responsibility of the dealer from whom you
purchased the unit. It also excludes damages due to misuse or neglect. Damages resulting from electrostatic discharge (ESD) will
not be warranted. This warranty does not cover damages beyond ELMO's control. In no event shall ELMO be liable for any direct,
indirect or consequential damages, loss of anticipated profits, loss of time or any other losses incurred by the buyer in connection
with the purchase, installation, operation or failure of this product. We, ELMO and its agents, are not responsible for viruses.
Users should install anti-virus software on their DVR at their own risk. For more details on the limitations of this warranty,
contact your distributor.
**For technical assistance, please call: 1-800-947-3566
To obtain service, please follow these steps:
1.
Arrange for delivery of your equipment to: ELMO, 1478 Old Country Road, Plainview, New York, 11803, USA.
2.
All shipments should be shipped prepaid, insured and properly packaged (preferably in the original packaging) and accompanied
by a letter outlining the defect.
3.
Supply your warranty registration, bill of sale, or other evidence of purchase date.
NOTE: The ELMO DVR must be used with an Uninterruptible Power Supply (rated at a minimum of 500 watts), with range
protection. Failure to do so will void all warranties!
This product is the product of ELMO's advanced technology and has passed extensive reliability and compatibility tests. Copyright
of this manual belongs to ELMO, and may not be reprinted or reproduced without prior written permission. If you need to modify
or repair your system, we recommend that you contact a certified ELMO Dealer/Installer. Otherwise, the system warranty will be
voided. Should you have any problems or questions with our product, contact your local ELMO Dealer/Installer. This product is
certified for domestic and industrial use: CE certified for Europe, and FCC certified for the USA.
3
Please avoid these conditions when selecting a location for your system:
-
Excessive heat, such as direct sunlight or heating appliances
-
Moisture, dust, and smoke
-
Magnetic fields or electrical waves
-
Below freezing temperatures
-
Obstruction to system ventilation hole
Before installing this system, please ensure that:
-
The power is switched off
-
There is enough room for the system and its connecting cables
-
The system is placed on an even surface
-
The system is not placed near any electronic equipment. (For example, a microwave, radio, or any type of wireless equipment such
as a telephone or cell phone)
To unpack your DVR, follow these steps:
1.
Place the box on a flat, clean surface.
2.
Remove the box by pulling and lifting the system up with both hands.
3.
Place the system down carefully.
4.
Read the User Manual thoroughly before installing your system.
5.
Make sure all the parts listed below have been included:
Main ELMO DVR Server and Remote Software
ELMO DVR manual
Electrical cord for AC
Windows 2000™/ WindowsXP
Keys
Telephone cord
Keyboard
ELMO DVR control cable
Mouse
Table 1. Required Items
4 - ELMO USER MANUAL 2003G
Figure 1. Required Items
!" # $ #% 5
!" # $ #%
The following diagram displays the back of your DVR:
Figure 2. ELMO DVR Rear View
6 - ELMO USER MANUAL 2003G
& ' (
The following functions will not work if the cable is not connected:
-
Sensor Function
-
Control Function
-
Pan/Tilt Function
-
External Monitor Output
Figure 3. Serial Cable Warning
!" # '!#! 7
!" # '!#!
' !" # ')
The installation process configures Windows to automatically start your DVR on start up. Alternatively, you can start the server
by double-clicking on the ELMO Server icon on your desktop.
With Windows 2000™ and Windows XP™, you can also use our virtual keyboard to enter information. Simply click on the
keyboard icon located on the lower right-hand side of your main screen.
Figure 4. Keyboard
*
When your server was installed, a default administrative user was automatically created. This user has access to all setup
options and cameras. For security reasons, it is highly recommended that you change the password of this user and create other
users with different levels of access.
If you have changed your default username and password and have forgotten what they are, please contact your local dealer for
information on how to reset them.
')
To log on to your server, follow these steps:
1.
Click the Login button on the main screen. A Login window appears.
2.
Enter your Username and Password .
3.
Click the OK button or press Enter to continue.
For more information on creating or changing user privileges, please see Managing Users
& " '
))%
The main screen consists of the screen division buttons, camera indicators, and sensor and control buttons. In addition, you can
use the main screen to log in or out, search recorded videos, and perform setup configurations. Finally, you can turn your server
off on the main screen.
8 - ELMO USER MANUAL 2003G
Figure 5. ELMO DVR Server Main Screen
1
Time and Date
Displays the system's current time and date.
2
Login/Logout
Displays a login prompt that allows you to gain access to view cameras, search, and change settings.
3
Search
Displays a search screen which includes playback, search, and/or save file for backup by its date, time, and camera.
4
Setup
Displays a setup window which includes settings such as hardware, motion, password, screen division,
communication, system setup, server information, and POS Integration.
5
Panic
Will perform Encrypted Backup of the previous five minutes to your local drive.
6
PAC
PAC DM™ Software for searching POS and card access transactions and generating reports.
))% 9
7
PAC Parser
Setup templates and settings for POS and Card Access integration
8
Hard Drive/Memory Meter
Displays the remaining hard drive space in the video storage partition(s) of the hard drive, and the available RAM of
the system.
9
Power
Shuts down your DVR.
10
Camera Sensor
Indicates camera, sensor, and control activity.
11
Screen Divisions
On a standard system setup there are 6 camera divisions available:4, 6, 9, 10, 13, and 16.
Full screen mode (No interface shown).
Rotate four cameras in a four division screen.
12
Help
Launches the ELMO DVR Help Window.
Table 2. ELMO DVR Server Main Screen Features
10 - ELMO USER MANUAL 2003G
+
,
'!#!
'
))%
On the Camera Setup tab, you can specify the names of cameras, the sensor to be triggered for each camera, and the cameras
that are to record if motion is detected. If the camera is a Pan/Tilt/Zoom (PTZ), you can also specify the type of camera.
Figure 6. Camera Setup
-". ' To create or modify your camera settings, follow these steps:
1.
Select Enable on the camera that you wish to be enabled.
This feature is NOT available on ELMO DVR Remote.
2.
Enter a descriptive Name for each camera. The name has to have the following format: Camera ID-Name.
3.
Enter the Sensor number(s) that will trigger the camera to record if it is set in Sensor Record mode and the sensor is activated.
4.
Enter the camera number(s) that will record when motion occurs.
5.
Select P/T/Z if the camera supports the PAN/TILT/ZOOM feature.
This feature is NOT available on ELMO DVR Remote.
6.
Select the Type of camera if the camera supports the P/T/Z feature.
Related Topics: Sensor Setup | Control Setup | External Monitor | Motion Detection
' % . ' ' 11
When Preset Touring is setup for a PTZ camera, the time that the camera will remain at each preset is defined by entering the
Dwell Time value on Hardware Setup page.
To setup the dwell time for preset touring, follow these steps:
1.
Click Setup on the main screen.
2.
Click the Hardware Setup tab.
3.
Locate the Preset Touring section at the bottom of the Hardware Setup tab. See picture below:
4.
Enter a desired Dwell Time.
5.
Click Save to save settings.
' '
))%
Sensor setup is only applicable if sensors are available and are being used.
Figure 7. Sensor Setup
' '
To set up sensors, follow these steps:
1.
Click Enable on the sensor you wish to activate.
2.
Click NC/NO to select the type of sensor connection (NC - Normally Closed, NO - Normally Open).
3.
Specify Post Recording amount if applicable.
12 - ELMO USER MANUAL 2003G
NOTE: This feature is NOT available on ELMO DVR Remote.
Related Topics: Camera Setup | Control Setup | External Monitor
'
))%
Control settings are applicable only if controls are available and are being used.
Figure 8. Control Setup
Active Time
Active time refers to the designated time when the control is active (default is continuous 00:00-00:00). If the sensor is triggered
outside the specified time, it will be ignored.
Dwell Time
Dwell Time refers to the amount of time the control will remain active when it has been triggered.
". ' To create or modify control settings, follow these steps:
1.
Click Enable on the desired control.
2.
Enter the Name of the selected control.
3.
Set the Active Time for the control if required.
4.
Enter the Sensor which activates the selected control. If more than one sensor will activate the control, use commas to separate
the sensor numbers.
5.
Enter the Dwell time for the control.
!/ " ' 13
Related Topics: Camera Setup | Sensor Setup | External Monitor
!/ " '
))%
The External Monitor Setup tab allows you to view specified cameras on an external monitor. Cameras are displayed in sequence
with a delay equal to the dwell time.
Figure 9. External Monitor
Dwell
Dwell refers to the interval (in seconds) between the display of each camera.
' !/ "
To set up an external monitor, follow these steps:
1.
Specify the Dwell time for the sequence.
2.
Select the cameras you need in the sequence.
3.
Click Save to save the setup settings.
Related Topics:Camera Setup | Sensor Setup | Control Setup
" ))%
On the Motion Detection tab, you can define up to five target zones for motion detection on each camera. Additionally, you can
14 - ELMO USER MANUAL 2003G
set video options which affect all camera video displays and recording options.
Figure 10. Motion Detection
Individual Camera Settings
-
Sensitivity: Adjusts the sensitivity in the detection zone(s) by using the scroll arrow.
-
Alarm: Triggers an audible indicator when motion is detected within specified zone(s)
Control: If motion is triggered, the associated control will be triggered.
-
Time: Dwell Time for the control feature.
-
Area clear:Clears all detection zones for a selected camera.
-
Area draw: Draws a detection zone covering the whole area for a selected camera.
-
Brightness / Hue / Contrast: Adjusts the brightness, hue and contrast of the selected camera.
-
Color or Day/Night:Sets the selected camera to record in color or black and white.
This feature is NOT available on Remote.
-
Default:Returns to the default settings.
Recording frame rate per camera
' " 15
-
Each camera's recording rate (in frames per second - fps) is adjustable.
-
Default : Sets all cameras to their default frame rate settings.
-
If you increase the frame rate of a certain camera, the speed of the other cameras will be decreased to compensate.
Setup for all cameras
-
Area Clear: Clears all detection zones for all cameras.
-
Area Draw: Draws a detection zone covering the entire area for all cameras.
-
Screen size: Sets screen size from 320 x 240 or 640 x 480.
-
Quality: Sets image quality from 20% to 100%.
-
Transfer quality: Sets the quality of the image transferred to the remote to between 20% and 100%.
-
Color of motion area: Selects the color of the motion detection area in the display mode between green or red.
-
Full screen when motion: Goes from multi screen to full screen when motion is detected on the specified camera(s).
-
Set Dwell Time: Once selected, cameras will rotate through screens according to the dwell time specified on the main display
page.
' " To set up motion detection on a selected camera, follow these steps:
1.
Select the desired camera.
2.
On the video window, move the mouse to the start point.
3.
Hold down the left mouse button and drag the mouse to draw a rectangular region (target zone). You can define up to five target
zones.
4.
Set the individual camera settings.
5.
Click the Save button to your save settings.
Related Topics:Intelliguard
" % '
After installation, your DVR automatically creates an administrative account. It is recommended that you change the password
for this account or create new users with different levels of security.
-". To create or modify a user, follow these steps:
1.
Login as an administrative user.
2.
Click Setup on the main screen.
3.
Click the Password Setup tab.
4.
Click the Add User button.
5.
Enter the User Name and Password.
6.
Confirm the Password.
7.
Select the features you want the user to be able to access.
8.
Click the Save button to save the newly created user.
16 - ELMO USER MANUAL 2003G
!/ To delete an existing user, follow these steps:
1.
Select the desired user from the list of users.
2.
Click the Delete button.
'& '
))%
The Schedule tab allows you to schedule the recording time on their camera system according to the type of recording
(continuous, motion, sensor, or pre-alarm).
Figure 11. Schedule Setup
Copy To: Allows you to copy recording settings to one or all of the other cameras.
Figure 12. Copy To
' '& 17
Custom Configuration: Allows you to select a specific date you would like to program your recording to. For example, you may not
want continuous recording on a holiday. On this screen, you can also select the option of having the holiday setting "rotate" or
repeat itself on a weekly, monthly or yearly basis. The default setting is Motion Sensor.
Figure 13. Custom Configuration
' '&
To set up scheduling, follow these steps:
1.
Select a camera to start scheduling the time for recording.
2.
Set the Calendar parameters. To set the recording times in Simple mode: weekend, Saturdays, and Sundays/Custom ( the
time/hour settings will remain the same)
3.
a.
Camera: Click on the desired camera to enter recording settings
b.
Weekday: Set the recording mode for the weekday (C-continuous, S-sensor, M-motion, P- pre-alarm)
c.
Saturday: Set the recording mode for Saturday (C-continuous, S-sensor, M-motion, P- Pre-alarm)
d.
Sunday/Holiday: Set the recording mode for Sunday and for holiday(s)
Set the Record Mode:
a.
Continuous: Check for continuous recording. If this function is selected, all other recording settings will be cancelled.
b.
Sensor: Check to have sensor-activated recording.
c.
Motion: Check to have motion-activated recording.
d.
Pre-Alarm: Check to have camera record five seconds before and after motion is detected.
18 - ELMO USER MANUAL 2003G
4.
Click Save to save settings.
' )
))%
On the Screen Division tab, you can configure the number of cameras that are displayed on the main screen and select which
cameras are to be shown on the large screen.
Figure 14. Screen Division
Default: Change to default settings for the selected division.
Default all: Change to default settings for all divisions available.
' ' )
To set your Screen Division, follow these steps:
1.
Select your desired division (4, 6, 9, 10, 13, or 16).
2.
Select the cameras to be placed on the screen division.
3.
Select the camera to be displayed on the Large Screen . You can select the larger screens for magnification among the 6, 10, and
13 divisions.
))%
' * ) & 19
The Communication tab allow you to use your DVR to send alerts whenever a sensor is triggered.
Figure 15. Communication
Type of Connection : Specifies whether or not a connection is allowed.
Bandwidth Throttle: Allows you to control the bandwidth of the data transferred over the network.
Frequency of Call Out: Determines how many times per day to transmit alerts.
Sensor for Emergency: If the sensor detects any signal during the designated time, it will send an alarm to the remote software,
with the captured image. You can assign the external sensor numbers.
Emergency Phone Numbers The first number is the number to dial for all emergency communication. The second number is a
backup number in case the first one fails.
Transfer Time: The time in seconds before the transmission begins, after the selected sensor is triggered. If any other signal is
detected during the transfer, the DVR will transmit the image again.
' * ) &
To send an alert via telephone, follow these steps:
1.
Select LAN/PSTN/LEASED CIRCUIT (Router)
2.
Select the Bandwidth Throttle
3.
Enter Frequency of Call Out
20 - ELMO USER MANUAL 2003G
4.
Select Motion for Emergency
5.
Select the Sensor for Emergency
6.
Enter the Emergency Phone Number and an Alternate Phone Number .
7.
Enter the Transfer Time .
8.
Click Save to save your settings.
' * ) & # ')
To send an alert to another DVR server, follow these steps:
1.
Select LAN/PSTN/LEASED CIRCUIT(Router).
2.
Select the Bandwidth Throttle.
3.
Enter Frequency of Call Out.
4.
Select Motion for Emergency.
5.
Select the Sensor for Emergency.
6.
Enter the Emergency IP Address .
7.
Enter an Alternate Phone Number.
8.
Enter the Transfer Time .
9.
Click Save to save your settings.
') .
))%
The Server Information tab allows you to set or get information about your server.
* ' 21
Figure 16. Server Information
Server Information:Enter the ServerID, location, model, version, distributor, and the purchase date. It is important that you enter
the ServerID and also remember its code for remote viewing. (When you try to connect to the server from a remote location, the
system will check the server ID code and password together. If either the code or the password is incorrect, you will be
disconnected from the server.)
Display Camera Status bar: Displays camera status bar on main screen.
Display Control Status bar: Displays control status bar on main screen.
Display Sensor Status bar: Displays sensor bar on main screen.
Display Motion Detection Grid: Displays motion detection grid when cameras are recording in motion mode on the main screen.
Image Transfer to Floppy Disk: If you select this function, the DVR will store the data in JPEG mode. If you don't select this
function, it will save the image in BMP format.
Disable Video on Main Screen: Will not show video on the main screen (it is hidden).
Disable Server Information: When unchecked, will not display the server information on the main screen.
Date Display Format: Allows you to format how time is displayed. Select the type of display you want.
Sensor and Control Type: Select '8 SENSOR' to use eight sensors, and '16 SENSOR' to use sixteen sensors. Proper number of
sensor buttons will be displayed in the Surveillance mode when you chose 'Sensor Type'. You will be able to see the proper
number of buttons in 'Hardware Setup' and 'Communication Setup'.
Tooltips:Tooltips are shown automatically in search mode.
Export Setting: Export settings to folder to be used in the future.
Import Setting: Import settings previously exported from this Setup page.
Setting the System Clock: Adjust server for Daylight Savings Time.
22 - ELMO USER MANUAL 2003G
* ' ))%
Audio recording is available with your DVR if a sound card is installed. After enabling audio recording on a camera, the system
microphone's sound data will be recorded together with the video data. The sound data will be recorded as soon as the video
signal starts recording. It will not be recorded if the video data is not being recorded at the same time.
Figure 17. Audio Settings
Enable Audio Playback : If a channel has audio playback enabled, you should hear the recorded audio when recorded video is
being played back.
Audio Recording Disabled: Audio recording is disabled if your system does not have a sound card installed, or if your sound card
has not been detected.
!( * To enable audio recording on cameras, follow these steps:
1.
Select the camera you wish to enable audio recording on.
2.
Click Enable Audio Recording.
!( * (
To enable audio playback on cameras, follow these steps:
1.
Select the camera for which you wish to enable audio playback.
2.
Click Enable Audio Playback .
' '
))% 23
))%
In the System Setup tab, you can set the scheduled time that the server should restart. Additionally, you can enable
watermarking features, configure backup schedules, easy updates, and configure a joystick keyboard.
Figure 18. System Settings
System Restart Time: Sets the time (weekly or daily) when the system will be automatically rebooted. To activate this option,
please check the box next to the desired day and select the appropriate time.
This feature is NOT available on ELMO DVR Remote.
Watermark: Clicking Enable Watermark allows you to authenticate a Watermark onto an image.
Display Watermark Image: This will or will not display the Watermark on an image. If you click on this option, the image will
have a Watermark authentication image.
Backup Settings: Used to set a schedule for running backups. See the topic Remote Backup for more information on remote
backup.
Activate Sensor Backup: If a sensor is tripped, an encrypted backup will be performed to CD. This feature is similar to the Main
Screen Panic Button feature.
This feature is NOT available on ELMO DVR Remote.
Network Port Setting: Changes network connection ports for ELMO DVR Server.
24 - ELMO USER MANUAL 2003G
This feature is NOT available on ELMO DVR Remote.
Video Loss Alarm: When there is Video Loss, the following will occur:
a. Alarm one will sound on the PC speaker
b. Enable control will activate the associated control
c. Audio-2
d. Set Email will send an email when there is video Loss
Dwell Time: Associated with Enable control and Alarm used
Hardware Setup
Watchdog Port: Watchdog serial Cable Communication Port
This feature is NOT available on ELMO DVR Remote.
Select Num of Days to Store Data: Will only store video for this period of time.
Video Format : Choose between NTSC and PAL.
!( # *
To enable video loss alarm, follow these steps:
1.
Click Enable Alarm .
2.
Click Enable Sound if you need to activate an audible alert.
3.
Select the Control No. to be activated when a video signal is lost. This control must be activated in Hardware Setup.
4.
Set the Dwell Time for which the sound will be active.
012
))%
Intelli-Zone™ is a feature that allows the camera to intelligently pan, tilt, or zoom to a specified preset. The ELMO DVR server
will automatically detect if that camera has P/T/Z features and adjust the pan, tilt, or zoom where applicable. Intelli-Zone™ does
not provide real-time tracking. Instead, it offers a simulated tracking technology.
' 01 25
Figure 19. Intelli-Zone™ Setup
' 01 To Setup Intelli-Zone follow these steps:
1.
Select the Intelli-Zone tab from the setup window.
2.
Specify camera on which you want to setup Intelli-Zone.
3.
Click Enable Intelli-Zone.
4.
Define P/T/Z Control Presets 1 - 10. You can also use the presets defined in the PTZ mode on the main screen.
5.
Create a target zone.
6.
Select the Start Position's preset. This is the position the camera will return to after the specified dwell time.
7.
Select the Go to preset. The camera will move to this position when motion is detected.
8.
Enter the Dwell Time. This defines the delay time before the camera returns to the Start Position.
9.
In the section Start Position, select the camera name.
10. Specify the Active Time to enable Intelli-Zone on this camera.
' '
26 - ELMO USER MANUAL 2003G
))%
The Storage Structure tab shows which disk partitions are allocated for video storage. It also gives allows you to modify the
storage structure. Allocation is not allowed on C or D drives.
The Storage Setup tab is NOT available on ELMO DVR Remote.
". ' *
To modify storage allocation, follow these steps:
1.
Click the Modify Storage Structure button. The window below appears.
Figure 20. Storage Setup
Click Yes to restructure the storage structure the next time the server reboot.
2.
Click Close Setup.
3.
Restart the server .
4.
When the server restarts, the Storage Structure dialog box shown below appears.
!0" 27
Figure 21. Storage Structure
5.
Click Allocate on the drive you wish to format.
6.
Click Proceed to start the allocation process. The Format confirmation window appears:
7.
Click Yes to proceed with formatting. The Select file system window appears:
Figure 22. File System Types
8.
Ensure that NTFS is selected for more security or FAT32 for normal security.
9.
Click OK . Once allocation is complete, the server will start normally.
!0"
))%
The E-Map tab is used to lay out cameras on a map. For example, if you have a drawing of your building, you can lay out cameras
in the location where you know a camera is installed. In live mode, you can then select the camera from the map and your DVR
server will display that camera alone.
28 - ELMO USER MANUAL 2003G
Figure 23. E-Map
!( !0"
To enable E-Map, follow these steps:
1.
Click Enable E-Map to activate the E-Map on the main screen.
2.
Select the Position No. of the desired position of the specified Screen Division in which the E-Map will appear.
3.
Click Find > to select a bitmap to load into the E-Map.
4.
Click Go to copy the selected image to the drawing area.
5.
Select the camera Setting to set the position of the cameras, controls, and/or sensors
6.
a.
Camera : Select the camera, then click the desired position for the camera on the E-Map.
b.
Control : Select the control, then click the desired position for the control on the E-Map.
c.
Sensor : Select the sensor, then click the desired position for the sensor on the E-Map.
Click Save to save the setup settings.
. !0"
To delete cameras drawn on the E-Map, follow these steps:
1.
Click the Delete Camera, Control, Sensor checkbox.
2.
Click the camera, control or sensor you want to delete.
#% ) & & 29
))%
Each user activity is saved in log files. These are viewed through the view log window. You can view logs that have been saved
on a daily basis. In addition, can also export logs to a text-based file.
Figure 24. View Log Records
Log Record Navigation : It is possible to browse logs at several levels:
-
View records per day: Allows you to view all the logged activity in a given day.
) & & To navigate through your log records, follow these steps:
1.
Click the plus sign (+) next to 'Log Records' to view the months that have been logged.
2.
Click the plus sign (+) next to the desired month to view all entries for that month.
3.
Select the log filename to view a particular day, or click the plus sign (+) next to the desired day to browse by username.
4.
After selecting a day or username, the relevant logged activity will appear in the right hand pane.
5.
Click Export to export a log to a text file.
0 2
))%
The Intelli-guard feature can be used to monitor the camera view within a defined area. Any changes in the defined area will
trigger an alarm response through email or in a telephone message.
30 - ELMO USER MANUAL 2003G
Figure 25. Intelli-guard
Individual Camera Adjustment: Adjusts the video brightness, hue, and contrast for each camera.
Background Refresh Time: If Intelliguard detects no changes in the monitored area, it will update the area picture after every
reload time period. This will decrease the cumulative image difference caused by time. By default, this value is set to 20
seconds. It can be adjusted from 1s to 1800s. If you don't want it updated, check Never update background .
Detection Size: This parameter determines the size in pixels of the object that may cause the alarm to be set off. Decrease the
detection size to make the Intelliguard detect only small size objects. Increase the detection size to detect only larger size objects
and omit the smaller ones.
Detection Sensitivity: Sets percentage of pixel change required to trigger detection.
Sound Wave File: Audio file to play when motion has been detected by Intelli-Guard.
Duration of Sound Wave: Length the sound file plays for.
Count: Shows you a tally of detected motions
!
))%
You can send an alert via email when a sensor is triggered, or when a video signal has been lost. You can also send the status of
the server by sending a screen shot from a specified camera.
' * # ! 3' 4
31
Figure 26. Email
Email Transmission Delay: This sets the delay time before the transmission is started after a sensor has been triggered.
Threshold: This value sets the number of lines to be included in the emails sent per day.
SMTP Server: Depending on your location, each Internet provider has specific SMTP information.
IP: The IP Address of the SMTP server. Example: smtp.bellnexxia.net
Port: Usually you do not have to change this. This is a default port for most SMTP servers. For more information on Port defaults,
please contact your email account manager.
Logon Method: "None" is a default method; otherwise, please contact your email account manager.
User name and password:Some Internet providers require user names and passwords to send out emails, if this is the case,
please enter accordingly.
' * # ! 3' 4
To send an alert via Email when sensors are triggered, follow these steps:
1.
Click Enable Email to activate the email function.
2.
Select Sensors. Sensors must be preset in the Hardware Setup prior to activation.
3.
Click Video Loss to enable email transmission when video signal is lost.
4.
Enter a valid Email Address. Optionally, you can enter multiple email addresses separated by commas.
32 - ELMO USER MANUAL 2003G
5.
Enter the Email Transmission Delay time in seconds.
6.
Enter the Sender's Name .
7.
Enter the Sender's Email Address .
8.
Complete the SMTP Server information.
' & ') ' ) !
To send the status of the server via email, follow these steps:
1.
Complete the above eight steps.
2.
Click Send Email in the Server Status section.
3.
Select the cameras you need to receive screen shots from Include Image Of.
4.
Enter the number of times per day to send the email in Send Email Every.
5.
Optionally enter an Email Title to describe the image.
Related Topics:
Intelliguard Setup | Communication Setup
# ))%
This feature allows you to measure a person's height once they are in the camera's view. During playback, you can estimate their
height by comparing them to the virtual ruler.
' # 33
Figure 27. Virtual Ruler
' # To set up the Virtual Ruler for a camera, follow these steps:
1.
Select the camera in which you want to insert the ruler.
2.
Select the color (black or white) of the ruler that you want. If the background is white, the ruler is better seen in black.
3.
Enter the Start Point (area you want the ruler to begin).
4.
Enter the End Point (area you want the ruler to end).
5.
Enter the Division (measurement that is divided equally between your Start Point and your End Point ).
6.
In the Unit section, select the unit of measurement you wish to use. For example, feet, inches, meters, etc.
# Using the Virtual Ruler
To use the Virtual Ruler, follow these steps:
1.
Physically measure the height that is required for your camera.
2.
Draw a mark on that area.
3.
Using your mouse, move the cursor to the picture.
4.
Hold down your left mouse button, and drag it in a straight line.
!/ ' .
))%
All the setup information you create can be exported to a file to be used in the future. If you have multiple servers installed and
you would like to keep the same settings, you can import previously exported setup settings.
!/ ' ' To export your Setup Settings, follow these steps:
1.
Click the Setup button on the main interface.
2.
Click the Server Information tab.
3.
Click the Export Settings button. The Browse for Folder window appears:
34 - ELMO USER MANUAL 2003G
4.
Browse to the folder you wish to export your server settings.
5.
Click the OK button. Your setup settings have now been saved.
' ' To import your Setup Settings, follow these steps:
1.
Click the Import button on the Server Information Tab. The Browse for Folder window appears.
2.
Click the OK button. Your setup settings have now been imported.
3.
Restart your server. Your imported settings will take effect.
$*5 !! #!' 35
$*5 !! #!'
6 $
))%
Quick backup allows you to perfom a backup eliminating preliminary steps such as selecting a backup type, a backup media, and
desired cameras. This backup method is perfomed only on a CD-R.
Note: Please ensure that a blank, unformatted CD-R is in the CD-R drive before you begin the backup process.
. 6 $
To perform a Quick Backup, follow these steps:
1.
Ensure that there is enough free space on the C drive. You should always have at least 650MB.
2.
Insert a blank, unformatted CD-R into the CD-R drive.
3.
Click the Search button on the main screen.
4.
Right click on the data area of the Search Bar.
5.
Select Mark Start to choose the start time.
6.
Select Mark End to choose the end time.
7.
Click Start CD backup–Encrypted to backup in encrypted format, or Start CD backup–AVI to backup in AVI format.
Figure 28. Search Mode Quick Backup
Note: On the sample picture, “Start: 18:15 End: 18:23” is the start time and end time. For AVI backup, select the camera(s) you
need to backup. Encrypted backup will always backup all of the cameras.
!7 *#7 ! $
))%
You can back up videos on your local drive, a remote drive, CD-R in encrypted or AVI, or in email format. Encrypted backups can
only be opened with the Remote software. AVI backups can only be opened by AVI viewers.
36 - ELMO USER MANUAL 2003G
$ ! *# +
To back up in encrypted or AVI format, follow these steps:
1.
Click Search on the main screen
2.
Click the Backup icon.
The Backup screen appears:
. '& $ 37
Figure 29. Backup Screen
3.
Select Encrypted or AVI as the backup type.
4.
Select the Start and End time from the Date/Time menu.
5.
Select the Calculate Size button to determine the size of the backup.
6.
Click the Select Media button to save to either a remote drive, a local drive, or a CD-R/CD-RW (600MG maximum).
7.
If you are backing up on a CD-R/CD-RW, select Format CD-R/CD-RW to format the CD so that you can proceed with the backup
on CD.
. '& $
))%
Your DVR allows you to save a single picture on selected media.
') '&
To save a snapshot of a camera, follow these steps:
1.
Click Search on the main screen.
38 - ELMO USER MANUAL 2003G
2.
Select a date for which there is data recorded. Dates with data are highlighted red on the calendar.
3.
Select the camera you wish to play.
4.
Click the Play button and play to the position at which you wish to take the snapshot.
5.
Stop playback.
6.
Click on the screen for which you wish to take the snapshot.
7.
Click the Backup button.
8.
The Backup dialog window appears:
' $ '& 39
Figure 30. Backup Dialog window
9.
Select the Snapshot option.
10. Select the appropriate media.
11. Click OK.
12. A dialog box will appear and ask if you would like to watermark the image to be saved. Select Yes . The watermark will allow
you to verify whether or not your picture has been tampered with.
13. The picture will be saved to the selected media, enabling it to be opened with any graphics viewer. Note: The picture is saved in
either Bitmap or JPEG format. This is set up in the Server Information section.
' $ '&
))%
This feature allows you to define future backups by creating backup schedules. You can backup to your local hard drive or to a
remote drive. You can schedule backups to occur on a daily, weekly, or monthly basis.
' $ '&
To set up Backup Schedules, follow these steps:
40 - ELMO USER MANUAL 2003G
1.
Click Backup Settings on the System Setup tab.The Setup Backup Schedule window appears:
Figure 31. Setup Backup Schedule
2.
Click the Add button. The Add Schedule dialog screen appears:
' $ '& 41
Figure 32. Add Schedule
3.
Fill out the Add Schedule options as follows:
a.
Enter a descriptive Title for the backup.
b.
In the Start section, set the start date and time. A popup calendar appears:
42 - ELMO USER MANUAL 2003G
c.
Set end date and time from the End section (similar to start time).
d.
Select a rotation option from the pull-down menu.
e.
Select the Backup Timer Interval from the pull-down menu. This sets the backup start time interval. For example,
'immediately', '1 hour later', etc.
f.
Select the backup Priority from the pull-down menu.
g.
Click Add media to specify where you would like to save the backed-up data.
' $ '& 43
h.
Select Local drive or Remote drive for the desired media.
i.
To back up to a local drive select the Local drive option. Then select the drive letter from the Path pull-down menu.
j.
To back up to a remote drive, select the Remote drive option.
k.
Enter the IP address of the remote PC in the IP Address text box. To access the drive, enter the password in the Password
text box if required.
l.
Select the appropriate remote drive by clicking the Select Drive button.
44 - ELMO USER MANUAL 2003G
Note: Before a remote connection can be made, K-Remote Backup Server must be running. This is installed along with the
remote DVR software.
50 $ ')
))%
When you backup to a remote drive, the backup process is performed through the K-Remote Backup Server. The K-Remote
Backup Server is installed with your ELMO Remote DVR and MUST be running in order for remote clients to backup via Remote
media.
Figure 33. K-Remote Backup Server
'!*8 '*#! #!' 45
'!*8 '*#! #!'
'& "
))%
You can search recorded videos on the Search Mode screen. The various searches you can perform include Index Search, Object
Search, and Bookmark Search.
Figure 34. Search Mode
Please see the following sections to learn more.
Searching by Date and Time
Using the Time Line Bar
Bookmarks
'& ( ))%
You can search a recorded video according to the date and time the video was recorded.
46 - ELMO USER MANUAL 2003G
'& ( To Search by date and time, follow these steps:
1.
Select Year and Month from Calendar
2.
Select the Day you want to search.
-
Days highlighted in red are days for which there is recorded data.
-
A day highlighted in white indicates a day you have selected to search.
-
A day highlighted in yellow indicates the current day of recording.
(Date picture was taken: September 24th 2003)
3.
Select the time that you want to view.
& $
))%
A 24-hour timeline is available showing you recorded video, motion, and sensors.
Figure 35. Timeline Bar
& $
1.
Click on the Time Line bar to expand or reduce the time line view.
$ 47
2.
Select different cameras by clicking on the appropriate camera buttons.
3.
Scroll up/down to view more cameras.
4.
The above time line indicates that there is recorded data in three cameras (1, 2, and 3 from 11AM to 12:30 AM).
-
A pink bar indicates Continuous recording.
-
A blue bar indicates Motion recording.
-
A red bar indicates Sensor recording.
-
A green bar indicates Pre-Alarm .
$
))%
Bookmarks are used as a quick method of saving the date and time that a video was recorded.
* $
To add a Bookmark, follow these steps:
1.
Click the Bookmarks button on the Search screen.
2.
The Bookmark window appears as shown below.
48 - ELMO USER MANUAL 2003G
Figure 36. Bookmark Window
3.
Click Add. The date and time are automatically entered.
4.
Enter a Description .
5.
Click Enter.
6.
Click OK to close the Bookmark window
To delete bookmarks, follow these steps:
1.
Select the desired time from the bookmark list.
2.
Click Delete.
3.
To delete all stored bookmarks, click Delete All .
To locate a stored bookmark, follow theses steps:
1.
Select the desired bookmark.
2.
Click Goto. The Time Line marker will jump to the date/time of the bookmark.
'& " ))%
The Search Mode Control Panel consists of many buttons. The following screen captures define the various functions of these
buttons:
Main Buttons
))% 49
Advanced Functions
Image Controls
50 - ELMO USER MANUAL 2003G
PAC Functions
. (9 '&
))%
In Object Search mode, ELMO DVR Server searches for movement in the video recorded and only outputs changes in motion.
. (9 '& 51
Figure 37. Object Search
. (9 '&
To perform object search, follow these steps:
1.
Click the Object Search Mode button on the Search Mode control panel. A grid appears on your screen:
2.
Use your mouse to select areas on the grid on which you wish to perform an object search.
3.
To deselect areas, use the right mouse button.
4.
Set the Start and End times on the Calendar .
5.
Click the Start Object Search button to begin object search. An output window appears with the detected areas stamped with
52 - ELMO USER MANUAL 2003G
the time.
If no motion was detected, the following window appears:
6.
To show only a text list (rather than image and text), click the Text button on the output window:
/ '&
))%
. / '& 53
Index search gives you quick access to specific frames where detected motion, triggered sensors, or pre-alarm recording took
place.
Figure 38. Index Search
. / '&
To perform an Index search, follow these steps:
1.
Click the Index Search button on the search control panel. The Index Search window appears on the time line:
2.
On the Index Search panel, select Motion , Sensor , or Pre-Alarm as the indexing method. The image below shows you that
motion occurred on Camera 01.
54 - ELMO USER MANUAL 2003G
3.
Click on any frame number. The Time Line marker will jump to the time of that frame recording.
* !* 55
* !*
' * / )
))%
Your DVR can be configured to display and capture current PAC activity on any camera you configure for PAC support.
Figure 39. PAC Text Overlay
' * / )
To set up PAC Text Overlay on a camera, follow these steps:
1.
Click the Setup button on the main screen.
2.
Click the Text Overlay tab.
3.
Select the camera on which you wish to see text overlay.
4.
On the video window draw a rectangular box around the area for which you would like to see the text overlay.
5.
Select Black/White for the text color. Selecting Intelligent will set the text color to the opposite color of the background.
Example : If the background is dark the text color would be white. If the background is bright the text color would be black.
6.
In Intelligent mode, adjust the Brightness according to desired background sensitivity.
56 - ELMO USER MANUAL 2003G
7.
Select Show Text Overlay on Live Mode to display text inserter on live mode.
8.
Enter the Number of Characters per line.
9.
Set the Horizontal Start Position with respect to the rectangle's left edge.
10. Set the Vertical Start Position with respect to the rectangle's top edge.
11. Enter the Scroll Delay to determine the number of frames delayed when text scrolls up.
12. Enter the Number of Lines to display in the rectangle.
13. Enter the Text Delay Time. If there is no text input for a long time, the text will disappear automatically.
!" # !"! 57
!" # !"!
'.%
))%
Your ELMO DVR Remote software is used to connect and manage multiple servers by using the internet or a local LAN
connection. Most of the features provided in ELMO DVR Server are available in ELMO DVR Remote. This section will describe the
features that are avialable only in ELMO DVR Remote.
' !" # '.
To start your ELMO DVR Remote Software, double-click the ELMO Remote icon on your desktop:
The following screen appears:
Figure 40. ELMO DVR Remote Main Screen
View
Activates the camera once your system has connected to the server.
58 - ELMO USER MANUAL 2003G
Search
Searches for previous events that have been recorded remotely, onto your
local hard drive, or to CD-R/CD-RW.
Setup
Loads the setup page to configure your ELMO DVR Remote features and
functions.
Connections
Manages lists of remote servers you can connect to and manage.
Disconnect
Breaks the connection from a connected server.
Multi-Site
Allows a user to specify which cameras will be in each division, allowing
cameras from different servers to be on the same screen. This is accomplished
through drag and drop.
RECEIVE
Displays the progress of data transmission.
IP Address
Displays the IP address of the currently active server.
Emergency Monitor
Handles any sensor or controller motion events.
Health Monitor
When connected to a DVR through this application, you can view the current
status of cameras (if there is video loss), control, and sensors.
Intelli-Upgrader
Allows you to upgrade the software on the DVR if it appears in the server list
created with the remote software.
K-Remote Backup Server
Handles backup processes, and gives the option of cancelling any backup
process. This MUST be running in order to perform remote backups.
2-Way Audio
Allows the remote user to communicate via voice with anyone who may be at
the server side.
Table 3. ELMO DVR Remote Main Screen Features
" ')
))%
Before you can connect to a server you must create a connection with the connections list. You can manage a server located
anywhere as long as you have internet access to that server. The server also should have a static IP Address or a Dynamic IP
domain service such as www.123ip.com.
* ) . To create a new server, follow these steps:
1.
Click the Connections button on the main screen. The following window appears:
* ) . 59
Figure 41. Server Connect Window
2.
Click the Add button. The Insert to new site window appears:
Figure 42. Creating a New Site
Group
The group (category) in which you would like to place the new
server.
Server Code
A maximum of seven alphanumeric characters. Note: This must
60 - ELMO USER MANUAL 2003G
match with your Server ID on the server software.
Add Group
Enables the user to add a Group.
Server Name
A descriptive name of your choice.
IP address
IP address of the remote server.
Connect When System
Start
Check this box to automatically connect to the server when the
remote software loads.
Name
The user name that is desired which corresponds to a user name
on the server.
Password
This password must match with the password on the remote
server for the user name you've entered above.
Cancel
Allows user to cancel creating a new server in the list of servers
to connect to.
Table 4. Insert to New Site Window Features
3.
Click the Add Group button to add a Group.
4.
Enter the name of the new Group.
5.
Click OK to continue.
')
))%
Before connecting to a server, ensure that the server is on, and that it is available on your local network or internet. Also, you
should use the same versions of ELMO DVR Server and ELMO DVR Remote.
')
To connect to a server, follow these steps:
1.
Click the Connections button on the main screen. The following window appears:
#% 61
Figure 43. Server Connection - Lan Window
2.
Select the desired server from the list of servers.
3.
Click the Connect button. The Connecting Server - LAN window appears showing the status of the connection:
Figure 44. Connecting server progress window
#% ))%
You can view cameras that were setup on the server from the remote software.If the connection is successful, a new screen
appears showing the server IP, cameras, sensors, and controls:
62 - ELMO USER MANUAL 2003G
Figure 45. Remote Software Main Screen
#% , ')
To view cameras that are set up on your server, follow these steps:
1.
On the main screen, select the cameras you wish to view.
Note: The frame rate is affected by the number of cameras you've selected. You can also select controls to be activated if the
server you are connecting to has controls set up.
2.
Click on the View button to activate your camera(s).
Note: If you do not select a camera and click View, the following prompt appears:
Figure 46. No camera selected prompt.
" ') 63
Note: If you are viewing existing cameras and you would like to add additional cameras, press the Stop button on the main
screen, then select the other desired cameras.
" ') ))%
It is possible to connect to multiple servers with ELMO DVR Remote. Once you have created multiple servers in the list of
connections, you can connect to more than one server.
" ')
To connect to multiple servers, follow these steps:
1.
From the list of servers, double-click on the server you wish to connect to. The Connecting Server - LAN status window appears:
Figure 47. Connecting Server progress window
2.
To view a different connected server click the up/down buttons on the multi-site selection tool:
Figure 48. Multi-Site selection tool
3.
To stop viewing cameras on a server without disconnecting, click the Stop button on the main screen.
4.
To stop viewing a camera, right-click on the camera name.
. " ')
To disconnect a connected server, follow these steps :
1.
Select the server with the Server Select tool if there are more than one connected servers.
64 - ELMO USER MANUAL 2003G
Figure 49. Multi-Site selection too.
2.
Click the Stop button on the main screen.
3.
Click the Disconnect button. The following window appears:
Figure 50. Disconnecting from a server.
4.
Click Yes to disconnect or No to return to viewing the server.
Note: If you are connected to a server and a user logs in and opens the setup page, you will be immediately disconnected from
the server.
$*5 !! #!' *,
65
$*5 !! #!' *,
$ " ))%
It is very important to backup (save) your data on a regular basis. This chapter will review the different types of backup media
available on your ELMO DVR Remote software.
Figure 51. Search mode select window - Displays local drives to search from and backup types.
Backup data: This type of backup is done on a Hard Drive or CD-R Drive and is saved when a remote backup is done.
Removal HDD Drive Data: This backup is from a Hard Drive that was removed from a DVR and connected to a remote server with
the remote software.
Server Current Screen: If configured on the Setup Configuration page, backups are done automatically when cameras are viewed
on the main screen.
Server Search Data: This backup is performed when a server is searched remotely and recorded videos are played back from
selected cameras.
* $
))%
While connected to a remote server, ELMO DVR Remote can be configured to backup cameras that are being viewed or cameras
that were played from a recent search.
. . * $
66 - ELMO USER MANUAL 2003G
To configure automatic backups, follow these steps:
1.
Disconnect from all connected servers.
2.
Click the Setup button on the main screen.
3.
Click the Setup Configuration tab.
4.
Locate the section Remote Video Recording:
Figure 52. Remote video recording options
5.
Check Record Live Video to record videos when viewing cameras in live mode.
6.
Check Save Recorded Video on Search to record videos when playing back videos in Search mode while connected to a server.
7.
Click the Select Drive drop down to choose the local drive on which the videos are to be backed up.
8.
Click OK to save and close Setup.
" $
))%
Remote backup gives you three types of backup options: Snapshot , Encrypted(Time backup), and AVI backup. Encrypted and AVI
backups are very similar, except for camera selection. In Encrypted Backup all the cameras are recorded automatically. In AVI
Backup , you are given the option of selecting the cameras you wish to record, as well as the video compression method.
Snapshot Backup gives you the option of saving a captured frame to selected media.
Note: K-Remote Backup Server MUST be running for any remote backup process to be done. ( See K-Remote Backup Server )
. $
To perform a remote backup, follow these steps:
1.
Connect to a server .
2.
Click Search on the main screen.
3.
Click the Backup button:
') '& + 67
Figure 53. Search Mode- Backup button
4.
Select Encrypted or AVI.
5.
If you select Encrypted Backup choose the Start time, End time, and the Backup Media .
6.
If you select AVI Backup, choose the cameras you wish to record, the video compression, and the AVI Caption:
7.
Click OK to start the backup process. K-Remote Backup Server shows you that a backup is being done:
Figure 54. K-Remote Backup Server
') '& + To save a snapshot of a camera on a floppy disk, follow these steps:
1.
Click Search on the main screen.
2.
Select a date with data recorded. Dates with data are highlighted red on the calendar.
3.
Select the camera you wish to play.
4.
Click the Play button and play to the position at which you wish to take the snapshot.
5.
Click the Stop button to stop playback.
6.
Click on the screen of which you wish to take the snapshot.
7.
Click the Backup button. The Backup dialog window appears.
8.
Select the Snapshot option.
9.
Select the media to save the snapshot on.
10. Select OK. A dialog box will appear asking if you would like to watermark the image to be saved.
11. Select Yes . The watermark will allow you verify whether or not your picture has been tampered with. The picture will be saved
to diskette, enabling it to be opened with any graphics viewer.
68 - ELMO USER MANUAL 2003G
Note: The picture is saved in either bitmap or JPEG format.
50 $ ')
))%
K-Remote Backup Server MUST be running for any remote backup process to be done. When you perform a remote backup using
ELMO DVR Remote 2003G, K-Remote Backup Server shows your backup progress:
Figure 55. K-Remote Backup Server
You can cancel a backup process that is underway.
$ To cancel a backup process, follow these steps:
1.
Click the Exit button in K-Remote Backup Server. The following window appears:
Figure 56. Disconnecting a K-Remote Backup process.
2.
Click OK to terminate the backup process and close K-Remote Backup Server , or click Cancel to continue the backup process.
'!*8 !! #!' 69
'!*8 !! #!'
'& # ' )
))%
You can search for recorded videos stored on your local drive by a previous backup.
'& # ' To search videos previously saved on a local drive, follow these steps:
1.
Disconnect all servers.
2.
Click Search on the main screen The following window appears:
Figure 57. Search Mode Select window.
3.
Select media types ( See Backup Media Types ) and select the appropriate local drive. Storage information appears regarding the
Server Code List:
70 - ELMO USER MANUAL 2003G
Figure 58. Search Mode Select window - Showing previous backup data.
4.
Select the appropriate choice and press OK . The local search screen appears:
') 71
Figure 59. Local Video Search/Playback window
If Removal HDD Drive Data is selected, the same screen will appear, but video data will come from an internal or external hard
drive. If Server Current Screen is selected, an option to view backed-up data stored on the remote PC will become available. If
Server Search Data is selected, there is the option to search data that was backed up on the remote PC.
5.
Select the time, date, cameras, and click Play .
')
))%
Search videos on a connected server is different from searching locally. You must be connected to a server before you can
peform a remote search.
'& ')
To search a connected server, follow these steps:
1.
Connect to a server.
2.
Click Search on the main screen. The Search window appears:
72 - ELMO USER MANUAL 2003G
Figure 60. Remote Search/Playback window
3.
Select the date, time, and cameras you need to playback; then use the playback buttons to playback the recorded video.
Note: Red highlighted dates indicate data that has been recorded on that day. The time line shows which cameras have data
recorded from them.
!+" * * '!
73
!+" * * '!
' . ))%
A local setup refers to peforming configuration using the setup button without connecting to a server.
Note: If you are connected to a server and you press the setup button, a window similar to the Server's setup window is loaded.
Figure 61. Local Setup Configuration
Watermark
This enables/disables the watermark function (watermark: a function that allows users to see if the picture was tampered with
or not).
Remote Video Recording
This allows users to download video either in Search mode or Display mode.It also stores the data on your local hard drive.
'
))%
You use the communication setup to perform configurations related to connection type, and modem settings.
74 - ELMO USER MANUAL 2003G
Figure 62. Local Communication Setup
Type of Connection: This allows users to choose between regular phone line or LAN/high speed Internet.
Installed Modem Name: Read-only text to describe the type of modem that is installed.
&
))%
On the the Other tab, you will configure Network Port Settings. If you do not understand the settings on this page, please see
your Network Administrator.
Figure 63. Local setup - Other Tab
))% 75
Network Port Settings: Set the TCP/IP ports for various communication options between the server and the remote software.
Figure 64. Network Port Settings window