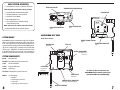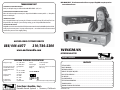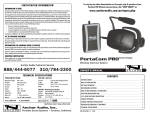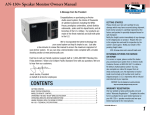
1
TROUBLESHOOTING
CAN’T HEAR A PERSON SPEAKING?
For videos on how to setup & use your AnchorMAN wireless
intercom system go to:
www.anchoraudio.com/anchorman.php
Increase headset volume using the headset volume button on the side of the belt pack. Push the + symbol button until you
reach desired volume. In extremely loud environments, you will need to use the dual ear muff headset with noise cancelling
properties. If you still can’t hear, you may be out of range and need to move closer to the user network.
MICROPHONE NOT PICKING UP YOUR VOICE?
First, adjust the microphone sensitivity setting on the side of the belt pack by pushing the + button incrementally until you
reach desired sensitivity level. Move the microphone closer to your mouth and speak up clearly. For example, people with
softer voices should set their belt packs to a more sensitive microphone level.
BACKGROUND NOISE TRANSMITTING ACROSS SYSTEM?
Reduce the microphone sensitivity setting by pushing the – symbol button until you reach the desired level.
TRANSMISSION IS WEAK?
Your rechargeable batteries may be running low. If batteries are weak, the Group LED’s will slowly flash. Your belt pack
needs to be recharged. If you need to keep working, you can use disposable alkaline batteries.
PROPER INTERCOM ETIQUETTE
Anchorman is designed to allow 4 people to speak at once in close quarters and one person to speak at a time when the belt
packs are far apart.. Use proper intercom etiquette – wait to break into the conversation network until the other belt pack
users have stopped speaking. If a large number of users are in the network, we suggest PTT to allow members to jump in
and out of conversation.
ANCHOR AUDIO CUSTOMER SERVICE
888/444-6077
310/784-2300
ANCHORMAN TECHNICAL SPECIFICATIONS
Range (line of sight)
Duplex
Simplex
FCC License (US users only)
Selectable Groups
Frequency
Frequency Settings
Output Power
Microphone
DC Requirements
Batteries
FCC ID: J8ZBP-900
0976
US: 250’ / 75 m
EU: 200’ / 160 m
US: 2,500’ / 750 m
EU: 1,000’ / 305 m
User Registration
4
US: 944 – 952 MHz
EU: 863 – 865 MHz
4 per Group
US: 17 dBm (50mW)
EU: 5 dBm (5mW)
Dynamic
9V – 1.2A
4 “AA” NiMH rechargeable
Battery Charge Time
5.5 hours = Full Charge
Battery Life – NiMH Rechargeable
Receive Only
7.5 hours
Continuous Transmit
3.5 hours
Battery Life – Alkaline Disposable
Receive Only
3.0 hours
Continuous Transmit
1.0 hours
Headset Connector
4-pin male XLR
Antenna
1/2 wavelength dipole
Dimensions & Weight
BP-900/BP-900EU
4 x 4.65 x 1.75” / 101.6 x 118.1 x 44.5 mm
13 oz / .37 kg (batteries installed)
H-200S
3.5 x 7.4 x 7.9” / 8.9 x 18.8 x 20 cm
13 oz / .37 kg
H-200
3.5 x 7.4 x 7.9” / 8.9 x 18.8 x 2O cm
16 oz / .45 kg
Antenna
7.18” / 182.372 mm
Antenna Extension
3.5” / 89 mm
Anchor Audio, Inc.
Portable Sound Systems • Torrance, California
AnchorMANPATENT PENDING
WIRELESS INTERCOM SYSTEM
OWNER’S MANUAL
CONTENTS
GETTING STARTED ................................................................................................................................................. 2
WHAT IS ANCHORMAN? .......................................................................................................................................... 2
BELT PACK OPERATION .......................................................................................................................................... 3
RECHARGEABLE BATTERIES ................................................................................................................................... 4
NETWORK EXPANSION ........................................................................................................................................... 4
HEADSET OPERATION & MICROPHONE SENSITIVITY SETTING ............................................................................ 5
BASIC SYSTEM OPERATION, SYSTEM RANGE & SYSTEM COMPONENTS ............................................................... 6
CHANGING USER ID SETTINGS & SETTING DIP SWITCH FEATURES..................................................................... 8
USING THE WINGMAN W/ ANCHORMAN ............................................................................................................... 9
CERTIFICATION INFORMATION ............................................................................................................................ 11
TROUBLESHOOTING ............................................................................................................................................. 12
ANCHORMAN TECHNICAL SPECIFICATIONS ......................................................................................................... 12
100-0164-000/B - 12/07
A MESSAGE FROM THE OWNER
CERTIFICATION INFORMATION
Thank you for choosing an Anchor Audio wireless intercom system. Our products incorporate state-of-the-art design
and the finest quality of materials and workmanship. We’re proud of our products and appreciate the confidence
which you have shown by selecting an Anchor system.
INFORMATION TO USER
I hope you’ll take a few minutes to review this manual. We’ve incorporated several unique features into our products,
and your knowledge of how to use them will enhance the performance and your enjoyment of the system.
Janet Jacobs, President
on behalf of all Anchor Employees
GETTING STARTED
Please check your new unit carefully for any damage which may have occurred during shipment. Each Anchor product
is carefully inspected at the factory and packed in specially designed boxes for safe transport.
Notify the freight carrier immediately of any damage to the shipping box or product. Repack the unit in the original
box and wait for inspection by the carrier’s claim agent. Notify your dealer of the pending freight claim.
NOTE: All damage claims must be made with freight carrier!
RETURNING SYSTEMS FOR SERVICE OR REPAIR
For service or repair, please contact the dealer where system was purchased or Anchor Audio Customer Service
(800/262-4671 or 310/784-2300) to obtain a RA (Return Authorization) number. All shipments to Anchor Audio must
include RA number and be shipped prepaid. C.O.D. shipments will be refused and returned at your expense.
Customers outside the USA must contact dealer where system was purchased for service or repair instructions.
IMPORTANT: Save shipping box & packing materials, they’re specially designed to ship your unit!
WARRANTY REGISTRATION & INFORMATION
Please go to our website, www.anchoraudio.com, and select “Warranty Registration”. Completing this online registration form will activate your limited two-year warranty.
Warranty is void if the belt pack case or headset has been opened, screws have been removed or there is evidence of
tampering.
The Anchor Audio BP-900 transmitter/receiver complies with part 74 of the United States Federal Communications
Commission. Licensing of Anchor equipment is the user’s responsibility and licensing depends on the user’s classification and user’s application. Anchor Audio strongly urges the user to contact the appropriate telecommunications
authority for clarification. For info: http://wireless.fcc.gov/uls/index.htm?job=home.
This device complies with Part 15 of the FCC Rules. Operation is subject to the following two conditions: (1) This device
may not cause harmful interference, and (2) This device must accept any interference received, including interference
that may cause undesired operation.
This equipment has been tested and found to comply with the limits for Class B Digital Device, pursuant to Part 15 of
the FCC Rules. These limits are designed to provide reasonable protection against harmful interference in a residential
installation. This equipment generates and can radiate radio frequency energy and, if not installed and used in accordance with the instructions, may cause harmful interference to radio communications. However, there is no guarantee
that interference will not occur in a particular installation. If this equipment does cause harmful interference to radio
or television reception, which can be determined by turning the equipment off and on, the user is encouraged to try to
correct the interference by one or more of the following measures.
• Reorient or relocate the receiving antenna
• Increase the separation between the equipment and receiver
• Connect the equipment into an outlet on a circuit different from
that to which the receiver is connected
• Consult dealer or an experienced radio/TV technician for help
Any changes or modifications not expressly approved by the party responsible for compliance could void user’s authority to operate equipment.
FCC RF EXPOSURE STATEMENT
To satisfy RF exposure requirements, this devise must not be co-located or operating in conjunction with any other antenna or transmitter. This product should be used only with body worn accessories not containing metal. This product
should only be used with approved body worn accessories.
This product complies with the 99/5/EC directive.
WHAT IS ANCHORMAN?
AnchorMAN is a wireless full duplex intercom system that is easy to configure and simple to operate. Up to four
belt packs can talk at once and an unlimited number of belt packs can listen. Belt packs can be assigned to up
to four separate groups. The transmitter and receiver operate utilizing FDMA techniques in the 944 – 952 MHz
range without the need for a base station.
2
For videos on how to setup & use your AnchorMAN wireless intercom system go to:
www.anchoraudio.com/anchorman.php
CAUTION: Changes or modifications made by user could void user’s authority to operate equipment.
11
BELT PACK OPERATION
The ergonomically designed BP-900 AnchorMAN belt pack features an XLR headset jack, heavy duty antenna, headset
volume control, microphone sensitivity control, group selection, PTT (push to talk) and transmission indicator LED. The
belt pack is powered by 4 (included) “AA” NiMH rechargeable batteries.
GROUP SELECTOR
To create a belt pack group, each member must set
their Group Selector to the same letter – A, B, C or D.
Press the GRP Button to change groups. The LED will
light indicating the selected Group (A, B, C, D).
TRANSMIT/RECEIVE INDICATOR LED
GROUP SELECTOR LED
Example: Film Crew
GROUP
SELECTOR
BUTTON
The director assigns photography to Group A, sound
to Group B and lighting to Group C. He can then be
a part of any group by simply pressing the Group
Selector Button to the desired group.
PUSH TO TALK BUTTON
Due to the unique environmental conditions found at some locations (Example: Next to a radio station transmission
tower.) you may find that one of the four Group settings experiences disruptive interference. Simply discontinue use
of the effected Group and try the three remaining Groups to identify the clearest signal. For best results try the Group
farthest from the affected Group first (If Group A has interference try Group D).
GROUP SELECTION FOR EU USERS
To change Groups set DIP switch 3 as follows:
DIP 3 = UP/Off
–
Groups A & B
DIP 3 = DOWN/On
–
Groups C & D
PUSH TO TALK MODE / ACTIVE MODE
POWER BUTTON
Push to Talk Mode (PTT) – Default mode when the PWR button is pushed.
Press PTT button to speak to Group, release PTT button to listen.
Active Mode – Hands free voice activated operation (VOX) requires adjusting the Microphone Sensitivity level. Upon power up, belt packs default to
low requiring PTT operation. Push the “+” button repeatedly to increase
mic sensitivity until transmission is activated by the sound of your voice.
MICROPHONE SENSITIVITY
10
EU USERS: EU regulations limit continuous transmission time to five minutes.
This will require you to release the PTT button for one second before
continuing for another five minute maximum time period.
3
RECHARGEABLE BATTERIES
USING THE WINGMAN W/ ANCHORMAN
AnchorMAN belt packs include 4 “AA” NiMH rechargeable batteries and AC Gang Charger. Fully charged NiMH batteries yield approximately 7 hours of normal use. Alkaline “AA” batteries can be used but battery life will decrease by
half. Connecting the AC charger to a belt pack with alkaline batteries installed could seriously damage the system.
WHAT IS WINGMAN?
INSTALL BATTERIES
CHARGE BATTERIES
1. Slide battery compartment door to remove
1. Connect Gang Charger (included) into Charging
Port on bottom of belt packs
The WingMAN includes a transceiver that operates in a FDMA format which is compatible with AnchorMAN belt packs.
An integrated interface circuit makes it possible to easily interface the transceiver with party-line intercom systems.
This allows users to easily switch communications between one of the four AnchorMAN groups and one of two party
line groups.
2. Install 4 “AA“ NiMH rechargeable batteries
NOTE: Place “–“ end of battery against spring.
3. Replace battery compartment door
NOTE: Flashing Group LED indicates battery low.
2. Plug Gang Charger into AC outlet
(Charging Port LED on = battery charging)
3. Charge belt pack for 5 hours
(Charging Port LED off = battery fully charged)
WingMAN is an interface station that allows full duplex communication between AnchorMAN belt packs and unbalanced party-line intercom systems.
BASIC WINGMAN SETUP & OPERATION
For detailed instructions on using the WingMAN please consult the owners manual that came with the unit.
1. Attach supplied antennas to the “RX” & “TX” back panel jacks.
2. Connect your wired intercom system to the 3-pin XLR back panel jack “INTERFACE”.
CAUTION: Do not attempt to charge alkaline batteries.
Some users are required (for emergency preparedness, etc.) to leave their AnchorMAN units plugged into the charger
at all times. For these applications we recommend replacing the rechargeable batteries every 12 months.
NETWORK EXPANSION
CAN I USE MY OWN HEADSET?
The AnchorMAN is designed to work with dynamic microphone elements.
Headset pin configuration: 1 = Mic (–) / 2 = Mic (+) / 3 = Headphone (–) / 4= Headphone (+)
Shields can be connected to chassis ground pin.
I’VE RUN OUT OF BATTERY LIFE, NOW WHAT?
You can substitute “AA” alkaline batteries for the rechargeable batteries. However, connecting the battery charger to
the belt pack when alkaline batteries are installed could seriously damage your belt pack.
CAN MY ANCHORMAN WORK WITH OTHER WIRELESS INTERCOM SYSTEMS?
No. AnchorMAN uses a proprietary design and software exclusive to the product.
3. Connect DC power supply.
4. Set DIP Switch #4 to designate wired intercom system.
DIP Switch #4 Settings:
ON (DOWN) – 100 ohm systems (Anchor Audio PortaCOM)
OFF (UP) – 200 ohm systems (Clear-Com or RTS)
5. ANCHOR AUDIO PORTACOM USERS ONLY: Select wired channel according to PIN CONFIGURATION.
6. Set GROUP knob to the AnchorMAN belt packs GROUP.
7. Turn the WingMAN power switch to ON.
8. Adjust WIRED & WIRELESS VOLUME to desired listening levels.
NOTE: AnchorMAN belt packs assigned to the same Group & Frequency as the WingMAN will
experience interference when transmitting.
WIRED VOLUME
WIRELESS VOLUME
CAN SOMEONE EAVESDROP ON MY CONVERSATION?
No. AnchorMAN is not penetrated by common scanners.
IF I BREAK A HEADSET, WHAT DO I DO?
The H-200 and H-200S headsets are covered by a two-year warranty. Follow the instructions in the Getting Started
section on page 2 for a Return Authorization. AnchorMAN headsets are sold separately if a replacement is needed.
CAN I ADD BELT PACKS TO MY NETWORK?
Yes. The system is designed to accommodate an unlimited number of listeners. However, the maximum number of
people that can speak at once in one group is limited to four. Belt packs that are set to the same USER ID (DIP 1
and 2) and group will interfere if they transmit at the same time. However, if two users are not expected to speak at
the same time, they can share a USER ID.
WIRED CHANNEL SWITCH
ANCHORMAN GROUP SELECTOR
DIP SWITCH
TRANSMIT ANTENNA JACK
WINGMAN FRONT &
BACK PANELS
Model Shown: WM-900
RECEIVE ANTENNA JACK
4
WIRED SYSTEM INTERFACE
DC POWER JACK
9
CHANGING USER ID SETTINGS
HEADSET OPERATION
Each AnchorMAN belt pack is preset at the factory with an individual USER ID (1 – 4). If more than four users are
required in a single group, use DIP switches 1 & 2 to assign belt packs to a USER ID. In groups of five or more, users
will be required to share USER ID’s. Each belt pack will be able to monitor all communications within the group, but
only one user with a shared USER ID will be able to transmit at a time.
AnchorMAN wireless intercom systems use both single and dual-earpiece, noise
cancelling headsets featuring 4-pin XLR connectors and dynamic microphones.
When you receive your AnchorMAN 4-user set each belt pack is labeled with 1, 2, 3 or 4 , this number corresponds to
the USER ID assigned to that unit at the factory. Additional labels have been included (numbers 1 – 4) to be used
when changing USER ID’s. Use the following tables when changing USER ID settings.
US Frequencies (MHz)
Group A Group B Group C
EU Frequencies (MHz)
Group A Group B Group C
Group D
1. Put on headset and adjust for a firm, comfortable fit
2. Connect headset cable to belt pack jack using the
XLR connector
RAISE
Headset Volume
3. Position boom microphone close to mouth
4. Headset Volume Control buttons are on belt pack
adjust volume by pushing “+” or “–“ repeatedly
LOWER Headset Volume
Group D
User 1
945
945.4
945.8
946.2
User 1
863.2
863.3
863.4
863.5
User 2
946.6
947
947.4
947.8
User 2
863.6
863.7
863.8
863.9
User 3
948.2
948.6
949
949.4
User 3
864
864.1
864.2
864.3
User 4
949.8
950.2
950.6
951
User 4
864.4
864.5
864.6
864.7
H-200
Dual-Earpiece
Headset
H-200S
Single-Earpiece
Headset
Questions? Contact Technical Support at 888-444-6077 or Refer to the Technical Documents at
www.anchoraudio.com/anchorman.php.
SETTING DIP SWITCH FEATURES
The DIP Switches are located one the belt pack behind the antenna, to access flip antenna up. A description of DIP 1 &
2 can be found at the top of this page and DIP 3 is covered on Page 3 under “Group Selection For EU Users”.
CAUTION: Turn Belt Pack power OFF before making any changes to DIP switch settings.
DIP SWITCH 4 – ENABLE FIVE-MINUTE “TIMED” VOX MODE
When DIP 4 is set to the ON position, VOX transmissions will be limited to approximately 5 minutes. Each subsequent
voice trigger will reset the five-minute timer.
For videos on how to setup & use your AnchorMAN wireless intercom system go to:
www.anchoraudio.com/anchorman.php
MICROPHONE SENSITIVITY SETTING
MORE Mic
Sensitivity
The most sensitive settings should be used in very quiet environments
with little or no back ground noise. Experiment with the Microphone
Sensitivity level to ensure voice detection picks up the beginning and
end of each sentence.
EU USERS: EU regulations limit continuous transmission time to five minutes.
DIP SWITCH 5 – ENABLE ADJUSTABLE SQUELCH LEVEL (RSSI)
Set DIP 5 to the ON position to use the Headset Volume Control buttons to adjust the squelch level. Use this feature to
minimize RF interference from the surrounding area.
NOTE: A high squelch setting reduces interference but may reduce performance range.
Use the Microphone +/– buttons to adjust voice detection sensitivity
levels. Press + for more voice detection sensitivity and – for less. The
highest + setting will pick up your voice even at a whisper.
LESS Mic Sensitivity
Remember, what you hear in your headset is what other members of the
network will hear.
CAUTION: Setting voice detection to an overly sensitive level can cause ambient background
noise to trigger transmission, disturbing all members of the network.
8
5
BASIC SYSTEM OPERATION
1. Charge batteries for 6 hours or until charger LED turns of
GROUP SELECTOR LED
TRANSMIT/RECEIVE INDICATOR LED
NOTE: Belt packs operate about 7 hours per charge.
2. Plug headset cable into belt pack & adjust boom
POWER BUTTON
3. Hold down PWR button to turn belt pack ON
4. Set belt packs to same GROUP
5. Adjust Headset Volume level
6. Press & hold PTT button to talk, (belt pack top)
release PTT button to listen
NOTE: Repeat steps for each belt pack in the network.
SYSTEM RANGE
PUSH TO TALK BUTTON
GROUP SELECTOR BUTTON
See page 3/Active Mode for voice activated operation.
Page 3
Page 3
ANCHORMAN BELT PACK
Model Shown: BP-900
AnchorMAN belt packs can communicate through many solid objects.
However, if the solid objects contain metal or liquids, range will be reduced. Also, range will reduce as the path between belt packs becomes
more obstructed. As belt packs get farther apart AnchorMAN automatically reverts to simplex mode for a maximum range of 2,500’/750m
(EU max. range: 1,000’/305m). This means you will operate in Push
to Talk mode and speak one person at a time. If the signal fades the
belt packs are too far apart and you will need to move closer together.
HEADSET VOLUME CONTROL
Page 5
ANTENNA JACK
SMA Connector
MICROPHONE SENSITIVITY
BELT CLIP
Page 5
BATTERY COMPARTMENT
Press lightly & slide to
remove cover
SYSTEM COMPONENTS
BP-900
Wireless Belt Pack
BP-900EU Wireless Belt Pack (European frequencies)
H-200
Dual Ear Muff Headset
H-200S
Single Ear Muff Headset
GC-900
Gang Charger
HC-1600A Pelican Hardcase w/ Custom Foam Insert
MAN-40
DIP Settings:
HEADSET JACK
Four User Package:
• 4 - Belt Packs
• 4 - Headsets (single or dual muff)
• 1 - Gang Charger
• 1 - Lightweight, high-density storage case
6
DIP SWITCHES
Preset at factory
For videos on how to setup & use your
AnchorMAN wireless intercom system go to:
www.anchoraudio.com/anchorman.php
XLR Connector
CHARGER PORT & CHARGER LED
Connect Gang Charger for NiMH batteries
HEAVY DUTY ANTENNA
7
NEED MORE HELP? View demonstration videos on proper WingMAN setup & operation:
www.anchoraudio.com
TROUBLESHOOTING?
INTERFERENCE IN ANCHORMAN HEADSETS?
Switch your belt pack settings to a different AnchorMAN USER GROUP: A, B, C or D.
BACKGROUND NOISE TRANSMITTING ACROSS SYSTEM?
Reduce the headset microphone sensitivity level. Adjust the AnchorMAN mic sensitivity with the +/– Microphone
buttons on the belt pack.
TRANSMISSION IS WEAK?
Your rechargeable batteries may be running low. If batteries are weak, the Group LED’s will slowly flash. Your
belt pack needs to be recharged. If you need to keep working, you can use disposable alkaline batteries.
PROPER INTERCOM ETIQUETTE
WingMAN is an interface station that allows full duplex communication between AnchorMAN belt packs and unbalanced party-line intercom systems. Use proper intercom etiquette – wait to break into the conversation network
until the other system users have stopped speaking.
ANCHOR AUDIO CUSTOMER SERVICE
888/444-6077
310/784-2300
www.anchoraudio.com
WINGMAN
INTERCOM ADAPTOR
OWNER’S MANUAL
WINGMAN TECHNICAL SPECIFICATIONS
Range (line of sight)
FCC License (US users only)
Selectable Wireless Groups
Selectable Wired Channels
Frequency
Frequency Settings
Output Power
DC Requirements
Interface Connector
US: 1,500’ / 450 m
EU: 1000’ / 305 m
User Registration
4
2
US: 944 – 952 MHz
EU: 863 – 865 MHz
4 per Group
US: 8 dBm
EU: 5 dBm
6V – 0.5A
3-pin female XLR
Antenna
Antenna Length
Dimensions
Weight
1/2 wave length dipole
7.2” / 182 mm
8.5 x 4.5 x 1.7 in / 21.6 x 11.4 x 4.32 cm
2.4lbs / 1.1kg
FCC ID: J8ZWM-900
0976
(Specifications subject to change without notice)
Anchor Audio, Inc.
Portable Sound Systems • Torrance, California
CONTENTS
GETTING STARTED ................................................................................................................................................. 2
WHAT IS WINGMAN?............................................................................................................................................... 3
ANTENNA PLACEMENT ........................................................................................................................................... 3
WIRELESS TELEX (BTR-700) USERS ....................................................................................................................... 3
BASIC SYSTEM OPERATION .................................................................................................................................... 4
DIP SWITCHES ........................................................................................................................................................ 4
PIN CONFIGURATION ............................................................................................................................................. 5
CERTIFICATION INFORMATION .............................................................................................................................. 7
TROUBLESHOOTING ............................................................................................................................................... 8
WINGMAN TECHNICAL SPECIFICATIONS................................................................................................................ 8
100-0165-000/C - 3/08
A MESSAGE FROM THE OWNER
CERTIFICATION INFORMATION
Thank you for choosing an Anchor Audio intercom system. Our products incorporate state-of-the-art design and the
finest quality of materials and workmanship. We’re proud of our products and appreciate the confidence which you
have shown by selecting an Anchor system.
INFORMATION TO USER
I hope you’ll take a few minutes to review this manual. We’ve incorporated several unique features into our products,
and your knowledge of how to use them will enhance the performance and your enjoyment of the system.
The Anchor Audio WM-900 intercom adapter complies with part 74 of the United States Federal Communications Commission. Licensing of Anchor equipment is the user’s responsibility and licensing depends on the user’s classification
and user’s application. Anchor Audio strongly urges the user to contact the appropriate telecommunications authority
for clarification. For info: http://wireless.fcc.gov/uls/index.htm?job=home.
This device complies with Part 15 of the FCC Rules. Operation is subject to the following two conditions: (1) This device
may not cause harmful interference, and (2) This device must accept any interference received, including interference
that may cause undesired operation.
Janet Jacobs, President
on behalf of all Anchor Employees
GETTING STARTED
Please check your new unit carefully for any damage which may have occurred during shipment. Each Anchor product
is carefully inspected at the factory and packed in specially designed boxes for safe transport.
Notify the freight carrier immediately of any damage to the shipping box or product. Repack the unit in the original
box and wait for inspection by the carrier’s claim agent. Notify your dealer of the pending freight claim.
NOTE: All damage claims must be made with freight carrier!
RETURNING SYSTEMS FOR SERVICE OR REPAIR
For service or repair, please contact the dealer where system was purchased or Anchor Audio Customer Service
(800/262-4671 or 310/784-2300) to obtain a RA (Return Authorization) number. All shipments to Anchor Audio must
include RA number and be shipped prepaid. C.O.D. shipments will be refused and returned at your expense.
Customers outside the USA must contact dealer where system was purchased for service or repair instructions.
IMPORTANT: Save shipping box & packing materials,
they’re specially designed to ship your unit!
WARRANTY REGISTRATION & INFORMATION
Please go to our website, www.anchoraudio.com, and select “Warranty Registration”. Completing this online registration form will activate your limited two-year warranty.
Warranty is void if the belt pack case or headset has been opened, screws have been removed or there is evidence of
tampering.
Waste electrical and electronic products must not be
disposed of with household waste. Please recycle
where facilities exist. Check with your Local Authority
or Retailer for recycling advice.
2
This equipment has been tested and found to comply with the limits for Class B Digital Device, pursuant to Part 15 of
the FCC Rules. These limits are designed to provide reasonable protection against harmful interference in a residential
installation. This equipment generates and can radiate radio frequency energy and, if not installed and used in accordance with the instructions, may cause harmful interference to radio communications. However, there is no guarantee
that interference will not occur in a particular installation. If this equipment does cause harmful interference to radio
or television reception, which can be determined by turning the equipment off and on, the user is encouraged to try to
correct the interference by one or more of the following measures.
• Reorient or relocate the receiving antenna
• Increase the separation between the equipment and receiver
• Connect the equipment into an outlet on a circuit different from
that to which the receiver is connected
• Consult dealer or an experienced radio/TV technician for help
Any changes or modifications not expressly approved by the party responsible for compliance could void user’s authority to operate equipment.
FCC RF EXPOSURE STATEMENT
To satisfy RF exposure requirements, this devise must not be co-located or operating in conjunction with any other antenna or transmitter. This product should be used only with body worn accessories not containing metal. This product
should only be used with approved body worn accessories.
This product complies with the 99/5/EC directive.
CAUTION: Changes or modifications made by user could void user’s
authority to operate equipment.
7
WHAT IS WINGMAN?
WingMAN is an interface station that allows full duplex communication between AnchorMAN belt packs and unbalanced party-line intercom systems.
The WingMAN includes a transceiver that operates in a FDMA format which is compatible with AnchorMAN belt packs.
An integrated interface circuit makes it possible to easily interface the transceiver with party-line intercom systems.
This allows users to easily switch communications between one of the four AnchorMAN groups and one of two party
line groups.
ANTENNA PLACEMENT
In order to maximize system range/performance the WingMAN is designed with dual antennas. Generally, the greater
the antenna separation the better WingMAN will perform. After connecting both antennas adjust their positions until
Strong signal quality is indicated by the ANTENNA LED.
The ANTENNA LED shows range/signal quality based on antenna separation:
RED = Weak Signal / Green = Strong Signal
For increased range and better signal quality mount antennas using the optional Antenna Mounting Kit (includes cables & mounting hardware) to achieve maximum separation. We recommend a minimum of 10’ between antennas .
WIRELESS TELEX (BTR-700) USERS
Follow these Setup Instructions to connect the WingMAN to a BTR-700 Telex wireless base station:
1. Connect your BTR-700 (2-wire 3 pin XLR) output to the 3-pin XLR back panel jack “INTERFACE”.
2. Set WingMAN WIRED CHANNEL SWITCH to CH B.
3. Level adjustment on BTR-700 using the IN knob on the BTR-700 front panel
4. Set WIRED & WIRELESS VOLUME on WingMAN to maximum levels.
NEED MORE HELP? WingMAN setup & operation videos: www.anchoraudio.com
6
3
BASIC SYSTEM OPERATION
1. Attach supplied antennas to the “RX” & “TX” back
panel jacks.
2. Connect your wired intercom system to the 3-pin XLR back
panel jack “INTERFACE”.
TRANSMIT VOLUME CONTROL
Level of party line signal sent to the transmitter
SETTING LISTENING LEVELS
Adjust the WIRED VOLUME & WIRELESS VOLUME
knobs to match listening levels across systems
RECEIVE VOLUME CONTROL
Level of received signal going to the wired intercom system
3. Connect DC power supply.
ANTENNA SEPARATION
INDICATOR LED
System signal range/performance is
effected by antenna separation
4. Set DIP Switch #4 to designate wired intercom system.
DIP Switch #4 Settings:
ON (DOWN) – 100 ohm systems (Anchor Audio PortaCOM)
OFF (UP) – 200 ohm systems (Clearcom or RTS)
RED
Poor signal – increase
antenna separation
GREEN Optimum signal strength
5. ANCHOR AUDIO PORTACOM USERS ONLY: Select wired
channel according to PIN CONFIGURATION on back panel.
6. Set GROUP knob to the AnchorMAN belt packs GROUP.
7. Turn the WingMAN power switch to ON.
POWER SWITCH
WIRED CHANNEL SWITCH
Select channel for wired system
(see PIN CONFIGURATION)
ANCHORMAN GROUP SELECTOR
Set to match GROUP selection on
AnchorMAN belt packs
8. Adjust WIRED & WIRELESS VOLUME to desired
listening levels.
NOTE: AnchorMAN belt packs assigned to the
same Group & Frequency as the WingMAN will
experience interference when transmitting.
RECEIVE INDICATOR LED
Lights when signal is being received
PIN CONFIGURATION
WINGMAN
FRONT/BACK PANELS
The WingMAN interface connector uses a 3-pin XLR jack on the back
panel. Connect the interface box with the wired intercom system using the 3 pin XLR jack on the rear panel.
Model Shown: WM-900
Pin Configuration
PIN 1:
Ground
DIP SWITCHES
USER ID Selection – DIP Switches 1 & 2
WingMAN uses one of four GROUP/USER IDs to communicate with the
AnchorMAN. Select a USER ID (1 – 4) by setting DIP Switches 1 & 2
on the back panel:
SWITCH
1
2
PIN 2:
Wired Channel A
RECEIVE ANTENNA JACK
(see ANTENNA PLACEMENT)
WIRED SYSTEM INTERFACE
3-pin XLR jack – connect to
wired intercom system
PIN 3:
Wired Channel B
Select Wired Channel (A or B) to be used according to the pin description above (also shown on pack panel). The Wired Channel
Switch matches the Anchor Audio PortaCOM belt pack channels.
USER 1 USER 2 USER 3 USER 4
UP
DOWN
UP
DOWN
UP
UP
DOWN DOWN
AnchorMAN belt packs with the same GROUP & USER ID setting may
experience significant transmission interference.
Wired Interface Setup – DIP Switch 4
Determines impedance match of the wired interface.
DIP Switch #4 Settings:
ON (DOWN) – 100 ohm systems (Anchor Audio PortaCOM)
OFF (UP) – 200 ohm systems (Clearcom or RTS)
4
DIP SWITCH
Setup USER ID & Select
100/200 ohm operation
(see DIP SWITCHES)
XLR JACK PIN ASSIGNMENTS
(see PIN CONFIGURATION)
DC POWER JACK
Connect DC power supply
TRANSMIT ANTENNA JACK
(see ANTENNA PLACEMENT)
5