1
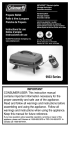
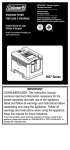
INSTASTART™ Electronic Ignition
Propane Rotisserie/Oven
Instructions for use
© 2006 The Coleman Company, Inc.
www.coleman.com
®
ANSI Z21.58a-2006/CSA 1.6a-2006
Outdoor Cooking Gas Appliances
9987 Series
This unit is an accessory for Coleman®
Propane Grill Models 9993 and 9998. Also read
the additional instructions and warnings that are
provided in the manual that came with your
Coleman® Grill.
IMPORTANT
CONSUMER/USER: This instruction manual
contains important information necessary for the
proper assembly and safe use of the appliance.
Read and follow all warnings and instructions before
assembling and using the appliance. Follow all
warnings and instructions when using the appliance.
Keep this manual for future reference.
If you have questions about assembly, operation, servicing or repair of this
appliance, please call Coleman at 1-800-835-3278 or TDD: 316-832-8707. In
Canada call 1-800-387-6161.
DANGER
If you smell gas:
1. Shut off gas to the appliance.
2. Extinguish any open flame.
3. Open lid.
4. If odor continues, keep away from the appliance
and immediately call your gas supplier or your
fire department.
Failure to follow these instructions could result in fire
or explosion which could cause property damage,
personal injury or death.
DANGER
1. Never operate this appliance unattended.
2. Never operate this appliance within 10 feet
(3.05 m) of any other gas cylinder.
3. Never operate this appliance within 25 feet
(7.5 m) of any flammable liquid.
4. Heated liquids remain at scalding temperatures
long after the cooking process. Never touch
cooking appliance until liquids have cooled to
115°F (45°C) or less.
5. Never allow oil or grease to get hotter than
400°F (200°C). If the temperature exceeds 400°F
(200°C) or if oil begins to smoke, immediately
turn the burner or gas supply OFF.
6. If a fire should occur, keep away from the
appliance and immediately call your fire
department. Do not attempt to extinguish an oil
or grease fire with water.
Failure to follow these instructions could result in
fire, explosion or burn hazard, which could cause
property damage, personal injury or death.
English-1
Only persons who can understand and follow
the instructions should use or service this
outdoor rotisserie.
If you need assistance or outdoor rotisserie
information such as an instruction manual or
labels, contact The Coleman Company, Inc.
DANGER
DANGER indicates an imminently hazardous
situation which, if not avoided, will result in
death or serious injury.
WARNING
WARNING indicates a potentially hazardous
situation which, if not avoided, could result in
death or serious injury.
DANGER
CAUTION
CAUTION indicates a potentially hazardous
situation which, if not avoided, may result in
minor or moderate personal injury, or
property damage.
CAUTION
CARBON MONOXIDE
HAZARD
• This appliance can
produce carbon
monoxide which has
no odor.
• Using it in an enclosed
space can kill you.
• Never use this appliance
in an enclosed space
such as a camper, tent,
car or home.
This manual contains important information about
the assembly, operation and maintenance of this
outdoor propane appliance. General safety information is presented on this page and is also located throughout these instructions. Particular attention should be paid to information accompanied by
the safety alert symbol “ DANGER”,
“ WARNING”, “ CAUTION”.
• The use of alcohol, prescription or nonprescription drugs may impair your ability to
properly assemble or safely operate the
appliance.
• When cooking with oil or grease, have a type
BC or ABC fire extinguisher readily available.
In the event of an oil or grease fire, do not
attempt to extinguish with water. Immediately
call the fire department. A Type BC or ABC
fire extinguisher may, in some circumstances
contain the fire.
• In the event of rain, snow, hail, sleet or other
forms of precipitation while cooking with oil or
grease, cover the cooking vessel immediately
and turn off the appliance burners and gas
supply. Do not attempt to move the appliance
or cooking vessel.
• When cooking, the appliance must be on a
level, stable noncombustible surface in an area
clear of combustible material. An asphalt
surface (blacktop) may not be acceptable for
this purpose.
• Do not leave the appliance unattended. Keep
children and pets away from the appliance at
all times.
• Do not place empty cooking vessel on the
appliance while in operation. Use caution when
placing anything in cooking vessel while the
appliance is in operation.
• Do not move the appliance when in use. Allow
the cooking vessel to cool to 115°F (45°C)
before moving or storing.
• This appliance is not intended for and should
never be used as a heater.
Keep this manual for future reference and to educate new users of this product. This manual should
be read in conjunction with the labeling on the product.
Safety precautions are essential when any
mechanical or propane fueled equipment is
involved. These precautions are necessary when
using, storing, and servicing. Using this equipment
with the respect and caution demanded will reduce
the possibilities of personal injury or property damage.
The following symbols shown below are used
extensively throughout these instructions. Always
heed these precautions, as they are essential when
using any mechanical or propane fueled equipment.
English-2
DANGER
DANGER
• EXPLOSION - FIRE HAZARD
• CARBON MONOXIDE HAZARD
• Never store propane near high heat, open
flames, pilot lights, direct sunlight, other
ignition sources or where temperatures exceed
120 degrees F (49°C).
• Propane gas is heavier than air and leaking
propane will sink to the lowest level possible. It
can ignite by ignition sources including
matches, lighters, sparks or open flames of
any kind many feet away from the original
leak. If you smell gas, leave the area
immediately.
• Never install or remove propane tank while
outdoor rotisserie is lighted, near flame, pilot
lights, other ignition sources or while outdoor
rotisserie is hot to touch.
• During operation, this product can be a source
of ignition. Never use the rotisserie in spaces
that contain or may contain volatile or airborne
combustibles, or products such as gasoline,
solvents, paint thinner, dust particles or
unknown chemicals.
• Minimum distance from sides and back of unit
to walls or railings is 36 inches (92 cm). Do not
use under overhead unprotected combustible
construction.
• Provide adequate clearances around air
openings into the combustion chamber.
• DO NOT use gas rotisserie indoors or in
garages, breezeways, sheds or enclosed
areas.
• Do not obstruct the flow of combustion and
ventilation air.
• This rotisserie is a combustion appliance. All
combustion appliances produce carbon
monoxide (CO) during the combustion
process. This product is designed to produce
extremely minute, non-hazardous amounts of
CO if used and maintained in accordance with
all warnings and instructions. Do not block air
flow into or out of the rotisserie.
• Carbon Monoxide (CO) poisoning produces
flu-like symptoms, watery eyes, headaches,
dizziness, fatigue and possibly death. You
can’t see it and you can’t smell it. It’s an
invisible killer. If these symptoms are present
during operation of this product get fresh air
immediately!
• For outdoor use only. If stored indoors,
detach cylinder outdoors.
• Never use inside house, camper, tent,
vehicle or other unventilated or enclosed
areas. This rotisserie consumes air
(oxygen). Do not use in unventilated or
enclosed areas to avoid endangering
your life.
WARNING
We cannot foresee every use which may be
made of our products.
Check with your local fire safety authority if
you have questions about use.
Other standards govern the use of fuel gases
and heat producing products for specific uses.
Your local authorities can advise you about
these.
• This rotisserie is designed as an accessory
for Coleman® Grill models 9993 and 9998.
The fuel is regulated through the preset
regulator that came with your grill. Do not
attempt to adjust.
• The installation must conform with local
codes or, in absence of local codes, with the
National Fuel Gas Code, ANSI Z223.1/NFPA
54, Storage and Handling of Liquefied
Petroleum Gases, ANSI/NFPA 58 or CSA
B149.1, Natural Gas and Propane
Installation Code.
• This appliance is not intended to be installed
in or on recreational vehicles and/or boats.
• This appliance is not intended for
commercial use.
WARNING
• This product is fueled by propane gas. Propane
gas is invisible, odorless, and flammable. An
odorant is normally added to help detect leaks
and can be described as a ”rotten egg” smell.
The odorant can fade over time so leaking gas
is not always detectable by smell alone.
• Only cylinders marked “propane” must
be used.
• Use only propane gas set up for
vapor withdrawal.
• Propane gas should be stored or used in
compliance with local ordinances and codes or
with ANSI/NFPA 58. Turn off propane and
disconnect cylinder when not in use.
• Cylinders must be stored out of reach
of children.
CALIFORNIA PROPOSITION 65:
WARNING: This fuel, and byproducts of
combustion of this fuel, contain chemicals known
to the state of California to cause cancer, birth
defects, or other reproductive harm.
English-3
Electrical Attachments
The maximum sum total amperage rating of
electrical accessories attached to the 9993 or
9998 Series Coleman Grills must not exceed
10 amps.
When using an electric attachment with
the grill, follow the specification and warning
statements accompanying the attachment.
IMPORTANT: If using an external
electrical source, the installed appliance must
be electrically grounded according to local
codes or, in the absence of local codes, with
the National Electrical Code, ANSI/NFPA 70
or the Canadian Electrical Code CSA C22.1.
1. To protect against electric shock, do not
immerse cord or plugs in water or other liquid.
2. Unplug from the outlet when not in use and
before cleaning. Allow to cool before putting on
or taking off parts.
3. Do not operate any outdoor cooking gas
appliance with a damaged cord, plug, or after
the appliance malfunctions or has been
damaged in any manner. Contact Coleman for
repair.
4. Do not let the cord hang over the edge of a
table or touch hot surfaces.
5. Do not use an outdoor cooking gas appliance
for purposes other than intended.
6. When connecting, first connect accessories to
the electrical receptacle in the rear of the grill,
next connect the short service cord on the grill
to the extension cord, and finally connect the
extension cord to the power supply.
7. Use only a Ground Fault Interrupter (GFI)
protected circuit with this outdoor cooking gas
appliance.
8. Never remove the grounding plug or use with
an adapter of 2 prongs.
9. Use only extension cords with a 3 prong
grounding plug, rated for the power of the
equipment, and approved for outdoor use with
a W-A marking.
WARNING
Electrical Grounding Instructions
This outdoor cooking gas appliance
is equipped with a three-prong
(grounding) plug for your protection
against shock hazard and should be
plugged directly into a properly
grounded three-prong receptacle. Do
not cut or remove the grounding
prong from this plug.
Longer detachable power-supply cords or
extension cords must be used with care. The
marked electrical rating of the cord set or
extension cord must be at least as great as
the electrical rating of the appliance. Keep the
connection to an extension cord away from
water and off the ground. Arrange the cord so
that it will not drape over the countertop or
tabletop where it can be pulled on by children
or tripped over unintentionally.
Never clean any electrical product with
water or cleaning fluids. Store electrical
products indoors and out of reach of children
when not in use. DO NOT allow cord to touch
any hot surfaces which could melt insulation.
English-4
WARNING
CAUTION
• SERVICE SAFETY
• Keep all connections and fittings clean.
Inspect propane cylinder and rotisserie
propane connections for damage before
attaching.
• During set up, check all connections and
fittings for leaks using soapy water. Never use
a flame. Bubbles indicate a leak. Check that
the connection is not cross-threaded and that
it is tight. Perform another leak check. If there
is still a leak, remove the cylinder and contact
Coleman for service or repairs.
• Use as a cooking appliance only. Never alter
in any way or use with any device or part not
expressly approved by Coleman.
• Clean rotisserie frequently to avoid grease
accumulation and possible grease fires.
• BURN HAZARD
• Never leave rotisserie unattended when hot
or in use.
• Keep out of reach of children.
Technical Characteristics
Input: 6,000 BTU/H
Category: Pressure regulated propane.
Fuel: Uses fuel system on Coleman® grill models 9993 and 9998.
Regulator: Uses regulator on Coleman® grill models 9993 and 9998.
Ignition: Piezo electronic ignition.
Rotisserie Motor: 120V-60HZ, 4 Watts, .033 Amps.
Features
9
1
8
1.
2.
3.
4.
5.
6.
7.
8.
9.
2
Lid
Wire Oven Rack
Rotisserie Spit Rod
Fuel Hose
Electrical Cord
Igniter
Control Knob
Glass View Window
Thermometer
3
7
6
4
5
Fig. 1
English-5
Rotisserie Assembly
3. Engage the locks by firmly pushing the tabs
into the slots (Fig. 4). Be sure to engage two
locks on the Side Rotisserie.
Attach the Rotisserie to
the Grill
NOTE: This Side Solution™ Rotisserie
attachment is designed for use only when properly
attached to Coleman® grill models 9993 and 9998.
Attempted use or setup in a manner not described
in this manual is prohibited and will void the
warranty.
■ Remove the components from the carton and
discard all packing components.
■ Wash the food contact surfaces with hot soapy
water and dry completely. These items include
the rotisserie spit rod and the meat forks. Wipe
the inside and outside surfaces with a clean
damp cloth and dry completely.
■ For outdoor use only.
1. Align the tabs on the Side Rotisserie with the
slots on the side of the grill (Fig. 2).
Fig. 4
4. Check that the cylinder valve is closed by
turning the cylinder knob clockwise to a full
stop (Fig. 5).
Fig. 2
2. Use firm pressure to push the Side Rotisserie
down and into place (Fig. 3). The joint
between the Side Rotisserie and the Grill will
be even.
Fig. 5
5. Turn off the control knob (Fig. 6).
Fig. 3
English-6
Fig. 6
10. Slide the motor downward over the bracket
and push firmly into position (Fig. 10).
Rotisserie
Assembly
6. Push the fuel hose connection through the
opening in the side grill panel (Fig. 7).
Fig. 10
11. Plug the rotisserie cord into the outlet in the
back of the grill.
Setup
Fig. 7
1. Slide the grease tray into the rails below the
rotisserie (Fig. 11).
7. Open the door to reveal the Quick Coupler in
the upper corner. Retract the Collar on the
Quick Coupler before attaching to the male
fitting (Fig. 8). Release the collar to lock the
connection.
Fig. 11
Rotisserie Setup
NOTE: To use the rotisserie, the wire oven rack
must be removed and set aside.
Fig. 8
2. Assemble the meat forks and the collar onto
the spit rod (Fig. 12). Adjust the location of the
collar with the thumbscrew to support the spit
rod.
8. Check that the hose has no kinks or sharp
bends and clears areas that will become hot
during use. Never put strain on the hose where
it joins a fitting.
9. Push the electrical plug down through the
rotisserie frame (Fig. 9).
Fig. 12
Fig. 9
English-7
3. Insert the pointed end of the spit rod into the
opening in the motor and rest the collar on the
frame (Fig. 13). The spit rod should freely turn
when the motor is turned on.
Burner and Orifice
1. Proper location of the burner with respect to the
venturi and orifice fitting is important. To verify
the proper factory installation of the burner and
venturi, look at the unit from below and locate
the burner and venturi. The burner inlet must
be located in line with the venturi and the
orifice fitting on the end of the fuel tube
(Fig. 16).
Infra Red Burner
Fig. 13
4. Figure 14 illustrates the spit rod correctly
installed.
Venturi
Orifice Fitting
Fig. 16
Fig. 14
■ Check and clean the burner/venturi tubes for
insects and insect nests. A clogged tube can
lead to a fire beneath the appliance.
Oven Setup
Leak Testing
1. To use the unit as an oven, slide the wire oven
rack into the rails (Fig. 15).
NOTE: The wire oven rack must be installed
correctly. The correct installation is with the
lowest side of the heat deflector near the
burner.
WARNING
• Perform leak test outdoors.
• Extinguish all open flames.
• NEVER leak test when smoking.
• Do not use the outdoor rotisserie until
connection has been leak tested and does
not leak.
CAUTION
• SERVICE SAFETY
Fig. 15
• Keep all connections and fittings clean.
Inspect propane cylinder and rotisserie
propane connections for damage before
attaching.
• During set up, check all connections and
fittings for leaks using soapy water. Bubbles
indicate a leak. Never use a flame to check
for leaks.
English-8
Leak Testing (cont.)
Operation
DANGER
CAUTION
Inspect the gas supply hose before each
use. Look underneath the grill to inspect
the hose assembly below the grill. If
there are cuts, damage, excessive
abrasion or wear, replace the hose prior
to operating the appliance. During
assembly of the grill and when attaching
or replacing the L.P. gas cylinder, insure
that the gas supply hose is free of kinks
and/or damage and is at least three
inches away from hot surfaces such as
the grill housing. Use only hose
replacements specified in the parts list.
• CARBON MONOXIDE HAZARD
• For outdoor use only.
• Never use inside house, camper, tent, vehicle
or other unventilated or enclosed areas. This
unit consumes air (oxygen). Do not use in
unventilated or enclosed areas to avoid
endangering your life.
DANGER
How to Check for Leaks
1. Make a soapy solution of equal parts mild
liquid dishwashing detergent and water.
2. Turn off all burner control knobs.
3. Turn on the fuel supply by turning the
cylinder valve knob counterclockwise (right
to left) one rotation.
4. Apply a soap solution to the connections
indicated with the arrows in Fig. 17 and 18. If
bubbles appear at these areas, a leak is
indicated.
5. Also follow the “Leak Check” section in the
manual that came with your grill.
• EXPLOSION - FIRE HAZARD
• Propane is heavier than air and can
accumulate in low places. If you smell gas,
leave the area immediately.
• Always attach or detach propane source
outdoors; never while unit is lighted, near
flame, pilot lights, other ignition sources or
while unit is hot to touch.
• This unit is very hot during use and can ignite
flammables too close to the burners.
• Minimum distance shall be at least 36 inches
(92 cm) from any structure or combustible
material.
• Do not use gas rotisserie on or under any
apartment, or condominium balcony or deck.
• Keep gasoline and other flammable liquids and
vapors well away from unit.
■ Do not attempt to operate until you have read
and understood all General Safety Information in
this manual and all assembly is complete and
leak checks have been performed.
Side Rotisserie
Burner Lighting
Fig. 17
WARNING
• BURN HAZARD
• This appliance will be hot during and
after use.
• Never leave rotisserie unattended
when hot or in use.
• Keep out of reach of children.
Fig. 18
English-9
Rotisserie Burner
Lighting (cont.)
INSTASTART™ Electronic
Ignition Rotisserie:
1. Open the lid.
2. Make sure all valves are OFF.
3. Turn on the cylinder valve.
4. Push in and turn on the Rotisserie Control
Knob counterclockwise to HIGH, then
repeatedly press the igniter switch until the
flame ignites (Fig 19).
5. If ignition does not occur in 5 seconds, turn
the Rotisserie Control Knob off, wait 5
minutes, and repeat the lighting procedure.
6. If the burner does not light after trying
again, turn off Rotisserie Control Knob and
try match lighting the burner.
HINT: If the igniter fails to light the rotisserie
burner, adjust electrode tip with needlenose pliers. A spark must jump near a gas
opening in the burner when igniter is
activated. Use care not to damage the
ceramic insulator on electrode.
Match Lighting:
CAUTION
Use a LONG wooden match or a butane
lighter with an extension. Make sure all
burner controls are off except for the
burner being lighted. If a long-reach
match or lighter is not accessible, use the
match extension. The match extension is
located inside the doors. Insert a match in
the holder end of the extension, strike and
place the burning match near the
BURNER being operated.
1. Open the lid.
2. Make sure all valves are OFF.
3. Turn on the cylinder valve.
4. Strike and place the burning match
near the rotisserie burner, then push
in and turn on the Rotisserie Control Knob
counterclockwise to HIGH (Fig. 21).
Fig. 21
Push
Repeatedly
5. Adjust flame with the control knob (Fig. 22).
Fig. 19
7. Observe the flame from below the rotisserie.
8. Flame should be blue with a hint of yellow
on tips.
9. Adjust flame with the control knob (Fig. 20).
Fig. 22
Fig. 20
English-10
■ A good flame should be blue with minimal
yellow tip. Some yellow tips on flames are
acceptable as long as no carbon or soot
deposits appear (Fig. 23).
BAD
GOOD
Blue
Yellow
Yellow
Blue
Holes in Burner
Fig. 23
NOTE: If the burner flame is accidentally
extinguished, turn off the control knob
and wait 5 minutes before relighting
the appliance.
To Turn Off
Turn off the control knob (Fig. 24).
Fig. 24
To Store
DANGER
• EXPLOSION - FIRE HAZARD
• Never store propane near high heat, open
flames, pilot lights, direct sunlight, other
ignition sources or where temperatures
exceed 120 degrees F (49°C).
• When the rotisserie and grill are not in use,
the gas MUST be turned off at the fuel
supply cylinder.
• Do not store a spare LP-gas cylinder under or
near this appliance. Failure to follow the above
instructions exactly may result in fire causing
death or serious injury.
English-11
Care, Maintenance
and Cleaning
CAUTION
All cleaning and maintenance should be
done only when the rotisserie and grill
are cool and with the fuel supply turned
off at the cylinder.
Cleaning the Burner:
WARNING
Spider’s nests or wasp’s mud inside the
burner tube may cause fire at the valve. If a
fire occurs, immediately turn off the gas
supply at the L.P. cylinder valve (see
representative illustration in Fig. 25).
Suggested Cleaning Materials:
•
•
•
•
Mild dishwashing liquid detergent
Hot water
Nylon cleaning pad
Soft, dry cloth
Component Cleaning:
■ Make sure rotisserie is sufficiently cool.
■ COOKING SURFACES: Wash the food
contact surfaces with hot soapy water. These
items include the rotisserie spit rod and meat
forks. Remove stubborn residue with a mild
cleanser and a nylon cleaning pad. DO
NOT use a commercial oven cleaner. Wipe
dry with a soft, dry cloth.
■ EXTERIOR SURFACES: Clean exterior
surfaces with mild soap and hot water.
Remove stubborn residue with a mild
cleanser and a nylon cleaning pad. DO
NOT use abrasive cleaners. Wipe dry with
a soft, dry cloth.
Igniter service:
REPRESENTATIVE
ILLUSTRATION
Fig. 25
Note:
Spiders and small insects can spin webs and
build nests inside the burner tube. This
especially occurs in late summer and fall
before frost when spiders are most active.
These nests can obstruct gas flow and cause
a fire in and around the burner valve. Such a
fire can cause operator injury and serious
damage to the rotisserie. To ensure full heat
output, inspect the burner tube often (once or
twice a month).
The igniter for the rotisserie is a standard
piezo igniter. It does not require a battery.
See the parts list for replacement items for
your rotisserie.
If your unit shows indications of insect webs
or nests, contact your nearest service center
or call Coleman for assistance. Figure 26
shows the areas for a service center to
inspect.
Preventive maintenance:
NOTE: Water or air pressure will not normally
clear a spider web.
Light and burn the infrared burner at least
once a month to ensure there is not a buildup of debris or grease on the burner. This will
ensure the ceramic burner will continue to
operate as it should.
Infra Red Burner
Venturi
Orifice Fitting
Fig. 26
English-12
Parts List
No.
Part Number
Description
1
2
3
4
9987-5031
“Please Call”
9987-5151
9987-2521
Lid Assembly
Window Assembly
Burner Assembly
Grease Tray
No.
5
6
7
8
9
Part Number
9987-5061
9987-5111
9986-5181
9987-2511
9987-5131
Description
Spit Rod w/ Forks
Igniter Assembly
Knob Assembly
Motor Assembly
Wire Oven Rack
1
2
9
8
3
7
6
5
4
English-13
Warranty
Limited One Year Warranty
The Coleman Company, Inc. (“Coleman”)
warrants that for a period of one year from the
date of original retail purchase, this product will
be free from defects in material and
workmanship. Coleman, at its option, will repair or
replace this product or any component of the
product found to be defective during the warranty
period. Replacement will be made with a new or
remanufactured product or component. If the
product is no longer available, replacement may
be made with a similar product of equal or greater
value. This is your exclusive warranty.
This warranty is valid for the original retail
purchaser from the date of initial retail purchase
and is not transferable. Keep the original sales
receipt. Proof of purchase is required to obtain
warranty performance. Coleman dealers, service
centers, or retail stores selling Coleman®
products do not have the right to alter, modify or
in any way change the terms and conditions of
this warranty.
What This Warranty Does Not Cover
This warranty does not cover normal wear of
parts, parts that are not genuine Coleman® parts,
or damage resulting from any of the following:
negligent use or misuse of the product; use on
improper voltage or current; commercial use of
the product; use contrary to the operating
instructions; disassembly, repair or alteration by
anyone other than Coleman or an authorized
service center. Further, the warranty does not
cover Acts of God, such as fire, flood, hurricanes
and tornadoes. Warranty void if damage to
product results from the use of a part other than a
genuine Coleman® part.
COLEMAN SHALL NOT BE LIABLE FOR
DEFECTS THAT ARE CAUSED BY THE USE
OF UNAUTHORIZED PARTS OR SERVICE.
COLEMAN SHALL NOT BE LIABLE FOR ANY
INCIDENTAL OR CONSEQUENTIAL
DAMAGES CAUSED BY THE BREACH OF
ANY EXPRESS OR IMPLIED WARRANTY OR
CONDITIONS. EXCEPT TO THE EXTENT
PROHIBITED BY APPLICABLE LAW, ANY
IMPLIED WARRANTY OF MERCHANTABILITY
OR FITNESS FOR A PARTICULAR PURPOSE
IS LIMITED IN DURATION TO THE DURATION
OF THE ABOVE WARRANTY OR
CONDITIONS. SOME STATES, PROVINCES,
OR JURISDICTIONS DO NOT ALLOW THE
EXCLUSION OR LIMITATION OF INCIDENTAL
OR CONSEQUENTIAL DAMAGES OR
LIMITATIONS ON HOW LONG AN IMPLIED
WARRANTY LASTS, SO THE ABOVE
LIMITATIONS OR EXCLUSION MAY NOT
APPLY TO YOU. THIS WARRANTY GIVES
YOU SPECIFIC LEGAL RIGHTS, AND YOU
MAY ALSO HAVE OTHER RIGHTS THAT VARY
FROM STATE TO STATE OR PROVINCE TO
PROVINCE.
How to Obtain Warranty Service
Take the product to an authorized Coleman
service center.You can find the nearest
authorized Coleman service center by visiting
www.coleman.com or calling 1-800-835-3278 or
TDD 316-832-8707 in the United States or 1 800
387-6161 in Canada. If a service center is not
conveniently located, attach to the product a tag
that includes your name, address, daytime
telephone number and description of the problem.
Include a copy of the original sales receipt.
Carefully package the product and send either by
courier or insured mail with shipping and
insurance prepaid to:
For products purchased in the
United States:
The Coleman Company, Inc.
3600 North Hydraulic
Wichita, KS 67219
For products purchased in Canada:
Sunbeam Corporation (Canada) Limited
DBA Jarden Consumer Solutions
5975 Falbourne Street
Mississauga, Ontario
Canada L5R 3V8
The costs of transporting the product to
Coleman or an authorized service center for
warranty service is the responsibility of the
purchaser.
Do not mail products with fuel in tanks, or with
disposable propane cylinders. Remove glass
globes from lanterns and wrap separately.
DO NOT RETURN THIS PRODUCT TO THE
PLACE OF PURCHASE.
If you have any questions regarding this
warranty please call 1-800-835-3278 or TDD 316832-8707 in the United States or 1 800 387-6161
in Canada.
English-14
The Coleman Company, Inc. • 3600 North Hydraulic • Wichita, KS 67219 U.S.A.
1-800-835-3278 • TDD: 316-832-8707
© 2006 The Coleman Company, Inc. All rights reserved. Coleman® and
are registered trademarks and INSTASTART™ is a trademark of The Coleman Company, Inc.
www.coleman.com
9987-050 (20070109)