1
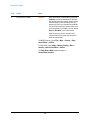
Agilent Signal Generators This manual provides documentation for the following instruments: MXG Signal Generator (Series A and B) EXG Signal Generator PSG Signal Generator ESG Signal Generator Security Features and Document of Volatility Agilent Technologies Notices © Agilent Technologies, Inc. 2004-2014 No part of this manual may be reproduced in any form or by any means (including electronic storage and retrieval or translation into a foreign language) without prior agreement and written consent from Agilent Technologies, Inc. as governed by United States and international copyright laws. Trademark Acknowledgements Adobe Acrobat® and Reader® are US registered trademarks of Adobe Systems Incorporated. Adobe® PDF is a trademark of Adobe Systems Incorporated. Greenliant and NANDrive are trademarks of Greenliant Systems Ltd. Manual Part Number E4400-90621 Print Date February 2014 Supersedes: August 2012 Printed in USA Agilent Technologies Inc. 1400 Fountaingrove Parkway Santa Rosa, CA 95403 Warranty The material contained in this document is provided “as is,” and is subject to being changed, without notice, in future editions. Further, to the maximum extent permitted by applicable law, Agilent disclaims all warranties, either express or implied, with regard to this manual and any information contained herein, including but not limited to the implied warranties of merchantability and fitness for a particular purpose. Agilent shall not be liable for errors or for incidental or consequential damages in connection with the furnishing, use, or performance of this document or of any information contained herein. Should Agilent and the user have a separate written agreement with warranty terms covering the material in this document that conflict with these terms, the warranty terms in the separate agreement shall control. Technology Licenses The hardware and/or software described in this document are furnished under a license and may be used or copied only in accordance with the terms of such license. Restricted Rights Legend If software is for use in the performance of a US Government prime contract or subcontract, Software is delivered and licensed as “Commercial computer software” as defined in DFAR 252.227-7014 (June 1995), or as a “commercial item” as defined in FAR 2.101(a) or as “Restricted computer software” as defined in FAR 52.227-19 (June 1987) or any equivalent agency regulation or contract clause. Use, duplication or disclosure of Software is subject to Agilent Technologies’ standard commercial license terms, and non-DOD Departments and Agencies of the US Government will receive no greater than Restricted Rights as defined in FAR 52.227-19(c)(1-2) (June 1987). US Government users will receive no greater than Limited Rights as defined in FAR 52.227-14 (June 1987) or DFAR 252.227-7015 (b)(2) (November 1995), as applicable in any technical data. Safety Notices CAUTION A CAUTION notice denotes a hazard. It calls attention to an operating procedure, practice, or the like that, if not correctly performed or adhered to, could result in damage to the product or loss of important data. Do not proceed beyond a CAUTION notice until the indicated conditions are fully understood and met. WARNING A WARNING notice denotes a hazard. It calls attention to an operating procedure, practice, or the like that, if not correctly performed or adhered to, could result in personal injury or death. Do not proceed beyond a WARNING notice until the indicated conditions are fully understood and met. Warranty This Agilent technologies instrument product is warranted against defects in material and workmanship for a period of one year from the date of shipment. During the warranty period, Agilent Technologies will, at its option, either repair or replace products that prove to be defective. For warranty service or repair, this product must be returned to a service facility designated by Agilent Technologies. Buyer shall prepay shipping charges to Agilent Technologies, and Agilent Technologies shall pay shipping charges to return the product to Buyer. For products returned to Agilent Technologies from another country, Buyer shall pay all shipping charges, duties, and taxes. Where to Find the Latest Information Documentation is updated periodically. For the latest information about these products, including instrument software upgrades, application information, and product information, see the following URLs: http://www.agilent.com/find/mxg http://www.agilent.com/find/exg http://www.agilent.com/find/psg http://www.agilent.com/find/esg To receive the latest updates by email, subscribe to Agilent Email Updates: http://www.agilent.com/find/emailupdates Information on preventing instrument damage can be found at: http://www.agilent.com/find/tips Is your product software up-to-date? Periodically, Agilent releases software updates to fix known defects and incorporate product enhancements. To search for software updates for your product, go to the Agilent Technical Support website at: http://www.agilent.com/find/techsupport 3 4 Contents 1 Table of Contents 2. Contacting Agilent Sales and Service Offices . . . . . . . . . . . . . . . . . . . . . . . . . . . . . . . . . . . . . . . . . . . . . . 7 3. Products Covered by this Document . . . . . . . . . . . . . . . . . . . . . . . . . . . . . . . . . . . . . . . . . . . . . . . . . . . . . . 9 Document Purpose . . . . . . . . . . . . . . . . . . . . . . . . . . . . . . . . . . . . . . . . . . . . . . . . . . . . . . . . . . . . . . . . . . . . . . . . . . 10 Recommended Software Upgrades . . . . . . . . . . . . . . . . . . . . . . . . . . . . . . . . . . . . . . . . . . . . . . . . . . . . . . . . . . . . . 11 4. Security Terms and Definitions . . . . . . . . . . . . . . . . . . . . . . . . . . . . . . . . . . . . . . . . . . . . . . . . . . . . . . . . . 13 5. Instrument Memory & Volatility. . . . . . . . . . . . . . . . . . . . . . . . . . . . . . . . . . . . . . . . . . . . . . . . . . . . . . . . . 15 MXG (Series B) & EXG Memory . . . . . . . . . . . . . . . . . . . . . . . . . . . . . . . . . . . . . . . . . . . . . . . . . . . . . . . . . . . . . . . 16 MXG (Series A) Memory . . . . . . . . . . . . . . . . . . . . . . . . . . . . . . . . . . . . . . . . . . . . . . . . . . . . . . . . . . . . . . . . . . . . . 19 ESG and PSG Memory . . . . . . . . . . . . . . . . . . . . . . . . . . . . . . . . . . . . . . . . . . . . . . . . . . . . . . . . . . . . . . . . . . . . . . . 23 6. Memory Clearing, Sanitization and Removal Procedures . . . . . . . . . . . . . . . . . . . . . . . . . . . . . . . . . . . . 29 Erase All . . . . . . . . . . . . . . . . . . . . . . . . . . . . . . . . . . . . . . . . . . . . . . . . . . . . . . . . . . . . . . . . . . . . . . . . . . . . . . . . . . 30 Erase and Overwrite All . . . . . . . . . . . . . . . . . . . . . . . . . . . . . . . . . . . . . . . . . . . . . . . . . . . . . . . . . . . . . . . . . . . . . . 31 Erase and Sanitize All. . . . . . . . . . . . . . . . . . . . . . . . . . . . . . . . . . . . . . . . . . . . . . . . . . . . . . . . . . . . . . . . . . . . . . . . 32 Force Internal to SD Card . . . . . . . . . . . . . . . . . . . . . . . . . . . . . . . . . . . . . . . . . . . . . . . . . . . . . . . . . . . . . . . . . . . . . 33 Clear Persistent State Information . . . . . . . . . . . . . . . . . . . . . . . . . . . . . . . . . . . . . . . . . . . . . . . . . . . . . . . . . . . . . 34 Persistent State . . . . . . . . . . . . . . . . . . . . . . . . . . . . . . . . . . . . . . . . . . . . . . . . . . . . . . . . . . . . . . . . . . . . . . . . . .34 Instrument Setup . . . . . . . . . . . . . . . . . . . . . . . . . . . . . . . . . . . . . . . . . . . . . . . . . . . . . . . . . . . . . . . . . . . . . . .34 LAN Setup. . . . . . . . . . . . . . . . . . . . . . . . . . . . . . . . . . . . . . . . . . . . . . . . . . . . . . . . . . . . . . . . . . . . . . . . . . . . .34 User IQ Cal File (Vector Models Only) . . . . . . . . . . . . . . . . . . . . . . . . . . . . . . . . . . . . . . . . . . . . . . . . . . . . . . .34 7. Using Secure Mode . . . . . . . . . . . . . . . . . . . . . . . . . . . . . . . . . . . . . . . . . . . . . . . . . . . . . . . . . . . . . . . . . . 35 8. Using Secure Display . . . . . . . . . . . . . . . . . . . . . . . . . . . . . . . . . . . . . . . . . . . . . . . . . . . . . . . . . . . . . . . . . 37 9. Security Issues for Certain Firmware Revisions . . . . . . . . . . . . . . . . . . . . . . . . . . . . . . . . . . . . . . . . . . . 39 Firmware Update Procedure . . . . . . . . . . . . . . . . . . . . . . . . . . . . . . . . . . . . . . . . . . . . . . . . . . . . . . . . . . . . . . . . . . 39 Error Messages and Secure Environments. . . . . . . . . . . . . . . . . . . . . . . . . . . . . . . . . . . . . . . . . . . . . . . . . . . . . . . 40 Recovering Erased System Files . . . . . . . . . . . . . . . . . . . . . . . . . . . . . . . . . . . . . . . . . . . . . . . . . . . . . . . . . . . . . . . 41 10. Procedure for Declassifying a Faulty Instrument . . . . . . . . . . . . . . . . . . . . . . . . . . . . . . . . . . . . . . . . . . 43 Appendix A. References . . . . . . . . . . . . . . . . . . . . . . . . . . . . . . . . . . . . . . . . . . . . . . . . . . . . . . . . . . . . . . . . . 47 5 Contents 6 Contacting Agilent Sales and Service Offices 2 Contacting Agilent Sales and Service Offices Assistance with test and measurement needs, and information to help you find a local Agilent office, is available via the internet at, http://www.agilent.com/find/assist. If you do not have internet access, please contact your designated Agilent representative. NOTE In any correspondence or telephone conversation, refer to the instrument by its model number and full serial number. With this information, the Agilent representative can determine whether your unit is still within its warranty period. 7 Contacting Agilent Sales and Service Offices 8 Products Covered by this Document 3 Products Covered by this Document Product Family Name Product Name Model Number Firmware Revision X-Series Signal Generators MXG Microwave Analog Signal Generator N5183B All MXG RF Vector Signal Generator N5182B All MXG RF Analog Signal Generator N5181B All EXG Microwave Analog Signal Generator N5173B All EXG RF Vector Signal Generator N5172B All EXG RF Analog Signal Generator N5171B All MXG Signal Generator (Series A) N5183A All N5182A N5181A N5162Aa N5161Aa 9 Products Covered by this Document Document Purpose Product Family Name Product Name Model Number Firmware Revision Agilent Signal Generators PSG Signal Generator E8663D All E8663Bb All E8267Db All E8267C C.03.40 or higher E8257N All E8257Db All E8257C C.03.40 or higher E8247C C.03.40 or higher E4438Cb C.03.40 or higher E4428Cb All ESG Signal Generator a. For the N5161A/62A Signal Generators, the softkey menus and features described in this guide are only available through the web-enabled interface or via SCPI commands. Refer to the instrument Installation Guide, Programming Guide and SCPI Programmers Reference for more information. b. See “Recommended Software Upgrades” on page 11 for important firmware version information. Document Purpose This document describes instrument memory types and security features. It provides a statement regarding the volatility of all memory types, and specifies the steps required to declassify an instrument through memory clearing, sanitization, or removal. For additional information, go to: http://www.agilent.com/find/security IMPORTANT Be sure that all information stored by the user in the instrument that needs to be saved is properly backed up before attempting to clear any of the instrument memory. Agilent Technologies cannot be held responsible for any lost files or data resulting from the clearing of memory. Be sure to read this document entirely before proceeding with any file deletion or memory clearing. 10 Products Covered by this Document Recommended Software Upgrades Recommended Software Upgrades The information in this section applies only to PSG and ESG Signal Generators. CAUTION Do not use the Erase All, Erase and Overwrite All, Erase and Sanitize All, Erase, Overwrite, or Sanitize procedures with any of the firmware revisions listed in Table 3-1 below. If your instrument’s current firmware revision is among those listed, please upgrade immediately to newer firmware. For details, see “Firmware Update Procedure” on page 39. Table 3-1 Firmware revisions that require upgrades Instrument model number Current firmware revision Upgrade to firmware revision E44x8C C.04.84, C.04.86, C.04.95 C.04.96 or later E82x7D C.04.81, C.04.85, C.04.92 C.04.94 or later E8663B C.04.90 C.04.93 or later 11 Products Covered by this Document Recommended Software Upgrades 12 Security Terms and Definitions 4 Security Terms and Definitions Term Definition Clearing As defined in Section 8-301a of DoD 5220.22-M, “National Industrial Security Program Operating Manual (NISPOM)”, clearing is the process of eradicating the data on media before reusing the media in an environment that provides an acceptable level of protection for the data that was on the media before clearing. Hence, clearing is typically used when the instrument is to remain in an environment with an acceptable level of protection. Instrument Declassification A term that refers to procedures that must be undertaken before an instrument can be removed from a secure environment, such as is the case when the instrument is returned for calibration. Declassification procedures include memory sanitization or memory removal, or both. Agilent declassification procedures are designed to meet the requirements specified in DoD 5220.22-M, “National Industrial Security Program Operating Manual (NISPOM)”, Chapter 8. Sanitization As defined in Section 8-301b of DoD 5220.22-M, “National Industrial Security Program Operating Manual (NISPOM)”, sanitization is the process of removing the data from media before reusing the media in an environment that does not provide an acceptable level of protection for the data that was in the media before sanitizing. Hence, instrument sanitization is typically required when an instrument is moved from a secure to a non-secure environment, such as when it is returned to the factory for calibration. Agilent memory sanitization procedures are designed for customers who need to meet the requirements specified by the US Defense Security Service (DSS). These requirements are specified in the “Clearing and Sanitization Matrix” in Section 5.2.5.5.5 of the ISFO Process Manual for the Certification and Accreditation of Classified Systems under the NISPOM. Secure Erase Secure Erase is a term that is used to refer to either the clearing or sanitization features of Agilent instruments. 13 Security Terms and Definitions 14 Instrument Memory & Volatility 5 Instrument Memory & Volatility This chapter contains information on the memory components in your instrument. The tables provide details of the size of each memory component, its type, how it is used, its location, volatility, and the sanitization procedure. Details are subdivided by Product Name as follows: • “MXG (Series B) & EXG Memory” on page 16 • “MXG (Series A) Memory” on page 19 • “ESG and PSG Memory” on page 23 15 Instrument Memory & Volatility MXG (Series B) & EXG Memory MXG (Series B) & EXG Memory The following tables describe each memory type used in the base instrument and optional baseband generator. 1. Main Memory Data Retained When Powered Off? Memory Component, Type and Size Base Instrument (All models and options) Writable During Normal Operation? Table 5-1 Purpose/Contents Yes No Firmware operating memory. (DRAM) Data Input Method Location in Instrument and Remarks Sanitization Procedure Operating system CPU board, not battery backed. Turn off instrument power. 512 MByte 2. Main Memory Volatile memory. Yes Yes (Flash) 512 MByte, partitioned as follows: Factory calibration and configuration data systema, User file which includes flatness calibration, instrument states, and sweep lists 200 MByte: Boot (Main firmware image, Operating system) Firmware upgrades and user-saved dataa CPU board Operating system Front Panel board Boot Area: no user data User and Secure Storage Areas: see “Erase and Sanitize All” on page 32. 50 MByte: System (Calibration/ Configuration) 1 MByte: Secure Storage 180 MByte: User 3. Front Panel Memory No Yes Front panel keyboard controller firmware (Flash) 24 KByte 16 None required (no user data) Instrument Memory & Volatility MXG (Series B) & EXG Memory Memory Component, Type and Size 4. Front Panel Memory Data Retained When Powered Off? Base Instrument (All models and options) Writable During Normal Operation? Table 5-1 Purpose/Contents Yes No Front panel operating memory Data Input Method Location in Instrument and Remarks Sanitization Procedure Front panel firmware Front Panel board Turn off instrument power. (SRAM) Volatile memory. 2 KByte 5. Front Panel Memory No Yes Unused None Front Panel board None required Yes Yes Optional storage of User data User-saved data Removable card may be retained in Secure Area None required (EEPROM) 256 Byte 6. SD Card (Option 006) (Flash) 8 GByte a. Analog instruments only 1. Waveform Memory (DRAM) Data Retained When Powered Off? Memory Component, Type and Size Vector Models with Baseband Generator Writable During Normal Operation? Table 5-2 Purpose/Contents Yes No Waveforms (including header and marker data) 1 GByte 17 Data Input Method Location in Instrument and Remarks Sanitization Procedure Normal user operation Volatile memory. Turn off instrument power. Not battery backed. Instrument Memory & Volatility MXG (Series B) & EXG Memory 2. Extended Persistent Memory Data Retained When Powered Off? Memory Component, Type and Size Vector Models with Baseband Generator Writable During Normal Operation? Table 5-2 Purpose/Contents Yes Yes All user data No Yes Data Input Method Normal user operation See “Erase and Sanitize All” on page 32. Factory or service only None required (no user data) (Flash SSD) Location in Instrument and Remarks Sanitization Procedure 40 GByte, partitioned as follows: 4 GByte: Apps 4 GByte: Base User Remainder: Optional Extended User Calibration Data Memory (Flash) 128 KByte 18 Instrument Memory & Volatility MXG (Series A) Memory MXG (Series A) Memory The following tables describe each memory type used in the base instrument and optional baseband generator. 1. Main Memory Data Retained When Powered Off? Memory Component, Type and Size Base Instrument (All models and options) Writable During Normal Operation? Table 5-3 Purpose/Contents Yes No Firmware operating memory Data Input Method Location in Instrument and Remarks Sanitization Procedure Operating system CPU board, not battery backed. Turn off instrument power. Firmware upgrades and user-saved dataa CPU board (same chip as firmware memory, but managed separately) Because this memory chip contains 8 MB of user data (described here) and 8 MB of firmware memory, a full-chip erase is not desirable. no user data (DRAM) 32 MByte 2. Main Memory (Flash) 8 MByte Yes Yes Factory calibration/ configuration data User file systema, which includes flatness calibration, instrument states, and sweep lists User data areas are selectively and completely sanitized by the procedure “Erase and Sanitize All” on page 32. 19 Instrument Memory & Volatility MXG (Series A) Memory 3. Firmware Memory Data Retained When Powered Off? Memory Component, Type and Size Base Instrument (All models and options) Writable During Normal Operation? Table 5-3 Purpose/Contents No Yes Main firmware image (Flash) 8 MByte Data Input Method Location in Instrument and Remarks Sanitization Procedure Factory installed or firmware upgrade CPU board (same chip as main flash memory, but managed separately) Because this memory chip contains 8 MB of user data and 8 MB of firmware memory (described here), a full-chip erase is not desirable. During normal operation, this memory cannot be overwritten. User data areas are selectively and completely sanitized by the procedure “Erase and Sanitize All” on page 32. 4. Bootrom Memory No Yes CPU bootup parameters Factory programmed CPU board (EEPROM) Yes Yes LAN configuration Front panel entry or remotely During normal operation, this memory cannot be overwritten or erased except for LAN configuration. 8 KByte This read-only data is programmed at the factory. 20 None required (no user data) Instrument Memory & Volatility MXG (Series A) Memory 5. Calibration Data Data Retained When Powered Off? Memory Component, Type and Size Base Instrument (All models and options) Writable During Normal Operation? Table 5-3 Purpose/Contents No Yes Factory calibration and configuration data backup Factory or service only RF Board None required (no user data) No No Display buffer Operating system RF board, not battery backed. Turn off instrument power. No Yes Front panel keyboard controller firmware Operating system Front Panel board None required (no user data) (Flash) Data Input Method Location in Instrument and Remarks Sanitization Procedure 256 KByte 6. LCD Display Memory (DRAM) 160 KByte 7. Front Panel Memory (Flash) 32 KByte a. Analog instruments only 1. Waveform Memory (DRAM) Data Retained When Powered Off? Memory Component, Type and Size Vector Models with Baseband Generator (N5162A/N5182A with Options 651, 652, or 654) Writable During Normal Operation? Table 5-4 Purpose/Contents Yes No Waveforms (including header and marker data) 320 MByte 21 Data Input Method Location in Instrument and Remarks Sanitization Procedure Normal user operation Not battery backed. Turn off instrument power. Instrument Memory & Volatility MXG (Series A) Memory 2. Extended Persistent Memory Data Retained When Powered Off? Memory Component, Type and Size Vector Models with Baseband Generator (N5162A/N5182A with Options 651, 652, or 654) Writable During Normal Operation? Table 5-4 Purpose/Contents Data Input Method Yes Yes All user data Normal user operation User data is completely sanitized by the procedure “Erase and Sanitize All” on page 32. No Yes No user data Factory or service only None required (no user data) (Flash)a 4 GByte 3. Calibration Data Memory Location in Instrument and Remarks Sanitization Procedure (Flash) 128 KByte a. For serial numbers lower than MY/US/SG4818xxxx, the persistent memory value is 512 MByte. 22 Instrument Memory & Volatility ESG and PSG Memory ESG and PSG Memory The following tables describe each memory type used in the base instrument, optional baseband generator, optional hard disk and option flash drive. 1. Main Memory Data Retained When Powered Off? Memory Component, Type and Size Base Instrument (All models and options) Writable During Normal Operation? Table 5-5 Purpose/Contents Data Input Method Location in Instrument and Remarks Sanitization Procedurea Yes No Firmware operating memory Operating system (not user) CPU board. Turn off instrument power. Factory calibration/ configuration data Firmware upgrades and user-saved data CPU board (same chip as firmware memory, but managed separately) (SDRAM) Not battery backed. 64 MByte 2. Main Memory (Flash) 20 MByte Yes Yes User file system, which includes instrument status backup, flatness calibration, IQ calibration, instrument states, waveforms (including header and marker data), modulation definitions, and sweep lists 23 User data is not stored in this memory if hard disk (Option 005) or flash drive (Option 008/009) is installed. Because this 32 MB memory chip contains 20 MB of user data (described here) and 12 MB of firmware memory, a selective chip erase is performed. User data areas are selectively and completely sanitized by the procedure “Erase and Sanitize All” on page 32. Instrument Memory & Volatility ESG and PSG Memory 3. Firmware Memory Data Retained When Powered Off? Memory Component, Type and Size Base Instrument (All models and options) Writable During Normal Operation? Table 5-5 Purpose/Contents No Yes Main firmware image Factory installed or firmware upgrade Yes Yes LAN configuration Front panel entry or remotely (Flash) 12 MByte 4. Battery Backed Memory Yes Yes 512 KByte (Flash) Location in Instrument and Remarks Sanitization Procedurea CPU board (same chip as main flash memory, but managed separately) Because this 32 MB memory chip contains 20 MB of user data and 12 MB of firmware memory (described here), a selective chip erase is performed. No Yes CPU bootup program and firmware loader/updater 128 KByte 24 During normal operation, this memory cannot be overwritten except for LAN configuration. Firmware operations CPU board Factory programmed CPU board Last instrument state, last instrument state backup, and persistent instrument state and instrument status (SRAM) 5. Bootrom Memory User-editable data (table editors) Data Input Method The battery is located on the motherboard for the ESG and on the CPU board for the PSG. During normal operation, this memory cannot be overwritten or erased. User data areas are selectively and completely sanitized by the procedure “Erase and Sanitize All” on page 32. Sanitized by the procedure described in “Erase and Sanitize All” on page 32. None required (no user data) Instrument Memory & Volatility ESG and PSG Memory 6. Calibration Backup Memory Data Retained When Powered Off? Memory Component, Type and Size Base Instrument (All models and options) Writable During Normal Operation? Table 5-5 Purpose/Contents Data Input Method Location in Instrument and Remarks Sanitization Procedurea No Yes Factory calibration/ configuration data backup Factory or service only Motherboard None required (no user data) No Yes Factory calibration and information files, code images, and self-test limits Factory or service only All RF boards, baseband generator, and motherboard None required (no user data) Yes No CPU data and instruction cache Memory is managed by CPU, not user CPU board, not battery backed. Turn off instrument power. (Flash) 512 KByte 7. Boards Memory (Flash) 512 Bytes 8. Microprocessor Cache (SRAM) 3 KByte a. Sanitization procedures mentioned in this table are not available in E8257N instruments, unless Option 340 has been installed. 1. Waveform Memory (SDRAM) Data Retained When Powered Off? Memory Component, Type and Size Vector Models with Baseband Generator (E4438C/E8267D with Options 601 or 602) Writable During Normal Operation? Table 5-6 Purpose/Contents Yes No Waveforms (including header and marker data) and PRAM 40 MByte 320 MByte 25 Data Input Method Location in Instrument and Remarks Sanitization Procedure Normal user operation Not battery backed. User data is completely sanitized by the procedure “Erase and Sanitize All” on page 32. Instrument Memory & Volatility ESG and PSG Memory 2. BBG Firmware Memory Data Retained When Powered Off? Memory Component, Type and Size Vector Models with Baseband Generator (E4438C/E8267D with Options 601 or 602) Writable During Normal Operation? Table 5-6 Purpose/Contents Data Input Method Location in Instrument and Remarks No Yes Firmware image for baseband generator Firmware upgrade Yes No Operating memory of baseband coprocessor CPU During normal operation, some user information, such as payload data, can remain in the memory. This memory is used during normal baseband generator operation. It is not directly accessible by the user. Normal user operation This memory is used during normal baseband generator operation. It is not directly accessible by the user. Sanitization Procedure None required (no user data) (Flash) 32 MByte 3. Coprocessor Memory (SRAM) 32 MByte 4. Buffer Memory (SRAM) No No Support buffer memory for ARB and real-time applications 5 x 512 KByte Not battery backed. Not battery backed. 26 Turn off instrument power. Turn off instrument power. Instrument Memory & Volatility ESG and PSG Memory 1. Media Storage Data Retained When Powered Off? Memory Component, Type and Size Hard Disk (E4438C/E8267C/E8267D with Option 005) Writable During Normal Operation? Table 5-7 Purpose/Contents Yes Yes User files, including flatness calibrations, IQ calibration, instrument states, waveforms (including header and marker data), modulation definitions, and sweep lists (Built-in Hard Disk) 6 GByte or 10 GByte (4 GByte usable in both cases) 2. Buffer Memory No No Data Input Method Location in Instrument and Remarks Sanitization Procedure User-saved data The hard disk is an option for vector instruments (E4438C Option 005, E8267D Option 005, and E8267C Option 005) and is therefore not installed in some instruments. If it is installed, these files are stored on the hard disk instead of in flash memory. The magnetic residue requires several rewrite cycles or drive removal and destruction. Buffer (cache) memory Normal operation, via hard disk (DRAM) 512 KByte 27 User data is completely sanitized by the procedure “Erase and Sanitize All” on page 32. Turn off instrument power. Instrument Memory & Volatility ESG and PSG Memory 1. Memory Storage (Removable Flash drive) Size varies Data Retained When Powered Off? Memory Component, Type and Size Flash Drive (E8257N with Options 008 and 340, E8257D/E8663D with Option 008, and E8267D with Option 009) Writable During Normal Operation? Table 5-8 Purpose/Contents Yes Yes User files, including flatness calibrations, IQ calibration, instrument states, waveforms (including header and marker data), modulation definitions, and sweep lists Data Input Method Location in Instrument and Remarks Sanitization Procedure User-saved data The flash drive, E8267D Option 009, replaces the hard drive, E8267D Option 005, on E8267D instruments with serial prefixes US/MY4829. It is, therefore, not installed in some instruments. If it is installed, these files are stored on the flash drive instead of in flash memory. User data is completely sanitized by the procedure “Erase and Sanitize All” on page 32.a a. Removing the Flash Drive card from an instrument with one of these options sanitizes the instrument, but also renders it inoperative for data collection, calibration, repair, etc. 28 Memory Clearing, Sanitization and Removal Procedures 6 Memory Clearing, Sanitization and Removal Procedures This chapter describes several security functions you can use to remove sensitive data stored in the instrument before moving it from a secure development environment. The functions described are: • “Erase All” on page 30 • “Erase and Overwrite All” on page 31 • “Erase and Sanitize All” on page 32 • “Force Internal to SD Card” on page 33 • “Clear Persistent State Information” on page 34 NOTE The functions described in this chapter are not available in the E8257N instrument, unless Option 340 has been installed. CAUTION These functions do not erase or sanitize external media connected to the instrument’s USB port. CAUTION (This information applies only to PSG and ESG Signal Generators.) Do not use the Erase All, Erase and Overwrite All, Erase and Sanitize All, Erase, Overwrite, or Sanitize procedure with any of these firmware revisions: E44x8C: C.04.84, C.04.86, C.04.95 E82x7D: C.04.81, C.04.85, C.04.92 E8663B: C.04.90 If your instrument’s current firmware revision is among those listed above, please upgrade immediately to newer firmware. For details, see “Firmware Update Procedure” on page 39. 29 Memory Clearing, Sanitization and Removal Procedures Erase All Erase All This function removes all user files, user flatness calibrations, user I/Q calibrations, and resets all table editors with original factory values, ensuring that user data and configurations are not accessible or viewable. The instrument appears as if it is in its original factory state, however, the memory is not sanitized. This action is relatively quick, typically taking less than one minute (the exact time depends on the number of files). Model Key Sequence MXG (Series A/B) File > More > Security > Erase All > Confirm Erase EXG PSG Utility > Memory Catalog > More > Security > Erase All > Confirm Erase ESG Note that there is a similar but distinct function, as described below, that deletes all user files but does not reset the table editors: Model Key Sequence MXG (Series A/B) File > Delete All Files EXG PSG Utility > Memory Catalog > More > Delete All Files ESG 30 Memory Clearing, Sanitization and Removal Procedures Erase and Overwrite All Erase and Overwrite All This function is available in MXG Series A, PSG, and ESG instruments only. It is not available in MXG Series B and EXG instruments. Use Erase and Sanitize All instead. This function performs the same actions as Erase All, plus it clears and overwrites various memory types, as described below. Memory Type Models Description SRAM Not MXG All addressable locations are overwritten once with random characters. CPU Flash All User data is erased with flash chip block-erase commands. No overwrite is performed. During erasure, the system files are temporarily moved to main memory and are then restored to CPU Flash when erasure is complete. Extended Persistent Memory MXG N5162A/82A only The file system is formatted, then all addressable locations are overwritten with random characters, and then the file system is reformatted again. PSG E8267C, E8267D with Option 005 only All addressable locations are overwritten once with a random character. (Batterybacked) (Flash) Hard Disk ESG E4438C Flash Drive PSG E8257N with Options 008 and 340 All addressable locations are overwritten once with a random character. PSG E8257D, E8663D with Option 008 PSG E8267D with Option 009 Model Key Sequence MXG (Series A) File > More > Security > Erase and Overwrite All > Confirm Overwrite PSG Utility > Memory Catalog > More > Security > Erase and Overwrite All > Confirm Overwrite ESG 31 Memory Clearing, Sanitization and Removal Procedures Erase and Sanitize All Erase and Sanitize All This function performs the same actions as Erase All, plus it clears and overwrites the various memory types, as described below. Memory Type Models Description SRAM PSG, ESG only All addressable locations are overwritten once with random characters. CPU Flash (Main Memory) MXG Series B User and “Secure Storage” partitions on CPU flash are erased by flash vendor firmware. For algorithm details, see the Application Note Greenliant NANDrive Security Erase Feature, Purge Command Specification. CPU Flash MXG Series A (Batterybacked) EXG PSG ESG Extended Persistent Memory User data is erased with flash chip block-erase commands. No overwrite is performed. During erasure, the system files are temporarily moved to main memory and are then restored to CPU Flash when erasure is complete. MXG N5162A/82A only The file system is formatted, then all addressable locations are overwritten with random characters, and then the file system is reformatted again. These actions are then repeated. PSG E8267C, E8267D with Option 005 only All addressable locations are overwritten with a random character three times. (Flash) Hard Disk ESG E4438C Flash Drive MXG N5182B EXG N5172B Flash Drive PSG E8257N with Options 008 and 340 Erased by drive vendor’s firmware, which erases user data area, SSD reserve area, and retired blocks. The firmware accepts and implements the ATA commands SECURITY ERASE UNIT and ENHANCED ERASE MODE. For details of these commands, see AT Attachment 8 - ATA/ATAPI Command Set (ATA8-ACS). All addressable locations are overwritten with a random character three times. PSG E8257D, E8663D with Option 008 PSG E8267D with Option 009 32 Memory Clearing, Sanitization and Removal Procedures Force Internal to SD Card NOTE The Erase and Sanitize All operation resets the instrument’s LAN settings to their factory defaults. For more details, see “LAN Setup” on page 34. Model Key Sequence MXG (Series A/B) File > More > Security > Erase and Sanitize All > Confirm Sanitize EXG PSG ESG Utility > Memory Catalog > More > Security > Erase and Sanitize All > Confirm Sanitize Force Internal to SD Card This function is available only in the MXG Series B and EXG instruments. The options for this setting are Off or On: • On: Forces all internal settings and files to be stored only on the external SD memory card, including instrument states, user data files, sweep list files, and other user created files. If it becomes necessary to sanitize the instrument, these settings may then be securely retained by removing the SD card and retaining it in the secure area. • Off: All internal settings are stored in the instrument’s Main Memory (see “MXG (Series B) & EXG Memory” on page 16). This memory may be sanitized using the Erase and Sanitize All function. Model Key Sequence MXG (Series B) File > More > Security > Force Internal to SD Card EXG 33 Memory Clearing, Sanitization and Removal Procedures Clear Persistent State Information Clear Persistent State Information Persistent State The persistent state settings contain instrument setup information that can be toggled within predefined limits such as display intensity, contrast and the GPIB address. In vector models, the user IQ Cal is also saved in this area. The following key sequences or SCPI commands can be used to clear the IQ Cal file and to set the operating states that are not affected by an instrument power-on, preset, or *RST command to their factory default: Instrument Setup Key Sequence MXG (Series A/B) EXG PSG ESG SCPI Command All Models Utility > Power On/Preset > Restore System Settings to Default Values > Confirm Restore Sys Settings to Default Values Utility > Power On/Preset > Restore System Defaults > Confirm Restore Sys Defaults :SYSTem:PRESet:PERSistent LAN Setup The LAN setup (hostname, IP address, subnet mask, and default gateway) information is not modified by an instrument power-on or *RST command. This information can be changed or cleared by entering new data, or can be reset to the factory default settings by performing an Erase and Sanitize All operation. User IQ Cal File (Vector Models Only) When a user-defined IQ Calibration has been performed, the cal file data is removed by setting the cal file to default, as follows: Key Sequence All Models I/Q > I/Q Calibration > Revert to Default Cal Settings SCPI Command MXG (Series A/B) :CAL:IQ:DEF EXG PSG :CAL:IQ:DEF ESG :CAL:WBIQ:DEF 34 Using Secure Mode 7 Using Secure Mode The "Secure Mode" procedure described here is available only for MXG Series A, PSG (except E8257N without Option 340) and ESG instruments. However, the immediate-action functions Erase All and Erase and Sanitize All are also available in MXG Series B and EXG Signal Generators, and achieve the same results. NOTE Secure Mode automatically applies the selected Security Level action the next time the instrument’s power is cycled. To activate Secure Mode, do the following: Step Action Notes 1 Open the Security Level menu For MXG (Series A), press: File > More > Security > Security Level For ESG/PSG, press: Utility > Memory Catalog > More > Security > Security Level 2 Select the Security Level Available options: • None equivalent to a factory preset, no user information is lost • Erase equivalent to Erase All • Overwrite equivalent to Erase and Overwrite All • Sanitize equivalent to Erase and Sanitize All 35 Using Secure Mode Step Action Notes 3 Activate Secure Mode CAUTION Once you activate secure mode (by pressing Confirm), you cannot deactivate or decrease the Security Level; the erasure actions for the selected Security Level execute at the next power cycle. Once you activate Secure Mode, you can only increase the Security Level until you cycle power. For example, you can change Erase to Overwrite, but not the reverse. After the power cycle, the Security Level selection remains the same, but the secure mode is not activated. For MXG (Series A), press: File > More > Security > Enter Secure Mode > Confirm For ESG/PSG, press: Utility > Memory Catalog > More > Security > Enter Secure Mode > Confirm The Enter Secure Mode softkey changes to Secure Mode Activated. 36 Using Secure Display 8 NOTE Using Secure Display Front panel control of this feature is not available on PSG E8257N instruments (unless Option 340 is installed), or on E82x7C instruments with firmware revisions earlier than C.03.76. The feature can be activated remotely, however, using SCPI commands. Refer to the “System Commands” chapter of the instrument’s SCPI Command Reference for more information. This function prevents unauthorized personnel from reading the instrument display or tampering with the current configuration via the front panel. When Secure Display is active, the display is blank, except for an advisory message, as shown in Figure 8-1 below. All front panel keys are disabled. To set Secure Display, press: Utility > Display > More > Activate Secure Display > Confirm Secure Display Once Secure Display has been activated, the power must be cycled to re-enable the display and front panel keys. Figure 8-1 Signal Generator Screen with Secure Display Activated 37 Using Secure Display 38 Security Issues for Certain Firmware Revisions Firmware Update Procedure 9 Security Issues for Certain Firmware Revisions The information in this chapter applies only to PSG and ESG Signal Generators. If your ESG or PSG instrument currently has one of the firmware revisions listed in Table 9-1, using certain security features may cause the deletion of some of the instrument’s system files. Before using the security features, update your firmware to the appropriate revision listed in the "Update to" column of Table 9-1. Table 9-1 Firmware Revisions by Instrument Model Model Affected firmware revisions Update to E4428C C.04.84, C.04.86, or C.04.95 C.04.96 or later E4438C C.04.84, C.04.86, or C.04.95 C.04.96 or later E8257D C.04.81, C.04.85, or C.04.92 C.04.94 or later E8267D C.04.81, C.04.85, or C.04.92 C.04.94 or later E8663B C.04.90 C.04.93 or later Firmware Update Procedure To obtain the latest firmware online, perform the following steps: 1. Access the instrument’s web page: www.agilent.com/find/<model_number> (Example: www.agilent.com/find/E4438C). 2. Under the Technical Support Tab, select Drivers and Software, and follow the remaining links to the firmware upgrade page. If web access is not available, Agilent can provide the new firmware on CD-ROM. To obtain the CD-ROM, contact Agilent or your Agilent representative, as described in “Contacting Agilent Sales and Service Offices” on page 7. 39 Security Issues for Certain Firmware Revisions Error Messages and Secure Environments Error Messages and Secure Environments If you cannot upgrade the firmware prior to using the security features, Agilent will help you to recover from error messages that may appear after executing the security functions. The error messages indicate that instrument system files have been erased. The following list shows some possible error messages: • 256, File name not found; /SYS/LICENSE.TXT • 617, Configuration Error; License file not found. Creating empty one. • A missing or damaged system file was encountered while trying to diagnose the system. Even if these error messages appear, the security function has completely sanitized the instrument. If the instrument is located in a secure environment, it is safe to remove it. After removing it from the secure area, follow the process below to recover the lost system files. 40 Security Issues for Certain Firmware Revisions Recovering Erased System Files Recovering Erased System Files To recover the lost files, perform the following steps: 1. Obtain your instrument’s model and serial number. 2. Contact Agilent and request a replacement license file. The Agilent representative will ask for the model and serial number. 3. Update the firmware to the revision specified in the "Update to" column of Table 9-1 on page 39. a. If problems occur when upgrading the firmware, manually enter as many license keys as possible using Utilities Instrument Info > Options Info > Auxiliary Software Options b. Upgrade the firmware again. 4. Open Internet Explorer and enter http://<instrument IP address>/update. 5. Locate Recover Self-test System Files and click Execute. 6. Locate Overwrite LICENSE.TXT, cut and paste the replacement license file (obtained in Step 2) into the text box, and click Execute. 7. Cycle the power on the instrument. 8. If configuration errors persist after completing the previous steps, contact Agilent again. 41 Security Issues for Certain Firmware Revisions Recovering Erased System Files 42 Procedure for Declassifying a Faulty Instrument 10 Procedure for Declassifying a Faulty Instrument If the instrument is not functional, and you are unable to use the security functions, you may physically remove the Processor board and Hard Disk or Solid State Drive (if installed). For removal and replacement procedures, refer to the Service Guide for your instrument, as listed in Table 10-1 below. Table 10-1 Service Guide Document Locations Signal Generator Model Link to Service Guide N5183B MXG Microwave Analog Signal Generator http://cp.literature.agilent.com/litweb/pdf/N5180-90059.pdf N5182B MXG RF Vector Signal Generator (Series B) N5181B MXG RF Analog Signal Generator (Series B) N5173B EXG Microwave Analog Signal Generator N5172B EXG RF Vector Signal Generator N5171B EXG RF Analog Signal Generator N5161A/62A/81A/82A/83A MXG (Series A) Signal Generators http://cp.literature.agilent.com/litweb/pdf/N5180-90006.pdf E4428C/38C ESG Signal Generators http://cp.literature.agilent.com/litweb/pdf/E4400-90511.pdf E8257N, E8257D/67D, E8663D PSG Signal Generators http://cp.literature.agilent.com/litweb/pdf/E8251-90359.pdf E8663B Analog Signal Generator http://cp.literature.agilent.com/litweb/pdf/E8663-90009.pdf 43 Procedure for Declassifying a Faulty Instrument Once the Processor and Hard Disk assemblies have been removed, proceed as in Table 10-2 below: Table 10-2 Assembly Disposal Procedures Assembly Procedure Processor (CPU) Board Either Discard the processor board and send the instrument to a repair facility. A new Processor Board will be installed, then the instrument will be repaired and calibrated. If the instrument is still under warranty, you will not be charged for the new Processor Board. or If you have another working instrument, install the Processor Board into that instrument and erase the memory. Then reinstall the Processor Board back into the non-working instrument and send it to a repair facility for repair and calibration. If you discover that the Processor Board does not function in the working instrument, discard the Processor Board and note that it caused the instrument failure on the repair order. If the instrument is still under warranty, you will not be charged for the new Processor Board. A4 Memory Assembly Either (MXG Vector Instruments Only) Discard the board and send the instrument to a repair facility. A new board will be installed, then the instrument will be repaired and calibrated. If the instrument is still under warranty, you will not be charged for the new board. or If you have another working instrument, install the board into that instrument and erase the memory. Then reinstall the board back into the non-working instrument and send it to a repair facility for repair and calibration. If you discover that the board does not function in the working instrument, discard the board and note that it caused the instrument failure on the repair order. If the instrument is still under warranty, you will not be charged for the new board. Hard Disk Either (E4438C Option 005, E8267D Option 005, and E8267C Option 005 only) Discard the Hard Disk and send the instrument to a repair facility. Indicate on the repair order that the Hard Disk was removed and must be replaced. A new Hard Disk will be installed, then the instrument will be repaired and calibrated. If the instrument is still under warranty, you will not be charged for the new hard disk. or Keep the Hard Disk and send the instrument to a repair facility. When the instrument is returned, reinstall the Hard Disk. 44 Procedure for Declassifying a Faulty Instrument Table 10-2 Assembly Disposal Procedures Assembly Procedure Solid State (Flash) Drive Remove the Solid State Drive from the instrument, then send the instrument to a repair facility. Indicate on the repair order that the Solid State Drive was removed and must be replaced. When the instrument is returned, reinstall the original Solid State Drive. (E8257N Option 008, E8257D/E8663D Option 008, and E8267D Option 009 only) 45 Procedure for Declassifying a Faulty Instrument 46 References A: References 1. DoD 5220.22-M, “National Industrial Security Program Operating Manual (NISPOM)” United States Department of Defense. Revised February 28, 2006. May be downloaded in Acrobat (PDF) format from: http://www.dss.mil/isp/fac_clear/download_nispom.html 2. ISFO Process Manual for the Certification and Accreditation of Classified Systems under the NISPOM Defense Security Service. DSS-cleared industries may request a copy of this document via email, by following the instructions at: http://www.dss.mil/isp/odaa/request.html 3. Greenliant NANDrive Security Erase Feature, Purge Command Specification This Application Note may be obtained in PDF format from Greenliant Systems Ltd., by contacting the company via their web site: http://www.greenliant.com/contact_us 4. AT Attachment 8 - ATA/ATAPI Command Set (ATA8-ACS) INCITS Technical Committee T13/1699-D Revision 6a, September 6th, 2008 This standard may be downloaded in Acrobat (PDF) format from the INCITS T13 web site: http://www.t13.org/documents/UploadedDocuments/docs2008/D1699r6a-ATA8-ACS.pdf 5. Installation Guide Agilent Technologies Inc. Specific to Signal Generator model MXG (Series B) & EXG: http://cp.literature.agilent.com/litweb/pdf/N5180-90054.pdf MXG (Series A): http://cp.literature.agilent.com/litweb/pdf/N5180-90002.pdf PSG: http://cp.literature.agilent.com/litweb/pdf/E8251-90352.pdf ESG: http://cp.literature.agilent.com/litweb/pdf/E4400-90502.pdf 47 References 6. Programming Guide Agilent Technologies Inc. Specific to Signal Generator model: MXG (Series B), EXG & PSG: http://cp.literature.agilent.com/litweb/pdf/E8251-90355.pdf MXG (Series A) & ESG: http://cp.literature.agilent.com/litweb/pdf/N5180-90005.pdf 7. SCPI Programmers Reference Agilent Technologies Inc. Specific to Signal Generator model: MXG (Series B) & EXG: http://cp.literature.agilent.com/litweb/pdf/N5180-90057.pdf MXG (Series A): http://cp.literature.agilent.com/litweb/pdf/N5180-90004.pdf PSG: http://cp.literature.agilent.com/litweb/pdf/E8251-90356.pdf ESG: http://cp.literature.agilent.com/litweb/pdf/E4400-90506.pdf This information is subject to change without notice. © Agilent Technologies, Inc. 2004-2014 Published in USA, February 2014 Supersedes: August 2012 E4400-90621 Agilent Technologies