1
Vax VEC-41 User Guide.qxd:Vax VEC-41 User Guide
1/7/08
09:38
Page 4
www.vax.co.uk
3. How to Assemble
4. How to Operate
IMPORTANT: Always unplug the vacuum
cleaner from the electrical outlet before
assembling or removing the accessories.
Cord Release
!
1.
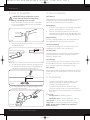
Insert the flexible hose into the inlet on the main
body of the vacuum cleaner. Push in until it clicks
into position (Fig.3/1).
Fully unwind the power cord. A yellow mark on the power
cord indicates the recommended cord length. Do not
exceed the cord length beyond the red mark.
On/off Button
1.
Insert the power plug into the electrical outlet. Make
sure the vacuum cleaner is switched off.
2.
Press the on/off button located on the top of the
vacuum cleaner, to switch on the vacuum cleaner and
press the button again to turn the vacuum cleaner off.
Carpet Cleaning
Fig.3/1
2.
Push the telescopic extension tube on to the end of
the handle (Fig.3/2).
For carpet and rug cleaning, press the rocker switch on
the combination floor head to raise the brushes.
Hard Floor Cleaning
For hard floor cleaning, press the rocker switch on the
combination floor head to lower the brushes.
Variable Power
Located opposite the on/off button there is a variable
power dial. Slide this clockwise and anti-clockwise to
adjust the suction power.
Hose Storage
Fig.3/2
3.
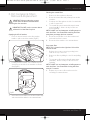
The telescopic extension tube can be lengthened or
shortened by pushing the button in and sliding the
tube apart or together as required (Fig.3/3).
For convenience there is a slot located on either side of
the vacuum cleaner next to the carry handle where the
floor tool can be parked for carrying and storage.
Carry Handle
Use the carry handle located in the middle of the vacuum
cleaner (inc. auto cord rewind button) to move from room
to room.
5. Accessories
1.
The accessories can be attached directly to the
handle by removing the telescopic tubes and
pushing in the desired accessory.
2.
The accessories can also be attached to the
telescopic extension tube for extra reach. Remove
the combination floor head and push on the desired
accessory.
Fig.3/3
4.
Fit the combination floor head by pushing onto the
extension tube (Fig.3/4).
2-in-1 Tool
Dusting brush: for delicate surfaces.
Upholstery tool: for carpet, upholstery, stairs, etc.
Crevice tool: for crevices, corners and cracks, etc.
Fig.3/4
4 assemble / operate / accessories
TurboTool: for pet hair, stair and upholstery cleaning
(NOTE: Do not use the TurboTool on suede and
leather surfaces).