1
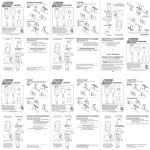
BARBIE GIRLS™ CUSTOMER SUPPORT
FCC Statement
For product sold in USA
This device complies with Part 15 of the FCC Rules.
Operation is subject to the following two conditions:
(1) This device may not cause harmful interference, and (2) this device must accept any interference received,
including interference that may cause undesired operation.
• This equipment has been tested and found to comply with the limits for a Class B digital device, pursuant to
part 15 of the FCC rules. These limits are designed to provide reasonable protection against harmful interference
in a residential installation. This equipment generates, uses and can radiate radio frequency energy
and, if not installed and used in accordance with the instructions, may cause harmful interference to radio
communications. However, there is no guarantee that interference will not occur in a particular installation.
If this equipment does cause harmful interference to radio or television reception, which can be determined
by turning the equipment off and on, the user is encouraged to try to correct the interference by one or more
of the following measures:
• Reorient or relocate the receiving antenna.
• Increase the separation between the equipment and receiver.
• Connect the equipment into an outlet on a circuit different from that to which the receiver is connected.
• Consult the dealer or an experienced radio/TV technician for help.
NOTE: Changes or modifi cations not expressly approved by the manufacturer responsible
for compliance could void the user’s authority to operate the equipment.
For product sold in Canada • Pour les produits vendus au Canada
THIS CLASS B DIGITAL APPARATUS COMPLIES WITH CANADIAN ICES-003.
CET APPAREIL NUMÉRIQUE DE LA CLASSE B EST CONFORME À LA NORME NMB-003 DU CANADA.
(VALID FOR CANADA ONLY • VALABLE AU CANADA SEULEMENT)
For questions about the Barbie Girl™ device
and BarbieGirls.com, call
US and Canada: service.mattel.com or call 877 3BARBIE (877-322-7243),
M-F 9am - 7pm, Sat 11am - 5pm, Eastern Time.
UK: service.mattel.com/uk or Call 01628 500303, M-F 9am - 5pm
Australia: 1300 135 312 or 1800 674 753 M-F 8am - 4:30pm, EST.
New Zealand: 0800 174 063 M-F 10am - 6:30pm, Australia EST.
For U.S.A. market only:
We want you to have fun playing with our products.
Please give us your feedback by filling out the short on-line survey.
Go to:
service.mattel.com/surveys
Thanks for helping us make great toys even better!
Operation is subject to the following two conditions :
(1) this device may not cause interference, and (2) this device must accept any interference, including interference
that may cause undesired operation of the device.
L’utilisation de ce dispositif est autorisée seulement aux conditions suivantes :
(1) Il ne doit pas produire de brouillage et (2) il doit pouvoir tolérer tout brouillage radioélectrique reçu,
même si ce brouillage est susceptible de compromettre son fonctionnement.
19
INSTRUCTIONS
Mattel Canada Inc., Mississauga, Ontario L5R 3W2. You may call us free at/ Composez sans frais le 1-800-524-8697.
Mattel U.K. Ltd., Vanwall Business Park, Maidenhead SL6 4UB.
Mattel Australia Pty., Ltd., Richmond, Victoria. 3121.Consumer Advisory Service - 1300 135 312.
Mattel East Asia Ltd., Room 1106, South Tower, World Finance Centre, Harbour City, Tsimshatsui, HK, China.
Diimport & Diedarkan Oleh: Mattel SEA Ptd Ltd.(993532-P) Lot 13.5, 13th Floor, Menara Lien Hoe, Persiaran
Tropicana Golf Country Resort, 47410 PJ. Tel:03-78803817, Fax:03-78803867.
Mattel, Inc., 333 Continental Blvd., El Segundo, CA 90245 U.S.A. Consumer Relations 1 (800) 524-8697.
L2935-0920G4
Keep these instructions for future reference
as they contain important information.
6+
© 2007 Mattel, Inc., 333 Continental Blvd., El Segundo, CA 90245 USA. All Rights Reserved. Tous droits
réservés. Macromedia is a trademark of Adobe Systems Incorporated. Pentium is a trademark or registered
trademark of Intel Corporation or its subsidiaries in the United States and other countries. Windows Media
Player, Windows and the Windows logo are trademarks, or registered trademarks of Microsoft Corporation
in the United States and/or other countries. This product is protected by certain intellectual property rights
of Microsoft. Use or distribution of such technology outside of this product is prohibited without a license
from Microsoft. iTunes is a registered trademark of Apple, Inc. in the United States and/or other countries.
miniSD is a trademark of SD-3C, LLC.
GENERAL
TABLE OF CONTENTS
SYSTEM REQUIREMENTS:
Windows® XP or Windows® Vista; Pentium® III 800 MHz or above
or equivalent processor; 512MB RAM; 200MB free hard drive space;
DirectX 9.0b or above; Internet Explorer 6.0 or later with SP1 and
Macromedia Flash Plug In; Internet connection (broadband
recommended); Windows Media Player 11; USB 2.0 port; CD-ROM drive;
NOT MAC O/S COMPATIBLE.
Software use is subject to acceptance of the
End User License Agreement.
UNPACK CONTENTS ……………………………………………………2
FEATURES:
512MB built-in memory
Holds up to 120 songs/8 hours of MP3 music 1
Holds up to 240 songs/16 hours of WMA music 1
Expandable miniSD card slot, up to 2GB (card sold separately)
USB connector
Built-in rechargeable lithium polymer battery
(charges via the USB port)
Up to 10 hours of battery life per charge 2
3.5mm headphone jack
MUSIC PLAY ……………………………………………………………9
Charging the Battery ……………………………………………9
Transferring Music Files ……………………………………… 10
Transferring Music From CD to your Computer ………… 10
Transferring Music to Barbie Girl™ …………………… 11
Controls ……………………………………………………… 12
Listening To Music …………………………………………… 14
Listening Tips ………………………………………………… 14
Music on the Go! ……………………………………………… 14
Optional miniSD Card ………………………………………… 15
1
Song capacity based on 4 minutes per song and 128-Kbps MP3 encoding or
64 Kbps WMA encoding; actual capacity varies by content and bit rate.
2
Playback varies with use. Rechargeable batteries have a limited number of charges.
FASHION PLAY …………………………………………………………3
ONLINE PLAY …………………………………………………………4
Installation & Registration ……………………………………4
Remove Player Safely from Computer …………………………5
Barbie Girls™ Software …………………………………………7
Note To Parents …………………………………………………7
Chat ……………………………………………………………7
Best Friends Registration ………………………………………8
HINTS
………………………………………………………… 16
STORAGE ………………………………………………………… 17
Horizontal Use ………………………………………………… 17
Wall mounted ………………………………………………… 17
1
UNPACK CONTENTS
FASHION PLAY
Please remove items from the package and compare to the contents
shown here ( 1 ). If any items are missing, contact your local Mattel
office. Fashions may vary.
Mix and match “face”, “fashions” and “hair” to create your own look.
To disassemble: Insert the “key” on the belt clip into the slot then
twist to remove the back cover of your Barbie Girl™ ( 1 & 2 ).
1
1
KEY
A
2
B
To remove fashion pieces:
1
Turn package over and peel off labels as shown ( 2 ).
Remove paper cover and Online Startup Guide ( 3 ).
Remove CD-ROM from back compartment ( 4 ).
2
4
3
3
2
4
To add fashion pieces:
2
3
1
2
3
4
ONLINE PLAY
Your Barbie Girl™ includes a one-year premium subscription at
BarbieGirls.com. Your one-year subscription is activated when
you register your Barbie Girl™ during the CD registration process.
At the end of one year, your premium subscription will expire and
you will be given the option to renew.
3. Make sure you’re connected
to the Internet, and use the
code found on the bottom of your
docking station ( 3 )to register.
Installation and Registration
4. Go online and start exploring!
You can watch a video tour about BarbieGirls.com.
Click on the
icon if you need help along the way.
1
1. Insert the CD-ROM into your CD drive ( 1 )
to launch the installer. If it doesn’t launch
automatically, double-click “My Computer”
on your Desktop, then double-click on the
CD drive. Double-click “setup.exe”.
2. After installation is complete, plug the
docking station into your computer’s USB
port and place your Barbie Girl™ device in
the docking station ( 2a-2c ).
2a
2c
2b
4
3
5. When finished, remove the device from your computer safely.
Follow this procedure
to prevent damage to
your Barbie Girl™:
4a
Double-click the “Safely
Remove Hardware” icon
in the System Tray ( 4a ).
In the “Safely Remove
Hardware” window that
appears, click on the
“Barbie Girls” entry ( 4b ).
Click “Stop” ( 4c ).
4b
5
4c
Barbie Girls™ Software
The “Stop a Hardware
device” window pops
up. Click “OK” ( 4d ).
When the “Safe To
Remove Hardware”
bubble appears you can
unplug the docking
station from the
computer, or unplug
your Barbie Girl™ from
the docking station.
4d
Use the Barbie Girls™ software for easy access to BarbieGirls.com
and your music. Launch the software by double-clicking on the
desktop icon
. Or, just plug in your Barbie Girl™. The software
will launch automatically.
You can connect to BarbieGirls.com, add new Best Friends, or launch
Windows Media Player™ to transfer music to your Barbie Girl™.
Note to Parents:
If you can’t see the “Safely Remove Hardware” icon, double-click
on “My Computer”. Right-click on the “Barbie Girl” entry and select
“Eject”. Now it is safe to unplug your Barbie Girl™.
5. Retract the USB connector ( 5a )
and replace the protective cover ( 5b ).
BarbieGirls.com was designed to be a safe, fun and exciting place for
girls to play online. Our special B Chat™ feature utilizes a sophisticated
word filter that keeps chat appropriate and prevents personal
information, such as your child’s name, phone number or address,
from being given out to anyone unknown to you. You can help by
spending time online with your child and monitoring your child’s
online use!
Chat
BarbieGirls.com offers two kinds of chat. B Chat™ is available
to all Barbie Girls™ characters online, and does not allow girls to
share personal information. Secret B Chat™ is available only to
girls who follow the Best Friends registration process below. With
Secret B Chat™, girls can chat about even more!
5a
5b
6
7
MUSIC PLAY
Best Friends Registration
Your best friends in real life can become your best friends
online too! You can have a Secret B Chat™ with your best friends
on BarbieGirls.com. It’s easy:
1 ) Place your friend’s Barbie Girl™ in your docking station to launch
the Best Friends installer. If the Barbie Girls™ software
is already running, just click the “Add a Best Friend” icon.
Charging the Battery
Barbie Girl™ contains a rechargeable battery and charges via your
USB port. Charge the battery before using the device. Slide knob
toward bottom of device to expose the USB connector ( 1 ).
Remove the USB connector’s protective cover ( 2 ) and save. Plug
into docking station ( 3 ), and plug the docking station into a USB
port on your computer.
1
3
2
2 ) Enter both of your screen names and your password.
3 ) Go online to play!
8
It will take up to three hours to recharge. The LED lights when charging,
and turns off when Barbie Girl™ is fully charged. Barbie Girl™ can
play back for approximately 10 hours when fully charged. When the
LED flashes or volume decreases, it is time to recharge the battery.
9
Transferring Music Files
NOTE: Distributing copies of music tracks without permission is
a violation of international copyright laws.
Transferring Music From CD to your Computer
1. Launch the Barbie Girls™ software by plugging in your Barbie Girl™
or double-clicking the desktop icon
. Click the
“Transfer Music” icon to start Windows Media Player™.
2. Insert an audio CD into your CD-ROM drive.
3. Click the “Rip” tab. Check the songs you
want to transfer to your music library.
4. Click “Start Rip”. After a short
time the songs will be added to
your library and can then be added
to your Barbie Girl™.
For additional information about
ripping music, click the “Help”
menu in Windows Media Player.
Transferring Music to Barbie Girl™
1. Launch the Barbie Girls™ software by plugging in your Barbie Girl™
or double-clicking the desktop icon
. Click the
“Transfer Music” icon to start Windows Media Player™.
2. Click the “Sync” tab. Click “Library”
to view the songs in your library.
3. Drag songs to the right window.
4. Click “Start Sync” to copy songs to
Barbie Girl™.
5. When sync is complete, disconnect Barbie Girl™
from your computer safely. See pages 5 and 6.
If a miniSD card is attached, music will sync to the miniSD card first.
To sync to onboard memory, click “Next Device->”.
Follow steps 3 through 5 above.
If MP3 or WMA files are present in an attached miniSD card, music
will play first from onboard memory, then from the card.
For additional information about synching music,
click the “Help” menu in Windows Media Player.
10
11
Controls
Adjust the volume by pressing the VOLUME UP [ + ] or
VOLUME DOWN [ - ] button.
POWER ON: Plug in the earbuds ( 1 ) to
turn your Barbie Girl™ on. Or if the earbuds
are already in, hold down the PLAY/PAUSE
button for 3 seconds to turn your
Barbie Girl™ on. The LED lights when the
power is on.
Music playback will start automatically after a few seconds.
Press the PLAY / PAUSE [ II ] button to pause the music.
Press again to continue play.
1
During playback, press and hold the SKIP / SEARCH FORWARD [ ]
button to advance forward within a song (or, press and hold the
SKIP / SEARCH BACKWARD [ ] button to move backwards through
a song). Release the button when you have located the section you
wanted. Normal playback resumes.
Press and release the SKIP / SEARCH FORWARD [ ] button to
advance to the next song. Repeat until you get to the desired song.
VOLUME UP
Press and release the SKIP / SEARCH BACKWARD [ ] button to
hear the beginning of the current song. Press again to go back to
the beginning of the previous song. Repeat until you get to the
desired song.
PLAY / PAUSE
SKIP / SEARCH
FORWARD
SKIP / SEARCH
BACKWARD
POWER OFF: To turn your Barbie Girl™ off, hold down the
PLAY/PAUSE [ II ] button for 3 seconds. The LED turns off.
You can also unplug the earbuds to turn the power off.
VOLUME DOWN
12
13
Listening To Music
miniSD CARD
Barbie Girls™ earbuds come with 3 sizes of
earpieces. Use the set that best fits your
ears. To remove an earpiece, grasp it
carefully and pull away from the earbud.
To attach an earpiece, push it over the
stem on the earbud.
Your Barbie Girl™ has a built-in miniSD card reader that will allow you
extra song/file storage capacity of up to 2GB (card not included).
CAUTION: Hold down the PLAY/PAUSE button for 3 seconds to turn
Barbie Girl™ off before inserting or removing a miniSD card.
For Smaller Ears
For Larger Ears
Listening Tips
To protect your hearing, ALWAYS follow these instructions:
1. Connect the earbuds to the device as shown.
2. After a few seconds, playback will begin automatically.
3. Press the VOLUME DOWN [ - ] button several times.
4 Put the earbuds in your ears.
5. Slowly increase the volume by pressing the VOLUME UP [ + ]
button until you hear the music clearly and without distortion.
Use this setting for future listening.
Music On The Go!
To remove the miniSD card:
Your Barbie Girl™ comes with a
protective plastic card. To remove
the card, remove the cover (see 1 & 2,
below), then push in on the edge.
The card will pop put.
To insert the miniSD card:
Insert the “key” on the belt clip into the slot then twist to remove
the back cover of your Barbie Girl™ ( 1 & 2 ). Insert the miniSD card
as shown ( 3 ). Replace the cover ( 4 ).
1
Your Barbie Girl™ is portable.
Insert the Belt Clip into the
device ( 1 ). Slide the belt clip
down onto your belt or the top
edge of your trousers ( 2 ) as
shown. Disconnect the belt clip
by pressing the button on the
connector ( 3 ).
2
KEY
A
B
1
14
2
3
4
3
15
HINTS
STORAGE
BATTERY SAFETY INFORMATION
Your Barbie Girl™ is not compatible with music downloaded from the
iTunes™ store, or WMA files protected with DRM.
Barbie Girl™ comes with a durable storage case.
It can be used horizontally or mounted on a wall.
Product includes a non-replaceable lithium battery.
If you ever need to reset your
Barbie Girl™ – Remove the cover
from the back of your Barbie Girl™
(see page 3). Use a paper clip to
press the reset switch as shown.
Replace the cover. Resetting your
Barbie Girl™ will not delete any of
your music files.
Horizontal Use
Attach the CD to the rear of the storage case ( 1 ).
Put all the components of your Barbie Girl™ into the storage case ( 2 ).
Put the lid on the storage case ( 3 ).
In exceptional circumstances batteries may leak fluids that can
cause a chemical burn injury or ruin your product.
To avoid battery leakage:
Dispose of batteries safely.
Do not dispose of this product in a fire. The batteries inside may
explode or leak.
1
Adult Note:
If you’re having trouble registering your Barbie Girl™ or making Best
Friends, make sure everything is plugged in. Check the connection
between your Barbie Girl™ and the docking station, and make sure
the docking station cable is plugged into your USB port. Make sure
you’re connected to the Internet.
See back cover for customer support information.
2
3
Wall Mounted
Attach the CD to the rear of the storage case ( 1 ). Insert the slot on
back of storage case onto a nail or screw that is secured into a wall ( 2 ).
Put all the components of your Barbie Girl™ into the storage case ( 3 ).
Put the lid on the storage case ( 4 ).
1
2
To remove battery for safe disposal, open the Barbie Girl™
device using a Phillips head screwdriver (not included) and remove
battery.
Protect the environment by not disposing of this
product with household waste (2002/96/EC). Check
your local authority for recycling advice and facilities.
3
4
16
17
18