1
BiGuard C01
BiGuard VPN Client
Secure access to Company Network
User’s Manual
Version Release 3.0
Table of Contents
CHAPTER 1: INTRODUCTION ............................................................................................................. 1
INTRODUCTION TO BIGUARD VPN CLIENT ............................................................................................... 1
FEATURES .................................................................................................................................................. 1
CHAPTER 2: INSTALLING BIGUARD VPN CLIENT ....................................................................... 3
SOFTWARE INSTALLATION .......................................................................................................................... 3
SOFTWARE EVALUATION ............................................................................................................................ 4
ACTIVATION WIZARD................................................................................................................................. 4
Two easy step Wizard............................................................................................................................ 4
Step 1 of 2: Enter License Number .................................................................................................. 5
Step 2 of 2: Online Activation .......................................................................................................... 6
Activation errors ............................................................................................................................... 6
SOFTWARE UNINSTALLATION..................................................................................................................... 7
CHAPTER 3: NAVIGATION THE USER INTERFACE ...................................................................... 8
NAVIGATION THE USER INTERFACE............................................................................................................. 8
SYSTEM TRAY............................................................................................................................................ 8
MAIN WINDOW........................................................................................................................................ 10
MAIN MENUS .......................................................................................................................................... 10
STATUS BAR .............................................................................................................................................11
WINDOWS “ABOUT”.................................................................................................................................11
HIDDEN INTERFACE ................................................................................................................................. 12
WIZARDS ................................................................................................................................................. 12
PREFERENCES .......................................................................................................................................... 12
VPN Client start mode........................................................................................................................ 12
Miscellaneous ..................................................................................................................................... 13
CHAPTER 4: VPN CONFIGURATION................................................................................................ 14
CONFIGURATION WIZARD ........................................................................................................................ 14
Four easy step Wizard ........................................................................................................................ 14
Step 1 of 4 ........................................................................................................................................... 15
Step 2 of 4 ........................................................................................................................................... 15
Step 3 of 4 ........................................................................................................................................... 16
Step 4 of 4 ........................................................................................................................................... 16
VPN TUNNEL CONFIGURATION ............................................................................................................... 17
How to create a VPN Tunnel? ............................................................................................................ 17
Multiple Authentication or IPSec Configuration Phase..................................................................... 17
Advanced Features ............................................................................................................................. 18
AUTHENTICATION OR PHASE 1................................................................................................................. 18
What is Phase 1? ................................................................................................................................ 18
Phase 1 Settings Description.............................................................................................................. 19
Phase 1 Advanced configuration........................................................................................................ 20
IPSEC CONFIGURATION OR PHASE 2 ........................................................................................................ 22
What is Phase 2? ................................................................................................................................ 22
Phase 2 Settings Description.............................................................................................................. 22
Phase 2 Advanced configuration........................................................................................................ 23
GLOBAL PARAMETERS – GLOBAL SETTINGS DESCRIPTION ...................................................................... 25
VPN TUNNEL VIEW – HOW TO VIEW OPENED TUNNELS? ......................................................................... 26
USB MODE.............................................................................................................................................. 27
What is USB Mode?............................................................................................................................ 27
Table of Contents
i
How to set USB Mode on?.................................................................................................................. 27
How to enable a new USB Stick? ....................................................................................................... 28
How to automatically open tunnels when an USB Stick is plugged in? ............................................. 28
CERTIFICATE MANAGEMENT (PLEASE SEE APPENDIX A - COMPATIBLE TABLE OF BILLION VPN ENABLED
DEVICES AND BIGUARD VPN CLIENT) .................................................................................................... 29
Additional support documents ............................................................................................................ 29
How to configure IPSec VPN Client with Certificates? ..................................................................... 29
CONFIGURATION MANAGEMENT – HOW TO IMPORT OR EXPORT A VPN CONFIGURATION? ..................... 30
CONFIGURATION TOOLS........................................................................................................................... 31
Command line tools ............................................................................................................................ 31
Stopping VPN Client: option “/stop” ................................................................................................. 31
Import VPN Configuration: option “/import” and “/importance”.................................................... 31
VPN Client Startup mode: VPNSTART............................................................................................... 31
Hiding VPN Client configuration user interface: VPNHIDE............................................................. 31
CONSOLE AND LOGS ................................................................................................................................ 32
Console Windows................................................................................................................................ 32
CHAPTER 5: TROUBLESHOOTING .................................................................................................. 34
INTRODUCTION ........................................................................................................................................ 34
TOOLS IN CASE OF TROUBLE .................................................................................................................... 34
A good network analyzer: ethereal..................................................................................................... 34
VPN IPSEC TROUBLESHOOTING ............................................................................................................. 34
« PAYLOAD MALFORMED » error (wrong Phase 1 [SA])............................................................... 34
« INVALID COOKIE » error .............................................................................................................. 34
« no keystate » error ........................................................................................................................... 35
« received remote ID other than expected » error.............................................................................. 35
« NO PROPOSAL CHOSEN » error .................................................................................................. 35
« INVALID ID INFORMATION » error ............................................................................................. 36
No response for phase 1 requests ....................................................................................................... 36
SEND, RECV and that is all!.............................................................................................................. 36
No response to phase 2 requests......................................................................................................... 37
I clicked on “Open tunnel”, but nothing happens.............................................................................. 37
The VPN tunnel is up but I can’t ping! ............................................................................................... 37
APPENDIX A: COMPATIBLE TABLE OF BILLION VPN ENABLED DEVICES AND BIGUARD
VPN CLIENT............................................................................................................................................ 38
APPENDIX B: PRODUCT SUPPORT AND CONTACT INFORMATION...................................... 39
Table of Contents
ii
Billion BiGuard VPN Client
Chapter 1: Introduction
Introduction to BiGuard VPN Client
Your network is constantly evolving as you integrate more business applications and
consolidate servers. In that environment, it is becoming extremely complex to maintain total
security at the edge while users being employees or Teleworkers on the go are working with
customers and partners. You need to get access to those applications and servers quickly,
easily and securely.
BiGuard VPN client is an IPSec VPN software for Windows versions that allows establishing
secure connections over the Internet usually between a remote worker and the Corporate
Intranet. IPSec is the most secure way to connect to the enterprise as it provide strong user
authentication, strong tunnel encryption with ability to cope with existing network and firewall
settings.
Features
Windows supported versions
Win95, Win98, Me, NT, Win2000, WinXP
Tunneling Protocol
Full IKE support: The IKE implementation is based on the OpenBSD 3.1 implementation
(ISAKMPD), thus providing best compatibility with existing IPSec routers and gateways.
Full IPSec support: Main mode and Aggressive mode
MD5 and SHA hash algorithms
NAT Traversal
NAT Traversal Draft 1 (enhanced), Draft 2 and 3 (full implementation)
Including NAT_OA support (floating port for IKE exchange)
Including NAT keepalive
Encryption
Provides DES, 3DES and AES 128/192/256 bits encryption.
User Authentication (Please see Appendix A)
X-Auth support
Preshared keying support
Support of Group 1, 2 and 5 (i.e. DH768, 1024 and 1536)
Flexible Certificate support (PEM, PKCS12, ...)
USB Stick
VPN configurations and security elements (certificates, Preshared key, ...) can be saved
into an USB Stick in order to remove authentication information from the computer.
Log console
All phase messages are logged for testing or staging purpose, and multiple files (10)
allows to easily narrow the view on specific aspects.
1
Chapter 1: Introduction
Billion BiGuard VPN Client
Invisible User Interface
Silent install and invisible graphical interface allow IT managers to deploy solutions while
preventing user to misuse configurations.
Configuration building
User Interface and Command Line.
2
Chapter 1: Introduction
Billion BiGuard VPN Client
Chapter 2: Installing BiGuard VPN Client
Software installation
BiGuard VPN client installation is a classical Windows installation that does not require specific
information. After completing the installation, you will be asked to reboot your computer.
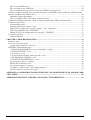
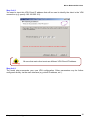
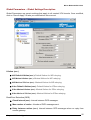
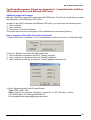
After reboot and session login, a window appears for a license number request. The license
number is shown on the CD packaging.
Quit: will close established this window and software.
Evaluate: allows you to continue software evaluation. Evaluation period is displayed into the
yellow bar above.
Activate: allows you to activate the software online. This requires a License Number. When
clicking on “Activate” button, an Activation Wizard pops up.
Buy: allows you to find the purchase contact window a license in Billion’s Website.
On Windows NT, 2000 and XP, you must have administrator rights. If it is not
the case, the installation stops after the language choice with an error
message.
Shortcuts: After software installation, BiGuard VPN window can be launched:
1. From user desktop, by double-clicking on BiGuard VPN shortcut.
2. From VPN Client icon available in the taskbar.
3. From menu Start > Programs > Billion > BiGuard VPN > Billion BiGuard VPN.
3
Chapter 2: Installing BiGuard VPN Client
Billion BiGuard VPN Client
Software Evaluation
It is possible to use BiGuard VPN Client during the evaluation period (i.e. limited to 30 days) by
clicking on "Evaluate" button. When the IPSec VPN Client is on "Evaluation" mode, the register
window appears at each boot of the client. Evaluation period is displayed into the yellow bar
above.
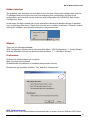
Once evaluation period expires, “Evaluation” button is no longer available and the software is
disabled.
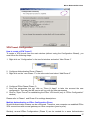
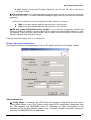
Activation Wizard
Two easy step Wizard
The Activation Wizard is a two steps Wizard that allows users to activate the software online.
Activation requires a License Number. Enter your License Number, email address and click
'Next' as shown below. Email address will be used to send back an activation confirmation to
the user.
The “Activation Wizard” can be launched from the VPN Client software as such:
Click on the “?” menu and then click on "Activation Wizard".
Click on the “Activate” button in the startup windows when you start the VPN Client.
4
Chapter 2: Installing BiGuard VPN Client
Billion BiGuard VPN Client
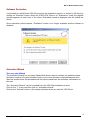
Step 1 of 2: Enter License Number
Activation requires a License Number. Enter your License Number, your email address and click
“Next” as shown below. Email address will be used to send back an activation confirmation
email to the user once activation has been successfully performed.
From VPN Client release 3.0 and later, the License Number format is a 24-digit number (i.e. 4
times 6 digits). Older License Number format is a 20-digit number. You can select the right
format by clicking on “Format” on the right end side next to the License Number field as follow:
5
Chapter 2: Installing BiGuard VPN Client
Billion BiGuard VPN Client
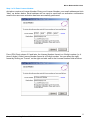
Step 2 of 2: Online Activation
The “Activation Wizard” will automatically connect to the online software activation server to
activate the VPN Client Software. You can go back at anytime to change the License Number.
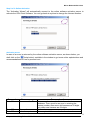
Activation errors
In case of an error is returned by the online software activation server, as shown below, you
shall click on the
(help button) available in the window to get more online explainations and
recommandations on how to proceed next.
Error codes
Error messages
Error 001
License not found
Error 002
Error 003
Reserved
Activation quota
Error explanations
License number doesn't exist in the activation server
database. There must be an error in entering the
license number. Also some old licenses are 20 digits
only while new licenses are 24 digits.
Reserved
Too many installations and activations have been
6
Chapter 2: Installing BiGuard VPN Client
Billion BiGuard VPN Client
exceeded
Error 004
Wrong product code
Error 050
Impossible to
complete activation
process
Impossible to
complete activation
process
Impossible to
complete activation
process
Cannot connect
activation server
Error 051
Error 052
Error 053
Error 054
Error 055
processed for this specific license number. License
numbers can not be used more than allowed by your
IT department.
The License number you've entered is not allowed on
this software product. This software product requires
a specific license number that is provided by the
distributor of this software.
Activation server can not generate activate code for
this license at the moment of activation
Activation server can not generate activate code for
this license at the moment of activation
Activation server can not generate activate code for
this license at the moment of activation
The activation server can't be contacted. Reasons
can be broken Internet connection, activation server
down, firewall and security policies.
Cannot connect
The activation server can't be contacted. Reasons
activation server
can be broken Internet connection, activation server
down, firewall and security policies.
Activation code error Activation code might have been modified after
activation.
Software Uninstallation
BiGuard VPN Client can be uninstalled:
1. From Windows Control Panel by selecting “Add/Remove programs”.
2. From Start Menu > Programs > Billion > BiGuard VPN > Uninstall BiGuard VPN
7
Chapter 2: Installing BiGuard VPN Client
Billion BiGuard VPN Client
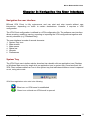
Chapter 3: Navigation the User Interface
Navigation the user interface
BiGuard VPN Client is fully autonomous and can start and stop tunnels without user
intervention, depending on traffic to certain destinations. However it requires a VPN
configuration.
The VPN Client configuration is defined in a VPN configuration file. The software user interface
allows creating, modifying, saving, exporting or importing the VPN configurations together with
security elements (e.g. Preshared key).
The user interface is made of several elements:
1. System Tray Icon
2. Main window
3. Main menus
4. Status bar
5. Wizards
6. Preferences
System Tray
The VPN Client user interface cab be launched via a double click on application icon (Desktop
or Windows Start menu) by single click on application icon in system tray. Once launched, the
VPN Client software shows an icon in this system tray that indicates whether a tunnel is opened
or not, using color code.
VPN Client application color code is the following:
Blue icon: no VPN tunnel is established
Green icon: at least one VPN tunnel is opened
8
Chapter 3: Navigation the User Interface
Billion BiGuard VPN Client
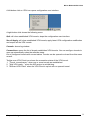
A left-button click on VPN icon opens configuration user interface.
A right-button click shows the following menu:
Quit: will close established VPN tunnels, stops the configuration user interface.
Save & Apply: will close established VPN tunnels, apply latest VPN configuration modification
and reopen all the VPN tunnels.
Console: shows log window.
Connections: opens the list of already established VPN tunnels. You can configure tunnels to
open up automatically when the software starts.
List of configured tunnels with current status. Tunnels can be opened or closed from this menu
as well.
Tooltips over VPN Client icon shows the connection status of the VPN tunnel:
1. "Tunnel <tunnelname>” when one or more tunnels are established.
2. "Wait VPN ready...” when the IKE service is reinitializing.
3. "BiGuard VPN Client” when the VPN Client is up but with no opened tunnel.
9
Chapter 3: Navigation the User Interface
Billion BiGuard VPN Client
Main Window
The main window is made of several elements:
1. Three buttons “Console”, “Parameters” and “Connections” (left column).
2. A tree list window (left window) that contains all IKE and IPSec configuration.
3. A configuration window (right window) that shows the associated tree level.
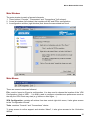
Main Menus
There are several menus as followed:
File: used to Import or Export a configuration. It is also used to choose the location of the VPN
Configuration: local or USB…. It is finally used to configure miscellaneous preferences such as
the way the VPN Client may start (e.g. before or after logon, ...).
VPN Configuration: contains all actions from tree control right-click menu, it also gives access
to the “Configuration Wizard”.
Tools: contains “Console” and “Connections” choice.
?: gives access to online support and window “About”, it also gives access to the “Activation
Wizard”
10
Chapter 3: Navigation the User Interface
Billion BiGuard VPN Client
Status Bar
The status bar displays several informations:
The left side box indicates the VPN configuration location. For example, if the "USB Mode" is
set, the image will show a USB stick, enabled or not depending on the presence of a valid VPN
USB stick.
The central box gives some information about VPN Client Software status (e.g. "opening tunnel
in progress", "saving configuration rules in progress", "VPN client start up in progress", …)
The light box (right side) gives some information about tunnels (e.g. Green light
means at least one tunnel is open, Gray light
means no tunnel open)
Windows “About”
The “About” window provides the VPN Client software version. There is also an URL to our web
site.
11
Chapter 3: Navigation the User Interface
Billion BiGuard VPN Client
Hidden Interface
The graphical user interface can be hidden to the end user. We provide configuration tools for
IT managers that prevent the end user from changing their configuration. Access to the
configuration user interface can be restricted with configuration tool VPNHIDE. See section
Configuration Tools.
In that case, the Main window can not be opened and showed by double-clicking on desktop
icon, by selecting Start menu. Right-click over the icon in taskbar is limited to "Console" access,
quitting the software, and opening/closing the configured tunnels:
Wizards
There are two Wizards available:
VPN Configuration Wizard can be launched from Menu “VPN Configuration” > “Config Wizard”.
Software Activation Wizard can be launched from Menu “?” > “Activation Wizard“.
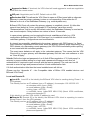
Preferences
Preferences window allows you to define:
Start up mode of the software
Enable/Disable the detection of interface disconnection feature
Preferences are available via Menu “File” and click “Preferences”.
VPN Client start mode
BiGuard IPSec VPN Client software has several start up mode, such as: BiGuard VPN Client
12
Chapter 3: Navigation the User Interface
Billion BiGuard VPN Client
can start with 3 different modes:
Start VPN Client software before MS Windows logon: this mode can be used for secure
remote login
Start VPN Client software after MS Windows logon
Don't start VPN Client when I start MS Windows: VPN Client is launched by user or from a
script ("manual" mode)
Miscellaneous
Disable detection of interface disconnection: allows the VPN Client maintain tunnels opened
while the network interface disconnects momentarely but very often. This type of behavior
occurs when the interface used to open tunnels is unstable such as WiFi, GPRS and all 3G
interfaces.
13
Chapter 3: Navigation the User Interface
Billion BiGuard VPN Client
Chapter 4: VPN Configuration
Configuration Wizard
Four easy step Wizard
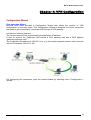
BiGuard VPN client provides a Configuration Wizard that allows the creation of VPN
configuration in four easy steps. This Configuration Wizard is designed for remote computers
that need to get connected to a corporate LAN through a VPN gateway.
Let take the following example:
The remote computer has a dynamically provided public IP address.
It tries to connect the Corporate LAN behind a VPN gateway that has a DNS address
"gateway.mydomain.com".
The Corporate LAN address is 192.168.1.xxx. e.g. the remote computer want to reach a server
with the IP address: 192.168.1.100.
For configuring this connection, open the wizard window by selecting menu "Configuration >
Wizard".
14
Chapter 4: VPN Configuration
Billion BiGuard VPN Client
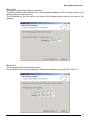
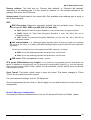
Step 1 of 4
You need to specify the following information:
The public (network side) address of the remote gateway Address (In IP or Domain name). (e.g.
specify gateway.mydomain.com)
The Preshared-key you will use for this tunnel (this Preshared-key must be the same in the
gateway).
Step 2 of 4
You must specify the following information:
The IP address of your remote gateway LAN Network address (e.g. specify 192.168.1.0).
15
Chapter 4: VPN Configuration
Billion BiGuard VPN Client
Step 3 of 4
You need to input this VPN Client IP address that will be used to identify the client in the VPN
connection (e.g. specify 192.100.205.101).
Be sure that each client must use different VPN Client IP Address.
Warning
Step 4 of 4
The fourth step summaries your new VPN configuration. Other parameters may be further
configured directly via the main interface (e.g.virtual IP address, etc..).
16
Chapter 4: VPN Configuration
Billion BiGuard VPN Client
VPN Tunnel Configuration
How to create a VPN Tunnel?
To create a VPN tunnel from the main window (without using the Configuration Wizard), you
must follow the following steps:
1. Right-click on “Configuration’ in the tree list window and select “New Phase 1”
2. Configure Authentication Phase (Phase 1)
3. Right-click on the “new Phase 1” in the tree control and select “Add Phase 2”
4. Configure IPSec Phase (Phase 2)
5. Once the parameters are set, click on "Save & Apply" to take into account the new
configuration. That way the IKE service will run with the new parameters
6. Click on "Open Tunnel" for establishing the IPSec VPN tunnel (only in "IPSec Configuration"
window)
Please refer to Phase 1 and Phase 2 for settings descriptions.
Multiple Authentication or IPSec Configuration Phase
Several Authentication Phases can be configured. Therefore, one computer can establish IPSec
VPN connections with several gateways or other computers (peer to peer).
Similarly, several IPSec Configurations (Phase 2) can be created for a same Authentication
17
Chapter 4: VPN Configuration
Billion BiGuard VPN Client
Phase (Phase 1).
Advanced Features
Advanced features and parameters can be defined for Phase 1 and Phase 2.
Those defined in Phase 1 apply to all Phase 2 created in current VPN Configuration:
Enable/Disable Config Mode
Enable/Disable Agressive Mode
Enable/Disable Redundant Gateway
Change IKE Port
Set X-Auth Login/password with pop up option
Those defined in Phase 2 only apply to the associated Phase 2:
Automatic Open Mode
Choose Script/Application to be launched when tunnel opens
Manual settings of DNS/WINS server addresses
Authentication or Phase 1
What is Phase 1?
“Authentication” or “Phase 1” window will concern settings for Authentication Phase or Phase 1.
It is also called IKE Negotiation Phase.
Phase 1's purpose is to negotiate IKE policy sets, authenticate the peers, and set up a secure
channel between the peers. As part of Phase 1, each end system must identify and authenticate
itself to the other.
18
Chapter 4: VPN Configuration
Billion BiGuard VPN Client
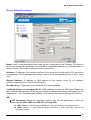
Phase 1 Settings Description
Name: Label for Authentication phase used only the configuration user interface. This value is
never used during IKE negotiation. It is possible to change this name at any time and read it in
the tree control. Two Phase1s cannot have the same name.
Interface: IP address of the network interface of the computer, through which VPN connection
is established. If the IP address may change (when it is received dynamically by an ISP), select
"Any".
Remote Gateway: IP address or DNS address of the remote router (in our example:
gateway.mydomain.com). This field is mandatory.
Pre-shared key: Password or key shared with the remote gateway.
Certificate (Please see the Appendix A): X509 certificate used by the VPN client (Please see
the “Certificate Management” of this on-line manual for detailed instructions and please see the
“Appendix A” – the Compatible table of Billion VPN enabled devices and BiGuard VPN Client).
IKE:
~ IKE encryption: Select the encryption method from the pull-down menu. There are
several options, DES, 3DES and AES (128, 192 and 256).
z DES: Stands for Data Encryption Standard, it uses 56 bits as an encryption method.
z 3DES: Stands for Triple Data Encryption Standard, it uses 168 (56*3) bits as an
encryption method.
19
Chapter 4: VPN Configuration
Billion BiGuard VPN Client
z AES: Stands for Advanced Encryption Standards, you can use 128, 192 or 256 bits as
encryption method.
~ IKE authentication: It is a Message Digest algorithm which coverts any length of a message
into a unique set of bits. It is widely used MD5 (Message Digest) and SHA (Secure Hash Algorithm)
algorithms.
SHA is more resistant to brute-force attacks than MD5, however it is slower.
z
z
MD5: A one-way hashing algorithm that produces a 128−bit hash.
SHA: A one-way hashing algorithm that produces a 160−bit hash.
~ IKE key group (Diffie-Hellman key length): It is a public-key cryptography protocol that
allows two parties to establish a shared secret over an unsecured communication channel (i.e. over
the Internet). There are three modes, MODP 768-bit, MODP 1024-bit and MODP 1536-bit. MODP
stands for Modular Exponentiation Groups.
For more advanced settings, click on “P1 Advanced“.
Phase 1 Advanced configuration
For Advanced features and parameters, click on “P1 Advanced” button into Phase 1 panel.
Advanced features
~ Config Mode: If checked, the VPN Client will activate Config-Mode for this tunnel.
Config-Mode allows to the VPN Client to fetch some VPN Configuration information from
the VPN gateway like DNS/WINS server IP addresses. In case Config-Mode is not
available on the remote gateway, please refer to section “Phase2 Advanced” settings to
manually set DNS/WINS server addresses.
20
Chapter 4: VPN Configuration
Billion BiGuard VPN Client
~ Aggressive Mode: If checked, the VPN client will used aggressive mode as negotiation
mode with the remote router.
~ IKE port: Negotiation port for IKE. Default value is 500.
~ Redundant GW: This allows the VPN Client to open an IPSec tunnel with an alternate
gateway in case the primary gateway is down or not responding. Enter either the IP
address or the url of the Redundant Gateway (e.g. router.dyndns.com).
BiGuard VPN Client will contact the primary gateway to establish a tunnel. If it fails after
several tries (default is 5 tries, configurable in "Parameters" panel then modify
"Retransmissions" field to modify this default value) the Redundant Gateway is used as the
new tunnel endpoint. Delay between two retries is about 10 seconds.
In case primary gateway can be reached but tunnel establishment fails (e.g. VPN
configuration problems) then the VPN Client won't try to establish tunnels with the
redundant gateway. Configurations need modifications.
If a tunnel is successfully established to the primary gateway with DPD feature (i.e. Dead
Peer Detection) negotiated on both sides, when the primary gateway stops responding (e.g.
DPD detects non-responding remote gateways) the VPN Client immediately starts opening
a new tunnel with the redundant gateway.
The exact same behaviour will apply to the redundant gateway. This means that the VPN
Client will try to open primary and redundant gateway until the user exits software or click
on “Save & Apply”.
X-Auth: Define the login and password of an X-Auth IPSec negotiation. If "X-Auth popup" is
selected, a popup window asking for a login and a password will appear each time an
authentication is required to open a tunnel with the remote gateway. The end user has 20
seconds to enter its login and password before X-Auth authentication fails.
If X-Auth authentication fails then the tunnel establishment will fail too.
(Please see the “Appendix A” – the Compatible table of Billion VPN enabled devices and
BiGuard VPN Client).
Local and Remote ID
~ Local ID: Local ID is the identity the BiGuard VPN client is sending during Phase 1 to
VPN gateway.
This identity can be: an IP address (type = IP address), for example: 195.100.205.101
an domaine name (type = DNS);
an email address (type = Email);
a string (type = KEY ID);
a certificate issuer (type=DER ASN1 DN) (About X509 certificates,
please see Appendix A).
If this identity is not set, VPN client’s IP address is used.
~ Remote ID: Remote ID is the identity the BiGuard VPN client is expecting to receive
during Phase 1 from the VPN gateway.
This identity can be: an IP address (type = IP address);
an domaine name (type = DNS);
an email address (type = Email);
a string (type = KEY ID);
a certificate issuer (type=DER ASN1 DN) (About X509 certificates,
please see Appendix A).
21
Chapter 4: VPN Configuration
Billion BiGuard VPN Client
If this identity is not set, VPN gateway's IP address is used.
IPSec Configuration or Phase 2
What is Phase 2?
“IPSec Configuration” or “Phase 2” window will concern settings for Phase 2.
The purpose of Phase 2 is to negotiate the IPSec security parameters that are applied to the
traffic going through tunnels negotiated during Phase 1.
Phase 2 Settings Description
Name: Label for IPSec Configuration only used by the VPN client. This parameter is never
transmitted during IPSec Negotiation. It is possible to change this name at any time and read it
in the tree list window. Two Phases cannot have the same name.
VPN Client address: Virtual IP address used by the client inside the remote LAN: The
computer will appear in the LAN with this IP address. It is important this IP address not to
belong to the remote LAN (e.g., in the example, you should avoid an IP address like
192.168.1.10).
Address type: The remote endpoint may be a LAN or a single computer. In the first case
choose "Subnet address". Choose "Single address" otherwise. When choosing "Subnet
address", the two fields "Remote LAN address" and "Subnet mask" became available. When
choosing "Single address", only the field "Remote host address" is available.
22
Chapter 4: VPN Configuration
Billion BiGuard VPN Client
Remote address: This field may be "Remote host address" or "Remote LAN address"
depending of the address type. It is the remote IP address, or LAN network address of the
gateway, that opens the VPN tunnel.
Subnet mask: Subnet mask of the remote LAN. Only available when address type is equal to
the "Subnet address".
ESP:
~ ESP Encryption: Select the encryption method from the pull-down menu. There are
several options, DES, 3DES and AES (128, 192 and 256).
z DES: Stands for Data Encryption Standard, it uses 56 bits as an encryption method.
z 3DES: Stands for Triple Data Encryption Standard, it uses 168 (56*3) bits as an
encryption method.
z AES: Stands for Advanced Encryption Standards, you can use 128, 192 or 256 bits as
encryption method.
~ ESP authentication: It is a Message Digest algorithm which coverts any length of a message
into a unique set of bits. It is widely used MD5 (Message Digest) and SHA (Secure Hash Algorithm)
algorithms.
SHA is more resistant to brute-force attacks than MD5, however it is slower.
z MD5: A one-way hashing algorithm that produces a 128−bit hash.
z SHA: A one-way hashing algorithm that produces a 160−bit hash.
~ ESP mode: IPSec encapsulation mode : tunnel.
PFS group (Diffie-Hellman key length): It is a public-key cryptography protocol that allows two
parties to establish a shared secret over an unsecured communication channel (i.e. over the Internet).
There are three modes, MODP 768-bit, MODP 1024-bit and MODP 1536-bit. MODP stands for Modular
Exponentiation Groups.
Open Tunnel: This button allows users to open the tunnel. This button changes to "Close
Tunnel" as soon as the tunnel is opened.
For more advanced settings, click on “P2 Advanced”.
Once the parameters are set, click on “Save & Apply” to save and to take into account the new
configuration.
Phase 2 Advanced configuration
For Advanced features and parameters, click on “P1 Advanced” button into Phase 1 panel.
23
Chapter 4: VPN Configuration
Billion BiGuard VPN Client
Automatic Open mode: The VPN Client can automatically open the specified tunnel (Phase2)
on specific events such as:
Auto open this tunnel when the VPN Client starts up.
Auto open this tunnel when USB stick is inserted (see section "USB Mode").
Auto open this tunnel when the VPN Client detect traffic towards remote LAN.
Open script: A specific script or application (e.g. Outlook, CRM apps, ..) can be launched when
this tunnel opens. Script or application can be selected by browsing using
button.
Alternate servers: DNS and WINS server IP addresses of the remote LAN can be entered
here, to help users to resolve intranet addressing. The DNS or WINS addresses are taken into
account as soon as the tunnel is opened, and as long as it is opened.
24
Chapter 4: VPN Configuration
Billion BiGuard VPN Client
Global Parameters – Global Settings Description
Global Parameters are generic settings that apply to all created VPN tunnels. Once modified,
click on “Save & Apply” to take you modifications into account.
Lifetime (sec.)
~ IKE Default Lifetime (sec.): Default lifetime for IKE rekeying.
~ IKE Minimal Lifetime (sec.): Minimal lifetime for IKE rekeying.
~ IKE Maximal lifetime (sec.): Maximal lifetime for IKE rekeying.
~ IPSec Default Lifetime (sec.): Default lifetime for IPSec rekeying.
~ IPSec Minimal Lifetime (sec.): Minimal lifetime for IPSec rekeying.
~ IPSec Maximal lifetime (sec.): Maximal lifetime for IPSec rekeying.
Dead Peer Detection (DPD)
~ Check interval (sec.): Interval between DPD messages.
~ Max number of retries : Number of DPD messages sent.
~ Delay between retries (sec.): Interval between DPD messages when no reply from
remote gateway.
25
Chapter 4: VPN Configuration
Billion BiGuard VPN Client
Miscellaneous:
~ Retransmissions: How many times a message should be retransmitted before giving
up.
~ Delay between retries (sec.): Waiting time in an exchange before giving up a
negociation.
~ Block non-ciphered connection: When this option is checked, only encrypted traffic is
authorized.
Dead Peer Detection (i.e. DPD) is an Internet Key Exchange (IKE) extension (i.e. RFC3706) for
detecting a dead IKE peer.
BiGuard IPSec VPN Client is using DPD:
to delete opened SA in the VPN Client when peer has been detected dead.
to re-start IKE negotiations with the Redundant Gateway if activated in the “Phase1 Advanced”
VPN configuration panel.
Once the parameters are set, click on “Save & Apply” to save and to take into account the new
configuration.
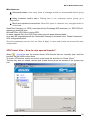
VPN Tunnel View – How to view opened tunnels?
Select
to see the screen shows VPN tunnels that are currently open and this
interface can be used to close them.
To close a VPN tunnel, select one tunnel in the tunnel list and click on “Close Tunnel”.
Tunnels may also be viewed, opened and closed directly from the context of the system tray
icon.
26
Chapter 4: VPN Configuration
Billion BiGuard VPN Client
USB Mode
What is USB Mode?
BiGuard VPN Client brings the capability to secure VPN configurations and VPN security
elements (e.g. PreShared key, Certificates, …) by the use of an USB Stick.
When you select "USB mode", the VPN configuration and security elements contained into the
configuration are stored onto the USB Stick the first time you plug it in. Once done and the
"USB mode" is set "On", you just need to insert the USB Stick to automatically open tunnels.
And you just need to unplug the USB Stick to automatically close all established tunnels.
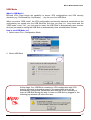
How to set USB Mode on?
1. Select menu File > Configuration Mode
2. Select USB Stick
At this stage, if an USB Stick containing a VPN configuration with VPN
security elements is already plugged in, the associated drive will be
automatically recognized. Please note also that this is not necessary to
insert a USB Stick during this step. In case no USB Stick is plugged in, the
following pop window will inform the user:
27
Chapter 4: VPN Configuration
Billion BiGuard VPN Client
Once USB mode is set on, the left side box in the status bar shows an USB stick icon.
The USB Stick icon is plain when a USB Stick is plugged in:
The USB Stick icon is gray when no USB Stick is plugged in:
How to enable a new USB Stick?
A new USB Stick (no data) must be enabled by copying VPN configuration and security
elements onto it.
When you insert a new USB Stick, the IPSec VPN Client automatically propose to enable the
USB Stick through the following options:
~ Copying the VPN configuration and security elements onto the USB Stick: the VPN
client will copy the security information onto the USB Stick and leave a copy in the
computer. This used by IT managers to enable multiple USB Sticks for multiple users in no
time.
~ Moving the configuration onto the USB Stick: the IPSec VPN client will copy the security
information onto the USB Stick and remove all security information from the computer. This
method is used to secure a computer once VPN configuration completed setup.
How to automatically open tunnels when an USB Stick is plugged in?
Each and every tunnel must be configured individually:
1. Select one tunnel by clicking on IPSec Configuration (Phase 2) in the tree list window.
2. Click on “P2 Advanced” button
3. Select the "Automatically open this tunnel when USB Stick is inserted" mode.
28
Chapter 4: VPN Configuration
Billion BiGuard VPN Client
Certificate Management (Please see Appendix A - Compatible table of Billion
VPN enabled devices and BiGuard VPN Client)
Additional support documents
BiGuard VPN Client uses X509 certificates with PEM format. This kind of certificates is created
with OpenSSL, not with BiGuard VPN Client.
In order to use X509 Certificates with BiGuard VPN client, you must have the following items:
1. Root certificate
2. User certificate
3. Private key of the user certificate
The private key must not be encrypted. X509 certificates are used during Phase 1.
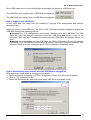
How to configure IPSec VPN Client with Certificates?
1. Select radio button “Certificate” in the “Authentication” window and click on “Certificates Mgt”
2. Click on "Browse" and select the appropriate files.
1. Root certificate is copied into directory " [install_path]\ca\".
2. User certificate is copied into directory " [install_path]\cert\".
3. User certificate private key is copied to " [install_path]\private\local.key".
3. Open 'Advanced button' and fill Local ID with:
Type: "DER_ASN1_DN".
Value: subject user certificate ("Subject:") conten like "C=FR, ST=Paris, L=Paris,
O=TheGreenBow, OU=Internal OpenSSL CA,
CN=exemple/[email protected]".
29
Chapter 4: VPN Configuration
Billion BiGuard VPN Client
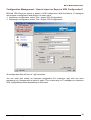
Configuration Management – How to Import or Export a VPN Configuration?
BiGuard VPN Client can import or export a VPN Configuration. With this feature, IT managers
can prepare a configuration and deliver it to other users.
1. Importing a configuration, select "File > Import VPN Configuration".
2. Exporting a configuration, select "File > Export VPN Configuration".
All configuration files will have a ".tgb" extension.
You can open and modify an exported configuration file (extension .tgb) with any word
processing e.g. Notepad and re import it again. This is other way for IT managers to customize
VPN configurations before dispatching to end-users.
30
Chapter 4: VPN Configuration
Billion BiGuard VPN Client
Configuration Tools
Command line tools
Those tools are available as command line type and are meant to be used by IT managers to
change the IPSec VPN Client behavior to their needs.
1. Stopping IPSec VPN Client
2. Import VPN Configuration
3. IPSec VPN Client Startup mode
4. Hiding IPSec VPN Client configuration user interface
Stopping VPN Client: option “/stop”
BiGuard VPN Client can be stopped at any time by the command line:
" [path]\vpnconf.exe /stop " where [path] is the client installation directory.
If there are several active tunnels, they will close properly.
This feature can be used, for example, in a script that launch the VPN Client after establishing a
dialup connection and exit it just before the disconnection.
Import VPN Configuration: option “/import” and “/importance”
BiGuard VPN Client can import a specific configuration file by the command line:
" [path]\vpnconf.exe /import:[file.tgb] " where [path] is the client installation directory, and
[file.tgb] is the VPN Configuration file.
" /import: " may be used either if the VPN Client is running or not. When the VPN Client is
already running, it imports dynamically the new configuration and automatically applies it (i-e:
restarts the IKE service). If the VPN Client is not running, it is launched with the new
configuration.
" /importonce: " allows to import a VPN configuration file without running the VPN Client. This
command is especially useful in installation scripts: it allows to run a silent installation and to
import a configuration automatically.
VPN Client Startup mode: VPNSTART
VpnStart.exe is a configuration tool that sets up the client startup mode.
BiGuard VPN Client can start with 3 different modes:
1. During PC boot: this mode can be used for secure remote action.
2. At Windows login ("login" mode).
3. Launched by user or from a script ("manual" mode).
BiGuard VPN Client 3.0 and later version includes this feature into the VPN Client itself.
Hiding VPN Client configuration user interface: VPNHIDE
VpnHide.exe is a configuration tool that hides BiGuard VPN Client interface. It can be used by
IT managers for preventing end-user from modifying configuration settings.
In "invisible" mode, the window interface is never shown.
31
Chapter 4: VPN Configuration
Billion BiGuard VPN Client
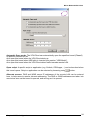
Console and Logs
Console Windows
The “Console” window is available from the context menu of the systray icon or from “Console”
button in the configuration user interface. This window can be used to analyze VPN tunnels.
This tool is particularly useful for IT managers in setting up their network.
Save: Save logs in a file.
Stop: Stop saving logs in a file.
Clear: Clear console window content.
Options: Set level of log filtering.
32
Chapter 4: VPN Configuration
Billion BiGuard VPN Client
Misc (Misc): log level for configuration reading or dump of low level messages
Trpt (Transport): log level for UDP transport mode
Msg (Message): log level for IKE decode
Cryp (Crypto): log level and dump for crypto material exchanged
Timr (Timer): log level about timers
Sdep (Sysdep): log level about IKE interface from/to IPSec
SA (SA): log level for SA managment
Exch (Exchange): log level about IKE exchanges (very useful)
Nego (Negotiation): log level about phase 1 and phase 2 negotiations
Plcy (Policy): not used
All (All): Apply the same log level to all subsystems
Most of the time log level set to 0 is largely enough for resolving configuration issues.
33
Chapter 4: VPN Configuration
Billion BiGuard VPN Client
Chapter 5: Troubleshooting
Introduction
The goal of this section is to help IT Managers, system administrators or users facing VPN
configuration issues of their IPSec VPN network. All information concerning VPN connection
state, VPN trace or VPN Logs can be found in the "Console" Window of BiGuard VPN Client.
Tools in case of trouble
Configuring an IPSec VPN tunnel can be a hard task. One missing parameter can prevent a
VPN connection from being established. Some tools are available to find source of troubles
during a VPN establishment.
A good network analyzer: ethereal
Ethereal is free software that can be used for packet and traffic analysis. It shows IP or TCP
packets received on a network card. This tool is available on website: http://www.ethereal.com/.
It can be used to follow protocol exchange between two devices. For installation and use details,
read its specific documentation.
VPN IPSec Troubleshooting
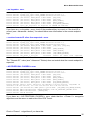
« PAYLOAD MALFORMED » error (wrong Phase 1 [SA])
114915 Default sysdep_app_open: Init Connection for : Cnx-Cnx-P2 Cnx-remote-addr
114915 Default sysdep_app_open: IPV4_SUBNET Network 192.168.1.1
114915 Default sysdep_app_open: IPV4_SUBNET Netmask 255.255.255.0
114920 Default (SA Cnx-P1) SEND phase 1 Main Mode [SA][VID]
114920 Default (SA Cnx-P1) RECV phase 1 Main Mode [NOTIFY]
114920 Default exchange_run: exchange_validate failed
114920 Default dropped message from 195.100.205.114 port 500 due to notification
type PAYLOAD_MALFORMED
114920 Default SEND Informational [NOTIFY] with PAYLOAD_MALFORMED error
If you have an « PAYLOAD MALFORMED » error you might have a wrong Phase 1 [SA], check
if the encryption algorithms are the same on each side of the VPN tunnel.
« INVALID COOKIE » error
115933 Default message_recv: invalid cookie(s) 5918ca0c2634288f 7364e3e486e49105
115933 Default dropped message from 195.100.205.114 port 500 due to notification
type INVALID_COOKIE
115933 Default SEND Informational [NOTIFY] with INVALID_COOKIE error
If you have an « INVALID COOKIE » error, it means that one of the endpoint is using a SA that
is no more in use. Reset the VPN connection on each side.
34
Chapter 5: Troubleshooting
Billion BiGuard VPN Client
« no keystate » error
115305
115305
115305
115315
115317
115317
115319
115319
115319
Default
Default
Default
Default
Default
Default
Default
Default
Default
sysdep_app_open: Init Connection for : Cnx-Cnx-P2 Cnx-remote-addr
sysdep_app_open: IPV4_SUBNET Network 192.168.1.1
sysdep_app_open: IPV4_SUBNET Netmask 255.255.255.0
(SA Cnx-P1) SEND phase 1 Main Mode [SA][VID]
(SA Cnx-P1) RECV phase 1 Main Mode [SA][VID]
(SA Cnx-P1) SEND phase 1 Main Mode [KEY][NONCE]
(SA Cnx-P1) RECV phase 1 Main Mode [KEY][NONCE]
(SA Cnx-P1) SEND phase 1 Main Mode [ID][HASH][NOTIFY]
ipsec_get_keystate: no keystate in ISAKMP SA 00B57C50
If you have an « no keystate » error, check if the preshared key is correct or if the local ID is
correct (see « Advanced » button). You should have more information in the remote endpoint
logs.
« received remote ID other than expected » error
120343
120343
120343
120348
120349
120349
120351
120351
120351
120351
Default
Default
Default
Default
Default
Default
Default
Default
Default
Default
sysdep_app_open: Init Connection for : Cnx-Cnx-P2 Cnx-remote-addr
sysdep_app_open: IPV4_SUBNET Network 192.168.1.1
sysdep_app_open: IPV4_SUBNET Netmask 255.255.255.0
(SA Cnx-P1) SEND phase 1 Main Mode [SA][VID] [SA][VID]
(SA Cnx-P1) RECV phase 1 Main Mode
(SA Cnx-P1) SEND phase 1 Main Mode [KEY][NONCE]
(SA Cnx-P1) RECV phase 1 Main Mode [KEY][NONCE]
(SA Cnx-P1) SEND phase 1 Main Mode [ID][HASH][NOTIFY]
(SA Cnx-P1) RECV phase 1 Main Mode [ID][HASH][NOTIFY]
ike_phase_1_recv_ID:
received
remote ID other than expected
The " Remote ID " value (see " Advanced " Button) does not match what the remote endpoint is
expected.
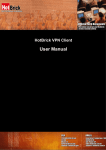
« NO PROPOSAL CHOSEN » error
115905 Default sysdep_app_open: Init Connection for : Cnx-Cnx-P2 Cnx-remote-addr
115905 Default sysdep_app_open: IPV4_SUBNET Network 192.168.1.1
115905 Default sysdep_app_open: IPV4_SUBNET Netmask 255.255.255.0
115911 Default (SA Cnx-P1) SEND phase 1 Main Mode [SA][VID]
115913 Default (SA Cnx-P1) RECV phase 1 Main Mode [SA][VID]
115913 Default (SA Cnx-P1) SEND phase 1 Main Mode [KEY][NONCE]
115915 Default (SA Cnx-P1) RECV phase 1 Main Mode [KEY][NONCE]
115915 Default (SA Cnx-P1) SEND phase 1 Main Mode [ID][HASH][NOTIFY]
115915 Default (SA Cnx-P1) RECV phase 1 Main Mode [ID][HASH][NOTIFY]
115915 Default phase 1 done: initiator id c364cd70: 195.100.205.112, responder id
c364cd72: 195.100.205.114, src: 195.100.205.112 dst: 195.100.205.114
115915 Default (SA Cnx-Cnx-P2) SEND phase 2 Quick Mode [SA][KEY][ID][HASH][NONCE]
115915 Default RECV Informational [HASH][NOTIFY] with NO_PROPOSAL_CHOSEN error
115915 Default RECV Informational [HASH][DEL]
115915 Default Cnx-P1 deleted
If you have an « NO PROPOSAL CHOSEN » error, check that the « Phase 2 » encryption
algorithms are the same on each side of the VPN Tunnel.
Check « Phase 1 » algorithms if you have this:
35
Chapter 5: Troubleshooting
Billion BiGuard VPN Client
115905
115905
115905
115911
115911
Default
Default
Default
Default
Default
sysdep_app_open: Init Connection for : Cnx-Cnx-P2 Cnx-remote-addr
sysdep_app_open: IPV4_SUBNET Network 192.168.1.1
sysdep_app_open: IPV4_SUBNET Netmask 255.255.255.0
(SA Cnx-P1) SEND phase 1 Main Mode [SA][VID]
RECV Informational [NOTIFY] with NO_PROPOSAL_CHOSEN error
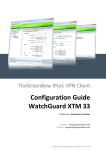
« INVALID ID INFORMATION » error
122609 Default sysdep_app_open: Init Connection for : Cnx-Cnx-P2 Cnx-remote-addr
122609 Default sysdep_app_open: IPV4_SUBNET Network 192.168.3.1
122609 Default sysdep_app_open: IPV4_SUBNET Netmask 255.255.255.0
122623 Default (SA Cnx-P1) SEND phase 1 Main Mode [SA][VID]
122625 Default (SA Cnx-P1) RECV phase 1 Main Mode [SA][VID]
122625 Default (SA Cnx-P1) SEND phase 1 Main Mode [KEY][NONCE]
122626 Default (SA Cnx-P1) RECV phase 1 Main Mode [KEY][NONCE]
122626 Default (SA Cnx-P1) SEND phase 1 Main Mode [ID][HASH][NOTIFY]
122626 Default (SA Cnx-P1) RECV phase 1 Main Mode [ID][HASH][NOTIFY]
122626 Default phase 1 done: initiator id c364cd70: 195.100.205.112, responder id
c364cd72: 195.100.205.114, src: 195.100.205.112 dst: 195.100.205.114
122626 Default (SA Cnx-Cnx-P2) SEND phase 2 Quick Mode [SA][KEY][ID][HASH][NONCE]
122626 Default RECV Informational [HASH][NOTIFY] with INVALID_ID_INFORMATION error
122626 Default RECV Informational [HASH][DEL]
122626 Default Cnx-P1 deleted
If you have an « INVALID ID INFORMATION » error, check if « Phase 2 » ID (local address and
network address) is correct and match what is expected by the remote endpoint.
Check also ID type (“Subnet address” and “Single address”). If network mask is not check, you
are using a IPV4_ADDR type (and not a IPV4_SUBNET type).
Check in your VPN Router SA monitor if a previous SA is still alive.
No response for phase 1 requests
114920 Default (SA
[NONCE] [ID] [VID]
114920 Default (SA
[NONCE] [ID] [VID]
114920 Default (SA
[NONCE] [ID] [VID]
114920 Default (SA
[NONCE] [ID] [VID]
CnxVpn1-P1) SEND phase 1 Aggressive Mode
[SA] [KEY_EXCH]
CnxVpn1-P1) SEND phase 1 Aggressive Mode
[SA] [KEY_EXCH]
CnxVpn1-P1) SEND phase 1 Aggressive Mode
[SA] [KEY_EXCH]
CnxVpn1-P1) SEND phase 1 Aggressive Mode
[SA] [KEY_EXCH]
If the remote gateway does not answer, there must be wrong parameters. Check the algorithms
are the same on each side of the VPN tunnel. Check also phase 1 IDs (in “Advanced" window).
SEND, RECV and that is all!
115315 Default (SA CnxVpn1-P1) SEND phase 1 Aggressive Mode
[NONCE] [ID] [VID]
115317 Default (SA CnxVpn1-P1) RECV phase 1 Aggressive Mode
[NONCE] [ID] [VID]
[SA] [KEY_EXCH]
[HASH] [SA] [KEY_EXCH]
Check if the preshared key is correct. Maybe two VPN tunnels are configured on your VPN
Router.
36
Chapter 5: Troubleshooting
Billion BiGuard VPN Client
No response to phase 2 requests
120348 Default
[ID] [ID]
120349 Default
[ID] [ID]
120351 Default
[ID] [ID]
120351 Default
[ID] [ID]
(SA CnxVpn1-CnxVpn1-P2) SEND phase 2 Quick Mode
[HASH] [SA] [NONCE]
(SA CnxVpn1-CnxVpn1-P2) SEND phase 2 Quick Mode
[HASH] [SA] [NONCE]
(SA CnxVpn1-CnxVpn1-P2) SEND phase 2 Quick Mode
[HASH] [SA] [NONCE]
(SA CnxVpn1-CnxVpn1-P2) SEND phase 2 Quick Mode
[HASH] [SA] [NONCE]
Check algorithms and phase 2 identities (“Local address” and “Network address”). Some
settings must mismatch between the VPN and the VPN gateway.
I clicked on “Open tunnel”, but nothing happens.
Read logs of each VPN tunnel endpoint. IKE requests can be dropped by firewalls. An IPSec
Client uses UDP port 500 and protocol ESP (protocol 50).
The VPN tunnel is up but I can’t ping!
If the VPN tunnel is up, but you still cannot ping the remote LAN, here are a few guidelines:
1. Check Phase 2 settings: VPN Client address and Remote LAN address. Usually, VPN Client
IP address should not belong to the remote LAN subnet.
2. Once VPN tunnel is up, packets are sent with ESP protocol. This protocol can be blocked by
firewall. Check that every device between the client and the VPN server does accept ESP.
3. Check your VPN server logs. Packets can be dropped by one of its firewall rules.
4. Check your ISP support ESP.
5. If you still cannot ping, follow ICMP traffic on VPN server LAN interface and on LAN
computer interface (with Ethereal for example). You will have an indication that encryption
works.
6. Check the “default gateway” value in VPN Server LAN. A target on your remote LAN can
receive pings but does not answer because there is a no “Default gateway” setting.
7. You cannot access to the computers in the LAN by their name. You must specify their IP
address inside the LAN.
We recommend you to install ethereal (http://www.ethereal.com) on one of your target computer.
You can check that your pings arrive inside the LAN.
37
Chapter 5: Troubleshooting
Billion BiGuard VPN Client
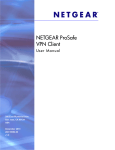
Appendix A: Compatible table of Billion VPN
enabled devices and BiGuard VPN Client
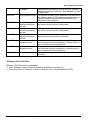
BIPAC 74xx series BIPAC 75xx series BIPAC 85xx series BiGuard 2/10/30 series
Hash algorithms
MD5
SHA1
Encryption
DES
3DES
AES 128
AES 192
AES 256
Diffie Hellman Group Support
Group1: MODP 768
Group2: MODP 1024
Group5: MODP 1536
Authentication Mechanism
Preshared key
X509 Certificate
support (PEM)
X-Auth
Key Management
ISAKMP (RFC2408)
IKE (RFC2409)
IPSec Mode
ESP
Tunnel
IKE Mode
Main
Aggressive
Quick
v
v
v
v
v
v
v
v
v
v
v
v
v
v
v
v
v
v
v
v
v
v
v
v
v
v
v
v
v
v
v
v
v
v
v
v
v
v
v
v
v
v
v
v
x
x
x
x
x
x
x
x
v
v
v
v
v
v
v
v
v
v
v
v
v
v
v
v
v
v
v
v
v
v
v
v
v
v
v
v
x = not support
Appendix A: Compatible table of Billion VPN enabled devices and BiGuard VPN Client
38
Billion BiGuard VPN Client
APPENDIX B: Product Support and Contact
Information
Most problems can be solved by referring to the Troubleshooting section in the User’s Manual. If you
cannot resolve the problem with the Troubleshooting chapter, please contact the dealer where you
purchased this product.
Contact Billion
WORLDWIDE
http://www.billion.com/
39
Appendix B: Product Support and Contact Information