1
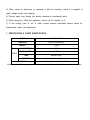
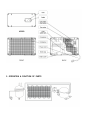
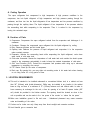
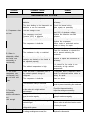
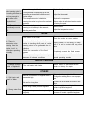
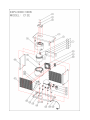
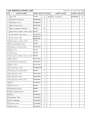
1
TABLE OF CONTENTS
1.
SPECIFICATION
&
IDENTIFICATION .............................................................................2
2.
OPERATION
&
PARTS
FUNCTION
OF
PARTS....................................................................................3, 4
A. Cooling Operation
B. Function of Parts
3.
REQUIREMENTS.......................................................................................................4
LOCATION
4.
INSTALLATION
PROCEDURES ..................................................................................................5
5.
STORAGE.......................................................................................................……………………..5
6.
CLEANING ..................................................................................................……………………….6
7. TROUBLESHOOTING GUIDE..............................................................................………..…....7,
8
8.
DIAGRAM………………………….........................................................………..…….......9
WIRING
9. EXPLODED VIEW & SERVICE PARTS LIST
A.
C12E..................................................................................................................................10,
11
FOR YOUR SAFETY
Please read the following safety precaution before servicing the watercooler.
1) Check if an electric leakage occurs in the appliance.
2) To prevent electric shock, unplug prior to servicing.
3) In case of testing with power on, wear rubber gloves to prevent electric shock.
2
4) When using an instrument or replacing a part for repairing, check it is applied to
rated voltage current and capacity.
5) Prevent water from flowing into electric elements in mechanical parts.
6) When carrying or tilting the appliance, remove all the objects on it.
7) If the cooling cycle is out of order, contact nearest authorized service center for
maintenance, repair and adjustment.
1. SPECIFICATION & PARTS IDENTIFICATION
COLD
MODEL
C12E (CHILLER)
DIMENSION
410W×210D×290H(mm)
WEIGHT
12.5kg
CONSUMPTION
120W
TEMP CONTROL
AUTO
TANK
Stainless Steel
CAPACITY
5.0 ℓ/h (10 )
ELECTRICAL
220-240V, 50/60Hz. 110-127V, 50/60Hz.
Check the available power supply against the watercooler data plate to assure correct electrical service.
3
2. OPERATION & FUNCTION OF PARTS
4
A. Cooling Operation
The vapor refrigerants that compressed to high temperature & high pressure conditions in the
compressor, turn into liquid refrigerant of high temperature and high pressure passing through the
condenser, and then turn into the liquid refrigerants of low temperature and low pressure conditions by
passing through the capillary tubes. The liquid refrigerant of low temperature & low pressure absorbs
the surrounding heat while evaporating in the evaporator. Then, it is sucked in the compressor by
turning into saturated vapor.
B. Function of Parts
① Compressor: Compresses the vapor refrigerant sucked from the evaporator and discharges it to
condenser
② Condenser: Changes the compressed vapor refrigerant into the liquid refrigerant by cooling.
③ Drier: Removes moisture and dirt inside pipes
④ Capillary tube: Reduces the pressure of liquid refrigerant and evaporates it in the evaporator
under constant pressure.
⑤ Evaporator: Absorbs the surrounding heats while evaporating the liquid refrigerant, cools down
water inside of cold water tank.
⑥ Cold water thermostat: Senses the temperature of cold water tank and controls the electric power
supply to the compressor automatically in order to keep the constant temperature of cold water.
⑦ Over Load Protector (OLP): Protects the compressor and operates when rising up to abnormal
temperature or energizing over current.
⑧ PTC Starter: Starts up the motor of compressor.
⑨ Drain cap: By opening this, you may drain out remaining water in hot water tank when cleaning
or not using cooler for a long period of time.
3. LOCATION REQUIREMENTS
A. This unit is intended to be installed underneath a conventional kitchen sink, in a cabinet not less
than 36”" (914mm) wide (inside dimension). Chiller may be installed in any location in the cabinet
base as long as there is a minimum of 5”" (127mm) between unit and cabinet walls. In order to
have necessary air exchange for the unit, a free air opening of at least 60 square inches (387
cm²) should be provided in the kitchen counter. The opening should be located as close to the
unit as possible and can be made in the ‘ toe space of the counter’ or ‘ above the toe space’
B. Make sure installation ground is flat and even. - Unbalanced placement may cause excessive
noise and trembling of the cooler.
C. Coolers are for indoor use only. Keep away from direct sunlight and excessive moisture.
D. Avoid harmful gas or excessive heat.
5
4. INSTALLATION PROCEDURES
A. Connect the 1/4”OD tubing between water inlet of chiller and the supply water hose with pressure
rating suitable for use with the application. The tubing must be acceptable for use with potable
water.
B. Using the 1/4”OD tubing included with the (gooseneck) faucet, connect on water outlet of chiller.
-Flush water in lines before installing gooseneck faucet.
-Acceptable supply water pressure is 15~100 PSI (100~700kPa)
CAUTION: TO PREVENT PROPERTY DAMAGE DUE TO WATER LEAKAGE, SEEK INSPECTION BY
PLUMBERS TO SEE THE WATER PRESSURE IS LESS THAN 100PSI (690KPA) BEFORE YOU CONNECT
THE SUPPLY WATER HOSE.
C. Slowly open supply water valve. By opening faucet lever, let water flows for about one minute.
Check all the connections.
-Purge off all air from all water lines by opening faucet lever. Steady stream assures all air is
ventilated.
D. Prior to drinking, flush water through chiller for at least 5 minutes.
E. Check the available power supply against the chiller data plate to assure correct electrical service.
F. Plug in chiller and the chiller will be ready to serve you cold water in 30 minute after installation
CAUTION: FAILURE TO ABIDE BY ABOVE PROCEDURE CAN CAUSE PHYSICAL DAMAGE ON THE
COOLER.
5. STORAGE
A. Unplug power cord.
B. Open faucet until water is room temperature.
C. Close the source water valve.
D. Disconnect the water pipe from the product.
E. Place a bucket beneath the drain pipe. Open the drain cover and cap. Then, drain the remaining
water.
F. When storing, ensure it stands on its erect position on the flat and even ground. (Do not lay the
product on its sides down or upside down.)
G. When not use for a long period of time, conduct product cleaning before you put in storage.
CAUTION: FAILURE TO ABIDE BY ABOVE PROCEDURE MAY INCUR PHYSICAL DAMAGE ON THE
COOLER.
7. TROUBLESHOOTING GUIDE
6
TROUBLE
POSSIBLE CAUSE
REMEDY
REFRIGERATION SYSTEM
A. Compressor does
not run.
B. Water is
adequately chilled,
but cooler runs
excessively or
continuously.
C. The cooler
compressor runs
continuously, but I
do not have cold
water.
D. The cooler
excessively
and the cold water is
not
cold enough.
E. The cooler has a
No electric power to outlet.
Turn on electric power outlet.
The thermostat is misadjusted or
Adjust or replace the thermostat, as
defective.
necessary.
The wires leading to the thermostat are Check the internal wiring.
defective or are not connected.
Make repairs as necessary.
Check the line voltage. It must be at
The line voltage is low.
least 90% of minimum voltage.
The compressor over-load
Replace the defective over-load
Protector (OLP) is defective.
protector.
The starting relay (PTC) is defective.
Replace the starting relay.
Replace the compressor.
The compressor is defective.
Return cooler to authorized service
center or factory for repair.
Poor ventilation.
Minimum side & rear clearance 4"
Clean the condenser or relocate the
The condenser is dirty or restricted.
unit to prevent restricting the
condenser.
The thermostat is defective. (the
Replace or adjust the thermostat as
contacts are shorted or the control is
necessary.
not adjusted properly)
It is normal for the cooler to run
The ambient temperature is high.
continuously at high ambient
temperatures.
There has been a substantial loss in
If refrigerant leak is suspected, return
the sealed system's charge of
cooler to authorized service center or
refrigerant.
factory for repair.
The compressor is defective.
Same as above.
The condenser is dirty or restricted.
Clean the condenser and relocate the
cooler to prevent restricting the condenser.
The cold water thermostat is set high and
or the cooler is in a high ambient
environment.
Usage of the cold water system is greater
than the cooler capacity.
The temperature of supply water is too high
The refrigeration system is overcharged or
undercharged.
There is a partial restriction in the
refrigeration system.
If wattage readings are normal, the
7
Check the thermostat setting.
Adjust the setting as necessary.
Inform the customer of the cold water
system's maximum capacity.
Wait for a moment until cold water is made
Return cooler to authorized service center
or factory for repair.
Replace the thermostat.
thermostat may be defective.
The thermostat is improperly set for the
is cooling, but does not prevailing environmental conditions and
run long enough to
cooler usage.
The compressor motor is defective,
cool water to the
causing the cooler to cycle on the overload
required level.
protector.
F. A. The cold water
The cold water thermostat is so much low,
flows slowly or not at
causing ice to build up in the reservoir,
all.
blocking water flow.
short running cycle. It
Replace the thermostat.
Adjust the thermostat.
Replace the compressor.
Return cooler to authorized service center
or factory for repair.
Defrost cooler.
Adjust the temperature control.
NOISE
The cooler must be leveled.
Place the cooler on even surface.
The cooler is not level.
A. There is
excessive noise
coming from the
cooler, but it is
otherwise operating
normally.
A section of the tubing inside the
cooler is touching other parts of cooler,
causing noise to be generated due to
vibration.
Check the connection of the fixed
screws.
The compressor's operation is noisy
because of inherent conditions.
Adjust position of the tubing to make
sure it is not in contact with any other
parts.
Completely connect the fixed screws.
Advise the customer of the cooler's
normal operating sounds.
WATER LEAKAGE
A. Leakage through
inside of appliance
Return chiller to authorized service
center or factory for repair.
The cold water tank leaks.
OTHERS
A. Odd taste and
smell in Water
Mineral concentration of supplied water is
somewhat high.
No use for a long time.
When using a water pressure regulator.
B. Strong water flow
Supplied water pressure is set up too high
originally.
8
This product does not include filters.
Change the existing filter or use a proper
one.
Continue to let the water flow until it runs
clear.
Adjust a regulator according to it’ manual or
contact a qualified engineer.
Install a regulator that can control the
pressure or contact a qualified engineer.
9
10