1
Cybex Eagle 11010 Overhead Press Owner’s Manual
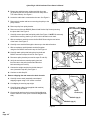
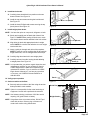
E. Remove the three Phillips head screws securing the
top (back) shroud and carefully remove the shroud.
See Figure 5.
F. Loosen bottom two screws shown in Figure 6.
NOTE: Do not remove the bottom two screws.
Phillips Head
Screw (3)
G. Remove the top two screws securing the back shroud.
See Figure 7.
Figure 5
H. Carefully slide rear shroud assembly upward and
remove.
6. Install the weight stack.
Screw (loosen do not remove)
A. Note how the increment weights are installed.
B. With an assistant holding the increment weights, move the adjusting
knob to 0 lbs. and remove all six increment weights (three each side).
Figure 6
C. Using an external snap ring pliers, remove the upper
snap ring from one of the guide rods and carefully
lower the guide rod. See Figure 8.
D. Remove lower snap ring and wave washer from the
guide rod. Repeat steps 6C and 6D to remove both
snap rings from other guide rod.
Screw
E. If possible, lean guide rods outward, away from machine
in order to provide the most room for installing weight
plates.
Figure 7
Frame
F. Slide top weight up and out of machine and carefully
set it aside.
G. Wipe guide rods clean over entire length. Lubricate with
light coating of medium weight automotive engine oil.
H. Carefully install each weight plate one at a time.
NOTE: When installing weight plates, position plates so
wide edges of bushing face upward and narrow edges
of bushing face downward. See Figures 9A and 9B.
T
C
RE
R
O
C
WIDE bushing
edge faces
upward
Figure 9A
Upper snap ring
Wave washer
Guide rod
Lower snap ring
Figure 8
G
N
O
WR
NARROW
bushing edge
NOTE: The narrow bushing
edge must face downward.
Figure 9B
Assembly
Page 4-3