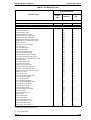
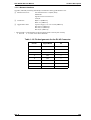
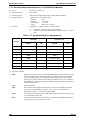
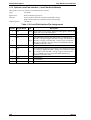
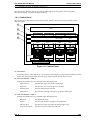
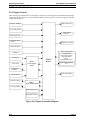
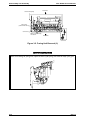
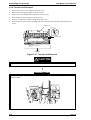
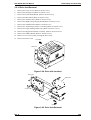
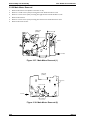
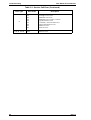
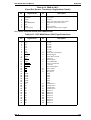
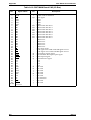
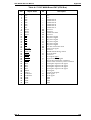
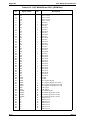
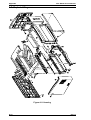
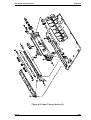
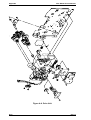
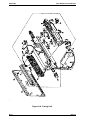
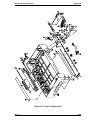
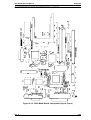
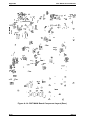
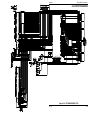
1
EPSON TERMINAL PRINTER EPL-N2000 SERVICE MANUAL EPSON 4006861 NOTICE All right reserved. Reproduction of any part of this manual in any form wharsoever without SEIKO EPSON's express written permission is forbidden. The contents of this manual are subject to change without notice. All efforts have been made to ensure the accuracy of the contents of this manual. However, should any errors be detected, SEIKO EPSON would greatly appreciate being informed of them. The above notwithstanding SEIKO EPSON can assume no responsibility for any errors in this manual or the consequences thereof. Epson is a resistoered trademark of Seiko Epson Corporation. Generall respective companies. Copyright 1996 by SEIKO EPSON CORPORATION Nagano, Japan PRECAUTIONS Precautionary notations throughout the tect are categorized relative to 1) personal injury, and 2) damage to equipment: DANGER Singnals a precaution which, if ignored, could ressult in serious or fatal personal injury, Great caution should be exercised in performing procedures preceded by a DANGER headings. WARNING Singnals a precaution which, if ignored, could result in damage to equipment. The precautionary measures itemized below should always be observed when performing repair /maintenance procedures. DANGER 1. ALWAYS DISCONNECT THE PRODUCT FROM BOTH THE POWER SOURCE AND THE HOST COMPUTER BEFORE PERFORMING ANY MAINTENANCE OR REPAIR PROCEDURE. 2. NO WORK SHOULD BE PERFORMED ON THE UNIT BY PERSONS UNFAMIAR WITH BASIC SAFETY MEASURES AS DICTATED FOR ALL ELECTRONICS TECHNICIANS IN THEIR LINE OF WORK 3. WHEN PERFORMING TESTING AS DISCATED WITHIN THIS MANUL, DO NOT CONNECT THE UNIT TO A POWER SOURCE UNIT INSTRUCTED TO DO SO. WHEN THE POWER SUPPLY CABLE MUST BE CONNECTED, USE EXTREME CAUTION IN WORKING ON POWER SUPPLY AND OTHER ELECTRONIC COMPONENTS. WARNING 1. REPAIRS ON EPSON PRODUCT SHOULD BE PERFORMED ONLY BY AN EPSON CERTIFIED REPAIR TECHNICIAN. 2. MAKE CERTAIN THAT THE SOURCE VOLTAGE IS THE SAME AS THE RATED VOLTAGE, LISTED ON THE SERIAL NUMBER/RATIG PLATE. IF THE EPSON PRODUCT HAS A PRIMARY-AC RATING DIFERENT FORM THE AVAILABLE POWER SOURCE, DO NOT CONNECTE IT TO THE POWER SOURCE. 3. ALWAYS VERIFY THAT THE EPSON PRODUCT HAS BEEN DISCONNECTED FROM THE POWER SOURCE BEFORE REMOVING OR REPLACING PRINTED CIRCUIT BOARDS AND/OR INDDMDUAL CHIPS. 4. IN ORDER TO PROTECT SENSITIVE m P CHIPS AND CIRCUITRY, USE STATIC DISCHARGE EQUIPMENT, SUCH AS ANTI-STATIC WRIST STRAPS, WHEN ACCESSING INTERNAL COMPONENTS. 5. REPLACE MALFUNCTIONING COMPONENTS ONLY WITH THOSE COMPONENTS RECOMMENTED BY THE MAANUFACTURE; INTRODUCTION OF SECOND-SOURCE ICs OR OTHER NONAPPROVED COMPONENTS MAY DAMAGE THE PRODUCT AND VOID ANY APPLICABLE EPSON WARRANTY. SAFETY INFORMATION This printer is a page printer which operates by means of a laser. There is no possibility of danger from the laser, provided the printer is operated according to the instructions in this manual provided. Since radiation emitted by the laser is completely confined within protective housings, the laser beam cannot escape from the machine during any phase of user operation. For United States Users; [Laser Safety1 This printer is certified as a Class 1 Laser product under the U.S. Department of Health and Human Services (DHHS) Radiation Performance Standard according to the Radiation Control for Health and Safety Act of 1968. This means that the printer does not produce hazardous laser radiation. [CDRH Regulations] The Center for Devices and Radiological Health (CDRH) of the U.S. Food and Drug Administration implemented regulations for laser products on August 2,1976. Compliance is mandatory for products marketed in the United States. The label shown below indicates compliance with the CDRH regulations and must be attached to laser products marketed in the United States. 1 WARNING: Use of controls, adjustments or performance of procedures other than those specified in this manual may result in hazardous radiation exposure. [Internal Laser Radiation] Maximum Radiation Power: Wave Length: 5.0 x 1o-4 (W) 7 9 0 *2onm This is a Class IIIb Laser Diode Assay that has an invisible laser beam. The print head unit is NOT A FIELD SERVICE ITEM. Therefore, the print head unit should not be opened under any circumstances. For Other Countries Users; WARNING: Use of controls, adjustments or performance of procedures other than those specified in this manual may result in hazardous radiation exposure. This is a semiconductor laser. The maximum power of the laser diode is 5.0 x low4 W and the wavelength is 790 + 20 nm. For Denmark Users; ADVARS EL Usynlig laserstrdling ved abning, nar sikkerhedsafbrydere er ude af funktion. Undna udszttelse for strbling. I Klasse 1 laser nrodukt der onfvlder IEC825 sikkerheds kravene. For Finland. Sweden Users: " VAROITUS Laitteen kayttaminen muulla kuin t&a kayttoohjeessa mainitulla tavalla saattaa altistaa kayttajan turvallisuusluokan 1 ylittavalle nakymattomalle lasersateiylle. I VARNING Om apparaten anvands pa annat satt %-I i denna bruksanvisning specificerats, kan anvandaren utsattas for osynlig laserstrhlning, som over&rider gransen for laser klass 1. For Finland. Sweden Service PeoDle VAROITUS Avattaessa ja suojalukitus ohitettaessa olet alttiina nakymattomalle lasersateilylle. Ala katso sateeseen. VARNING Osynlig laserstralning nar denna de1 ar Bppnad och sparren ar urkopplad. Betrakta ei stralen. For Norway Users; ADVARSEL Dersom apparatet brukes pa annen mate enn spesifisert i denne bruksanvisning, kan brukeren utsettes for unsynlig laserstrdling som over&rider grensen for laser klasse 1. Dette er en halvleder laser. Maksimal effeckt til laserdiode er 5.0 x lo-" W og bolgelengde er 790 + 20 nm. Laser Safety Labels [Label on rear printer case] A laser safety labels is attached on the outside of the printer shown below. For United State This laser product conforms to the applicable requirement of 21 CFR Chapter I, subchapter J. SEIKO EPSON CORP. Hirooka Office 80 Hirooka, Shiojiri-shi, Nagano-ken, Japan MANUFACTURED: For Europe lASERKlASSE1NACHIEC825 CUBS1 LMERPRODUCTTOIEC825 WE1 UWR PR0DUKTI.H.T. IEC825 LUOKANl lAsERwlE [Label inside printer] The following laser safety label will be attached inside the printer as shown below. For Denmark, Finland, Sweden, and Norway III CALITION - INVISIBLE LASER RADIATION WHEN OPEN AVOID &X'GSURE TO SEAM IJNSlCnTBARE IASE-LUNG WENN ASDECKUNG GEOFFNET NlCHl DEM SlRAHL AUSSEIZEN ADVAflSEL- USYNUG IASERSTliUNG N&l DEKSEL iPNES UNNGA EKSPONERlNG FGR .STRhN 1 VAROL AVAlTAESSA OLET ALTTIINA NhWMihN blSEFt.SbElLYUT h.6. KATSO SbEESEEN ADVARSEL USYNUG LASERStiNG VED hMNG UNDGA UDS- E FOR Sl-&lNG VARNINGOSVNIJG IASERSdLNlNG N&l DENNA DEL AR 6WNAD SThLEN iR FARLIG I I vORSlCHT- For Finland. Sweden Users: " VAROITUS Laitteen kayttaminen muulla kuin " kayttoohjeessa mainitulla tavalla saattaa altistaa kayttajan turvallisuusluokan 1 ylittavalle nakymattomalle lasersateiylle. I VARNING Om apparaten anvands pa annat satt %-I i denna bruksanvisning specificerats, kan anvandaren utsattas for osynlig laserstrhlning, som over&rider gransen for laser klass 1. For Finland. Sweden Service PeoDle VAROITUS Avattaessa ja suojalukitus ohitettaessa olet alttiina nakymattomalle lasersateilylle. Ala katso sateeseen. VARNING Osynlig laserstralning nar denna de1 ar Bppnad och sparren ar urkopplad. Betrakta ei stralen. For Norway Users; ADVARSEL Dersom apparatet brukes pa annen mate enn spesifisert i denne bruksanvisning, kan brukeren utsettes for unsynlig laserstrdling som over&rider grensen for laser klasse 1. Dette er en halvleder laser. Maksimal effeckt til laserdiode er 5.0 x lo-" W og bolgelengde er 790 + 20 nm. Laser Safety Labels [Label on rear printer case] A laser safety labels is attached on the outside of the printer shown below. For United State This laser product conforms to the applicable requirement of 21 CFR Chapter I, subchapter J. SEIKO EPSON CORP. Hirooka Office 80 Hirooka, Shiojiri-shi, Nagano-ken, Japan MANUFACTURED: REVISION SHEET Revision Issued Date Rev. A November 17, 1996 Revision Page 1st issued TABLE OF CONTENTS CHAPTER 1. CHAPTER 2. CHAPTER 3. CHAPTER 4. CHAPTER 5. CHAPTER 6. APPENDIX GENERAL DESCRIPTION OPERATION PRINCIPLES DISASSEMBLY AND ASSEMBLY ADJUSTMENTS TROUBLESHOOTING MAINTENANCE Chapter 1 Product Description Table of Contents 1.1 FEATURES 1-1 1.2 SPECIFICATIONS 1-4 1.2.1 Basic Specifications . . . . . . . . . . . . . . . . . . . . . . . . . . . . . . . . . . . . . . . . . 1-4 1.2.2 Electric Specifications . . . . . . . . . . . . . . . . . . . . . . . . . . . . . . . . . . . . . . . 1-7 1.2.3 Specifications for Reliability and Durability. . . . . . . . . . . . . . . . . . . . . . . . 1-8 1.2.4 Environmental Conditions for Operation (Including Consumables) . . . . . 1-9 1.2.5 Environmental Conditions for Storage and Transportation . . . . . . . . . . 1-10 1.2.6 Specifications for the ImagingCartridge . . . . . . . . . . . . . . . . . . . . . . . . . 1-11 1.2.7 Applicable Standard . . . . . . . . . . . . . . . . . . . . . . . . . . . . . . . . . . . . . . . . 1-12 1.2.8 Physical Specifications. . . . . . . . . . . . . . . . . . . . . . . . . . . . . . . . . . . . . . 1-12 1.2.9 Process Specifications . . . . . . . . . . . . . . . . . . . . . . . . . . . . . . . . . . . . . . 1-12 1.2.10 Controller Specifications. . . . . . . . . . . . . . . . . . . . . . . . . . . . . . . . . . . . . 1-13 1.2.11 Software Specifications . . . . . . . . . . . . . . . . . . . . . . . . . . . . . . . . . . . . . 1-13 1.2.12 Font Specifications . . . . . . . . . . . . . . . . . . . . . . . . . . . . . . . . . . . . . . . . . 1-14 1.3 INTERFACE SPECIFICATIONS 1-17 1.3.1 Parallel Interface Specifications . . . . . . . . . . . . . . . . . . . . . . . . . . . . . . . 1-17 1.3.1.1 Parallel Interface B Type Specifications . . . . . . . . . . . . . . . . . . . 1-17 1.3.1.2 Parallel Interface C Type Specifications . . . . . . . . . . . . . . . . . . . 1-22 1.3.1.3 Network Interface. . . . . . . . . . . . . . . . . . . . . . . . . . . . . . . . . . . . . 1-23 1.3.2 Serial Interface Specifications . . . . . . . . . . . . . . . . . . . . . . . . . . . . . . . . . 1-24 1.3.3 Optional LocalTalk Interface . . . . . . . . . . . . . . . . . . . . . . . . . . . . . . . . . . 1-26 1.4 OPERATING INSTRUCTIONS 1-27 1.4.1 Control Panel. . . . . . . . . . . . . . . . . . . . . . . . . . . . . . . . . . . . . . . . . . . . . . 1-27 1.4.2 Panel Setting . . . . . . . . . . . . . . . . . . . . . . . . . . . . . . . . . . . . . . . . . . . . . . 1-29 1.4.3 Service Mode. . . . . . . . . . . . . . . . . . . . . . . . . . . . . . . . . . . . . . . . . . . . . . 1-36 1.4.3.1 Hexadecimal Dump Mode . . . . . . . . . . . . . . . . . . . . . . . . . . . . . . 1-36 1.4.3.2 EEPROM Initialize Mode . . . . . . . . . . . . . . . . . . . . . . . . . . . . . . . 1-36 1.4.3.3 Formatting Flash Card . . . . . . . . . . . . . . . . . . . . . . . . . . . . . . . . . 1-36 1.4.3.4 Page Counter Clearance . . . . . . . . . . . . . . . . . . . . . . . . . . . . . . . 1-36 1.4.3.5 Flash ROM Updating . . . . . . . . . . . . . . . . . . . . . . . . . . . . . . . . . . 1-36 1.4.4 Display of Message . . . . . . . . . . . . . . . . . . . . . . . . . . . . . . . . . . . . . . . . . 1-37 1.4.4.1 Status Message . . . . . . . . . . . . . . . . . . . . . . . . . . . . . . . . . . . . . . 1-37 1.4.4.2 Error Message . . . . . . . . . . . . . . . . . . . . . . . . . . . . . . . . . . . . . . . 1-38 1.4.4.3 Warning Messages . . . . . . . . . . . . . . . . . . . . . . . . . . . . . . . . . . . . 1-46 1.4.4.4 Message at Power On . . . . . . . . . . . . . . . . . . . . . . . . . . . . . . . . . 1-49 1.4.4.5 Service Call Error Message . . . . . . . . . . . . . . . . . . . . . . . . . . . . . 1-49 1.4.5 Printer Sharing. . . . . . . . . . . . . . . . . . . . . . . . . . . . . . . . . . . . . . . . . . . . . 1-50 1.4.5.1 Port Fixed Mode . . . . . . . . . . . . . . . . . . . . . . . . . . . . . . . . . . . . . 1-50 1.4.5.2 Auto Sense Mode . . . . . . . . . . . . . . . . . . . . . . . . . . . . . . . . . . . . 1-50 1.4.6 Controller RAM Status. . . . . . . . . . . . . . . . . . . . . . . . . . . . . . . . . . . . . . . 1-51 1.4.7 EJL (EPSON Job Control Language) . . . . . . . . . . . . . . . . . . . . . . . . . . . 1-51 1.4.8 BiRITech (BI Resolution Improvement Technology) . . . . . . . . . . . . . . . . 1-51 1.4.9 PGI (Photo and Graphics Improvement) . . . . . . . . . . . . . . . . . . . . . . . . . 1-52 1.4.10 Toner Saver Mode. . . . . . . . . . . . . . . . . . . . . . . . . . . . . . . . . . . . . . . . . . 1-52 1.4.11 Precaution for Power Off . . . . . . . . . . . . . . . . . . . . . . . . . . . . . . . . . . . . . 1-52 1.5 MAIN COMPONENTS 1.5.1 C207 MAIN Board . . . . . . . . . . . . . . . . . . . . . . . . . . . . . . . . . . . . . . . . . 1.5.2 PWB-A Board . . . . . . . . . . . . . . . . . . . . . . . . . . . . . . . . . . . . . . . . . . . . 1.5.3 PWB-E Board . . . . . . . . . . . . . . . . . . . . . . . . . . . . . . . . . . . . . . . . . . . . 1.5.4 PWB-F Board Unit . . . . . . . . . . . . . . . . . . . . . . . . . . . . . . . . . . . . . . . . . 1.5.5 Paper Takeup Roller Unit . . . . . . . . . . . . . . . . . . . . . . . . . . . . . . . . . . . 1.5.6 Registration Roller Assembly . . . . . . . . . . . . . . . . . . . . . . . . . . . . . . . . 1.5.7 Transfer Unit . . . . . . . . . . . . . . . . . . . . . . . . . . . . . . . . . . . . . . . . . . . . . 1.5.8 Print Head Unit (Optical Unit) . . . . . . . . . . . . . . . . . . . . . . . . . . . . . . . . 1.5.9 Fusing Unit . . . . . . . . . . . . . . . . . . . . . . . . . . . . . . . . . . . . . . . . . . . . . . 1.5.10 Drive Unit. . . . . . . . . . . . . . . . . . . . . . . . . . . . . . . . . . . . . . . . . . . . . . . . 1.5.11 ImagingCartridge. . . . . . . . . . . . . . . . . . . . . . . . . . . . . . . . . . . . . . . . . . 1.5.12 Cassette Unit . . . . . . . . . . . . . . . . . . . . . . . . . . . . . . . . . . . . . . . . . . . . . 1-53 1-54 1-55 1-55 1-56 1-56 1-57 1-57 1-58 1-58 1-59 1-59 1-60 List of Figures Figure 1-1. Figure 1-2. Figure 1-3. Figure 1-4. Figure 1-5. Figure 1-6. Figure 1-7. Figure 1-8. Figure 1-9. Figure 1-10 Figure 1-11. Figure 1-12. Figure 1-13. Figure 1-14. Figure 1-15. Figure 1-16. Figure 1-17. Figure 1-18. Figure 1-19. Figure 1-20. Figure 1-21. Figure 1-22. Exterior View of the EPL-N2000 . . . . . . . . . . . . . . . . . . . . . . . . . . 1-1 Printable Area . . . . . . . . . . . . . . . . . . . . . . . . . . . . . . . . . . . . . . . . 1-7 Space Requirements . . . . . . . . . . . . . . . . . . . . . . . . . . . . . . . . . . . 1-9 Timing Chart . . . . . . . . . . . . . . . . . . . . . . . . . . . . . . . . . . . . . . . . 1-17 Operation Panel . . . . . . . . . . . . . . . . . . . . . . . . . . . . . . . . . . . . . . 1-27 Interface Port Fixed Mode . . . . . . . . . . . . . . . . . . . . . . . . . . . . . . 1-50 Interface Auto Sense Mode . . . . . . . . . . . . . . . . . . . . . . . . . . . . . 1-50 BiRITech Function . . . . . . . . . . . . . . . . . . . . . . . . . . . . . . . . . . . . 1-51 Toner Saver Mode . . . . . . . . . . . . . . . . . . . . . . . . . . . . . . . . . . . . 1-52 Main Component Layout . . . . . . . . . . . . . . . . . . . . . . . . . . . . . . . 1-53 C207 MAIN Board . . . . . . . . . . . . . . . . . . . . . . . . . . . . . . . . . . . . 1-54 PWB-A Board. . . . . . . . . . . . . . . . . . . . . . . . . . . . . . . . . . . . . . . . 1-55 PWB-E Board. . . . . . . . . . . . . . . . . . . . . . . . . . . . . . . . . . . . . . . . 1-55 PWB-F Board. . . . . . . . . . . . . . . . . . . . . . . . . . . . . . . . . . . . . . . . 1-56 Paper Takeup Roller Unit . . . . . . . . . . . . . . . . . . . . . . . . . . . . . . 1-56 Registration Roller Assembly. . . . . . . . . . . . . . . . . . . . . . . . . . . . 1-57 Transfer Unit . . . . . . . . . . . . . . . . . . . . . . . . . . . . . . . . . . . . . . . . 1-57 Print Head Unit. . . . . . . . . . . . . . . . . . . . . . . . . . . . . . . . . . . . . . . 1-58 Fusing Unit. . . . . . . . . . . . . . . . . . . . . . . . . . . . . . . . . . . . . . . . . . 1-58 Drive Unit . . . . . . . . . . . . . . . . . . . . . . . . . . . . . . . . . . . . . . . . . . . 1-59 ImagingCartridge . . . . . . . . . . . . . . . . . . . . . . . . . . . . . . . . . . . . . 1-59 Cassette Unit . . . . . . . . . . . . . . . . . . . . . . . . . . . . . . . . . . . . . . . . 1-60 List of Tables Table 1-1. Options and Consumables for EPL-N2000. . . . . . . . . . . . . . . . . . . . 1-2 Table 1-2. Paper Feed Sources . . . . . . . . . . . . . . . . . . . . . . . . . . . . . . . . . . . . . 1-4 Table 1-3. Available Paper Sizes . . . . . . . . . . . . . . . . . . . . . . . . . . . . . . . . . . . . 1-5 Table 1-4. Paper Types . . . . . . . . . . . . . . . . . . . . . . . . . . . . . . . . . . . . . . . . . . . 1-6 Table 1-5. Usability of Special Paper . . . . . . . . . . . . . . . . . . . . . . . . . . . . . . . . . 1-6 Table 1-6. Electrical Specifications . . . . . . . . . . . . . . . . . . . . . . . . . . . . . . . . . . 1-7 Table 1-7. Paper Feed Reliability . . . . . . . . . . . . . . . . . . . . . . . . . . . . . . . . . . . . 1-7 Table 1-8. Paper Skew . . . . . . . . . . . . . . . . . . . . . . . . . . . . . . . . . . . . . . . . . . . . 1-7 Table 1-9. Environmental Conditions for Storage . . . . . . . . . . . . . . . . . . . . . . 1-10 Table 1-10. Environmental Conditions for Storage and Transportation. . . . . . . 1-11 Table 1-11. Differences between LJ4-GL/2 Mode and GL-like Mode . . . . . . . . 1-14 Table 1-12. Built-in Fonts . . . . . . . . . . . . . . . . . . . . . . . . . . . . . . . . . . . . . . . . . . 1-15 Table 1-13. Timing in Compatibility Mode . . . . . . . . . . . . . . . . . . . . . . . . . . . . . 1-18 Table 1-14. Pin Assignments for Parallel B Type I/F . . . . . . . . . . . . . . . . . . . . . 1-18 Table 1-15. Pin Assignments for Parallel C Type I/F . . . . . . . . . . . . . . . . . . . . . 1-22 Table 1-16. Pin Assignments for RJ-45 . . . . . . . . . . . . . . . . . . . . . . . . . . . . . . . 1-23 Table 1-17. Serial Interface Pin Assignments . . . . . . . . . . . . . . . . . . . . . . . . . . 1-24 Table 1-18. LocalTalk Interface Pin Assignments . . . . . . . . . . . . . . . . . . . . . . . 1-26 Table 1-19. SelecType Options . . . . . . . . . . . . . . . . . . . . . . . . . . . . . . . . . . . . . 1-30 Table 1-20. Status Messages. . . . . . . . . . . . . . . . . . . . . . . . . . . . . . . . . . . . . . . 1-37 Table 1-21. Error Messages . . . . . . . . . . . . . . . . . . . . . . . . . . . . . . . . . . . . . . . . 1-38 Table 1-22. Warning Messages . . . . . . . . . . . . . . . . . . . . . . . . . . . . . . . . . . . . . 1-46 Table 1-23. Messages at Power On. . . . . . . . . . . . . . . . . . . . . . . . . . . . . . . . . . 1-49 Table 1-24. Service Call Error Messages . . . . . . . . . . . . . . . . . . . . . . . . . . . . . 1-49 Table 1-25. Toner Saver Mode . . . . . . . . . . . . . . . . . . . . . . . . . . . . . . . . . . . . . 1-52 1.1 FEATURES The EPSON EPL-N2000 is a non-impact page printer that combines a semi-conductor laser with electrophotographic technology. The main features are: ❏ Paper feed up to 1150 sheets (for A4 or letter-size paper): Standard: Optional: 150 sheets for MP (multipurpose) tray 500 sheets for standard lower paper cassette 500 sheets for 500-sheet lower paper cassette unit ❏ High print speed: 20 ppm in single-sided print mode for A4 or letter-size paper ❏ Integrated imaging cartridge: Provides long cartridge life (10,000 sheets) and easy user maintenance. ❏ Optional duplex print ❏ Ozone Printing process creates no ozone gas ❏ High capacity output tray: Face-down exit tray holds up to 500 sheets ❏ 2 optional paper cassettes for the lower paper cassettes unit: 500-sheet cassette for A4 or letter-size paper 250-sheet universal cassette (available for up to A3-size paper) ❏ Power saving mode: Conforms to Energy Star program Figure 1-1. Exterior View of the EPL-N2000 Rev. A 1-1 Product Description EPL-N2000 Service Manual Table 1-1 lists the consumables and optional units available for the EPL-N2000. Table 1-1. Options and Consumables for EPL-N2000 Option Part # ROM SIMM (EpsonScript Level 2 PostScript ROM SIMM) C83226* 1MB RAM SIMM --- 2MB RAM SIMM --- 4MB RAM SIMM --- 8MB RAM SIMM --- 16MB RAM SIMM --- 32MB RAM SIMM Minimum RAM size: 2MB --1 NLSP Bitmap 2 Font ROM for LGC* --- NLSP Bitmap 2 Font ROM for HA --- NLSP Bitmap 2 Font ROM for OCR --- LocalTalk/Serial Module C82334* Interface Cable (2 m, 6.6’) C83602* Interface Cable (0.4 m, 1.3’) Requirements Available only in Europe Cannot be used with AppleTalk I/F of Type B I/F Board C836031 (See Note 2) C836041 See Notes 2 and 3) C836051 (See Note 2) C836061 (See Notes 2 and 3) C83615* (See Note 4) C836141 (See Note 5) Notes: 1. Can be used in HP (GL/2) and ESC/P 2 modes. 2. Can be used only when 32KB serial interface is used. 3. Can be used in combination with interface cable C836141 with the serial interface mode for the LocalTalk /Serial Module. 4. Can be used when RS-232C I/F is selected for serial interface mode and LocalTalk/Serial Module. 5. Can be used with the serial interface mode for LocalTalk/Serial Module. 6. The asterisk is a substitution for the last digit of the product number, which varies by country: 1: For EAI 2: For areas other than EAI 1-2 Rev. A EPL-N2000 Service Manual Product Description Table 1-1. Options and Consumables for EPL-N2000 (Continued) Option Type B Interface Board Part # Description C82307* 32KB Serial I/F (RS-422) C82310* 32KB Parallel Interface C82312* AppleTalk Interface C82314* Coax Interface C82315* Twinax Interface C82313* GPIB Interface or IEEE-1284 C82324* NetWare C82328* Fax Imaging Cartridge S051035 250 Sheet Paper Cassette A3 Universal C81269* 500 Sheet Paper Cassette A4 C81264* 500 Sheet Paper Tray LT C81265* 250 Sheet Paper Tray A3 Universal C81270* 500 Sheet Paper Tray A4 C81266* 500 sheet Paper Tray LT C81267* duplex Unit C81268* *The asterisk is a substitution for the last digit of the product number, which varies by country: 1: for EAI 2: for the areas other than EAI Rev. A 1-3 Product Description EPL-N2000 Service Manual 1.2 SPECIFICATIONS This section provides statistical data for the EPL-N2000. 1.2.1 Basic Specifications ❏ Type Desktop page printer ❏ Printing method Laser beam scanning and dry electrophotographic process ❏ Resolution 600 dpi ❏ Printing speed Single-sided print: Duplex print: 20.0 ppm*1, 11.0 ppm*2 12.0 ppm*1, 6 .0 ppm*2 ❏ First print time Single-sided print: Duplex print: 16.0 seconds*1, 18.0 seconds*2 26.0 seconds*1, 36.0 seconds*2 ❏ Warm-up time 100 V, 200 V: Less than 70 seconds (at rated current and 23o C (68o F) temperature) ❏ Paper supplies See Table 1-2. *1: Using A4 or letter-size paper in landscape orientation in the direction of the paper path. *2: Using A3 paper in portrait orientation in the direction paper of the paper path. Table 1-2. Paper Feed Sources Paper Supply Paper Size*1 Capacity Usage Thickness (Ream Weight) Standard: MP Tray Standard lower cassette unit Optional lower cassette unit*3 Universal A3+, A3, B4, F4, A4 (L) B5 (L), l-B5 (L), A5 (L), Ledger, Legal, GLG, Letter (L), GLT (L), Executive (L), HLT (L) 200 *2 Envelopes Monarch, C10, DL, C5, C6 *1 10 A4/letter cassette GLG, LGL, B A3, B4, LTR (L) A4 (L), B5 (L), A5 (L) *1 A4/letter cassette A4 (L), LTR (L), *1 A3 universal cassette A3, B4, F4, A4 (L) B5 (L), l-B5 (L), A5 (L), Ledger, Legal, GLG, Letter (L), GLT (L), Executive (L), HLT (L) Thick paper: Special papers: 60 to 135 g /m2 (16 to 36 lb) 90 to 157 g/m2 (24 to 42 lb) Labels, transparencies Standard paper 60 to 105 g/m2 (16 to 28 lb) 2 250 * Standard paper 60 to 90 g/m2 (16 to 24 lb) Standard paper 500 *2 60 to 90 g/m2 (16 to 24 lb) 250 *1: (L) indicates landscape orientation; all others are portrait orientation *2: With 75 g/m2 (20 lb) paper. *3: The A4/letter cassette and A3 universal cassette are available for both the standard and optional cassette units. 1-4 Rev. A EPL-N2000 Service Manual ❏ Product Description Paper sizes Front tray See Table 1-3. Width: 92 mm to 330.2 mm (3.26" to 13") Length: 140 mm to 483 mm (5.5" to 19") Table 1-3. Available Paper Sizes Paper Type Size Width X Length MP Tray Cassette Duplex*2 Universal Universal A4/Letter A3+ 328 X 453 mm P*1 — — P A3 297 X 420 mm P P — P B4 257 X 364 mm P P — P F4 210 x 330 mm P P — P 1 210 X 297 mm L* L L L B5* 182 x 257 mm L L — L l-B5*3 176 X 250 mm L L — L A5 148 x 210 mm L L — L Ledger 11" X 17" P P — P Legal 8.5 X 14" P P — P GLG 8.5" X 13" P P — P Letter 8.5" X 11" L L L L GLT 8" X 10.5" L L — L Executive 7.25" X 10.5" L L — L HLT 5.5" X 8.5" L L — L Monarch 3 7/8" X7 1/2" P — — — C-10 4 1/8"x9 1/2" P — — — DL 110 X 220 mm P — — — C5 162 X 229 mm P — — — C6 114 X 162 mm P — — — A4 3 *1: P: Portrait orientation L: Landscape orientation *2: Only standard-size paper can be used for duplex printing. *3: The printer identifies B5 with l-B5 paper. Rev. A 1-5 Product Description ❏ Paper types EPL-N2000 Service Manual Normal paper: Recycled paper: Special paper: Specific paper: 60 to 90 g/m2 (16 to 24 lb) 60 to 90 g/m2 (16 to 24 lb) Transparencies (OHP), letterhead, envelopes, labels, thick paper (91 to 157 g/m2, 24 to 42 lb) A3+ 328 mm × 453 mm, 75 to 80 g/m2 (20 to 21 lb) Table 1-4. Paper Types U.S. Recommended Normal Paper Paper Standard Paper Recycled Paper Special Paper Europe Minolta Bond 20 lb. (Nekoosa) Copy paper 70 Copy paper 80 (Neusiedler) Xerox 4024 DP 20 lb — Ardor Recycled Xerox/Bond 20 lb (Nekoosa) RCC80 (Steinbeis) Letterhead Four Star 403C 20 lb, Parchment Deed 13C 20 lb Neenah Bond 20 lb, Gilbert 20 lb Transparency (OHP) 3M PP2500 Table 1-5. Usability of Special Papers Feeding Source Standard Paper Normal Paper Special Papers — OHP, Envelopes, Labels MP tray RF R P Lower paper cassette RF R N RF R N RF R N RF R N Universal cassette (250 sheets) A4, letter cassette (500 sheets) Duplex unit RF: Reliable feeding and good image quality. R: Reliable feeding and good image quality, but limited to paper generally available. P: Possible, but limited to paper generally available. N: Not supported. ❏ Paper feed alignment direction: Center alignment for all sizes ❏ Paper ejection: Face-down only ❏ Output tray capacity: 500 sheets (75 g/m2, 20 lb paper) 1-6 Rev. A EPL-N2000 Service Manual ❏ Printable area: Product Description See Figure 1-2. E A B 4 mm C F Paper transprt Direction Printable Area D 4 mm 4 mm 4 mm Figure 1-2. Printable Area For A3+ paper (E X F) : 297 × 420 mm ( 12.12 X 17.14 ") The maximum printable area with good image quality (E X F) : 323 × 443 mm (12.72 × 17.44"). Printable area can vary, depending on the emulation. Note: 1.2.2 Electrical Specifications Table 1-6. Electrical Specifications Printer Version Rated Voltage Rated Frequency Range 100 V Version 90 V to 110 V (100 V ± 10 %) 120 V Version 108 V to 132 V (120 V ± 10 %) 200 V Series 207 V to 253 (230 V ± 10 %) 50 /60 Hz ± 3 Hz Less than 790 W Less than 45 W (in energy-saver mode) Less than 8 A Less than 7 A Current Consumption ( at rated voltage) ( at rated voltage) Power Consumption Rev. A Less than 5 A ( at rated voltage) 1-7 Product Description EPL-N2000 Service Manual 1.2.3 Specifications for Reliability, Durability, and Maintenance ❏ MPBF* (mean prints between failures): over 60,000 sheets or 3,000 hours * MPBF indicates an average number of pages printed before occurrence of problem requiring replacement or service. Table 1-7. Paper Feed Reliability Cassette*1 MP tray Jam rate *2 1/ 2000 or less 1/ 2000 or less 1/ 1000 or less Feed failure 1/ 2000 or less 1/ 2000 or less 1/2000 or less Multiple paper feeds 1/ 500 or less 1/ 500 or less 1/500 Leading edge bent 1/ 1000 for 1C or more *3 1/ 1000 for 1C or more *3 1/500 or less Paper wrinkle 1/ 1000 or less 1/ 1000 or less 1/500 or less *1: A4/letter cassette and universal cassette from the lower paper cassette units. *2: Multiple paper feeds excluded. *3: Disregarding a sheet bent less than 1C. (1C = 1 corner bent by 1 mm or less) Note: ❏ Duplex Statistics above only apply to newly unpacked paper. Print Position (Refer to Figure 1-2.) Single-sided print: Main scan direction: Sub scan direction: Standard position (C) ± 2.0 mm Standard position (A) ± 2.5 mm Duplex print: Main scan direction: Sub scan direction: Standard position (C) ± 3.0 mm Standard position (A) ± 2.5 mm ❏ Paper curl height: ± 30 mm or less ❏ MTTR (mean time to repair): 30 minutes or less ❏ Printer operating life: 5 years or 360,000 sheets, whichever comes first. ❏ Acoustic noise: 38 db(A), standby 53 db(A), operation ❏ Ozone density: Less than 0.02 ppm (Blue Angel standard conformance) ❏ Toxicity: No toxicity exists in OPC, toner, or plastic materials ❏ Skew See Table 1-8. Table 1-8. Paper Skew Single-sided print Direction A4 (Landscape) A3 C-D*1 A-B*2 ± 1.5 mm ± 2.0 mm ± 3.0 mm ± 2.0 mm C-D A-B æ 2.5 mm ± 3.0 mm ± 4.5 mm ± 3.0 mm Duplex print *1: Main scan direction 1-8 *2: Sub scan direction (See Figure 1-2.) Rev. A EPL-N2000 Service Manual Product Description 1.2.4 Environmental Conditions for Operation (Including Consumables) ❏ Temperature: 10 to 35o C (50 to 90o F) ❏ Humidity: 15 to 85% RH (withour condensation) ❏ Altitude: 2500 m (8202’) or less ❏ Atmospheric pressure: 760 hpa or more ❏ Levelness: 1o or less ❏ Illuminance: 3,000 lux or less (must not be exposed to direct sunlight.) ❏ Surrounding space required: See Figure 1-3. 200 mm (8") 970 mm (40") 200 mm (8") With the duplex unit 180 mm (7") Without the duplex unit 400 mm (16") With the universal cassette 200 mm (8") Leave 880 mm in height including 400 mm for opening the top cover. An additional 94 mm in height is needed when installing the optional cassette unit. Figure 1-3. Space Requirements Rev. A 1-9 Product Description EPL-N2000 Service Manual 1.2.5 Environmental Conditions for Storage and Transportation Table 1-9. Environmental Conditions for Storage Storage life 18 months after production, packed. Normal (over full storage life ) Temperature Humidity Extremes (1/3 of full storage life) 0 to 35° C (32 to 95 F) High 35 to 55° C (95 to 131 F)* 1 Low –20 to 0° C (–4 to 32 F) Change range per hour Less than 10° C (18 F) Normal (over full storage life ) 30 to 85 RH Extremes (1/3 of the full storage life) High 85 to 95% RH Low 10 to 30% RH Atmospheric 61.3 to 101.3K Pa (460 to 760 mm Hg) Pressure *1 Without Imaging cartridge ❏ ❏ Resistance to vibration (including consumables): Vibration frequency: 5 to 100 Hz , 100 to 5 Hz Acceleration: 1G Transportation time: 10 minutes (1 way) Accelaration directions: 3 directions Acceleration duration: 60 minutes for each direction — X, Y and Z (180 minutes total) Drop test: No damage at JIS Z0200-1987 level 1 1-10 Rev. A EPL-N2000 Service Manual Product Description 1.2.6 Specifications for the Imaging Cartridge ❏ Cartridge life: * This number is printable pages in continuous print mode using A4 or letter size paper at a 5% image ratio (black/white ratio). Life varies, depending on the image ratio and printing mode, such as continuous/intermittent, density and toner saver. 10,000 sheets * Table 1-10. Environmental Conditions for Storage and Transportation Storage life 18 months after production, packed. 0 to 35o C (32 to 95 F) Normal (over full storage life ) Temperature Humidity Extremes (1/3 of the full storage life) High 35 to 40oC (95 to 104 F)* 1 Low –20 to 0oC (–4 to 32 F) Change range per hour Less than 10oC (18 F) Normal (over full storage life ) 30 to 85 RH Extremes (1/3 of the full storage life) High 85 to 95% RH Low 10 to 30% RH Atmospheric 74.0 to 101.3K Pa (555 to 760 mm Hg) Pressure * 1: Without condensation ❏ Drop test: Height : 76 cm ❏ Resistance to vibration: Same as the printer Rev. A 1-11 Product Description EPL-N2000 Service Manual 1.2.7 Applicable Standards Safety Standards ❏ USA UL1950 ❏ Canada CSA950 ❏ Europe EN60950:1992 Annex ZB, ZC Safety Regulations (Laser Radiation) ❏ USA 21 CFR Chapter 1 Subchapter J Part 1040 ❏ Europe IEC825 EMI ❏ USA 47 CFR Part 15 Subpart B Class A ❏ Canada ICES-003:Issue 2 Class A ❏ Europe EN 55022 (Class A) Others ❏ Toner No effect on human health ( OSHA-TSCA, EINEX ) ❏ OPC No effect on human health ( under OSHA regulations) ❏ Ozone UL478 (5th edition) ❏ Materials SWISS environmental law ( must contain no CdS) 1.2.8 Physical Specifications ❏ Dimensions (Width X Depth X Height): 561 × 402 × 408 mm (22 × 16 × 16") (Without optional lower cassette unit) 561 × 402 × 508.3 mm (22 × 16 × 20") (With optional lower cassette unit) ❏ Weight: Approximately 24 kg ( 53 lb.) (Consumables and options excluded) 1.2.9 Process Specifications ❏ Printing system Electrostatic and dry electrophotographic process ❏ Exposing source Semi-conductor laser beam scanning system ❏ Exposed object OPC drum (Organic Photo Conductor) ❏ Charging system Rotating charge brush system ❏ Developing system Fine Micro Toning system ❏ Toner Nonmagnetic toner ❏ Image transfer system Roller transfer system ❏ Drum cleaning system Cleaning blade ❏ Fixing system Heat roller ❏ Image density control Variable developer bias (can be set by user) 1-12 Rev. A EPL-N2000 Service Manual Product Description 1.2.10 Controller Specifications ❏ CPU: RISC type CPU: Clock speed: MB86935-50 47.6 MHz ❏ RAM: Standard: Max.*1: 4MB 68MB ❏ ROM: 4MB ❏ EEPROM: 16Kbits ❏ Host interface: Standard: Optional: ❏ Optional slots: RAM SIMMs: ROM SIMM: PCMCIA: NLSP socket: Type B: B idirectional parallel B type / C type Ethernet*2 Type B *3 LocalTalk/Serial Module 2 slots 1 slot 1 slot 1 slot 1 slot CAUTION *1: Expanded with up to 2 SIMMs *2: Type-B I/F Board (C82331*) (standard) is instsalled in Type-B slot. *3: Remove Type-B I/F Board (C82331*) (Standard) before inserting Type-B I/F card. Make sure power is off when installing and removing options. 1 .2.11 Software Specifications ❏ Built-in emulation modes: PCL5e *1 GL/2 *1 EPSON GL/2 *2 FX ESC/P 2 I239X *1: Included in HP LaserJet 4 emulation. *2: EPSON GL/2 mode, which emulates the GL/2 mode in the HP LaserJet 4 emulation, has 2 modes; LJ4-GL2 mode and GL-like mode. ❏ LJ4-GL2 mode: Used to print with software that supports the HP 7600 series electrostatic plotter. It emulates GL/2 mode in the HP LaserJet 4 emulation. In EPSON GL/2 mode, however, the operator can reach some parameters with SelecType, without sending commands. ❏ GL-like mode: Used to print with software that supports the HP7475A series pen plotter. GL-like mode features all the commands for LJ4-GL/2 mode, except some instructions such as plotter unit and picture frame, that are the same as in EPSON GL/2 mode. However, since GL-like mode doesn’t support some commands used in the HP GL mode, print cannot be assured with application software that specifies those commands. See Table 1-11 for differences between LJ4-GL/2 mode and the GL-like mode. Rev. A 1-13 Product Description EPL-N2000 Service Manual Table 1-11. Differences between LJ4-GL/2 Mode and GL-like Mode LJ4-GL/2 Mode GL-like Mode Orientation Can be set in printing menu Always landscape Plotter Unit 1/1016 inch 1/1021 inch Picture Frame Same as in GL/2 mode in HP LaserJet mode Hard clip limit for EPSON GL mode Default Value for P1 and P2 Left and right bottom edge of the picture frame Inside the picture frame Undefined Command The first character discarded Both of 2 characters discarded CS, CA Command Unsupported Supported (Not fully compatible with the HP-GL mode) Procedure for omission of 2nd parameter of the DT command No terminator plotted Terminator plotted Default value for number of pens 2 8 (can be set by sending a command) 1.2.12 Fonts Specifications ❏ Built-in fonts: Scalable: 45 fonts Bitmap: 1 font See Table 1-12 on the next page for the list of the built-in fonts. 1-14 Rev. A EPL-N2000 Service Manual Product Description Table 1-12. Built-in Fonts Applicable Modes Resident Fonts PCL 5e GL/2 ESC/P 2 FX Bitmap font Line Printer S NS NS S S S S S S S S S S S S S S S S S S S S S S S S S S S S S S S S S S S S S S S S S S S S S NS NS NS NS NS NS NS NS NS NS NS NS NS NS NS NS NS NS NS NS NS NS NS NS NS NS NS NS S S NS NS S S NS NS NS NS S S NS NS S S NS NS NS NS NS NS NS NS NS NS NS NS NS NS NS NS NS NS NS NS NS NS NS NS NS NS NS NS NS NS NS NS NS S S NS NS NS NS S S NS NS S S NS Scalable fonts Dutch 801 Roman SWC Dutch 801 Bold SWC Dutch 801 Italic SWC Dutch 801 Bold Italic SWC ZapfHumanist 601 Demi SWC ZapfHumanist 601 Bold SWC ZapfHumanist 601 Demi Italic SWC ZapfHumanist 601 Bold Italic SWC Ribbon 131 SWC Clarendon Condensed SWC Swiss 742 SWC Swiss 742 Bold SWC Swiss 742 Italic SWC Swiss 742 Bold Italic SWC Swiss 742 Condensed SWC Swiss 742 Bold Condensed SWC Swiss 742 Condensed italilc SWC Swiss 742 Bold Condensed italilc SWC Incised 901 SWC Incised 901 Black SWC Incised 901 SWC Italic Original Garamond SWC Original Garamond Bold SWC Original Garamond Italic SWC Original Garamond Bold Italic SWC Audrey Two SWC Flareserif 821 SWC Flareserif 821 Extra Bold SWC Swiss 721 Roman SWM Swiss 721 Bold SWM Swiss 721 Oblique SWM Swiss 721 Bold Oblique SWM Dutch 801 Roman SWM Dutch 801 Bold SWM Dutch 801 Italic SWM Dutch 801 Bold Italic SWM Symbol Set SWA More WingBats SWM Courier SWC Courier Bold SWC Courier Italic SWC Courier Bold Italic SWC Letter Gothic Roman SWC Letter Gothic Bold SWC Letter Gothic Italic SWC S: Supported , NS: Not supported ❏ Font Symbol Sets Rev. A 1-15 Product Description EPL-N2000 Service Manual In LJ4 Emulation Mode (Bitmap Fonts): 28 Symbol Sets Roman-8 *1 Roman Extension Legal IBM-US ANCI ASCII JIS ASCII IRV French ECM94-1 8859-9 ISO 8859-2 ISO IBM-DN Swedish 2 HP German German PcMultilingual Norwege 2 Italian UK Norwege 1 IBM Spanish HP Spanish French 2 Chines Spanish Swedish Portuguese IBM Portuguese In LJ4 Emulation Mode (Scalable Fonts): 27 Symbol Sets Roman-8 *1 ECM94-1 8859-2 ISO 8859-9 ISO MsPublishing Desktop WiE.Europe Windows IBM-US *1: Roman Extension Legal PsMath WiTurkish VeMath Math-8 PcTk437 PsTest IBN-DN Veinterrnational VeUS PiFont PcE.Europe Symbol WiAnsi Wingdings McText PcMultilingual Includes other 19 sets (partial variations of the Roman-8 set): Norweg 1, Italian, Swedish, ANSI ASCII, UK, French, German, Spanish, Norweg2, French2, 29HP German, JIS ASCII, HP Spanish, Chinese, IRV, Swedish2, Portuguese, IBM Portuguese, IBM Spanish In ESC/P 2 or FX Modes: 9 Symbol Sets and 15 International Character Sets PC437 (USA/standard Europe) PC860 (Portuguese) PC865 (Norwegian) PC852 (East Europe) Abicomp PC850 (Multilingual) PC863 (Canadian-French) PC857 (PcTurk2) BRASCII USA Germany Denmark Italy Japan Denmark2 Latin America Legal* France UK Sweden Spain Norway Spain2 Korea* * Available for ESC/P 2 emulation only In i239X Emulation Mode: 5 Symbol Sets and 7 Fonts PC437 (USA/standard Europe) PC850 (Multilingual) PC860 (Portuguese) PC863 (Canadian-French) PC865 (Norwegian) EPSON Sans-Serif EPSON Gothic EPSON Orator 1-16 Courier SWC EPSON Presentor EPSON Script EPSON Prestige Rev. A EPL-N2000 Service Manual Product Description 1.3 INTERFACE SPECIFICATIONS The following interfaces are available for EPL-N2000 printer. ❏ Standard: Parallel B type I/F Parallel C type I/F Network I/F ❏ Optional: LocalTalk / Serial Module * Type-B I/F * Connector for LocalTalk is built in on the I/F bracket, along with connectors for standard I/F. NOTE: Type-B I/F Board (C82331*) (standard) is inserted in the Type-B interface slot. Note the following when Type-B I/F Board (C82331*) is installed: ❏ Remove Type-B I/F Board (C82331*) when installing Type-B interface. ❏ Remove Type-B I/F Board (C82331*) when using LocalTalk/Serial Module in LocalTalk mode. * Type-B I/F Board: C82331* ( The asterisk is a substitution for the last digit which varies by the country. 1 : For EAI 2 : For the areas other than EAI 1.3.1 Parallel Interface Specifications 1.3.1.1 Parallel Interface B Type Specifications ❏ Type: Bidirectional Parallel I/F (IEEE-1284) ❏ Operation modes: Compatibility mode Nibble mode ECP mode (Byte mode and EPP mode are not supported.) ❏ Data transmission system: STROBE synchronization, 8-bit parallel data transfer ❏ Handshaking: BUSY and ACKNLG signals ❏ Connector type: 57RE-4060-730B (D5) Receptacle: (DDK) ❏ Applicable plug: Amphenol or equivalent ❏ Cable length: 3 meters (10") or less (1) DATA 1-8 (2) VALID VALID (3) STROBE (4) BUSY (7) (5) ACKNLG (6) Figure 1-4. Timing Chart ❏ Signal timing: Rev. A See the figure below and Table 1-13. 1-17 Product Description EPL-N2000 Service Manual Table 1-13. Timing in Compatibility Mode Description *1 Minimum (1) DATA setup 0.5 µs (2) DATA hold 0.5 µs (3) STROBE↑ pulse width↓ 0.5 µs Typical Maximum 0s (4) BUSY↓ to STROBEX↓ 0.5 ms (5) STROBEX↓ to BUSY↑ 0s (6) BUSY↓ to STROBEX↓ (7) ACKX pulse width 0.5 µs (8) ACKX↑ to BUSY↓ 0s (9) BUSY↑ to PE↑ or ERRX↓ 2 ms* (10) PE↓ or ERRX↑ to BUSY↓ 2 ms* 1 µs*2 0.5 µs (11) Power on to signal output valid 2 ms* (12) PE↓ or ERRX↑ to ACKX↓ 0 s* (13) STROBEX↑ to ACKX↓ *1: Signals ending in "X" are Active LOW. *2: SE specification Table 1-14. Pin Assignments for Parallel B Type I/F Pin Compatibility Mode 1 nStrobe 2 to 9 1-18 Nibble Mode ECP Mode HostClk I/O I DATA 1 to DATA 8 I/O 10 nAcknlg PtrCLK PeriphClk O 11 Busy PtrBusy PeriphAck O 12 PError AckDataReq nAckReverse O 13 Select 14 nAutofeed Xflag HostBusy O HostAck I 15 NC — 16 GND — 17 FG — 18 PeripheralLogicHigh O 19 to 30 GND — Rev. A EPL-N2000 Service Manual Product Description Table 1-14. Pin Assignments for Parallel B Type I/F (Continued) Pin Compatibility mode 31 Nibble mode nInit 32 Fault ECP mode I/O nReverseReq I nPeriphReq O nDataAvail 33 NC — 34 NC — 35 NC — 36 nSelctIn IEEE1284 active O NC: Not connected. CG: CHASSIS -GND ❏ Signal descriptions StrobeX (in) Compatibility mode: Latch pulse used to read print data. DATA is valid when the signal is LOW. Negotiation phase: Latch pulse used to read an extensibility request value Nibble mode: Always HIGH ECP mode: Used to transmit print or address data from the host computer to the printer by handshaking with PeriphAck (Busy). DATA 1 to DATA 8 (in/out) All modes: DATA 8 is MSB and DATA 1 is LSB. Compatible mode Forward channel data Negotiation phase Extensibility request value Nibble mode Not used ECP mode Bidirectional data or address Acknlg (out) Compatible mode: An acknowledge pulse that indicates that data from the host computer has been received. [SE specification] This signal is always output along with the Busy signal. Strobe is independent of these signals. Negotiation phase: Indicates that IEEE 1284 is supported when it’s LOW, which later goes HIGH indicating that Xflag and Data Available Flag are valid. Reverse data transfer phase: Indicates that nibble data is valid when it’s LOW in nibble mode. Reverse idle phase: Switching this signal from LOW to HIGH causes an interruption informing the host computer that data is available. ECP mode Used to transmit data from the printer to the host computer by handshaking with HostAck (nAutfeed). Rev. A 1-19 Product Description EPL-N2000 Service Manual BUSY (out) Compatible mode: HIGH status indicates the printer is not ready to accept data. Negotiation phase: Reflects busy status in forward channel. Reverse data transfer phase: Nibble data bit is 3, then 7 in nibble mode. Reverse idle phase: Reflects busy status in forward channel. ECP mode: Used for flow control in forward channel. Also used in reverse mode as the 9th data bit, which indicates whether signal data information is data or command. PE (out) Compatible mode: Indicates paper jam or paper empty status in paper tray or cassette. ERRX goes LOW when PE goes HIGH. Negotiation phase: HIGH status indicates whether or not IEEE is supported. Then, it follows nDataAvail (nFault). Reverse data transfer phase: Nibble data bit is 2, then 6 in Nibble mode. Reverse idle phase: Remains HIGH until the host computer requests data transmission. Then, it follows nDataAvail (nFault). ECP mode: Aknowledges nReverseRequest when this signal is set to LOW. The host computer detects the status as an allowance to drive signal data. Slctout (out) Compatibility mode: Always HIGH Negotiation phase: Xflag indicates Extensibility flag. It is used in response to extensibility request value from the host computer. Reverse data transfer phase: Nibble data bit is 1, then 5 in nibble mode. Reverse idle phase: Same as negotiation phase. ECP mode: Same as negotiation phase. AutoX (in) Compatible mode: Not used. Negotiation phase: This signal goes HIGH and IEEE 1284 active (nSelectIN) goes LOW when requesting IEEE 1284 mode. Then it is set to HIGH by setting PtrClk (nAck) to LOW. Reverse data transfer phase: The host computer informs the printer that it is ready to receive data in nibble mode by setting this signal to LOW. Then sets the signal to HIGH to inform the printer that data has been received. Reverse idle phase: This signal goes HIGH in response to a LOW pulse of PtrClk (nAck) to enter reverse data phase again. Reverse idle phase is returned to compatibility mode if this signal goes HIGH and IEEE 1284 active (nselectIn) goes LOW at the same time. ECP mode: Used for flow control of forward channel. Also used in reverse mode as the 9th data bit, which indicates whether signal data information is valid data or command. 1-20 Rev. A EPL-N2000 Service Manual PeriLH (out) Product Description [SE specification] Only defined for IEEE 1284-C connector. Init (in) Compatible mode: As long as this signal is LOW, the Busy signal remains HIGH. 1. The printer processes data received before the signal goes LOW. 2. The printer ignores a LOW strobe pulse input while the signal is LOW. Negotiation phase: Always HIGH. Reverse data transfer phase: Always HIGH. ECP mode: Set to LOW when switching to reverse channel. Data signal can be transmitted to peripheral devices only when this signal is LOW and 1284 active is HIGH. Error (out) Compatible mode: Indicates an error has occurred when this signal is LOW. Negotiation phase: Goes HIGH when acknowledging compatibility with IEEE 1284. In nibble mode, goes LOW to indicate data is ready to be sent after the host computer has set HostBusy(nAutoFeed) to HIGH. Reverse data transfer phase: Set to LOW to indicate data to be sent to the host is ready in nibble mode. Reverse idle phase: Indicates whether or not data is valid. ECP mode: Goes LOW when requesting transmission with the host computer. Effective both in forward and reverse channel. Slctin Compatible mode: Always LOW. Negotiation phase: Set to HIGH while HostBusy is LOW to request 1284 mode. Reverse data transfer phase: Set to HIGH to indicate the bus direction is from the printer to the host. To terminate 1284 mode, this signal is set to LOW and the bus direction subsequently reverses to the printer. Reverse idle phase: Same as the reverse data transfer phase. ECP mode: Always stays at HIGH level. Set to LOW to terminate ECP mode and switch back to compatibility mode. HostLogicHigh Not used. GND Ground level for the twisted pair return signal. CG Connected to the printer chassis. The printer chassis GND and then signal GND are connected to each other. +5 V Pulled up to +5 V through 1K Ω resistor. Rev. A 1-21 Product Description EPL-N2000 Service Manual 1.3.1.2 Parallel Interface C Type Specifications ❏ Type: Bidirectional parallel I/F (IEEE-1284) ❏ Operational modes: Compatibility, nibble, ECP modes (Byte mode and EPP mode are not supported.) ❏ Data transmission system: STROBE synchronization, 8-bit parallel data transfer ❏ Handshaking: BUSY and ACKNL signals ❏ Connector type: DHA-RP36-13AN receptacle (DDK) ❏ Applicable plug: IEEE 1284-C plug ❏ Cable length: 3 meters (10’) or less ❏ Signal timing: Same as B type Table 1-15. Pin Assignments for Parallel C Type I/F Pin Compatibility Mode Nibble Mode ECP Mode I/O 1 BUSY PtrBusy PeriphAck O 2 Slctout 3 nAcknlg PtrClk PeriphClk O 4 nFault nDataAvial nPeriphReq O 5 PError AckDataReq nAckReverse O 6 to 13 nInit I/O nReverseRequest I 15 nStrobe HostClk I 16 nSelectIn ReverseReq I 17 Autofeed HostBusy HostAck I 18 HostLogicHigh I 19 to 35 GND I 36 PeripheralLogicHigh O Signal description 1-22 O DATA 1 to DATA 8 14 ❏ Xflag Same as for Parallel B Type I/F. Rev. A EPL-N2000 Service Manual Product Description 1.3.1.3 Network Interface Type-B I/F Board (C82331*) (standard) is installed in the Type-B interface slot. NovellNetware 3.X (IPX/SPX) EtherTalk Epson Peer to Peer Protocol TCP/IP ❏ Interface Protocol: ❏ Connector: RJ45 X 1 (10Base T) BNC X 1 (10Base 2) ❏ Applicable Cable 2-pair Category 3 or 4 or 5 UTP (10Base T) RG-58A/U (10Base 2) RG-58C/U (10Base 2) RG-58/U (10Base 2) * The asterisk is a substitution for the last digit which varies by the country. 1 : For EAI 2 : For the areas other than EAI Table 1-16. Pin Assignments for the RJ-45 Connector Rev. A Pin No. Signal Name I/O 1 Tx+ O 2 Tx– O 3 Rx+ I 4 NC — 5 NC — 6 Rx– I 7 NC — 8 NC — 1-23 Product Description EPL-N2000 Service Manual 1.3.2 Serial Interface Specifications ( LocalTalk/Serial Module) ❏ Type: RS-232C/current loop ❏ Transfer system: Full duplex ❏ Transfer speed: 300, 600, 1200, 2400, 4800, 9600, 19200, 38400, 57600 bps ❏ Synchronization: Asynchronous start-stop system Start-bit: 1 bit Stop-bit: 1 or 2 bits Data length: 7 or 8 bits Parity: Odd, even, or none ❏ Protocol: DTR/RTS *1, X-ON/X-OFF , or robust mode *2 *1: Cannot be combined with X-ON/X-OFF ) *2: Sends an X-ON a second when the printer is ready to receive data. Table 1-17. Serial Interface Pin Assignments RS-232C Current Loop Pin No. ❏ Signal I/O Signal I/O 1 DTR O NC — 2 CTS I NC — 3 TXD O TTY-TXD return I 4 GND — GND — 5 RXD I TTY-RXD return O 6 NC — TTY-TXD O 7 NC — NC — 8 NC — TTY-RXD I Signal descriptions DTR Signal output by the printer. When the DTR signal is HIGH, the printer can receive the RXD signal. When the SelecType settings do not specify DTR control, the signal level remains HIGH while printer power is on. When SelecType is used for DTR control, DTR goes LOW for any error condition. Data (RXD) from the host computer must be stopped within 128 characters after DTR goes LOW. CTS Always ignored. TXD Serial ASCII data output by the printer. It remains in MARK state (LOW level) between transmitted character codes. Logic 0 is at HIGH level (SPACE), and logic 1 is at LOW level (MARK). GND Connected to the printer chassis. The printer chassis GND and signal GND are connected to each other. RXD Serial ASCII data input to the printer. It maintains the MARK state (LOW level) between received character codes. 1-24 Rev. A EPL-N2000 Service Manual Product Description TTY-TXD Current loop signal: HIGH impedance (SPACE) between pins 17 and 24 or X-ON signal sent across pins 17 and 24 indicates that the printer is ready to accept data; LOW impedance (MARK) or X-OFF signal sent indicates that the printer is busy. TTY-RXD Return Current loop signal: Current return for pin 17. TTY-TXD Return Current loop signal: Input data current loop. TTY-RXD Current loop signal: Current return to pin 25. Protocol There are two types of protocols, as listed below, and each of them can be designated by the SelecType independently. ❒ DTR/DSR protocol The DTR/DSR control protocol can be selected by SelecType. The DTR signal is set to a HIGH level when the printer is ready to receive data, and to LOW when an error is detected. DTR remains HIGH when SelecType is set to OFF for DTR control. The printer sends only TXD off when the DSR signal is HIGH. (DSR signal is always assumed HIGH when select mode for DSR is set to OFF. X-ON/X-OFF transmission is independent of DSR. ❒ X-ON/X-OFF (DC1/DC3) protocol Select mode is used to execute X-ON/X-OFF protocol. The X-OFF (DC3) code, transmitted by error detection, warns the host computer to stop sending data within 128 characters. No further X-OFF codes are sent in response to additional data sent from the host computer after the warning has been given once. An X-ON code is transmitted when all the errors are cleared. The X-OFF code is transmitted only once when the remaining capacity of receiving buffer drops under for 128 characters, or any error occurs. The X-ON code is sent when the printer is powered on. The SelecType setting can be used to withhold X-ON/X-OFF code transmission. Rev. A 1-25 Product Description EPL-N2000 Service Manual 1.3.3 Optional LocalTalk Interface ( LocalTalk/Serial Modelu) This printer can use an optional LocalTalk interface module. Type: LocalTalk Signal level: Same as RS-422 signal level Protocol: X-ON/X-OFF (cannot be combined with DTR control) DTR control (cannot be combined with X-ON/X-OFF) Transfer speed: 230.4K bps Table 1-18. LocalTalk Interface Pin Assignments Pin No. 1 2 Signal Name DTR CTS TXD– 3 4 GND RXD– 5 6 7 8 1-26 TXD+ NC RXD+ I/O Description Signal output by the printer. When the DTR signal is HIGH, the printer can receive the RXD signal. IN The printer transmits data through TXD while CTS is HIGH. Serial ASCII data output from the printer. At a HIGH level when SD+ voltage is higher than SD– voltage. At a LOW level OUT when SD+ voltage is less than SD– voltage. Logic 0 is SPACE and logic 1 is MARK . The state must be maintained between transmitted character codes. — Ground. Serial ASCII data input from computer. At a HIGH level when RD+ voltage is higher than RD– voltage. At a LOW level when IN RD+ voltage is less than RD– voltage. Logic 0 is SPACE and logic 1 is MARK. The state must be maintained between transmitted character codes. OUT Refer to TXD–. — Not connected. IN Refer to RXD–. OUT Rev. A EPL-N2000 Service Manual Product Description 1.4 OPERATING INSTRUCTIONS This section describes the functions performed through the control panel, such as test print, hexadecimal dump, and the SelecType functions. 1.4.1 Control Panel This section gives instructions for the control panel, which consists of an LCD, 8 buttons, and 6 indicator lights. 1 2 LCD 3 Paper Source 4 BiRITech Menu 8 Paper Size Copies Manual Feed MP Tray Size Item Orientation Toner Save Mode Value Enter 10 11 9 Status Sheet SelecType Continue Form Feed On Line 12 Reset Figure 1-5. Control Panel (1) LCD Panel A 20-character (5 × 7 dot matrix) by 1-row liquid crystal display (LCD) unit that indicates printer status and selected items when the SelecType mode and One Touch mode are ON. (2) One Touch Mode — LED 1 Settings described below are available when this light is ON. Paper Source: Specifies the paper tray used to feed paper. Page Size: Specifies the size of the image to be formed. Manual Feed: Turns manual feed on and off. Orientation: Specifies the printing orientation: portrait or landscape. (3) One Touch Mode — LED 2 Settings described below are available when this light is ON. Rev. A BiRITech: Sets BiRITech mode. Copies: Specifies the number of pages to be duplicated. MP Tray Size: Specifies the paper size fed from multipurpose tray. Toner Saver Mode: Turns Toner Saver mode ON and OFF. 1-27 Product Description EPL-N2000 Service Manual (4) SelecType Mode LED (Green Light) The printer is in the SelecType mode when this light is ON. (5) Continue LED (Yellow Light) When this light is ON, it indicates an error has occurred that can be cleared by pressing the Continue button. (6) DATA LED (Yellow Light) ON: Indicates received data is stored in the printer and has not been printed out. The light, however, remains OFF if the stored data is not valid print data, but other data, such as control codes and commands. The light does not go OFF until data for remaining commands has been received. OFF: There is no valid print data in printer memory. Flashing: The printer is processing data. (7) On Line LED (Green Light) Describes whether or not the printer is ready. ON: The printer is ready to receive data. OFF: The printer is ready to receive data, but not to print yet. (8) Menu SelecType Mode: Press this button to enter SelecType Mode. Each press scrolls through the menus available for SelecType mode. To scroll back to the previous menu, press the SelecType/Alt button while holding down Menu button. One Touch Mode: Used to select one of the settings available for the menu indicated above the button. Press the SelecType/Alt button while holding down the Menu button. (9) Item SelecType Mode: Used to choose an item in the menu selected. Press repeatedly until the item to be selected is indicated on LCD. To scroll back to the previous menu, press the SelecType/Alt button while holding down the Menu button. One Touch Mode: Used to select a setting available for the menu indicated above this button. To scroll back to the previous menu, press the SelecType/Alt button while holding down the Menu button. (10) Value Used to shift to the item where the latest selection was made. SelecType Mode: Used to shift to the item changed by the previous setting and select a value (parameter). Press repeatedly until the value to be selected is indicated on the LCD. Press the SelecType/Alt and Value buttons simultaneously to scroll back the items. One Touch Mode: Used to select a setting available for the menu indicated above this button. Press the SelecType/Alt and Value buttons simultaneously to scroll back the options. (11) Enter Used to enter Status Sheet Printing mode. SelecType Mode: Pressed to confirm a new value or start executing a selected mode. One Touch Mode: Pressed to confirm a new setting. 1-28 Rev. A EPL-N2000 Service Manual Product Description (12) SelecType/Alt Selects One Touch Mode 1 or 2. Press this button repeatedly to scroll modes in the order: SelecType Mode, One Touch Mode 1, One Touch Mode 2, and Normal Mode. (13) Continue/Reset If you press this button while the Continue LED is flashing, it clears the error. Pressing this button while the On Line LED is OFF puts the printer back in Ready status. Pressing this button while the On Line LED is OFF and the LCD displays a warning clears the warning. To reset the printer, press this button and Alt button simultaneously, and LCD displays RESET. If you hold down the buttons an additional 5 seconds, the LCD displays RESET ALL, and a warm boot starts. (14) Form Feed The printer prints received data stored in its buffer if this button is pressed while On Line LED is OFF and Data LED is ON. Dulex print is canceled and data is printed in the the single print mode. (15) On Line If this button is pressed when On Line LED is ON: Single-sided print: The printer goes off line immediately, and the page in process is ejected. Duplex print: The printer goes off line after printing both sides of one sheet, or two sheets, maximum. The printer goes on line if this button is pressed when it’s off line. 1.4.2 Panel Settings This printer has two panel setting modes: One Touch mode*1 and the SelecType mode. One Touch mode is more limited but easier to use. This mode has direct access to specified items in the menu tree*2, while the SelecType mode has to follow the fully branched out menu tree to reach a parameter. Therefore, descriptions for One Touch mode have been eliminated in this section. Once new settings are registered on EEPROM, they are not changed until the printer is turned off. See Table 1-20 for SelecType options. *1: Changes made in One Touch mode only affect environments available in the currently selected interface. See the user’s guide for details. Rev. A 1-29 Product Description EPL-N2000 Service Manual Table 1-19. SelecType Options Menus (Changed by MENU button) TEST MENU Values (Changed by ↑ or ↓ button) (Set by ENTER button) Items (Changed by ITEM Button) STATUS SHEET LJ4 FONT SAMPLE ESC/P 2 FONT SAMPLE FX FONT SAMPLE I239X FONT SAMPLE PS STATUS SHEET*1 PS FONT SAMPLE*1 PS FACT SHEET*1 Ext Printer Info*24 EMULATION MENU LJ4, FX, ESC/P 2, I239X, PS*1, GL/2, Auto Parallel B Parallel C SERIAL*2 15 PRINTING MENU L/T*2 PS*1,GL2,Auto, LJ4*12, FX,1239X AUX*6 Same as parallel B ETHERNET Same as parallel B PAPER SOURCE Auto, MP, LC1, LC2*3 PAGE SIZE A4*4, A3, A5, B4, B5, LT*5,HLT,LGL, GLT, GLG, B, EXE, F4, MON, C10, DL, C5, C6, IB5, CTM, A3+ ORIENTATION Port, Land COPIES 1 to 999 MANUAL FEED OFF, ON RESOLUTION 600, 300 DUPLEX*16 OFF, ON 16 TRAY SIZE MENU BINDING* Long Edge, Short Edge START PAGE*16 Front, Back MP TRAY SIZE A4*4, A3, A5, B4, B5, LT*5, HLT, LGL, GLT, GLG, B, EXE, F4, MON, C10, DL, C5, C6, IB5, A3+ LC1 SIZE*14 250-sheet cassette A4, A3, A5, B4, B5, LT, HLT, LGL, GLG B, EXE, F4, 500-sheet cassette A4, LT LC2 SIZE*3*14 1-30 Rev. A EPL-N2000 Service Manual Product Description Table 1-19. SelecType Options (Continued) Menus CONFIG MENU Items BiRITech Medium, Dark, Off, Light TONER SAVE Off, On DENSITY 3,4,5,1,2 TOP OFFSET –9.0 to 0.0 to 99.0 mm in steps of 0.5 mm –9.0 to 0.0 to 150.0 mm in steps of 0.5 mm LEFT OFFSET 16 SET UP MENU Values BACK SHIFT* 0 to 30 mm in steps of 1 mm SIZE IGNORE Off, On AUTO CONT Off, On PAGE PROTECT Auto, On IMAGE OPTIMUM Auto, On PAPER TYPE Normal, Thin, Thick, Trnsprnc INTERFACE Auto, Parallel B, Parallel C, Serial, L/T*15, AUX*6 TIMEOUT 5 to 60 to 300 STND BY Enable, Disable LANG LANG SPRACHE LINGUA LENG SPRK SPROG TAAL LANG LING LANG English Franais Deutch Italiano Espaol Svenska Dansk Nederi Suomi Portugus Option 1 to 8*13 PANEL LOCK*17 Off,On PRINTER NAME TONER*14 Off,On E* * * * E* * PAGE COUNT*14 0 to 99999999 F, E* F, E * F * * F, E F SelecType INIT PARALLEL B MENU SPEED PARALLEL C MENU Rev. A Fast, Normal BI-D On, Off BUFFER SIZE Normal, Maximum, Minimum SPEED Fast, Normal BI-D On, Off BUFFER SIZE Normal, Maximum, Minimum 1-31 Product Description EPL-N2000 Service Manual Table 1-19. SelecType Options (Continued) Menu Item SERIAL MENU *2 Available Options WORD LENGTH 8, 7 BAUD RATE 9600, 19200, 38400, 57600, 300, 600, 1200, 2400, 4800 PARITY None, Even, Odd STOP BIT 1, 2 DTR On, Off X-ON/X-OFF On, Off, Robust BUFFER SIZE Normal, Maximum, Minimum L/T MENU*15 BUFFER SIZE Normal, Maximum, Minimum 6 AUX MENU* BUFFER SIZE Normal, Maximum, Minimum LJ4 FONT SOURCE Resident, SIMM, Card, Download FONT NUMBER 0 to available (Maximum, 65535) PITCH 0.44 to 10.00 to 99.99 cpi in steps of 0.01 cpi HEIGIHT 4.00 to 12.00 to 999.75 pt in steps of 0.25 pt SYSTEM Roman-8, ECM94-1, 8859-2 ISO, 8859-9 ISO, IBM- US, IBM DN, PcMultiling, PcE.Europe, PcTk437, WiAnsi, WiE.Europe, WiTurkish, DeskTop, PsText, Velntemati, VeUS, MsPublishin, Math-8, PsMath, VeMath, PiFont, Legal, UK, ANSI ASCII, Swedish2, Italian, Spanish, German, Norweg1, French2, Windows, Pclcelandic*9, PcLt774*9, PcTurk1*9, PcPortugues*9, PcEt850*9, PcTurk2*9, PcCanFrench*9, PcS1437*9, OcNordic*9, 8859-3 ISO*9, 8859-4 ISO*9, WiBaltic*9, WiEstonian*9, WiLatvian*9, Mazowia*9, CodeMJK*9, BpBRASCII*9, BpAbicomb*9, PcGK437*9, PcGK851*9, PcGK869*9, 8859-7 ISO*9, WiGreek*9, Europe3*9, PcCy855*9, PcCy866*9, PcLt866*9, 8859-5 ISO*9, WiCyrillic*9, Bulgarian*9, OCR A*9, OCR B*9, Hebrew7*10, 8859-8 ISO*10, Hebrew8*10, PcHe862*10, Arabic8*10, PcAr864*10, 8859-6 ISO*10, OCR A*10, OCR B*10, PcTurk1*19, PcTurk2*19, PcGreek437*20, PcGk8869*20, 8859-7 ISO*20, PcCy855*21, PcCy86621*, Bulgarian*21, Mozawia*22, CodeMJK*22, OCR A*18, OCR B*18 FORM 5 to 60*5 to 64*4 to 128 Lines SOURCE SYMSET *9,10,18 0 to 277 to 3199 DEST SYMSET *9,10,18 0 to 277 to3199 1-32 Rev. A EPL-N2000 Service Manual Product Description Table 1-19. SelecType Options (Continued) Menu GL2 Item GLMODE GLlike, LJ4GL2 SCALE OFF, A0, A1, A2, A3 ORIGIN CORNER, CENTER PEN Pen0 , Pen1, Pen2*4 to Pen16*4 END Butt, Square, Triangular, Round JOIN Mitered, Miteredbeveled, Triangular, Round, Beveled , None PEN0 0.05 to 0.35 to 5.00 mm in steps of 0.05 mm 0.05 to 0.35 to 5.00 mm in steps of 0.05 mm PEN1 4 0.05 to 0.35 to 5.00 mm in steps of 0.05 mm 4 PEN3* 0.05 to 0.35 to 5.00 mm in steps of 0.05 mm PEN4*4 0.05 to 0.35 to 5.00 mm in steps of 0.05 mm PEN5*4 0.05 to 0.35 to 5.00 mm in steps of 0.05 mm 4 PEN6* 0.05 to 0.35 to 5.00 mm in steps of 0.05 mm FONT Courier, Roman, Sans-serif, Prestige, RomanT, SansH, Script, OCR B PITCH 10 cpi, 12 cpi, 15 cpi, Prop CONDENSED Off , On T MARGIN 0.40 to 0.50 to 1.50 inch in steps of 0.05 inch TEXT 1 to 62 to 66*6 to available (Maximum, 111) lines CGTABLE Pc USA, Italic, PcMultilin, PcPortugues, PcCanFrenc, PcNordic, PcTurkish2, Pc.E.Europe, BpBRASCII, BpAbicomp, PcS1437*14, PcTurkish1*14, Pclcelandic*14, 8859-9 ISO*14, Mazowia*14, CodeMJK*14, PcGK437*14, PcGK851*14, PcGK869*14, 8859-7 ISO*14, PcCy855*14, PcCy866*14, Bulgarian*14, Hebrew7*10, Hebrew8*10, PcAr864*10, PcHe862*10 COUNTRY USA, France, Germany, UK, Denmark, Sweden, Italy, Spain1, Japan, Norway, Denmark2, Spain2, LatinAmeric, Kore, Legal AUTO CR On ,Off AUTO LF Off , On BIT IMAGE Dark, Light, BarCode ZEROCHR 0. Ø PEN2* ESC/P 2 Rev. A Available Options 1-33 Product Description EPL-N2000 Service Manual Table 1-19. SelecType Options (Continued) Menu FX I239X 1-34 Item Available Options FONT Courier, Roman, Orator S, Sans-serif, Prestige, Script , OCR B PITCH 10 CPI, 12 CPI, 15 CPI, Prop CONDENSED OFF, ON T-MARGIN 0.40 to 0.50 to 1.50 inch in steps of 0.05 inch TEXT 1 to 62*5 to 66*4 to available lines (Maximum, 111) CG TABLE Pc USA, Italic, PcMultilin, PcPortuguese, PcCanFrenc, PcNordic, PcTurkish2, Pc.E.Europe, BpBRASCII, BpAbicomp COUNTRY USA, France, Germany, UK, Denmark, Sweden, Italy, Spain1, Japan, Norway, Denmark2, Spain2, LatinAmeric AUTO CR ON, OFF AUTO LF ON, OFF ZERO CHAR 0,Ø BIT IMAGE Dark, Light, BarCode FONT Courier, Prestage, Gothic, Orator, Script, Presentor, Sans serif PITCH 10 cpi, 12 cpi, 15 cpi, 17 cpi, 20 cpi, 24 cpi, Prop CODE PAGE 437, 850, 860, 863, 865 T.MARGIN 0.30 to 0.40 to 1.50 inch in steps of 0.05 inch TEXT 1 to 63*5 to 67*4 to available (Maximum, 111) lines AUTO CR Off , On AUTO LF Off , On ALT. GRAPHICS Off , On BIT IMAGE Dark, Light, BarCode ZEROCHR 0. Ø CHARACTER SET 1*5, 2*4 Rev. A EPL-N2000 Service Manual Product Description Notes: Underlined values in boldface show factory settings. *1: Appears only when the optional EPSONScript Level 2 Post Script ROM SIMM (C83226*)is installed. *2: Appears when the optional LocalTalk serial interface is installed in serial interface mode. *3: Appears when the optional lower cassette unit is installed. *4: Factory setting for Europe and Pacific. *5: Factory setting for North America. *6: Appears when Type B interface is installed. *7: Varies depending the cassettes installed. *8: Appears when DC1 font ROM SIMM or font card is installed. *9: Appears when NLSP Bitmap 2 Font ROM for LGC is installed. *10: Appears when NLSP Bitmap 2 Font ROM for HA is installed. *11: Appears when the printer is operated in GL-Like mode. *12: A default setting only when the optional EPSONScript Level 2 Post Script ROM SIMM (C83226*) is not installed. *13: Options are available when NLSP Font ROM or ROM SIMM is installed. Number of options available varies with NLSP Font ROM or ROM SIMM and options only up to 8 are indicated on LCD. When NLSP Font ROM or ROM SIMM in use has no status sheet resource on it, no option is given. English is used to indicate items and values in SelecType mode. *14: Total number of sheets printed is indicated and no selection can be made for this item. *15: Appears when the optional LocalTalk with serial interface is installed in LocalTalk interface mode. *16: Appears when the optional duplex unit is installed. *17: Doesn’t appear on LCD. *18: Appears when NLSP Bitmap2 FONT ROM for OCR is installed.*23 *19: Appears when NLSP EDG OEM Scalable FONT ROM for Greek is installed.*23 *20: Appears when NLSP EDG OEM Scalable FONT ROM for Greek is installed.*23 *21: Appears when NLSP EDG OEM Scalable FONT ROM for Cyrillic is installed.*23 *22 Appears when NLSP EDG OEM Scalable FONT ROM for Latin is installed.*23 *23: When the value for Symset in LJ4 Menu is set to this symbol set, other values for Font Source and Font Number change automatically to "Resident" and "0". Therefore, note that this symbol set is used when Font Source and Font Number are properly set to the values which support this symbol set. *24: Appears when NLSP Font ROM has status sheet on it. Rev. A 1-35 Product Description EPL-N2000 Service Manual 1.4.3 Service Mode This printer has the following 5 service modes. ❏ Hexadecimal dump mode ❏ Format Flash Card ❏ Flash ROM update ❏ ❏ EEPROM Initialize mode Page Counter clear 1.4.3.1 Hexadecimal Dump Mode ❏ Button: Form Feed button with Power Switch On. ❏ Indication on LCD: HEX Dump ( This message appears after RAM check is completed.) ❏ Function: Converts received data into hexadecimal format (from 00 to FF) and prints it out. Functions with any interface. ❏ Prints: 1. 2. 3. 4. ❏ Exit: Notes: Data received Hex Dump List ASCII character list. If a received code is not a printable ASCII character, the printer prints a period (.) in the ASCII column. The page number Press the Reset button to perform the warm boot operation. Turn the printer off , then back on. 1. Interfaces switch only as a result of the timeout function. This change resets the data buffer to 0 and the page number to 1. 2. When hexadecimal dump mode is functional, SelecType and One Touch modes are not available. 1.4.3.2 EEPROM Initialize Mode EEPROM initialize operations are required only when the main board or EEPROM is replaced, or when these operations are specified in this manual. ❏ Buttons: On Line + Continue + Menu with Power Switch On. ❏ Indication on LCD: Format Nvram ❏ Function: Resets all user settings to the factory default settings and clears the printer status information (page counter and jam counter). 1.4.3.3 Format Flash Card ❏ Buttons: SelecType + Item+ Value + Enter with Power Switch On. ❏ Indication on LCD: Formatting Card ❏ Function: Erases all information on Flash Card. It functions with Flash Card, SRAM card, and EEPROM card. Note: Be sure not to turn the printer off while a card is formatting. " Write Erro Card" is indicated instead when the IC card inserted is not supported or "Write Protect" is On. 1.4.3.4 Page Counter Clear ❏ Buttons: On Line + Menu + Item with Power Switch On. ❏ Function: Resets the page counter to 0. 1.4.3.5 Flash ROM Update ❏ Button: 1. Press OnLine, Menu, Item, and Value buttons with Power Switch On. 2. Press Item, Value, and Enter buttons while "Program Device" is indicated. 3. Data is transmitted after "Please Send Data" is indicated. ❏ Function: Updates PROM. 1-36 Rev. A EPL-N2000 Service Manual Product Description 1.4.4 Display of Messages This section describes messages on LCD. They are divided into 4 categories; status messages, error messages, warning messages, and service call error messages. 1.4.4.1 Status Messages The LCD normally indicates the printer’s status and the software mode. Table 1-20. Status Messages Message Reset All Reset Reset to Save Warming Up Standby Ready Writing Card Writing SIMM EPL-N2000 Rev. A Description and Corrective Measure Warm boot is in process. Printer replaces this message with "Reset" while performing reset after warm boot is completed . Reset is in process. Printer status: SelecType is changed while another job is printing. LED status: On-Line LED goes OFF. Measures: Press either Continue or On-Line to recover. Note that the setting made in SelecType mode is not valid until current the job is complete. To make a new setting take immediate effect, perform a reset or warm boot. However, this clears all print data. The printer is warming up. The printer is in energy saver status. The printer is ready to receive new data. The printer is storing data to the PCMCIA card. Be sure to avoid turning off the printer off or removing the card during this operation. The printer automatically starts a warm boot when the process is completed. The printer is storing data to the Flash simm. Be sure to avoid turning off the printer off or removing the card during this operation. The printer automatically starts a warm boot when the process is completed. Printer name is indicated in place of "Ready" when "Printer Name" is set to ON in SelecType mode. 1-37 Product Description EPL-N2000 Service Manual 1.4.4.2 Error Messages If any of the following errors occurs, it will be displayed on the LCD. The error must be cleared immediately, using the measures shown in the following tables. Table 1-21. Error Messages Error Messages and Descriptions Operator Error Card Status A card is inserted or removed while the printer is ON. This message is not displayed when removal of an IC card creates a service call error. LED On Line OFF Continue OFF Form Feed Keeps the same status as before. Measure Start a warm boot, or turn the printer off then back on again. Duplex Unit Open Status LED Measure The duplex unit cover is open. On Line OFF Continue OFF Form Feed Keeps the same status as before. Close the duplex unit cover. Check Duplex P- Size Status [SelecType: Size Ignore = OFF in the Config menu] The size of the paper loaded does not match the page size selected. LED On Line OFF Continue OFF Form Feed Keeps the same status as before. Measure 1. 2. 3. Place the selected paper size in the paper cassette. Open the top cover or duplex cover to remove the paper. Close the cover. Then the printer automatically resumes printing of the jammed page. The paper is loaded from the same paper entrance. Paper Jam Status A paper jam has occurred in the paper path, except at the paper entrance. This message is also displayed when paper is stuck at both the paper entrance and in the paper path. LED On Line OFF Continue OFF Form Feed Keeps the same status as before. Measure 1-38 1. 2. Open the top cover and remove the paper. Close the cover. Then the printer automatically resumes printing. Rev. A EPL-N2000 Service Manual Product Description Table 1-21. Error Messages (Continued) Error Messages and Descriptions Feed Jam Status LED Paper has not been fed properly from the specified paper entrance. If paper is also jamming in the paper path, it is considered a Paper Jam error. On Line OFF Continue OFF Form Feed Keeps the same status as before 1. 2. Measure 3. Remove the paper from the paper entrance. Open the top cover to make sure there is no paper jammed in any paper path, and then close it. Always be sure to open the top cover. Otherwise the error does not clear. The printer automatically resumes printing of the jammed page after warming up. Paper is loaded from the same paper entrance. Paper Jam in Duplex Staus LED Measure A paper jam has occured in the duplex unit. On Line OFF Continue OFF Form Feed Keeps the same status as before. 1. 2. Open the cover of the duplex unit and remove the paper. Close the cover. Then the printer automatically resumes printing of the jammed page after warming up. Paper is loaded from the same paper entrance. Printer Open Staus LED Measure The top cover is open. On Line OFF Continue OFF Form Feed Keeps the same status as before. Close the cover. Turn Paper Status LED Measure Rev. A The printer does not support the orientation of the paper currently loaded in LC1 or LC2. On Line OFF Continue OFF Form Feed Keeps the same status as before. The error is automatically cleared if the paper is reloaded in the correct orientation. This error does not occur when the MP tray is used. 1-39 Product Description EPL-N2000 Service Manual Table 1-21. Error Messages (Continued) Error Messages and Descriptions Manual Feed Status LED Measure bbbb The printer has received data when Manual Feed is set to ON through the SelecType mode or a command. On Line OFF Continue Flashing Form Feed Keeps the same status as before This error can be cleared using any of the following methods: 1. Press the On Line button after placing "bbbb"size paper in the MP tray. Note that the Check Paper Size error does not occur, regardless of whether Size Ignore = ON in the Config menu. A Paper Out error does not occur despite paper empty condition in the MP Tray. 2. Press the Continue button. In this case, the printer starts printing after the paper source is selected, ignoring Manual Feed = ON. A Paper Out or Check Paper Size occurs when there is no paper in the selected paper source or the size of paper in the selected paper source does not match the size specified. 3. Perform a reset or warm boot. Paper Out aaaaa bbbbb*1 This error can be caused by any of the problems listed below: 1. There is no paper loaded in the paper source indicated by "aaaaa"*2 2. No paper is loaded in any paper source. [SelecType: Manual Feed = OFF] The actual message for "aaaa" is the paper source from which paper was fed in the previous printing. "LC1" is displayed instead if no paper is detected in any paper source when the printer is turned on. Status 3. There is no paper in "aaaa"*2 when Manual Feed = ON has been canceled by pressing the Continue button when printing is started. *1: The actual display for "bbbb" is the paper size selected using SelecType mode or the printer driver. *2: The actual display for "aaaa" is the paper source from which paper is specified to be fed. MP = Multipurpose tray LC1 = Lower paper cassette LC2 = Optional lower paper cassette LED 1-40 On Line OFF Continue OFF Form Feed Keeps the same status as before. Rev. A EPL-N2000 Service Manual Product Description Table 1-21. Error Messages (Continued) Error Messages and Descriptions Paper Out aaaaa bbbbb*1 1. Measure 2. When "aaaa" is LC1 or LC2: The error is cleared by inserting the "bbbb" size paper into cassette "aaaa". When "aaaa" is MP: The error is cleared by inserting the "bbbb" size paper in MP tray. If the warning error "Check Paper Size" does not appear after printing, it means that the Paper Size for MP tray in the SelecType menu has been changed automatically to "bbbb." Toner Out Staus LED Measure Toner is nearly out, which may cause print quality to deteriorate. If the you press the button, the printer outputs another sheet, but afterward the same message returns on the panel. On Line OFF Continue OFF Form Feed Keeps the same status as before. 1. 2. Replace the toner cartridge with a new one. Press the Continue button for a temporary recovery. Paper Set aaaa bbbb Staus LED Measure [SelecType: Size Ignore = OFF] Paper loaded in paper source "aaaa" does not match the selected page size. On Line OFF: ON: Size Ignore = OFF Size Ignore = ON Continue Flashing Form Feed Keeps the same status as before. [SelecType: Auto Cont = OFF in the Config menu] The error is cleared with either of the following methods: 1. Press the Continue button after inserting the "bbbb"size paper into the "aaaa" paper source. Then the printer starts feeding "bbbb" size paper from the "aaaa" paper source. 2. Press the Continue button without replacing the paper. If there is more than 2 pages of data remaining, the printer discontinues the job after printing 1 page and the same error occurs. [SelecType: Auto Cont = ON in the Config menu] The error is automatically cleared without replacing paper after a set period of time. Then the printer resumes feeding paper from the "aaaa" paper source. In this case, when there is data for 2 pages or more, the printer indicates the same error message before each page. Rev. A 1-41 Product Description EPL-N2000 Service Manual Table 1-21. Error Messages (Continued) Error Messages and Descriptions Print Overrun Status LED The time required to develop an image exceeds the print speed because the current data is too complicated. On Line OFF: ON Size Ignore = OFF Size Ignore = ON Continue Flashing Form Feed Keeps the same status as before. This error can be cleared using any of the following methods: [SelecType: Auto Cont = OFF in the Config menu] 1. Press the Continue button. If there is memory available, the printer resumes printing of the page containing the error, using the memory left. This is only attempted once, and if it results in the same error, the printer omits the page containing the error and proceeds to the following page. When the error occurs on the reverse side of a duplex page, both sides are reprinted. 2. Perform reset or warm boot. Measure [SelecType: Auto Cont = ON in the Config menu] 3. The error is cleared automatically after a specific amount of time. If there is still memory left, the printer resumes printing on the page containing the error, using the memory left. This is only attempted once and if the same error occurs, the printer omits the page with the error and proceeds to the following page. When the error occurs on the reverse side of a duplex page, both sides are reprinted. 4. Set Page Protect = ON in the printer driver. 5. Set Device Resolution = 300 dpi in the printer driver. 6. Add more memory. Mem Overflow Status LED Measure 1-42 Memory has run out during a process, and the printer stops the current task. On Line OFF: ON: Auto Cont = OFF in the Config menu Auto Cont = ON in the Config menu Continue Flashing Form Feed Keeps the same status as before. See Page 1-43 Rev. A EPL-N2000 Service Manual Product Description Table 1-21. Error Messages (Continued) Error Messages and Descriptions Mem Overflow Measure [SelecType: Auto Cont = OFF in the Config menu] The error is cleared by using any of the following methods: 1. Press the Continue button. Results vary by case, as described below. If the error occurred on the first side of a duplex page, the paper is ejected leaving the reverse side blank. Data for the reverse side is printed on the reverse side of the next sheet. If the error is caused by the lack of image buffer memory, the printer prints only the data already processed. If the error occurred during writing of data for fonts or macros, the printer continues the current task ignoring the data written when the error occurred. 2. Reset the printer or perform warm boot. [SelecType: Auto Cont = ON in the Config menu] 3. The error is automatically cleared after a specific amount of time. 4. 5. Add more memory. This error can be caused when the memory used for fonts is too large. In such a case, turn off the printer and remove one of the above devices . Duplex Mem Overflow Status LED Measure In duplex printing mode, there was not enough memory left for the data on the reverse side of the sheet. The paper was ejected after the first side was printed. Then an error message was indicated. On Line OFF Continue Flashing Form Feed Keeps the same status as before. [SelecType: Auto Cont = OFF in the Config menu] 1. Press the Continue button to resume printing of data for the reverse side on the next sheet. 2. Reset the printer or perform warm boot. [SelecType: Auto Cont = ON in the Config menu] 3. The printer resumes printing automatically after a specific amount of time. Data for the reverse side is printed on the reverse side of the next sheet. Illegal Aux I/F Card Status LED Measure Rev. A The optional I/F card inserted in theType-B slot cannot be used with this printer. On Line OFF Continue OFF Form Feed Keeps the same status as before. Turn the printer off, remove the optional card, and then turn the printer back on. 1-43 Product Description EPL-N2000 Service Manual Table 1-21. Error Messages (Continued) Error Messages and Descriptions Illegal Card Status LED Measure An IC card that has been inserted will not work with this printer. On Line OFF Continue OFF Form Feed Keeps the same status as before. 1. 2. Turn the printer off and remove the card. Then turn the printer back on. Remove the IC card with the printer on to make the Continue LED flash. Then press the Continue button while the Continue LED is flashing. The printer automatically starts a warm boot. Illegal I/F Module Status LED Measure LocalTalk/Serial Module installed is not available. On Line OFF Continue OFF Form Feed Keeps the same status as before. Turn off the printer and remove the LocalTlk/Serial module. Write Error Card Status LED This error can be caused by any of 3 situations described below: 1. No data can be written onto the card. 2. Writing is not completed properly. 3. The card is not inserted. On Line OFF Continue OFF Form Feed Keeps the same status as before. 1. 2. Measure 3. 1-44 Turn the printer off and remove the card. Then turn the printer back on. Remove the IC card with the printer on to make the Continue LED flash. Then press the Continue button while the Continue LED is flashing. The printer automatically returns to normal status. Perform a Warm boot. Rev. A EPL-N2000 Service Manual Product Description Table 1-21. Error Messages (Continued) Error Messages and Descriptions Write Error SIMM Status LED This error can be caused by any of 3 situations described below: 1. No data can be written onto the SIMM. 2. Writing is not completed properly. 3. The SIMM is not inserted. On Line OFF Continue OFF Form Feed Keeps the same status as before. 1. 2. Measure 3. Turn the printer off and remove the card. Then turn the printer back on. Remove the IC card with the printer on to make the Continue LED flash. Then press the Continue button while the Continue LED is flashing. The printer automatically returns to normal status. Perform a Warm boot. Change Card Battery Status LED Measure Rev. A Backup battery life on the PCMCIA card has ended. On Line OFF Continue OFF Form Feed Keeps the same status as before. Turn off the printer and remove the card to replace the battery. Then reinsert the card. This error occurs in all the memory cards, such as SRAM cards, which have a backup battery installed. 1-45 Product Description EPL-N2000 Service Manual 1.4.4.3 Warning Messages If any of the following warning errors occurs, it is displayed on the LCD. The printing process itself is not affected by any of the warning messages, which is soon replaced by a Ready message. Table 1-22. Warning Messages Warning Messages and Descriptions Image Optimum Status LED Measure The printer could not print at the density selected, due to lack of memory, and it simplified the print image. On Line, Continue, Form Feed 1. 2. Keeps the same status as before. Clear the warning message by pressing the Continue button. Reset the printer or perform warm boot to discontinue data processing. Toner Low Status LED Measure Toner left has dropped to the specific amount. It’s detected by the toner sensor in the engine. On Line, Continue, Form Feed 1. 2. Keeps the same status as before. Press the Continue button to clear the warning. Replace the toner cartridge with a new one. Card Battery Low Status LED Measure A backup battery in a PCMCIA card is low. On Line, Continue, Form Feed Keeps the same status as before. Replace the backup battery with a new one. Check Paper Size Status LED Measure 1-46 [Size Ignore = OFF in Config menu] This warning is given when the size of the paper loaded and the selected page size do not match. When using MP tray, the value for MP Tray Size in the Tray Size SelecType menu is set to the Page Size, if this message does not appear on the LCD. The printer, however, does not always detect size differences when a particular size of paper is loaded. On Line, Continue, Form Feed 1. 2. * Keeps the same status as before. Press the Continue button to clear the warning. Reset the printer or perform warm boot. When this message is displayed, printing occasionally results in a size of paper that was not specified. Rev. A EPL-N2000 Service Manual Product Description Table 1-22. Warning Messages (Continued) Warning Messages and Descriptions Check Serial I/F Status LED Measure This warning is given after detection of an error such as a framing error, parity error, overrun error, or break character error when the serial I/F is installed. Data sent from serial I/F is ignored while the warning is indicated and it does not stop until a warm boot is performed. During this condition, however, other printer jobs and data sent from other than Serial Interface are not interfered. On Line, Continue, Form Feed Keeps the same status as before. Perform an warm boot. Menus Locked Status LED Measure This warning is given when Panel Lock is set to On in EJL mode and EEPROM cannot store new settings. This message is indicated under any of the circumstances described below: 1. Menu, Item, Value, and Enter buttons are pressed in One Touch mode. 2. Enter switch is pressed in SelecType mode. On Line, Continue, Form Feed Keeps the same status as before. Press any of the switches. Duplex Print Was Off Status LED Measure Rev. A In duplex mode, the printer discontinues printing and indicates this message under any of the circumstances described below: 1. CTM-size paper is selected. 2. The paper type selected is other than Normal. 3. An envelope size (MON, C10, DL, C5, C6) is selected as the paper size. 4. The duplex unit is not installed. 5. Paper size, paper source, and paper type specified for two sides are different. 6. The paper size selected is A3+. On Line, Continue, Form Feed 1. 2. Keeps the same status as before. Press the Continue button to clear the warning. Reset the printer or perform a warm boot. 1-47 Product Description EPL-N2000 Service Manual Table 1-22. Warning Messages (Continued) Warning Messages and Descriptions (Continued) Format Error Card Status LED Measure Data can be written onto the card inserted, but the card hasn’t been formatted. This message can be ignored when the card is new. If the card, however, has already data stored, the card is under either of following conditions: 1. Data wasn’t written properly. 2. The memory stored is damaged. In such cases, write data again or turn off the printer to remove the card. On Line, Continue, Form Feed 1. 2. Keeps the same status as before. Clear the message by pressing Continue switch. Turn off the printer and remove the card. Format Error SIMM Status LED Measure 1-48 Data can be written onto the SIMM installed, but the SIMM hasn’t been formatted. This message can be ignored when the SIMM is new. If the SIMM, however, has already data stored, the SIMM is under either of following conditions: 1. Data wasn’t written properly. 2. The memory stored is damaged. In such cases, write data again or turn off the printer to remove the card. On Line, Continue, Form Feed 1. 2. Keeps the same status as before. Clear the message by pressing Continue switch. Turn off the printer and remove the SIMM. Rev. A EPL-N2000 Service Manual Product Description 1.4.4.4 Messages at Power On Table 1-23. Power On Messages Status Messages and Description ROM Check Status System ROM being checked. RAM Check XX . XMB Status System RAM being checked. " RAM Check XX . XMB OK" is indicated when RAM check is completed. If memory is added, be sure that "XX.X" match the size of the added RAM memory. Self Test Status Self Test, Reset being performed. 1.4.4.5 Service Call Error Messages A service call error is an error that has to be recovered by a qualified service person. Table 1-25 describes the indications on LCD. For code descriptions, refer to Chapter 5. Table 1-24. Service Call Error Messages Service Call Error Messages Service Req Status LED Measure Rev. A effff The printer detects an error that may not be recovered by end users. e: Error Type Codes E: Error related to the engine. C: Error related to the controller. ffff: Error code (Refer to Chapter 5.) On Line, Continue, Form Feed On Ask the end user to turn the printer off, then back on again. If the same message still appears, note the error code and make a service call. 1-49 Product Description EPL-N2000 Service Manual 1.4.5 Printer Sharing This section describes printer sharing. This printer has two methods of printer sharing: port fixed mode and auto sense mode. These modes are selected through SelecType. 1.4.5.1 Port Fixed Mode When the printer is in port fixed mode, only one interface port is active. Data from other port is ignored. The interface to be used can be selected through SelecType. User 1 Parallel I/F B type User 2 Parallel I/F C type User 3 Ethernet ( Type-B I/F ) User 4 LocalTalk /Serial Input Buffer Interface environment Print Parallel B Parallel C Ethernet ( Type-B I/F ) Module LocalTalk /Serial Module Figure 1-6. Interface Port Fixed Mode 1.4.5.2 Auto Sense Mode This printer can be connected to a maximum of 4 interfaces at a time. When the printer is in Auto Sense Mode, any interface, standard or optional, that receives data first will print first . Each interface has its own values that are selected through SelecType. Host A Parallel B type Host B Parallel C type Input Buffer I/F Setting Input Buffer I/F Setting Print 10Base2 Host C 10BaseT Ethernet Type B I/F Input Buffer I/F Setting Input Buffer I/F Setting LocalTalk Host D Host E LocalTalk/Serial Module (option) Serial LocalTalk/ Serial Module Figure 1-7. Interface Auto Sense Mode 1-50 Rev. A EPL-N2000 Service Manual Product Description 1.4.6 Controller RAM Status RAM on the controller of this printer uses dynamic memory allocation to make the best use of the memory. Therefore, no portion is rigidly allocated for user-defined settings such as font download, form overlay, and buffer size, and the total amount of memory available changes depending on new values. When data exceeds memory capacity during a process, the error message Mem Overflow appears on the LCD. In this case, more memory needs to be added. You can occasionally prevent the error by decreasing memory buffer size. 1.4.7 EJL (Epson Job Control Language) This printer supports EPSON’s original EJL. This system allows users to access printer setting modes through commands sent by the computer. This mode is especially beneficial to users who operate printers through the network. 1.4.8 BiRITech (Bi Resolution Improvement Technology) This printer has BiRITech, which is used to smooth out jagged edges of lines or shapes. The resolution, with this technology, has been improved to control dot formation in the main scan at approximately 1200 dpi, and it provides printing of a high quality. Note: Using BiRITech may possibly cause print quality to deteriorate with meshed patterns or special graphic images. You can avoid this by setting BiRITech to OFF in SelecType. 1 inch 1 2 3 4 600 1 2 3 4 1 inch 5 6 7 R 8 600 Figure 1-8. BiRITech Function Rev. A 1-51 Product Description EPL-N2000 Service Manual 1.4.9 PGI (Photo and Graphics Improvement ) PGI enhances the print quality of halftones and tone gradations, generally used in photographic and graphic images. Compared with conventional systems, which use one white or black dot as the minimum unit, PGI technology divides a single dot into 3 parts for a more precise image. Therefore, the amount of data required for this technology is twice as large as the previous method. 1.4.10 Toner Saver Mode Toner saver mode can cut toner consumption to half normal use. The printer saves toner by substituting a gray shade, formed with reduced dots, for the black inside characters. The upper and right edges are reinforced with full black lines. Use of this mode, however, is limited to output that does not require good print quality. Table 1-25. Toner Saver Mode Toner Saver Mode Off On *1: Edge Reinforcement All edges Halftone/ Full Black Full black 1 Upper and right edge* Halftone made of 2 dots out of 4 X 4 dots. Toward the orientation in which image is laid, regardless of the direction paper is fed. Reinforced Halftone Normal Mode Toner save mode Figure 1-9. Toner Save Mode 1.4.11 Precaution for Power Off This printer has an EEPROM installed on the main controller to store user default settings . If the printer is turned off while the printer is writing new data to the EEPROM, that new data will be lost, and this may cause an error the next time the printer is powered on. To avoid this, do not turn off the printer until the message Ready is indicated on the LCD. 1-52 Rev. A EPL-N2000 Service Manual Product Description 1.5 MAIN COMPONENTS To simplify maintenance and repair, the main components of the EPL-N2000 have been designed for easy removal and replacement. The main components are: ❏ ❏ ❏ ❏ ❏ ❏ ❏ ❏ ❏ ❏ ❏ ❏ ❏ C207 MAIN board Control panel PWB-A board PWB-E board PWB-F board Print head unit assembly Fusing unit Transfer unit Paper takeup roller unit Registration roller unit Drive unit Imaging cartridge Cassette unit Main control board Engine controller circuit board Power supply unit High-voltage supply unit Lower cassette unit Fusing Unit PWB-F Optical Unit Control Panel PWB-E C207 MAIN PWB-A Figure 1-10. Main Component Layout Rev. A 1-53 Product Description EPL-N2000 Service Manual 1.5.1 Main Controller (C207 MAIN Board) The C207 MAIN board is the main controller board for the EPL-N2000. 4 M-Bit DRAM 16 M-Bit DRAM MASK ROM (FONT ROM) ROM Slot IC16 IC15 IC6 IC5 RAM SIMM Module RAM SIMM Module IC12 IC11 IC10 IC9 IC39 Type B I/F Connector IC1 RISC CPU MB86936 SLAM GG46833 IC28 IC38 IC card slot IC20 PIC E05B29 Option 8M-Bit ROM EEPROM 93C86 IOC 2 E05B27BA Parallel C Type I/F IC29 IOC 2 IC37 Parallel B Type I/F E05B27BA LocalTalk/ Serial I/F Connector RIT4 Plus E05B28 Figure 1-11. C207 MAIN Board 1-54 Rev. A EPL-N2000 Service Manual Product Description 1.5.2 PWB-A Board This unit is the engine control board. The engine is driven by the commands from the C207 MAIN board, including information from the sensors. Figure 1-12. PWB-A Board 1.5.3 PWB-E Board PWB-E board is the power supply board, which converts the AC line voltage into +24 and 5 VDC voltages. This board also supplies AC line voltage to the fusing unit to heat the heater lamp. CAUTION Never touch variable volumes RV1 and RV2. They are for factory use only. Figure 1-13. PWB-E Board Rev. A 1-55 Product Description EPL-N2000 Service Manual 1.5.4 PWB-F Board Unit The PWB-F is the high-voltage supply circuit board. It applies +24 VDC to the development bias, OPC drum charge bias, and image transfer bias. Never touch variable volumes VR1, VR2, VR3, VR5, VR6. They are for factory use only. Figure 1-14. PWB-F Board 1.5.5 Paper Takeup Roller Unit This unit is used to take up paper from a paper tray or cassette. Figure 1-15. Paper Takeup Roller 1-56 Rev. A EPL-N2000 Service Manual Product Description 1.5.6 Registration Roller Assembly This unit is used to prevent paper skew prior to transfer process. Paper reaches the register, pushes against the register, and then is pushed back to the correct position by its natural bounce. Figure 1-16. Registration Roller 1.5.7 Transfer Unit The transfer unit transfers the toner image from the surface of the PC drum onto the paper. When paper is transported across the transfer roller and PC drum, the transfer roller, located on the reverse side of the paper, applies a positive electric charge to the paper to attract the toner image from the drum to the paper. Figure 1-17. Transfer Unit Rev. A 1-57 Product Description EPL-N2000 Service Manual 1.5.8 Print Head Unit (Optical Unit) The Print Head unit consists of the laser diode (semi-conductor laser), the polygon motor which drives the polygon mirror for laser scanning, mirrors, and the lenses. The optical unit emits the laser beam onto the surface of the PC drum via the polygon mirror, mirrors, and lenses to produce a latent electrostatic image. Figure 1-18. Print Head Unit 1.5.9 Fusing Unit The fusing unit, which consists of the roller and heater lamp, fixes toner images onto the paper, using heat and pressure. The thermistor is installed in the unit for heat control and the thermostat takes over the job when the heat control fails. . Figure 1-19. Fusing Unit 1-58 Rev. A EPL-N2000 Service Manual Product Description 1.5.10 Drive Unit The drive unit, which consists of the main motor and a number of transmitting gears, drives the paper transport rollers, Imaging cartridge, and fusing unit. The registration roller clutch, paper takeup solenoid, and interlock switch are installed inside the unit. Figure 1-20. Drive Unit 1.5.11 Imaging cartridge The Imaging cartridge contains mechanisms to control charging, developing, and cleaning. The toner tank is installed inside the cartridge, and the whole cartridge must be replaced when toner runs out. The cartridge has a fuse attached, which the printer can use to detect whether or not the cartridge is new. Figure 1-21. Imaging Cartridge Rev. A 1-59 Product Description EPL-N2000 Service Manual 1.5.12 Cassette Unit The cassette unit is used to feed paper from a cassette into the printer. The paper empty sensor detects paper outs, and the paper near empty sensor detects the amount of paper remaining in the cassette. Paper takeup roller Transport roller Paper empty sensor Paper size switches Paper near empty sensor Figure 1-22. Cassette Unit 1-60 Rev. A CHAPTER 2 OPERATING PRINCIPLES Table of Contents 2.1 Engine Operation 2.1.1 Printing Process . . . . . . . . . . . . . . . . . . . . . . . . . . . . . . . . . . . . . . . . . . . . 2.1.1.1 Charging Process . . . . . . . . . . . . . . . . . . . . . . . . . . . . . . . . . . . . . 2.1.1.2 Exposure Process. . . . . . . . . . . . . . . . . . . . . . . . . . . . . . . . . . . . . 2.1.1.3 Developing Process . . . . . . . . . . . . . . . . . . . . . . . . . . . . . . . . . . . 2.1.1.4 Transfer Process . . . . . . . . . . . . . . . . . . . . . . . . . . . . . . . . . . . . . 2.1.1.5 Fusing Process . . . . . . . . . . . . . . . . . . . . . . . . . . . . . . . . . . . . . . . 2.1.1.6 Cleaning Process . . . . . . . . . . . . . . . . . . . . . . . . . . . . . . . . . . . . . 2.1.2 Engine Mechanism Operation . . . . . . . . . . . . . . . . . . . . . . . . . . . . . . . . . . 2.1.2.1 Fusing Unit . . . . . . . . . . . . . . . . . . . . . . . . . . . . . . . . . . . . . . . . . . 2.1.2.2 Paper Feeding Mechanism. . . . . . . . . . . . . . . . . . . . . . . . . . . . . . 2-1 2-1 2-2 2-3 2-4 2-5 2-6 2-7 2-7 2-7 2-8 2.2 Controller Mechanism 2-10 2.2.1 Engine Control. . . . . . . . . . . . . . . . . . . . . . . . . . . . . . . . . . . . . . . . . . . . . 2-10 2.2.1.1 Main Motor Mechanism Control . . . . . . . . . . . . . . . . . . . . . . . . . 2-11 2.2.1.2 Laser Unit Control. . . . . . . . . . . . . . . . . . . . . . . . . . . . . . . . . . . . 2-11 2.2.1.3 Fusing Control . . . . . . . . . . . . . . . . . . . . . . . . . . . . . . . . . . . . . . 2-12 2.2.1.4 Sensor Control . . . . . . . . . . . . . . . . . . . . . . . . . . . . . . . . . . . . . . 2-13 2.2.2 Video Control Operation . . . . . . . . . . . . . . . . . . . . . . . . . . . . . . . . . . . . . 2-15 2.2.2.1 C207 MAIN Board Operation . . . . . . . . . . . . . . . . . . . . . . . . . . . 2-15 2.2.2.2 Video Controller Operating Principles . . . . . . . . . . . . . . . . . . . . 2-17 List of Tables Table 2-1. Table 2-2. Table 2-3. Table 2-4. Printing Process for the EPL-N2000 . . . . . . . . . . . . . . . . . . . . . . . . . 2-1 Paper Size Switches . . . . . . . . . . . . . . . . . . . . . . . . . . . . . . . . . . . . . 2-9 Sensor Description . . . . . . . . . . . . . . . . . . . . . . . . . . . . . . . . . . . . . 2-13 Functions of C207 MAIN Board . . . . . . . . . . . . . . . . . . . . . . . . . . . 2-16 List of Figures Figure Figure Figure Figure Figure Figure Figure Figure Figure Figure Figure Figure Figure Figure 2-1. Main Process Mechanism Parts and Paper Paths . . . . . . . . . . . . . 2-1 2-2. Charging Process . . . . . . . . . . . . . . . . . . . . . . . . . . . . . . . . . . . . . . 2-2 2-3. Exposure Process. . . . . . . . . . . . . . . . . . . . . . . . . . . . . . . . . . . . . . 2-3 2-4. Developing Process . . . . . . . . . . . . . . . . . . . . . . . . . . . . . . . . . . . . 2-4 2-5. Transfer /Separation Process . . . . . . . . . . . . . . . . . . . . . . . . . . . . . 2-5 2-6. Fusing Process . . . . . . . . . . . . . . . . . . . . . . . . . . . . . . . . . . . . . . . . 2-6 2-7. Paper Tray Feed Mechanism . . . . . . . . . . . . . . . . . . . . . . . . . . . . . 2-8 2-8. Paper Cassette Feed Mechanism . . . . . . . . . . . . . . . . . . . . . . . . . 2-9 2-9. Engine Controller Diagram . . . . . . . . . . . . . . . . . . . . . . . . . . . . . . 2-10 2-10. Main Motor Drive Circuit . . . . . . . . . . . . . . . . . . . . . . . . . . . . . . . . 2-11 2-11. Laser Control. . . . . . . . . . . . . . . . . . . . . . . . . . . . . . . . . . . . . . . . . 2-11 2-12. Fuser Control . . . . . . . . . . . . . . . . . . . . . . . . . . . . . . . . . . . . . . . . 2-12 2-13. Sensor Location . . . . . . . . . . . . . . . . . . . . . . . . . . . . . . . . . . . . . . 2-13 2-14. C207 MAIN Board Flowchart . . . . . . . . . . . . . . . . . . . . . . . . . . . . 2-15 EPL-N2000 Service Manual Operating Principles 2.1 Engine Operation This section describes the functions and operating principles of the EPL-N2000 engine. 2.1.1 Printing Process The whole printing process for this printer is divided into the seven stages described in Table 2-1. Table 2-1. Printing Process for the EPL-N2000 Steps Process Description 1 Charging Charges the surface of the PC drum with static electricity. A rayon brush is used. 2 Exposure The laser beam emitted from the laser unit produces an electrostatic latent image on the surface of the PC drum. 3 Development Toner is fed through the sleeve roller to the surface of the PC drum to produce a visible toner image. Transfer The transfer roller transfers the toner image from the surface of the PC drum onto the paper, using an electrical charge applied from the transfer roller. 5 Separating The electrode discharges the paper to separate it from the drum. 6 Fusing Toner image is fixed on the paper with heat and pressure. 7 Cleaning The cleaning blade clears toner off the PC drum and transfer roller. 4 Figure 2-1 shows the locations and name of the main engine components and the paper paths. Fusing Unit Upper Fusing Roller Lower Fusing Roller Print Head unit Imaging Cartridge Charging Brush Cleaning Blade PC Drum Sleeve Roller Needle Pole Transfer Roller Registration Rollers Figure 2-1. Mechanism Parts and Paper Paths for Main Printing Process Rev.A 2-1 Operating Principles EPL-N2000 Service Manual 2.1.1.1 Charging Process In the charging process, the high voltage unit applies negative DC voltage as the bias voltage to the rayon charging brush. Then, the PC drum is evenly charged with the negative electric charge applied from the charging brush. DC bias Charging Brush –1150 V Charge Bias:-1150V (DC) PC Drum PC Drum Ground Figure 2-2. Charging Process 2-2 Rev.A EPL-N2000 Service Manual Operating Principles 2.1.1.2 Exposure Process In the exposure process, the laser unit emits laser beams onto the PC drum surface to create an electrostatic latent image. There is a polygon mirror installed inside the laser unit. The mirror, which is rotated by the scanner motor, reflects laser beams from the laser diode toward the drum, on which the laser beams run, scanning from one edge to the other. There is a sensor called SOS, or Start Of Scan, sensor attached in the laser unit. The laser beam is emitted onto the sensor to detect the starting point for scanning of each line. It correctly times the illumination of the laser diode with the rotation of the polygon mirror. Polygon Mirror Laser Diode SOS Sensor PC Drum Charging Brush Charge Bias:-1150V(DC) PC Drum Laser Beam PC Drum Ground Drum Surface Figure 2-3. Exposure Process Rev.A 2-3 Operating Principles EPL-N2000 Service Manual 2.1.1.3 Developing Process Paper goes through this process to convert electrostatic image produced through the charging and exposure processes into visible image. It is accomplished using toner and 3 bias voltages; developingt bias, toner bias, and seal bias. Developing bias feeds toner evenly on the sleeve roller. The amount of toner fed onto the roller is controlled by developing bias, which enables the printer to adjust printing tones. Developing bias –300 V (–220 to –330 V) Toner bias –550 V Seal bias –249 bias Developing bias:-300V (-220V to -330V ) Toner bias:-500V PC Drum PWB-F High Voltage Unit Sleeve Roller Toner Hopper Seal bias:-249V Toner Feed Roller Figure 2-4. Developing Process 2-4 Rev.A EPL-N2000 Service Manual Operating Principles 2.1.1.4 Transfer Process In the transfer system, toner image created on the PC drum through the developing process is transferred to the paper. The roller transfer system is used for this printer. When the paper goes through the PC drum and the transfer roller, the roller provides the paper with positive voltage applied from the high voltage unit. Then, the toner image on the drum transfers to the paper being attracted by the positive voltage. The needle pole located above the roller is used to collect the remaining static electricity on the paper. Transfer bias + 4000 V DC Paper PC Drum + + Needle Pole + + Transfer Roller Transfer Bias:+ 4000 VDC Figure 2-5. Transfer Process Rev.A 2-5 Operating Principles EPL-N2000 Service Manual 2.1.1.5 Fusing Process The fusing unit permanently fixes the toner image, transferred from the PC drum, onto the paper. The fusing system this printer uses is the heat roller fusing system. The toner on the paper is melted by the upper fusing roller, which is heated by the heater lamp, then the toner is fixed by pressure from the paper traveling through the upper and lower fusing rollers. There is a thermostat and thermistor installed on the upper fusing roller.The thermistor detects the surface temperature of the upper fusing roller. The PWB-A board switches the heater lamp on or off, depending on the temperature detected. When the temperature is abnormally high, which is usually caused by a malfunction of the control board or the thermistor, the thermostat detects it and cuts off the current. During warm up, the heater continues to heat up until it reaches 190oC (374 F). At printing, the heater is controlled to remain 180oC (356 F). Thermistor Thermostat Paper Upper Fusing Roller Lower Fusing Roller Heater Lamp Thermistor PWB-A Heater Lamp Thermostat Figure 2-6. Fusing Process 2-6 Rev.A EPL-N2000 Service Manual Operating Principles 2.1.1.6 Cleaning Process Toner remaining on the PC drum after transfer process is scraped off with the cleaning blade, placed in close contact with the surface of the PC drum. The toner that has been scraped off is collected back into the toner collection box inside the Imaging cartridge. 2.1.2 Engine Mechanism Operation This section describes the major units in the engine and their mechanisms. 2.1.2.1 Fusing Unit ❏ Upper fusing roller A metallic sleeve roller that melts the toner on the paper. It is heated by a heater lamp built internally. ❏ Lower fusing roller A silicon rubber roller that applies pressure to the paper for fusing the toner to the page. ❏ Heater lamp A lamp built into the upper fusing roller. This is supplied AC power to heat the upper fusing roller. ❏ Thermistor The thermistor, located next to the upper fusing roller, detects the roller’s surface temperature. To control the roller’s temperature, the control circuit alternately switches the heater lamp on and off based on the temperature the thermistor detects. (This process continues occurring as long as the thermostat does not detect overheating.) ❏ Thermostat When the thermistor fails to control the temperature, the thermostat takes over the job. The thermostat has a series connection to the heater lamp’s power source line, and when the temperature rises to the specific level, it opens the contact point. Then current is cut off as a consequence. Rev.A 2-7 Operating Principles EPL-N2000 Service Manual 2.1.2.2 Paper Feeding Mechanism ❏ Multi Purpose Tray The drive for the tray is transmitted to the push-down cam by way of the main motor, paper takeup clutch, and paper takeup roller. The paper takeup roller and push-down cam rotate once when the the paper takeup solenoid is energized. While turning, the push-down cam pushes down the stack of paper on the paper lifting plate. Then the paper takeup roller picks up a sheet of paper. Friction between the paper separator and transport roller avoid multiple paper feeding. Push-down Cam Transport Roller Paper Takeup Roller Paper Takeup Clutch Separator Paper Lifting Plate Paper Take-up Solenoid Figure 2-7. Paper Tray Feed Mechanism 2-8 Rev.A EPL-N2000 Service Manual ❏ Operating Principles Lower Cassette Tray The drive for the lower cassette tray is transmitted from the printer to the transport roller via the transmission gear, paper takeup clutch, and paper takeup roller. The lower paper cassette unit is controlled by the engine control board (PWB-A) through control board PWB-C. When the paper takeup solenoid (SL2) is energized, the paper takeup roller rotates once to pick up a sheet of paper, and the transport roller carries it to the PC drum. The separator avoides multiple paper feeding. The paper size switch on control board (PWB-C) detects the size of the paper loaded in the tray. The paper near-empty sensor detects 2 conditions: whether the amount of paper remaining in the tray is 50 sheets or less or whether it is 250 sheets or less. The paper empty sensor is used to detect paper empty condition. Table 2-2 shows combinations of the paper sizes and corresponding switches. Table 2-2. Paper Size Switches Paper Size SW1 SW2 SW3 SW4 Paper Size SW1 SW2 SW3 SW4 ON ON OFF ON HLT OFF ON ON ON 1 A4* OFF ON OFF OFF LGL OFF ON OFF ON A5*1 OFF OFF ON ON GLG ON OFF ON ON B4*1 A3 ON OFF ON OFF GLT ON OFF OFF OFF 1 B5* OFF OFF OFF ON ON ON ON OFF LT*1 OFF OFF ON OFF No cassette OFF OFF OFF OFF B(11"*117") *1: In landscape orientation Transport Roller Paper Takeup Roller Paper Empty Sensor Paper Take-up solenoid(SL2) Paper Near Empty Sensor Paper Size Switches SW1 SW2 SW3 SW4 PWB-C board (reverse side) Figure 2-8. Paper Cassette Feed Mechanism Rev.A 2-9 Operating Principles EPL-N2000 Service Manual 2.2 Controller Mechanism 2.2.1 Engine Control This section gives information on the engine controller, power supply board, and the high-voltage supply board. The engine is controlled by the PWB-A board. Figure 2-9 shows an engine controller connection diagram. Main Motor (M1) Imaging Cartridge Toner Empty Sensor Paper Takeup Solenoid Paper Empty Sensor Paper Near Empty Sensor Registration Clutch Paper Exit Sensor Paper Cassette Unit Thermistor PWB-C Board Thermostat Heater Lamp PWB-E Power Supply Board PWB-A Board Paper Empty Sensor Paper Near Empty Sensor Cassette Size Sensor Paper Takeup Solenoid SL2 Power Source Fan Motor Print Head Assembly Interlock Switch Bias High Voltage PWB-F High Voltage Board Fusing Fan Motor Paper Takeup Sensor Registration Sensor Figure 2-9. Engine Controller Diagram 2-10 Rev.A EPL-N2000 Service Manual Operating Principles 2.2.1.1 Main Motor Mechanism and Control The main motor, which is located in the driving unit, transmits drive force to the rollers in the printer. A main motor malfunction is detected if any of following conditions is detected: 1. The lock signal (CN5-1) goes OFF (LOW), and the OFF status continues for 1 second or more. 2. The lock signal (CN5-1) does not go OFF (LOW) within 1 second after the main motor goes ON (CN5-2=Low). Figure 2-10 shows the main motor (M1) drive circuit. PWB-A Board Main Motor MOTOR LOCK 1 MOTOR ON/OFF 2 CN5 2 + 4V 3 GND 4 Figure 2-10. Main Motor Drive Circuit 2.2.1.2 Laser Unit Control The laser unit, which consists of the laser diode unit and the polygon mirror, exposes the PC drum. The output level of laser is adjusted prior to the printing, and a laser error occurs if the adjustment fails. If any of following conditions in the polygon motor is detected, the polygon motor is regarded as malfunctioning. 1. The polygon motor lock signal does not go ON within 10 seconds after the polygon motor goes ON. 2. The polygon motor lock signal goes ON after the polygon motor is energized, but it goes OFF again and does not come back ON within 1 second or more. 3. The SOS signal is not detected during printing. P/H (Print Head) Unit PWB-A Board SSCAN 1 PWB-D Laser Diode Board +5 V 7 CN2 8 +24 V Polygon Motor M2 POLYGON-LOCK 12 Figure 2-11. Laser Control Rev.A 2-11 Operating Principles EPL-N2000 Service Manual 2.2.1.3 Fusing Control The thermistor detects the surface temperature of the fusing roller and inputs the corresponding analog voltage to the PWB-A board. The heater lamp is turned ON and OFF by a signal output from PWB-A, based on the temperature detected by the thermistor. A fusing error occurs if any of following conditions is detected: 1. The thermistor voltage varies only in the range of 0.1 V within 12 to 30 seconds after the upper fusing roller starts warming up. 2. 120 seconds has passed after the upper fusing roller started warming up. But the temperature of the upper fusing roller is still under 190oC (374 F). 3. In standby, the upper fusing roller temperature drops under 140oC (284 F). 4. During printing, the upper fusing roller temperature drops under 150oC (302 F). 5. When the temperature is under control, the upper fusing roller temperature exceeds 240ooC (482 F). CN13 5 5 + V Thermistor CPU 4 PWB-E Board CN4 Heater Lamp 2 Heater ON/OFF Thermostat PWB-A Board Figure 2-12. Fuser Control 2-12 Rev.A EPL-N2000 Service Manual Operating Principles 2.2.1.4 Sensor Control This section gives information on the sensors and how they are used to detect abnormal operations. Figure 2-13 shows the sensor layout. 1 3 2 4 5 6 7 8 9 24 23 10 22 11 28 12 13 25 27 14 15 21 26 20 19 29 18 17 16 Figure 2-13. Sensor Locations See Table 2-3 for sensor descriptions. Table 2-3. Sensor Descriptions No. Description No. Description 1 A3 Output Tray 16 Registration Roller 2 Paper Output Tray 17 Transport Roller 3 Imaging cartridge 18 Cassette Paper Takeup Roller 4 Charging Brush 19 Paper Empty Sensor (PE2) 5 Paper Exit Roller 20 Paper Near Empty Sensor (PE2) 6 Upper Fusing Roller 21 Lower Paper Cassette Unit 7 Paper Exit Sensor (PC3) 22 Paper Empty Sensor (PE1) 8 Lower Fusing Roller 22 Paper Near Empty Sensor (PEN1) 9 Switchback Motor (Optional) 23 Toner Empty Sensor (TE 1) 10 Duplex Transport Roller (Optional) 24 Laser Unit 11 Duplex Paper Sensor (Optional) 25 Registration Sensor (PCR 1) 12 Main Motor 26 Paper Lifting Plate 13 Transport Motor (Optional) 27 MP Tray 14 Duplex Cover Switch 28 Transfer Roller 15 Paper Takeup Sensor 29 Paper Takeup Roller Rev.A 2-13 Operating Principles EPL-N2000 Service Manual A paper jam is detected if any of following conditions occurs: ❏ During feeding from the MP tray, the paper takeup sensor (PC1) fails to go OFF within approximately 1.6 seconds after the paper takeup roller has started rotating. ❏ During feeding from the paper cassette, the registration sensor (PCR1) does not go OFF within approximately 1.4 seconds* after the paper takeup roller has started rotating. * 2.5 seconds for the optional paper cassette ❏ During feeding from the paper cassette, the paper takeup sensor (PC1) fails to go OFF within approximately 1.0 seconds after the leading edge of the page has reached the registration sensor. ❏ The paper takeup sensor (PC1) does not go ON while power is on or when the upper and the duplex unit covers are closed. ❏ The paper takeup sensor (PC1) does not go ON within approximately 2.8 seconds after the leading edge of the page has reached the paper takeup sensor (PC1) . ❏ The paper exit sensor (PC3) fails to go OFF within approximately 2.3 seconds after the leading edge of the page has reached the paper takeup sensor (PC1). ❏ The paper exit sensor (PC3) does not come ON within approximately 2.3 seconds after the ending edge has passed the paper takeup sensor (PC1). ❏ The paper exit sensor (PC3) does not come ON while power is on or when or the upper and duplex unit covers are closed. ❏ The duplex paper sensor (PC4) does not go OFF within approximately 2.7 seconds after the switch-back motor for the duplex unit has gone ON. ❏ The registration sensor (PCR1) fails to go OFF within approximately 1.1 seconds after the leading edge of the page has reached the duplex paper sensor (PC4). ❏ During duplex printing, the paper takeup sensor (PC1) does not go OFF within approximately 1.0 seconds after the leading edge of the page has reached the registration sensor (PCR1). ❏ The duplex paper sensor (PC4) does not come ON while power is on or when the upper and duplex unit covers are closed. ❏ The registration sensor (PCR1) does not come ON while power is on or when the upper and duplex unit covers are closed. ❏ The registration sensor (PCR1) fails to come ON when the upper unit cover is closed. ❏ The registration sensor (PCR1) fails to come ON when the duplex unit cover is closed. 2-14 Rev.A EPL-N2000 Service Manual Operating Principles 2.2.2 Video Control Operation 2.2.2.1 C207 MAIN Board Operation The video controller receives print data and converts it into corresponding image signal before transmitting them to the engine controller. Figure 2-14 shows a block diagram of C207 MAIN board. The C207 MAIN board contains a wide variety of ICs such as the CPU, memory, ASIC , and driver. External Device PCMCIA Card C207 PROG BOARD CN14 LL FONT (Option) CPU (IC1) MB86936 CN7 PIC (IC21) E05B29 ROM (IC21) FONT ROM-SIMM MASK-ROM (IC15,16) CN12 CN11 ROM A2-27 AB D0-31 DB Control Control SLAM (IC39) GG46833 D-RAM RAM-SIMM CN 9,10 IC5,6,9,10, 11,12 D0-31 A2-27 MA0-10 MAB RAM DB Control CLK Control RESET EEPROM 16KB (IC38) AB0-7 AB DB0-7 DB IOC2 (IC29) IOC2 (IC28) CN4 CN5 Type-B I/F CN3 CN2 I/F CN6 LocalTalk/ Serial Module Parallel C I/F Parallel B I/F AB DB Control RIT4 Plus (IC37) E05B28 Video Signal CN15 CN1 Panel Unit Video Video and Panel Figure 2-14. C207 MAIN Board Flow Chart Rev.A 2-15 Operating Principles EPL-N2000 Service Manual Table 2-1 lists the main components of the C207 MAIN board and their functions. Table 2-1. Functions of Main Board Components Component Location Function MB86936 RISC CPU IC1 The CPU, which operates at 47.6 MHz manages the video controller operation. SLAM GG46833 IC39 This LSI contains the following functions: ■ DRAM management ( refresh control, RAS/CAS control ) ■ Wait controller ■ Interrupt controller RIT4 Plus E05B28 ASIC IC37 This ASIC is a video controller for BiRIT and EMGT. IOC2 E05B27 ASIC IC28, IC29 This ASIC contains the following functions: ■ IC28: Parallel B interface ■ IC29: Parallel C interface Two 8 M-bit FONT ROMs IC15, IC16 These ROMs are font ROMs. Option 8M-Bit ROM IC21 This ROM is local language ROM (font) option. EEPROM IC38 This 16K-bit EEPROM stores the followings: ■ Mode type ■ Printer page counter value ■ Toner life counter value ■ SelecType setting DRAM IC9 - 12 *1 2 IC5, IC 6 * These DRAMs are used as the working area of the elements such as the CPU, input buffer, and image buffer. PIC E05B29 ASIC IC20 This ASIC contains following functions: ■ PCMCIA controller ■ LocalLanguage controller C207 PROG Board - 4M-bit Flash ROMs are mounted on the C207 PROG board to store the control programs. *1: IC9, 10, 11 ,12 are used in Europe. *2: IC5 and IC 6 are used in the United States. 2-16 Rev.A EPL-N2000 Service Manual Operating Principles 2.2.2.2 Video Controller Operation Principles Print data and commands transmitted from the host computer through the network, parallel, or optional I/F are read and then stored in the input buffer in DRAM. If the buffer size (which varies depending on the SelecType setting) is increased, the host computer is released sooner. Data and commands are then stored in the video RAM (the image buffer) memory area after being processed in the video controller CPU, where the data is converted into print bitmap data (image data). The size of the video RAM depends on the current size of the RAM memory and the SelecType setting. An error or warning for memory size occurs under the following conditions, and such problems usually can be solved by changing buffer size or increasing RAM memory: ❏ Bitmap data from the CPU is too complicated for the size of video RAM. ❏ When data is complicated, the CPU cannot process it faster than it is transmitted to the engine controller board. Image data stored in video RAM is transmitted to the ASIC, where the BiRITech and PGI functions manipulate the data. The data is then passed on to the engine controller as video data. The engine controller processes the video data transmitted from the video controller. Engine mechanisms driven by the PWB-A board then perform printing. When an error occurs, the CPU in the engine controller detects it and sends status information to the video controller, where the information is processed, and the corresponding error message and the code are displayed on the Control panel. Rev.A 2-17 CHAPTER 3 DISASSEMBLY AND ASSEMBLY Table of Contents 3.1 General Description 3.1.1 Precautions for Disassembly /Assembly . . . . . . . . . . . . . . . . . . . . . . . . . . 3.1.2 Tools . . . . . . . . . . . . . . . . . . . . . . . . . . . . . . . . . . . . . . . . . . . . . . . . . . . . . 3.1.3 Specifications for Screws . . . . . . . . . . . . . . . . . . . . . . . . . . . . . . . . . . . . . 3.1.4 Service Checks after Repair . . . . . . . . . . . . . . . . . . . . . . . . . . . . . . . . . . . 3.1.5 Servicing Operations . . . . . . . . . . . . . . . . . . . . . . . . . . . . . . . . . . . . . . . . . 3-1 3-1 3-2 3-3 3-4 3.2 DISASSEMBLY AND ASSEMBLY 3-6 3.2.1 Outer Covers Removal . . . . . . . . . . . . . . . . . . . . . . . . . . . . . . . . . . . . . . . 3-6 3.2.1.1 Opening the Top Cover . . . . . . . . . . . . . . . . . . . . . . . . . . . . . . . . 3-6 3.2.1.2 Left Cover Removal . . . . . . . . . . . . . . . . . . . . . . . . . . . . . . . . . . . 3-6 3.2.1.3 Right Cover Removal . . . . . . . . . . . . . . . . . . . . . . . . . . . . . . . . . . 3-6 3.2.1.4 Top Cover Removal . . . . . . . . . . . . . . . . . . . . . . . . . . . . . . . . . . . 3-6 3.2.1.5 LCD Panel Removal . . . . . . . . . . . . . . . . . . . . . . . . . . . . . . . . . . . 3-7 3.2.1.6 Right Front Cover Removal . . . . . . . . . . . . . . . . . . . . . . . . . . . . . 3-7 3.2.1.7 Front Cover Removal . . . . . . . . . . . . . . . . . . . . . . . . . . . . . . . . . . 3-7 3.2.1.8 Rear Cover Removal . . . . . . . . . . . . . . . . . . . . . . . . . . . . . . . . . . 3-7 3.2.2 Fusing Unit Removal . . . . . . . . . . . . . . . . . . . . . . . . . . . . . . . . . . . . . . . . . 3-9 3.2.3 PWB-E Board (Power Supply Board) Removal . . . . . . . . . . . . . . . . . . . 3-11 3.2.4 MAIN Controller Board Removal . . . . . . . . . . . . . . . . . . . . . . . . . . . . . . . 3-12 3.2.4.1 Shield Frame Removal . . . . . . . . . . . . . . . . . . . . . . . . . . . . . . . . 3-12 3.2.4.2 C207 MAIN Board Removal . . . . . . . . . . . . . . . . . . . . . . . . . . . 3-12 3.2.5 Rear Panel Removal . . . . . . . . . . . . . . . . . . . . . . . . . . . . . . . . . . . . . . . . 3-13 3.2.6 Transfer Unit Removal . . . . . . . . . . . . . . . . . . . . . . . . . . . . . . . . . . . . . . 3-14 3.2.7 High Voltage Supply Board (PWB-F Board) Unit Removal. . . . . . . . . . . 3-15 3.2.8 Printhead Unit Removal . . . . . . . . . . . . . . . . . . . . . . . . . . . . . . . . . . . . . 3-16 3.2.8.1 Harness Cover Removal. . . . . . . . . . . . . . . . . . . . . . . . . . . . . . . 3-16 3.2.8.2 Printhead Unit Removal . . . . . . . . . . . . . . . . . . . . . . . . . . . . . . . 3-17 3.2.9 Paper Empty Sensor Assembly Removal . . . . . . . . . . . . . . . . . . . . . . . 3-18 3.2.10 Paper Takeup Roller Assembly Removal . . . . . . . . . . . . . . . . . . . . . . . 3-20 3.2.11 Paper Takeup Roller Unit Removal . . . . . . . . . . . . . . . . . . . . . . . . . . . . 3-21 3.2.12 Registration Roller Assembly . . . . . . . . . . . . . . . . . . . . . . . . . . . . . . . . 3-23 3.2.13 PWB-A Board Unit Removal . . . . . . . . . . . . . . . . . . . . . . . . . . . . . . . . . 3-24 3.2.14 Drive Unit Removal. . . . . . . . . . . . . . . . . . . . . . . . . . . . . . . . . . . . . . . . . 3-25 3.2.15 Heater Lamp Removal . . . . . . . . . . . . . . . . . . . . . . . . . . . . . . . . . . . . . . 3-27 3.2.15.1 Left Fusing Lamp Cover Removal . . . . . . . . . . . . . . . . . . . . . . 3-27 3.2.15.2 Right Fusing Lamp Cover Removal. . . . . . . . . . . . . . . . . . . . . 3-27 3.2.15.3 Heater Lamp Removal . . . . . . . . . . . . . . . . . . . . . . . . . . . . . . . 3-28 3.2.16 Paper Exit Sensor Removal . . . . . . . . . . . . . . . . . . . . . . . . . . . . . . . . . . 3-30 3.2.17 Lower Fusing Roller Removal . . . . . . . . . . . . . . . . . . . . . . . . . . . . . . . . 3-31 3.2.18 Separator Removal . . . . . . . . . . . . . . . . . . . . . . . . . . . . . . . . . . . . . . . . 3-32 3.2.19 Thermistor Removal . . . . . . . . . . . . . . . . . . . . . . . . . . . . . . . . . . . . . . . . 3-33 3.2.20 Thermostat Removal . . . . . . . . . . . . . . . . . . . . . . . . . . . . . . . . . . . . . . . 3-34 3.2.21 Upper Fusing Roller Removal . . . . . . . . . . . . . . . . . . . . . . . . . . . . . . . . 3-35 3.2.22 Main Motor Removal . . . . . . . . . . . . . . . . . . . . . . . . . . . . . . . . . . . . . . . 3-36 3.2.23 Interlock Switch Removal . . . . . . . . . . . . . . . . . . . . . . . . . . . . . . . . . . . . 3-37 3.2.24 Paper Takeup Solenoid Removal. . . . . . . . . . . . . . . . . . . . . . . . . . . . . . 3-38 List of Tables Table 3-1. Table 3-2. Table 3-3. Table 3-4. Tools. . . . . . . . . . . . . . . . . . . . . . . . . . . . . . . . . . . . . . . . . . . . . . . . . Screw Abbreviations . . . . . . . . . . . . . . . . . . . . . . . . . . . . . . . . . . . . Screw and Washer Types . . . . . . . . . . . . . . . . . . . . . . . . . . . . . . . . Checks after Repair . . . . . . . . . . . . . . . . . . . . . . . . . . . . . . . . . . . . . 3-1 3-2 3-2 3-3 List of Figures Figure 3-1. Rear Cover Hook Locations . . . . . . . . . . . . . . . . . . . . . . . . . . . . . . 3-7 Figure 3-2. Outer Cover Removal . . . . . . . . . . . . . . . . . . . . . . . . . . . . . . . . . . . 3-8 Figure 3-3. Fusing Unit Location . . . . . . . . . . . . . . . . . . . . . . . . . . . . . . . . . . . . 3-9 Figure 3-4. Fusing Unit Removal (1) . . . . . . . . . . . . . . . . . . . . . . . . . . . . . . . . . 3-9 Figure 3-5. Fusing Unit Removal (2) . . . . . . . . . . . . . . . . . . . . . . . . . . . . . . . . 3-10 Figure 3-6. Unit Location (1) . . . . . . . . . . . . . . . . . . . . . . . . . . . . . . . . . . . . . . 3-11 Figure 3-7. PWB-E Board (Power Supply Board) Removal . . . . . . . . . . . . . . 3-11 Figure 3-8. Shield Frame Removal . . . . . . . . . . . . . . . . . . . . . . . . . . . . . . . . 3-12 Figure 3-9. C207 MAIN Board Removal . . . . . . . . . . . . . . . . . . . . . . . . . . . . . 3-12 Figure 3-10. Rear Panel Removal. . . . . . . . . . . . . . . . . . . . . . . . . . . . . . . . . . . 3-13 Figure 3-11. Transfer Unit Removal . . . . . . . . . . . . . . . . . . . . . . . . . . . . . . . . . 3-14 Figure 3-12. High Voltage Supply Board Unit Removal . . . . . . . . . . . . . . . . . . 3-15 Figure 3-13. Printhead Unit Location. . . . . . . . . . . . . . . . . . . . . . . . . . . . . . . . . 3-16 Figure 3-14. Harness Cover Removal. . . . . . . . . . . . . . . . . . . . . . . . . . . . . . . . 3-16 Figure 3-15. Printhead Unit Removal . . . . . . . . . . . . . . . . . . . . . . . . . . . . . . . . 3-17 Figure 3-16. Unit Location (2) . . . . . . . . . . . . . . . . . . . . . . . . . . . . . . . . . . . . . . 3-18 Figure 3-17. Paper Empty Sensor Assembly Removal. . . . . . . . . . . . . . . . . . . 3-18 Figure 3-18. Transport Guide Removal. . . . . . . . . . . . . . . . . . . . . . . . . . . . . . . 3-20 Figure 3-19. Paper Takeup Roller Assembly Removal . . . . . . . . . . . . . . . . . . . 3-20 Figure 3-20. Paper Lifting Plate Removal . . . . . . . . . . . . . . . . . . . . . . . . . . . . . 3-21 Figure 3-21. Paper Takeup Roller Removal . . . . . . . . . . . . . . . . . . . . . . . . . . . 3-22 Figure 3-22. Registration Roller Assembly Removal . . . . . . . . . . . . . . . . . . . . 3-23 Figure 3-23. PWB-A Board Unit Removal . . . . . . . . . . . . . . . . . . . . . . . . . . . . . 3-24 Figure 3-24. Drive Unit Location . . . . . . . . . . . . . . . . . . . . . . . . . . . . . . . . . . . . 3-25 Figure 3-25. Drive Unit Removal . . . . . . . . . . . . . . . . . . . . . . . . . . . . . . . . . . . . 3-25 Figure 3-26. Drive Unit Gear Engagement . . . . . . . . . . . . . . . . . . . . . . . . . . . . 3-26 Figure 3-27. Left Fusing Lamp Cover Removal . . . . . . . . . . . . . . . . . . . . . . . . 3-27 Figure 3-28. Right Fusing Lamp Cover Removal. . . . . . . . . . . . . . . . . . . . . . . 3-27 Figure 3-29. Unit Location (3) . . . . . . . . . . . . . . . . . . . . . . . . . . . . . . . . . . . . . . 3-28 Figure 3-30. Heater Lamp Removal . . . . . . . . . . . . . . . . . . . . . . . . . . . . . . . . . 3-28 Figure 3-31. Paper Exit Sensor Removal . . . . . . . . . . . . . . . . . . . . . . . . . . . . . 3-30 Figure 3-32. Lower Fusing Roller Removal. . . . . . . . . . . . . . . . . . . . . . . . . . . . 3-31 Figure 3-33. Separator Removal . . . . . . . . . . . . . . . . . . . . . . . . . . . . . . . . . . . . 3-32 Figure 3-34. Thermistor Removal . . . . . . . . . . . . . . . . . . . . . . . . . . . . . . . . . . . 3-33 Figure 3-35. Thermostat Removal. . . . . . . . . . . . . . . . . . . . . . . . . . . . . . . . . . . 3-34 Figure 3-36. Upper Fusing Roller Removal. . . . . . . . . . . . . . . . . . . . . . . . . . . . 3-35 Figure 3-37. Main Motor Removal (1) . . . . . . . . . . . . . . . . . . . . . . . . . . . . . . . . 3-36 Figure 3-38. Main Motor Removal (2) . . . . . . . . . . . . . . . . . . . . . . . . . . . . . . . . 3-36 Figure 3-39. Interlock Switch Removal (1) . . . . . . . . . . . . . . . . . . . . . . . . . . . . 3-37 Figure 3-40. Interlock Switch Removal (2) . . . . . . . . . . . . . . . . . . . . . . . . . . . . 3-37 Figure 3-41. Paper Takeup Solenoid Removal (1) . . . . . . . . . . . . . . . . . . . . . . 3-38 Figure 3-42. Paper Takeup Solenoid Removal (2) . . . . . . . . . . . . . . . . . . . . . . 3-38 EPL-N2000 Service Manual Disassembly and Assembly 3.1 GENERAL INFORMATION This chapter describes the disassembly/assembly procedures to be used for replacing the main assemblies of the EPL-N2000. 3.1.1 Precautions for Disassembly/Assembly Follow the precautions below when disassembling/assembling the printer. WARNING ❏ Disconnect the power cord before disassembling/assembling the printer. ❏ Be sure to handle the fusing unit carefully, because the unit remains hot for a while after the printer stops printing. ❏ If it is necessary to plug in the power cord and operate the printer after disassembling it, take the following precautions: 1.Keep your hands and clothing well away from operating or rotating parts (such as rollers, fan motors, etc.) 2.Never touch electric terminals or high-voltage components (such as the charger and the high voltage unit). ❏ Be sure to close the top cover when operating the printer. This printer uses an invisible laser beam which could cause damage or loss of eyesight. Therefore never energize the interlock switch to connect current with the top cover open. CAUTION ❏ Handle frame edges with care since this printer has a considerable amount of metal materials. ❏ Do not disassemble the Imaging cartridge. ❏ If the Imaging cartridge is removed from the printer, do not place it in direct sunlight. ❏ Do not disassemble the printhead assembly. ❏ To prevent damage to ICs from static electricity, do not touch the ICs on the circuit board or the terminals of peripheral electrical components with your hands. ❏ Use only the recommended tools to ensure safe and efficient maintenance work. Inappropriate tools may damage the machine. ❏ Never open the top cover until the main motor stops completely. ❏ When transporting the printer, remove the Imaging cartridge. ❏ When transporting the printer a long distance, pack it using the original packing material. 3.1.2 Tools Use the tools listed in Table 3-1 for disassembling/assembling the printer. Table 3-1. Tools Name Rev. A Part No. Philips screwdriver No. 2 B743800200 Regular screwdriver B743000100 Tweezers B641000100 Soldering iron B740200100 Round-nose pliers B740400100 3-1 Disassembly and Assembly EPL-N2000 Service Manual 3.1.3 Specifications for Screws In the following sections, abbreviations are used for small parts such as screws and washers. Table 3-2 lists these abbreviations. Table 3-3 lists screw and washer types. CAUTION Be sure to use the correct type of screw since many different types of screws are used in this printer. Table 3-2. Screw Abbreviations Abbreviation Part Name CCS Cross-recessed Cup head S-tight CCB Cross-recessed Cup head B-tight CB(S-P1) Cross-recessed Bind head with Spring lock washer and 1 Plain washer CBS Cross-recessed Bind head S-tight CPS Cross-resseded Pan head S-tight Table 3-3. Screw and Washer Types Screw type Appearance CCS CCB CB(S-P1) CBS CPS 3-2 Rev. A EPL-N2000 Service Manual Disassembly and Assembly 3.1.4 Service Checks after Repair Check the repaired unit using the list in Table 3-4 before returning the printer to the user to ensure that repair and shipping are accomplished appropriately. Table 3-4. Checks after Repair Item Operation ROM version Location Control panel Do all LEDs, LCD, and buttons function normally? Heater lamp Does the heater lamp turn on normally? Status sheet Is the status sheet printed normally? Data print Does data print in all modes? --- Is it the latest version? --- Are toner and dust removed from the paper path? Is the lens on the optical unit clean? Is the paper takeup roller clean? Are the fusing rollers clean? Is the outer surface of the printer clean? --- Is the Imaging cartridge removed from the printer? Is the unit packed securely? Are accessories packed also? Cleaning Packing Rev. A Checkpoint Check 3-3 Disassembly and Assembly EPL-N2000 Service Manual 3.1.5 Servicing Operations This section describes the special service modes and combinations of switches used to enter each mode. The modes listed in this section are only to be operated by qualified service people for repair. Therefore the specifications for these modes were eliminated from the user’s guide. ❏ EEPROM Initialization The EEPROM, mounted on the controller board, is used to save settings selected through the SelecType mode and the printer status information such as the page counter. This function resets all user settings and printer status information to the factory default settings. ■ Switches to use: Turn on the printer while holding down the On Line, Continue, and Menu switches. CAUTION Use of this function must be limited to the the conditions listed below, since it also clears page counter information. ❏ EEPROM is replaced. ❏ The C207 MAIN Board, along with EEPROM, is replaced. ❏ When refurbishing the EEPROM. ❏ Page Counter Clearance The page counter information, which can be checked through the SelecType, is stored on the EEPROM. The page counter clear function resets the page counter to "0". ■ Switches to use: Turn on the printer while holding down the On Line, Item, and Menu switches. ❏ Flash IC Card Clear When the optional flash IC card is used, the saved information in the card is erased with this mode. It’s only available when the card is inserted in card slot A. ■ Switches to use: Turn on the printer while holding down the SelecType, Item, Value, and Enter switches. "Formatting Card" appears, which is indicated on the LCD. "Write Error Card" is indicated in place of "Formatting Card" under the following conditions. The IC card inserted is not acceptable. The card is write protected. ❏ Flash ROM Update This function is used to update a Flash ROM. ■ Switches to use: 1. Turn On the printer while holding down the On Line, Menu, Item, and Value switches. 2. Press the Item, Value, and Enter switches while "Program Device" is indicated. The parallel interface (B connector) starts sending data when "Please Send Data" is indicated. 3-4 Rev. A EPL-N2000 Service Manual Disassembly and Assembly Use the 2 other modes listed below when you need information to analyzing the cause of a persistent error related to a firmware malfunction. ❏ Resetting of the CPU after a service call error has occurred. When a "Exxx" or "C2000" error has occurred, it can be cleared using this function without turning the printer Off and back On. ■ Switches to use: Press the SelecType, Menu, Item, Value, and Enter switches. This combination is effective only when the printer is in an error status. ❏ Indication of service call error details When a "Exxx" or "C2000" error has occurred, detailed information on the error can be indicated by using this function. ■ Switches to use: Press the Continue, SelecType, and Menu switches at one time. The LCD panel displays detailed information on the error. If any of the switches is then pressed, error type is displayed. Rev. A 3-5 Disassembly and Assembly EPL-N2000 Service Manual 3.2 DISASSEMBLY AND ASSEMBLY This section describes and illustrates the procedures for disassembling and assembling the components of the EPL-N2000. The assembly procedures are not described, except for special notes where necessary, because assembly can be accomplished by performing disassembly in reverse order. 3.2.1 Outer Covers Removal This section describes how to remove the left cover, right cover, front cover, top cover, rear cover, right front cover, right rear cover and the control panel. See the figure below which shows the location of the covers and screws. 3.2.1.1 Opening the Top Cover 1. Push the blue release lever and open the top cover. CAUTION Never touch the following parts when opening the top cover. ❏Fusing unit: It remains hot for a while after the printer stops printing. ❏Transfer Roller: Contact with the roller causes printing deterioration . ❏Dust tight t glass: Contact with the dust tight glass causes printing deterioration . Dust Tight Glass Fusing Unit Transfer Roller 3.2.1.2 Left Cover Removal 1. Loosen 2 CCS screws (3 X 8) from the top and rear parts of the left cover . 2. Remove the left cover. 3.2.1.3 Right Cover Removal 1. Loosen 3 CCS screws (3 X 8) from the upper part of the right cover. 2. Remove the right cover. 3.2.1.4 Top Cover Removal 1. Remove a screw from the cover. 2. Remove a shoulder screw from the top cover. 3. Remove a CCB screw (3 X 8) from the top cover. 4. Remove the top cover. 3-6 Rev. A EPL-N2000 Service Manual Disassembly and Assembly 3.2.1.5 Control Panel Removal 1. Remove the FFC from the C207 MAIN Board. 2. Remove 2 CCS screws (3 X 8) from the right and upper side of the panel. 3. Remove the Control Panel. 3.2.1.6 Right Front Cover Removal 1. Loosen 1 CCS screw (3 X 8) from the upper part of the right front cover. 2. Remove the Right Front Cover. 3.2.1.7 Front Cover Removal 1. Loosen 2 CCS screws (3 X 6) from the upper part of the front cover. 2. Remove 2 CCS screws (3 X 8) from the front side of the front cover. 3. Remove 2 CCS screws (3 X 6) from the inside of the front paper tray. 4. Pull out the Front Cover and remove. 3.2.1.8 Rear Cover Removal 1. Remove 2 CCS screws (3 X 8) from the upper part of the rear cover. 2. Release 6 hooks securing the rear cover. (Refer to Figure 3-2.) 3. Remove the rear cover. Disassembly Note Release the 6 hooks with care so as they won’t break. Hooks Figure 3-1. Rear Cover Hook Locations Rev. A 3-7 Disassembly and Assembly EPL-N2000 Service Manual CCS Screw (3X8) Top Cover A CCS Screw (3X8) Control Panel Shoulder Screw CCB Screw (3X8) Right Cover CCS Screw (3X8) CCS Screw (3X8) Cover CCS Screw (3X8) A CCS Screw (3X6) CCS Screw Right Front Cover Rear Cover CCS Screw (3X8) CCS Screw (3X6) Front Cover Left Cover CCS Screw (3X8) Front Side Figure 3-2. Outer Cover Removal 3-8 Rev. A EPL-N2000 Service Manual Disassembly and Assembly 3.2.2 Fusing Unit Removal 1. Remove 2 CCS screws ( 3 X 8 ) securing the fusing unit through the rear cover and rear panel. 2. Disconnect the connectors from the fusing unit. ( 2 from the right , 1 from the left ) 3. Remove 2 CCS screws (3 X 8) Securing the fusing unit. 4. Remove the fusing unit. Fusing Unit Front side Rear side Figure 3-3. Fusing Unit Location Fusing Unit Rear Panel Rear Cover CCS Screws (3 X 8) Rear Side Figure 3-4. Fusing Unit Removal (1) Rev. A 3-9 Disassembly and Assembly EPL-N2000 Service Manual CCS Screws (3 X 8) Front Side Fusing Unit (viewed from the top) Connectors Refer to the assembly note below. Rear Side Connector Figure 3-5. Fusing Unit Removal (2) Assembling Note When reassembling the fusing unit, adjust the notch of the fusing unit with the shaft of the gear. 3-10 Rev. A EPL-N2000 Service Manual Disassembly and Assembly 3.2.3 PWB-E Board (Power Supply Board) Removal 1. Remove the outer covers. (Refer to Section 3.2.1.) 2. Disconnect 5 connectors ( NC 1 to CN5) on the electrical board. 3. Remove 6 CCS screws (3X 6) from the PWB-E Board. 4. Remove the PWB-E Board. PWB-E Board C207 MAIN Board PWB-A Board Front side High Voltage Supply Board Figure 3-6. Unit Location (1) PWB-E Board CCS Screws (3X8) Front Side Figure 3-7. PWB-E Board Removal Rev. A 3-11 Disassembly and Assembly EPL-N2000 Service Manual 3.2.4 Main Controller Board Removal Refer to Figure 3-6. 3.2.4.1 Shield Frame Removal 1. Remove the outer covers. (Refer to Section 3.2.1.) 2. Remove 15 CBS screws (3X6) securing the shield frame. 3. Remove the shield frame. Shield Frame CBS Screw (3X6) CBS Screw (3X6) CBS Screw (3X6) Right Side Front Side Figure 3-8. Shield Frame Removal 3.2.4.2 C207 MAIN Board Removal 1. Remove the outer covers. (Refer to Section 3.2.1.) 2. Remove the shield frame. (Refer to Section 3.2.4.1.) 3. Remove 4 CCS screws (3X6) securing the connector panel of the C207 MAIN Board. 4. Remove 6 CBS screws (3X8) securing the MAIN Board. 5. Remove the C207 MAIN Board. C207 MAIN Board Connector Panel CCS Screw (3X6) CB(S)(P1) Screw Front Side Right Side Figure 3-9. C207 MAIN Board Removal 3-12 Rev. A EPL-N2000 Service Manual Disassembly and Assembly 3.2.5 Rear Panel Removal 1. Remove the outer covers. (Refer to Section 3.2.1.) 2. Remove the C207 MAIN Board. (Refer to Section 3.2.4 .) 3. Remove the 6 CCS screws (3X6) securing the rear panel. 4. Lift up the Rear Panel to release 2 hooks, then remove the panel. Be sure to disconnect the fan connector from the High Voltage Supply (PWB-F) Board Unit. Rear Panel CCS Screw (3X6) PWB-E Board CN2 CCS Screw (3X6) Fan Connector Rear Side 3-10. Rear Panel Removal Rev. A 3-13 Disassembly and Assembly EPL-N2000 Service Manual 3.2.6 Transfer Unit Removal 1. Remove the outer covers. (Refer to Section 3.2.1.) 2. Remove the Fusing unit. (Refer to Section 3.2.2.) 3. Remove the C207 MAIN Board. (Refer to Section 3.2.4.) 4. Remove the rear panel. (Refer to Section 3.2.5.) 5. Remove 1 CCB screw (3X8) securing the transfer unit. 6. Remove the Transfer Unit by pushing aside the left frame in the direction indicated by the arrow. Transfer Unit Left Frame CCB Screw (3X8) Refer to the figure below. Rear Side Figure 3-11. Transfer Unit Removal CAUTION Don’t touch the surface of the Transfer Roller with your bare hands. Assembly Note When assembling the transfer Unit, ensure that the pins on the Transfer Unit fit into the holes in the Drive Unit. 3-14 Rev. A EPL-N2000 Service Manual Disassembly and Assembly 3.2.7 High Voltage Supply (PWB-F) Board Unit Removal Refer to Figure 3-6. 1. Remove the outer covers. (Refer to Section 3.2.1.) 2. Remove the Fusing Unit. (Refer to Section 3.2.2 .) 3. Remove the C207 MAIN Board. (Refer to Section 3.2.4.) 4. Remove the Rear Panel. (Refer to Section 3.2.5.) 5. Remove the Transfer Unit. (Refer to Section 3.2.6.) 6. Disconnect the CN1 of the High Voltage Supply Board Unit. 7. Remove the CCS screw (3X8) securing the High Voltage Supply Board Unit. 8. Remove the High Voltage Supply Board Unit. Connector CN1 HVPS Board CCS Screw (3X8) Refer to the figure below.. Rear Side Figure 3-12. High Voltage Supply Board Unit Removal CAUTION Never change the variable resistor volume (VR 1 to 6) on the High Voltage Supply Board. Assembly Note When assembling the High Voltage Supply Board, ensure that the pins on the High Voltage Supply Board fit into the holes in the Drive Unit. Drive Unit Right Side Rear Side Rev. A 3-15 Disassembly and Assembly EPL-N2000 Service Manual 3.2.8 Printhead Unit Removal Front Side Printhead Unit Figure 3-13. Printhead Unit Location 3.2.8.1 Harness Cover Removal 1. Remove the outer covers. (Refer to Section 3.2.1.) 2. Remove 2 CCS screws (3X8) securing the harness cover. CCS Screw (3X8) Harness Cover Printhead Unit Figure 3-14. Harness Cover Removal 3-16 Rev. A EPL-N2000 Service Manual Disassembly and Assembly 3.2.8.2 Printhead Unit Removal 1. Remove the outer covers. (Refer to Section 3.2.1.) 2. Remove the harness cover. (Refer to Section3.2.8.1.) 3. Disconnect the connector (CN2) on the PWB-A Board. 4. Remove 2 CB(S-P1) screws (3X20) and a CCS screw (3X12) securing the Printhead. 5. Remove the Printhead. Connector CN2 Print heat Unit CCS Screw (3X12) CB(S-P1) Screw Figure 3-15. Printhead Unit Removal Rev. A 3-17 Disassembly and Assembly EPL-N2000 Service Manual 3.2.9 Paper Empty Sensor Assembly Removal 1. Remove the outer covers. (Refer to Section 3.2.1.) 2. Remove the harness cover. (Refer to Section 3.2.8.1.) 3. Disconnect the connectors (CN3, CN6, CN9) on the PWB-A Board. 4. Remove 3 CCS screws (3X6) securing the Paper Empty Sensor Assembly. 5. Remove the Paper Empty Sensor Assembly. Detection Lever Paper Empty Sensor Assembly Paper Takeup Roller Unit Front Side Figure 3-16. Unit Location (2) Connector cables to CN3, 6, 9 /PWB-A CCS Screw (3X6) Right Side CCS Screw (3X6) Rear Side Detection Lever Paper Empty Sensor Assembly Refer to the caution next page. Figure 3-17. Paper Empty Sensor Assembly Removal 3-18 Rev. A EPL-N2000 Service Manual Disassembly and Assembly CAUTION Be careful handling the Paper Empty Sensor Assembly so the detection lever doesn’t break. Detection Lever Rear Side Rev. A 3-19 Disassembly and Assembly EPL-N2000 Service Manual 3.2.10 Paper Takeup Roller Assembly Removal Refer to Figure 3-16. 1. Open the top cover. 2. Remove the Fusing Unit. 3. Release the hooks on both edges of the the Transport guide, then remove the Transport guide. 4. Remove 1 CB(S-P1) screw (3X8) securing the Paper Takeup Roller Assembly. 5. Remove the Paper Takeup Roller Assembly. Transport Guide Front Side Push Hook Figure 3-18. Transport Guide Removal Paper Takeup Roller Assembly CB(S)(P1) Screw (3X8) Rear Side Figure 3-19. Paper Takeup Roller Assembly Removal 3-20 Rev. A EPL-N2000 Service Manual Disassembly and Assembly 3.2.11 Paper Takeup Roller Unit Removal 1. Remove the outer covers. (Refer to Section 3.2.1.) 2. Remove the Fusing Unit. (Refer to Section 3.2.2 .) 3. Remove the Transfer Unit. (Refer to Section 3.2.6.) 4. Remove the High Voltage Supply Board.(Refer to Section 3.2.7.) 5. Remove the Paper Empty Sensor Assembly (Refer to Section 3.2.9.) 6. Remove 1 CCB screw (3X8) securing the Paper Lifting Plate. 7. Remove 1 CCS screw (3X8) securing the Paper Takeup Roller Unit 8. Remove the Paper Lifting Plate. 9. Remove the Paper Takeup Roller Unit. Paper Lifting Plate CCB Screw (3X8) Figure 3-20. Paper Lifting Plate Removal CAUTION There is a spring under the paper lifting plate. Make sure that the spring won’t catch the connector when taking out the paper lifting plate. Paper Lifting Plate Spring Rev. A 3-21 Disassembly and Assembly EPL-N2000 Service Manual Paper Takeup Roller Unit CCS Screw (3x8) Front Side Refer to the figure below. Figure 3-21. Paper Takeup Roller Removal Assembly Note When reinstalling the Paper Takeup Roller Unit, fit the pins on the Paper Takeup Roller into the corresponding holes in the Drive Unit. Paper Takeup Roller (Right Edge) Front Side CAUTION When installing or reinstalling the Paper Takeup Roller Unit, make sure that it won’t interfere with the contact points of the Imaging cartridge. 3-22 Rev. A EPL-N2000 Service Manual Disassembly and Assembly 3.2.12 Registration Roller Assembly 1. Remove the outer covers. (Refer to Section 3.2.1.) 2. Remove the Fusing Unit. (Refer to Section 3.2.2 .) 3. Remove the Transfer Unit. (Refer to Section 3.2.6.) 4. Remove the High Voltage Supply Board. (Refer to Section 3.2.7.) 5. Remove the Paper Empty Sensor Assembly. (Refer to Section 3.2.9.) 6. Remove the Paper Takeup Roller Unit. (Refer to Section 3.2.11.) 7. Remove 2 CCS screws (3X8) securing Registration Roller Assembly. 8. Remove the Registration Roller Assembly. Registration Roller Assembly Front Side Drive Unit CCS Screw (3x8) Refer to the figure below. Figure 3-22. Registration Roller Assembly Removal Assembly Note When reinstalling the Registration Roller Assembly , fit the pins on the Registration Roller Assembly into the corresponding holes in the Drive Unit. Drive Unit Registration Roller Assembly (Right Edge) Front Side Rev. A 3-23 Disassembly and Assembly EPL-N2000 Service Manual 3.2.13 PWB-A Board Unit Removal Refer to Figure 3-6. 1. Remove the outer covers. (Refer to Section 3.2.1.) 2. Remove the Fusing Unit. (Refer to Section 3.2.2 .) 3. Remove the C207 MAIN Board. (Refer to Section 3.2.4.) 4. Remove 2 CCS screws (3X6) securing the PWB-A Board Unit. 5. Remove the PWB-A Board Unit. PWB-A Board Drive Unit Front Side Right Side CCS Screw (3X6) CCS Screw (3X6) Figure 3-23. PWB-A Board Unit Removal Assembly Note When assembling the PWB-A Board Unit, be suer to adjust it to the slots in the Drive Unit. 3-24 Rev. A EPL-N2000 Service Manual Disassembly and Assembly 3.2.14 Drive Unit Removal 1. Remove the outer covers. (Refer to Section 3.2.1.) 2. Remove the Fusing Unit. (Refer to Section 3.2.2.) 3. Remove the C207 MAIN Board. (Refer to Section 3.2.4.) 4. Remove the Rear Panel. (Refer to Section 3.2.5.) 5. Remove the Transfer Unit. (Refer to Section 3.2.6.) 6. Remove the High Voltage Supply Board.(Refer to Section 3.2.7.) 7. Remove the Printhead Unit (Refer to Section 3.2.8.) 8. Remove the Paper Empty Sensor Assembly (Refer to Section 3.2.9.) 9. Remove the Paper Takeup Roller Unit. (Refer to Section 3.2.11.) 10. Remove the Registration Roller Assembly. (Refer to Section 3.2.12.) 11. Remove the PWB-A Board. (Refer to Section 3.2.13.) 12. Remove 5 CCS screws (3X6) securing the Drive Unit. 13. Remove the Drive Unit. Front Side Drive Unit Figure 3-24. Drive Unit Location Drive Unit PWB-E Board CCS SCrw (3X6) Front Side Right Side Figure 3-25. Drive Unit Removal Rev. A 3-25 Disassembly and Assembly EPL-N2000 Service Manual Figure 3-26. Drive Unit Gear Engagement 3-26 Rev. A EPL-N2000 Service Manual Disassembly and Assembly 3.2.15 Heater Lamp Removal 3.2.15.1 Left Fusing Lamp Cover Removal 1. Remove the outer covers. (Refer to Section 3.2.1.) 2. Remove the Fusing Unit. (Refer to Section 3.2.2 .) 3. Remove 1 CCS screw (3X8) securing Left Fusing Lamp Cover. 4. Remove the Left Fusing Lamp Cover by turning it in clockwise direction. Fusing Unit (Viewed from the Left Edge) Left Fusing Lamp Cover Rea Side Left Side CCS Screw (3X8) Figure 3-27. Left Fusing Lamp Cover Removal 3.2.15.2 Right Fusing Lamp Cover Removal 1. Remove CCB screw (3X8) securing the Right Fusing Lamp Cover. 2. Slide the Right Fusing Lamp Cover to the right to release the fitting, then remove it. Fusing Unit (Viewed from the Right Edge) Right Fusing Lamp Cover Fitting Front Side Right Side CCB Screw (3X8) Figure 3-28. Right Fusing Lamp Cover Removal Rev. A 3-27 Disassembly and Assembly EPL-N2000 Service Manual 3.2.15.3 Heater Lamp Removal 1. Release the heater lamp as shown (A) in Figure 3-30. 2. Remove the Heater Lamp from the Fusing Unit. Fusing Roller Heater Lamp Actuator Thermistor Thermoatat Upper Fusing Roller Lower Fusin Roller Paper Exit Sensor Rear Side Figure 3-29. Unit Location (3) (A) Fusing Unit Heater Lamp (1) Push (2) Rear Side Figure 3-30. Heater Lamp Removal CAUTION ❏ Be careful not to break the tube lamp when handling it. ❏ Don’t touch the glass part of the tube lamp with your bare hands. 3-28 Rev. A EPL-N2000 Service Manual Disassembly and Assembly Assembly Note Note the direction in which the Heater Lamp is installed. Make sure that the lamp edge with the voltage mark on it is set to the right side of the Fusing Unit. Fusing Unit (Right edge) Voltage Mark XV Heater Lamp Rev. A 3-29 Disassembly and Assembly EPL-N2000 Service Manual 3.2.16 Paper Exit Sensor Removal Refer to Figure 3-29. 1. Remove the outer covers. (Refer to Section 3.2.1.) 2. Remove the Fusing Unit. (Refer to Section 3.2.2 .) 3. Disconnect the connector for the Paper Exit Sensor. 4. Remove the Paper Exit Sensor. 5. Remove the actuator spring. 6. Slide the actuator in the direction indicated by the arrow, then remove it. Actuator, Spring Fusing Unit Connector Rear Side Paper Exit Sensor Actuator Spring Slide Figure 3-31. Paper Exit Sensor Removal 3-30 Rev. A EPL-N2000 Service Manual Disassembly and Assembly 3.2.17 Lower Fusing Roller Removal Refer to Figure 3-29. 1. Remove the outer covers. (Refer to Section 3.2.1.) 2. Remove the Fusing Unit. (Refer to Section 3.2.2 .) 3. Remove 2 CCS screws (3X10) securing the rear fusing cover. 4. Push the lock stoppers indicated by the arrow. 5. Remove the rear fusing cover. 6. Remove the Lower Fusing Roller. Lower Fusing Roller Lock Stopper Bushing Lock Stopper Rear Fusing Cover CCS Screw (3X10) Bushing Rear Side CCS Screw (3X10) Figure 3-32. Lower Fusing Roller Removal CAUTION When removing and installing the rear fusing cover, be careful not to bend the contact spring. Rev. A 3-31 Disassembly and Assembly EPL-N2000 Service Manual 3.2.18 Separator Removal 1. Remove the outer covers. (Refer to Section 3.2.1.) 2. Remove the Fusing Unit. (Refer to Section 3.2.2 .) 3. Remove the Lower Fusing Roller. 4. Remove the springs that secure the separators to the hooks. 5. Slide the separating rolls, and remove them from the separators. 6. Remove the stoppers. 7. Slide and raise the separators to a right angle, and pull them upward to remove. Separator Upper Fusing Roller Hook Separating Roll Spring Stopper Separator Shorter Upper Fusing Roller Longer Figure 3-33. Separator Removal Assembly Note Note the direction in which the stoppers are placed. The 3 stoppers on the right face in the opposite direction to the 3 on the left. 3-32 Rev. A EPL-N2000 Service Manual Disassembly and Assembly 3.2.19 Thermistor Removal Refer to Figure 3-29. 1. Remove the outer covers. (Refer to Section 3.2.1.) 2. Remove the Fusing Unit. (Refer to Section 3.2.2 .) 3. Remove the Heater Lamp. (Refer to Section 3.2.15.) 4. Remove the Lower Fusing Roller. (Refer to Section 3.2.17.) 5. Remove 2 shoulder screws securing the front fusing cover. 6. Remove the front fusing cover. 7. Remove CPS screw (3X10) securing the thermistor. 8. Remove the thermistor. Shoulder Screw CPS Scrw (3X10) Shoulder Screw Front Fusing Cover Thermistor Rear Side Figure 3-34. Thermistor Removal Rev. A 3-33 Disassembly and Assembly EPL-N2000 Service Manual 3.2.20 Thermostat Removal Refer to Figure 3-29. 1. Remove the outer covers. (Refer to Section 3.2.1.) 2. Remove the Fusing Unit. (Refer to Section 3.2.2 .) 3. Remove the Heater Lamp. (Refer to Section 3.2.15.) 4. Remove the Lower Fusing Roller. (Refer to Section 3.2.17.) 5. Remove the front fusing cover. (Refer to Section 3.2.19.) 6. Remove 2 CB(S-P1) screws (3X6) securing the thermostat. 7 Remove the thermostat. Thermostat Front Fusing Cover CB(S)(P1) Screw (3X6) Rear Side Figure 3-35. Thermostat Removal 3-34 Rev. A EPL-N2000 Service Manual Disassembly and Assembly 3.2.21 Upper Fusing Roller Removal Refer to Figure 3-29. 1. Remove the outer covers. (Refer to Section 3.2.1.) 2. Remove the Fusing Unit. (Refer to Section 3.2.2 .) 3. Remove the Heater Lamp. (Refer to Section 3.2.15.) 4. Remove the Lower Fusing Roller. (Refer to Section 3.2.17.) 5. Remove the front fusing cover. (Refer to Section 3.2.19.) 6. Remove 2 G rings from the right and left edges. 7. Remove the gear, ring, and bushings. 8. Slide the Upper Fusing Roller to the gear side and remove it. Bushing Ring Gear G-ring Upper Fusing Roller Figure 3-36. Upper Fusing Roller Removal Rev. A 3-35 Disassembly and Assembly EPL-N2000 Service Manual 3.2.22 Main Motor Removal 1. Remove the Drive Unit. (Refer to Section 3.2.15.) 2. Remove 3 CCB screws (3X8) securing the frame inside the Drive Unit. 3. Remove 2 CCS screws (3X6) securing the right frame outside the Drive Unit. 4. Remove the frames. 5. Remove 4 CCS screws (3X6) securing the main motor inside the Drive Unit. 6. Remove the main motor. Drive Unit (Inside) CCB Screw (3X8) Frame Front Side CCB Screw (3X8) Figure 3-37. Main Motor Removal (1) Drive Unit (outside) Right Frame CCS Screw (3X6) Front Side CCS Screw (3X6) Figure 3-38. Main Motor Removal (2) 3-36 Rev. A EPL-N2000 Service Manual Disassembly and Assembly 3.2.23 Interlock Switch Removal 1. Remove the main motor. (Refer to Section 3.2.22.) 2. Remove the E ring for the right frame. 3. Remove 10 CCB screws (3X8) securing the right frame. 4. Remove the right frame. 5. Remove 2 CB(S-P1) screws securing the interlock switch, along with the bracket. Drive Unit (outside) CCB Screw (3X8) Refer to the figure below. Right Frame CB(S-P1) screw CCB Screw (3X8) Front Side E-ring CCB Screw (3X8) Figure 3-39. Interlock Switch Removal (1) Interlock Switch CB(S-P1) Screw Figure 3-40. Interlock Switch Removal (2) Rev. A 3-37 Disassembly and Assembly EPL-N2000 Service Manual 3.2.24 Paper Takeup Solenoid Removal 1. Remove the right frame for the Drive Unit. (Refer to Section 3.2.23.) 2. Remove CCB screw (3X8) securing the solenoid. 3. Remove the solenoid. Drive Unit (Inside) Right Frame Front Side Solenoid (Refer to the figure below.) Figure 3-41. Paper Takeup Solenoid Removal (1) CCB Screw (3X8) Figure 3-42. Paper Takeup Solenoid Removal 3-38 Rev. A Chapter 4 Adjustment No adjustment is required in this product. CHAPTER 5 TROUBLESHOOTING Table of Contents 5.1 Overview 5-1 5.2 Self Diagnostic Function 5-1 5.3 Troubleshooting 5-3 5.3.1 Troubleshooting Abnormal Operations . . . . . . . . . . . . . . . . . . . . . . . . . . . 5-3 5.3.2 Troubleshooting Print Quality Problems . . . . . . . . . . . . . . . . . . . . . . . . . 5-11 List of Tables Table 5-1. Table 5-2. Table 5-3. Table 5-4. Table 5-5. Table 5-6. Table 5-7. Table 5-8. Table 5-9. Table 5-10. Table 5-11. Table 5-12. Table 5-13. Table 5-14. Table 5-15. Table 5-16. Table 5-17. Table 5-18. Table 5-19. Table 5-20. Table 5-21. Table 5-22. Table 5-23. Table 5-24. Service Call Error . . . . . . . . . . . . . . . . . . . . . . . . . . . . . . . . . . . . . . 5-1 Symptoms and Reference Tables. . . . . . . . . . . . . . . . . . . . . . . . . . 5-3 The Printer Does Not Operate At All . . . . . . . . . . . . . . . . . . . . . . . . 5-4 RAM Check Is Not Started . . . . . . . . . . . . . . . . . . . . . . . . . . . . . . . 5-4 The LCD Displays Printer Open. . . . . . . . . . . . . . . . . . . . . . . . . . . 5-4 The LCD Displays Paper Out. . . . . . . . . . . . . . . . . . . . . . . . . . . . . 5-5 The LCD Displays Paper Jam . . . . . . . . . . . . . . . . . . . . . . . . . . . . 5-5 The LCD Displays Feed Jam . . . . . . . . . . . . . . . . . . . . . . . . . . . . . 5-6 The LCD Displays Toner Out . . . . . . . . . . . . . . . . . . . . . . . . . . . . . 5-6 The LCD Displays Write Error Card . . . . . . . . . . . . . . . . . . . . . . . . 5-6 The LCD Displays Sevice Req. E0003 . . . . . . . . . . . . . . . . . . . . . 5-7 The LCD Displays Sevice Req. E0004 . . . . . . . . . . . . . . . . . . . . . 5-7 The LCD Displays Sevice Req. E0005 . . . . . . . . . . . . . . . . . . . . . 5-7 The LCD Displays Sevice Req. E0006/0009 . . . . . . . . . . . . . . . . . 5-8 The LCD Displays Sevice Req. E0014 . . . . . . . . . . . . . . . . . . . . . 5-8 The LCD Displays Sevice Req. C1000/1001/1002 . . . . . . . . . . . . 5-8 The LCD Displays Sevice Req. C1003 . . . . . . . . . . . . . . . . . . . . . 5-8 The LCD Displays Sevice Req. C1100/1101 . . . . . . . . . . . . . . . . . 5-9 The LCD Displays Sevice Req. C1120/1121/1122/1123. . . . . . . . 5-9 The LCD Displays Sevice Req. C1180 . . . . . . . . . . . . . . . . . . . . . 5-9 The LCD Displays Sevice Req. C1200/1210 . . . . . . . . . . . . . . . . . 5-9 The LCD Displays Sevice Req. C1400 . . . . . . . . . . . . . . . . . . . . 5-10 The LCD Displays Other Error Codes . . . . . . . . . . . . . . . . . . . . . 5-10 Print Quality Problems . . . . . . . . . . . . . . . . . . . . . . . . . . . . . . . . . 5-10 Troubleshooting 5-2 EPL-N2000 Service Manual Rev. A EPL-N2000 Service Manual Troubleshooting 5.1 OVERVIEW Types of errors that may produce a similar symptom in a page printer, such as poor print quality or abnormal operation, vary widely, making identification of failed parts and components more difficult. To overcome such problems for this printer, this section describes troubleshooting procedures using the printer’s built-in self-diagnostic function for easy and efficient repair. 5.2 SELF-DIAGNOSTIC FUNCTION This printer’s control circuit is equipped with a self-diagnostic function that checks the operating conditions for each component. If the printer detects an error that a user cannot recover from, the printer displays the location and error code on the LCD panel. The message is as follows: Service Req effff In the message above, e represents the error type and ffff represents the error code. Errors are divided into two categories: E and C. ❏ E: Related to the engine. ❏ C: Related to the controller. Table 5-1 lists error types and error codes. Table 5-1. Service Call Error Error Type Rev. A Error Code Description E 0003 0004 0005 0006 0009 0014 Fusing unit error Main motor error Fan motor error Polygon motor or laser scanner error Laser diode error Engine communication error C 0001 0002 0003 0004 0007 0009 0010 0017 to 0031 0036 0128 to 0254 0255 1000 1001 1002 1003 1100 1101 1120 1121 1122 1123 1170 1180 CPU error (Reserved) CPU error (Privilege violation) CPU error (Illegal instruction) CPU error (Unsupported FPU instruction) CPU error (Address misalignment) CPU error (Reserved) CPU error (Tag overflow) CPU error (Unsupported interrupt) CPU error (Unsupported coprocessor instruction) CPU error (Unimplemented instruction) CPU error (Break error) Standard RAM error (RAM not recognized) Standard RAM error (Minimum stack unrecognized) Standard RAM error (Memory address less than 4MB ) Optional RAM error (Memory address 4MB or more) ROM checksum error (bit 0 to 15, font) ROM checksum error (bit 16 to 31, font) ROM checksum error (bit 0 to 7, program) ROM checksum error (bit 8 to 15, program) ROM checksum error (bit 16 to 23, program) ROM checksum error (bit 24 to 31, program) NLSP Font ROM checksum error Optional ROM SIMM checksum error 5-1 Troubleshooting EPL-N2000 Service Manual Table 5-1. Service Call Error (Continued) Error Type C A, B, D, F to Z 5-2 Error Code Description 1190 1200 1210 1300 1320 1400 1999 2000 Cartridge access error EEPROM write error EEPROM write counter overflow Type B Interface error LocalTalk / Serial module error Engine initialization error Hardware error Software error XXXX Software error Rev. A EPL-N2000 Service Manual Troubleshooting 5.3 TROUBLESHOOTING This section describes troubleshooting abnormal operations and print quality problems. 5.3.1 Troubleshooting Abnormal Operations When the printer detects an error, use Table 5-2 to identify the symptom and the reference table number. If a service call error has occurred, follow the steps below before taking an action. 1. Note the error code. 2. Turn off the printer. 3. Turn the printer back on to see if the same message still appears. Table 5-2. Symptoms and Reference Tables Rev. A 5-3 Troubleshooting EPL-N2000 Service Manual Symptom Message The printer does not operate at all. Printer Condition The main motor does not rotate when the printer is on. Threrefore, the RAM check is not started. Reference Table 5-3 RAM check does not start. RAM check is not started when the printer is turned on. 5-4 "Printer Open" The paper cover is closed, but the LCD still displays "Printer Open." 5-5 "Paper Out" Paper is loaded, but the LCD displays "Paper Out." 5-6 "Paper Jam" The LCD panel displays "Paper Jam" at power on or when paper is loaded. 5-7 "Feed Jam" The LCD displays "Feed Jam" when the MP tray is used. The LCD displays "Feed Jam" when the standard lower paper cassette is used. 5-8 The LCD displays "Feed Jam" when the optional lower paper cassette is used. "Toner Out" The LCD displays "Toner Out" when a new Imaging cartridge is installed. 5-9 "Write Error Card" The LCD displays "Write Error Card" when an IC card is inserted. 5-10 "Service Req XXXX" XXXX = "E0003" Fusing unit error 5-11 XXXX = "E0004" Main motor error 5-12 XXXX = "E0005" Fan motor error 5-13 XXXX = "E0006" Polygon motor or laser scanner error 5-14 XXXX = "E0009" Laser diode error 5-14 XXXX = "E0014" Engine communication error 5-15 XXXX = "C1000/1001/1002" 5-16 XXXX = "C1003" 5-17 XXXX = "C1100/1101" 5-18 XXXX = "C1120/1121/1122/1123" 5-19 XXXX = "C1180" 5-20 XXXX = "C1200/1210" 5-21 XXXX = "C1400" 5-22 XXXX = "Other errors" 5-23 5-4 Rev. A EPL-N2000 Service Manual Troubleshooting Table 5-3. The Printer Does Not Operate at All Step Cause Checkpoint Finding Solution 1 Connector CN4 on the Is the cable from the PWB-E Board PWB-A board may not be properly connected? connected properly. Yes Connect the cable properly. 2 The fuse on the PWB-E board has blown. Yes Replace the fuse. 3 Connector CN4 on the Is the cable from the PWB-A board PWB-E board may not be properly connected? properly connected. Yes Connect the cable properly. 4 The PWB-E board may be bad. When turning on the printer, check the output between pin 7 (+) and pin 5 (–) of CN4 on the PWB-A board. Is the output HIGH? No Replace the PWB-E board. 5 The PWB-A board may be bad. --- --- Replace the PWB-A board. Has fuse F2 on the PWB-E board blown? Table 5-4. RAM Check is Not Started Step Cause Checkpoint 1 C207 MAIN board may be bad. Is a RAM check performed when the main board is replaced? 2 The control panel may be --bad. Finding Solution Yes Replace the main board. --- Replace the panel. Table 5-5. The LCD Displays "Printer Open" Step Cause Checkpoint 1 The interlock switch and the top cover do not engage securely. 2 The interlock switch may 1. be bad. 2. Is the interlock switch lever pressed No when the top cover is closed? 3. 3 Finding Disconnect connector CN3 on No the PWB-E board. Place a meter on the connector on the interlock switch side. Alternate the switch on and off. Is the current detected? PWB-E board may be bad. Check the output of test pin TP2 on No the PWB-A board. Is the output +24 V? Rev. A Solution Reposition the interlock switch . Replace the interlock switch. Replace the PWB-E board. 5-5 Troubleshooting EPL-N2000 Service Manual Table 5-6. The LCD Displays "Paper Out" Step Cause Checkpoint Finding Solution 1 The paper empty sensor actuator may be bad. Does the sensor operate smoothly? Is the actuator in good condition? No Reposition the actuator or replace it. 2 The paper empty sensor may be bad. Check the outputs of pin 7 of CN6 on the PWB-A board. Correct levels: HIGH: No paper is loaded. LOW: Paper is loaded. Are the outputs correct? No Replace the PE1 sensor. Table 5-7. The LCD Displays "Paper Jam" Step Cause Checkpoint Finding Solution 1 The actuator for the paper takeup sensor, paper exit sensor, or the registration sensor may be bad. Are those actuators properly positioned? 2 The paper takeup sensor, paper exit sensor, or the registration sensor may not be connected properly. Are the cables connected properly No to the takeup sensor connector, paper exit sensor connector, and the registration sensor connector? Reconnect the sensor properly. 3 The paper takeup sensor may be bad. Check the outputs of pin 6 of CN10 against pin 4 on the PWB-A board. Correct levels: HIGH: No paper is loaded. LOW: Paper is loaded. Are the outputs correct? No Replace the paper takeup sensor. 4 The paper exit sensor may be bad. Check the outputs of pin 3 of CN13 against pin 1 on the PWB-A board. Correct levels: HIGH: No paper is loaded. LOW: Paper is loaded. Are the outputs correct? No Replace the paper exit sensor. 5 The registration sensor may be bad. Check the outputs of pin 5 of CN10 against pin 1 on the PWB-A board. Correct levels: HIGH: No paper is loaded. LOW: Paper is loaded. Are the outputs correct? No Replace the registration sensor. 5-6 No Reinstall the actuators in the correct positions. Rev. A EPL-N2000 Service Manual Troubleshooting Table 5-8. The LCD Displays "Feed Jam" Step Cause Checkpoint Finding Solution 1 The main motor may be bad. When turning on the printer, check No the output of pin 2 of CN5 on the PWB-A board. Is the output HIGH? Replace the main motor. 2 Paper takeup solenoid may be bad. If the paper takeup solenoid does not turn, disconnect the cable from connector CN12 on the PWB-A board and check the coil resistance (at 20° C, 68 F) Is the resistance 80 W ± 10% ? No Replace the pickup solenoid (feed solenoid). If the solenoid coil is shorted, check No the current between pin 2 of CN12 on the PWB-A board and GND. Is any current detected? Replace the paper takeup solenoid and the PWB-A board. Is paper taken up normally (without slipping)? Clean the paper takeup assembly, or replace it. 3 The paper takeup roller assembly may be bad. No Table 5-9. The LCD Displays "Toner Out" Step 1 Cause The toner in the Imaging cartridge has run out. Checkpoint --- Finding --- Solution Replace the Imaging cartridge. Table 5-10. The LCD Displays "Write Error Card" Step Cause Checkpoint Finding Solution 1 The installed IC card may Can this printer use the installed IC be illegal. card? (Refer to Table 1-1 in Chapter 1.) No Remove the illegal card. 2 The installed IC card may Does the printer recognize another be dead. legal card ? Yes Replace the IC card. 3 C207 MAIN board may be bad. No Replace the C207 MAIN board. Rev. A Install an IC card that works with another EPL-N2000. Does the printer recognize the card? 5-7 Troubleshooting EPL-N2000 Service Manual Table 5-11. The LCD Displays "Service Req. E0003" Step Cause Checkpoint Finding Solution 1 The connector may be connected improperly. Is CN2 on the PWB-E board properly connected ? No Connect it properly. 2 The thermistor may be bad. Is operation OK when the thermistor is replaced? Yes Replace the thermistor. 3 The heater lamp may be bad. Turn the printer on when the fusing No unit is cold. Does the heater lamp light up ? Replace the heater lamp. 4 The thermostat may be bad. Check the thermostat current at normal temperature. Is a current detected? Replace the thermostat. No Table 5-12. The LCD Displays "Service Req. E0004" Step Cause Checkpoint Finding Solution 1 The connector may be connected improperly. Is connector CN5 on the PWB-A board properly connected? No Connect it properly. 2 The main motor may be bad. Replace the main motor. Is operation OK? Yes Replace the main motor. 3 The PWB-E board may be bad. --- --- Replace the PWB-A board Table 5-13. The LCD Displays SERVICE REQ. E0005 Step Cause Checkpoint Finding Solution 1 The connector may be connected improperly. Are connectors CN5 and CN12 (relay connectors) on the PWB-A board properly connected? Is connector CN2 on the PWB-F board properly connected? No Connect them properly. 2 The PWB-E/ PWB-F board may be bad. Does the power supply fan rotate if the PWB-E board is replaced? Does the fusing fan rotate if the PWB-F board is replaced? Yes Replace the PWB-E board or PWB-F board. 3 The PWB-A board may be bad. --- --- Replace the PWB-A board. 5-8 Rev. A EPL-N2000 Service Manual Troubleshooting Table 5-14. The LCD Displays SERVICE REQ. E0006/0009 Step Cause Checkpoint Finding Solution 1 The connectors may be connected improperly. Are the connectors on the PWB-A board properly connected? No Connect them properly. 2 The PWB-A board may be bad. Is operation OK when the PWB-A board is replaced? Yes Replace the PWB-A board. 3 The print head may be bad. Is operation OK when the print head is replaced? Yes Replace the print head unit. Table 5-15. The LCD Displays SERVICE REQ. E0014 Step Cause Checkpoint Finding Solution 1 The connectors may be connected improperly. Are the connectors on the C207 MAIN board properly connected? No Connect them properly. 2 C207 MAIN board may be bad. Is operation OK when the C207 MAIN board is replaced? Yes Replace the main board. Table 5-16. The LCD Displays SERVICE REQ. C1000/1001/1002 Step 1 Cause C207 MAIN board may be bad. Checkpoint --- Finding --- Solution Replace the main board. Table 5-17. The LCD Displays SERVICE REQ. C1003 Step Cause Checkpoint Finding Solution 1 The optional RAM SIMM Is the error cleared when the may be bad. optional RAM is removed? Yes Replace it. 2 C207 MAIN board may be bad. --- Replace the main board. --- Table 5-18. The LCD Displays "Service Req. C1100/1101" Step Cause Checkpoint Finding Solution 1 The CG ROM may be bad. Is operation OK when the CG ROM Yes is replaced? C1100: Replace IC32 C1101: Replace IC31 Replace the ROM. 2 C207 MAIN board may be bad. --- Replace the main board. Rev. A --- 5-9 Troubleshooting EPL-N2000 Service Manual Table 5-19. The LCD Displays SERVICE REQ. C1120/1121/1122/1123 Step Cause Checkpoint Finding Solution 1 The PROG ROM may be bad. Is operation OK when the PROG ROM is replaced? C1120: Replace IC30 C1121: Replace IC30 C1122: Replace IC29 C1123: Replace IC29 Yes Replace the ROM (IC29/30). If ICs 1, 2, 3, and 4 are attached, replace them instead. 2 C207 MAIN board may be bad. --- --- Replace the main board. Table 5-20 The LCD Displays "Service Req. C1180" Step Cause Checkpoint Finding Solution 1 The optional ROM SIMM Is operation OK when the ROM may be bad. SIMM is replaced? Yes Replace the ROM SIMM. 2 C207 MAIN board may be bad. --- Replace the main board. --- Table 5-21. The LCD Displays "Service Req. C1200/1210" Step Cause Checkpoint Finding Solution 1 The EEPROM may be bad. Perform EEPROM initialization. (Note that the information including the page counter will be lost.) Is operation OK? Yes Replace the EEPROM. 2 C207 MAIN board may be bad. --- --- Replace the main board. Table 5-22. The LCD Displays "Service Req. C1400" Step 1 Cause C207 MAIN board may be bad. Checkpoint Is operation OK when the main board is replaced? Finding Yes Solution Replace the main board. Table 5-23. The LCD Displays Other Error Codes Step 1 5-10 Cause C207 MAIN board may be bad. Checkpoint Is operation OK when the main board is replaced? Finding Yes Solution Replace the main board. Rev. A EPL-N2000 Service Manual Troubleshooting 5.3.2 Troubleshooting Print Quality Problems This section describes how to isolate print quality problems from their possible causes and remedy them, as shown in Table 5-24. Table 5-24. Print Quality Problems Symptom Black/white lines (vertical) Horizontal lines Possible Cause Solution Dust, lint in the print head unit Clean the print head unit (white lines) window. Replace the print head unit. Dust, lint in the transfer roller (white lines) Clean the transfer roller. Scratches on the PC drum (black lines) Replace the Imaging cartridge. Low main charge voltage (black lines) Replace high voltage power supply and check contacts. Dust on the gears Remove the dust. Replace the drive unit. Uneven rotation of the polygon Replace the print head unit. motor Low image density Rev. A Low development bias Replace the high-voltage unit (PWB-F). Adjust the density by SelecType. Toner empty Replace the Imaging cartridge. 5-11 Troubleshooting Foggy background EPL-N2000 Service Manual High development bias Replace the high-voltage unit (PWB-F). End of PC drum life Replace the Imaging cartridge. Table 5-24. Print Quality Problems Symptom No image printed (Blank /completely black ) Possible Cause High development bias Solution Replace the high-voltage unit (PWB-E). Replace the Imaging cartridge. Low development bias Offset image 5-12 Improper transfer Clean the transfer unit or the fusing unit. The fusing roller does not grip paper properly. Wipe the dust off the fusing roller. Rev. A CHAPTER 6 MAINTENANCE Table of Contents 6.1 Maintenance 6-1 6.1.1 User Maintenance . . . . . . . . . . . . . . . . . . . . . . . . . . . . . . . . . . . . . . . . . . . 6-1 6.1.2 Service Maintenance . . . . . . . . . . . . . . . . . . . . . . . . . . . . . . . . . . . . . . . . . 6-1 List of Tables Table 6-1. Instructions for User Maintenance . . . . . . . . . . . . . . . . . . . . . . . . . . . 6-1 Table 6-2. Instructions for Service Maintenance . . . . . . . . . . . . . . . . . . . . . . . . . 6-1 EPL-N2000 Service Manual Maintenance 6.1 MAINTENANCE This section gives information necessary for maintaining the printer in its optimum condition. Appropriate maintenance after troubleshooting, as well as after the occasional replacement of worn out units, is essential to prevent potential problems from occurring. Maintenance items described in this section are divided into two subsections: user maintenance and service maintenance (performed only by qualified repair personnel). 6.1.1 User Maintenance Users can achieve maximum print quality from the printer by following the instructions in Table 6-1. Table 6-1. Instructions for User Maintenance Item Occasion Procedure Clean the printhead unit glass Abnormal symptom such as vertical lines appear. Clean the glass surface with a dry, soft cloth. Imaging cartridge replacement Print quality has deteriorated or Replace the Imaging cartridge. the total number of printed pages exceeds the specified maximum (Approximately 8,000 to 10,000 sheets). 6.1.2 Service Maintenance The EPSON EPL-N2000 does not require any replacement of units at specified intervals. It is, however, recommended that specific units be replaced after periods determined by the total number of sheets printed. This is indispensable in preventing abnormal operations, such as multi-sheet feeds, paper jams, and fusing malfunctions, which can be often caused by worn out units. Refer to Table 6-2 for guidance. Table 6-2. Instructions for Service Maintenance Unit Printable number of sheets The fusing unit Approximately 60,000 to120,000 sheets The paper takeup roller assembly Approximately 120,000 sheets The transfer unit Approximately 60,000 to 120,000 sheets ❏ If dirt sticks, use a moist cloth, and then clean with a dry cloth. ❏ Do not use solvents, such as thinner and alcohol. ❏ Never touch the surface of the transfer roller. When it needs cleaning, run blank prints repeatedly. Otherwise, remove the transfer unit and blow off the dust using an air gun. Rev. A 6-1 Appendix Table of Contents A.1 Connector Pin Assignments . . . . . . . . . . . . . . . . . . . . . . . . . . . . . . . . . . . . A-1 A.1.1 Engine Controller Board (PWB-A Board) . . . . . . . . . . . . . . . . . . . . A-4 A.1.2 Video Controller Board (C207 MAIN Board) . . . . . . . . . . . . . . . . . . A-7 A.2 Exploded Diagrams. . . . . . . . . . . . . . . . . . . . . . . . . . . . . . . . . . . . . . . . . . A-18 A3 Circuit Board component Layout. . . . . . . . . . . . . . . . . . . . . . . . . . . . . . . . A-29 A4 Circuit Diagrams . . . . . . . . . . . . . . . . . . . . . . . . . . . . . . . . . . . . . . . . . . . . A-32 List of Tables Table A-1. PWB-A Board Connector Specifications . . . . . . . . . . . . . . . . . . . . A-2 Table A-2. C207 MAIN Board Connector Specifications . . . . . . . . . . . . . . . . . A-3 Table A-3. PWB-A, C207 MAIN Board CN1 (Video I/F). . . . . . . . . . . . . . . . . . A-4 Table A-4. PWB-A CN2 (Printhead Unit) . . . . . . . . . . . . . . . . . . . . . . . . . . . . . A-4 Table A-5. PWB-A CN3 (Paper Near Empty Sensor: PNE1). . . . . . . . . . . . . . A-4 Table A-6. PWB-A CN4 (PWB-E). . . . . . . . . . . . . . . . . . . . . . . . . . . . . . . . . . . A-5 Table A-7. PWB-A CN5 (Main Motor) . . . . . . . . . . . . . . . . . . . . . . . . . . . . . . . A-5 Table A-8. PWB-A CN6 (Toner Empty Sensor: PE1) . . . . . . . . . . . . . . . . . . . A-5 Table A-9. PWB-A CN8 (Paper Cassette Unit) . . . . . . . . . . . . . . . . . . . . . . . . A-5 Table A-10. PWB-A CN9 (Imaging Cartridge Fuse). . . . . . . . . . . . . . . . . . . . . . A-6 Table A-11. PWB-A CN10 (PWB-F). . . . . . . . . . . . . . . . . . . . . . . . . . . . . . . . . . A-6 Table A-12. PWB-A CN11 (Duplex Unit: Option) . . . . . . . . . . . . . . . . . . . . . . . . A-6 Table A-13. PWB-A CN12 (Paper Solenoid: SL1) . . . . . . . . . . . . . . . . . . . . . . . A-6 Table A-14. PWB-A CN13 (Paper Exit Sensor, Thermistor, Registration Clutch) . . . . . . . . . . A-7 Table A-15. C207 MAIN Board CN4 (Type B Interface) . . . . . . . . . . . . . . . . . . A-7 Table A-16. C207 MAIN Board CN5 (I/O Bus) . . . . . . . . . . . . . . . . . . . . . . . . . A-8 Table A-17. C207 MAIN Board CN7 (CPU Bus) . . . . . . . . . . . . . . . . . . . . . . . . A-9 Table A-18. C207 MAIN Board CN9 ,CN10 (RAM-SIMM) . . . . . . . . . . . . . . . . A-10 Table A-19. C207 MAIN Board CN11 (ROM Bus) . . . . . . . . . . . . . . . . . . . . . . A-12 Table A-20. C207 MAIN Board CN12 (ROM-SIMM) . . . . . . . . . . . . . . . . . . . . A-14 Table A-21. C207 MAIN Board CN14 (IC Card Slot) . . . . . . . . . . . . . . . . . . . . A-16 Table A-22. C207 MAIN Board CN15 (Control Panel) . . . . . . . . . . . . . . . . . . . A-17 List of Figures Figure A-1. Main Controller Diagram . . . . . . . . . . . . . . . . . . . . . . . . . . . . . . . . A-1 Figure A-2. Housing . . . . . . . . . . . . . . . . . . . . . . . . . . . . . . . . . . . . . . . . . . . . A-18 Figure A-3. Frames. . . . . . . . . . . . . . . . . . . . . . . . . . . . . . . . . . . . . . . . . . . . . A-19 Figure A-4. Paper Takeup Section (1) . . . . . . . . . . . . . . . . . . . . . . . . . . . . . . A-20 Figure A-5. Paper Takeup Section (2) . . . . . . . . . . . . . . . . . . . . . . . . . . . . . . A-21 Figure A-6. Drive Unit . . . . . . . . . . . . . . . . . . . . . . . . . . . . . . . . . . . . . . . . . . . A-22 Figure A-7. Transfer Unit . . . . . . . . . . . . . . . . . . . . . . . . . . . . . . . . . . . . . . . . A-23 Figure A-8. Fusing Unit. . . . . . . . . . . . . . . . . . . . . . . . . . . . . . . . . . . . . . . . . . A-24 Figure A-9. Paper Cassette Unit . . . . . . . . . . . . . . . . . . . . . . . . . . . . . . . . . . A-25 Figure A-10. Lower Paper Cassette (Standard) . . . . . . . . . . . . . . . . . . . . . . . . A-26 Figure A-11. Lower Paper Cassette (Optional) . . . . . . . . . . . . . . . . . . . . . . . . A-27 Figure A-12. Optional Duplex Unit . . . . . . . . . . . . . . . . . . . . . . . . . . . . . . . . . . A-28 Figure A-13. C202 MAIN Board Component Layout (Front) . . . . . . . . . . . . . . A-29 Figure A-14. C202 MAIN Board Component Layout (Rear). . . . . . . . . . . . . . . A-30 Figure A-15. C202 MAIN Board PROG Component Layout . . . . . . . . . . . . . . A-31 Figure A-16. C207 MAIN Board (CPU) . . . . . . . . . . . . . . . . . . . . . . . . . . . . . . . Figure A-17. C207 MAIN Board (ROM/ROM-SIMM) . . . . . . . . . . . . . . . . . . . . Figure A-18. C207 MAIN Board (RAM/RAM-SIMM) . . . . . . . . . . . . . . . . . . . . . Figure A-19. C207 MAIN Board (Interface) . . . . . . . . . . . . . . . . . . . . . . . . . . . . Figure A-20. C207 MAIN Board (Video I/F) . . . . . . . . . . . . . . . . . . . . . . . . . . . Figure A-21. C207 MAIN Board (MISC>) . . . . . . . . . . . . . . . . . . . . . . . . . . . . . Figure A-22. C207 PROG Board. . . . . . . . . . . . . . . . . . . . . . . . . . . . . . . . . . . . A-32 A-33 A-34 A-35 A-36 A-37 A-38 EPL-N2000 Service Manual Appendix A.1 CONNECTOR PIN ASSIGNMENTS Figures A-1 illustrates the interconnection of the main controller board. Power Supply Fun Motor Interlock Switch M4 Fusing Unit CN5 Heater Lamp CN3 CN2 PWB-E Power Supply Board CN1 Thermostat TS1 Power Switch CN4 Thermistor TE1 Duplex Unit (Optional) Paper Exit Sensor PC 3 CN4 Duplex Controller Board CN13 CN11 Transfer Unit Cover Switch PC4 Paper Takeup Sensor (PC1) S3 Paper Cassette Unit CN1 CN2 M5 Transport Motor CN3 Duplex Sensor PWB-A Engine Controller Board PWB-F High Voltage Unit Imaging Cartridge M3 M6 Switchback Motor PWB-B Registration Clutch CL 1 CN10 Paper Size Switch Registation Sensor(PCR 1) CN8 Fusing Fan Motor CN2 Optional Cassette Unit CN1 Paper Empty Sensor(PE2) M1 CN1 Paper Near Empty Sensor (PNE2) CN5 Main Motor PWB-C CN3 CN12 Paper Takeup Solenoid (SL1) PWB-G Paper Takeup Solenoid (SL2) CN3 Paper Near Empty Print Head Unit CN6 Toner Empty Sensor (TE1) PWB-D CN9 Imaging Cartridge Part Fuse Paper Empty Sensor Laser Diode Board M2 CN2 Polygon Motor CN1 CPU bus CN1 Parallel B I/F CN2 CN9 Parallel C I/F Network I/F CN7 RAM-SIMM A CN11 CN3 CN10 RAM-SIMM B CN6 IC Card A CN15 Control Panel CN8 Emulator bus I/O bus CN5 CN12 ROM-SIMM N-BUS Flash RAM Socket Type-B Slot CN14 ROM bus CN13 CN4 C207 MAIN Board Figure A-1. Main Controller Diagram Rev. A A-1 Appendix EPL-N2000 Service Manual Table A-1. PWB-A Board Connector Specifications Connector A-2 Description Pins Reference Tables CN1 C207 MAIN board 20 A-2 CN2 Printhead unit 12 A-4 CN3 Paper near empty sensor (PNE1) 3 A-5 CN4 Power supply board (PWB-E board) 8 A-6 CN5 Main motor 4 A-7 CN6 Toner empty sensor (TE1) Paper empty sensor (PE1) 7 A-8 CN7 Not used — — CN8 Cassette unit 10 A-9 CN9 Imaging cartridge part fuse 2 A-10 CN10 High voltage unit (PWB-F) 11 A-11 CN11 Duplex unit (optional) 12 A-12 CN12 Paper takeup solenoid 2 A-13 CN13 Paper exit sensor, thermistor, registration clutch 7 A-14 Rev. A EPL-N2000 Service Manual Appendix Table A-2. C207 MAIN Board Connector Specifications Connector Rev. A Description Pins Reference Tables CN1 Video interface (to PWB-A board) 20 A-3 CN2 IEEE 1284 interface (B connector) 36 1-11 (Chapter 1) CN3 IEEE 1284 interface (C connector) 36 1-13 (Chapter 1) CN4 Type-B interface 36 A-15 CN5 I / O bus 40 A-16 CN6 Network interface 8 1-15 (Chapter 1) CN7 CPU bus 40 A-17 CN9 RAM-SIMM 2 72 A-18 CN10 RAM-SIMM 1 72 A-18 CN11 ROM bus (to C207 PROG board) 80 A-19 CN12 ROM-SIMM 72 A-20 CN14 IC card slot 68 A-22 CN15 Control panel 20 A-23 A-3 Appendix EPL-N2000 Service Manual A.1.1 Engine Controller Board (PWB-A Board) Table A-3 PWB-A, C207 MAIN Board CN1 (Video I/F) Pin 1 2 3 4 5 6 7 8 9 10 11 12 13 14 15 16 17 18 19 20 Signal Name I/O O I I O O I I - +5V +5V RESET PRRDY STS CTBSY SRCLK TOD GND HSYNC +5V — EPRDY ETBSY CMD PRINT CPRDY GND VIDEO GND I I O O O O - Description +5 V (Logic power source) +5 V (Logic power source) Engine initialize signal Engine print enable signal Communication with the engine controller Command transmit signal Clock signal Engine ready signal Signal ground Horizontal synchronous signal +5 V (Logic power source) Not used Engine current status signal Engine status transmit signal Communication with engine controller Print start command Controller current status signal Signal ground Video data Signal ground Table A-4 PWB-A CN2 (Printhead Unit) Pin Signal Name I/O 1 2 3 4 5 6 7 8 9 10 11 12 SSCAN LD.MONITOR DA2 DA1 GND LDATA +5V +24V GND POLYGON_MOTOR POLYGON_CLOCK POLYGON_LOCK I I O O O O O I Description Vertical synchronous signal Laser power detection signal Laser power adjust signal 1 Laser power adjust signal 2 Ground Laser drive signal Laser diode drive power source Polygon motor drive power source Ground Polygon motor drive signal Polygon motor clock Polygon motor lock signal Table A-5 PWB-A CN3 (Paper Near Empty Sensor: PNE1) Pin 1 2 3 A-4 Signal Name ANODE GND PNE1 I/O I Description Sensor drive signal Ground Detection signal Rev. A EPL-N2000 Service Manual Appendix Table A-6 PWB-A CN4 (PWB-E) Pin 1 2 3 4 5 6 7 8 Signal Name PW_FAN HEATER GND +24V GND GND +5V +5V I/O Description O O - Power source fan drive signal Heater lamp drive signal Ground +24 V Ground Ground +5 V +5 V Table A-7 PWB-A CN5 (Main Motor) Pin 1 2 3 4 Signal Name MOTOR_LOCK MAIN_MOTOR +24V GND I/O I O - Description Motor lock signal Motor drive signal Motor drive power source Ground Table A-8 PWB-A CN6 (Toner Empty Sensor: PE1) Pin 1 2 3 4 5 6 7 Signal Name +5V TONER_LEVEL TONER_LED GND ANODE GND P_EMP 1 I/O I O I Description +5 V Toner amount detection signal TE1 sensor LED drive signal Ground PE1 anode Ground Paper amount detection signal Table A-9 PWB-A CN8 (Paper Cassette Unit) Rev. A Pin Signal Name I/O 1 2 3 4 5 6 7 8 9 10 PICK_UP 3 PICK_UP 2 3RD_SIG 2ND_SIG SIFT_LOAD SENSOR_CLOCK +24V +5V GND GND O O I I O O - Description Solenoid SL3 (optional) drive signal Solenoid SL2 drive signal Optional cassette sensor detection signal Standard cassette sensor detection signal Sensor identification signal Sensor clock signal Solenoid drive power source +5 V Ground Ground A-5 Appendix EPL-N2000 Service Manual Table A-10 PWB-A CN9 (Imaging Cartridge Fuse) Pin 1 2 Signal Name I/O I/O +5V I/C_NEW Description Fuse detection/ fuse blow power source New cartridge detection / fuse blow signal Table A-11 PWB-A CN10 (PWB-F) Pin 1 2 3 4 5 6 7 8 9 10 11 Signal Name +5V FU_FAN +24V GND PCR1 PC1 HV_T_CTL HV_B_CTL HV_CT B_REM SS_HL_CTL I/O O I I O O O Description +5 V Fan motor drive +24 V Ground Registration sensor detection signal Paper takeup sensor detection signal Transfer bias control signal Development bias control signal High voltage control Developer bias On/Off signal Seal bias HIGH/LOW control Table A-12 PWB-A CN11 (Duplex Unit: Option) Pin 1 2 3 4 5 6 7 8 9 10 11 12 Signal Name GND +5V +24V UP_SET UP_PS HANSO_CTL HANSO_B HANSO_A HAISI_CTL HAISI_B HAISI_A UP_OPEN I/O I I O O O O O O I Description Ground +5 V +24 V Duplex unit detection signal Duplex paper takeup sensor (PC4) detection signal Transport motor control signal Transport motor control signal B Transport motor control signal A Switchback motor control signal Switchback motor control signal B Switchback motor control signal A Cover switch signal detection Table A-13 PWB-A CN12 (Paper Solenoid: SL1) Pin 1 2 A-6 Signal Name +24V PICK_IP1 I/O O Description Solenoid drive power source Solenoid drive signal Rev. A EPL-N2000 Service Manual Appendix Table A-14 PWB-A CN13 (Paper Exit Sensor, Thermistor, Registration Clutch)) Pin 1 2 3 4 5 6 7 Signal Name ANODE GND +PC3 THERMISTOR +5V +24V R_CLUTCH I/O I I - Description PC3 anode Ground Paper exit sensor detection signal Thermistor detection sensor +5 V +24 V (clutch) Registration clutch drive signal A.1.2 Video Controller Board (C207 MAIN Board) Table A-15 C207 MAIN Board CN4 (Type B Interface) Pin 1 2 3 4 5 6 7 8 9 10 11 12 13 14 15 16 17 18 19 20 21 22 23 24 25 26 27 28 29 30 31 32 33 34 35 36 Rev. A Signal Name +5V +5V +5V +5V +5V +5V TXD READY RXD NC RESET INH CMREQ WRRDY RDREQ WR RD CS GND GND GND GND GND GND A3 A2 A1 A0 D7 D6 D5 D4 D3 D2 D1 D0 I/O O O I O O I I I O O O O O O O I/O I/O I/O I/O I/O I/O I/O I/O Description +5 VDC +5 VDC +5 VDC +5 VDC +5 VDC +5 VDC Serial data transmitted READY signal Serial data received Not used RESET signal I/F card disable Request command I/F ready Data read request Write enable Read enable Chip select GND GND GND GND GND GND Address bit 3 Address bit 2 Address bit 1 Address bit 0 Data bit 7 Data bit 6 Data bit 5 Data bit 4 Data bit 3 Data bit 2 Data bit 1 Data bit 0 A-7 Appendix EPL-N2000 Service Manual Table A-16 C207 MAIN Board CN5 (I/O Bus) Pin 1 2 3 4 5 6 7 8 9 10 11 12 13 14 15 16 17 18 19 20 21 22 23 24 25 26 27 28 29 30 31 32 33 34 35 36 37 38 39 40 41~60 A-8 Signal Name PCLK RST GND GND GND GND DB0 DB1 DB2 DB3 DB4 DB5 DB6 DB7 AB0 AB1 AB2 AB3 AB4 CS RD WR IREQ NMI DREQ DTCT +5V +5V +5V +5V TXD+ TXDRXD+ RXDDTR CTS NC NC LCD SWRD Not used I/O I I/O I/O I/O I/O I/O I/O I/O I/O I/O O O O O O O I I O I I I - Description System clock for 85230-10 Reset signal GND GND GND GND Bidirectional data bus 0 Bidirectional data bus 1 Bidirectional data bus 2 Bidirectional data bus 3 Bidirectional data bus 4 Bidirectional data bus 5 Bidirectional data bus 6 Bidirectional data bus 7 Address bus Address bus Address bus Address bus Address bus Chip select signal Read signal. Goes LOW with WR signal at reset. Write signal. Goes LOW with RD signal at reset. Interruption request signal Non-maskable interrupt request signal DMA request signal Board detection signal +5 V +5 V +5 V +5 V Not used Not used Not used Not used Not used Not used No connection No connection Not used Not used — Rev. A EPL-N2000 Service Manual Appendix Table A-17 C207 MAIN Board CN7 (CPU Bus) Pin 1 2 3 4 5 6 7 8 9 10 11 12 13 14 15 16 17 18 19 20 21 22 23 24 25 26 27 28 29 30 31 32 33 34 35 36 37 38 39 40 Rev. A Signal Name +5V +5V A26 A27 A28 A29 A30 A31 ASI10 ASI11 ASI12 ASI13 CS0 CS1 CS2 CS3 CS4 CS5 AS RD_WR SAMEPG TMR_OV LOCK ERROR BREQ BGANT READY MEXC IRL0 IRL1 IRL2 IRL3 RESET XTAL1 CLKOUT1 CLKOUT2 GND GND GND GND I/O I I I I I I I/O I/O I/O I/O O O O O O O I/O I/O O I O O I O I I I I I I I I O O - Description +5 V +5 V Address bit 26 Address bit 27 Address bit 28 Address bit 29 Address bit 30 Address bit 31 Not used Not used Address bus data Not used Chip select signal Chip select signal Chip select signal Chip select signal Chip select signal Chip select signal New bus transaction starts Read/write signal Not used DRAM refresh timing control Bus lock signal Not used Bus request signal Response to BREQ signal Current bus transaction completed Informs CPU of memory error occurrence Interruption request code signal Interruption request code signal Interruption request code signal Interruption request code signal Reset signal Crystal clock signal Clock signal Clock signal GND GND GND GND A-9 Appendix EPL-N2000 Service Manual Table A-18 C207 MAIN Board CN9, CN10 (RAM-SIMM) Pin 1 2 3 4 5 6 7 8 9 10 11 12 13 14 15 16 17 18 19 20 21 22 23 24 25 26 27 28 29 30 31 32 33 34 35 36 37 38 39 40 41 42 43 44 45 46 47 48 49 50 51 52 53 54 55 A-10 Signal Name VSS DQ0 DQ16 DQ1 DQ17 DQ2 DQ18 DQ3 DQ19 VDD NC A0 A1 A2 A3 A4 A5 A6 NC DQ4 DQ20 DQ5 DQ21 DQ6 DQ22 DQ7 DQ23 A7 NC VDD A8 A9 RAS3 RAS2 NC NC NC NC VSS CAS0 CAS2 CAS3 CAS1 RAS0 RAS1 NC WE NC DQ8 DQ24 DQ9 DQ25 DQ10 DQ26 DQ11 I/O I/O I/O I/O I/O I/O I/O I/O I/O O O O O O O O I/O I/O I/O I/O I/O I/O I/O I/O O O O O O O O O O O O O I/O I/O I/O I/O I/O I/O I/O Description GND Data bit 0 Data bit 16 Data bit 1 Data bit 17 Data bit 2 Data bit 18 Data bit 3 Data bit 19 +5 VDC Not used Address bit 0 Address bit 1 Address bit 2 Address bit 3 Address bit 4 Address bit 5 Address bit 6 Not used Data bit 4 Data bit 20 Data bit 5 Data bit 21 Data bit 6 Data bit 22 Data bit 7 Data bit 23 Address bit 7 Not used +5 VDC Address bit 8 Address bit 9 RAS3 RAS2 Not used Not used Not used Not used GND CAS0 CAS2 CAS3 CAS1 RAS0 RAS1 Not used Write enable Not used Data bit 8 Data bit 24 Data bit 9 Data bit 25 Data bit 10 Data bit 26 Data bit 11 Rev. A EPL-N2000 Service Manual Appendix Table A-18 C207 MAIN Board CN9, CN10 (RAM-SIMM) (continued) Pin 56 57 58 59 60 61 62 63 64 65 66 67 68 69 70 71 72 Rev. A Signal Name DQ27 DQ12 DQ28 VDD DQ29 DQ13 DQ30 DQ14 DQ31 DQ15 NC PD1 PD2 PD3 PD4 NC VSS I/O I/O I/O I/O I/O I/O I/O I/O I/O I/O - Description Data bit 27 Data bit 12 Data bit 28 +5 VDC Data bit 29 Data bit 13 Data bit 30 Data bit 14 Data bit 31 Data bit 15 Not used Not used Not used Not used Not used Not used GND A-11 Appendix EPL-N2000 Service Manual Table A-19 C207 MAIN Board CN11 (ROM Bus) Pin 1 2 3 4 5 6 7 8 9 10 11 12 13 14 15 16 17 18 19 20 21 22 23 24 25 26 27 28 29 30 31 32 33 34 35 36 37 38 39 40 41 42 43 44 45 46 47 48 49 50 51 52 53 54 55 A-12 Signal Name +5V +5V +5V +5V D0 D16 D1 D17 D2 D18 D3 D19 D4 D20 D5 D21 D6 D22 D7 D23 D8 D24 D9 D25 D10 D26 D11 D27 D12 D28 D13 D29 D14 D30 D15 D31 GND GND CSI0X CSI2X CS00X CS01X RDX WRX BWE0X BWE2X BWE1X BWE3X A0 A1 A2 A3 A4 A5 A6 I/O I I I I I I I I I I I I I I I I I I I I I I I I I I I I I I I I I I I O O O O O O O O O O O O O O Description Power source Power source Power source Power source Data bit 0 Data bit 16 Data bit 1 Data bit 17 Data bit 2 Data bit 18 Data bit 3 Data bit 19 Data bit 4 Data bit 20 Data bit 5 Data bit 21 Data bit 6 Data bit 22 Data bit 7 Data bit 23 Data bit 8 Data bit 24 Data bit 9 Data bit 25 Data bit 10 Data bit 26 Data bit 11 Data bit 27 Data bit 12 Data bit 28 Data bit 13 Data bit 29 Data bit 14 Data bit 30 Data bit 15 Data bit 31 Ground Ground Select signal (input) Select signal (input) (not used) Select signal (output) (not used) Select signal (output) (not used) Read signal Write signal Bite enable signal Bite enable signal (not used) Bite enable signal (not used) Bite enable signal (not used) Address bit 0 Address bit 1 Address bit 2 Address bit 3 Address bit 4 Address bit 5 Address bit 6 Rev. A EPL-N2000 Service Manual Appendix Table A-19 C207 MAIN Board CN11 (ROM Bus) (continued) Pin 56 57 58 59 60 61 62 63 64 65 66 67 68 69 70 71 72 73 74 75 76 77 78 79 80 Rev. A Signal Name A7 A8 A9 A10 A11 A12 A13 A14 A15 A16 A17 A18 A19 A20 A21 A22 A23 RD/BYX RPX/RESETX VPP VPP GND GND GND GND I/O O O O O O O O O O O O O O O O O O I O - Description Address bit 7 Address bit 8 Address bit 9 Address bit 10 Address bit 11 Address bit 12 Address bit 13 Address bit 14 Address bit 15 Address bit 16 Address bit 17 Address bit 18 Address bit 19 Address bit 20 Address bit 21 Address bit 22 Address bit 23 READY/BUSY status signal Reset signal Write power source Write power source Ground Ground Ground Ground A-13 Appendix EPL-N2000 Service Manual Table A-20 C207 MAIN Board CN12 (ROM-SIMM) Pin 1 2 3 4 5 6 7 8 9 10 11 12 13 14 15 16 17 18 19 20 21 22 23 24 25 26 27 28 29 30 31 32 33 34 35 36 37 38 39 40 41 42 43 44 45 46 47 48 49 50 51 52 53 54 55 A-14 Signal Name VSS DQ0 DQ16 DQ1 DQ17 DQ2 DQ18 DQ3 DQ19 VDD RD A0 A1 A2 A3 A4 A5 A6 A10 DQ4 DQ20 DQ5 DQ21 DQ6 DQ22 DQ7 DQ23 A7 A19 VDD A8 A9 A20 EEP RESET A21 A22 A23 VSS A11 A13 A14 A12 CS0 CS1 A18 WR A17 DQ8 DQ24 DQ9 DQ25 DQ10 DQ26 DQ11 I/O I/O I/O I/O I/O I/O I/O I/O I/O O O O O O O O O O I/O I/O I/O I/O I/O I/O I/O I/O O O O O O O O O O O O O O O O O O O O I/O I/O I/O I/O I/O I/O I/O Description Power source Data bit 0 Data bit 16 Data bit 1 Data bit 17 Data bit 2 Data bit 18 Data bit 3 Data bit 19 Power source Read signal Address bit 0 Address bit 1 Address bit 2 Address bit 3 Address bit 4 Address bit 5 Address bit 6 Address bit 10 Data bit 4 Data bit 20 Data bit 5 Data bit 21 Data bit 6 Data bit 22 Data bit 7 Data bit 23 Address bit 7 Address bit 19 Power source Address bit 8 Address bit 9 Address bit 20 Select signal for EEPROM Reset signal Address bit 21 Address bit 22 Address bit 23 Power source Address bit 11 Address bit 13 Address bit 14 Address bit 12 Select signal (0) Select signal (1) Address bit 18 Read signal Address bit 17 Data bit 8 Data bit 24 Data bit 9 Data bit 25 Data bit 10 Data bit 26 Data bit 11 Rev. A EPL-N2000 Service Manual Appendix Table A-20 C207 MAIN Board CN12 (ROM-SIMM) (continued) Pin 56 57 58 59 60 61 62 63 64 65 66 67 68 69 70 71 72 Rev. A Signal Name DQ27 DQ12 DQ28 VDD DQ29 DQ13 DQ30 DQ14 DQ31 DQ15 A16 (NC) RDY/BSY NC NC NC A15 VSS I/O I/O I/O I/O I/O I/O I/O I/O I/O I/O O O - Description Data bit 27 Data bit 12 Data bit 28 Power source Data bit 29 Data bit 13 Data bit 30 Data bit 14 Data bit 31 Data bit 15 Address bit 16 Not used Not used Not used Not used Address bit 15 Power source A-15 Appendix EPL-N2000 Service Manual Table A-21 C207 MAIN Board CN14 (IC Card Slot) Pin 1 2 3 4 5 6 7 8 9 10 11 12 13 14 15 16 17 18 19 20 21 22 23 24 25 26 27 28 29 30 31 32 33 34 35 36 37 38 39 40 41 42 43 44 45 46 47 48 49 50 51 52 53 54 55 A-16 Signal Name GND D3 D4 D5 D6 D7 CE1 A10 0E A11 A9 A8 A13 A14 WE RDY/BCYX +5V VPP1 A16 A15 A12 A7 A6 A5 A4 A3 A2 A1 A0 D0 D1 D2 WP GND GND CD1 D11 D12 D13 D14 D15 CD2 RFSH NC NC A17 A18 A19 A20 A21 +5V VPP2 A22 A23 A24 I/O I/O I/O I/O I/O I/O O O O O O O O O O O O O O O O O O O O O I/O I/O I/O I O O O O O I O O O O O O O O Description GND Data bit 3 Data bit 4 Data bit 5 Data bit 6 Data bit 7 Chip select 1 Address bit 10 Output enable Address bit 11 Address bit 9 Address bit 8 Address bit 13 Address bit 14 Write enable Not used +5 VDC +5 VDC Address bit 16 Address bit 15 Address bit 12 Address bit 7 Address bit 6 Address bit 5 Address bit 4 Address bit 3 Address bit 2 Address bit 1 Address bit 0 Data bit 0 Data bit 1 Data bit 2 Not used GND GND Card ID 1 Data bit 11 Data bit 12 Data bit 13 Data bit 14 Data bit 15 Card ID 2 Not used Not used Not used Address bit 17 Address bit 18 Address bit 19 Address bit 20 Address bit 21 +5 VDC Not used Address bit 22 Address bit 23 Address bit 24 Rev. A EPL-N2000 Service Manual Appendix Table A-21 C207 MAIN Board CN14 (IC Card Slot) (continued) Pin 56 57 58 59 60 61 62 63 64 65 66 67 68 Signal Name A25 NC RESET WAIT NC REG BVD2 BVD1 D8 D9 D10 CD2 GND I/O O O O I/O I/O I/O - Description Address bit 25 Not used Reset signal Not used Not used Card select Not used Not used Data bit 8 Data bit 9 Data bit 10 Not used GND Table A-22 C207 MAIN Board CN15 (Control Panel) Pin 1 2 3 4 5 6 7 8 9 10 11 12 13 14 15 16 17 18 19 20 Rev. A Signal Name LCDCLK GND SWINIT GND LCD A1 LED SWRD NC LCDWR DB0 DB1 DB2 DB3 DB4 DB5 DB6 DB7 +5V +5V I/O O I O I O O O I/O I/O I/O I/O I/O I/O I/O I/O - Description System clock GND Switch interupt request GND Select of LCD Address bit 1 LED data write signal Switch data read signal Not used LCD data write signal Data bit 0 Data bit 1 Data bit 2 Data bit 3 Data bit 4 Data bit 5 Data bit 6 Data bit 7 +5 VDC +5 VDC A-17 Appendix EPL-N2000 Service Manual A.2 Exploded Diagrams Figure A-2. Housing A-18 Rev. A EPL-N2000 Service Manual Appendix Figure A-3. Frames Rev. A A-19 Appendix EPL-N2000 Service Manual Fifure A-4. Paper Takeup Section (1) A-20 Rev. A EPL-N2000 Service Manual Appendix Figure A-5. Paper Takeup Section (2) Rev. A A-21 Appendix EPL-N2000 Service Manual Figure A-6. Drive Unit A-22 Rev. A EPL-N2000 Service Manual Appendix Fifure A-7. Transfer Unit Rev. A A-23 Appendix EPL-N2000 Service Manual Figure A-8. Fusing Unit A-24 Rev. A EPL-N2000 Service Manual Appendix Figure A-9. Paper Cassette Unit Rev. A A-25 Appendix EPL-N2000 Service Manual Figure A-10. Lower Paper Cassette (Standard) A-26 Rev. A EPL-N2000 Service Manual Appendix Figure A-11. Lower Paper Cassette (Optional) Rev. A A-27 Appendix EPL-N2000 Service Manual Figure A-12. Optional Duplex Unit A-28 Rev. A EPL-N2000 Service Manual Appendix A.3 CIRCUIT BOARD COMPONENT LAYOUT Figure A-13. C202 MAIN Board Component Layout (Front) Rev. A A-29 Appendix EPL-N2000 Service Manual Figure A-14. C207 MAIN Board Component Layout (Rear) A-30 Rev. A EPL-N2000 Service Manual Appendix 8 14 C1 19 CN1 79 PJ9 C2 R5 PJ4 R3 PJ2 . 1 PJ15 1 C1 PJ7 PJ6 PJ1 C4 PJ3 PJ5 PJ 14 PJ 13PJ 1 PJ11 PJ17 PJ18 -711V C2 7 PROG EPSON R4 R2 2 PJ16 9 R11 R8 C8 2 23149 4 R1 IC1 R9 PJ12 PJ8 C9 IC2 IC6 IC4 IC3 C7 R1 PJ19 R13 R12 UNIT C3 IC5 2 2 3 1 48 IC7 ASSY . C6 IC8 C5 Figure A-15. C207 MAIN Board PROG Component Layout Rev. A A-31 Appendix EPL-N2000 Service Manual CN7 CPU_BUS CC L L TS RK K X B E MA R R E O OT GB MR L R ME D I I I I AA AA GG GG+ + S U U A RR E R O_ E A | R R R R C C C C CC S S S S A A A A A A NN N N 5 5 E T T L NE X OC OP D WA L L L L S S S S S S I I I I 3 3 2 22 2 DD D D V V T 2 1 1 T Q C R K V GY R S 3 2 1 0 5 4 3 2 1 0 3 2 1 0 1 0 9 8 7 6 4 33321 333322 222222 21 333 2 1111 11 111 9 8765 43 0 987 365465 843217 09 210 9 8765 43 210 IC2 1 IN 2 GND OUT 3 LM3940IT-3.3 1 CCC CCC SSS SSS 543 210 1 C59 1u/50V 2 A.4 CIRCUIT DIAGRAMS AA 22 76 C60 2 33u/ A[0..27] DO[0..31] IC1 C61 0.1U 5 18 26 61 77 86 100 121 139 144 157 175 180 204 IO_VDD IO_VDD IO_VDD IO_VDD IO_VDD IO_VDD IO_VDD IO_VDD IO_VDD IO_VDD IO_VDD IO_VDD IO_VDD IO_VDD 6 19 27 64 79 93 99 118 128 147 152 174 185 203 IO_VSS IO_VSS IO_VSS IO_VSS IO_VSS IO_VSS IO_VSS IO_VSS IO_VSS IO_VSS IO_VSS IO_VSS IO_VSS IO_VSS C62 0.1U 7 21 28 38 57 69 70 71 84 97 107 112 142 167 182 C58 0.1U C57 0.1U 12 20 36 54 56 68 74 85 106 115 134 143 168 183 43 C56 0.1U 42 1 2 3 4 31 98 119 129 130 153 190 191 197 205 206 88 81 17 16 14 24 15 13 49 46 45 44 53 52 51 50 41 55 48 47 39 CN8 B3 A3 B2 A2 B5 A5 B4 A4 1 2 A7 B7 A9 B11 B9 A11 B14 A14 ASX ERRORX BGRNTX CLKOUT1 RESETX RESETINX A12 B12 A13 B13 J2 PJ6 EMU_BRK VDD VDD VDD VDD VDD VDD VDD VDD VDD VDD VDD VDD VDD VDD VDD 3 PID MP:Open Dev.:Short VSS VSS VSS VSS VSS VSS VSS VSS VSS VSS VSS VSS VSS VSS D0 D1 D2 D3 D4 D5 D6 D7 D8 D9 D10 D11 D12 D13 D14 D15 D16 D17 D18 D19 D20 D21 D22 D23 D24 D25 D26 D27 D28 D29 D30 D31 111 110 109 108 105 104 102 101 96 95 94 92 91 90 89 87 83 82 80 78 76 75 73 72 67 66 65 63 62 60 59 58 DO0 DO1 DO2 DO3 DO4 DO5 DO6 DO7 DO8 DO9 DO10 DO11 DO12 DO13 DO14 DO15 DO16 DO17 DO18 DO19 DO20 DO21 DO22 DO23 DO24 DO25 DO26 DO27 DO28 DO29 DO30 DO31 A2 A3 A4 A5 A6 A7 A8 A9 A10 A11 A12 A13 A14 A15 A16 A17 A18 A19 A20 A21 A22 A23 A24 A25 A26 A27 163 164 165 166 169 170 172 173 176 178 179 181 184 186 187 189 192 193 194 196 199 200 201 202 207 208 AO2 AO3 AO4 AO5 AO6 AO7 AO8 AO9 AO10 AO11 AO12 AO13 AO14 AO15 AO16 AO17 AO18 AO19 AO20 AO21 AO22 AO23 AO24 AO25 AO26 AO27 BE0 BE1 BE2 BE3 ASI0|VDAT4 ASI1|VDAT5 ASI2|VDAT6 ASI3|VDAT7 PARITY0 PARITY1 PARITY2 PARITY3 D[0..31] AO[0..25] 150 149 148 146 4 3 2 1 151 154 155 156 188 195 37 40 RM17 4 3 2 1 5 6 7 8 DO0 DO1 DO2 DO3 DO4 DO5 DO6 DO7 DO8 DO9 DO10 DO11 DO12 DO13 DO14 DO15 DO16 DO17 DO18 DO19 DO20 DO21 DO22 DO23 DO24 DO25 DO26 DO27 DO28 DO29 DO30 DO31 RM11 2 3 4 RM21 2 3 4 RM31 2 3 4 RM41 2 3 4 RM51 2 3 4 RM61 2 3 4 RM71 2 3 4 RM81 2 3 4 8 7 6 5 8 7 6 5 8 7 6 5 8 7 6 5 8 7 6 5 8 7 6 5 8 7 6 5 8 7 6 5 AO2 AO3 AO4 AO5 AO6 AO7 AO8 AO9 AO10 AO11 AO12 AO13 AO14 AO15 AO16 AO17 AO18 AO19 AO20 AO21 AO22 AO23 AO24 AO25 AO26 AO27 RM94 3 2 1 RM10 4 3 2 1 RM11 4 3 2 1 RM12 4 3 2 1 4 RM13 3 2 1 RM14 4 3 2 1 R24 R25 5 6 7 8 5 6 7 8 5 6 7 8 5 6 7 8 5 6 7 8 5 6 7 8 33 33 D0 D1 D2 D3 D4 D5 D6 D7 D8 D9 D10 D11 D12 D13 D14 D15 D16 D17 D18 D19 D20 D21 D22 D23 D24 D25 D26 D27 D28 D29 D30 D31 33/4 33/4 33/4 33/4 33/4 33/4 33/4 33/4 33/4 33/4 33/4 33/4 33/4 33/4 5 6 7 8 RM16 10K/4 R100 R101 R102 10K 10K 10K TP2 ASX R30 R29 33 R28 33 TP1 R/WX CS0 CS1 CS2 CS3 CS4 CS5 J1 DOE FLOAT 7 38 22 66 156 157 158 159 12 33 51 67 82 100 121 139 155 170 1 23 44 56 77 89 111 132 144 165 BTEST CTEST ITEST3 ITEST2 ITEST1 ITEST0 VDD5 VDD5 VDD5 VDD5 VDD5 VDD5 VDD5 VDD5 VDD5 VDD5 VDD3 VDD3 VDD3 VDD3 VDD3 VDD3 VDD3 VDD3 VDD3 VDD3 3 1 2 7 D31 D30 D29 D28 D27 D26 D25 D24 D23 D22 D21 D20 D19 D18 D17 D16 D15 D14 D13 D12 D11 D10 D9 D8 D7 D6 D5 D4 D3 D2 D1 D0 2 3 4 5 8 9 10 11 13 14 15 16 18 19 20 21 24 25 26 27 29 30 31 32 34 35 36 37 40 41 42 43 DO31 DO30 DO29 DO28 DO27 DO26 DO25 DO24 DO23 DO22 DO21 DO20 DO19 DO18 DO17 DO16 DO15 DO14 DO13 DO12 DO11 DO10 DO9 DO8 DO7 DO6 DO5 DO4 DO3 DO2 DO1 DO0 A27 A26 A25 A24 A23 A22 A21 A20 A19 A18 A17 A16 A15 A14 A13 A12 A11 A10 A9 A8 A7 A6 A5 A4 A3 A2 131 130 129 128 125 124 123 122 120 119 118 117 115 114 113 112 109 108 107 106 104 103 102 101 99 98 AO27 AO26 AO25 AO24 AO23 AO22 AO21 AO20 AO19 AO18 AO17 AO16 AO15 AO14 AO13 AO12 AO11 AO10 AO9 AO8 AO7 AO6 AO5 AO4 AO3 AO2 6 17 28 39 45 50 61 72 83 88 94 105 116 127 133 138 149 160 171 176 VSS VSS VSS VSS VSS VSS VSS VSS VSS VSS VSS VSS VSS VSS VSS VSS VSS VSS VSS VSS 63 96 97 161 162 163 164 166 167 168 169 172 173 174 175 RESERVED AS 76 RESERVED R/W 78 RESERVED RESERVED READY 110 64 RESERVED ERROR 65 RESERVED LOCK 95 RESERVED NONCACHE 126 RESERVED MEXC RESERVED RDYOUT 79 RESERVED RESERVED BREQ 68 RESERVED BGRNT 70 RESERVED PBREQ 69 BMREQ 73 RESERVED BMACK 71 RESERVED IDLEEN 150 75 SAMEPAGE OVF 74 IRL3/IRQ15 IRL2/IRQ14 IRL1/IRQ13 IRL0/IRQ12 ASI3 ASI2 ASI1 ASI0 CS5 CS4 CS3 CS2 CS1 CS0 BE3 BE2 BE1 BE0 PDOWN WKUP RESET 88 89 90 91 92 93 143 141 110 CS0 CS1 CS2 CS3 CS4 CS5 AS RD_WR READY 138 LOCK MA0 MA1 MA2 MA3 MA4 MA5 MA6 MA7 MA8 MA9 MA10 RAS5 RAS4 RAS3 RAS2 RAS1 RAS0 CAS3 CAS2 CAS1 CAS0 WE DB0 DB1 DB2 DB3 DB4 DB5 DB6 DB7 AB0 AB1 AB2 AB3 AB4 AB5 AB6 AB7 BE0 BE1 BE2 BE3 IREQ0 IREQ1 IREQ2 IREQ3 IREQ4 IREQ5 IREQ6 IREQ7 NMI FL3 TX14271NB 1 SW1 PB FL1 TH09502NA 1 8 5 OUT 1 N.C. CJ 4 R34 3 GND 13 C66 40M 2 0 EECS EESK EEDO EEDI 6 1 NC 2 NC 3 NC 8 NC C GND RESET MCLK 68 DS CP R 1 1IC4A 4 5 +Q 5 R35 G N 6 DQ 5 6 7 8 MA4 MA5 MA6 MA7 MA8 MA9 MA10 R111 RM53 22/4 D[0..31] MA[0..10] MA[0..10] RAS5X RAS4X RAS3X RAS2X RAS1X RAS0X CAS_LLX CAS_LHX CAS_HLX CAS_HHX 22 AB0 AB1 AB2 AB3 AB4 AB5 AB6 AB7 WEX RAM_MOD.SCH I/F Module DB[0..7] DB[0..7] AB[0..7] AB[0..7] IREQ1X IREQ2X IREQ7X NMIX IREQ4X DREQ0X DREQ1X DREQ2X DREQ3X IORSTX RESETX PCLK INH CMREQX WRRDYX RDREQX RBX WBX RCX WCX DS0X DS1X DS2X DS7X WP_I BPICLK LCD0X 172 173 174 178 179 180 181 182 171 R124 R108 68 22 5 5 5 5 5 5 5 55 5 5 5 V V V V V V V VV V V V 12 467911 1112 07 319713 4680 41 7531 9 8 175 LCLK 177 SWINT 159 GG GGGGGG GGGGGG GGGGG GGG NN NNNNNN NNNNNN NNNNN NNN DD DDDDDD DDDDDD DDDDD DDD 21 1 08 8 66 7 0.1U C128 0.1U C130 2MCLK IRQ5X LCLK LCD0X LEDX SWRDX R120 R121 22 22 R109 22 R38 C68 1U 10K 1 2 SWINT R37 47K VIDEO.SCH Net_Card Module D[0..31] 169 156 A[0..27] ASX RWX READYX CS3X 139 10K BE3 BE2 BE1 BE0 BE00X BE08X BE16X BE24X WP IREQ0X IREQ6X RESETX E_RSTX DREQX DACKX 0.1U MCLK NETCARD.sch PJ18 J4 STSX ETBSYX PRRDYX EPRDYX CTBSYX SRCLK CMDX CPRDYX PRINTX LCDWRX 1 2 3 5 67 7 8 8 9 1 1 1 1 1 11 1 12 1 3 5 6 8 0 02 8 2 5 6 0 1 1 3 4 56 7 80 4 7 3 9 0 2 44 6 90 6 0.1U C129 DB[0..7] WBX RBX VDATA0 VDATA1 VCLK R110 TT EE SS NT T C0 1 AB[0..7] RITX RESETX E_RSTX HSOUTX TODX 33/4 5 6 7 8 5 6 7 8 33/4 13 158 157 14 16 STSX ETBSYX PRRDYX EPRDYX CTBSYX SRCLK CMDX CPRDYX PRINTX at_if.sch Video_IF MODULE DB[0..7] RM50 4 3 2 1 4 3 2 1 RM51 BE0X BE1X BE2X BE3X ROM_MOD.SCH RAM Module M51953BFP R36 13 68 C67 0 22/4 5 6 7 8 4 3 2 1 BE0 BE1 BE2 BE3 RM49 68/4 1 8 2 7 3 6 4 5 R98 68 R99 68 RM48 47/4 1 8 2 7 3 6 4 5 202 203 204 205 4 5 6 7 DCLK NACK NREQ 25 RESETX RDX WRX RM55 4 3 2 1 DB0 DB1 DB2 DB3 DB4 DB5 DB6 DB7 184 185 190 191 192 193 194 195 A[0..27] EEPX 33 196 197 198 199 207 208 1 2 168 160 161 170 11 12 TOL TOP VDO0 VDO1 MN93C86A 28 100 155 188 EIF C127 2 R33 C63 1U 3 19 18 20 21 C148 0.1U PJ3 CR1 VCC 5 4 1 1 2 3 4 6 7 87 86 84 83 INH CMREQ WRRDY RDREQ RC WC RDYIN IC3 VCC OUT C64 0.1U 10 1K IC38 VCC CS SK DI DO ORG GND NC BMREQ BMACK 73 71 52 51 49 48 IORST PCLK BREQ BGRNT 140 109 69 70 74 75 105 106 108 126 127 134 135 D[0..31] CS0X CS1X CS2X AB[0..7] IRL0 IRL1 IRL2 IRL3 WKUP CS0 CS1 CS2 CS3 101 102 150 151 152 153 MEXC 103 A[0..27] 17 DREQ0 DREQ1 DREQ2 DREQ3 DS0 DS1 DS2 DS3 DS4 DS5 DS6 DS7 5 CLKDBL BMODE16 BMODE8 CS0 CS1 CS2 CS3 CS4 CS5 MA0 MA1 MA2 MA3 R123 RD WR TP5 GND C126 0.1U R32 4 62 122 123 124 125 PEE PJ20 CJ J3 C65 0.1U 145 BE0 BE1 BE2 BE3 S_Reset 2 CAS0 CAS1 CAS2 CAS3 TP4 MCLK 8 3 57 58 59 60 D0 D1 D2 D3 D4 D5 D6 D7 D8 D9 D10 D11 D12 D13 D14 D15 D16 D17 D18 D19 D20 D21 D22 D23 D24 D25 D26 D27 D28 D29 D30 D31 RM54 5 6 7 8 22/4 CJ CJ 2 RAS0 RAS1 RAS2 RAS3 167 166 163 162 149 148 145 144 133 132 129 128 116 115 112 111 99 98 95 94 81 80 77 76 63 62 59 58 40 39 37 36 4 3 2 1 WB RB 3 52 53 54 55 D0 D1 D2 D3 D4 D5 D6 D7 D8 D9 D10 D11 D12 D13 D14 D15 D16 D17 D18 D19 D20 D21 D22 D23 D24 D25 D26 D27 D28 D29 D30 D31 104 137 33/4 RM15 4 5 3 6 2 7 1 8 R26 33 R27 33 C131 0.1U IC41 DWE3 DWE2 DWE1 DWE0 A2 A3 A4 A5 A6 A7 A8 A9 A10 A11 A12 A13 A14 A15 A16 A17 A18 A19 A20 A21 A22 A23 A24 A25 A26 A27 117 118 120 121 MB86936 46 47 48 49 22 23 24 29 30 31 32 33 34 35 41 42 44 45 46 47 53 54 55 56 57 64 65 66 67 68 33 D[0..31] IC39 SLAM A2 A3 A4 A5 A6 A7 A8 A9 A10 A11 A12 A13 A14 A15 A16 A17 A18 A19 A20 A21 A22 A23 A24 A25 A26 A27 136 C55 A8 TP3 RDYX R31 A1 B1 A6 B6 B8 A10 B10 A15 B15 ROM Module BE0 BE1 BE2 BE3 0.1U EMULATOR BUS CS[0..5] A2 A3 A4 A5 A6 A7 A8 A9 A10 A11 A12 A13 A14 A15 A16 A17 A18 A19 A20 A21 A22 A23 A24 A25 A26 A27 33/4 AVDD 126 AS 125 RD|WR READY 117 141 SAMEPG|RAS3 25 AVSS TMR_OVF|RAS2 123 LOCK 122 ERROR 116 VDAT3 MEXC VDAT2 VDAT1 11 IRL0|IRQ12 VDAT0 10 IRL1|IRQ13 9 IRL2|IRQ14 8 IRL3|IRQ15 RAS0 114 DWE BREQ CAS0 BGRNT 120 CAS1 131 CAS2 CS0 133 CAS3 CS1 135 TIMEROUT0 CS2 136 LSYNC CS3 137 NC CS4 140 PSYNC CS5|RAS1 VCLK 30 XTAL1 29 XTAL2 33 PJ21 CLKOUT1 35 PJ22 BMODE8 CLKOUT2 113 BMODE16 RESET TMS TCK BMREQ 103 124 TDI BMACK TDO PBREQ 127 TRST DREQ0 132 138 CLK_ECB DREQ1 EMU_SD0 DREQ2 22 145 EMU_SD1 DACK0 158 EMU_SD2 DACK1 23 EMU_SD3 DACK2 171 EMU_D0 EOP0 177 EMU_D1 EOP1 34 EMU_D2 EOP2 EMU_D3 RDYOUT 159 160 EMU_BRK PDRESET EMU_ENB NVWE 161 EMU_VDD OE 162 198 CLKDBL EMU_VSS PID NONCACHE 32 BE[0..3] CJ 3 2 7 74LV74 Clock_Sel_1 PJ19 CJ 1 0 IC4B 12 11 DS R125 10 CP R 1 3 R104 Q 9 Q 8 13 10 C142 2 74LV74 NFM51R10P107 140 141 142 143 134 135 136 137 80 81 84 85 86 87 90 91 92 93 TP7 WKUP 146 147 TP6 148 WKUP CLKIN 154 CLKSEL1 CLKSEL2 CLKEXT 151 152 153 Figure A-16. C207 MAIN BOARD (CPU) Rev. A MB86830 PJ14 Sel15 PJ15 Sel1G PJ16 Sel25 PJ17 Sel2G A-32 Appendix EPL-N2000 Service Manual CN12 ROM_SIMM W R N N R / C C L B V V V S S S S S S 7 6 6 6 0 9 8 7 7 3 1 2 9 V V V C C C C C C C83 5 3 1 9 0 0 R E S W E R R T U D 3 4 1 5 7 1 E C C E S S P 1 0 3 4 4 4 5 4 A A A A A A A A A A A A A A 2 2 2 2 1 1 1 1 1 1 1 1 1 1 A A A A A A A A A A 3 2 1 0 9 8 7 6 5 4 3 2 1 0 9 8 7 6 5 4 3 2 1 0 D D D D D D D D D D D D D D D D D D D D D D 3 3 2 2 2 2 2 2 2 2 2 2 1 1 1 1 1 1 1 1 1 1 D D D D D D D D D D 1 0 9 8 7 6 5 4 3 2 1 0 9 8 7 6 5 4 3 2 1 0 9 8 7 6 5 4 3 2 1 0 3 3 3 3 2 4 4 6 7 4 4 4 4 1 3 3 2 1 1 1 1 1 1 1 8 7 6 3 9 6 8 6 1 2 1 3 0 9 2 1 8 8 7 6 5 4 3 2 6 6 6 5 5 5 5 5 2 2 2 2 9 7 5 3 6 6 6 5 5 5 5 4 2 2 2 2 8 6 4 2 4 2 0 8 6 4 2 0 7 5 3 1 5 3 1 7 5 3 1 9 6 4 2 0 A A A A A A A A A A A A A A A A A A A A A A A A 2 2 2 2 2 2 1 1 1 1 1 1 1 1 1 1 9 8 7 6 5 4 3 2 5 4 3 2 1 0 9 8 7 6 5 4 3 2 1 0 D D D D D D D D D D D D D D D D D D D D D D D D D D D D D D D D 3 3 2 2 2 2 2 2 2 2 2 2 1 1 1 1 1 1 1 1 1 1 9 8 7 6 5 4 3 2 1 0 1 0 9 8 7 6 5 4 3 2 1 0 9 8 7 6 5 4 3 2 1 0 0.1U A[0..27] A[0..27] D[0..31] D[0..31] A A 2 2 2 1 EEPX PJ13 K_WRL WRX J141 2 3 F/M_Sel11 RESETX J151 2 RDX 3 F/M_Sel12 IC19 A26 A27 2 3 1A 1B J12 CS2X 1 2 1 3 A24 A25 WW/2Byte 1G 14 13 15 2G C84 0.1U R40 R39 33 33 12 11 10 9 2Y0 2Y1 2Y2 2Y3 2A 2B 16 4 5 6 7 1Y0 1Y1 1Y2 1Y3 VCC 8 R122 GND 74F139 10K 2 1 CS0X J8 IC17A 1 3 3 IC18A SIDE 2 1 74LS04 R42 R41 33 2 74F32 CS1X 10K R112 IC40 7 C144 0.1U C145 0.22U IC42F 1K VCC 6 OUT 5 4 C GND NC NC NC NC 13 12 IC17D 12 1 2 3 8 11 74F04 13 74F32 M51953BFP Connect to IC18 pin 14 and 7 C140 0.1U Connect to IC17 pin 14 and 7 A A A A A A A A A A A A A A A A A A A 2 1 1 1 1 1 1 1 1 1 1 9 8 7 6 5 4 3 2 0 9 8 7 6 5 4 3 2 1 0 A A A A A A A A A A A A A A A A A A A 2 1 1 1 1 1 1 1 1 1 1 9 8 7 6 5 4 3 2 0 9 8 7 6 5 4 3 2 1 0 C141 0.1U 1 1 4 2 O C E E N N A A A A A A A A A A A A A A A A A A A A . . 1 1 1 1 1 1 1 1 1 1 9 8 7 6 5 4 3 2 1 0 C C 9 8 7 6 5 4 3 2 1 0 . . IC16 O C E E BE3X 3 1 2 3 2 3 3 3 C82 BE1X 0.1U O O O O O O 1 1 1 1 1 1 O O O O O O O O O O 5 4 3 2 1 0 9 8 7 6 5 4 3 2 1 0 3 2 2 2 2 2 1 1 3 2 2 2 2 1 1 1 1 9 7 5 2 0 8 6 0 8 6 4 1 9 7 5 D D D D D D D D D D D D D D D D 3 3 2 2 2 2 2 2 2 2 2 2 1 1 1 1 1 0 9 8 7 6 5 4 3 2 1 0 9 8 7 6 4 4 3 3 3 3 3 3 4 4 4 1 1 1 4 3 2 3 4 5 6 7 8 9 0 1 2 4 5 6 7 8 9 0 1 N N A A A A A A A A A A A A A A A A A A A A . . 1 1 1 1 1 1 1 1 1 1 9 8 7 6 5 4 3 2 1 0 C C 9 8 7 6 5 4 3 2 1 0 . 8/16M MASK/SOP B V Y D T D E G G N N D D BE2X 1 1 4 2 4 4 3 3 3 3 3 3 4 4 4 1 1 1 4 3 2 3 4 5 6 7 8 9 0 1 2 4 5 6 7 8 9 0 1 . 8/16M MASK/SOP B V Y D T D E G G N N D D 3 1 2 3 2 3 3 3 C81 IC15 O O O O O O 1 1 1 1 1 1 O O O O O O O O O O 5 4 3 2 1 0 9 8 7 6 5 4 3 2 1 0 3 2 2 2 2 2 1 1 3 2 2 2 2 1 1 1 1 9 7 5 2 0 8 6 0 8 6 4 1 9 7 5 D D D D D D D D D D D D D D D D 1 1 1 1 1 1 9 8 7 6 5 4 3 2 1 0 5 4 3 2 1 0 0.1U BE0X PJ1 WR_Enb MP:Short Dev.:Close W/W:Close PJ2 DTCT_Enb A A A A A A A A A A A A A A A A A A A A A A A A 2 2 2 2 2 2 1 1 1 1 1 1 1 1 1 1 9 8 7 6 5 4 3 2 5 4 3 2 1 0 9 8 7 6 5 4 3 2 1 0 C149 0.1U 8 7 7 7 3 0 9 8 7 8 V V V V W S S S S R S S S S 1 3 7 D T C T 4 3 2 1 V V V V C C C C C C C C 7 7 6 5 V V P P P P 7 7 4 3 R E S E T R D / B Y 4 4 4 4 8 6 7 5 B W E 3 B W E 2 B W E 1 B W E 0 4 4 4 3 W R R D 0 4 4 2 1 C S O 1 C S O 0 4 3 0 9 C S I 1 C S I 0 7 7 7 6 6 6 6 6 6 6 6 6 6 5 5 5 5 5 5 5 5 5 5 4 2 1 0 9 8 7 6 5 4 3 2 1 0 9 8 7 6 5 4 3 2 1 0 9 A A A A A A A A A A A A A A A A A A A A A A A A 2 2 2 2 1 1 1 1 1 1 1 1 1 1 9 8 7 6 5 4 3 2 1 0 3 2 1 0 9 8 7 6 5 4 3 2 1 0 D D D D D D D D D D D D D D D D D D D D D D D D D D D D D D D D 3 3 2 2 2 2 2 2 2 2 2 2 1 1 1 1 1 1 1 1 1 1 9 8 7 6 5 4 3 2 1 0 1 0 9 8 7 6 5 4 3 2 1 0 9 8 7 6 5 4 3 2 1 0 3 3 3 3 2 2 2 2 2 1 1 1 1 1 3 3 3 2 2 2 2 2 1 1 1 1 1 6 4 2 0 8 6 4 2 0 8 6 4 2 0 8 6 5 3 1 9 7 5 3 1 9 7 5 3 1 9 7 5 D D D D D D D D D D D D D D D D D D D D D D D D D D D D D D D D 3 3 2 2 2 2 2 2 2 2 2 2 1 1 1 1 1 1 1 1 1 1 9 8 7 6 5 4 3 2 1 0 1 0 9 8 7 6 5 4 3 2 1 0 9 8 7 6 5 4 3 2 1 0 CN11 ROM_BUS Rev. A Figure A-17. C207 MAIN BOARD (ROM/ROM-SIMM) A-33 Appendix D[0..31] MA[0..10] EPL-N2000 Service Manual D[0..31] MA[0..10] RAS0X RAS1X CAS_LLX CAS_LHX CAS_HLX CAS_HHX WEX RAS2X RAS3X RAS4X RAS5X Only use for 4M DRAM PJ9 S_MA00 C133 MA0 0.1U PJ10 CN9 2 4 6 8 20 22 24 26 49 51 53 55 57 61 63 65 3 5 7 9 21 23 25 27 50 52 54 56 58 60 62 64 D0 D1 D2 D3 D4 D5 D6 D7 D8 D9 D10 D11 D12 D13 D14 D15 D16 D17 D18 D19 D20 D21 D22 D23 D24 D25 D26 D27 D28 D29 D30 D31 36 37 35 38 12 13 14 15 16 17 18 28 31 32 19 MA0 MA1 MA2 MA3 MA4 MA5 MA6 MA7 MA8 MA9 MA10 11 29 46 48 66 71 40 43 41 42 44 45 34 33 47 10 30 59 DQ0 DQ1 DQ2 DQ3 DQ4 DQ5 DQ6 DQ7 DQ8 DQ9 DQ10 DQ11 DQ12 DQ13 DQ14 DQ15 DQ16 DQ17 DQ18 DQ19 DQ20 DQ21 DQ22 DQ23 DQ24 DQ25 DQ26 DQ27 DQ28 DQ29 DQ30 DQ31 2 4 6 8 20 22 24 26 49 51 53 55 57 61 63 65 3 5 7 9 21 23 25 27 50 52 54 56 58 60 62 64 36 37 35 38 MP0 MP1 MP2 MP3 A0 A1 A2 A3 A4 A5 A6 A7 A8 A9 A10 12 13 14 15 16 17 18 28 31 32 19 MA0 MA1 MA2 MA3 MA4 MA5 MA6 MA7 MA8 MA9 MA10 11 29 46 48 66 71 N.C. N.C. N.C. N.C. N.C. N.C. CAS0 CAS1 CAS2 CAS3 RAS0 RAS1 RAS2 RAS3 WE 40 43 41 42 44 45 34 33 47 10 30 59 VCC VCC VCC C69 0.1U PJ11 S_MA90 CN10 D0 D1 D2 D3 D4 D5 D6 D7 D8 D9 D10 D11 D12 D13 D14 D15 D16 D17 D18 D19 D20 D21 D22 D23 D24 D25 D26 D27 D28 D29 D30 D31 DQ0 DQ1 DQ2 DQ3 DQ4 DQ5 DQ6 DQ7 DQ8 DQ9 DQ10 DQ11 DQ12 DQ13 DQ14 DQ15 DQ16 DQ17 DQ18 DQ19 DQ20 DQ21 DQ22 DQ23 DQ24 DQ25 DQ26 DQ27 DQ28 DQ29 DQ30 DQ31 MA9 PJ12 N.C. N.C. N.C. N.C. N.C. N.C. MA4 MA5 MA6 MA7 MA8 67 68 69 70 VSS VSS VSS PD1 PD2 PD3 PD4 RAM SIMM2 17 18 19 20 23 24 25 26 27 28 14 31 30 13 29 1 6 21 A0 A1 A2 A3 A4 A5 A6 A7 A8 A9 RAS LCAS UCAS WE OE VCC VCC VCC C72 0.1U 22 37 42 IC12 IO1 IO2 IO3 IO4 IO5 IO6 IO7 IO8 IO9 IO10 IO11 IO12 IO13 IO14 IO15 IO16 N.C. N.C. N.C. N.C. N.C. 2 3 4 5 7 8 9 10 33 34 35 36 38 39 40 41 D0 D1 D2 D3 D4 D5 D6 D7 D8 D9 D10 D11 D12 D13 D14 D15 11 12 15 16 32 MA4 MA5 MA6 MA7 MA8 17 18 19 20 23 24 25 26 27 28 VSS VSS VSS 14 31 30 13 29 CAS0 CAS1 CAS2 CAS3 1 6 21 RAS0 RAS1 RAS2 RAS3 A0 A1 A2 A3 A4 A5 A6 A7 A8 A9 RAS LCAS UCAS WE OE VCC VCC VCC C71 0.1U WE 22 37 42 VCC VCC VCC 67 68 69 70 10 11 12 13 16 17 18 19 20 9 6 21 8 23 7 22 IO1 IO2 IO3 IO4 IO5 IO6 IO7 IO8 IO9 IO10 IO11 IO12 IO13 IO14 IO15 IO16 N.C. N.C. N.C. N.C. N.C. 2 3 4 5 7 8 9 10 33 34 35 36 38 39 40 41 D16 D17 D18 D19 D20 D21 D22 D23 D24 D25 D26 D27 D28 D29 D30 D31 IO1 IO2 IO3 IO4 IO5 IO6 IO7 IO8 VCC VCC 2 3 4 5 24 25 26 27 D0 D1 D2 D3 D4 D5 D6 D7 1 14 C78 RAS CAS WE GND OE GND 0.1U 15 28 VSS VSS VSS PD1 PD2 PD3 PD4 Figure A-18. C207 MAIN BOARD (RAM/RAM-SIMM) IO1 IO2 IO3 IO4 IO5 IO6 IO7 IO8 VCC VCC 2 3 4 5 24 25 26 27 D8 D9 D10 D11 D12 D13 D14 D15 1 14 C77 RAS CAS WE GND OE GND 0.1U 15 28 IC10 MA0 MA1 MA2 MA3 MA4 MA5 MA6 MA7 MA8 MA9 MA10 10 11 12 13 16 17 18 19 20 9 6 21 8 23 7 22 A0 A1 A2 A3 A4 A5 A6 A7 A8 A9 NC NC IO1 IO2 IO3 IO4 IO5 IO6 IO7 IO8 VCC VCC 2 3 4 5 24 25 26 27 D16 D17 D18 D19 D20 D21 D22 D23 1 14 C76 RAS CAS WE GND OE GND 0.1U 15 28 4M DRAM*8 IC9 MA0 MA1 MA2 MA3 MA4 MA5 MA6 MA7 MA8 MA9 MA10 10 11 12 13 16 17 18 19 20 9 6 21 8 23 7 22 RAM SIMM1 A0 A1 A2 A3 A4 A5 A6 A7 A8 A9 NC NC 4M DRAM*8 11 12 15 16 32 VSS VSS VSS Rev. A A0 A1 A2 A3 A4 A5 A6 A7 A8 A9 NC NC IC11 IC5 MA1 MA2 MA3 10 11 12 13 16 17 18 19 20 9 6 21 8 23 7 22 MA0 MA1 MA2 MA3 MA4 MA5 MA6 MA7 MA8 MA9 MA10 16M DRAM 1 39 72 MA0 MA1 MA2 MA3 MA4 MA5 MA6 MA7 MA8 MA9 MA10 4M DRAM*8 16M DRAM C70 0.1U 1 39 72 S_MA91 IC6 MA1 MA2 MA3 MP0 MP1 MP2 MP3 A0 A1 A2 A3 A4 A5 A6 A7 A8 A9 A10 S_MA01 A0 A1 A2 A3 A4 A5 A6 A7 A8 A9 NC NC IO1 IO2 IO3 IO4 IO5 IO6 IO7 IO8 VCC VCC 2 3 4 5 24 25 26 27 D24 D25 D26 D27 D28 D29 D30 D31 1 14 C75 RAS CAS WE GND OE GND 0.1U 15 28 4M DRAM*8 A-34 Appendix SRCLK R94 EPL-N2000 Service Manual EPRDYX PRRDYX ETBSYX STSX 33 CMDX CPRDYX PRINTX CTBSYX DB[0..7] AB[0..7] DB[0..7] AB[0..7] IC43 10 GND C146 0.1U 20 +5 18 3 16 5 14 7 12 9 DB0 DB1 DB2 DB3 DB4 DB5 DB6 DB7 DB0 DB1 DB2 DB3 DB4 DB5 DB6 DB7 1Y1 2Y4 1Y2 2Y3 1Y3 2Y2 1Y4 2Y1 2G 1G 19 1 54 55 56 57 58 59 60 61 2 17 4 15 6 13 8 11 1A1 2A4 1A2 2A3 1A3 2A2 1A4 2A1 79 80 81 82 83 84 85 86 1 1 1 1 1 1 1 1 1 1 1 1 2 3 4 5 6 8 4 6 6 9 2 2 3 3 4 4 3 3 5 3 3 2 7 8 1 2 1 2 0 3 D24 D25 D26 D27 D28 D29 D30 D31 S C C C CT WD D D D E I CPCPS N H R H RT T KT KT 2 0 0 1 1 T NDOCC E MMP D D S I AT RR T I I SS 1 NNT T T T 0 1 PSCCPC R RMP RT F CDRI B DNS DL K YT Y 1 1 1 1 1 2 2 2 12 9 0 12 3 SEV PE T T S RP S B RRR SEDD Y QY Y IODATA0 IODATA1 IODATA2 IODATA3 IODATA4 IODATA5 IODATA6 IODATA7 74LS244/1 66 67 68 69 70 71 72 73 AB0 AB1 AB2 AB3 AB4 AB5 AB6 AB7 R63 IREQ1X 74 75 76 90 77 78 33 R103 10K IREQ4X R96 R97 10K 10K R71 LCD0X WP_I J10 J11 US/EU Option US:Open R114 DREQ2X 34 35 36 38 39 40 33 EU:Short 52 53 64 62 33 49 50 51 47 48 DS1X RBX WBX BPICLK RESETX AB0 AB1 AB2 AB3 AB4 AB5 2 3 4 5 6 7 8 9 AB6 AB7 1 11 2 3 4 5 6 7 9 10 IC36 I I I I I I I I I/O I/O I/O I/O I/O I/O O 19 12 O 18 17 16 15 14 13 VCC 126 127 128 129 130 131 135 136 20 I I C112 0.1U GND 10 A2 A3 A4 A5 A6 A7 A8 A9 155 156 153 150 154 157 STB SLCT AUTO INIT 166 149 151 152 DSR CTS RXD 168 169 172 DTR RTS TXD BCLK 167 170 173 174 TA00 TA01 TA02 TA03 TA10 TA11 TA12 TA13 IOREQ IOEAD IOEND IOBSY CE READ WRITE MCLK RESET 1 2 3 4 165 164 163 162 161 160 159 158 BUSY ACK SELO ERROR PE DIR0 TDATA10 TDATA11 TDATA12 TDATA13 TDATA14 TDATA15 TDATA16 TDATA17 IOP0 IOP1 IOP2 IOP3 IOP4 IOP5 IC18B3 IC18C5 R113 R72 3 4 2 1 RM38 4 74LS04 6 74LS04 9 IC18D 33 33 6 5 7 8 33/4 7 8 9 VVVVVV DDDDDD DDDDDD 1 2 4 8 1 1 2 4 9 1 3 0 2 C97 0.1U G GG GG G GG GG GG NNNNNNNNNNNN NNNNNNNNNN DDDDDDDDDDDD CCCCCCCCCC 2 4 4 8 8 1 1 1 1 1 1 1 8 1 2 2 3 9 1 1 1 1 3 5 6 7 8 12 3 3 7 7 7 5 1 9 7 6 0 0 1 2 14 3 4 15 6 3 9 7 5 IC33 A1 A2 A3 A4 B1 B2 B3 B4 20 19 18 17 A5 A6 A7 B5 B6 B7 VCC VCC 14 13 12 15 16 GND GND 5 6 8 74LS04 10 11 DIR HD RM39 1.2K/4 RM42 1.2K/4 1.2K/4 RM41 R79 1.2K C110 0.1U 16 19 20 21 22 23 24 25 26 27 28 29 30 33 1.2K/4 RM40 12 3 4 4 3 2 1 12 3 4 4 3 2 1 8 7 6 5 5 6 7 8 8 7 6 5 5 6 7 8 74ACT1284 1 2 3 4 IC18E11 IC18F13 11 12 13 14 16 17 18 19 7 8 9 10 74LS04 12 10 11 J9 1 2 3 TT/OC A1 A2 A3 A4 B1 B2 B3 B4 20 19 18 17 A5 A6 A7 B5 B6 B7 VCC VCC 14 13 12 15 16 DIR HD GND GND 5 6 RM45 3 4 2 1 68/4 6 5 7 8 RM46 1 2 3 4 R81 C111 0.1U 33/4 8 7 6 5 8 7 6 5 33/4 2 3 4 5 6 7 8 9 1 36 14 31 33/4 8 7 6 5 33 10 11 12 13 32 74ACT1284 137 138 139 140 141 142 143 144 20 19 18 17 20 24 25 26 145 146 147 148 RM43 1 2 3 4 1 2 3 4 RM44 IC34 74LS04 R73 R74 R75 33 33 33 C109 0.1U 100 PNLDATA0 101 PNLDATA1 102 PNLDATA2 104 PNLDATA3 105 PNLDATA4 106 PNLDATA5 107 PNLDATA6 108 PNLDATA7 91 LCLK 93 LCD 94 CD 95 LED 97 SWRD 98 PRD PWR 99 TCE0 TRD0 TWR0 RDREQ0 WRRDY0 CMREQ0 INH0 TRST0 PAL16L8-15 PDATA0 PDATA1 PDATA2 PDATA3 PDATA4 PDATA5 PDATA6 PDATA7 TDATA00 TDATA01 TDATA02 TDATA03 TDATA04 TDATA05 TDATA06 TDATA07 INT0 INT1 INT2 INT3 INT4 INT5 TCE1 TRD1 TWR1 RDREQ1 WRRDY1 CMREQ1 INH1 TRST1 IC28 14 13 12 15 16 5 6 C113 100p C114 100p C115 100p C116 100p R80 3.9K 35 17 15 18 34 IC35 B1 B2 B3 B4 A1 A2 A3 A4 B5 B6 B7 VCC VCC A5 A6 A7 GND GND DIR HD 1 2 3 4 DB0 DB1 DB2 DB3 DB4 DB5 DB6 DB7 36 35 34 33 32 31 30 29 AB0 AB1 AB2 AB3 28 27 26 25 CN2 GND GND GND GND GND GND GND GND GND GND GND GND GND GND 18 17 16 12 11 DS0X INH IORSTX 13 14 15 CMREQX WRRDYX RDREQX 7 8 9 D0 D1 D2 D3 D4 D5 D6 D7 R57 R58 R59 10K 10K 10K 1 2 3 4 5 6 STB SLIN AFXT INIT CN4 D0 D1 D2 D3 D4 D5 D6 D7 A0 A1 A2 A3 CS RD WR INH RESET CMREQ WRRDY RDREQ TXD READY RXD +5V +5V +5V +5V +5V +5V C101 0.1U 19 20 21 22 23 24 ACK BUSY PE SELOT ERR +5 CG N.C. N.C. N.C. 10 GND GND GND GND GND GND N.C. TYPEB 1284-B 7 8 9 10 11 74ACT1284 1 0 9 IC17C 74F32 IOC2 R127 8 DREQ3X C98 33 0.1U 10 C147 0.1U 20 DB0 DB1 DB2 DB3 DB4 DB5 DB6 DB7 18 3 16 5 14 7 12 9 DB0 DB1 DB2 DB3 DB4 DB5 DB6 DB7 IC45 GND +5 1Y1 2Y4 1Y2 2Y3 1Y3 2Y2 1Y4 2Y1 2G 1G 1A1 2A4 1A2 2A3 1A3 2A2 1A4 2A1 79 80 81 82 83 84 85 86 19 1 54 55 56 57 58 59 60 61 2 17 4 15 6 13 8 11 1 1 1 1 1 1 1 1 1 1 5 1 1 6 8 2 3 4 6 6 9 2 2 3 3 4 4 4 3 3 5 3 3 2 7 8 1 2 1 2 0 3 D24 D25 D26 D27 D28 D29 D30 D31 S C C C CT WD D D D E I CPCPS N H R H RT T KT KT 2 0 0 1 1 T NDOCC E MMP D D S I AT RR T I I SS 1 NNT T T T 0 1 PSCCPC R RMP RT F CDRI B DNS DL K YT Y 66 67 68 69 70 71 72 73 IREQ2X R116 33 R56 10K 74 75 76 90 77 78 34 35 36 38 39 40 DREQ1X DS2X R117 33 52 53 64 62 49 50 51 47 48 2 3 4 5 6 7 9 10 126 127 128 129 130 131 135 136 IODATA0 IODATA1 IODATA2 IODATA3 IODATA4 IODATA5 IODATA6 IODATA7 A2 A3 A4 A5 A6 A7 A8 A9 IC29 PDATA0 PDATA1 PDATA2 PDATA3 PDATA4 PDATA5 PDATA6 PDATA7 IOP0 IOP1 IOP2 IOP3 IOP4 IOP5 IOREQ IOEAD IOEND IOBSY CE READ WRITE MCLK RESET DSR CTS RXD 168 169 172 VVVVVV DDDDDD DDDDDD 1 2 4 8 1 1 2 4 9 1 3 0 2 C99 TDATA00 TDATA01 TDATA02 TDATA03 TDATA04 TDATA05 TDATA06 TDATA07 TDATA10 TDATA11 TDATA12 TDATA13 TDATA14 TDATA15 TDATA16 TDATA17 137 138 139 140 141 142 143 144 0.1U G GG GG G GG GG GG NNNNNNNNNNNN NNNNNNNNNN DDDDDDDDDDDD CCCCCCCCCC 2 4 4 8 8 1 1 1 1 1 1 1 8 1 2 2 3 9 1 1 1 1 3 5 6 7 8 12 3 3 7 7 7 5 1 9 7 6 0 0 1 2 14 3 4 15 6 3 9 7 5 IC42A1 IC42B3 R115 R64 3 4 2 1 RM37 20 24 25 26 145 146 147 148 100 101 102 104 105 106 107 108 91 93 94 95 97 98 99 2 74F04 4 33 33 6 5 7 8 33/4 7 8 9 74F04 IC42C5 6 10 11 74F04 IC30 A1 A2 A3 A4 A5 A6 A7 DIR HD B1 B2 B3 B4 B5 B6 B7 VCC VCC GND GND 20 19 18 17 14 13 12 15 16 5 6 RM29 1.2K/4 RM34 1.2K/4 R60 1.2K C102 0.1U RM33 1.2K/4 RM30 1.2K/4 3 2 1 4 4 3 2 1 4 3 2 14 3 2 1 6 7 8 5 5 6 7 8 5 6 7 8 5 6 7 8 74ACT1284 1 2 3 4 167 170 173 174 11 12 13 14 16 17 18 19 PNLDATA0 PNLDATA1 PNLDATA2 PNLDATA3 PNLDATA4 PNLDATA5 PNLDATA6 PNLDATA7 LCLK LCD CD LED SWRD PRD PWR TCE0 TRD0 TWR0 RDREQ0 WRRDY0 CMREQ0 INH0 TRST0 155 156 153 150 154 157 STB SLCT AUTO INIT TA00 TA01 TA02 TA03 TA10 TA11 TA12 TA13 1 2 3 4 165 164 163 162 161 160 159 158 166 149 151 152 DTR RTS TXD BCLK INT0 INT1 INT2 INT3 INT4 INT5 TCE1 TRD1 TWR1 RDREQ1 WRRDY1 CMREQ1 INH1 TRST1 SEV PE T T S RP S B RRR SEDD Y QY Y BUSY ACK SELO ERROR PE DIR0 74LS244/1 AB0 AB1 AB2 AB3 AB4 AB5 AB6 AB7 1 1 1 1 1 2 2 2 12 12 3 9 0 IC42D9 7 8 9 8 74F04 IC31 A1 A2 A3 A4 B1 B2 B3 B4 A5 A6 A7 B5 B6 B7 VCC VCC IC42E 11 10 11 10 DIR HD 74F04 GND GND 20 19 18 17 RM36 33/4 2 7 1 8 3 6 4 5 R62 33 14 13 12 15 16 5 6 33/4 8 7 6 5 8 7 6 5 RM32 33/4 RM31 1 2 3 4 1 2 3 4 6 7 8 9 10 11 12 13 R61 C103 0.1U RM35 1 2 3 4 74ACT1284 68/4 8 7 6 5 19 20 21 22 23 24 25 26 27 28 29 30 31 32 33 34 35 3.9K 3 1 5 2 4 36 15 16 17 14 18 CN3 GND GND GND GND GND GND GND GND GND GND GND GND GND GND GND GND GND D1 D2 D3 D4 D5 D6 D7 D8 ACK BUSY PE SELOT ERR PERILH DB0 DB1 DB2 DB3 DB4 DB5 DB6 DB7 7 8 9 10 11 12 13 14 AB0 AB1 AB2 AB3 AB4 15 16 17 18 19 20 21 22 DS7X RCX WCX 24 23 25 1 26 2 NMIX IREQ7X DREQ0X PCLK 1 2 3 4 31 32 33 34 35 36 RM52 8 7 6 5 37 38 39 40 10K/4 STRB SELIN AUTO INIT HOSTLH 27 28 29 30 C150 0.1U 3 4 5 6 1284-C 20 19 18 17 R65 R66 R67 14 13 12 15 16 33 33 33 C108 0.1U 5 6 IC32 B1 B2 B3 B4 B5 B6 B7 VCC VCC GND GND A1 A2 A3 A4 A5 A6 A7 DIR HD 1 2 3 4 C104 100p C105 100p C106 100p C107 100p 7 8 9 DB0 DB1 DB2 DB3 DB4 DB5 DB6 DB7 AB0 AB1 AB2 AB3 AB4 CS RD WR NMI IREQ DREQ PCLK DTCT RST TXD+ TXDRXD+ RXDDTR CTS NC NC LCD SWRD VCC VCC VCC VCC GND GND GND GND IOBUS 6 3 8 5 1 2 7 10 11 CN5 4 CN6 TXD+ TXDRXD+ RXDDTR SYNCB N.C. GND AT 74ACT1284 Figure A-19. C207 MAIN BOARD (Interface) IOC2 C100 0.1U Rev. A A-35 Appendix EPL-N2000 Service Manual TODX C134 100P C135 100P C136 100P C137 100P C138 100P C139 100P DB[0..7] DB[0..7] IC37 DB0 DB1 DB2 DB3 DB4 DB5 DB6 DB7 A B 0 2 3 4 5 8 9 10 11 AB[0..7] AB[0..7] AB0 AB1 AB2 AB3 AB4 AB5 AB6 18 19 20 21 22 23 24 14 15 16 RITX RBX WBX 97 98 VDATA0 VDATA1 26 RESETX 29 R82 R83 R84 IRQ5X HSOUTX VCLK 2MCLK 33 33 33 89 92 93 95 96 CPUD0 CPUD1 CPUD2 CPUD3 CPUD4 CPUD5 CPUD6 CPUD7 CPUA0 CPUA1 CPUA2 CPUA3 CPUA4 CPUA5 CPUA6 CS RD WR VDIN0 VDIN1 RESET BVCLK RAMD0/VIRQ HST CLKOUT MODE2 MODE1 49 TEST5/EIFEN 48 TEST6/STS 47 TEST7/ETBSY 46 TEST8/PRRDY 45 TEST9/EPRDY 83 RAMD6/CTBSY 84 RAMD5/PRFD 85 RAMD4/SRCLK 86 RAMD3/CMD 87 RAMD2/CPRDY 88 RAMD1/PRINT VDOUT VSYNC HSYNC RAMCS WE OE AD12/PLLTHRU AD11/PLLMONOE AD10/PLLENB AD9/PLLM1 AD8/PLLM0 AD7/PLLPRB1 AD6/PLLPRB0 AD5 AD4 RAMD7 AD3 AD2 AD1 AD0/PLLMON 5VPLL 3VPLL FL2 TX14271NB 3 CR2 1 8 2 C153 0.1U PJ7 BP VCC OUT N.C. C124 0.1U 4 C152 0.01U R126 33 5 1 R95 33 3 1 GND 2 47.60528M C125 NFM51R00P506T1 PJ8 CLKO_ENB 55 54 53 52 44 43 42 79 78 77 76 75 74 73 72 TEST1/PB0 TEST2/PB1 TEST3/PB2 TEST4/PB3 TEST10/PB4 TEST11/PB5 TEST12/PB6 RAMD8/PA0 RAMD9/PA1 RAMD10/PA2 RAMD11/PA3 RAMD12/PA4 RAMD13/PA5 RAMD14/PA6 RAMD15/PA7 35 37 38 PLLCAP AD13 5V 5V 5V 5V 5V 5V 3V 3V 3V 3V 3V R93 EPRDYX CPRDYX PRRDYX PRINTX ETBSYX CTBSYX SRCLK STSX CMDX 33 25 39 94 57 58 59 60 62 63 64 65 66 82 67 68 69 33 R87 33 R88 33 R89 33 R90 33 R91 R92 33 33 13 17 4 16 14 6 7 5 15 8 10 19 3 12 E_RSTX R22 1K 1 2 11 EPRDY CPRDY PRRDY PRINT ETBSY CTBSY SRCLK STS CMD TOD HSYNC VIDEO RESET NC +5 +5 +5 1 C42 0.1U 2 C41 220U/ 9 18 20 GND GND GND ALBA_VIDEO 30 28 C119 0.1U 31 CN15 32 56 C120 220p 10% C143 33p 10% 6 12 27 36 41 50 61 70 81 91 99 C123 0.1U 11 12 13 14 15 16 17 18 DB0 DB1 DB2 DB3 DB4 DB5 DB6 DB7 17 40 51 71 100 C122 0.1U 1 LCLK 1 7 13 34 80 90 C117 0.1U GND GND GND GND GND GND GND GND GND GND GND 3.3K/4 8 7 6 5 3.3K 680 CN1 C118 0.1U PLLGND RM47 1 2 3 4 R85 R86 C121 0.1U 6 5 10 7 3 8 LCD0X LCDWRX LEDX SWINT SWRDX 9 19 20 C132 0.1U 2 4 LCLK DB0 DB1 DB2 DB3 DB4 DB5 DB6 DB7 A1 LCD LCDWR LED SWINT SWRD NC +5V +5V GND GND ALBA_PNL RIT4PLUS Figure A-20. C207 MAIN BOARD (Video I/F) Rev. A A-36 Appendix A[0..27] RM19 33/4 RM18 33/4 RM20 33/4 RM21 33/4 D[0..31] EPL-N2000 Service Manual CN13 N-BUS A[0..27] A2 A3 A4 A5 A6 A7 A8 A9 A10 A11 A12 A13 A14 A15 A16 A17 A18 A19 A20 A21 A22 A23 A24 A25 A26 A27 D[0..31] 3 4 6 7 8 9 11 12 13 14 16 17 18 19 20 21 23 24 25 26 27 28 29 30 32 33 34 35 36 37 39 40 41 42 44 45 46 47 48 49 50 51 53 54 55 56 57 58 59 62 63 64 65 66 67 68 69 70 D0 D1 D2 D3 D4 D5 D6 D7 D8 D9 D10 D11 D12 D13 D14 D15 D16 D17 D18 D19 D20 D21 D22 D23 D24 D25 D26 D27 D28 D29 D30 D31 72 74 2 75 76 77 78 80 81 82 83 MCLK READYX DREQX DACKX RWX ASX BE00X BE08X BE16X BE24X 79 CS3X 84 85 IREQ0X IREQ6X 87 10 22 43 61 86 97 114 136 147 165 171 196 201 RESETX C96 0.1U C95 0.1U C94 0.1U IC20 148 149 150 151 152 153 154 155 157 158 159 160 161 162 163 166 1 2 3 4 1 2 3 4 1 2 3 4 1 2 3 4 8 7 6 5 8 7 6 5 8 7 6 5 8 7 6 5 RAD0 RAD1 RAD2 RAD3 RAD4 RAD5 RAD6 RAD7 RAD8 RAD9 RAD10 RAD11 RAD12 RAD13 RAD14 RAD15 RAD16 RAD17 RAD18 RAD19 RAD20 176 177 178 179 180 181 182 184 185 186 187 188 189 190 191 193 194 195 197 198 199 4 3 2 1 4 3 2 1 4 3 2 1 4 3 2 1 4 3 2 1 R43 5 6 7 8 5 6 7 8 5 6 7 8 5 6 7 8 5 6 7 8 NALE NCS NWAIT NIOR NIOW NIRQ 167 168 169 172 173 174 R44 R45 33 33 R46 R51 33 33 RALE RCS CID0 CID1 RMEMR RMEMW 202 203 204 205 98 99 R47 R48 33 33 CD0 CD1 CD2 CD3 CD4 CD5 CD6 CD7 CD8 CD9 CD10 CD11 CD12 CD13 CD14 CD15 128 129 130 131 132 133 134 135 137 138 139 140 141 143 144 146 CD0 CD1 CD2 CD3 CD4 CD5 CD6 CD7 CD8 CD9 CD10 CD11 CD12 CD13 CD14 CD15 NC CA1 CA13 CA14 CA15 CA16 CA17 CA18 CA19 CA20 CA21 CA22 CA23 CA24 CA25 110 111 112 113 115 116 117 118 120 121 122 123 124 125 126 CA13 CA14 CA15 CA16 CA17 CA18 CA19 CA20 CA21 CA22 CA23 CA24 CA25 BUFEN BUFDIR CCE0 CCE1 REG MEMR MEMW WP CDCT1 CDCT2 BVD1 BVD2 RDY/BSY WAIT RSTDRV 91 92 93 94 95 207 208 100 101 102 103 104 106 107 108 SD0 SD1 SD2 SD3 SD4 SD5 SD6 SD7 SD8 SD9 SD10 SD11 SD12 SD13 SD14 SD15 SD16 SD17 SD18 SD19 SD20 SD21 SD22 SD23 SD24 SD25 SD26 SD27 SD28 SD29 SD30 SD31 SCLK READY RDYMODE DREQ DACK R/W AS BE00 BE08 BE16 BE24 CS IREQ0 IREQ1 RESET VCC VCC VCC VCC VCC VCC VCC VCC VCC VCC VCC VCC VCC C87 0.1U 1 15 31 38 52 60 71 73 96 105 119 127 142 145 156 164 175 183 192 200 NAD0 NAD1 NAD2 NAD3 NAD4 NAD5 NAD6 NAD7 NAD8 NAD9 NAD10 NAD11 NAD12 NAD13 NAD14 NAD15 SA2 SA3 SA4 SA5 SA6 SA7 SA8 SA9 SA10 SA11 SA12 SA13 SA14 SA15 SA16 SA17 SA18 SA19 SA20 SA21 SA22 SA23 SA24 SA25 SA26 SA27 GND GND GND GND GND GND GND GND GND GND GND GND GND GND GND GND GND GND GND GND LA1 88 LCE LOE 89 90 NC NC NC 5 170 206 R49 R50 RRRRRRRRRRR NNNNNN NNNNNNNNNNA A A AA A RRRRRRRRRRAA A A AA A A AA A A AA A AA A A AA DDDDDD AA AA A A AA A A DDDDDDDDDDD DDDDDDDDDD1 1 1 1 1 1 1 1 1 1 2 DDDDDDDDDD 1 1 1 1 1 1 0 1 2 3 4 5 6 7 8 9 0 12 3 4 5 6 7 8 9 0 0 12 3 4 5 6 7 8 9 0 12 3 4 5 3 2 3 3 3 4 3 5 3 6 3 7 3 9 3 1 3 5 2 5 2 5 2 5 2 5 2 5 2 5 2 5 2 4 14 1 0 9 9 7 8 6 7 5 5 4 4 2 3 12 0 0 9 9 8 8 1 2 3 4 6 7 8 9 0 RRRRRRRRRRRRRRRRRRRRR AAAAAAAAAAAAAAAAAAAAA DDDDDDDDDDDDDDDDDDDDD 0 1 2 3 4 5 6 7 8 9 1 1 1 1 1 1 1 1 1 12 0 12 3 4 5 6 7 8 9 0 R A D [ 0 . . 2 0 ] VVVV CCCC CCCC 8 4 5 6 2 3 0 GGGGGGG NNNNNNN DDDDDDD 1 1 2 2 3 4 5 4 1 6 5 7 8 18 17 16 15 14 13 12 11 CD0 CD1 CD2 CD3 CD4 CD5 CD6 CD7 RM27 5 6 7 8 4 3 2 1 20 C86 0.1U 10K/4 10 IC26 B1 B2 B3 B4 B5 B6 B7 B8 A1 A2 A3 A4 A5 A6 A7 A8 +5 G DIR 2 3 4 5 6 7 8 9 19 1 30 31 32 2 3 4 5 6 64 65 66 37 38 39 40 41 GND 74LS245 RAD0 RAD1 RAD2 RAD3 RAD4 RAD5 RAD6 RAD7 RAD8 RAD9 RAD10 RAD11 RAD12 RAD13 RAD14 RAD15 RAD16 RAD17 RAD18 RAD19 RAD20 33 RM22 33/4 18 17 16 15 14 13 12 11 CD8 CD9 CD10 CD11 CD12 CD13 CD14 CD15 RM23 33/4 RM24 33/4 20 RM25 33/4 C85 0.1U RM26 33/4 10 IC25 B1 B2 B3 B4 B5 B6 B7 B8 A1 A2 A3 A4 A5 A6 A7 A8 +5 G DIR 2 3 4 5 6 7 8 9 19 1 CCA2 CCA3 CCA4 CCA5 CCA6 CCA7 CCA8 CCA9 CCA10 CCA11 CCA12 CCA13 CCA14 CCA15 CCA16 CCA17 CCA18 CCA19 CCA20 CCA21 CCA22 CCA23 CCA24 CCA25 GND 74LS245 2 4 6 8 11 13 15 17 IC27 1A1 1A2 1A3 1A4 2A1 2A2 2A3 2A4 1 19 1Y1 1Y2 1Y3 1Y4 2Y1 2Y2 2Y3 2Y4 +5 1G 2G 18 16 14 12 9 7 5 3 20 E_RSTX C88 33 33 WP 0.1U GND CD[0..15] 10 74LS244 7 8 5 RM28 6 10K/4 2 1 4 3 R52 R53 R54 IC17B 6 5 CA[0..25] 74F32 1 2 J13 3 Gate_Sel A2 A3 A4 A5 A6 A7 A8 A9 A10 A11 A12 A13 A14 A15 A16 A17 A18 A19 10 9 8 7 6 5 4 3 41 40 39 38 37 36 35 34 33 2 1 42 A2 A3 A4 A5 A6 A7 A8 A9 IC21 A0 A1 A2 A3 A4 A5 A6 A7 A8 A9 A10 A11 A12 A13 A14 A15 A16 A17 A18 N.C. CE OE W/B/V O0 O1 O2 O3 O4 O5 O6 O7 O8 O9 O10 O11 O12 O13 O14 O15 VDD Rev. A CD0 CD1 CD2 CD3 CD4 CD5 CD6 CD7 CD8 CD9 CD10 CD11 CD12 CD13 CD14 CD15 22 GND GND 12 31 1 19 IC22 2A4 2A3 2A2 2A1 1A4 1A3 1A2 1A1 2Y4 2Y3 2Y2 2Y1 1Y4 1Y3 1Y2 1Y1 1G 2G +5 3 5 7 9 12 14 16 18 CCA2 CCA3 CCA4 CCA5 CCA6 CCA7 CCA8 CCA9 CA13 11 CA14 13 CA15 15 CA16 17 CA17 2 CA18 4 CA19 6 CA20 8 1 19 20 IC24 2A1 2A2 2A3 2A4 1A1 1A2 1A3 1A4 2Y1 2Y2 2Y3 2Y4 1Y1 1Y2 1Y3 1Y4 1G 2G +5 9 7 5 3 18 16 14 12 GND CCA13 CCA14 CCA15 CCA16 CCA17 CCA18 CCA19 CCA20 C C A [ 0 . . 2 5 ] 18 52 17 51 C151 0.1U C93 0.1U 1 34 35 68 CN14 D0 D1 D2 D3 D4 D5 D6 D7 D8 D9 D10 D11 D12 D13 D14 D15 A0 A1 A2 A3 A4 A5 A6 A7 A8 A9 A10 A11 A12 A13 A14 A15 A16 A17 A18 A19 A20 A21 A22 A23 A24 A25 CE1X CE2X OEX WEX WPX READY CD1X CD2X VS1X VS2X IOR IOW RFU RESET WAITX REGX BVD2 BVD1 VPP1 VPP2 VCC VCC GND GND GND GND PCMCIA 20 C91 0.1U C89 0.1U 10 GND 74LS244 CA21 2 CA22 4 CA23 6 CA24 8 CA25 13 A10 15 A11 17 A12 11 1 19 C92 0.1U EPROM4M*16 PIC 14 16 18 20 23 25 27 29 15 17 19 21 24 26 28 30 17 15 13 11 8 6 4 2 29 28 27 26 25 24 23 22 12 11 8 10 21 13 14 20 19 46 47 48 49 50 53 54 55 56 7 42 9 15 33 16 36 67 43 57 44 45 60 58 59 61 62 63 R119 33 10K 10K 10K 4 11 13 32 TEST 109 I R C C MM N W A NA I I R A RI I EE L C I OOE L C D DMM E S T R WQ E S 0 1 R W 14 4 4 1 1 4 1 1 4 14 5 7 3 4 6 6 2 1 3 0 15 10 74LS244 IC23 1A1 1A2 1A3 1A4 2A2 2A3 2A4 2A1 1Y1 1Y2 1Y3 1Y4 2Y2 2Y3 2Y4 2Y1 1G 2G +5 18 16 14 12 7 5 3 9 CCA21 CCA22 CCA23 CCA24 CCA25 CCA10 CCA11 CCA12 20 C90 0.1U GND 74LS244 10 Figure A-21. C207 MAIN BOARD (MISC>) A-37 Appendix PJ10 CJ PJ17 CJ PJ11 CJ PJ16 CJ A20 PJ1 CJ PJ15 CJ A21 PJ2 R2 CJ PJ3 R3 CJ PJ4 R4 CJ PJ5 R5 CJ PJ6 PJ13 CJ CJ EPL-N2000 Service Manual PJ18 CJ D[0..31] A[0..23] CN1 D0 D1 D2 D3 D4 D5 D6 D7 D8 D9 D10 D11 D12 D13 D14 D15 D16 D17 D18 D19 D20 D21 D22 D23 D24 D25 D26 D27 D28 D29 D30 D31 A0 A1 A2 A3 A4 A5 A6 A7 A8 A9 A10 A11 A12 A13 A14 A15 A16 A17 A18 A19 A20 A21 A22 A23 CSI0 CSI1 CSO0 CSO1 RD WR0 BWE0 BWE1 BWE2 BWE3 RD/BY RESET VPP VPP VCC VCC VCC VCC DTCT WR1 VSS VSS VSS VSS 5 7 9 11 13 15 17 19 21 23 25 27 29 31 33 35 6 8 10 12 14 16 18 20 22 24 26 28 30 32 34 36 D0 D1 D2 D3 D4 D5 D6 D7 D8 D9 D10 D11 D12 D13 D14 D15 D16 D17 D18 D19 D20 D21 D22 D23 D24 D25 D26 D27 D28 D29 D30 D31 49 50 51 52 53 54 55 56 57 58 59 60 61 62 63 64 65 66 67 68 69 70 71 72 A2 A3 A4 A5 A6 A7 A8 A9 A10 A11 A12 A13 A14 A15 A16 A17 A18 A19 A20 A21 A22 A23 A24 A25 A22 33 33 33 33 IC socket IC3 7 VCC 6 OUT C7 0.1U 5 4 NC NC NC NC C GND CJ CJ PJ19 CJ 4M Flash(IC3,4,5,6)/Fujitsu PJ1: Open ,PJ10,11: Open PJ2: Open ,R2: Short PJ3: Open ,R3: Short PJ7: Open ,PJ14: Short 4M Flash(IC3,4,5,6)/Intel PJ1: Open ,PJ10,11: Short PJ2: Open ,R2: Short PJ3: Open ,R3: Short PJ7: Open ,PJ14: Short 8M Flash(IC3,4,5,6) PJ1: Short ,PJ10,11: Open PJ2: Open ,R2: Short PJ3: Open ,R3: Short PJ7: Open ,PJ14: Short 8M MASK(IC3,4,5,6) PJ1: Open ,PJ10,11: Open PJ2: Short ,R2: Open PJ3: Short ,R3: Open PJ7: Open ,PJ14: Open 8M MASK(IC7,8) PJ4: Open ,R4: Open PJ5: Open ,R5: Open PJ6: Open ,PJ13: Open 16M MASK(IC7,8) PJ4: Short ,R4: Open PJ5: Short ,R5: Open PJ6: Open ,PJ13: Open 32M MASK(IC7,8) PJ4: Short ,R4: Open PJ5: Short ,R5: Open PJ6: Short ,PJ13: Open 8M Flash(IC7,8) PJ4: Open ,R4: Short PJ5: Open ,R5: Short PJ6: Open ,PJ13: Short R1 1K IC2 PJ7 PJ14 1 2 3 8 M51953BFP C9 0.22U 11 10 9 8 7 6 5 4 42 41 40 39 38 37 36 35 34 3 2 43 44 1 12 14 A2 A3 A4 A5 A6 A7 A8 A9 A10 A11 A12 A13 A14 A15 A16 A17 A18 A19 PJ8 setting IC3,4,5,6=4M Flash: Short IC3,4,5,6=8M Flash: Open A20 A21 A22 A23 A2 A3 A4 A5 A6 A7 A8 A9 A10 A11 A12 A13 A14 A15 A16 A17 A18 A19 PJ9 setting(Depend on Main spec) for RE65 Open :use Main board font ROM Short:use IC7,8 as font data 11 10 9 8 7 6 5 4 42 41 40 39 38 37 36 35 34 3 2 43 44 1 IC1 39 40 2 3 4 5 6 7 8 9 41 42 43 44 45 47 46 48 1 11 I I I I I I I I I/O/Q I/O/Q I/O/Q I/O/Q I/O/Q I/O/Q I/O/Q I/O/Q CLK/I OE/I 73 74 VCC GND 19 18 17 16 15 14 13 12 R8 R9 CE00X CE01X WE0-15 WE16-31 33 33 12 14 A0 A1 A2 A3 A4 A5 A6 A7 A8 A9 A10 A11 A12 A13 A14 A15 A16 A17 A18 A19 N.C. N.C. CE OE IC5 O0 O1 O2 O3 O4 O5 O6 O7 O8 O9 O10 O11 O12 O13 O14 O15 BYTE VDD 33 23 GND GND GND GND 10K PJ8 CJ R12 R13 C8 0.1U R11 10K PJ12 CJ 11 10 9 8 7 6 5 4 42 41 40 39 38 37 36 35 34 3 2 43 44 1 12 14 D16 D17 D18 D19 D20 D21 D22 D23 D24 D25 D26 D27 D28 D29 D30 D31 C2 0.1U 13 32 A2 A3 A4 A5 A6 A7 A8 A9 A10 A11 A12 A13 A14 A15 A16 A17 A18 A19 11 10 9 8 7 6 5 4 42 41 40 39 38 37 36 35 34 3 2 43 44 1 12 14 MROM16M*16/SOP R10 A2 A3 A4 A5 A6 A7 A8 A9 A10 A11 A12 A13 A14 A15 A16 A17 A18 A19 13 32 MROM16M*16/SOP IC4 15 A0 O0 17 A1 O1 19 A2 O2 21 A3 O3 24 A4 O4 26 A5 O5 28 A6 O6 30 A7 O7 16 A8 O8 18 A9 O9 20 A10 O10 22 A11 O11 25 A12 O12 27 A13 O13 29 A14 O14 31 A15 O15 A16 33 A17 BYTE 23 A18 VDD A19 N.C. N.C. CE OE D0 D1 D2 D3 D4 D5 D6 D7 D8 D9 D10 D11 D12 D13 D14 D15 C1 0.1U 20 10 15 17 19 21 24 26 28 30 16 18 20 22 25 27 29 31 A0 A1 A2 A3 A4 A5 A6 A7 A8 A9 A10 A11 A12 A13 A14 A15 A16 A17 A18 A19 N.C. N.C. CE OE IC7 O0 O1 O2 O3 O4 O5 O6 O7 O8 O9 O10 O11 O12 O13 O14 O15 15 17 19 21 24 26 28 30 16 18 20 22 25 27 29 31 BYTE VDD 33 23 A2 A3 A4 A5 A6 A7 A8 A9 A10 A11 A12 A13 A14 A15 A16 A17 A18 A19 A20 C3 0.1U GND GND 13 32 MROM16M*16/SOP IC6 15 A0 O0 17 A1 O1 19 A2 O2 21 A3 O3 24 A4 O4 26 A5 O5 28 A6 O6 30 A7 O7 16 A8 O8 18 A9 O9 20 A10 O10 22 A11 O11 25 A12 O12 27 A13 O13 29 A14 O14 31 A15 O15 A16 33 A17 BYTE 23 A18 VDD A19 N.C. N.C. CE OE D0 D1 D2 D3 D4 D5 D6 D7 D8 D9 D10 D11 D12 D13 D14 D15 GND GND 11 10 9 8 7 6 5 4 42 41 40 39 38 37 36 35 34 3 2 43 44 1 12 14 D16 D17 D18 D19 D20 D21 D22 D23 D24 D25 D26 D27 D28 D29 D30 D31 C4 0.1U 13 32 MROM16M*16/SOP A2 A3 A4 A5 A6 A7 A8 A9 A10 A11 A12 A13 A14 A15 A16 A17 A18 A19 A20 11 10 9 8 7 6 5 4 42 41 40 39 38 37 36 35 34 3 2 43 44 1 12 14 A0 A1 A2 A3 A4 A5 A6 A7 A8 A9 A10 A11 A12 A13 A14 A15 A16 A17 A18 A19 N.C. N.C. CE OE O0 O1 O2 O3 O4 O5 O6 O7 O8 O9 O10 O11 O12 O13 O14 O15 15 17 19 21 24 26 28 30 16 18 20 22 25 27 29 31 BYTE VDD 33 23 C5 0.1U GND GND 13 32 MROM16M*16/SOP IC8 15 A0 O0 17 A1 O1 19 A2 O2 21 A3 O3 24 A4 O4 26 A5 O5 28 A6 O6 30 A7 O7 16 A8 O8 18 A9 O9 20 A10 O10 22 A11 O11 25 A12 O12 27 A13 O13 29 A14 O14 31 A15 O15 A16 33 A17 BYTE 23 A18 VDD A19 N.C. N.C. CE OE D0 D1 D2 D3 D4 D5 D6 D7 D8 D9 D10 D11 D12 D13 D14 D15 GND GND D16 D17 D18 D19 D20 D21 D22 D23 D24 D25 D26 D27 D28 D29 D30 D31 C6 0.1U 13 32 MROM16M*16/SOP 33 33 IC3,4,5,6 can use 4/8M Flash(Intel/Fujitsu),8/16/32M MASK IC7,8 can use 8M Flash(Intel/Fujitsu),8/16/32M MASK PAL16V8 75 76 1 2 3 4 37 PJ9 CJ C10 0.1U 38 77 78 79 80 Figure A-22. C207 PROG BOARD ROM_BUS/R Rev. A A-38 EPSON