1
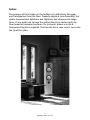
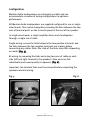
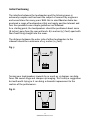
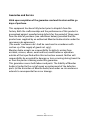
Contents
What we have provided in your Gold Reference Owners Manual
Page
2
Introduction
4
Safety Instructions
5
Tool Box contents
6
Stands/ Plinths
7
Plinth fitting
8
Spike fitting
9
Configuration/Bi-wiring
10
Bi-amping/Tri-wiring/Tri-amping
11
Initial Positioning
12
Final position & adjustments
13
Ancillary Equipment
14
Maintenance
15
Guarantee/ Service
16
Claims under this guarantee
1
© Monitor Audio Ltd 2001
An introduction to your
Monitor Audio Gold Reference Owners Manual
Thank you for purchasing this pair of Monitor Audio Gold Reference
loudspeakers. We are confident they will give you many years of
exceptional listening pleasure.
All our speakers are hand crafted and assembled at purpose built
factory units in England. We have over 27 years experience applying
traditional woodworking skills to loudspeaker cabinet construction. For
the Gold Reference series, these skills are combined with state of the art
drive unit technology and the highest standards of engineering.
The enjoyment of music is and should be a life enhancing experience.
Music can stimulate your imagination and change your mood; provide
endless hours of entertainment and a means to relax.
At Monitor Audio we believe your hi-fi speakers should recreate the full
sonic and emotional experience of listening to live music or a studio
production exactly as the recording engineers intended. Our aim is to
build loudspeakers that get you closer to the music. Or, as we say at
Monitor Audio, ‘As close as it gets’.
Important
Owing to the complex, close tolerance construction of the loudspeaker
drive units, a running in period of approximately 60 hours is
recommended before optimum performance is achievable.
2
© Monitor Audio Ltd 2001
3
© Monitor Audio Ltd 2001
Safety Instructions
1. Read Instructions
All the safety and operating instructions in this manual should be
read before using the loudspeakers.
2. Retain Instructions
Retain this manual for future reference.
3. Follow the Instructions
All operating instructions should be followed.
4. Water & Moisture
The speaker/s should not be used near water - for example, bathtub,
wash bowl, kitchen sink, washing machine, in a wet basement or
near a swimming pool. Under no circumstance should plants, fish
bowls or drinks be placed on the speakers.
5. Positioning
The speaker/s have been designed for floor or stand mounting as
recommended by the stand manufacturer only.
6. Heat
The speaker/s should not be placed near any heat source such as
radiators, open fires, stoves, direct sunlight or any other appliance
that produces heat.
7. Cleaning
The speaker/s can be cleaned with a soft dry cloth. The engineers
selvyt cloth, enclosed within your Monitor Audio toolbox (where
provided), is ideal for this purpose.
8. Service
The user should not attempt to service the speaker/s beyond that
specified in the operating instructions. All other servicing
requirements should be carried out by qualified service personnel.
4
© Monitor Audio Ltd 2001
Tool Box
A Gold Reference tool box is supplied with the floorstanding models
(GR20 and GR60) to help facilitate set up. This contains everything
needed to attach the plinth, fit the spikes and level your Monitor Audio
speaker.
Contents
2.5mm Hex. Key - For Drive Units
3.0mm Hex. Key - For Spike Adjustment
Screwdriver
- For Plinth Bolts
Spirit Level
8 Spikes (4 per speaker) with Thumbwheel Nuts
8 Floor Discs
Monitor Audio engineers Selvyt cloth
Warranty Card
Fig. 1.
5
© Monitor Audio Ltd 2001
Stands
If the model you have chosen is of the bookshelf/standmount type
(GR10), you will need to consider the positioning of your loudspeakers.
If you intend to place them on bookshelves, there may be compromises
that prevent the speakers from performing at their optimum.
Placing your loudspeakers on stands (see Fig. 2.) will enable them to
deliver a more dynamic and believable sound. Heavy stands are
recommended as they add further rigidity to the loudspeaker and
elevate system performance. We also recommend the use of a reusable
adhesive substance (such as Blu-tac) between the bottom surface of the
loudspeaker and the top plate of the stand. This will make the speaker
and stand a stable unit and prevent accidents if accidentally knocked.
Sonic improvements are an additional benefit.
Plinths
For all floorstanding models (GR20 and GR60) we recommend fitting the
supplied plinth. This will enlarge the footprint of the loudspeaker and
increase its stability.
See positioning (page 11).
Fig. 2.
6
© Monitor Audio Ltd 2001
Assembly
To attach the plinth, invert the speaker as shown (see Fig. 3), resting the
top on a non-abrasive protective sheet. Now locate the plinth, painted
side down, on the four fixing studs. Using the bolts supplied, screw the
plinth firmly to the bottom of the loudspeaker with the screwdriver
supplied. Remove the Gold Spikes from the toolbox and rotate the
thumbwheel nut until it is in contact with the body of the spike.
By hand, screw the spikes into the location holes until they just touch
the plinth.
Carefully turn the loudspeaker the right way up and position it so that
the spikes rest on the floor discs supplied in the toolbox (if used). Place
the supplied spirit level on top of the speaker. Next, use the allen key
supplied to adjust each spike in turn until the speaker is level. This is
accomplished by inserting the longer shaft of the allen key into the
spike hole on the top face of the plinth and locating it in the spike
recess. Slowly rotate the key clockwise and the spike height will
increase. Only once the spikes have been adjusted by the necessary
amount should the thumbwheels be rotated (anticlockwise) to lock the
spikes in position. If you do not wish to use the plinth see Fig. 4.
Warning: If using spikes make sure that they do not pierce any cables
that may be under the carpet. When handling your loudspeakers with
spikes use extreme caution.
Fig. 3.
Showing
additional plinth
and spike fixing
Fig. 4.
Showing spike
fixing
7
© Monitor Audio Ltd 2001
Spikes
The purpose of the 8 spikes in the toolbox is to effectively decouple
each loudspeaker from the floor. Properly adjusted (see Assembly), the
spikes improve bass definition and tightness and sharpen mid-range
focus. If you prefer not to have the spikes directly in contact with the
floor (wood or laminated surfaces, for instance), please use the 8
floor-protecting discs supplied. The top side has a cone recess to receive
the tip of the spike.
8
© Monitor Audio Ltd 2001
Configuration
Monitor Audio loudspeakers are extremely versatile and can
accommodate a number of wiring configurations to optimise
performance.
All Monitor Audio loudspeakers are supplied configured for use in single
wired mode. This can be changed by removing the links between the two
sets of terminal posts on the recessed panel at the rear of the speaker.
In single-wired mode, a single amplifier drives each loudspeaker
through a single run of cable.
Single wiring: ensure the links between the two positive terminals and
the links between the two negative terminals are in place before
connecting any cables. Note: the style of the links may differ depending
on model (Fig. 5).
Bi-wiring: by removing the links and using two runs of cable on each
side (left and right channels), the speakers’ drive units are fed
individually and sound quality is improved. (Fig. 6).
Important: the terminal links must be removed before connecting the
speakers when bi-wiring.
Fig. 5
Fig. 6
9
© Monitor Audio Ltd 2001
Bi-amping: a further lift in performance can be achieved through
bi-amping. Here two amplifier sections (in its simplest form an
integrated model with its matching power amp) are used to supply
separate drive units or groups of drive units. One amplifier drives the
bass-mid range section, the other the treble. (Fig. 6).
Important: it is vital that the terminal links are removed before
connecting the speakers when bi-amping.
Tri-wiring (Gold Reference 60): this option uses one amplifier but
requires three runs of cable on each side (left and right channels) to
supply bass, mid range and treble units individually and improve sound
quality. (Fig. 6a).
Tri-amping (Gold Reference 60): with tri-amping, three amplifier sections
are used to supply the individual drive units. This means dedicated
amplification for the bass, mid and treble sections and significantly
improved performance from the loudspeaker. (Fig. 6a)
Important: it is vital that the terminal links are removed before
connecting the speakers when tri-wiring or tri-amping.
Fig. 6a
10
© Monitor Audio Ltd 2001
Initial Positioning
The interface between the loudspeaker and the listening room is
extremely complex and has been the subject of research by engineers
and acousticians for many years. With this in mind Monitor Audio has
produced a range of loudspeakers that are largely position tolerant and
fuss free provided some simple guidelines are followed.
As a starting point, the loudspeakers should be positioned about 20cm
(8 inches) away from the rear wall and 1.8/2 metres (6/7 feet) apart with
their front firing straight into the room.
The distance between the outer side of either loudspeaker to the
sidewall should be a minimum of 0.5 metres (1.5 feet).
0.2M
Fig. 7.
1.8-3M
2M
0.5M
Turning your loudspeakers inwards by as much as 15 degrees can help
focus the sound stage and sharpen up imaging. This is only a suggestion
but well worth trying as it can bring a dramatic improvement to the
realism of the performance.
Fig. 8.
11
© Monitor Audio Ltd 2000
Final Position & Adjustments
It’s time to sit down, play some music and listen a little more closely. If
the positioning is broadly correct, the loudspeakers should effectively
“disappear”, the sound stage extending beyond the outer edges of the
cabinets. There should also be a real sense of depth with images
appearing behind the plane of the speakers as well as in front. Try to
imagine the sound as a picture. It should have realistic scaling and 3D
perspectives. Ask yourself if the tonal colours and textures seem natural
- they shouldn’t be saturated or pale. If you’re listening to the music
rather than the speakers, that’s a good sign.
Remember, these observations need to hold true with different types of
music and recording. Don’t use just an audiophile-standard recording of,
say, a jazz trio as it will almost certainly flatter the sound of the
system - though it may be useful for fine-tuning the bass performance.
Use a cross section of the music you regularly listen to. The more
consistently musical the results the better.
Modifying the in-room bass response of the loudspeakers is relatively
simple. For more bass, position the speakers closer to the rear wall; for
less, move them further into the room - especially if the bass is boomy
and/or uneven.
If your Monitor Audio loudspeaker has an internal rear chamber you can
further modify bass response by adding dry sand or lead shot.
The chamber is accessed at the back via a removable panel close to the
bottom of the speaker. Adding sand or lead shot damps cabinet
resonances and gives the bass a tauter, more controlled quality.
Important: only use dried sand. The sand or lead shot should be placed
in a plastic bag and firmly knotted. Damp sand must not be used as it
may eventually rot the wood. The amount of additional loading will vary
from room to room. If possible, discuss this with your dealer.
12
© Monitor Audio Ltd 2001
Ancillary Equipment
All Monitor Audio loudspeakers present an easy, efficient load and are
compatible with most good quality amplifiers.
Implementation of the latest design and construction techniques offer
equal suitability to the demands of both current and future digital and
analogue formats.
Monitor Audio’s power handling figures are based upon undistorted
speech and music signals.
All Monitor Audio loudspeakers are primarily intended for use in a
normal domestic environment. Provided you do not overdrive your
amplifier or make excessive use of bass or treble boosts, you should
never damage either the amplifier or loudspeakers.
(High quality components are utilised to produce these loudspeakers
ensuring accurate reproduction of the signal fed to them, so it is
important to appreciate that the ancillary equipment used will
profoundly affect performance).
If distortion is evident when the volume level is increased this is a sign
of overdriving and the volume level should be reduced immediately.
Used properly, loudspeakers will rarely fail and if both units reproduce
the same fault or distortion, then it is likely that the problem is
elsewhere in the system. In such instances please contact your dealer
immediately.
13
© Monitor Audio Ltd 2001
Maintenance
Great care and attention has gone into the materials used to make you
Monitor Audio Gold Reference loudspeakers. It is our intention that they
should provide a lifetime of musical pleasure.
A gentle wipe with the supplied dry, clean ‘selvyt’ cloth is all that is
required to remove any dust.
Avoid touching the loudspeaker drive units when cleaning, as any
damage will impair their performance.
The grille fabric may be cleaned with a soft clothes brush, but only while
the grilles are detached from the cabinet.
Treat your Gold Reference loudspeakers as you would a fine piece of
furniture. That is how they have been designed.
14
© Monitor Audio Ltd 2001
Guarantee and Service
Valid upon completion of the guarantee card and its return within 30
days of purchase.
This equipment has been fully tested prior to dispatch from the
factory. Both the craftsmanship and the performance of this product is
guaranteed against manufacturing defects for the period of three years
from the date of purchase (see conditions below), provided that the
product was supplied by an authorised Monitor Audio retailer under the
consumer sale agreement.
(The words ‘consumer sale’ shall be construed in accordance with
section 15 of the supply of goods act 1973).
Monitor Audio accepts no responsibility for defects arising from
accident, misuse, abuse, wear and tear, modification or operation
outside of that specified within this instruction manual. Neither will
responsibility be accepted for damage or loss occurring during transit to
or from the parties claiming under this guarantee.
This guarantee covers both labour and parts. The liability of Monitor
Audio is limited to the cost of repair or replacement of the defective
parts (at the discretion of Monitor Audio) and under no circumstances
extends to consequential losses or damage.
15
© Monitor Audio Ltd 2001
Claims under this Guarantee
The equipment should be returned in its packaging to the original
supplier where possible, or to any other authorised Monitor Audio
dealer. If it is not possible to return the equipment by hand, then it
should be sent carriage prepaid via a reputable carrier. If the original
packing is not available replacement packaging can be purchased from
Monitor Audio. If you have any difficulties complying with these
requirements please contact us at the following address:
Monitor Audio Ltd.
24 Brook Road
Rayleigh
Essex
SS6 7XL
England
Tel:
Fax:
web:
email:
+44 (0) 1268 740580
+44 (0) 1268 740589
www.monitoraudio.co.uk
[email protected]
This guarantee does not affect the statutory rights of the consumer
under UK law.
Monitor Audio reserve the right to alter specifications without notice if it
is considered that an improvement can be made to the product.
16
© Monitor Audio Ltd 2001
24 Brook Road, Rayleigh, Essex SS6 7XL. England.
Tel: +44 (0) 1268 740580 Fax: +44 (0) 1268 740589
[email protected]
www.monitoraudio.co.uk
As close as it gets
Gold Reference
Owners Manual