1
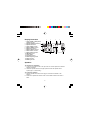
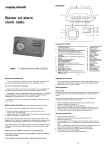
PLL Digital CD Clock Radio
29007
OPERATING INSTRUCTIONS
Illustration
13
22
12
11
10
9
8
14
7
5
3
2
1
6
16
4
15
19
20
21
17
17
18
1
2
3
4
5
6
7
8
9
10
11
12
13
14
15
16
17
18
19
20
21
22
PTS button
Set / clock wake button
Down button
Mode button
Up button
Stop button
Play / pause button
Off button
Snooze button
Sleep button
Radio on / band button
2
Wake 1 button
Cancel button
Wake 2 button
Preset recall button
Preset set button
Speakers
Battery compartment (underneath)
Volume control
CD open / close button
LCD display
Earphone socket (rear of unit)
Display illustration
1
2
3
4
5
6
7
8
9
10
11
12
13
14
15
7
5
2
4
6
Track number / radio preset
number indicator
Random playback indicator 8
9
Repeat all indicator
Clock setting indicator
Wake to Radio indicator
Wake to cd indicator
10
Wake to buzzer indicator
Alarm / wake 1 indicator
Alarm / wake 2 indicator
AM / PM indicator
Clock digits
Function indicator
Radio frequency scale
Stereo indicator
Memory indicator
3
1
15
14
11
12
13
Speakers
The speakers are detachable
1 To remove the speakers hold in the clip at the rear of each speaker and slide the
speaker backwards.
2 Unwind the speaker wire to the length required. Position the speaker where
required (up to 2 metres away).
To re-insert the speakers
1 Wind the speaker wire back onto the pegs in the direction indicated on the
speaker.
2 Position the speaker flush with the main unit and slide forwards until a click is
heard.
3
Electrical requirements
Check the voltage on the rating plate of your clock radio corresponds with
your house electricity supply which must be A.C. (alternating current).
If the socket outlets in your home are not suitable for the plug supplied with
this appliance the plug should be removed and the appropriate one fitted.
IMPORTANT : THE PLUG IF SEVERED FROM THE MAINS LEAD MUST BE
DESTROYED AS A PLUG WITH A BARED FLEXIBLE CORD IS
HAZARDOUS IF ENGAGED INTO A LIVE SOCKET OUTLET.
Should the fuse in the 13 amp plug require changing a 3 amp BS1362 fuse
must be fitted.
Battery back-up facility (unit will work without a battery being fitted)
Your cd clock radio is equipped with a battery back-up facility.
1 Remove the battery compartment cover (underneath the unit) by
pushing in the clip and lifting off.
2 Insert a battery size 9 volts PP3/6LR61 (Ensure battery is inserted correctly).
3 Replace the battery compartment cover.
Should a power interruption occur the clock will continue to run, however, time
keeping will not be accurate. The time will be displayed but the backlight will be
extinguished to conserve battery life. The memory will retain details of the clock time
and alarm settings.
If the optional battery is not installed in case of the AC power failure the clock will
flash at 12:00 when power is restored. You will need to reset the clock and
alarm settings.
Battery back-up is designed to operate for a short period only.
If the unit is not to be used for a prolonged period, remove the battery to
avoid battery leakage.
In the interests of environmental safety : dispose of batteries safely.
4
Setting the time
1
2
3
Press the SET CLOCK WAKE button and the
indicator will appear on the
display.
Press the DOWN button or UP button to adjust the time whilst the clock symbol
is displayed.
Note:
Press and hold the UP or DOWN buttons to skip through the settings with speed.
The time display has a 12 hour format. The AM / PM indicator will change to AM
or PM time respectively.
indicator will disappear.
After a few seconds the
Setting wake up time
1
2
3
Press the SET CLOCK WAKE button twice to set the alarm 1 time.
appear on the display.
Press and hold UP or DOWN buttons to set the alarm / wake up time.
will disappear.
After a few seconds,
will
4
To set alarm 2, press the SET CLOCK / WAKE button until
the display and repeat the above steps.
•
To change to another alarm / wake mode (e.g. from CD to radio), simply press
WAKE 1 or WAKE 2 to scroll through the wake options.
appears on
Setting wake to buzzer alarm
1
Press the WAKE 1 button to select wake to buzzer alarm until the buzzer alarm 1
2
symbol appears
on the display. Repeat for wake 2 if required.
The clock radio has a graduwake feature, the alarm tone will increase gradually to
a maximum volume in about 30-45 seconds. It is not possible to adjust the alarm
tone with the volume control.
5
Setting wake to radio alarm
1
2
3
4
5
6
7
•
•
Press the WAKE 1 button until the radio symbol
appears on the display.
Repeat for wake 2 if required.
Press the RADIO ON / BAND button to select MW / FM and press and hold
UP or DOWN button to tune to your desired station.
Press the PRESET / SET button to enter preset mode.
Press PRESET / RECALL button repeatedly to
select Alarm Memo. ‘AL MEMO’ will appear on the
display in the 11th preset station position.
Press the PRESET / SET button to confirm your
selection. This has now set your radio station for the
radio alarm function.
Rotate the VOLUME control to the desired level.
Press the OFF button to turn off the unit.
If you have not set a radio station for the alarm, (via alarm memo) the wake
up station will be at the last station tuned.
Ensure that the station set as the wake up station will be transmitting at the
wake up time.
Setting wake to cd
1
4
5
6
Press the WAKE 1 button until the cd symbol
appears on the display.
Repeat for WAKE 2 if required.
Press the CD OPEN button and insert a disc in the compartment.
To wake up to your preferred CD track (default is track 1).
Press and hold the PTS (programmable cd alarm track system) button while
pressing UP or DOWN button to select track.
Press PLAY/PAUSE to listen to the wake up volume level.
Rotate the volume to the desired wake-up volume level.
Press the OFF button to turn off the unit.
•
If the cd compartment is empty, the alarm tone will default to the buzzer.
2
3
6
Adjusting snooze duration
The snooze control temporarily silences the alarm and allows extra sleep time
after the alarm has sounded. You can use the SNOOZE feature repeatedly for
up to 2 hours, after which time the unit will turn off.
1 Press and hold the SNOOZE button.
2 Press the UP or DOWN button to set the snooze period (default is 9
minutes). Snooze can be set from 1 minute to 30 minutes. The alarm will
repeat after the set period.
Stopping the alarm
1
To silence the alarm temporarily:
• Press the SNOOZE button and the alarm will sound again when the
snooze period is over (see ‘Adjusting snooze duration’ above).
2
To stop alarm from sounding:
• Press the OFF button and the alarm will sound again the following day
at the set time.
3
To cancel the alarm completely:
Press the CANCEL button, then press the WAKE 1 or 2 buttons and the
selected alarm will be cancelled. The wake / alarm indicators will also be
cancelled.
• If you press WAKE 1 or 2 button again, the previous set alarm time/s will
be used.
Note: If the alarm is uninterrupted it will stop sounding after 2 hours.
7
Listening to radio
1
2
3
4
Press the RADIO ON / BAND button to switch on the radio.
Press the RADIO ON / BAND button to select FM, MW.
Press the UP or DOWN buttons to manually set to your desired station.
Adjust the VOLUME control to your desired listening level.
FM wire aerial
To obtain the maximum FM reception fully extend the wire FM aerial (which is
located at the rear of the unit) and alter the direction of the wire for best results.
The aerial for the MW waveband is located inside the unit. To obtain the
maximum MW reception rotate the cd clock radio.
Automatic station search
1
2
Press and hold the UP button until ‘UP’ is displayed on the display panel and
it will automatically search up the radio frequency.
Press and hold the DOWN button until ‘DN’ is displayed and it will
automatically search down the frequency.
Radio presets
1
2
3
4
Refer to ‘listening to the radio’ to tune to the desired radio station.
To store the frequency into the memory, press PRESET / SET button, the
preset station number will be automatically assigned the next available
number and will appear on the display.
Press the PRESET / RECALL to select another preset location.
Press PRESET / SET to confirm your settings.
Radio frequency tips
• There is a maximum of 11 (10 preset locations and 1 alarm memory location)
preset stations that can be stored.
• You can also overwrite preset station numbers by pressing PRESET / SET
button when listening to the chosen station. Press the PRESET / RECALL
button to select the preset to be overwritten and then press PRESET / SET
again to confirm.
8
Preset / recall
• Press the PRESET / RECALL button repeatedly to move between preset
stations when the radio is on.
Listening to a compact disc
1
2
3
4
•
•
•
•
Press the CD OPEN / CLOSE button to open the cd door.
Insert your disc, then close the door.
Press the PLAY / PAUSE button.
Adjust the VOLUME control to your desired listening level.
If you have not inserted a cd / or the disc is faulty, the display will show ‘nd’
when you press play.
Press the UP or DOWN buttons to search reverse or forward to select a track.
Press and hold UP or DOWN buttons to search within a track.
Press PLAY / PAUSE to pause playback.
Press STOP to stop playback.
Repeat function
1 Press the MODE button to repeat all the tracks on the cd, the
appear on the display.
Random function
indicator will
1
Press the MODE button twice to randomly play all the tracks on the cd, the
indicator will appear on the display.
Repeat and random can be used together.
1
2
and
indicators appear on the
Press the MODE button 3 times until the
display. This will play all cd tracks randomly and continuously.
Press mode button again to cancel all functions.
9
Sleep to cd / radio
You can drift off to sleep listening to cd or radio and the unit will automatically
switch off after an allocated time. If the alarm has been set the unit will operate at
the set alarm time.
1 Press and hold down the SLEEP button.
2 Press the UP or DOWN buttons whilst holding down the SLEEP button to select
a time from 1 minute to 1 hour 59 minutes.
CD:
Press PLAY / PAUSE button. CD play mode will automatically be in repeat
all mode when using the sleep to cd setting. (The unit will turn off
automatically once the sleep time has been reached).
•
Press the SNOOZE or OFF button to turn the unit off before the sleep time
has elapsed.
RADIO: When the sleep is activated it will automatically default to the last station/
preset that was used for the sleep function.
Note:
• The next time you reactivate the sleep function by pressing SLEEP, the time
setting will remain the same as the last time it was set.
• If you decide to turn off the unit before the end of the sleep period, press the
SNOOZE or OFF button and this will shut off the sleep cycle.
• When the sleep mode is active, press the SLEEP button to show the
time remaining before the unit goes off.
Warning labels
WARNING: to reduce the risk of electric shock, do not expose this appliance
to rain or moisture.
ATTENTION: To reduce the risk of electric shock, do not remove
the cover. There are no user serviceable parts inside the unit.
Refer any servicing to qualified personnel.
The lightning flash with arrowhead symbol within the triangle is a warning sign
alerting the user of ‘dangerous voltage’ inside the unit.
The exclamation point within the triangle is a warning sign alerting the user of
important instructions accompanying the product.
To prevent fire or shock hazard do not expose this apparatus to dripping or
splashing.
10
Maintenance
Do not expose your cd clock radio to extremes of temperature. The product should
be kept in a warm environment free from dust and damp. For external cleaning
use only a soft, clean, damp cloth. Use of detergents may damage the finish.
Technical specification
AC Power supply
Battery back-up
CD player
Laser
Radio
Earphone jack socket
:
:
:
:
:
:
:
230V
50Hz
9V DC type 6LR61/PP3 (not included)
Frequency response (60dB) 30Hz to 20kHz
= 780nm Max power = 2mW
FM 87.5MHz - 108MHz
MW 531KHz - 1611KHz
3.5mm diameter
WARNING : This unit uses a laser beam. To prevent an accident occuring the
unit should only be opened by a qualified engineer. If the door interlocks become
defective the laser may cause invisible radiation. Avoid exposure to the beam.
If there is a scratch, dirt or finger prints on the cd, it may cause tracking errors.
Before playing, clean the cd with a clean cloth. Wipe the cd from the centre
outwards. After playing, store the disc in its cd case.
The cd clock radio is for indoor use only.
Earphones
When connecting earphones to the earphone socket, the built in loudspeaker is
automatically switched off. Do not plug in the earphones when the alarm buzzer is set.
VENTILATION WARNING
The normal ventilation of the product shall not be impeded for intended use.
11
Guarantee
Morphy Richards products are manufactured to internationally accepted quality
standards. In addition to your statutory rights, Morphy Richards guarantee your
product to be free from manufacturing and component defects for a period of TWO
YEARS from date of purchase.
If your product proves to be defective within 28 days of purchase, your Morphy
Richards dealer from whom the product was purchased will be pleased to replace it
free of charge.
Should your product develop a defect within the guarantee period but after the
replacement period, please return the product to the following address, together with
the proof of purchase, brief details of the symptoms and your own name and
address.
After Sales Division
Morphy Richards Limited
Talbot Road
Mexborough
South Yorkshire
S64 8AJ
Your post office will provide a certificate of posting. The product will be repaired
and returned to you promptly.
Helpline (8:30-5:00 Mon-Thur/ 8:30-4:00 Fri) UK 0870 060 2614
Republic of Ireland 1800 409119
Replacement parts 0870 167 6645
Morphy Richards Website: www.morphyrichards.co.uk
446/8001/99 Rev 1
Morphy Richards Ltd, Talbot Road, Mexborough, S64 8AJ