1
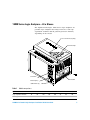
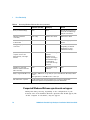
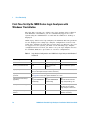
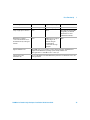
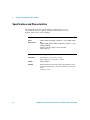
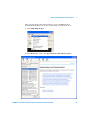
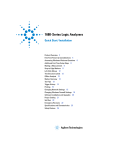
Agilent 16800 Series
Portable Logic Analyzers
Installation/Quick Start
Guide
REPRODUCTION AND DISTRIBUTION OF THIS TECHNICAL
MANUAL IS AUTHORIZED FOR GOVERNMENT PURPOSES.
Agilent Technologies
Notices
© Agilent Technologies, Inc. 2006-2011
Warranty
No part of this manual may be reproduced in
any form or by any means (including electronic storage and retrieval or translation
into a foreign language) without prior agreement and written consent from Agilent
Technologies, Inc. as governed by United
States and international copyright laws.
The material contained in this document is provided “as is,” and is subject to being changed, without notice,
in future editions. Further, to the maximum extent permitted by applicable
law, Agilent disclaims all warranties,
either express or implied, with regard
to this manual and any information
contained herein, including but not
limited to the implied warranties of
merchantability and fitness for a particular purpose. Agilent shall not be
liable for errors or for incidental or
consequential damages in connection with the furnishing, use, or performance of this document or of any
information contained herein. Should
Agilent and the user have a separate
written agreement with warranty
terms covering the material in this
document that conflict with these
terms, the warranty terms in the separate agreement shall control.
Manual Part Number
16800-97013
Edition
Third Edition, October 2011
Printed in Malaysia
Agilent Technologies, Inc.
1900 Garden of the Gods Road
Colorado Springs, CO 80907 USA
Microsoft ® is a U.S. registered trademark
of Microsoft Corporation.
Technology Licenses
The hardware and/or software described in
this document are furnished under a license
and may be used or copied only in accordance with the terms of such license.
Restricted Rights Legend
U.S. Government Restricted Rights. Software and technical data rights granted to
the federal government include only those
rights customarily provided to end user customers. Agilent provides this customary
commercial license in Software and technical data pursuant to FAR 12.211 (Technical
Data) and 12.212 (Computer Software) and,
for the Department of Defense, DFARS
252.227-7015 (Technical Data - Commercial
Items) and DFARS 227.7202-3 (Rights in
Commercial Computer Software or Computer Software Documentation).
2
Safety Notices
CAUTION
A CAUTION notice denotes a hazard. It calls attention to an operating procedure, practice, or the like
that, if not correctly performed or
adhered to, could result in damage
to the product or loss of important
data. Do not proceed beyond a
CAUTION notice until the indicated
conditions are fully understood and
met.
WA R N I N G
A WARNING notice denotes a
hazard. It calls attention to an
operating procedure, practice, or
the like that, if not correctly performed or adhered to, could result
in personal injury or death. Do not
proceed beyond a WARNING
notice until the indicated conditions are fully understood and
met.
16800 Series Portable Logic Analyzers Installation/Quick Start Guide
16800 Series Logic Analyzers—At a Glance
The Agilent Technologies 16800 Series logic analyzers are
portable logic analyzers that range from 34 to 204 logic
acquisition channels and 48 pattern generator channels,
depending on the model.
Accessories Pouch (top flap)
Tie-down Straps
Scroll Knob
Pod Cables
Run/Stop Keys
USB 2.0 Ports (2)
Table 1
Model comparisons
Agilent model number
16801A
16802A
16803A
16804A
16806A
16821A
16822A
16823A
Logic acquisition channels
34
68
102
136
204
34
68
102
Pattern generator channels
0
0
0
0
0
48
48
48
16800 Series Portable Logic Analyzers Installation/Quick Start Guide
3
Features, Logic Acquisition
• 1 M to 32 M memory depth per channel (depending on
memory option), software upgradeable.
• 250 MHz or 500 Mb/s maximum state data rate
(depending on state speed option), software upgradeable.
The 500 Mb/s maximum state data rate option is
available on the 68- channel and above logic analyzer
models.
• 1 GHz, 64 M deep timing analysis on half channels.
• Eye finder (automatic threshold and sample position
setup) feature.
• 4 GHz timing zoom with 64 K memory depth.
Features, Mainframe
• Built- in 15 inch TFT color LCD display, 1,024 x 768
(XGA) resolution. Touch screen with 16800A Option 103.
• 80 GB hard disk drive (or external hard drive 16800A
Option 109).
• 10/100 Base- T LAN port.
• USB 2.0 ports (six total, two on front, four on back).
• One PCI expansion slot.
• One PCI Express x1 expansion slot.
• The legacy 16800 series Logic Analyzers have the
Windows XP installation. The 16800 Logic Analyzers with
the serial number of MY51420101 or higher have
Windows 7 installation.
• Agilent Logic Analyzer application which takes the
complexity out of making logic analyzer measurements.
You can perform all operations directly from one window.
Features, Pattern Generator
• 24 channels at 300 MHz clock; 48 channels at 180 MHz
clock.
• Memory Depth: 16,777,216 vectors in half- channel mode.
4
16800 Series Portable Logic Analyzers Installation/Quick Start Guide
• Logic Level (data pods): 5 V TTL, 3- state TTL, 3- state
TTL/CMOS, 3- state 1.8 V, 3- state 2.5 V, 3- state 3.3 V,
ECL, 5 V PECL, 3.3 V LVPECL, and LVDS.
• Data Inputs: 3- bit pattern level sensing (clock pod).
• Clock Output: Synchronized to output data, delay of 7 ns
in 14 steps (clock pod).
• Clock Input: DC to 300 MHz (clock pod).
• Internal Clock Period: Programmable from 1 MHz to
300 MHz in 1 MHz steps.
• External Clock Period: DC to 300 MHz.
• External Clock Duty Cycle: 1.3 ns minimum high time.
Supplied Accessories
• PS2 mouse.
• PS2 keyboard.
• Accessory pouch and power cord.
Snap the accessories pouch to the top of the 16800 Series
logic analyzer. Use it to store probe leads, accessories, or
manuals. Use the tie- down straps under the flap to
conveniently hold pod cables not in use or during
transport.
Optional Accessories
• Probes.
Front Panel
Refer to the online help in the logic analyzer for information
on using the analyzer.
Rear Panel
Before you turn on the system, connect your mouse and
keyboard to the 16800 Series logic analyzer rear panel. If a
touch screen (Option 103) is not included, a connected
mouse and keyboard are required for normal system use.
16800 Series Portable Logic Analyzers Installation/Quick Start Guide
5
In This Guide…
This guide describes how to set up, use, and update your
16800 Series logic analyzer. It also contains information on
solving problems and additional safety information.
1
First-Time Set Up
This chapter describes the steps in setting up the logic
analyzer for the first time.
2
Getting Started with the Logic Analyzer
This chapter describes some basic features of the logic
analyzer and tells you where to find more information on
using the logic analyzer.
3
Updating the Logic Analyzer
This chapter describes how to change your logic analyzer’s
network and Windows Firewall settings. It also describes
how to get and install software updates.
4
Solving Problems
This chapter describes the logic analyzer’s built- in self tests
and recovering system software.
5
Safety Notices
This chapter contains additional safety information.
6
16800 Series Portable Logic Analyzers Installation/Quick Start Guide
Contents
1
First-Time Set Up
Proper Cooling
11
12
First-Time Set Up Considerations 13
Determine Whether the Instrument will be Connected to the Network
Get Network Setup Information 13
13
First-Time Set Up On Legacy 16800 Series Logic Analyzers With Windows XP
Installation 15
Answering Windows Welcome Questions 15
If expected Windows Welcome questions do not appear 16
First-Time Set Up On 16800 Series Logic Analyzers with Windows 7
Installation 18
Additional First-Time Setup Steps 20
Establishing an Administrator Account (recommended for standalone and
networked instruments) 20
Protecting the Instrument’s Operating System 20
2
Getting Started with the Logic Analyzer
Probing
21
22
Making a Measurement
Snap to Edge Markers
Left-Click Menus
23
25
26
Tree Structure Bus/Signal Names
Offline Analysis
Marker Overview
26
27
27
16800 Series Portable Logic Analyzers Installation/Quick Start Guide
7
Contents
Tool Tips
28
Trigger History
29
To power off the system 30
Using the Windows Shutdown 30
Using a Short Press of the Power Button 30
Using a Long Press of the Power Button 31
Unplugging the Power Cord or Power Loss 31
Specifications and Characteristics
3
Updating the Logic Analyzer
Changing Network Settings
On Windows XP 36
On Windows 7 36
32
35
36
Changing Windows Firewall Settings 37
To give other applications/ports access through the firewall
To restore the logic analyzer firewall defaults 41
Software Installation and Upgrades
Agilent Logic Analyzer Software
Optional Products 45
4
Solving Problems
47
Running Self-Tests
48
44
44
If the logic analyzer powers itself down
If the Power LEDs do not come on
49
49
If you get a registry error and the system won’t boot
If there are network connection problems
If there are touch screen problems
37
49
50
51
Using the System Recovery Software 54
On a Legacy 16800 Series Logic Analyzer with Windows XP Installation
8
54
16800 Series Portable Logic Analyzers Installation/Quick Start Guide
Contents
On a 16800 Series Logic Analyzer with Windows 7 Installation
Contacting Agilent Service/Support
5
Safety Notices
Warnings
59
61
62
To clean the instrument
Safety Symbols
Index
54
64
65
67
16800 Series Portable Logic Analyzers Installation/Quick Start Guide
9
Contents
10
16800 Series Portable Logic Analyzers Installation/Quick Start Guide
Agilent 16800 Series Portable Logic Analyzers
Installation/Quick Start Guide
1
First-Time Set Up
Proper Cooling 12
First-Time Set Up Considerations 13
First-Time Set Up On Legacy 16800 Series Logic Analyzers With Windows
XP Installation 15
First-Time Set Up On 16800 Series Logic Analyzers with Windows 7
Installation 18
Additional First-Time Setup Steps 20
Agilent Technologies
11
1
First-Time Set Up
Proper Cooling
Allow at least 5 cm (2 inches) of space between instruments for proper
cooling.
5 cm (2 inches)
12
5 cm (2 inches)
16800 Series Portable Logic Analyzers Installation/Quick Start Guide
First-Time Set Up
1
First-Time Set Up Considerations
Determine Whether the Instrument will be Connected to the
Network
NOTE
If you plan to use COM automation to programmatically control a logic analyzer from a
remote computer, be aware that the remote computer and the logic analyzer must both
have the same kind of network membership; that is, they must both be members of a
"Workgroup", or they must both be members of a "Domain". This is due to the security
requirements of Distributed COM.
Standalone
You are going to use the logic analyzer as a standalone instrument (no
LAN connection). Printing requires a printer attached to the logic
analyzer, sharing files is done via USB flash drive or floppy disk.
Connected to a Network
If you require the ability to print, share files, remotely control the logic
analyzer, etc. over the network, you need to either join a workgroup or
domain.
Get Network Setup Information
For networking, find out whether the network that your instrument will be
connected to uses the Microsoft Workgroup model or Microsoft Domain
model. In order for your instrument to perform tasks over the network
(print, transfer files, etc.) your instrument must be configured
appropriately for the networking model in use at your site.
Information you may require to complete your network configuration may
include, but is not limited to:
• The Workgroup or Domain name.
16800 Series Portable Logic Analyzers Installation/Quick Start Guide
13
1
First-Time Set Up
• Methodology for assigning IP addresses at your site (for example,
DHCP).
• Domain Name Service (DNS).
Other network information that may be readily available from your
network administrator.
14
16800 Series Portable Logic Analyzers Installation/Quick Start Guide
First-Time Set Up
1
First-Time Set Up On Legacy 16800 Series Logic Analyzers With
Windows XP Installation
The legacy 16800 series logic analyzers are shipped with Windows XP
installation. The first time you turn on these logic analyzers, the
Windows® Welcome session starts. Your logic analyzer configuration and
the answers to the Windows Welcome questions are affected by how you
choose to use the logic analyzer.
Use the Enter and arrow keys on the attached keyboard.
NOTE
Answering Windows Welcome Questions
Once you have determined how you want to use your logic analyzer and
your network configuration, power up your logic analyzer and answer the
Windows Welcome questions.
Table 2
Answering Windows Welcome Questions
Standalone (No LAN)
Workgroup
Domain
Help protect your PC
N/A
Choose “Help protect my
PC by turning on
Automatic Updates
now”.
Choose “Help protect my PC
by turning on Automatic
Updates now”.
What's your computer's name?
(After answering, wait several
minutes for next question to
appear)
If your organization has a standard naming scheme, use that scheme. Otherwise,
choose a descriptive name that follows the suggestions on the screen (less than 15
characters, etc.)
What's your administrator
password?
Agilent recommends entering an administrator password for administrator accounts.
See page 20 for actions that require administrator accounts.
Is this computer in a domain?
No
(Is given WORKGROUP
membership)
No
(Is given WORKGROUP
membership)
16800 Series Portable Logic Analyzers Installation/Quick Start Guide
Yes
Enter the domain name the
logic analyzer will log onto.
15
1
First-Time Set Up
Table 2
Answering Windows Welcome Questions (continued)
Standalone (No LAN)
Workgroup
Domain
Enter your domain settings.
N/A
N/A
Enter the name/password of
a user who can add the logic
analyzer to the domain.
Checking your Internet
connectivity
Press 'Skip'
Wait for this to finish.
Wait for this to finish.
How will this computer connect
to the Internet?
N/A
N/A
Choose the appropriate
answer.
Setting up a high-speed
connection?
N/A
N/A
Enter either the fixed IP/DNS
assigned by your network
administrator or select
"Obtain Automatically".
(If LAN connected) Will this
computer connect to the
Internet directly, or through a
network?
N/A
Choose "Yes, through a
network"
(Agilent does not
support connecting to
the internet through a
modem directly
connected to the logic
analyzer.)
N/A
(If LAN is not connected)
Windows unable to determine
LAN connectivity.
N/A
You are told to set up
LAN later.
N/A
Ready to register with Microsoft
The legacy 16900 series of Logic Analysis systems have Windows XP already enabled
to run.
This registration is to allow Microsoft to contact you.
Who will use this computer?
For All: Entering names here lets multiple users use the logic analyzer with
administrator permissions. By default their passwords will be blank.
If expected Windows Welcome questions do not appear
During first- time power- up, depending on the configuration of your
network, some of the Windows Welcome questions that should appear, like
“Is this computer in a domain?”, may not appear.
16
16800 Series Portable Logic Analyzers Installation/Quick Start Guide
First-Time Set Up
1
If this occurs, you need to change the logic analyzer’s network setup (after
the first- time power up) using the normal Windows XP methods (see
“Changing Network Settings” on page 36).
16800 Series Portable Logic Analyzers Installation/Quick Start Guide
17
1
First-Time Set Up
First-Time Set Up On 16800 Series Logic Analyzers with
Windows 7 Installation
The first time you turn on a 16800 series logic analyzer that is shipped
with Windows 7 installation, you are automatically logged on to the
system using the Administrator account and the Windows 7 desktop is
displayed.
Unlike legacy 16800 series logic analyzers, the Windows Welcome questions
are not displayed for setting logic analyzer configurations on these new
16800 logic analyzers the first time you turn these on. However, once you
are logged on to the system, you must set the following logic analyzer
configurations based on how you want to use your logic analyzer. You use
the standard Windows 7 procedures to set these configurations.
Table 3
Logic Analyzer Configurations on a 16800 Series Logic Analyzer with Windows 7
Installation
Configuration Task
Logic Analyzer Usage
Standalone (No LAN)
Workgroup
Protect your instrument’s PC
N/A
Specify computer name
If your organization has a standard naming scheme, use that scheme. Otherwise,
choose a descriptive name (less than 15 characters)
Specify the administrator
password
Agilent recommends entering an administrator password for administrator accounts.
See page 20 for actions that require administrator accounts.
Specify the domain name (if
applicable)
No
(Is given WORKGROUP
membership)
No
(Is given WORKGROUP
membership)
Yes
Enter the domain name the
logic analyzer will log onto.
Enter your domain settings.
N/A
N/A
Enter the name/password of
the user who can add the
logic analyzer to the domain.
Configure connectivity to the
Internet
N/A
N/A
Choose the appropriate
Internet connectivity.
18
Turn on Automatic
Updates
Domain
Turn on Automatic Updates
16800 Series Portable Logic Analyzers Installation/Quick Start Guide
First-Time Set Up
Configuration Task
1
Logic Analyzer Usage
Standalone (No LAN)
Workgroup
Domain
Set up a high-speed connection
N/A
N/A
Enter either the fixed IP/DNS
assigned by your network
administrator or select
"Obtain Automatically".
Determine if you want to
connect the instrument’s PC to
the Internet directly or through a
network.
N/A
Agilent does not support
connecting to the
Internet through a
modem directly
connected to the logic
analyzer.
N/A
Register with Microsoft
The 16800 series of Logic Analysis systems with serial number of MY51420101 or
higher have the Windows 7 operating system already enabled to run.
This registration is to allow Microsoft to contact you.
Specify users for the
instrument’s PC
You can add multiple users with administrator permissions to allow these users to use
the logic analyzer.
16800 Series Portable Logic Analyzers Installation/Quick Start Guide
19
1
First-Time Set Up
Additional First-Time Setup Steps
Establishing an Administrator Account (recommended for
standalone and networked instruments)
Agilent recommends that you set up an Administrator account for your
logic analyzer. You have to be logged in to the Administrator account to do
the following:
• Install most software (applies whether the instrument is networked or
standalone).
• Change the workgroup.
• Perform "Windows Updates".
• Change firewall settings.
Protecting the Instrument’s Operating System
Microsoft recommends the following three steps to ensure the instrument's
PC is protected.
1 Use an internet firewall.
2 Get operating system updates.
3 Use up- to- date antivirus software.
20
16800 Series Portable Logic Analyzers Installation/Quick Start Guide
Agilent 16800 Series Portable Logic Analyzers
Installation/Quick Start Guide
2
Getting Started with the Logic Analyzer
Probing 22
Making a Measurement 23
Snap to Edge Markers 25
Left-Click Menus 26
Tree Structure Bus/Signal Names 26
Offline Analysis 27
Marker Overview 27
Tool Tips 28
Trigger History 29
Specifications and Characteristics 32
Agilent Technologies
21
2
Getting Started with the Logic Analyzer
Probing
Probing is the key to effective and efficient use of logic analyzers. Agilent
Technologies offers a wide variety of probing accessories that support
general- purpose and application- specific measurement needs. We provide
reliable, electrically and mechanically unobtrusive probes that make it easy
to connect your Agilent logic analyzer to your system under test. For more
information on Agilent probes:
• See the quick reference card that came with your logic analyzer for an
overview of probing solutions.
• Go to www.agilent.com/find/logic_analyzer_probes for the most
up- to- date information on probe compatibility with a given logic
analyzer and purchasing information.
• Go to www.agilent.com and search for Probing Solutions for Logic
Analysis Systems (publication 5968- 4632E) for a catalog of detailed
probing information.
To connect and set up a probe, follow the instructions in the User’s Guide
that came with the probe.
22
16800 Series Portable Logic Analyzers Installation/Quick Start Guide
Getting Started with the Logic Analyzer
2
Making a Measurement
1 Start up the logic analyzer, connect to your target system, and select
Setup>Bus/Signal.
2 Assign buses and signals and click OK.
16800 Series Portable Logic Analyzers Installation/Quick Start Guide
23
2
Getting Started with the Logic Analyzer
3 Enter a trigger value.
4 Acquire and view data.
24
16800 Series Portable Logic Analyzers Installation/Quick Start Guide
Getting Started with the Logic Analyzer
2
Snap to Edge Markers
You can set the markers to jump to the nearest edge of a waveform. A
yellow target will show which edge the marker will jump to.
16800 Series Portable Logic Analyzers Installation/Quick Start Guide
25
2
Getting Started with the Logic Analyzer
Left-Click Menus
Drag a box around parts of the data. When you release the mouse button,
a menu appears.
Tree Structure Bus/Signal Names
Show individual signals in buses by clicking on the + to expand.
26
16800 Series Portable Logic Analyzers Installation/Quick Start Guide
Getting Started with the Logic Analyzer
2
Offline Analysis
Install the Agilent Logic Analyzer application on another Windows XP,
Windows 7, or Windows 2000 computer and you can analyze data without
the 16800 Series logic analyzer.
1 Follow the instructions in “Software Installation and Upgrades” on
page 44 to load the 16800 Series logic analyzer software on your PC.
2 Acquire a trace with the logic analyzer.
3 Save a configuration file with data.
4 Copy the file to the PC being used for offline analysis.
5 From the Agilent Logic Analyzer application software on your PC, open
the configuration file.
Marker Overview
The marker overview display shows marker locations within the data and
the part of data currently being displayed.
16800 Series Portable Logic Analyzers Installation/Quick Start Guide
27
2
Getting Started with the Logic Analyzer
Tool Tips
Pause the cursor over a tool Icon and a “Tool Tip Window” will appear.
28
16800 Series Portable Logic Analyzers Installation/Quick Start Guide
Getting Started with the Logic Analyzer
2
Trigger History
Save and recall trigger settings.
16800 Series Portable Logic Analyzers Installation/Quick Start Guide
29
2
Getting Started with the Logic Analyzer
To power off the system
You can power off the logic analyzer using Windows Shutdown or a short
press of the power button.
NOTE
When powering off the logic analyzer, wait until the fans stop turning (about 15 seconds)
before turning the logic analyzer back on. This ensures that internal circuitry restarts in a
known state.
Using the Windows Shutdown
On the logic analyzer desktop click Start>Shut Down or if you are
running remote desktop, click Start>Windows Security>Shut Down. This:
• Closes all programs that are running.
• Writes all data to the disk.
• Turns off the power supply.
• If the system is unplugged while it is off and then plugged back in, the
system will not power on until the power button is pressed.
Using a Short Press of the Power Button
Pressing the power button on the logic analyzer for a short time (less than
2 seconds):
• Closes all programs that are running.
• Writes all data to the disk.
• Turns off the power supply.
If the power button on the Remote Desktop is depressed for a short time
(less than 2 seconds or so), a message on the logic analyzer screen (not
on the remote desktop) will pop up asking if you really want to power
down. Clicking the 'yes' button results in the above events. Clicking 'no'
will prevent the shutdown. Not answering the dialog box (clicking neither
"Yes" nor "No") will have no effect. Further short presses on the power
button will have no effect.
30
16800 Series Portable Logic Analyzers Installation/Quick Start Guide
Getting Started with the Logic Analyzer
2
Using a Long Press of the Power Button
CAUTION
Only use a long press of the power button when the logic analyzer is unresponsive to
Windows Shutdown or a short press of the power button.
Pressing the power button for more than 4 seconds will power the system
down abruptly:
• Programs that are running will not be shut down. Any data that has
not been written to the disk will be lost.
• Turns off the power supply.
• If the system is unplugged while it is off and then plugged back in, the
system will not power on until the power button is pressed
Unplugging the Power Cord or Power Loss
CAUTION
Only unplug the power cord when the logic analyzer is unresponsive to all other
methods for powering off the system.
Unplugging power or a power loss is similar to the long press of the
power button with one exception:
• When the system is plugged back in, it will power up and boot into
Windows.
16800 Series Portable Logic Analyzers Installation/Quick Start Guide
31
2
Getting Started with the Logic Analyzer
Specifications and Characteristics
The following electrical and operating characteristics are not
specifications, but are typical operating characteristics for the
Agilent 16800 Series logic analyzers.
Electrical Characteristics
Power
Requirements
16801A, 16802A, and 16803A: 115/230 Vac +/- 20%, 48-66Hz, 615W
Max.
16804A, 16806A, 16821A, 16822A, and 16823A: 115/230 Vac +/- 20%,
48-66Hz, 775W Max.
CAT II (Line voltage in appliance and to wall outlet).
Pollution degree 2.
Environmental Characteristics (Operating)
32
Temperature
Instrument: 0° to + 50° C (+32° to +122° F).
Probes/cables: 0° to + 65° C (+32° to +149° F).
Altitude
3,000 m (10,000 ft).
Humidity
Relative humidity 8 to 80% at 40° C (104° F). Avoid sudden, extreme
temperature changes which could cause condensation on the circuit
board.
For indoor use only.
16800 Series Portable Logic Analyzers Installation/Quick Start Guide
Getting Started with the Logic Analyzer
2
More specifications and characteristics for your instrument and
measurement modules are in the on- line help. To find them go to:
1 Click Help>Help Topics.
2 Click Reference; then, click Specifications and Characteristics.
16800 Series Portable Logic Analyzers Installation/Quick Start Guide
33
2
34
Getting Started with the Logic Analyzer
16800 Series Portable Logic Analyzers Installation/Quick Start Guide
Agilent 16800 Series Portable Logic Analyzers
Installation/Quick Start Guide
3
Updating the Logic Analyzer
Changing Network Settings 36
Changing Windows Firewall Settings 37
Software Installation and Upgrades 44
Agilent Technologies
35
3
Updating the Logic Analyzer
Changing Network Settings
To make network changes after the first- time power up:
On Windows XP
The following steps are applicable for a logic analysis system with
Windows XP operating system:
• To change from a workgroup to a domain or vice versa, click Start then
right- click on My Computer and select Properties. Select the Computer
Name tab and click Change.
• To change network connection properties, click Start>Control
Panel>Network Connections. Select the connection you want to change
and click Change settings of this connection.
For more information on changing network settings, refer to the Windows
XP online help.
On Windows 7
The following steps are applicable for a logic analysis system with
Windows 7 operating system:
• To change from a workgroup to a domain or vice versa, click Computer
and select Properties. Click the Change Settings link in the Computer
name, domain and workgroup settings section. Then select the
Computer Name tab and click Change.
• To change network connection properties, click Start>Control
Panel>Network and Sharing Center. Select the connection you want to
change and then set the properties of this connection.
For more information on changing network settings, refer to the Windows
7 online help.
36
16800 Series Portable Logic Analyzers Installation/Quick Start Guide
Updating the Logic Analyzer
3
Changing Windows Firewall Settings
When 16800 Series logic analyzers are shipped from the factory, the
Windows Firewall is enabled and set up with the exceptions required by
the logic analyzer.
To give other applications/ports access through the firewall
For example, you may need to change firewall settings in order to:
• Use NetOp to remotely control the logic analyzer.
• Use RealVNC to remotely control the logic analyzer.
On Windows XP
To change firewall settings to give other applications/ports access:
1 From the Windows Start menu, choose Start>Control Panel.
2 In the Control Panel window, open Windows Firewall.
16800 Series Portable Logic Analyzers Installation/Quick Start Guide
37
3
38
Updating the Logic Analyzer
16800 Series Portable Logic Analyzers Installation/Quick Start Guide
Updating the Logic Analyzer
3
3 In the Windows Firewall dialog, click the Exceptions tab.
4 In the Exceptions tab, if the required program or service is listed, check
its box to enable it; otherwise, click Add Program... to give unlisted
applications permission to penetrate the firewall, or click Add Port... to
give unlisted ports access through the firewall.
Refer to the application’s documentation for information on port
numbers or other firewall setup information.
On Windows 7
To change firewall settings on Windows 7 to give other applications/ports
access:
1 From the Windows Start menu, choose Start>Control Panel.
2 In the Control Panel window, click Windows Firewall.
3 Click the Allow a program or a feature through Windows firewall
link.
16800 Series Portable Logic Analyzers Installation/Quick Start Guide
39
3
Updating the Logic Analyzer
4 The list of allowed programs and features is displayed. If the required
program or service is listed, check its box to enable it; otherwise, click
Allow another program... to give unlisted programs permission to
penetrate the firewall.
Refer to the application’s documentation for more information on port
numbers or other firewall setup information.
NOTE
40
Note that there are separate Windows Firewall profiles: Domain for when the computer has
domain membership, and Standard for when the computer has workgroup membership. If
you change the type of membership, any changes you made to the Windows Firewall
settings will have to be made again.
16800 Series Portable Logic Analyzers Installation/Quick Start Guide
Updating the Logic Analyzer
3
To restore the logic analyzer firewall defaults
On legacy 16800 logic analyzers
1 From the Windows Start menu, choose Start>Control Panel.
2 In the Control Panel window, open Windows Firewall.
16800 Series Portable Logic Analyzers Installation/Quick Start Guide
41
3
Updating the Logic Analyzer
3 In the Windows Firewall dialog, click the Advanced tab.
4 In the Advanced tab, click Restore Defaults to restore the default
Windows Firewall settings.
5 In the confirmation dialog, click Yes.
6 Click OK to close the Windows Firewall dialog.
7 From the Windows Start menu, choose Start>Run; then, enter or select
the file “C:\Program Files\Agilent Technologies\Logic Analyzer\
agFirewSP2.wsf”, and click OK.
On newer/current 16800 logic analyzers with 5.10 or later version of Logic
Analyzer software
If your 16800 Logic Analyzer has 5.10 or later version of Logic Analyzer
software and Windows XP installation, then restore the firewall defaults
by following the steps 1 to 6 in the procedure described in previous
section. After that, uninstall and then reinstall the Logic Analyzer
software from www.agilent.com/find/la- sw- download.
42
16800 Series Portable Logic Analyzers Installation/Quick Start Guide
Updating the Logic Analyzer
3
If your 16800 Logic Analyzer has 5.20 or later version of Logic Analyzer
software and Windows 7 installation, then restore the firewall defaults by
performing the following steps:
1 From the Windows Start menu, choose Start>Control Panel.
2 Click the Windows Firewall link.
3 Click Restore defaults in the left pane of the window.
4 Again click Restore defaults.
5 Uninstall and then reinstall the Logic Analyzer software from
www.agilent.com/find/la- sw- download.
The logic analyzer firewall defaults enable the following exceptions:
• Agilent Logic Analysis Application program.
• Agilent Logic Analysis Service program.
• File and Printer Sharing.
• Microsoft RPC Endport Mapper TCP port.
• Remote Desktop service.
• Web Server (HTTP) port.
The logic analyzer firewall defaults also enable the following ICMP
(Internet Control Message Protocol) settings:
• Allow incoming echo request.
• Allow outgoing destination unreachable.
• Allow outgoing time exceeded.
NOTE
Note that there are separate Windows Firewall profiles: Domain for when the computer has
domain membership, and Standard for when the computer has workgroup membership.
When you restore the logic analyzer firewall defaults, the defaults for both profiles are
restored.
16800 Series Portable Logic Analyzers Installation/Quick Start Guide
43
3
Updating the Logic Analyzer
Software Installation and Upgrades
Agilent Logic Analyzer Software
The Agilent 16800 Series logic analyzers are shipped with software already
installed, including any licensed optional products that you may have
purchased. The licensing process (described below) has been performed
and the (*.lic) license file is in place.
To upgrade/reinstall the logic analyzer software or to install the logic
analyzer software onto your PC for offline processing:
• On legacy 16800 series logic analyzers that were shipped with an
application CD, attach a USB CD- ROM drive. Then insert the
application CD and click INSTALL PRODUCTS>Install Logic Analyzer. To
install the logic analyzer software onto your PC for offline processing,
insert the application CD into your PC’s CD- ROM drive, click INSTALL
PRODUCTS>Install Logic Analyzer. Alternatively, you can also download
and install the Logic analyzer software from
www.agilent.com/find/la- sw- download.
• On 16800 series logic analyzers with serial number of MY51420101 or
higher and Windows 7 operating system, download the Logic analysis
system software from http://www.agilent.com/find/la- sw- download and
then install the software using the downloaded file. These systems are
not shipped with an application CD. You need the Agilent Logic
Analyzer software version 5.20 or later for these systems.
Note that newer versions of the Agilent Logic Analyzer software will
automatically uninstall the previous version as a step in the upgrade.
(User files in the "Documents and Settings" tree are not affected.)
To be notified when software upgrades are available for downloading from
the web, please sign up for e- mail notifications at:
www.agilent.com/find/emailupdates
44
16800 Series Portable Logic Analyzers Installation/Quick Start Guide
Updating the Logic Analyzer
3
Optional Products
If applicable, follow the instructions on the entitlement certificate that
came with your purchase to enable the optional tool.
16800 Series Portable Logic Analyzers Installation/Quick Start Guide
45
3
46
Updating the Logic Analyzer
16800 Series Portable Logic Analyzers Installation/Quick Start Guide
Agilent 16800 Series Portable Logic Analyzers
Installation/Quick Start Guide
4
Solving Problems
Running Self-Tests 48
If the logic analyzer powers itself down 49
If the Power LEDs do not come on 49
If you get a registry error and the system won’t boot 49
If there are network connection problems 50
If there are touch screen problems 51
Using the System Recovery Software 54
Contacting Agilent Service/Support 59
Agilent Technologies
47
4
Solving Problems
Running Self-Tests
1 In the Agilent logic analyzer application, click Help>Self Test.
2 In the analysis system Self Test dialog, double click on the test you
want to run.
48
16800 Series Portable Logic Analyzers Installation/Quick Start Guide
Solving Problems
4
If the logic analyzer powers itself down
If the logic analyzer warns you it is powering down before it powers
down, the dialog will describe the problem (such as a fan/overtemp
problem). If the logic analyzer just powers down, it is likely a power
supply problem.
If the Power LEDs do not come on
If the lights do not come on and if the system powers up momentarily
when you plug it in, make sure the power button hasn't become jammed
or stuck in the pushed in position.
If you get a registry error and the system won’t boot
When powered off unexpectedly (for example, with a long press of the
power button or a power loss), Windows may not flush all system
information to disk and is vulnerable to problems. When you power back
on you may get a "Registry Error" and the system won't boot. If this
happens you will need to restore from the system CD- ROM. In the Logic
Analysis systems with Windows 7 installation, you can restore the system
software using the recovery process. This process overwrites all the user
data and restores the system back to the original condition in which it
was shipped. Refer to the topic “On a 16800 Series Logic Analyzer with
Windows 7 Installation” on page 54 to know more about this process.
It is best to keep regular backups of your data and use proper power
down procedures. If you have data that was not backed up that you need
to try to save:
1 Physically remove the disk drive.
2 Mount it under another Windows XP/7 system based on which
operating system is installed on the Logic Analysis system.
3 Move the data to the boot disk until you can restore the operating
system.
16800 Series Portable Logic Analyzers Installation/Quick Start Guide
49
4
Solving Problems
If there are network connection problems
See the “Network Troubleshooting Guide” topic in the Agilent Logic
Analyzer application’s online help. Briefly:
• The Windows Firewall must be set to allow access to the “Agilent Logic
Analysis” service in order use remote connections (see “To restore the
logic analyzer firewall defaults” on page 41).
• The Windows Firewall must be set to respond to the following ICMP
(Internet Control Message Protocol) requests in order to use remote
connections:
• Allow incoming echo requests.
• Allow outgoing destination unreachable.
• Allow outgoing time exceeded.
(See “To restore the logic analyzer firewall defaults” on page 41.)
• The link activity light must be on; If these LEDs are not on, the LAN
segment may be dead.
• If connecting two logic analysis systems directly together (that is, no
hub or switch between them), make sure you are using a special
cross- over cable.
If your IP address is in the same subnet as a working computer’s (use
“ipconfig /all | more” to view IP addresses on machine in question), it is
possible that your network administrators have denied access to any
resources if the computer is not in the domain. In this case, you need to
add the computer (logic analysis system) to the domain.
50
16800 Series Portable Logic Analyzers Installation/Quick Start Guide
Solving Problems
4
If there are touch screen problems
If you observe the following touch screen problems:
• If the Touch Off button on the instrument’s front panel doesn’t work.
• If there are problems with the right- click functionality on the touch
screen.
• If the accuracy of touch locations is off.
You may be able to calibrate the touch screen to fix the problem by
following the procedures described below for legacy and newer 16800
series of logic analyzers.
On legacy 16800 series logic analyzers:
1 From the Windows Start menu, choose Start>All Programs>Agilent
Logic Analyzer>Utilities>Touch Screen >Settings.
2 In the UPDD Console dialog, select the Calibration settings area.
3 Make sure that Number of points is set to 3 and that Use eeprom
storage is checked; then, click Calibrate.
16800 Series Portable Logic Analyzers Installation/Quick Start Guide
51
4
Solving Problems
On newer/current 16800 series logic analyzers:
1 From the Windows Start menu, choose Start>All Programs>Agilent
Logic Analyzer>Utilities>Touch Screen>Calibration and Settings.
2 In the Microchip TSHARC Control Panel dialog, select the Calibration
tab.
3 By default, the number of points is set to 4 and the Inset is set at
20.0%.
4 Click Begin Calibration.
5 If you want to enable the right- click functionality on the touch screen,
select the Click Settings tab and then select the Enable Right- Click
checkbox. You can also set the area on the touch screen on which you
want to enable the right- click functionality.
52
16800 Series Portable Logic Analyzers Installation/Quick Start Guide
Solving Problems
4
If calibrating the touch screen doesn’t fix the problem, see “Contacting
Agilent Service/Support” on page 59.
16800 Series Portable Logic Analyzers Installation/Quick Start Guide
53
4
Solving Problems
Using the System Recovery Software
Restoring your system software might be necessary for the following
reasons:
• Hard drive failure.
• Virus in the system or unstable system.
• Intentional disk clean - for example if you are passing the system to
another team or returning it to a rental company and you do not want
any data left on it.
On a Legacy 16800 Series Logic Analyzer with Windows XP Installation
The legacy 16800 series of Logic Analyzers have the Windows XP
operating system installed. These systems also have the Agilent Logic
Analyzer software preinstalled.
You need to have a keyboard, mouse, and USB DVD- ROM drive connected.
Follow the instructions provided with the recovery CD or DVD that
accompanies your Logic Analyzer to restore your system software.
CAUTION
Running the recovery disks will reformat your hard drive. All data files and programs
will be overwritten. Save your data to a CD or to another machine before performing
this procedure.
On a 16800 Series Logic Analyzer with Windows 7 Installation
The 16800 series of Logic Analyzers with serial number of MY51420101 or
higher have the Windows 7 operating system installed. These systems also
have the Agilent Logic Analyzer software version 5.20 or later preinstalled.
These systems do not have any recovery CD or DVD in their shipment.
If you need to restore the logic analysis system software, you run the
recovery process on the hard drive of the system. This recovery process
uses the hidden partition on the hard drive to restore the hard disk drive
back to its original state in which it was shipped. When you run this
process, the recovered hard disk drive contains:
• the Windows 7 operating system
54
16800 Series Portable Logic Analyzers Installation/Quick Start Guide
Solving Problems
4
• the version of the Logic Analyzer software which was installed when
the system was originally shipped and not the latest or upgraded
version of the software that might be available at the time of system
recovery.
• the license files of any licensed optional products that you had
purchased with the Logic Analyzer and that were installed when the
system was originally shipped.
NOTE
When you run the recovery process, the software licensing Host ID of your logic analyzer
may change. If this happens, the restored license files will not work with the new host ID
and you will need rehosted license files. To get these files, you can contact your nearest
Agilent sales/service office. To locate a sales or service office, go to
www.agilent.com/find/contactus.
CAUTION
Running the recovery process reformats your logic analyzer’s hard disk drive to the
state in which it was originally shipped to you. All user data files and programs are
overwritten when the recovery process runs. Therefore, save your data to a CD or to
another machine before you start recovering the system software.
To run the recovery process
1 Shut down and then restart your Logic Analyzer.
While booting up, the Logic Analyzer displays the Windows Boot
Manager screen. This screen provides you the following options:
• Microsoft Windows 7 - This is the default selected option. This
option starts the Logic Analyzer with the Windows 7 operating
system. This is the normal startup of the system.
• Agilent Recovery system - You should select this option when you
want to restore/repair your Logic Analyzer software by running the
Agilent recovery process.
16800 Series Portable Logic Analyzers Installation/Quick Start Guide
55
4
Solving Problems
2 After a few seconds, Logic Analyzer automatically starts with the option
selected in the Windows Boot Manager. Select the Agilent Recovery
system option in the Windows Boot Manager screen using the arrow
keys and then press Enter.
The recovery process starts preparing the system for recovery and
displays the following screen with options to choose. You can enter:
• 1 to run Check Disk on the Logic Analyzer’s hard disk drive. If the
recovery process encounters any problems while running Check Disk,
it reports these problems else it returns to the Agilent Recovery
system prompt on completion of Check Disk.
• 2 to restore your Logic Analyzer software back to its original state in
which it was shipped.
• 3 to view a document that provides information on the recovery
process.
• 4 to repair the Logic Analysis system hard disk drive.
• 5 to exit the recovery process and restart the Logic Analyzer in the
normal mode.
56
16800 Series Portable Logic Analyzers Installation/Quick Start Guide
Solving Problems
4
3 Select the second option in the above screen by entering 2 in the text
box and clicking OK.
4 A warning message is displayed stating that the recovery process
overwrites the data on C: drive. If you want to save your data to a CD
or to another machine before you proceed further, then exit the
recovery process and save your data. Else, click OK to proceed with the
recovery process.
The recovery process starts.
16800 Series Portable Logic Analyzers Installation/Quick Start Guide
57
4
Solving Problems
If the recovery process is able to restore the system software
successfully, then the following screen is displayed.
5 Click OK to proceed. You Logic Analysis system now reboots to
Windows 7.
6 The Windows Boot Manager screen is displayed with Microsoft
Windows 7 as the default selection. The system automatically starts
with this default selection. Alternatively, you can press Enter to proceed
with the default selection.
58
16800 Series Portable Logic Analyzers Installation/Quick Start Guide
Solving Problems
NOTE
4
There are situations when you are not able to run the recovery process, (for instance, when
the hard disk drive of your system fails) or when running the recovery process does not
recover your system software. In such situations, you can send your Logic Analysis system
for hard disk repair/replacement to Agilent. Alternatively, you can contact your nearest
Agilent sales/service office. To locate a sales or service office, go to
www.agilent.com/find/contactus.
Contacting Agilent Service/Support
To locate a sales or service office near you, go to:
http://www.agilent.com/find/contactus
16800 Series Portable Logic Analyzers Installation/Quick Start Guide
59
4
60
Solving Problems
16800 Series Portable Logic Analyzers Installation/Quick Start Guide
61
5
Safety Notices
Warnings
• Before turning on the instrument, you must connect the protective
earth terminal of the instrument to the protective conductor of the
(mains) power cord. The mains plug shall only be inserted in a socket
outlet provided with a protective earth contact. You must not negate the
protective action by using an extension cord (power cable) without a
protective conductor (grounding). Grounding one conductor of a
two- conductor outlet is not sufficient protection.
• Only fuses with the required rated current, voltage, and specified type
(normal blow, time delay, etc.) should be used. Do not use repaired
fuses or short- circuited fuse holders. To do so could cause a shock or
fire hazard.
• If you energize this instrument by an auto transformer (for voltage
reduction or mains isolation), the common terminal must be connected
to the earth terminal of the power source.
• Whenever it is likely that the ground protection is impaired, you must
make the instrument inoperative and secure it against any unintended
operation.
• Service instructions are for trained service personnel. To avoid
dangerous electric shock, do not perform any service unless qualified to
do so. Do not attempt internal service or adjustment unless another
person, capable of rendering first aid and resuscitation, is present.
• Do not install substitute parts or perform any unauthorized
modification to the instrument.
• Capacitors inside the instrument may retain a charge even if the
instrument is disconnected from its source of supply.
• Do not operate the instrument in the presence of flammable gasses or
fumes. Operation of any electrical instrument in such an environment
constitutes a definite safety hazard.
• Do not use the instrument in a manner not specified by the
manufacturer.
• To optimize your comfort and productivity, it is important that you set
up your work area correctly and use your equipment properly. Refer to
http://www.agilent.com/quality/Working_In_Comfort.pdf for set- up and
use recommendations
62
16800 Series Portable Logic Analyzers Installation/Quick Start Guide
Safety Notices
5
• Position equipment so that it is not difficult to disconnect the power
cord.
16800 Series Portable Logic Analyzers Installation/Quick Start Guide
63
5
Safety Notices
To clean the instrument
If the instrument requires cleaning:
1 Remove power from the instrument.
2 Clean the external surfaces of the instrument with a soft cloth
dampened with a mixture of mild detergent and water.
3 Make sure that the instrument is completely dry before reconnecting it
to a power source.
64
16800 Series Portable Logic Analyzers Installation/Quick Start Guide
Safety Notices
5
Safety Symbols
!
Instruction manual symbol: the product is marked with this symbol when
it is necessary for you to refer to the instruction manual in order to
protect against damage to the product.
Hazardous voltage symbol.
Earth terminal symbol: Used to indicate a circuit common connected to
grounded chassis.
16800 Series Portable Logic Analyzers Installation/Quick Start Guide
65
5
66
Safety Notices
16800 Series Portable Logic Analyzers Installation/Quick Start Guide
Index
A
H
R
administrator, 13
administrator account, 20
Agilent web
service/support, 59
antivirus, 20
hard drive, 54
high-speed connection, 15
recovery procedures, 54
recovery process, 54
registry error, 49
restoring system, 54
running self tests, 48
C
caution
electrostatic discharge, 31
CD
product software, 44
change network settings, 36
characteristics, 33
Check Disk, 56
computer name, 15
connection, high speed, 15
contact information, 59
D
debugging network, 50
disk
clean/reformat, 54
domain, 13, 15
I
ICMP settings, 43
install
software, 44
internet, 15
inverse assemblers, 45
L
LAN, 15
LEDs, 49
N
network
adding logic analyzer, 13
connection decision, 13
debugging, 50
network connection problems, 50
network settings, 36
O
E
optional tools, 45
electrostatic discharge, 31
P
F
password, 15
power
problems, 49
turning off, 30
firewall, 20
changing settings, 20, 37
S
self tests, 48
service
contacting Agilent, 59
ground modules, 31
web address, 49
shut down system, 30
software
add-in, 44
installation, 13, 20, 44
updating, 44
specifications, 33
standalone operation, 13
system
power, 49
recovery, 54
software, 44
System recovery on Windows 7
installation, 54
T
tools, optional, 45
touchscreen problems, 51
U
update software, 44
G
grounding, 31
16800 Series Portable Logic Analyzers Installation/Quick Start Guide
67
Index
V
virus software, 20
W
windows
power problems, 49
updates, 20
welcome, 15
welcome questions, 15
Windows Boot Manager, 56
Windows Firewall settings
changing, 37
workgroup, 13
changing, 20
68
16800 Series Portable Logic Analyzers Installation/Quick Start Guide