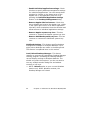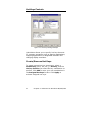
1
Appian
Hurricane
Multiple Monitor Graphics Card
User Guide
Copyright © 2001 Appian Graphics Corporation
All rights reserved. This document may not be copied
or otherwise reproduced without the prior written
consent of Appian Graphics Corp. Printed in the USA.
Text Part No. 780-00274-00
Appian Graphics, Hurricane, AGX1, AppianDX,
AppianSync, HydraThread and HydraVision are
trademarks and registered trademarks of Appian
Graphics Corp. All other products and names are
trademarks and registered trademarks of their
respective owners.
This material is made available for use under a license
from Appian Graphics Corp. and its use is subject to
all conditions and restrictions provided by the license
agreement. Appian software programs and Appian
hardware devices are covered by one or more of the
following U.S. patents:
5,835,090
5,848,294
5,949,437
Additional patents are pending.
ii
How to Contact Appian Graphics
In the United States (US), as well as Europe, the
Middle East, and Africa (EMEA), use the following
information to get help fast:
General
425-882-2020 (US)
+44 (0)20 7499-2535 (EMEA)
Sales
800-727-7426 (US)
Technical
Support
800-422-7369, 7am – 5pm PST (US)
+44 (0)20 7499-2535 (EMEA)
Fax
425-882-8618 (US)
+44 (0)20 7495-7636 (EMEA)
Address (US)
Appian Graphics Corp.
18005 NE 68th Street, Suite A120
Redmond, WA 98052
Address (EMEA)
Appian Graphics Ltd.
Top Floor, 73 New Bond Street
London, W1S 1RS
United Kingdom
Email
[email protected] (US)
[email protected] (EMEA)
Web site
www.appian.com
Information We Will Need
Please have the following information available before
you contact Appian Technical Support:
Ÿ The name and serial number of your Appian product
Ÿ Information about your computer; including the
manufacturer, the system BIOS, the
type/brand/model of your monitor(s), and other
devices installed in your system.
Ÿ A detailed description of the problem
iii
Contents
Chapter 1
1
Introduction to Hurricane ............................................. 1
Included with the Hurricane ................................................2
Using Multiple Monitors .......................................................3
Chapter 2
4
Get Started.................................................................... 4
General System Requirements ............................................4
Prepare for Hardware Installation ........................................4
Install the Hurricane...........................................................5
Hurricane Monitor Cabling...................................................6
Chapter 3
8
Install and Use Software for Windows NT 4.0............ 8
Install the Windows NT 4.0 Driver and HydraVision Software..9
Install Local Help Files ...................................................... 10
Use HydraVision .............................................................. 11
Multi-Monitor Controls.................................................. 15
Desktop Management Controls ..................................... 18
Hot Keys Controls ....................................................... 22
MultiDesk ................................................................... 23
Chapter 4
25
Install and Use Software for Windows 98/ME/200025
Install the Windows 98/ME Driver ..................................... 26
Install the Windows 2000 Driver ........................................ 27
Enable Additional Monitors ................................................ 28
Install Local Help Files ...................................................... 29
Use HydraVision .............................................................. 30
Desktop Management Controls ..................................... 32
Hot Keys Controls ....................................................... 37
MultiDesk ................................................................... 38
Chapter 5
40
Technical Information................................................. 40
Monitor Cables and Connector Pinouts ............................... 40
DVI Connector Pinouts ................................................ 41
DB-15 Connector Pinouts ............................................. 42
Functional Specifications ................................................... 43
iv
Chapter 6
44
Troubleshooting .......................................................... 44
Frequently Asked Questions .............................................. 44
Uninstall Hurricane Drivers and HydraVision Software ........ 48
Appendix A
49
Regulatory Information .............................................. 49
FCC Compliance Statement .............................................. 49
Industry Canada Compliance Statement ............................ 50
CE Compliance Statement ................................................ 50
Figures and Tables
Figure
Figure
Figure
Figure
Figure
Figure
Figure
Figure
Figure
Figure
Figure
Figure
Figure
Figure
Figure
Figure
Figure
Figure
Figure
Figure
Figure
1. Hurricane Connectors ...........................................6
2. DVI-to-VGA Adapter .............................................6
3. Dual Monitor Array ............................................. 11
4. HydraVision Syste m Tray Icon............................. 12
5. Accessing HydraVision for Windows NT 4.0 ........... 12
6. Display Properties Dialog Box Example ................ 13
7. Multi-Monitor Dialog Example............................... 15
8. Extended Display Settings Dialog Example............ 16
9. Desktop Management Dialog Example .................. 18
10. Hot Keys Dialog Example .................................. 22
11. MultiDesk System Tray Icon .............................. 23
12. MultiDesk Pop-Up Menu..................................... 24
13. Enable Additional Monitors Example.................... 28
14. HydraVision System Tray Icon ........................... 30
15. Accessing HydraVision ...................................... 30
16. Desktop Management Dialog Example ................ 32
17. Hot Keys Dialog Example .................................. 37
18. MultiDesk System Tray Icon .............................. 38
19. MultiDesk Pop-Up Menu..................................... 39
20. DVI Connector Pinouts ...................................... 41
21. DB-15 Connector Pinouts .................................. 42
Table 1. DVI Connector Description ................................... 41
Table 2. DB-15 Connector Pinouts ..................................... 42
v
[This page intentionally left blank.]
vi
Chapter 1
Introduction to Hurricane
Thank you for purchasing the Appian Hurricane
multiple monitor graphics card. This guide introduces
you to Appian Hurricane architecture, performance
capabilities and included software. This guide also
contains an overview of HydraVision display
management software, details about video support,
and important technical information. Be sure to read
this entire User Guide.
The Hurricane provides dual-monitor support. With
two display channels, the Hurricane is designed to
support multiple monitor configurations in Windows
98/ME, Windows 2000 and Windows NT 4.0.
The Hurricane card is a single-slot, multiple monitor
graphics solution featuring a high-speed PCI or AGP
bus interface, 32MB of on-board SDRAM
(Synchronous Dynamic Random Access Memory), and
full VGA and SVGA compatibility. The card interface
to the PCI (versions 2.1 and above) or AGP (1X, 2X
or 4X) bus incorporates multi-function capabilities for
complete multiple monitor operating system support.
The result is a fast, high-resolution display.
The Hurricane also features Appian’s powerful and
easy-to-use HydraVision multiple monitor desktop
management software for Windows 98/ME, Windows
2000 and Windows NT 4.0. HydraVision software
allows the user to define the placement and behavior
of windows and dialog boxes in the multiple monitor
display space, and provides a variety of productivity
tools designed specifically for managing multiple
monitors.
1
Chapter 1: Introduction to Hurricane
HydraVision display management software provides
language support for Brazilian Portuguese, Danish,
Dutch, Finnish, French, German, Italian, Japanese,
Korean, Norwegian, Spanish, Swedish, Simplified
Chinese and Traditional Chinese.
If you are running Windows in any of the above
languages, HydraVision will automatically load the
appropriate localized control panel or tab. If you are
running Windows in a non-supported language,
HydraVision and the local help files will be available in
English only.
Included with the Hurricane
Before using your Hurricane hardware and software,
please verify that your package contains the items
listed below.
Ÿ Appian Hurricane AGP or PCI graphics card
Ÿ Appian Hurricane Installation CD-ROM
Ÿ Registration/Warranty Card
Ÿ DVI-to-VGA adapter
Please contact Appian Technical Support if you find
any of these items missing or damaged. Fill out and
return the registration/warranty card to ensure full
support from Appian for your Hurricane product.
To get the best performance from your Hurricane
card, use the supplied Windows 98/ME, Windows
2000 or Windows NT 4.0 drivers and HydraVision
display management software. Each operating system
requires a separate program for configuring displays.
Be sure to use the appropriate device drivers and
configuration program for your operating system.
Appian Hurricane User Guide
2
Using Multiple Monitors
The Hurricane supports the use of multiple monitors in
Windows 98/ME, Windows 2000 and Windows NT 4.0.
Using a multiple monitor configuration is an efficient
and cost-effective way to increase the size of your
computer display area, commonly called the desktop.
With multiple monitors, you can view a single
application as a large window stretching across
several monitors, or you can display different
applications on each monitor.
3
Chapter 1: Introduction to Hurricane
Chapter 2
Get Started
General System Requirements
Ÿ A PC platform with a full-length PCI or AGP slot
compliant with PCI revision 2.1 or higher, or AGP
revision 2.0 or higher
Ÿ Windows 98/ME, Windows 2000 or Windows NT 4.0
with Service Pack 4 or higher
Ÿ Pentium II class processor
Ÿ At least 32MB of installed system memory (RAM), or
twice as much system RAM as graphics memory
The Hurricane is VGA compatible and provides full
support for Super VGA drivers written to Video
Electronics Standards Association (VESA)
specifications.
Prepare for Hardware Installation
To complete the installation, you may need some or all
of the following tools:
Ÿ Medium size flat head screwdriver
Ÿ Medium size Phillips head screwdriver
Ÿ 3/16” wrench or nut driver
To prepare your computer for installation of the
Hurricane card, perform the following steps:
1. Turn off the computer and the power for all external
devices (monitor, printer, etc.).
Appian Hurricane User Guide
4
2. Disconnect all cables from the rear of your computer
to give you more room to work. Note where each
cable connects so you can reconnect it after
installing the Hurricane card.
3. Remove the cover-mounting screws on the
computer. If necessary, refer to your system
instruction manual for information on removing the
computer cover.
4. Carefully remove the cover from the computer. The
system motherboard should now be in full view.
Install the Hurricane
To install your Appian Hurricane card, perform the
following steps:
5. Remove any previously installed graphics card(s)
from the system.
6. Locate an available PCI or AGP expansion slot for
the Hurricane card. If necessary, remove the
expansion slot cover and partner screw using the
appropriate tool.
Ö WARNING! The Hurricane is static sensitive. To
avoid damage to the card from static
electricity, ground yourself before handling the
card by touching the metal frame on your
computer. This dissipates any static electricity
and prevents damage to sensitive components.
7. Hold the Hurricane card by its top edge and slide it
into the available slot. The PCI or AGP bus interface
should fit into the slot. Make sure the Hurricane
card is firmly seated in the slot.
8. Once the Hurricane card is correctly seated in the
slot, secure it with the partner screw.
9. Replace and secure the computer cover.
10. Proceed to the monitor cabling section below.
5
Chapter 2: Get Started
Hurricane Monitor Cabling
The Hurricane card provides support for one DVI-I
monitor or two VGA monitors using the supplied DVI-toVGA adapter.
To connect the Hurricane card to the desired display
devices, plug the monitor cable into the card (See
Figure 1).
To connect a DVI monitor to the Hurricane, use the
supplied DVI-to-VGA adapter (Figure 2). To connect a
VGA monitor to the DVI-I connector, attach the
supplied DVI-to-VGA adapter to the DVI-I connector
and plug your monitor cable into the adapter.
Figure 1. Hurricane Connectors
Figure 2. DVI-to-VGA Adapter
Appian Hurricane User Guide
6
Once the cable installation is complete, you will be
ready to load the provided device drivers and
HydraVision display management software.
To install the device driver for Windows NT 4.0, go
to Chapter 3.
To install the device driver for Windows
98/ME/2000, go to Chapter 4.
7
Chapter 2: Get Started
Chapter 3
Install and Use Software
for Windows NT 4.0
This chapter explains how to install and use the
Hurricane Windows NT 4.0 driver and HydraVision
desktop management software.
HydraVision consists of a Desktop Manager that
tracks windows and dialog boxes, a graphical user
interface (GUI) control panel that allows you to
control multiple monitors running in a single system,
and the Appian MultiDesk utility.
$ NOTE: For general information regarding driver
installation in Windows NT 4.0, please refer to
your Windows documentation.
$ NOTE: Hurricane requires that you run Windows
NT 4.0 with Service Pack version 4 or later. The
Service Pack version number is shown on the blue
start up screen. If you have an older Service
Pack, upgrades are available from Microsoft
(www.microsoft.com).
Ö WARNING! To avoid possible conflicts,
temporarily disable your virus protection
software during installation of Hurricane
software. You may reactivate virus protection
after the installation is complete.
Appian Hurricane User Guide
8
Install the Windows NT 4.0
Driver and HydraVision Software
To install the Hurricane Windows NT 4.0 device driver
and HydraVision software, perform the following
steps:
1. Boot your system in VGA mode. From the boot
menu, select Windows NT Workstation Version
4.0 [VGA Mode] at the prompt.
2. From the Windows Start menu, select Settings,
then Control Panel.
3. Double-click the Display icon and select the
Settings tab from the Display Properties dialog
box.
4. Click the Display Type button.
5. Click the Change button.
6. Insert the Appian Hurricane installation CD-ROM.
7. Click the Have Disk button.
8. Select the path to the Windows NT driver file
(.inf) using the Browse button. Click OK.
9. The Change Display window appears with the
Appian driver displayed. Click OK.
10. A warning box from Windows appears stating that
you are installing third-party software drivers.
Click Yes to proceed.
11. The Hurricane driver files and HydraVision
software are now installed, and a message
appears confirming successful installation. Click
OK.
12. You are returned to the Display Type window.
Click Close to exit.
13. You are returned to the Display Properties
dialog box. Click Close to exit.
9
Chapter 3: Software fo r Windows NT 4.0
14. You will now be prompted by Windows to restart
your system. Click Yes.
15. Windows now restarts in single monitor mode. You
can change the resolution and refresh rate for the
Hurricane card from the Settings tab of the
Display Properties dialog box. You can enable
additional monitors from the Multi-Monitor tab of
the Display Properties dialog box.
$ NOTE: When selecting your analog display
options, keep in mind that most applications
require a color depth greater than 256 colors for
optimal display.
Install Local Help Files
Appian Help provides a choice between connecting to
on-line help or to local HTML-based help. Local HTMLbased help files can be installed from the CD-ROM
that shipped with your product package. If you wish
to have local HTML-based help files accessible from
the Help button of the Display Properties dialog box,
perform the following steps:
$ NOTE: You must have an Internet browser
installed on your system to view Appian help files.
1. Insert the Appian Hurricane installation CD-ROM
into the appropriate drive.
2. Run the Help Setup program by selecting Run
from the Windows Start menu and selecting the
path to the Help setup.exe file (in the Help
folder) using the Browse button.
3. Click OK.
4. Follow the program prompts to complete the
installation.
Appian Hurricane User Guide
10
Use HydraVision
HydraVision software works with the Hurricane
hardware and device drivers to create a seamless
multiple monitor desktop. HydraVision allows multiple
monitors connected to the Hurricane card to appear
as one large display rather than several smaller ones.
You can spread one application across all monitors or
put a different application on each monitor.
Figure 3. Dual Monitor Array
The above figure shows four applications displayed on
two monitors. The desktop and applications stretch
across both monitors. HydraVision allows you to drag,
drop and resize application windows to fit anywhere
on a multiple monitor desktop.
Using multiple monitors with Windows can be awkward
when windows and dialog boxes are split across
monitors or appear where they’re not wanted. The
HydraVision Desktop Manager solves this problem by
allowing you to set preferences for window and dialog
box placement.
HydraVision installation in Windows NT 4.0 enables
the Appian Desktop Manager and adds the
HydraVision display management software to your
Windows Control Panel group, where it appears as
additional tabs in the Display Properties dialog box.
The HydraVision control panel allows you to adjust
the Desktop Manager and other display options.
11
Chapter 3: Software fo r Windows NT 4.0
The Desktop Manager starts automatically with
Windows. You can tell that HydraVision is running by
the presence of the Appian icon in the Windows
system tray.
Figure 4. HydraVision System Tray Icon
Right-click on this icon to access HydraVision
features or help, or to unload the HydraVision
Desktop Manager. In addition to accessing
HydraVision from the system tray, you can also
access HydraVision by right-clicking on the Windows
desktop and selecting Properties.
Figure 5. Accessing HydraVision for Windows NT 4.0
The HydraVision Desktop Manager allows you to
adjust display options, such as hot keys, within a
user-friendly graphical interface.
$ NOTE: Some application windows and dialog boxes
are not written to Windows standards.
HydraVision may not be able to recognize and
control these application’s windows and dialog
boxes.
Appian Hurricane User Guide
12
Figure 6. Display Properties Dialog Box Example
The above figure shows an example of the Windows
Display Properties dialog box with the Appian
HydraVision tabs. All the normal Display Properties
tabs are still available, including the Settings tab,
which allows you to change desktop resolution and
color depth for analog displays.
The HydraVision tabs (Multi-Monitor, Desktop
Management and Hot Keys) allow you to modify
your display options.
HydraVision also provides a dialog for extended
display control, accessible from the Multi-Monitor
tab. The Extended Display Settings dialog allows
you to define and adjust each monitor in your system
separately.
13
Chapter 3: Software fo r Windows NT 4.0
Along the bottom of each HydraVision dialog are four
buttons: OK, Cancel, Apply and Help.
ú OK implements the changes you’ve made in the
Display Properties dialog box and exits the
control panel. Changes take effect immediately
unless you see a message prompting you to
restart your computer.
ú Cancel discards all changes made to any section
of Display Properties and closes the dialog box.
ú Apply implements your changes without closing
the Display Properties dialog box.
ú Help connects to either local or on-line HTMLbased help. You can also get context -sensitive
on-screen help by moving your mouse over the
relevant text for each control.
Appian Hurricane User Guide
14
Multi-Monitor Controls
Figure 7. Multi-Monitor Dialog Example
The Multi-Monitor dialog features a graphic
representation of the current monitor array. You can
drag the monitor illustrations to new locations in the
diagram to change the array. You can also enable
and disable monitors by double-clicking on the
monitor number in the list box.
If the Enable Individual Monitor Refresh Rates box
is checked, you can select independent refresh rates
for each monitor in the system. Available refresh
rates and other settings are contained in the
Extended Display Settings dialog. To access the
Extended Display Settings dialog, double-click on
the individual monitor illustrations.
15
Chapter 3: Software fo r Windows NT 4.0
Extended Display Settings
Figure 8. Extended Display Settings Dialog Example
Refresh rate settings:
ú Monitor Model—From the drop-down menu,
select the model and brand of the monitor(s) you
are using so that HydraVision can automatically
determine the appropriate refresh rate for your
display. This prevents manual selection of a
refresh rate that is not supported by your
monitor(s). If your monitor is not listed in the
drop-down menu, it should still operate with the
Hurricane card, as long as it is a multi-sync
monitor. For monitors that are not listed, select
Other and manually choose the desired refresh
rate.
Ö WARNING! Do not select a refresh rate higher
than your monitor can support. Monitor
damage may result.
Appian Hurricane User Guide
16
ú Refresh Rate—HydraVision automatically
determines the appropriate refresh rate for your
monitor based on your model selection, as
explained above. You may choose different
refresh rates from the drop-down menu for each
monitor. In general, a higher refresh rate improves
display quality but lowers performance, because
the graphics system can only do a fixed number
of operations per second. The more time it spends
redrawing the screen, the less time it has for
other operations.
Current Settings:
This box indicates the current resolution of your
monitors. To change the desktop size, go to the
Windows Display Properties dialog box and select
the Settings tab. Change the Desktop Area using
the slider bar.
$ NOTE: The Windows Settings dialog allows you to
define the resolution of your desktop. The
HydraVision Extended Display Settings dialog
allows you to define the resolution of each
monitor. If your monitors are set at different
resolutions, a virtual desktop will be enabled on
the monitor that is set to a lower resolution.
Panning control:
ú Panning is not enabled in Windows NT 4.0.
17
Chapter 3: Software fo r Windows NT 4.0
Desktop Management Controls
Figure 9. Desktop Management Dialog Example
The Desktop Management dialog lets you determine
the behavior of pop-up windows and dialog boxes in a
multiple monitor environment.
Dialog Control:
ú Enable dialog repositioning—Toggles dialog
control on and off. When it is checked, you can
choose to have dialog boxes appear on the parent
application’s monitor (The parent application is
the application that generated the dialog box.). If
the parent application or associated monitor
cannot be located, the dialog box defaults to
Monitor 1. You can also choose to have dialog
boxes appear on the monitor in which the cursor
is located or to always appear on a specific
monitor in the array.
Appian Hurricane User Guide
18
$ NOTE: Windows system logon and logoff
messages cannot be repositioned and will always
appear split across monitors unless the Boot to
single monitor control is enabled (see below).
Window control:
ú Single monitor windows—When this box is
checked, windows are sized no larger than a
single monitor. Windows that are placed on
monitor splits are automatically relocated to the
monitor on which most of the window appears.
ú Max button management—Allows you to control
the behavior of the Windows Maximize button.
In a typical Windows environment, clicking the
Maximize button causes a window to size itself
to the full desktop.
$ NOTE: Clicking the Appian icon on the application
title bar makes the active window fill the current
monitor, regardless of this setting.
− Max to window corners causes windows to
maximize to the monitor(s) that contains the
window’s upper left and lower right corners.
− Max to full desktop causes windows to
maximize to the entire monitor array.
− Max to current monitor causes windows to
maximize to the monitor that contains the
greatest portion of the window.
ú Max child windows—Keeps windows generated
by parent applications from splitting across
monitors (A child window is a window residing
within a parent application window.). The ability
to keep child windows on a single monitor when
maximized is extremely useful for editing multiple
documents side by side in a parent application.
19
Chapter 3: Software fo r Windows NT 4.0
General:
ú Application position memory—Check this box
to “remember” the size and location of
application windows when they are closed and
reapply those settings when the application is
reopened.
ú Boot to single monitor—Check this box to boot
your system in single monitor mode. This prevents
system messages and the Windows splash screen
from splitting across monitors during boot-up. The
display will switch to multiple monitor mode after
you log on and the Appian Desktop Manager
loads.
ú Remove Appian title bar buttons—Check this
box to disable and remove the Appian icon, visible
in the upper right corner of all active application
title bars, which maximizes the active window and
allows access to individual application settings.
ú Remove Appian system tray icon—This box
removes or restores the Appian system tray icon.
ú Remove MultiDesk system tray icon—This box
removes or restores the MultiDesk system tray
icon.
MultiDesk Settings—This button specifies desktop
management settings for multiple desktops. Up to
eight active desktops can reside in the background.
This feature is explained later in this section.
Appian Hurricane User Guide
20
Load/Unload Desktop Manager—This button
restores or removes the HydraVision Desktop
Manager. Unloading the Desktop Manager returns
display settings to Windows defaults. You should only
select this option if you do not want to use any
multiple mo nitor dialog box and window controls or
hot keys.
$ NOTE: Unload applies to your current Windows
session only. When Windows restarts, the
Desktop Manager will reload.
Load/Unload MultiDesk—This button restores or
removes multiple desktop functionality.
$ NOTE: Unload applies to your current Windows
session only. When Windows restarts, MultiDesk
will reload.
Individual Application Settings—This button allows
you to specify, enable and disable desktop
management settings for individual applications.
$ NOTE: These settings override the global settings
defined in the Desktop Management dialog.
21
Chapter 3: Software fo r Windows NT 4.0
Hot Keys Controls
Figure 10. Hot Keys Dialog Example
The Hot Keys dialog allows you to specify hot key
shortcuts for common operations such as starting
applications, snapping applications to designated
monitors and changing display resolution.
Create/Remove Hot Keys
To create custom hot key sequences, select a
Modifier key (Shift, Alt, etc.), a Hot key, and the
Hot key function you want this key combination to
perform. Click Add to enter your new combination in
the Assigned hot keys list box. Click Apply to
activate assigned hot keys.
Appian Hurricane User Guide
22
$ NOTE: Appian recommends that a modifier key be
used with any function key (F1, F2, etc.)
assigned as a hot key. This will prevent
interference with the function of these keys in
individual applications.
To delete a hot key from the Assigned hot keys list
box, highlight it, click Remove, and then click Apply.
You can disable all hot keys listed in the Assigned
hot keys list box by checking the Disable hot keys
box near the bottom of the Hot Keys dialog.
Use Hot Keys
You can use any assigned hot key at any time, from
within any application, to change your display.
MultiDesk
Appian’s HydraVision software supports multiple
desktops. With MultiDesk, one active desktop will
always be visible; while up to eight active desktops
can reside in the background. When MultiDesk is
running, the MultiDesk icon in the system tray
displays the number assigned to the current desktop.
Figure 11. MultiDesk System Tray Icon
Right-click on this icon to access MultiDesk controls.
In addition to accessing active desktops from the
system tray, you can also access active desktops
with a Hot key shortcut.
23
Chapter 3: Software fo r Windows NT 4.0
Figure 12. MultiDesk Pop-Up Menu
To switch to another defined desktop, select the
appropriate desktop number from the pop-up menu.
To enable, disable and name active desktops, select
MultiDesk Properties from the pop-up menu. To
arrange applications within active desktops, or to
enable specific applications on all desktops, select
Arrange MultiDesk from the pop-up menu.
$ NOTE: This applies to your current Windows
session only. When Windows restarts, MultiDesk
will reload.
Appian Hurricane User Guide
24
Chapter 4
Install and Use Software
for Windows 98/ME/2000
This chapter explains how to install and use the
Hurricane Windows 98/ME and Windows 2000 drivers
and HydraVision desktop management software.
$ NOTE: For general information regarding driver
installation in Windows 98 and Windows 2000,
please refer to your Windows documentation.
Ö WARNING! To avoid possible conflicts,
temporarily disable your virus protection
software during installation of Hurricane
software. You may reactivate virus protection
after the installation is complete.
25
Chapter 4: Software for Windows 98/ME/2000
Install the
Windows 98/ME Driver
To install the Hurricane Windows 98/ME device driver
and HydraVision software, perform the following
steps:
1. Upon boot-up of the system, the Add New
Hardware Wizard will appear. Click Next.
2. Select the Display a list of known drivers…
option and click Next.
3. Insert the Appian Hurricane installation CD-ROM
into the appropriate drive.
4. Click Have Disk.
5. Select the path to the Windows 98 driver files
(.INF) using the Browse button. Click OK.
6. If an Update Device Driver warning appears at
this point, click Yes.
7. Click Next.
8. The Windows driver files are copied and a
message appears, confirming successful
installation. Click Finish.
9. You will be prompted to restart the system. Click
Yes.
10. Windows now restarts in single monitor mode. You
can enable additional monitors and change the
resolution from the Settings tab of the Windows
Display Properties dialog box (see section
below).
Appian Hurricane User Guide
26
Install the Windows 2000 Driver
To install the Hurricane Windows 2000 device driver
and HydraVision software, perform the following
steps:
1. Upon boot-up of the system, Windows will
automatically detect the new hardware and the
Found New Hardware Wizard will appear. Click
Next.
2. Select the Display a list of the known drivers…
option and click Next.
3. Select Display Adapters and click Next.
4. Insert the Appian Hurricane installation CD-ROM
into the appropriate drive.
5. Click Have Disk.
6. Select the path to the Windows 2000 driver file
(.INF) on the CD-ROM using the Browse button.
Click OK.
7. The Appian driver will be displayed. Click Next.
8. Click Yes, Click Next, click Yes.
9. The driver files for the device are installed. Click
Finish to close the Wizard.
10. You will be prompted to restart the system. Click
Yes.
11. Windows now restarts in single monitor mode. You
can enable additional monitors and change the
resolution from the Settings tab of the Windows
Display Properties dialog box (see section
below).
27
Chapter 4: Software for Windows 98/ME/2000
Enable Additional Monitors
Figure 13. Enable Additional Monitors Example
To enable additional monitors, perform the following
steps:
1. From the Windows Start menu, select Settings,
then Control Panel.
2. Double-click the Display icon.
3. Select the Settings tab.
4. Click the illustration of the monitor you wish to
enable.
5. Check the Extend my Windows desktop onto
this monitor check box, then click Apply.
6. You can also change the screen area (resolution)
using the Screen area slider bar.
Appian Hurricane User Guide
28
Install Local Help Files
Appian Help provides a choice between connecting to
on-line help or to local HTML-based help. Local HTMLbased help files can be installed from the CD-ROM
that shipped with your product package. If you wish
to have local HTML-based help files accessible from
the Help button of the HydraVision control panel,
perform the following steps:
$ NOTE: You must have an Internet browser
installed on your system to view Appian help files.
1. Insert the Appian Hurricane installation CD-ROM
into the appropriate drive.
2. Run the help file Setup program by selecting Run
from the Windows Start menu and selecting the
path to the Help setup.exe file (in the Help
folder) using the Browse button.
3. Click OK. Follow the program prompts to complete
the installation.
29
Chapter 4: Software for Windows 98/ME/2000
Use HydraVision
The Windows 98/ME and Windows 2000 operating
systems are designed to recognize multiple monitors
in a single system. HydraVision installation enables
the Appian Desktop Manager and adds the
HydraVision display management software to your
Windows Control Panel group, where it appears as
additional tabs in the Display Properties dialog box.
HydraVision and the Appian Desktop Manager are
activated whenever Windows starts. You can tell
that HydraVision is running by the presence of the
Appian icon in the Windows system tray.
Figure 14. HydraVision System Tray Icon
Right-click on this icon to access HydraVision
features and help, or to unload the HydraVision
Desktop Manager. In addition to accessing
HydraVision from the system tray, you can also
access HydraVision from the Windows Start menu
under Programs.
Figure 15. Accessing HydraVision
Appian Hurricane User Guide
30
The HydraVision Desktop Manager allows you to
modify your display options. You can access the
Desktop Management and Hot Keys dialog boxes
by clicking on the appropriate tab in the Desktop
Manager.
Along the bottom of each HydraVision dialog are four
buttons: OK, Cancel, Apply and Help.
ú OK implements the changes you’ve made in the
HydraVision dialog and exits the Desktop Manager.
Changes take effect immediately unless you see a
message prompting you to restart your computer.
ú Cancel discards all changes made to any section
of the HydraVision dialog and closes the Desktop
Manager.
ú Apply implements your changes without closing
the Desktop Manager.
ú Help connects to either local or on-line HTMLbased help. You can also get context -sensitive
on-screen help by moving your mouse over the
relevant text for each control.
31
Chapter 4: Software for Windows 98/ME/2000
Desktop Management Controls
Figure 16. Desktop Management Dialog Example
The Desktop Management dialog lets you determine
the behavior of pop-up windows and dialog boxes in a
multiple monitor environment.
$ NOTE: Depending on the operating system, not all
the functions described in this section will be
available.
Appian Hurricane User Guide
32
Dialog control:
ú Enable dialog repositioning—Toggles dialog
control on and off. When it is checked, you can
choose to have dialog boxes appear on the parent
application’s monitor (The parent application is
the application that generated the dialog box.). If
the parent application or associated monitor
cannot be located, the dialog box defaults to
monitor 1. You can also choose to have dialog
boxes appear on the monitor in which the cursor
is located or to always appear on a specific
monitor in the array.
Window control:
ú Single monitor windows—When this box is
checked, windows are sized no larger than a
single monitor. Windows that are placed on
monitor splits are automatically relocated to the
monitor on which most of the window appears.
ú Appian Max/Restore or Max button
management—Allows you to control the
behavior of the Windows Maximize button. When
HydraVision is running, an Appian icon appears in
the upper right corner of your application title
bars. Clicking this icon makes the active window
maximize in one of the following ways:
− Max to window corners causes windows to
maximize to the monitor(s) that contain the
window’s upper left and lower right corners.
− Max to full desktop causes windows to
maximize to the entire monitor array.
− Max to current monitor causes windows to
maximize to the monitor that contains the
greatest portion of the window.
33
Chapter 4: Software for Windows 98/ME/2000
ú Max child windows—Keeps windows generated
by parent applications from splitting across
monitors (A child window is a window residing
within a parent application window.). The ability
to keep child windows on a single monitor when
maximized is extremely useful for editing multiple
documents side by side in a parent application.
$ NOTE: The Appian application title bar icon
changes from a single square to two smaller
squares when a window is in an Appian maximized
state. Clicking the icon again restores the active
window to its default state as a single square.
General:
ú Application position memory—Check this box
to “remember” the size and location of application
windows when they are closed and reapply those
settings when the application is reopened.
ú Automatically align monitors—Under Windows,
you can manually define monitor placement from
the Settings dialog in the Display Properties
dialog box. When this box is checked, HydraVision
will override user-defined monitor placement if the
monitors are not evenly aligned.
$ NOTE: This control will work only if all monitors
are running at the same resolution and your
desktop is configured as a rectangle (monitors
side by side).
ú Boot to single monitor—Check this box to boot
your system in single monitor mode. This prevents
system messages and the Windows splash screen
from splitting across monitors during boot-up. The
display will switch to multiple monitor mode after
you log on and the Appian Desktop Manager
loads.
Appian Hurricane User Guide
34
ú Enable individual application settings—Check
this box to specify desktop management settings
for individual applications. You can access these
settings by clicking on the down arrow of the
Appian icon in the application title bar or by
pressing the Individual Application Settings
button in the Desktop Management dialog.
ú Remove Appian title bar buttons—Check this
box to disable and remove the Appian icon, visible
in the upper right corner of all active application
title bars, which maximizes the active window and
allows access to individual application settings.
ú Remove Appian system tray icon—This box
removes or restores the Appian system tray icon.
ú Remove MultiDesk system tray icon—This box
removes or restores the MultiDesk system tray
icon.
MultiDesk Settings—This button specifies desktop
management settings for multiple desktops. Up to
eight active desktops can reside in the background.
This feature is explained later in this section.
Load/Unload Desktop Manager—This button
restores or removes the HydraVision Desktop Manager
tracking program. Unloading the Desktop Manager
returns display settings to Windows defaults. You
should only select this option if you do not want to
use any multiple monitor dialog box and window
controls or hot keys.
$ NOTE: Unload applies to your current Windows
session only. When Windows restarts, the
Desktop Manager will reload.
35
Chapter 4: Software for Windows 98/ME/2000
Load/Unload MultiDesk—This button restores or
removes multiple desktop functionality.
$ NOTE: Unload applies to your current Windows
session only. When Windows restarts, MultiDesk
will reload.
Individual Application Settings—This button allows
you to specify, enable and disable desktop
management settings for individual applications.
$ NOTE: These settings override the global settings
defined in the Desktop Management dialog.
Appian Hurricane User Guide
36
Hot Keys Controls
Figure 17. Hot Keys Dialog Example
HydraVision allows you to specify hot key shortcuts
for common operations such as starting applications,
snapping applications to designated monitors and
changing display resolution.
Create/Remove Hot Keys
To create custom hot key sequences, select a
Modifier key (Shift, Alt, etc.), a Hot key, and the
Hot key function you want this key combination to
perform. Click Add to enter your new combination in
the Assigned hot keys list box. Click Apply to
activate assigned hot keys.
37
Chapter 4: Software for Windows 98/ME/2000
$ NOTE: Appian recommends that a modifier key be
used with any function key (F1, F2, etc.)
assigned as a hot key. This will prevent
interference with the function of these keys in
individual applications.
To delete a hot key from the Assigned hot keys list
box, highlight it, click Remove, and then click Apply.
You can also disable all hot keys listed in the
Assigned hot keys list box by checking the Disable
hot keys box near the bottom of the Hot Keys
dialog.
Use Hot Keys
You can use any assigned hot key at any time, from
within any application, to change your display.
MultiDesk
Appian’s HydraVision software supports multiple
desktops. With MultiDesk, one active desktop will
always be visible, while up to eight active desktops
can reside in the background. When MultiDesk is
running, the MultiDesk icon in the system tray
displays the number assigned to the current desktop.
Figure 18. MultiDesk System Tray Icon
Right-click on this icon to access MultiDesk controls.
In addition to accessing active desktops from the
system tray, you can also access active desktops
with a Hot key shortcut.
Appian Hurricane User Guide
38
Figure 19. MultiDesk Pop-Up Menu
To switch to another defined desktop, select the
appropriate desktop number from the pop-up menu.
To enable, disable and name active desktops, select
MultiDesk Properties from the pop-up menu. To
arrange applications within active desktops, or to
enable specific applications on all desktops, select
Arrange MultiDesk from the pop-up menu.
The MultiDesk functionality can be removed by
selecting Unload Appian MultiDesk from the pop-up
menu.
$ NOTE: This applies to your current Windows
session only. When Windows restarts, MultiDesk
will reload.
39
Chapter 4: Software for Windows 98/ME/2000
Chapter 5
Technical Information
Monitor Cables
and Connector Pinouts
This section contains information about the
connectors on your Hurricane card, as well as
information about the connectors on the analog
adapters.
Appian Hurricane User Guide
40
DVI Connector Pinouts
Figure 20 and Table 1 indicate pinouts for the
standard DVI connectors on the Hurricane card.
Digital displays use this type of connector.
Figure 20. DVI Connector Pinouts
Pin
Allocation
Pin
Allocation
High Speed Pins
C1
Analog Red Video Out
C4
Analog Horizontal Sync
C2
Analog Green Video Out
C5
Analog Ground Return
C3
Analog Blue Video Out
Main Pins
1
TMDS Data2-
13
TMDS Data3+
2
TMDS Data2+
14
+5V Power
3
TMDS Data2/4 Shield
15
Ground (Return for +5V
Analog H/V Sync)
4
TMDS Data4-
16
Hot Plug Detect
5
TMDS Data4+
17
TMDS Data0-
6
DDC Clock
18
TMDS Data0+
7
DDC Data
19
TMDS Data0/5 Shield
8
Analog Vertical Sync
20
TMDS Data5-
9
TMDS Data1-
21
TMDS Data5+
10
TMDS Data1+
22
TMDS Clock Shield
11
TMDS Data1/3 Shield
23
TMDS Clock+
12
TMDS Data3-
24
TMDS Clock-
Table 1. DVI Connector Description
41
Chapter 5: Technical Information
DB-15 Connector Pinouts
Figure 21 and Table 2 indicate pinouts for the
standard DB-15 connector on the Hurricane and
analog adapters. Most analog monitors use this type
of connector.
5
4
3
10 9
2
8
1
7
6
15 14 13 12 11
Figure 21. DB-15 Connector Pinouts
Pin
Allocation
Pin
Allocation
1
Red Video
8
Blue return (Ground)
2
Green Video
9
+5V DC (Fused)
3
Blue Video
10
Sync return (Ground)
4
Reserved
11
Reserved
5
Ground
12
SCL (DDC)
6
Red return (Ground)
13
Horizontal Sync
7
Green return (Ground)
14
Vertical Sync
Continued in next
column ä
15
SDA (DDC)
Table 2. DB-15 Connector Pinouts
Appian Hurricane User Guide
42
Functional Specifications
Ÿ ATI Radeon VE graphics processor
Ÿ Dual 300 MHz DAC
Ÿ PCI or AGP bus interface
ú PCI 2.1 and 2.2 compliant
ú AGP revision 2.0 compliant
Ÿ DDWG/DVI-i compliant
Ÿ Driver support
ú Windows NT 4.0
ú Windows 98/ME
ú Windows 2000
Ÿ One standard DB-15 connector
Ÿ One standard DVI-i connector
43
Chapter 5: Technical Information
Chapter 6
Troubleshooting
If you have a problem with your Hurricane card and
don’t find the solution in this User Guide, please
contact Appian Technical Support at 800-422-7369
or [email protected].
You can also visit the technical support section of
the Appian web site at www.appian.com for the
latest product support information, additional
frequently asked questions and solutions to common
installation and usage problems.
Frequently Asked Questions
What if my system won’t boot after installing the
Hurricane card?
Ÿ Make sure the Hurricane is properly seated in the
PCI or AGP expansion slot.
Ÿ Verify the slot is functioning properly by installing
the card in a different PCI or AGP expansion slot.
Ÿ Make sure all power cables are secure and properly
connected.
Ÿ Check your power source and verify that the power
is turned on.
Ÿ If you are using Windows NT 4.0:
− Make sure other graphics cards have been
removed from the system.
− Make sure any on-board video is disabled.
− Make sure you are using Service Pack 4 or
later.
Appian Hurricane User Guide
44
What if the Windows operating system warns
that the graphics card is not configured properly?
Ÿ Check the driver installation and ensure that all
software corresponds to the operating system and
is correctly loaded.
Ÿ Reinstall the Hurricane driver.
Ÿ Make sure drivers and utilities from previously
installed graphics cards are removed/uninstalled
from the system.
1. Select Start|Settings|Control Panel,
double-click Add/Remove Programs.
2. Remove any drivers and utilities listed for
graphics cards no longer in the system.
Ÿ Check for address and interrupt conflicts to ensure
the I/O and memory addresses reserved for the
graphics card are not in use by other hardware
devices.
What if the Windows Device Manager shows a
resource conflict between my Hurricane card and
another system component?
Disable any display adapters listed in the Device
Manager other than the Hurricane card.
1. Right-click My Computer, select Properties.
2. Select the Device Manager tab.
3. Find Display Adapters and click on the plus sign
(+) to the left.
4. Double-click the name of any display adapters
listed other than the Hurricane card.
5. Check the Disable in this hardware profile box.
6. Shut down and restart the computer.
45
Chapter 6: Troubleshooting
What if nothing displays on the monitor(s)
connected to the Hurricane card?
Ÿ Be sure the Hurricane card is properly seated in the
PCI or AGP expansion slot and that cables are
secure and properly connected.
Ÿ Make sure the monitor is receiving power.
Ÿ Check the pins on the monitor and cable
connector(s) to ensure none are broken or bent.
Ÿ The brightness or contrast controls on your monitor
may not be adjusted correctly. Check and readjust
these controls.
Ÿ Make sure all monitors are enabled in the Display
Properties dialog box.
Ÿ Make sure the refresh rate is set correctly for each
monitor.
Ÿ Make sure the latest Appian display drivers are
installed.
Ÿ If you have a fixed frequency monitor, please
contact Appian Technical Support.
What if defects appear in my display?
Ÿ Make sure that both the graphics card and
monitor(s) support the resolution and refresh rates
you have selected. Refer to your monitor’s
documentation for recommended resolutions and
refresh rates.
Ÿ Make sure the latest Appian display drivers are
installed.
Appian Hurricane User Guide
46
Why do application boxes always appear on the
primary monitor, when my application is on
another monitor?
In Windows 2000, most Microsoft Windowscompatible programs are multiple-monitor aware.
However, many legacy applications are not. Some
legacy applications will display their dialog boxes split
either across two monitors, or only on the primary
monitor, regardless of which monitor that application
is running on.
In many cases, Appian HydraVision and HydraVision
can solve this problem through dialog repositioning.
1. Right-click the Appian icon on your taskbar.
2. Select Desktop Manager Configuration.
3. Select the Desktop Management tab.
4. Check the Enable dialog repositioning check
box and choose one of the options listed
underneath.
5. Click OK.
What resolutions are best for use with my flat
panel display?
Most flat panel displays are designed to work best at
a resolution of 1024x768. Consult the manual for your
display hardware to determine the resolution for
which your flat panel was designed.
Where can I find the most recent software and
documentation for the Hurricane card?
The latest Appian drivers and display management
software for the Hurricane are available from the
Appian FTP site at ftp.appian.com. Up-to-date
documentation can be obtained from the Appian web
site at www.appian.com.
47
Chapter 6: Troubleshooting
Uninstall Hurricane Drivers
and HydraVision Software
If you need to reinstall the Hurricane device drivers or
HydraVision software for any reason, be sure to
uninstall the driver and HydraVision files first. To
uninstall the device drivers or HydraVision software,
perform the following steps:
$ NOTE: In Windows NT 4.0, you must be logged on
as an administrator to successfully run the
Appian uninstall utility.
1. Right-click on the MultiDesk system tray icon to
access the MultiDesk menu and select Unload
Appian MultiDesk.
2. Right-click on the Appian system tray icon to
access the HydraVision menu and select Unload
Desktop Manager.
3. Select Start|Settings|Control Panel.
4. Double-click Add/Remove Programs (98/ME) or
Add/Remove Hardware (2000).
5. Select the appropriate Hurricane files.
6. Click the Remove button and follow any onscreen instructions.
7. When the uninstall process is complete, restart
your system.
Appian Hurricane User Guide
48
Appendix A
Regulatory Information
FCC Compliance Statement
This equipment has been tested and found to comply
with the limits for a Class B digital device pursuant to
Part 15 of the FCC rules. These limits are designed to
provide reasonable protection against harmful
interference in a residential installation. This
equipment generates, uses and can radiate radio
frequency energy and, if not installed and used in
accordance with the instructions, may cause harmful
interference with radio communications. However,
there is no guarantee that interference will not occur
in a particular installation.
If this equipment causes harmful interference with
radio or television reception, which can be determined
by turning the equipment off and on, the user is
encouraged to try to correct the interference by one
or more of the following measures:
Ÿ Reorient or relocate the receiving antenna.
Ÿ Increase the separation between the equipment
and receiver.
Ÿ Connect the equipment into an outlet on a circuit
different from that to which the receiver is
connected.
Ÿ Consult the dealer or an experienced radio/TV
technician for help.
This device complies with Part 15 of the FCC Rules.
Operation is subject to the following two conditions:
1) This device may not cause harmful interference,
and 2) this device must accept any interference
received, including interference that may cause
undesired operation.
49
Appendix B: Disclaimer
Changes or modifications to this device not expressly
approved by Appian Graphics may void the user’s
authority to operate the equipment.
Industry Canada
Compliance Statement
This Class B digital apparatus meets all requirements
of the Canadian Interference-Causing Equipment
Regulations.
Cet appareil numerique de la classe B respecte toutes
les exigencies du Reglement sur le materiel brouilleur
du Canada.
CE Compliance Statement
Electromagnetic Compatibility
The manufacturer hereby declares that this device
conforms to the following standards in accordance
with the European Commission Directive 89/336/EEC:
EN 55022:1998
EN 50082-1:1997
Appian Hurricane User Guide
50