1
ANTI-TILT BRACKET
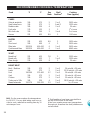
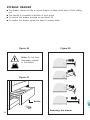
Dotted line showing the position of
the cooker when installed
Important!
To restrain the appliance and prevent it tipping accidentally, fit a
bracket to its rear to fix it securely
to the wall. Make sure you also fit
the supplied lock pin to the anti-tilt
bracket.
=
=
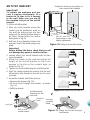
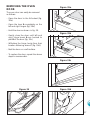
To fit the anti-tilt bracket:
75
1. After you have located where the
cooker is to be positioned, mark on 0
the wall the place where the two +15
screws of the anti-tilt bracket have to
be fitted. Please follow the indicamin 95 - max 110
tions given in Fig.7a.
(depending on feet
height adjustment)
2. Drill two 8 mm diameter holes in the
wall and insert the plastic plugs supFigure 7a Fitting the anti-tilt bracket
plied.
Important!
Before drilling the holes, check that you will
1
not damage any pipes or electrical wires.
3. Loosely attach the anti-tilt bracket with the two
screws supplied.
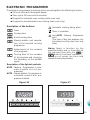
4. Move the cooker to the wall and adjust the
2
height of the anti-tilt bracket so that it can
engage in the slot on the cooker’s back, as
shown in Fig. 7a.
5. Tighten the screws attaching the anti-tilt bracket.
6. Push the cooker against the wall so that the anti3
tilt bracket is fully inserted in the slot on the cooker’s back.
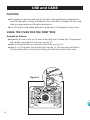
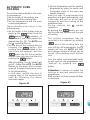
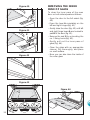
7. Access the bracket and fit the lock pin:
• Remove the drawer (Fig. 7b).
4
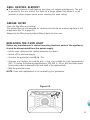
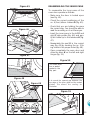
• Fit the lock pin through the bracket, as shown
(Fig. 7c).
• Refit the drawer.
Figure 7b Removing the drawer
Anti-tilt bracket
attached on the
rear wall
1
Cooker’s
back
Lock pin
Slot on the
cooker’s back
2
Lock pin
correctly
fitted
Figure 7c Fitting the lock pin through
the bracket
9