1
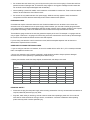
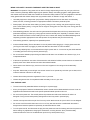
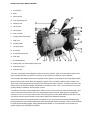
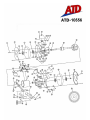
ATD-10556
6 INCH BENCH GRINDER WITH LIGHTS
INSTRUCTION MANUAL
SPECIFICATIONS: • Model: ATD10556 • Rated Voltage: 120V AC, 60 Hz • Rated Input Power: 1/2 HP (1.5 A) • No Load Speed: 3550 RPM • Wheel Size: 6” diameter x 3/4" face x 1/2” bore • Shaft Diameter: 1/2 in. • Includes: 36 grit grinding wheel, 60 grit grinding wheel, wire wheel and light bulbs SAVE THIS MANUAL
You will need this manual for safety instructions, operating procedures, and warranty.
Put it and the original sales invoice in a safe, dry place for future reference.
READ AND UNDERSTAND ALL WARNINGS, CAUTIONS AND OPERATING INSTRUCTIONS BEFORE USING
THIS EQUIPMENT. Failure to follow all instructions listed below may result in electric shock, fire, and/or serious
personal injury.
IMPORTANT SAFETY INSTRUCTIONS
To use this tool properly, you must observe the safety regulations, the assembly instructions and the operating
instructions found in this manual. All persons who use and service the machine have to be acquainted with this
manual and must be informed about its potential hazards. Children should be supervised at all times if they are in
the area in which the tool is being used. It is also imperative that you observe the accident prevention regulations in
force in your area. The same applies for general rules of occupational health and safety.
WARNING! When using electric tools, machines or equipment, basic safety precautions should always be followed
to reduce the risk of fire, electric shock and personal injury.
GENERAL SAFETY RULES
WARNING! Some dust created by power sanding, sawing, grinding, drilling, and other construction activities
contains chemicals known to cause cancer, birth defects, or other reproductive harm. Some examples of these
chemicals are:
•
•
•
Lead from lead-based paints
Crystalline silica from bricks and cement and other masonry products
Arsenic and chromium from chemically treated lumber
Your risk from these exposures varies, depending on how often you do this type of work. To reduce your exposure
to these chemicals: work in a well ventilated area, and work with approved safety equipment, such as those dust
masks that are specially designed to filter out microscopic particles.
Look for important safety precautions. Pay attention to them! Your safety is involved.
WORK AREA SAFETY
•
Keep your work area clean and well lit. Cluttered benches and dark areas invite accidents.
•
Do not operate power tools in explosive atmospheres, such as in the presence of flammable liquids, gases, or
dust. Power tools create sparks which may ignite the dust or fumes.
•
Keep children and bystanders away. All children should be kept away from the work area. Don’t let them handle
machines, tools or extension cords. Visitors can be a distraction and are difficult to protect from injury while you
are operating a power tool. Distractions can cause you to lose control.
ELECTRICAL SAFETY
•
Do not use in the rain. Do not expose power tools to rain or wet conditions. Water entering a power tool will
increase the risk of electric shock.
•
Power tool plugs must match the outlet. Never modify the plug in any way. Do not use any adapter plugs in any
earthed (grounded) power tools. Double insulated tools are equipped with a polarized plug (one blade is wider
than the other). This plug will fit in a polarized outlet only one way. If the plug does not fit fully in the outlet,
reverse the plug. If it still does not fit, contact a qualified electrician to install a polarized outlet. Do not change
the plug in any way. Double insulation eliminates the need for the three wire grounded power cord and grounded
power supply system.
•
Avoid body contact with earthed or grounded surfaces such as pipes, radiators, ranges and refrigerators. There
is an increased risk of electric shock if your body is grounded.
•
Do not abuse the cord. Never carry your tool by the cord or pull on the cord to unplug it. Protect the cord from
potential sources of damage: heat, oil & solvents, sharp edges or moving parts. Damaged cords increase the
risk of electric shock. Replace damaged cords immediately.
•
When operating a power tool outside, use an extension cord suitable for outdoor use. These cords are rated for
outdoor use and reduce the risk of electric shock.
•
Do not use AC-only rated tools with a DC power supply. While the tool may appear to work, the electrical
components of the AC-rated tool could likely fail and create a hazard to the operator.
EXTENSION CORDS
Grounded tools require a three wire extension cord. Double insulated tools can use either a two or three wire
extension cord. As the distance from the power supply outlet increases, you must use a heavier gauge extension
cord. Using extension cords with inadequately sized wire causes a serious drop in voltage, resulting in loss of power
and possible tool damage. Refer to the table shown below to determine the required minimum wire size.
The smaller the gauge number of the wire, the greater the capacity of the cord. For example: a 14-gauge cord can
carry a higher current than a 16-gauge cord. When using more than one extension cord to make up the total length,
be sure each cord contains at least the minimum wire size required.
If you are using one extension cord for more than one tool, add the nameplate amperes and use the sum to
determine the required minimum wire size.
GUIDELINES FOR USING EXTENSION CORDS
• If you are using an extension cord outdoors, be sure it is marked with the suffix “W-A” (“W” in Canada) to indicate
that it is acceptable for outdoor use.
• Be sure your extension cord is properly wired and in good electrical condition. Always replace a damaged
extension cord or have it repaired by a qualified person before using it.
• Protect your extension cords from sharp objects, excessive heat, and damp or wet areas.
Recommended Minimum Wire Gauge for Extension Cords (120 Volt)
Nameplate Extension Cord Length
25 feet
50 feet
75 feet
100 feet
150 feet
Amperes
0 — 2.0
18
18
18
18
16
16
2.1—3.4
3.5 — 5.0
5.1—7.0
7.1—12.0
12.1—16.0
16.1— 20.0
14
12
10
8
6
6
18
18
18
18
14
12
18
18
16
14
12
10
18
16
14
12
10
8
16
14
12
10
10
8
14
12
12
8
8
6
200 feet
PERSONAL SAFETY
•
Disconnect the plug from the power supply when mounting accessories. Use only recommended accessories as
required, otherwise personal injury may result.
•
Stay alert, watch what you are doing, and use common sense when operating a power tool. Do not use tool
while tired or under the influence of drugs, alcohol, or medication. A moment of inattention while operating
power tools may result in serious personal injury.
WEAR YOUR SAFETY GLASSES- FORESIGHT IS BETTER THAN NO SIGHT
English
WARNING! The operation of any power tool can result in foreign objects being thrown into your eyes, which can
result in severe eye damage. Before beginning tool operation, always wear safety goggles or safety glasses with
side shields and a full face shield when needed. We recommend safety masks for use over eyeglasses or standard
safety glasses with side shields. Always wear eye protection which is marked to comply with ANSI Z .1.
•
Use safety equipment. Always wear eye protection. Safety equipment such as dust mask, non-skid safety
shoes, hard hat, or hearing protection for appropriate conditions will reduce personal injuries.
•
Dress properly. Do not wear loose clothing or jewelry. Keep your hair, clothing, and gloves away from moving
parts. Loose clothes, jewelry, or long hair can be caught in moving parts. Air vents may cover moving parts and
should be avoided.
•
Wear breathing protection. Use of this tool can generate and/or disperse dust, which may cause serious and
permanent respiratory or other injury. Many types of wood are naturally toxic, especially in dust form. Wear a
clean dust mask if the work involves creating a lot of fine or coarse dust. Always use NIOSH/OSHA-approved
respiratory protection appropriate for the dust exposure. Direct particles away from face and body.
•
Wear hearing protection, especially from repeated exposure.
•
Avoid accidental starting. Ensure the switch is in the off position before plugging in. Carrying power tools with
your finger on the switch or plugging in power tools that have the switch on invites accidents.
•
Remove any adjusting keys or wrenches before turning the power tool on. A wrench or key that is left attached
to a rotating part of the tool may result in personal injury.
•
Do not overreach. Maintain proper footing and balance at all times. Loss of balance can cause an injury in an
unexpected situation.
•
If devices are provided for connection of dust extraction and collection facilities, ensure these are connected and
properly used. Use of these devices can reduce dust-related hazards.
•
Never stand on tool. Serious injury could occur if the tool is tipped or if the cutting tool is unintentionally
contacted.
•
Stay alert. Watch what you are doing & use common sense. Do not operate any tool when you are tired, sick or
under the influence of alcohol or other drugs.
•
Observe the accident prevention regulations in force in your area.
•
Observe the general rules of occupational health and safety in force in your area.
TOOL USE AND CARE
•
The tool must be fully assembled before connecting it to a power supply.
•
Know your equipment. Read and understand the owner’s manual and the labels attached to the tool. Learn its
applications and limitations as well as the specific potential hazards peculiar to this tool.
•
Do not force the power tool. The tool will perform the job better and safer at the feed rate for which it is
designed. Forcing the tool could possibly damage the tool and may result in personal injury.
•
Use the correct power tool for the job. Don’t force any tool or attachment to do a job for which it is not designed.
•
Do not use a tool if the switch does not turn it on or off. Any tool that cannot be controlled with the switch is
dangerous and must be repaired or replaced by an authorized service center.
•
Turn the power tool off, and disconnect the plug from the power source and/ or battery pack from the power tool
before making any adjustments, changing the accessories, or storing the tools. Such preventive safety
measures reduce the risk of an accidental start up which may cause personal injury.
•
Maintain power tools with care. Check for proper alignment and binding of moving parts, components, and any
other conditions that may affect the tool’s operation. A guard or any other part that is damaged must be properly
repaired or replaced by an authorized service center to avoid risk of personal injury.
English
Store idle tools out of reach of children and other inexperienced persons. They are dangerous in the hands of
untrained users.
English
•
•
Use only recommended accessories. Using accessories and attachments not recommended by the
manufacturer or intended for use on this type tool may cause damage to the tool or result in personal injury to
the user. Consult the operator’s manual for recommended accessories.
•
Keep cutting tools sharp and clean. Properly maintained cutting tools with sharp cutting edges are less likely to
bind and are easier to control.
•
Feed the work piece in the correct direction and speed. Feed the work piece into a blade, cutter, or abrasive
surface against the direction of the cutting tool’s direction of rotation only. Incorrectly feeding the work piece in
the same direction may cause the work piece to be thrown out at high speed.
•
Never leave the tool running unattended, turn the power off. Do not leave the tool until it comes to a complete
stop.
•
Never start the power tool when any rotating component is in contact with the work piece.
SERVICE
•
Inspect and maintain the tool regularly.
•
Have your power tool serviced by a qualified repair person using only identical replacement parts. This will
ensure that the safety of the power tool is maintained.
•
Service your power tool periodically. When cleaning a tool, be careful not to disassemble any portion of the tool
since internal wires may be misplaced or pinched.
•
The manufacturer shall not be liable for any changes made to the tool, nor for any damage resulting from such
changes.
SPECIFIC SAFETY RULES FOR BENCH GRINDERS
WARNING! Do not allow familiarity with your tool to make you careless. Remember that a careless fraction of a
second is sufficient to inflict severe injury.
•
•
Make sure the bench grinder is on a firm, level surface and properly secured to avoid injury from unexpected
movement. Firmly clamp or bolt the bench grinder to a support surface to prevent slipping or sliding during the
operation.
Unplug the tool before making adjustments, repairs, maintenance, or storing.
•
Always switch off the tool before unplugging it to avoid accidental starting when re-plugging the tool into a power
source.
•
Wear eye protection. Do not wear neckties or loose clothing.
•
Do not operate the bench grinder until it is assembled and installed according to this manual’s instructions.
•
Always make sure the wheel guards and eye shields are properly adjusted and secured in place.
•
Use only attachments rated for 3600 RPM or higher with a 1/2 in. arbor hole or appropriate sized bushing. Never
use an attachment rated lower than 3600 RPM or attempt to machine an undersized wheel to fit the arbor.
•
Always use the wheel flanges furnished with this tool to mount grinding wheels on the grinder shafts.
•
Do not over-tighten the wheel nut. Excessive tightening can cause the wheel to crack prior to or during
operation.
•
Inspect grinding wheels each time before starting the machine for visible defects such as fissures, cracks, or
chips. Replace damaged grinding wheels immediately.
Keep the spark guards close to the wheel and readjust them as the wheel wears.
•
Adjust tool rest distance from the grinding wheel to maintain a separation of 1/8 in. or less as the wheel diameter
decreases from use.
•
Do not use a grinding wheel that vibrates when used. If dressing the wheel does not solve the vibration, replace
it. Also inspect the machine for other causes of vibration such as worn bearings or bent shaft. Repair or replace
broken components immediately before reusing the machine.
•
Do not use the machine if the switch does not turn it on and off. Defective switches should be immediately
replaced by an authorized service center and the machine not used until repairs are completed.
•
Do not rapidly turn the machine on and off. This action can cause the wheel to loosen and create a possible
hazard.
•
Do not stand directly in front of the machine when turning it on. Always stand off to the side of the machine and
do not allow any part of your body to be in line with the path of the wheel.
•
Never grind on a cold wheel. The grinder should always be started and allowed to run at idle speed for one full
minute before applying work to the grinding wheel.
•
Never grind on the side of the wheel. Always grind on the face of the wheel only.
•
Never apply coolant directly to the grinding wheel. Coolant may weaken the bonding strength of the wheel
causing it to fail. Dip the hot work piece into water to cool it.
•
Never start the grinder with the work piece pressed against the grinding wheel or other attachments (wire
brushes, buffing wheels, etc.)
•
Always ease the work piece against the wheel when starting to grind. Use light pressure when applying the work
piece to the grinding wheel. Excessive pressure can cause the wheel to crack or overload the motor.
•
Avoid awkward operations and hand positions where an unexpected or sudden slip that could cause your hand
or fingers to move into the grinding wheel, wire brush, buffing wheel, etc.
•
Always keep hands and fingers away from rotating attachments.
•
Always hold the work piece firmly against the tool rest. Be sure the tool rest is securely tightened in place to
prevent movement during use.
•
Do not grind magnesium or aluminum. Fire may result.
•
Grinding creates hazardous sparks. Never operate the grinder near flammable gas, liquids, or in an explosive
atmosphere.
•
Dress the grinding wheel face only. Dressing the wheel sides can cause it to become too thin for safe use.
•
If any part of the grinder is missing, damaged, or fails in any way, or should any electrical component fail to
perform properly, shut off the switch. Remove the machine plug from the power source and have damaged,
missing, or failed parts replaced before resuming operation.
•
Clean the grinding dust from beneath the grinder frequently
•
Do not operate in rain or in damp locations.
English
•
IMPORTANT: The warnings, cautions and instructions detailed in this manual cannot cover all possible conditions
and situations that may occur. It must be understood by the operator that common sense and caution are factors
that cannot be built into this product, but must be supplied by the operator.
KNOW YOUR 6 INCH BENCH GRINDER
A. On/off switch
B. Base
C. Motor housing
D. Tool rest locking knob
E. Mounting hole
F. Left tool rest
G. Wheel guard
H. Side cover bolt
I.
Grinding wheel outer flange
J.
Side cover
K. Grinding wheel
L. Left spark guard
M. Eye shield
N. Eye shield locking knob
O. Work light
P. Eye shield bracket
Q. Spark guard / eye shield bracket locking knob
R. Right spark guard
S. Right tool rest
The heavy, cast grinder base is designed to absorb and reduce vibration. It has 2 mounting holes to allow it to be
firmly mounted with bolts or screws to a work bench or other surface so it does not move in operation.
Two work lights with flexible necks allow the operator to shine light at a correct angle to see critical edge formation.
Spark guards provide a barrier to the free dispersal of sparks, chips, and debris travelling with the rotation of the
wheel. They prevent this debris from spraying all over the work area and the operator. To make the best use of the
protection they can afford the operator, adjust them as necessary to a max. 1/8 in. (3.2 mm) above the face of the
grinding wheels, no matter the amount of wear on them.
Tool rests are meant to provide a stable base on which to rest your work as close to wheel as possible and to give
you the most control over the work piece. They are designed to slide in and out, allowing them to be adjusted
correctly at 1/16 in. (1.6 mm) max. from the face of the grinding wheel, as the wheel diameter shrinks due to wear.
The left tool rest has a groove formed in it to provide a guide for the sharpening of drill bits.
Eye shields provide a see-through first barrier of protection for your eyes and face from debris generated during
grinding operations. They should be adjusted as close to the grinding surface as possible. They are not a substitute
for proper approved safety goggles, safety glasses with side shields, or a full face shield. Do not operate your
grinder using only the eye shields as protection.
UNPACKING AND CONTENTS
IMPORTANT: Due to modern mass production techniques, it is unlikely the tool is faulty or that a part is missing. If
you find anything wrong, do not operate the tool until the parts have been replaced or the fault has been rectified.
Failure to do so could result in serious personal injury.
Package Contents
Item
Description.......................................................... Qty
-
Bench grinder ..................................................... 1
D
Tool rest locking knobs ....................................... 2
F
Left tool rest ........................................................ 1
L
Left spark guard .................................................. 1
M
Eye shields ......................................................... 2
N
Eye shield locking knobs .................................... 2
P
Eye shield brackets............................................. 2
Q
Spark guard / eye shield bracket locking knobs .. 2
R
Right spark guard ............................................... 1
S
Right tool rest ..................................................... 1
i
Small flat washers............................................... 4
ii
Large flat washers .............................................. 2
iii
Small lock washers .............................................. 2
iv
Large lock washers .............................................. 2
v
Star lock washers ................................................. 2
vi
Tool rest bolts ...................................................... 2
vii
Operator’s manual (not shown)
1
WARNING! If any parts are missing or damaged, do not attempt to assemble the tool, plug in power cord or turn the
switch on until the missing or damaged parts are replaced.
ASSEMBLY AND ADJUSTMENTS
WARNING! Always be sure that the tool is switched off and unplugged from the power source before any
adjustment, attachment of accessories, or maintenance check on the tool.
ATTACH AND ADJUST SPARK GUARDS AND EYE SHIELDS
NOTE: Always ensure the eye shields are well attached and the spark guards are properly adjusted before each
time the grinder is used. Eye shields and spark guards must be attached and correctly positioned over both grinding
wheels.
1. You’ll find a left (L) and a right (R) spark guard. Check the picture for the mounting position of each of them.
Follow steps 2 to 8 below to attach the spark guard and eye shield on the left side of the grinder.
2. Insert spark guard / eye shield bracket locking knob (Q) through a large lock washer (iv), a large flat washer (ii),
the eye shield bracket (ii) and the left spark guard (L)
3. Screw the knob into the hole in the left wheel guard. Tighten it sufficiently so it holds the spark guard and the
eye shield bracket in place.
4. Adjust the spark guard to place its lower edge about 1/8 in. (3.2 mm) away from the grinding wheel face.
5. Adjust the eye shield bracket as well to accept and hold the eye shield correctly.
6. Rotate the wheel by hand at least one revolution to ensure the wheel turns without contacting with the spark
guard. Fully tighten the locking knob (Q) to secure the spark guard and eye shield bracket onto the wheel guard.
7. Place a star lock washer (v), a small flat washer (i), and the eye shield (M) onto the threaded shaft of the eye
shield locking knob (N).
8. Screw and tighten all securely onto the eye shield bracket (P).
9. Repeat the steps above to attach the right spark guard (R) and eye shield onto the right wheel guard of the
grinder.
ATTACH AND ADJUST TOOL RESTS
Tool rests are required for each grinding wheel to support the work piece during the grinding operation.
WARNING! Never use any bench grinder on which tool rests have not been attached or if the tool rests have not
been correctly adjusted.
NOTE: The left and right tool rests are different. The tool rest with an angled v-groove (F) is the left side tool rest.
When it is properly mounted, with the slotted portion of the tool rest bolted flush to the bracket on the wheel guard,
each tool rest will be positioned directly before the face of the grinding wheel.
1. Hold the left tool rest (F) in the correct position against the tool rest bracket on left wheel guard.
2. Insert a tool rest bolt (vi) through tool rest bracket portion of the wheel guard and tool rest (F), followed by a
small flat washer (i), a small lock washer (iii), and finally the tool rest locking knob (D).
3. Tighten the locking knob (D) sufficiently to hold the tool rest while still allowing the tool rest to slide toward and
away from the wheel face.
4. Push the tool rest to slide within a maximum of 1/16 in. (1.6 mm) from the wheel. Turn the grinding wheel by
hand at least one complete revolution, checking that the wheel does not contact the tool rest.
5. Turn the locking knob tight to hold the tool rest in place.
MOUNT THE BENCH GRINDER
English
6. Repeat the above assembly steps 1 to 5 for the right tool rest (S).
If, while the bench grinder is running, it shows any tendency to slide, “walk”, or to tip over, then you must fasten the
grinder to a work bench or other supporting surface using bolts or screws (not supplied) through the two mounting
holes (E) in the grinder base.
Before permanently mounting the grinder to a work bench or other surface, try to determine the best mounting
position for it. A series of test runs with items that will typically be sharpened or ground on the grinder (e.g. lawn
mower blades, scissors, knives, wood chisels, wood turning tools, etc.) can be made without the grinder actually
turned on and may help determine, for instance, how near the work bench edge the grinder should be mounted so
that the bench top does interfere with grinding operations. The work bench or grinder pedestal to which the bench
grinder will be mounted must be flat, level, and sturdy enough to bear the weight of the grinder, other tools, and the
material being worked during use.
CHANGE THE GRINDING WHEELS
WARNING! Use only grinding wheels rated for the machine’s no-load speed (3550 RPM) or higher, which have a
1/2 in. arbor hole or a hole bushed to 1/2 in. Never use a grinding wheel rated for lower RPMs. Do not attempt to
machine an undersized wheel to fit the arbor.
1. Undo the nuts and remove the three bolts (H) holding the protective side cover (J) to the wheel guard (G).
2. Remove the side cover.
3. Place a wedge between the wheel and the tool rest to prevent the shaft from turning.
4. To remove the left side wheel (when facing the front of the bench grinder), turn the arbor nut clockwise to loosen
it. When replacing the wheel, turn it counterclockwise to tighten.
5. On the right hand wheel, turn the nut counterclockwise to loosen and clockwise to tighten it.
NOTE: Many grinding wheel manufacturers use removable arbor bushings to allow the same wheel to adapt to
different machine arbor diameters. Save these bushings for future use if not needed to install this new replacement
wheel.
6. Remove the arbor nut, outer flange (I) and the old wheel.
7. Inspect the replacement wheel for shipping damage, cracking or chipping.
8. Install the replacement wheel. Make sure the wheel is a snug fit (not loose) on the shaft.
9. Replace outer flange on the shaft.
10. Replace the arbor nut and tighten.
WARNING! Do not over-tighten wheel nuts when installing grinding wheels. The wheel could crack and fly apart in
use later. Tighten the wheel nut only enough to drive the wheel without slippage.
11. Replace the side cover.
12. Re-insert the three bolts and tighten the nuts.
13. For each wheel you replace, re-adjust the tool rest, spark guard, and eye shield.
14. Rotate the wheel by hand to ensure its free movement and to check proper adjustments of the tool rest and
spark guard.
OPERATION
IMPORTANT: Before each use of the bench grinder, inspect its general condition. Check for:
•
loose screws
•
damaged electrical wiring
•
cracked, chipped, or damaged wheels
•
misalignment or binding of the moving parts
•
If bench or pedestal mounted, check that all fasteners are in place and tight.
CAUTION: Keep your bench grinder clean by removing dust from working parts, from the lower portion of the wheel
guard assembly, and from the work area around it.
The ON/OFF Switch is located on the front of the grinder.
To turn the grinder on, push in the right hand portion of the switch marked with the white dot.
To turn the grinder off, push the left hand portion of the switch in.
WORK LIGHTS
Your grinder comes with two flex neck work lights which allow you to concentrate the light for better visibility of the
work area during operation. The lights switch on with the grinder and stay on until it is turned off.
WARNING! Always be sure that the tool is switched off and unplugged from the power source before adjusting,
adding accessories, checking a function on the tool, and when leaving the work area.
GRINDING WHEELS
Always keep the grinding wheels properly dressed to obtain the best grinding results and to minimize vibration.
Use light pressure on a work piece until the wheel becomes warm. Never force a work piece against a cold wheel.
It is strongly recommended that you use only balanced wheels on this grinder. This will significantly lengthen the life
of the grinder bearings and arbor shaft, and also eliminate the most common cause of vibration, yielding more
accurate work.
DRESSING A GRINDING WHEEL
When a grinding wheel is out of balance, worn out of shape, or simply dull, loaded and glazed, it must be trued and
dressed. This is best done using a
•
star-wheel dresser (not supplied)
•
silicone carbide stick type dresser (not supplied)
•
diamond-faced dressing tool (not supplied)
WARNING! Always wear safety goggles or safety glasses with side shields during operation of any power tool. If the
operation is dusty, wear appropriate protective mask.
1. Turn the grinder on.
2. Dress the wheel by moving the dresser forward on the tool rest until it just touches the highpoint on the face of
the wheel
3. Move the dresser back and forth across the wheel face
4. Repeat this procedure until the face of the grinding wheel is clean and the corners of the wheels are square
5. Do not dress the side surfaces of the wheel
BASIC OPERATIONS WITH THE GRINDER
WARNING! Always wear safety goggles or safety glasses with side shields during operation of any power tool. If the
operation is dusty, wear appropriate protective mask.
Your bench grinder is equipped with one coarse (36 grit) grinding wheel and one medium (60 grit) grinding wheel. It
is designed for sharpening tools such as scissors, knives, lawn mower blades, wood chisels, cold chisels, planer
blades, etc.
WARNING! Never sharpen or grind items made of or containing either aluminum or magnesium with your grinder.
Because grinders can remove material rapidly, a freshly dressed wheel and the amount of work piece pressure
applied to the wheel are keys to efficient grinding. Use the following basic guidelines to aid in working metals and
avoid overheating:
•
Never force a work piece against the grinding wheel.
•
Maintain the work piece in motion constantly against the grinding wheel with light pressure using an even pace
and motion.
•
Cool the work piece by maintaining a tray of water nearby. Dip your work into it regularly to prevent overheating.
Overheating can weaken metals and your grinding wheel.
•
Always work using the face of the grinding wheel with the wheel’s surface moving downward into your work
piece.
•
Do not use the side of the wheel to perform grinding operations.
•
Note the original bevel angle on the item sharpened and try to maintain this shape.
MAINTENANCE
CLEANING
Avoid using solvents when cleaning plastic parts. Most plastics are susceptible to damage from various types of
commercial solvents and may be damaged by their use. Use a clean cloth to remove dirt, dust, oil, grease, etc.
WARNING! Never allow brake fluids, gasoline, petroleum- based products, penetrating oils, etc., to come into
contact with plastic parts. Chemicals can damage, weaken, or destroy plastic which may result in serious personal
injury.
Any electric tools used on fiberglass, wallboard, spackling compounds, or plaster can suffer from accelerated wear
and possible premature failure because the chips, grindings, and debris produced are very abrasive, especially to
components such as bearings, brushes, and commutators. We do not recommend using this machine to work on
these types of materials for any length of time. If you do work with any of these materials, try to mitigate the damage
and clean the tool frequently using compressed air.
LUBRICATION
This tool is permanently lubricated at the factory and requires no additional lubrication.