1
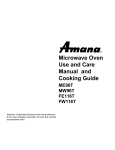
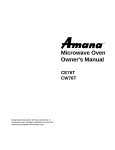
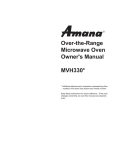
Microwave Convection Oven Use and Care Manual RMC800E RMC800W Attention: Keep these instructions for future reference. If microwave oven changes ownership, be sure this manual accompanies microwave oven. Contents Model Identification Important Safety Instructions Electrical Requirements Grounding Instructions Power Supply Cord Microwave Power Radio Interference Installation Unpacking Oven Oven Placement Feature Diagram How the Microwave/Convection Oven Works Control Panel Operation Clock 2 3 6 6 6 6 6 6 6 6 7 7 8 9 9 Micro Time Entry Cook Auto Accu-Thaw™ Convection Cooking Combination Cooking Auto Weight Combination Cooking Three-Program Cooking Child Lock Popcorn Cooking Hold Warm Reheat Regular Timer Utensils Microwave Utensil Check Test Care and Cleaning Oven Light Before Calling for Service Asure Extended Service Plan 9 9 10 10 11 11 11 12 12 12 12 13 14 14 15 15 16 Model Identification Please read this Use and Care Manual thoroughly. This manual provides proper maintenance information for maximum benefit of the features selected. Complete the enclosed registration card and promptly return. If registration card is missing, call Consumer Affairs department at 1-800-843-0304. If outside U.S.A., call 1-319-622-5511. When contacting Amana, provide product information. Product information is located on the appliance nameplate located on control panel escutcheon between door and control. Record the following information: Model Number: Serial No.: Date of purchase: Dealer’s name and address: Keep a copy of sales receipt for future reference or in case warranty service is required. If something is operating incorrectly, read “Before Calling for Service” section on page 15. Any further questions or to locate an authorized servicer, call 1-800-628-5782 inside the U.S.A. or 1-319-622-5511 outside the U.S.A. We recommend contacting an Amana authorized servicer if service is required. 2 IMPORTANT SAFETY INSTRUCTIONS Recognize this symbol as a SAFETY message WARNING WHEN USING ELECTRICAL APPLIANCES, BASIC SAFETY PRECAUTIONS SHOULD BE FOLLOWED TO REDUCE THE RISK OF BURNS, ELECTRICAL SHOCK, FIRE, INJURY TO PERSONS, OR EXPOSURE TO EXCESSIVE MICROWAVE ENERGY: 1. 2. READ all instructions before using the appliance. 13. Keep cord AWAY from HEATED surfaces. READ AND FOLLOW the specific “PRECAUTIONS TO AVOID POSSIBLE EXPOSURE TO EXCESSIVE MICROWAVE ENERGY” found on page 5. 3. This appliance MUST BE GROUNDED. Connect only to properly grounded outlet. See “GROUNDING INSTRUCTIONS” on page 6. 4. Install or locate this appliance ONLY in accordance with the provided installation instructions. 5. Some products such as whole eggs and sealed containers – for example, closed glass jars – may explode and SHOULD NOT be HEATED in this oven. 6. 12. DO NOT immerse cord or plug in water. 14. DO NOT let cord hang over edge of table or counter. 15. See door cleaning instructions on page 14. 16. DO NOT operate any heating or cooking appliance beneath this appliance. 17. DO NOT mount unit over or near any portion of a heating or cooking appliance. 18. DO NOT mount over a sink. 19. DO NOT store anything directly on top of the appliance surface when the appliance is in operation. Use this appliance ONLY for its intended use as described in this manual. Do not use corrosive chemicals or vapors in this appliance. This type of oven is specifically designed to heat or cook. It is not designed for industrial or laboratory use. 20. Oversized foods or oversized utensils should not be inserted in a microwave/convection oven as they may create a fire or risk of electrical shock. 7. As with any appliance, CLOSE SUPERVISION is necessary when used by CHILDREN. 21. DO NOT clean with metal scouring pads. Pieces can burn off the pad and touch electrical parts involving risk of electrical shock. 8. DO NOT operate this appliance if it has a damaged cord or plug, if it is not working properly, or if it has been damaged or dropped. 22. DO NOT use paper products when appliance is operated in convection or combination mode. This appliance should be serviced ONLY by qualified service personnel. Contact nearest authorized service facility for examination, repair or adjustment. 23. DO NOT store any materials, other than manufacturer's recommended accessories, in this appliance when not in use. 9. 24. DO NOT cover racks or any other part of the oven with metal foil. This will cause overheating of the oven. 10. DO NOT cover or block any openings on the appliance. 11. DO NOT store this appliance outdoors. DO NOT use this product near water – for example, near a kitchen sink, in a wet basement, or near a swimming pool, and the like. SAVE THESE INSTRUCTIONS 3 IMPORTANT SAFETY INSTRUCTIONS CAUTION TO REDUCE THE RISK OF FIRE IN THE OVEN CAVITY: a. DO NOT overcook food. Carefully attend appliance if paper, plastic, or other combustible materials are placed inside the oven to facilitate cooking. b. Remove wire twist-ties from paper or plastic bags before placing bag in oven. c. If materials inside the oven should ignite, keep oven door closed, turn oven off, and disconnect the power cord, or shut off power at the fuse or circuit breaker panel. IF THE DOOR IS OPENED THE FIRE MAY SPREAD! d. DO NOT use the cavity for storage purposes. DO NOT leave paper products, cooking utensils, or food in the cavity when not in use. THIS APPLIANCE MUST BE SERVICED ONLY BY QUALIFIED SERVICE PERSONNEL. CONTACT YOUR NEAREST AUTHORIZED SERVICE FACILITY FOR EXAMINATION, REPAIR, OR ADJUSTMENT. CAUTION TO AVOID PERSONAL INJURY OR PROPERTY DAMAGE, OBSERVE THE FOLLOWING: 1. 2. 3. 4. 5. 6. 7. 8. Do not heat baby bottles in microwave oven. Briskly stir or pour liquids before heating to prevent spontaneous boiling or eruption. Do not overheat. If air is not mixed into a liquid, liquid can erupt in oven or after removal from oven. 9. All uncooked foods should be heated to a final internal temperature of at least 165°F. Some foods require higher temperatures. These recommended temperatures kill most food borne, disease causing organisms. Some common visual signs that indicate the cooking temperature has been reached: • Food steams throughout, not just around edges. • Center bottom of dish is very hot to the touch. 10. If using a microwave popcorn popper, use according to manufacturer's instructions. Do not continue to heat after popping has stopped. Popcorn will scorch or burn. Do not leave oven unattended. Always press STOP/RESET before programming oven. Do not deep fat fry in oven. Fat could overheat and be hazardous to handle. Do not cook or reheat eggs in shell or with an unbroken yolk. Pressure may build up and erupt. Pierce yolk with a fork or knife before cooking. Do not reheat previously cooked eggs in the microwave oven unless finely chopped or scrambled. Pierce skin of potatoes, tomatoes, or other foods with a "skin" before cooking in microwave oven. This allows steam to escape during cooking. Do not home can in microwave oven. Home canning is generally done with metal lids. Since metal lids reflect heat, product may not be heated uniformly to 212°F or above. Food could deteriorate. USDA extension specialists do not recommend home canning in microwave ovens. Remove excess fat from meats and poultry to prevent splattering. SAVE THESE INSTRUCTIONS 4 IMPORTANT SAFETY INSTRUCTIONS 11. Use only popcorn in packages designed and labeled for microwave use. Pop according to package directions, beginning with the minimum amount of time recommended. Use caution when handling hot popcorn bag. 12. Microwave convenience foods are often packaged in specially designed packaging. Special plates, lids, containers, or other unique packaging materials may be used. Susceptor packing material (a thin, metalized plastic film) is frequently used to help brown and make crisp foods such as microwave pizzas, French fries, or fish sticks. Be sure to follow food package instructions carefully. Contact convenience food manufacturer with questions concerning these products. Amana Refrigeration, Inc., does not endorse any brand of microwave convenience foods, or any type of microwave food packaging. 13. Do not operate microwave oven empty. This could damage the oven. 14. Do not use regular cooking thermometers in oven. Most cooking thermometers contain mercury and may cause “arcing”, malfunction, and/or damage to oven. 15. Metal or ceramic accessories which are designed to absorb microwave energy to provide heat may be used with caution. Test device before use (See "Microwave Utensil Check Test" on page 14). Read and follow manufacturer's instructions provided with the accessory. Contact accessory manufacturer with questions concerning these accessories. Amana Refrigeration, Inc., does not endorse any brand of accessory. 16. Never use newspapers in oven since paper may ignite. 17. Pierce or open plastic bags (and other airtight containers) before heating in microwave oven. This allows steam to escape during cooking. 18. Containers may become hot and pot holders may be needed. 19. This oven operates at very high temperatures. The interior surfaces and interior door surface will become hot. Use dry, oven safe mittens to protect hands and arms. 20. Closely supervise any use by children. Make sure they can read instructions and reach controls. Never allow them to lean or swing on oven door. PRECAUTIONS TO AVOID POSSIBLE EXPOSURE TO EXCESSIVE MICROWAVE ENERGY (c) DO NOT operate the oven if it is damaged. It is particularly important that the oven door close properly and that there is no damage to the: (1) door (bent), (2) hinges and latches (broken or loosened), (3) door seals and sealing surfaces. (d) The oven should NOT be adjusted or repaired by anyone except properly qualified service personnel. (a) DO NOT attempt to operate this oven with the door open since open-door operation can result in harmful exposure to microwave energy. It is important not to defeat or tamper with the safety interlocks. (b) DO NOT place any object between the oven front face and the door or allow soil or cleaner residue to accumulate on sealing surfaces. SAVE THESE INSTRUCTIONS 5 Electrical Requirements GROUNDING INSTRUCTIONS DO NOT UNDER ANY CIRCUMSTANCES CUT OR REMOVE THE ROUND GROUNDING PRONG FROM THE PLUG OR BEND THE POWER PRONGS TO FIT A RECEPTACLE OTHER THAN THE ONE SHOWN FOR YOUR OVEN. SUCH ABUSE OF THE PLUG CAN RESULT IN ELECTRICAL SHOCKS OR OVERHEATING. WARNING - IMPROPER USE OF THE GROUNDING PLUG CAN RESULT IN A RISK OF ELECTRIC SHOCK OR DEATH. This appliance MUST be grounded. In the event of an electrical short circuit, grounding reduces the risk of electric shock by providing an escape wire for the electric current. This appliance is equipped with a cord having a grounding wire with a grounding plug. The plug must be plugged into an outlet that is properly installed and grounded. DO NOT use a two-prong adapter. Consult a qualified electrician or serviceman if the grounding instructions are not completely understood, or if doubt exists as to whether the appliance is properly grounded. 120V-15AMP Do not use an extension cord. If the product power cord is too short, have a qualified electrician install a three-slot receptacle. This oven should be plugged into a separate 60 hertz circuit with the electrical rating as shown in the appropriate drawing at left. When a microwave oven is on a circuit with other appliances, an increase in cooking times may be required and fuses can be blown. Radio Interference Power Supply Cord Microwave oven operation may cause interference to radio, TV, or similar equipment. To reduce or eliminate interference: • Clean door and sealing surfaces of oven. See "Care and Cleaning" instructions on page 14. • Place the radio, TV, etc. away from oven. • Use properly installed antenna on radio, TV, etc. to obtain stronger signal reception. A short power supply cord is provided to reduce the risks resulting from becoming entangled in or tripping over a longer cord. Microwave Power Models RMC800E and RMC800W deliver 850 watts of microwave power to the oven cavity. Installation Unpacking Oven • Inspect microwave oven for damage such as dents Oven Placement Locate oven on a flat surface. Do not place oven above a gas or electric range. Allow free air flow around oven. Keep all air vents clear. If air vents are covered during operation, oven may overheat. If oven overheats, a sensitive thermal safety device automatically turns oven off. Oven will be inoperable until it has cooled sufficiently. in door or dents inside oven cavity. • Report any dents or breakage to source of purchase immediately. Do not attempt to use oven if damaged. • Remove all materials from oven interior. • If oven has been stored in extremely cold area, wait a few hours before plugging in. Built-In Capability To build-in, use only Amana RMCB2TK27 or RMCW2TK27 trim kits. Trim kits will have a label identifying which oven models may be used. 6 Feature Diagram Window in Door to Monitor Cooking Oven comes with the following: Turntable Rotating ring assembly Convection rack Cookbook Use and Care Manual Air Vents Control Panel Safety Interlock Convection Rack Turntable Rotating Ring Assembly How the Microwave/Convection Oven Works Microwave Cooking Microwaves are generated by magnetrons and cook food evenly on rotating turntable. Convection Cooking This is a method of cooking with hot air from the convection heater situated at rear of oven. This method allows food to be browned evenly without losing any of the juices. Heated air is circulated in oven by a fan. This enables efficient heating and cooking of food. Temperature inside oven can be controlled according to the type and weight of food being cooked. May also be used when surface crusting is desired along with browning. Combination Cooking Using a combination of microwaves, hot air, and radiant heat, unit cooks alternately, according to programmed cycles. 7 Control Panel Display Window--Displays time of day, temperature, cooking power, and cooking category. Indicator Lights--Indicate programmed input. COMBINATION HIGH--Combination high cooking selector. COMBINATION LOW--Combination low cooking selector. CONVECTION--Convection cooking selector. TIME--Use to select cooking time of combination and convection cooking. AUTO WEIGHT COMBINATION COOK--Auto weight combination cooking selector. REHEAT--Auto reheat selector. MEAT, POULTRY, FISH--Auto Accu-Thaw selector. MICRO TIME ENTRY--Microwave time cooking selector. COOKMATIC LEVEL--Use to select cooking power of microwave cooking. POPCORN--Auto popcorn selector. Numbers--Use to enter • time of day • cooking time • cooking power • cooking temperature • weight of food. HOLD WARM--Select to keep foods warm. CLOCK--Use to set time of day. STOP/RESET--Stops oven and clears all entries except time of day. START--Use to start oven. 8 Operation Please see cookbook supplied with oven for additional operation information. Clock Notes: • If time of day is not set, display counts up per minute. • To reset time of day, follow steps 2-3 above. • Set time of day from 1:00 to 12:59. "E" displays and signal sounds if numbers are entered incorrectly. Press STOP/RESET. Electronic digital clock operates when power is supplied to oven. 1. When oven is plugged in, ":0" displays. 2. Press CLOCK. Colon disappears from display. 3. Press numbers for correct time of day. The selected time of day appears in display. For example, to set the clock for 12:30, press 1,2,3,0 in sequence. Clock does not designate a.m. or p.m. 4. Press CLOCK. Micro Time Entry Cooking 1. Press MICRO TIME ENTRY. "0" displays and PROG 1 indicator light blinks. 2. Press numbers for desired cooking time. Selected numbers display. 3. Press COOKMATIC LEVEL. "P-HI" displays. Note: To cook at high power, press START. 4. Press number for desired cooking power. Selected power displays. For example, to cook at 70% power, press number 7. "P-70" displays. 5. Press START. Oven begins cooking. Oven light and MICRO indicator light turn on. PROG 1 indicator light stops blinking. Display alternates showing cooking time counting down and power level. When cooking is complete, signal sounds. "End" displays. 6. Press STOP/RESET to return display to time of day. Auto Accu-Thaw 1. Press MEAT, POULTRY, or FISH. Selected category appears (dEF1, dEF2, or dEF3 respectively) and AUTO ACCU-THAW indicator light blinks in display window. 2. Press numbers for desired cooking weight. Selected weight displays. For example to set 1.5 pounds, press 1 and 5 in sequence. Note: Maximum weight limit is 9.9 pounds. If more than this is entered, "E" displays for error. Press numbers to reenter weight. 3. Press START. Defrost cycle begins. Oven light turns on. Preprogrammed defrosting time counts down. • Signal sounds halfway through cooking time. Press STOP/RESET to stop oven. Open oven door and turn food over. Press START to resume defrosting. • When defrosting is complete signal sounds and "End" displays. 4. Press STOP/RESET to return display to time of day. 9 Convection Cooking Preheat Oven Oven must be preheated when cooking with convection cooking method alone. 1. Press CONVECTION. "350F" displays. PROG1 indicator light blinks. 2. Press number with desired oven temperature. For example, if 400°F, press 8. 400°F 8 Selected temperature displays. Note: Temperatures are located in upper left corner of number pads. 3. Press START. Oven turns on. "Pr-H" and current temperature alternately display. Note: Before oven reaches selected temperature, current temperature displays in rising 5°F increments. If oven temperature is lower than 200°F, "LO F" displays until oven temperature reaches 200°F. 4. When preheat is complete, signal sounds and oven displays 30 minutes counting down. Press STOP/RESET twice and proceed with operation. Operation 1. Press CONVECTION. "350F" displays. PROG1 indicator light blinks. 2. Press number with desired oven temperature. Selected temperature displays. 3. Press TIME. "0" displays. 4. Press numbers for desired cooking time. Selected time displays. 5. Press START. Oven begins cooking. CONVECTION indicator light turns on. Note: Before oven reaches selected temperature, current temperature displays in rising 5°F increments. If oven temperature is lower than 200°F, "LO F" displays until oven temperature reaches 200°F. Combination Cooking 1. Press COMBINATION HIGH or COMBINATION LOW. "HI" or "LO" displays respectively and PROG1 indicator light blinks. 2. Press TIME. "0" displays. 3. Press numbers for desired cooking time. Selected cooking time displays. 4. Press START. Combination cooking begins. COMBI indicator light turns on. Selected cooking time counting down and "HI" or "LO" alternately display. When cooking is complete signal sounds. "End" displays. 5. Press STOP/RESET to return display to time of day. Caution To avoid burns always use dry, oven-safe mittens when using this appliance. 10 Auto Weight Combination Cooking 1. Press AUTO WEIGHT COMBINATION COOK. "AC-1" displays. 2. To select desired Auto Weight Combination category, press AUTO WEIGHT COMBINATION COOK repeatedly. See category selection chart at right. For example, to select pork category, press AUTO COMBINATION COOK 6 times. 3. Press numbers for desired cooking weight. LBS indicator light turns on. Selected weight displays. For example, to set 1.5 pounds, press 1 and 5 in sequence. 4. Press START. Auto Weight Combination cooking begins. COMBI indicator light turns on. Preprogrammed cooking time counting down and Auto Combination category (AC-X) alternately display. Note: Maximum weight limit is 5.9 pounds for all categories. If more than this is entered, "E" displays for error. Press numbers to reenter weight. • Signal sounds halfway through cooking time. Press STOP/RESET to stop oven. Open oven door and turn food over. Press START to resume cooking. • When Auto Weight Combination Cooking is complete, oven signal sounds. "End" displays. 5. Press STOP/RESET to return display to time of day. Auto Combination Sequence Food Category 1 Rare Beef 2 Medium Beef 3 Well Done Beef 4 Medium Lamb 5 Well Done Lamb 6 Pork 7 Poultry Minimum food weight is 0.1 pounds. Maximum food weight is 5.9 pounds. Caution To avoid burns always use dry, oven-safe mittens when using this appliance. Three-Program Cooking There are three memory programs. Micro Time Entry, Convection, and Combination-High or Low can be set in the three programs. The programming example is as follows: first program 4 minutes, high power; second program 10 minutes, 60% power; and third program 15 minutes, 400°F convection mode. 1. Press MICRO TIME ENTRY. "0" displays and PROG 1 indicator light blinks. 2. Press 4, 0, 0 in sequence to enter program 1 cooking time. "400" displays. 3. Press MICRO TIME ENTRY. "0" displays. PROG 2 indicator light blinks. 4. Press 1, 0,0,0 in sequence to enter program 2 cooking time. "1000" displays. 5. Press COOKMATIC LEVEL. "P-HI" displays. 6. Press 6 to enter power level 6. "P-60" displays. 7. Press CONVECTION. "350F" displays. PROG 3 indicator light blinks. 8. Press 8 to enter temperature. "400F" displays. 9. Press TIME. "0" appears in display. 10. Press 1,5,0,0 in sequence to enter time for program 3 cooking time. "1500" displays. 11. Press START. Child Lock Oven programs and appears to operate. Oven produces no microwave power or convection heat. 1. Press and hold 0 until signal sounds. CHILD LOCK indicator light comes on, and "L" displays. 2. To cancelchild lock, press 0 until signal sounds and CHILD LOCK indicator light turns off. Press STOP/RESET before making next selection. 11 Popcorn Cooking 1. Place convection rack on turntable. Place popcorn package on top of convection rack. 2. Press POPCORN. "PoP" displays. 3. Press START. Oven begins cooking. Oven light turns on. Preprogrammed cooking time and "PoP" alternately display. When cooking is complete signal sounds and "End" displays. Note: If additional time is required, use high (100%) power in 20 second increments. Never microwave bag of popcorn more than 5 minutes. Hold Warm Hold food at warm temperature for 60 minutes. 1. Press HOLD WARM. "Hold" displays. 2. Press START. Oven begins hold warm cycle. "Hold" displays. When holding time is complete, signal sounds. "End" displays. 3. Press STOP/RESET to return display to time of day. Reheat 1. Press REHEAT. "rH-1" displays. 2. Press REHEAT repeatedly for desired category of reheat (see chart on control panel). For example, to select CASSEROLE, press REHEAT three times. "rH-3" displays. 3. Press START. Reheat begins. Oven light turns on. Cooking time counting down and reheat category alternately display. When reheat cycle is complete signal sounds. "End" displays. 4. Press STOP/RESET to return display to time of day. Regular Timer 1. Press MICRO TIME ENTRY. "0" displays and PROG 1 indicator light blinks. 2. Press numbers for desired time. Time displays. Note: Time can be set for up to 99 minutes and 99 seconds in one program setting. It is possible to set time for a longer period by utilizing second program setting. 3. Press COOKMATIC LEVEL. "P-HI" displays. 4. Press 0. "p-0" displays. If "0" is pressed more than once, "P-HI" reappears. Important: If "0" power is not programmed oven generates microwaves. 5. Press START. MICRO indicator light turns on. Selected time counting down and "P-0" alternately display. When time has elapsed signal sounds. "End" displays. 6. Press STOP/RESET to return display to time of day. 12 Utensils Microwave* Convection Combination* YES* YES YES YES (Do not use china with gold or silver trim.) YES YES NO YES NO NO NO NO YES* NO NO YES* NO NO YES* NO NO YES* NO NO Heat-Resistant Glass, Glass Ceramic Ceramic, China Metal Cookware Non Heat-Resistant Glass Microwave Plastics Plastic Wrap, Wax Paper Paper Products Straw, Wicker, and Wood *Also see "Microwave Utensil Check Test" on page 14. 13 Microwave Utensil Check Test Use the following test to check utensils for microwave safeness: 1. Place glass measuring cup of water next to empty dish to be tested in unit. 2. Heat on full power for one minute. 3. Check temperature of tested dish. If dish remains cool and water is hot, dish is microwave safe. If dish is slightly warm, use for short term cooking only. If dish is hot and water is cool, do not use. Dish remains cool if not absorbing microwaves and microwaves are being absorbed by water. Dish becomes hot if absorbing microwaves. Care and Cleaning Caution To avoid burns allow oven to cool before cleaning. Interior, Exterior and Door If walls, floor, and door of microwave oven become splattered, wipe with paper towel or clean with mild detergent in warm water using soft sponge or cloth. Wring sponge or cloth to remove excess water before wiping unit. If desired, boil a cup of water in microwave oven to loosen soil before cleaning: • Do not use cleaners containing ammonia. These could damage finish. • Never pour water into microwave oven bottom. • Do not use water pressure type cleaning systems. Turntable Wash by hand using mild detergent in warm water or wash in dishwasher. Control Panel Open oven door to prevent oven from accidentally starting. Wipe with a damp cloth followed immediately by a dry cloth. Touch STOP/RESET after cleaning to clear screen in case any pads were pressed. Discharge Air Vents There will be a slight buildup of cooking vapors along discharge louvers in back of oven on right side. Clean air vent with damp cloth and dry. • Do not allow water to seep into ventilation openings on oven exterior. 14 Oven Light Oven light must be changed by authorized Amana servicer. See information on contacting a servcier below. Before Calling for Service Readout display does not light up: •Confirm unit is plugged in on dedicated circuit. •Confirm unit is on grounded and polarized circuit. •Check fuse or circuit breaker. Test circuit is operable by plugging another item in wall outlet. Readout display appears wrong: •Press STOP/RESET. Microwave oven does not operate: •Confirm door is securely closed. Food is overcooked: •Confirm cooking at correct power level. Food is undercooked: •Confirm unit is plugged into dedicated circuit. •Confirm cooking at correct power level. WARNING To avoid electrical shock, personal injury or death do not remove outer case at any time. Only authorized servicer should remove outer case. If removed by another person, warranty is voided. Any questions or to locate an authorized Amana® servicer, call 1-800-843-0304 inside the U.S.A or 319-622-5511 outside U.S.A. Contact an authorized Amana® servicer if service is required. When contacting us, provide product information including model and serial numbers and date of purchase. Model and serial numbers are located on nameplate. 15 Asure Extended Service Plan Amana is pleased to offer long-term service protection on this new microwave oven. Asure Extended Service Plan is specially designed to supplement Amana's strong warranty. Asure provides budget-protecting coverage on microwave oven for up to five full years and includes parts, labor and travel charges. A participating Amana dealer has details or contact: Amana Refrigeration, Inc. Consumer Affairs Department Amana, IA 52204 1-800-843-0304 If outside U.S.A., 1-319-622-5511 Part No. C8940843 Printed in U.S.A. 1995 Amana Refrigeration, Inc. Amana, Iowa 52204