1
ADVI0PS2
10.2" OVERHEAD LCD
MONITOR WITH
SONY PS2 PLAYER
OPERATION
MANUAL
128-8669
Important Notice
Installation of overhead products requires careful planning and preparation. Be extremely careful when working on a vehicle with side
curtain air bags. Do not route wires near any portion of the side curtain air bag assemblies. This includes any anchor points in A, B, C or
o pillars of the vehicle. Routing wires in these areas or running wires by the side curtain air bags can prevent the side curtain air bag from
fully deploying which can result in personal injury to vehicle occupants. If you have any questions regarding wire routing in a vehicle,
please contact Audiovox Technical Support at 1-800-225-6074.
When connecting power and ground in a mobile video installation ensure that the ACC wire is fused at the point where it is connected to
the vehicle ACC wiring. Failure to do so can result in damage to the vehicle if a short circuit develops between the vehicle connection
point and the mobile video product.
An LCD panel and/or video monitor may be installed in a motor vehicle and visible to the driver if the LCD panel or video monitor is used
for vehicle information, system control, rear or side observation or navigation. If the LCD panel or video monitor is used for television
reception, video or OVO play, the LCD panel or video monitor must be installed so that these features will only function when the vehicle is
in "park" or when the vehicle's parking brake is applied.
An LCD panel or video monitor used for television reception, video or OVO play that operates when the vehicle is in gear or when the
parking brake is not applied must be installed to the rear of the driver's seat where it will not be visible, directly or indirectly, to the operator
of the motor vehicle.
Warnings
• Do not use any solvents or cleaning materials when cleaning the video monitor.
• Do not use any abrasive cleaners, they may scratch the screen.
• Use only a lightly dampened lint free cloth to wipe the screen if it is dirty.
• Lock the LCD screen in the fully closed position when not in use.
• Before putting on headphones always adjust the volume setting to the lowest position.
• Remember to leave the dome light switch in the off or auto positions when the vehicle is unattended, as the dome lights, if left on, can drain
the vehicle's battery.
• Do not put pressure on the screen.
• Caution children to avoid touching or scratching the screen, as it may become dirty or damaged.
Licensed under one or more of the following patents: Patent NOS. 5,775,762 and 5,927,784
PlayStation®2 is a registered trademark of Sony Corporation
FEATURES
Congratulations
Congratulations on your purchase of the ADVENT
ADV10PS2 Player with Drop-Down Video I Monitor. The
ADV10PS2 has been designed to give you and your family
many years of video entertainment in the mobile
environment. Please read the directions that follow to
familiarize yourself with the product to ensure that you obtain
the best results from your equipment.
Please note: Installation options vary, see the individual
owner's manuals for each component in your system to
obtain a full understanding of each component's operation.
Safety Precaution
For safety reasons, when changing video media it is
recommended that the vehicle is not in motion, and that you
do not allow children to unfasten seat-belts to change video
media or make any adjustments to the system. System
adjustments can be accomplished using the remote control,
while seat-belts remain fastened. Enjoy your ADVENT
entertainment system but remember the safety of all
passengers remains the number one priority.
3
•
10.2" TFT (Thin Film Transistor) Active Matrix LCD
(Liquid Crystal Display) Monitor
•
Built-in SONY PiayStation2 game console
•
2 SONY PiayStation2 Wireless Game Controllers
•
Full Function Remote Control
•
OSD (On Screen Display) for Control of Picture Quality
and Functions
•
Infrared Transmitter for IR Wireless Headphones
•
2 wireless IR headphones
•
AudioNideo Source Inputs (PS2, AV1, AUX)
•
AN output via RCA pigtail
•
Dome Lights with 3-Position Switch
•
Built-in 16 Channel Frequency Wireless FM Modulator
•
Screen Mode Selection (4:3, 16:9)
•
Backlit Controls
•
Plays DVD, CD and SONY PiayStation2 Games
Quick Start Guide
1.
Insert batteries into the PiayStation2 game controllers and the remote control (game controller transceivers are
preinstalled when the unit is shipped).
2.
Turn the vehicle on (running this unit on battery power (accessory key setting) will drain the battery).
3.
Press the screen release button to lower the LCD screen. Swing the screen back to allow the PiayStation2 to drop
down.
4.
Push the PiayStation2 release button to drop down the PiayStation2
5.
Press the.! (open) button on the PiayStation2 to open the PiayStation2 disc cover.
6.
Insert a DVD or PiayStation2 game onto the spindle and press gently to seat the disc on the spindle.
7.
Close the disc cover on the PiayStation2 by pressing down gently on the center of the cover.
8.
Return the PiayStation2 to its docked position
9.
Turn the ADV1 OPS2 on by pressing the power button
NOTE: If a blue screen is present, press the green RESET key on the remote control or the PlayStation2.
10. If a game is played and the game controllers are not linked, press the "Force Link" button on each game controller.
11. If a DVD is played press the PLAY key on the remote control, or the "X" key on the game controller or the
Menu/Enter key on the front of the overhead unit.
4
Quick Start Guide (Cont)
12. When using the wireless headphones install the batteries in each headphone. Turn the volume to minimum before
turning them on. Once they are turned on, place them on your head (pay attention to R/L earpieces) and slowly
adjust the volume to a comfortable listening level.
13. When listening to the system over the vehicle radio:
a. Using the remote control:
i. to turn on the FM modulator by pressing FMM ON/OFF
ii. Select an FM frequency by pressing FMM Select.
iii. Tune the vehicle radio to the FM frequency selected.
b. Using the MENU/ENTER Key on the front of the unit:
i. Press MENU/ENTER.
ii. Use the T (down) key to highlight FMM, press MENU/ENTER.
iii. Use the T(down) or ... (up) key to select FMM ON.
iv. Press MENU/ENTER to select FMM ON.
v. To select the frequency press MENU/ENTER.
vi. Use the T (down) key to highlight FMM and press MENU/ENTER.
vii. Use the T (down) key to highlight FMM SELECT and press MENU/ENTER.
viii.Use the T(down) ... (up) ~ (right) or .... (left) keys to select an FM frequency.
(NOTE: For best sound quality select an FM Frequency that is not used in the area you will be driving)
ix. Press MENU/ENTER to set the FM frequency.
x. Tune your vehicle radio to the frequency just set in the steps above.
xi. Adjust the volume of the vehicle radio to a comfortable listening level.
5
Quick Start Guide (Cont)
Using the Control Panel
To access the Control Panel press the dark gray DISPLAY or dark gray SELECT button. The Control Panel (Below) can be
used to navigate the DVD disc. Refer to figure below:
Pressing the dark gray DISPLAY or dark gray SELECT button again will cause the Control Panel to change its position on
the screen. Pressing the DISPLAY or SELECT button a third time will turn off the Control Panel. Use the dark directional
buttons (T .. ~ ... ) to select an icon. When the desired icon is selected, press the X button.
NOTE: The Control Panel may appear at the end of some DVD movies.
For complete instructions regarding the functions provided by the Control Panel refer to the PiayStation2 User's Guide.
6
CONTROLS AND INDICATORS DIAGRAM (FRONT VIEW)
1. SOURCE Button (S)
Use to select the sources: PS2, AV1 and AUX.
7
r;
..---
6
3
5 4
~
0
~
-
c:
2
•
~~~M
. )
<.>~
~
("1
:::»
~
2. CURSOR Buttons (.A. ....... ~)
Use these buttons to access menu selections on the screen .
1
((!)
~
~
\
3. MENU/ENTER Button
Use this button to access SYSTEM MENU and select system
menu items.
4. Infrared Transmitter and Sensor
Transmits audio to wireless headphones, allows the remote
control to operate the unit and to control other accessories in the
system.
13
c
14
;'-..1
8
9
10
V
I
'I~
"
IllU'QltYC4lll11
.....~"'"
.....
"
.~Y¢"'.
I- I
~
-
5. POWER Button (<!.»
15
Used to turn the system on/off (standby).
16
I=~
_~•
6. Dome Lights
"",¢"""
Provide additional interior illumination .
~
7. Three Position Dome Light Switch
ON - Turns on the dome lights. (Do not leave switch on when
vehicle is off.)
OFF - The dome lights will not turn on in this position.
AUTO - Automatically switches on the dome lights in
Conjunction with the vehicle's interior illumination.
11
12
~
c::=J
d
8. PiayStation2 CONSOLE
9. MEMORY CARD SLOT 1 & MEMORY CARD SLOT 2
(Memory Cards not supplied)
10. PS2 WIRELESS FORCE 2 CONTROLLER TRANSCEIVERS
(Transceivers supplied)
7
CONTROL FUNCTION DESCRIPTION
(SIDE VIEW)
11. LCD Panel
12. Screen Release
Press to release the screen.
1 2
13. LCD Cut Off Switch
Used to turn off the LCD backlit when the LCD is in the closed
position.
o
@
3 4
0
@
14. OPEN
Push to open the PiayStation2 tray.
15. OPEN (~)
The disc tray opens.
1. HEADPHONE JACK
For wired headphone with a 1/8" (3.5mm) plug.
16. RESET ( 1/6 )
ON/Standby and RESET indicator.
2. Auxiliary Audio Right Input
3. Auxiliary Audio Left Input
4. Auxiliary Video Input
8
MAIN FUNCTION OPERATION
REMOTE CONTROL OPERATION
Back View
o
D
0
+---l--P36
P1
P2
P3
P4
P5
P6
P7
-+-+-- P35
P8 -+-=:;;~P9
=+-+--- P34
'":j~~~=----+--
-+-+--- P30
P10
L-_--l
-'--
+-+-
P14
P15
P16
P17
P18
Battery Installation
P26
+-+--P25
=------=,..---+-- P24
+---l--- P23
~--+--P22
P19
P20
Before attempting to operate your Remote Control, install the
batteries as described below.
1) Turn the Remote Control face down. Using your finger, slide
the battery cover off in the direction of the arrow.
2) Install Two "AAA" batteries. Make sure that proper polarity
(+ or -) is observed.
3) Align the cover tabs with the remote control and slide the
cover until it locks.
The remote control is designed to operate the unit. It is not a
universal remote control and will not control equipment from other
manufacturers.
~:=--:===:....-.+--P29
-+-+--- P28
L---+--P27
P11
P12
P13
o
P33
~--+--P32
-+-=~- '--1~;:;t::=.~=----+-- P31
'----=-----+-- P21
MUTE
M1
M2
r--
SOURCE
DISPLAY
~-+---M11
+-~~+---M10
m====;--+--- M9
M3
FMM SELECT
M4
M5
IRONIOFF
M6
S~~~~M
e
~--=---+---M8
GENTER
"'+---+---- M7
I DVD IPLAYSTATION I
9
REMOTE CONTROL FUNCTIONS
The remote control is divided into two sections, Dark Gray buttons on the top, which control the built-in PiayStaion2 and Light Gray
buttons on the bottom of the remote control, that control the other functions of the unit.
PLAYSTATION CONTROLS (P1-P36) (Dark Gray Buttons)
NOTE: PiayStation2 controls (refer to the SONY PiayStation2 manual for details).
P1. OPEN/CLOSE
Not used on this model.
P2. AUDIO
Displays and changes DVD audio options.
P3. SHUFFLE
Starts playback of titles or chapters in random order.
P4. ANGLE
Displays and changes DVD viewing angle options.
P5. PROGRAM
Displays the Program Setup screen.
P6. SUBTITLE
Displays and changes DVD subtitle options.
P7. REPEAT
Selects repeated playback of all the titles on the disc, or one title or chapter.
10
P8. SLOW (~I , •.-)
Changes to slow-motion playback. (Forward or Reverse)
P9. SCAN (~/(ffi)
Fast forwards or fast reverses playback on the screen to locate a particular scene.
P10. PLAY
Starts playback.
P11. DISPLAY
Displays the Control Panel of the PlayStation2.
P12. TOP MENU
Displays the disc menu of DVD-Video discs. The content varies from disc to disc.
P13. ~ BUTTON: DVD MENU
Selects the item to be changed.
P14. ENTER
Executes the item selected on the DVD disc menu or the on-screen Control Panel.
P15.
0 BUTTON: TITLE MENU
Selects the title to be played.
P16. DIRECTIONAL BUTTONS: CURSOR CONTROL
Use these buttons to access the menu selection on the screen.
P17. L3 BUTTON
Displays Subtitle Options to select the subtitle language and/or turn it on or off.
11
P18. L1 BUTTON
Previous (~), press to return to the previous chapter or track.
P19. L2 BUTTON
Search (lB ) using fast reverse or fast forward playback.
P20. SELECT
Displays the control panel of the PlayStation2.
P21
START
Press to Play/Pause disc playback.
P22. R2 BUTTON
Search (8) using forward playback.
P23. R1 BUTTON
Next (.~) press to skip to the next chapter or track.
P24. R3 BUTTON
Displays Audio Options, press the language changes.
P25. X BUTTON: ENTER
P26.
0
BUTTON: CANCEL I. (Stop)
P27. MENU
Displays the disc menu of DVD-Video discs. The content of the menu varies from disc to disc.
P28. RETURN
Returns to the previously selected screen within the disc menu of DVD-Video discs.
12
P29. PAUSE
Pauses and resumes playback.
P30. STOP
Stops playback.
P31. PREVIOUS (~~) / NEXT (~~)
Returns to the beginning of the current or previous chapter/Skips to the beginning of the next chapter.
P32. A-B REPEAT
Specifies a scene for playback and starts playback of the scene that has been set.
P33. CLEAR
Clears selected numbers or playback modes.
P34. TIME
Displays the current title or chapter number and the elapsed or remaining time.
P35. NUMBER 0-9
Used to select numerical items displayed on the screen.
P36 STANDBY/RESET
Used to turn on, reset, and set the PiayStation2 console in standby mode. On :Press Once. Reset :Press for about one second.
Standby mode :Press and Hold down for more than three seconds.
OVERHEAD MONITOR CONTROLS (M1-M11) (Light Gray Buttons)
M1. POWER
Press this button to turn the unit ON and OFF.
13
M2. MUTE
Press this button to mute the audio. Pressing the button again restores the sound to the previously set level.
M3. FMM ON/OFF
Turns the wireless FM Modulator ON or OFF.
M4
FMM SELECT
Select the FM Modulator Frequency.
MS. SYSTEM MENU
Allows the user to access the main system menu for picture controls, FM Modulator Select, screen mode etc.
MG. IR ON/OFF
Turn Infrared Transmitter power ON/OFF for IR Wireless Headphones.
M7. CURSOR BUTTON (........ ~)
Use these buttons to access system menu selections on the screen.
M8.
ENTER
Used to execute a selected setting or menu option.
Mg.
VOLUME (- PIX +)
Each time this button is pressed, the OSD will display the "adjustment bars" for BRIGHTNESS, CONTRAST, COLOR or TINT.
Once the desired adjustment bar is displayed, use the ("+" / "_") buttons to adjust the setting. The display will automatically
turn off if no adjustments are made after 6 seconds, or if any other button is pressed.
M10. SOURCE
Each time the button is pressed, the audio/video source will change: PS2, AV1 and AUX.
M11. DISPLAY
Press to display OSD information.
14
WIRELESS CONTROLLER (2.4GHz)
Carefully read the information before use. For detailed connection and usage
methods, refer to the Owner's Manual for the PiayStation2 system.
Requires 3 AAA Batteries (Not Included)
HOW TO USE
Battery Installation and Pairing Instruction:
Remove battery compartment cover and place batteries in compartment.
Make sure that your batteries are placed in the correct direction in the battery
compartment. Replace the battery cover once complete.
The wireless transceivers are pre-installed in the controller ports on your PiayStation2 system.
Turn on your PiayStation2 system. Press the green reset button on the remote control if the PlayStation2 does not come on
when the main unit is turned on.
The Link LED will flash for a few seconds and the transceiver will begin to search for the controller.
Once the controller is paired with the transceiver, the LED indicator will glow and will remain lit.
15
The LED will turn off when the controller is powered off or is in sleep mode.
In order to avoid conflicts between working controllers, each is issued a unique 10. However, if there is a need to re-pair the
controller and the transceiver, simply press the "Force Link" button on the transceiver first, then on the controller. The Link LED
will flash for a few seconds and the receiver will begin to search the controller.
Safety Precaution: Follow the battery manufacturer's instructions as well as these important safety tips. Do not open or
mutilate batteries as they might leak dangerous chemicals.
Sleep Mode:
The controller will revert to sleep mode after five minutes of inactivity or when the controller is without an active link for a
period of two minutes. The Pad will wake from sleep mode by pressing any of the following keys "Mode"", "Select", "Start",
"L3" or "R3".
Low Power Warning Function:
Under low battery conditions, the Mode LED will flash and the vibration motors will automatically turn off.
Vibration:
The controller's default vibration setting is on.
To turn off the vibration function, press the vibration button once. The controller will vibrate twice to confirm.
To turn the vibration on, press the vibration button once and the controller will vibrate once to indicate vibration is active.
Safety Precaution: Stop using this unit immediately if you begin to feel tired or if you begin to feel discomfort or
pain during use. Do not use the vibration function if you have an ailment or injury to the bones, joints or muscles
of your hands or arms.
16
SYSTEM MENU ADJUSTMENT
The System Menu contains features and options that let you customize your system to change the screen mode display, OSD language
and source default.
1)
2)
3)
4)
5)
6)
Press the MENU/ENTER button on unit to enter System Menu, the main page of the system menu will appear on screen.
Use the cursor buttons. or ... to select the desired item in the main page and press the MENU/ENTER button to select. (Items
selected in the menu will have a green background)
The sub menu will appear on screen.
Use the cursor buttons. or ... to select an item in the sub menu and then press the MENU/ENTER button to select.
Use the cursor buttons'" or ~ to adjust picture control and press the MENU/ENTER button to confirm setting.
Press and hold the MENU/ENTER button to exit System Menu.
NOTE: : System Menu can be controlled via unit and remote control. Press the SYSTEM MENU button for access. (Items selected in the
menu will have a green background)
PICTURE CONTROL (REMOTE CONTROL)
When watching a DVD or playing a game, the picture quality can be adjusted to suit your personal taste.
1)
2)
3)
Press the SYSTEM MENU button on the remote control, the SYSTEM MENU will appear.
Highlight PICTURE CONTROL using the light gray. or'" buttons and press the light gray ENTER button. The PICTURE CONTROL
menu will appear.
Use the light gray. or'" buttons to highlight the picture control to be changed and press the light gray ENTER button. The control
setting for that picture control will appear on the screen.
SYSTEM MENU
PICTURE CONTROL
PICTURE CONTROL
FMM
BRIGHTNESS
CONTRAST
OSD LANGUAGE
SOURCE DEFAULT PS2
SCREEN MODE
COLOR
TINT
RESET
17
16
CONTRAST
tJ--=====c
4)
5)
6)
Use light gray'" or ~ buttons to change the picture control setting.
To change another picture control setting press the SYSTEM MENU button and select another picture control using the light gray
.. or T buttons. Repeat step 4 to change the picture control setting.
To reset the picture control settings to the factory default settings, enter the picture control menu and use the light gray T button to
highlight RESET and press the light gray ENTER button.
NOTE: The light gray PIX control and light gray VOLUME and + buttons on the remote control can also be used to adjust the picture
control settings. When using this method highlight RESET and press the or + button to reset the picture controls to factory default
settings.)
FMM
FMM ON/OFF options - Turns the wireless FM Modulator on or off.
1)
Press the SYSTEM MENU on the remote control, the following screen will appear:
SYSTEM MENU
PICTURE CONTROL
FMM
OSD LANGUAGE
SOURCE DEFAULT DVD
SCREEN MODE
2).
Use the light gray T (down) arrow on the remote control to highlight FMM as shown below:
SYSTEM MENU
PICTURE CO NTROL
FMM
OSD LANGUAGE
SOURCE DEFAULT DVD
SCREEN MODE
18
3)
Press the light gray ENTER button on the remote control and the following screen will appear:
SCREEN MODE
FMMON
FMM OFF
FMMSELECT
4). Use the light gray. (up) or T (down) arrow on the remote control to highlight FMM ON and press the light gray ENTER button to
turn the FM Modulator on.
FMM SELECT
1. Repeat steps 1 through 3 above and highlight FMM SELECT
2). Use the light gray T (down) arrow on the remote control to highlight FMM SELECT and press the ENTER button, the following
screen will appear.
FMM SELECT
88.1MHz
89.7 MHz
88.3 MHz
89.9 MHz
88.5 MHz
90.1 MHz
88.7 MHz
90.3 MHz
88.9 MHz
90.5 MHz
89.1 MHz
90.7 MHz
89.3 MHz
90.9 MHz
89.5 MHz
91.1 MHz
3) Use the light gray. (up) T (down) ... (left) ~ (right) buttons on the remote control to select a frequency not used by a radio station
in the area. Press the light gray ENTER button to select the highlighted frequency.
NOTE: The menu will time out after a short period, or press the SYSTEM MENU button to turn off the menu.
19
OSO LANGUAGE
This allows the user to select the language for the on-screen display. The user can either select English, Spanish, French, German for the
OSD language.
SYSTEM MENU
PICTURE CONTROL
FMM
SPANISH
SOURCE DEFAULT PS2
GERMAN
FRENCH
SCREEN MODE
SOURCE OEFAULTPS2
This allows the user to set the system default source to PS2 (via System Menu).
NOTE: :
• If selected default source is set to PS2 every time the unit's power is cycled with the source set to something other then PS2, the unit will power
up and automatically switch the source overto PS2
• Unit will be set to Last Source on as the default mode of operation.
• Selection of Source default can only be made from within the system menu.
SYSTEM MENU
PICTURE CONTROL
FMM
OSD LANGUAGE
.....
..".
~!I!I£i,~~llJibt:"~~li:;
SCREEN MODE
SCREEN MOOE
This allows the user to change the screen format (aspect ratio 4:3, 16:9).
To select the screen aspect ratio format highlight SCREEN MODE and press MENU/ENTER button to enter the submenu. Then press the
Cursor button. or T to select from 4:3 or 16:9. Press MENU/ENTER button to confirm the setting.
SYSTEM MENU
PICTURE CONTROL
FMM
OSD LANGUAGE
.....
..".
SOURCE DEFAULT PS2
20
TURNING THE UNIT ON OR OFF
1. Pushing in the Screen Release button will unlock the LCD screen and it will drop down slightly. Pivot the screen downward until a
comfortable viewing angle is reached. The hinge friction will hold the screen in position while the system is in use.
2. Pressing the power button* on the unit orthe remote control will turn the system on and off. When in use the internal backlighting will
illuminate the controls.
3. After the unit has been turned on and is displaying a picture, adjust the viewing angle, by pivoting the screen to optimize the picture quality.
4. Rememberto turn the unit off and pivot the LCD to the locked position when not in use.
Power
ON/OFF
Button
Remote Sensor
Infrared Transmitter
L-------1-----\i----Screen Release
21
OVERHEAD DOME LIGHTS
The Dome Lights integrated into the unit are controlled by a three position slide switch. Sliding the switch to the ON position will turn
the lights ON. The OFF position will prevent the lights from turning ON with the vehicle's interior lighting, and the auto position will allow the
lights to turn ON and OFF with the vehicle's interior lighting. Refer to the Installation Guide for wire connections. Do not leave the vehicle
unattended with the dome light switch in the ON position, as this could result in a discharged battery.
ACCESSORIES
WIRELESS HEADPHONES
The unit includes a built-in infrared transmitter for use with the supplied wireless headphones. The headphone volume is adjusted using
the controls on each headset. Any number of wireless headphones may be used but they must be used within a line of sight from the
transmitter, as infrared transmissions, like visible light travel only in a straight line. See the documentation accompanying your wireless
headphones.
WIRED HEADPHONES (OPTIONAL)
There is one 1/8" headphone jack on the unit that can be used with any standard wired stereo headphones with a 1/8" plug. This jack is
controlled by the volume up/down buttons on the remote control or the .... (left) ~ (right) buttons on the overhead.
22
SOURCE FEATURE
AV1
The AV1 input may be connected to a external video source, video game system, or other audio / video devices. To access the
audio / video inputs, turn the unit on and press the S (source) button or the Source button on the remote control until IAV1" is
displayed on the screen. Turn the video source component on with its power button or remote control and it is now ready to play
the audio and video signals from the source connected.
NOTE: The AV1 source is available only ifpre-installed during your video product installation.
AUX
The AUX input (located on th right side of the unit) may be connected to a external video source, video game system, or other audio / video
devices. To access the audio / video inputs, turn the unit on and press the S (source) button or the Source button on the remote control until
"AUX" is displayed on the screen.
PS2
Press the source button until the screen displays PS2.
Press (1/6) RESET on unit/remote control to turn ON the PS2 Console.
23
TROUBLESHOOTING
SOLUTION
PROBLEM
IR remote inoperative
• Verify that the batteries in the remote are fresh.
• Verify that the remote sensor eye is not obstructed.
Disc won't play
• Insert a disc with the label side facing up.
• Check the type of disc you put into disc tray. This PS2 only plays PS2 GAMES, DVDs,
audioCDs.
• 80th the unit and the disc are coded by region. If the region codes don't match, the
disc can't be played.
• Make sure screen source is set to PS2.
Play starts, but then stops immediately
• The disc is dirty. Clean it.
• Condensation has formed. Allow player to dry out.
No sound or distorted sound
• Make sure your DVD is connected properly. Make sure all cables are securely
inserted into the appropriate jacks.
• Make sure the Modulator is ON and the Frequency selected on the unit matches
the frequency set on the radio.
• Make sure that unit is using Single Channel Headphones or Dual Channel
Headphones set to channel A.
• For wireless headphones make sure the batteries are fresh.
Can't advance through a movie
It can't advance through the opening credits and warning information that appear
at the beginning of movies because the disc is programmed to prohibit that action.
24
SOLUTION
PROBLEM
o Not allowed at the moment
• The feature or action cannot be completed at this time because:
1. The disc's software restricts it.
2. The disc's software doesn't support the feature (e.g., angles)
3. The feature is not available at the moment.
4.4 title or chapter number that is out of range.
Picture is distorted
• The disc might be damaged. Try another disc.
• It is normal for some distortion to appear during forward or reverse scan.
No forward or reverse scan
• Some discs have sections that prohibit rapid scanning or title and chapter skip .
• If you try to skip through the warning information and credits at the beginning of a
movie, you won't be able to. This part of the movie is often programmed to prohibit
skipping through it.
Service and
Re~
Warranty on all components in this system (ADV1 OPS2, Remote Control, Game Controllers and built-in Sony PlayStation2) is handled
by Audiovox Electronics Corporation. For service call 1-800-225-6074.
25
SPECIFICATIONS
REPLACEMENT PARTS
Remote Control
136-4926
LCD Backlighting
LED
Resolution
800 (RGB) x 480
Pixels
1,152,000
Operation Temperature
32 -131° F (0 - 50° C)
Storage Temperature
-4 - 158° F (-20 - 70 0 C)
Backlit life
10,000 Hours
Video Display System
NTSC / PAL
Headphone Audio Output
0.03W @ 32 ohms
Video Output
1.0Vp-p @ 75 ohms
Power Source
12V DC
Dimension
LxWxH
1211 X 1211 X 2.5"
315mm x 315mm x 64.5mm
Specifications subject to change without notice.
26
ADVENT LIMITED WARRANTY
Applies to ADVENT Mobile Video Products
AUDIOVOX ELECTRONICS CORP. (the Company) warrants to the original retail purchaser of this product that, should this product or any part thereof
(except game controllers), under normal use and conditions, be proven defective in material or workmanship within 36 months from the date of original
purchase, such defect(s) will be repaired or replaced with reconditioned product (at the Company's option) without charge for parts and repair labor.
If your new vehicle's radio, CD/DVD player is covered by the manufacturer's warranty for a period of 48 months as set forth in the OEM Warranty
Booklet, the company will extend the Advent Mobile Video product warranty for the same period of time. This is not applicable to extended warranty
purchases beyond the original manufacturer's warranty. A game controller, if supplied, is similarly warranted for ninety (90) days.
To obtain repair or replacement within the terms of this Warranty, the product is to be delivered with proof of warranty coverage (e.g. dated bill of sale),
specification of defect(s), transportation prepaid, to the Company at the address shown below.
This Warranty does not extend to the elimination of externally generated static or noise, to correction of antenna problems, to costs incurred for installation,
removal or reinstallation of the product, or to damage to digital memory/media devices, gaming devices, discs, speakers, accessories, or vehicle electrical
systems.
This Warranty does not apply to any product or part thereof which, in the opinion of the Company, has suffered or been damaged through alteration,
improper installation, mishandling, misuse, neglect, accident, or by removal or defacement of the factory serial number/bar code label(s). THE EXTENT OF
THE COMPANY'S LIABILITY UNDER THIS WARRANTY IS LIMITED TO THE REPAIR OR REPLACEMENT PROVIDED ABOVE AND, IN NO EVENT,
SHALL THE COMPANY'S LIABILITY EXCEED THE PURCHASE PRICE PAID BY PURCHASER FOR THE PRODUCT.
This Warranty is in lieu of all other express warranties or liabilities. ANY IMPLIED WARRANTIES, INCLUDING ANY IMPLIED WARRANTY OF
MERCHANTABILITY, SHALL BE LIMITED TO THE DURATION OF THIS WRITTEN WARRANTY. ANY ACTION FOR BREACH OF ANY WARRANTY
HEREUNDER INCLUDING ANY IMPLIED WARRANTY OF MERCHANTABILITY MUST BE BROUGHT WITH IN A PERIOD NOT EXCEEDING 12
MONTHS AFTER EXPIRATION OF THE WARRANTY. IN NO CASE SHALL THE COMPANY BE LIABLE FOR ANY CONSEQUENTIAL OR INCIDENTAL
DAMAGES FOR BREACH OF THIS ORANY OTHER WARRANTY. No person or representative is authorized to assume for the Company any liability other
than expressed herein in connection with the sale of this product.
Some states do not allow limitations on how long an implied warranty lasts orthe exclusion or limitation of incidental or consequential damage so the above
limitations or exclusions may not apply to you. This Warranty gives you specific legal rights and you may also have other rights which vary from state to
state.
~~=;;;;;;;;;;;;;;;;;;;;;;;;;;;;;;;;;;;;;;;;;;;;;;;;;A;;U;;do;;v;;oX;;;;;;;E;;'e;;c;;tr;;o;;n;;ic;;s;;c;;o;;rp;;o;;r;;a;;ti0;;n;;,;;1;;5;;0;;M;;a;;r;;c;;uS;;;;;;;B;;IV;;d;;.,;;H;;a;;u;;p;;p;;a;;u;;ge;;,;;N;;e;;W;;;;;;;Y;;or;;k;;1;;1;;7;;8;;8;;;;;;;1-;;8;;0;;0-;;6;;4;;5;;-4;;9;;9;;4;;;;;;;;;;;;;;;;;;;;;1;;28;;-;;7;;1;;88;;B;;;;;;;:;;;;:~~
I;;·
27
© 2009 ADVENT, 150 Marcus Blvd. Hauppauge, NY 11788
128-8669
AUDIO",'"OX®
ELECTRONICS CORP.
VODI0PS2
10.2" OVERHEAD LCD MONITOR
WITH SONY PS2 PLAYER
Q
o
Installation Guide
lmPortant Notice
An LCD panel and/or video monitor may be installed in a motor vehicle and visible to the
driver if the LCD panel or video monitor is used for vehicle information, system control,
rear or side observation or navigation. If the LCD panel or video monitor is used for
television reception, video or DVD play, the LCD panel or video monitor must be installed
so that these features will only function when the vehicle is in "park" or when the vehicle'S
parking brake is applied.
An LCD panel or video monitor used for television reception, video or DVD play that
operates when the vehicle is in gear or when the parking brake is not applied must be
installed to the rear of the driver's seat where it will not be visible, directly or indirectly, to
the operator of the motor vehicle.
Installation of overhead products requires careful planning and preparation. Be
extremely careful when working on a vehicle with side curtain air bags. Do not route
wires near any portion of the side curtain air bag assemblies. This includes any anchor
points in A, B, CorD pillars of the vehicle. Routing wires in these areas or running wires
by the side curtain air bags can prevent the side curtain air bag from fully deploying which
can result in personal injury to vehicle occupants. If you have any questions regarding
wire routing in a vehicle, please contactAudiovox Technical Support at 1-800-225-6074.
When connecting power and ground in a mobile video installation ensure that the ACC
wire is fused at the point where it is connected to the vehicle ACC wiring. Failure to do
so can result in damage to the vehicle if a short circuit develops between the vehicle
connection point and the mobile video product.
lmportant Note
The VOD1 OPS2 incorporates two new features:
1) A wireless FM Modulator
2) Snap on Covers with matching Trim Rings (Shale and Pewter).
Select the color that matches the interior trim.
Please be advised that the wireless FM modulator will perform well in most
applications. However, in certain applications the quality of the wireless
signal may be less than optimal, resulting in static or strong local station
bleed thru. If this is the case, an optional relay box is available. The Audiovox part
number is SIRSWB and it plugs into the 1/8" jack located next to the FM antenna on
the side of the chassis. This relay box is installed between the vehicle antenna and
the car radio to provide the best possible FM reception of the DVD player audio.
When the SIRSWB is installed it is recommended that the wireless FM antenna that
is plugged into the printed circuit board next to the 3.5mm jack be unplugged.
Licensed under one or more of the following patents,
Patent NOS. 5,775,762 and 5,927,784
MATERIALS INCLUDED IN THIS PACKAGE:
1)
2)
3)
4)
10.2" Overhead LCD Monitor With SONY PS2 Player
12 Pin Power I Signal Harness (PIN 112-3959)
2 Pin Power Wire Harness With Choke (PIN 112B3143)
Hardware Package
Screws ISO M5 x 10mm
M4 x 16 Self Drilling Screws
M3 x 8 Self Tapping Screws
5) Remote Control (PIN 136-4926)
6) Universal Mounting Bracket (PIN 108-4010)
7) Pry Tool
8) Screw Cap - Shale
- Pewter
9) PS2 DVD GAME DISC
10) Trim Ring - Shale (PIN 172-0010)
- Pewter (PIN 172-0011)
11) Snap On Cover (Screen Back) - Shale (PIN 172-0012)
- Pewter (PIN 172-0013)
12) Snap On Cover (Shroud) - Shale (PIN 172-0014)
- Pewter (PIN 172-0015)
13) Wireless Headphones (PIN IR1CFF)
14) PS2 Game Controller (PIN 136-4927)
- (1 pc)
- (1 pc)
- (1 pc)
- (4pcs)
- (4pcs)
- (6pcs)
- (1 pc)
- (1 pc)
- (1 pc)
- (4pcs)
- (4pcs)
- (2pcs)
- (1 pc)
- (1 pc)
- (1 pc)
- (1 pc)
- (1 pc)
- (1 pc)
- (2pcs)
- (2pcs)
@oo
®oo:::::
. ..... .
TOOLS REQUIRED:
#2 Phillips Screwdriver
#1 Phillips Screwdriver
Utility or Razor Knife or Shears
Wire Strippers
Upholstery hook tool (for removal of panels as necessary)
Electrical Tape
Masking Tape
Multimeter (to verify 12 volt DC and continuity: Do not use a test light or logic probe)
Marker pen - to mark headliner
Scribe (to mark trim ring if used)
Misc. electrical connectors (to connect to vehicle power source). Requirements will vary from vehicle
to vehicle)
OVO Movie (to verify system operation after installation)
3
Installing The Snap On Covers
1·I.~lLfS=)J.J;~
n"'=i
F"n
Housing
2
4.
3.
0 0
Snap On Cover
(Shroud)
1 Pewter, 1 Shale
5.
0
Trim Ring
1 Pewter, 1 Shale
Snap On Cover
(Screen Back Cab)
1 Pewter, 1 Shale
~oo
Screw Cap
(L & R)
4 Pewter, 4 Shale
Place the pod on a soft surface to avoid damaging the plastic.
~nstalling
The Shroud
Remove
tape backing
before installing.
~
(A)
Begin by hooking area "A" (above) over the dome light and slide the cover over the pod. The cover will snap in place.
Installing The Screen Cover
•
Open the screen and hook the two tabs "B" on the bottom edge of the screen. Snap the opposite side over the hinge.
Installing The Screw Cap
Plug-in
(0)
Screw cap get installed after the unit is mounted.
4
Removing The Snap On Cover (Shroud) From The Housing
Work on a soft surface to avoid damaging the plastic.
Insert the supplied pry tool between the Housing and Snap On Cover (Shroud), then press the pry tool to
release the Snap On Cover (Shroud).
Removing The Snap On Cover (Screen Back) From LCD The Housing
Insert the supplied pry tool between the Housing and Snap On Cover (Screen Back), then press the pry tool to
release the Snap On Cover (Screen Back).
5
GENERAL INSTALLATION APPROACH:
1)
Decide upon system configuration and options that will be installed.
2)
Review all manuals to become familiar with electrical requirements and hook ups.
3)
Decide upon mounting locations of all components and method of mounting.
4)
Prep the vehicle by removing any interior trim necessary to gain access to vehicle's wiring as well as all
areas where interconnecting wire harnesses will need to be located. If any access holes need to be cut
into the vehicle (headliner, other trim components etc.), this should be done now as well.
5)
Route the wiring harnesses throughout the vehicle as necessary. (Referto the Wiring Diagrams on
this manual as well as the wiring instructions forthe individual components and accessory options
being installed). Be sure that all wiring is protected from sharp edges and is routed in such a manner
that pinched when all components and interior trim are fully installed. Be sure to leave enough slack in
the wiring at each component to allow working room.
6)
Remove all AN system components from their packaging and place them loosely in the vehicle at their
respective locations.
7)
Connect all components together (electrically) and verify proper operation of all system functions.
Note: This is best done BEFORE, components have been permanently mounted.
8)
After verifying proper operation of the system, proceed to mount of each component.
9)
When all components are mounted, recheck function of entire system again to ensure that no wiring
was pinched or connected improperly during final installation.
VEHICLE PREPARATION:
1)
Locate an accessory power source (+ 12v when key is in the ACC. and run positions, and Ov when key is
off), and also a good ground generally, these wires can be found at the ignition switch or fuse-box.
2)
The mounting method and location will vary from vehicle to vehicle, so this manual will only focus on the
installation of the VOD 1OPS2 and related console accessories.
3)
Generally, the best location for the video monitor is where the vehicle's factory dome light is installed.
The monitor should be located in such a manner that it can be comfortably viewed by rear seat
passengers.
NEVER INSTALL THE MONITOR INAPLACEWITHINTHE DRIVER'S VIEW. THIS IS NOT ONLY
DANGEROUS, BUT IT ISALSO ILLEGAL IN MANY STATES.
4)
Once the mounting location of the monitor has been determined, there may be additional preparation
work necessary, depending on the vehicle structure and installation method. Some of the steps that
may be required are:
A)
Removal of the vehicle's dome light
B)
If the trim ring will be used, it may have to be trimmed to fit the contour of the vehicle's headliner.
Refer to the "Trim Ring Installation" section in this manual.
6
TRIM RING INSTALLATION:
Note: This page only covers special installation considerations for thick trim ring installation. If the video
monitor is to be installed in a vehicle with the thick trim ring, it may need to be trimmed to fit the contourofthe
vehicle Headliner.
Note: The trim rings supplied with this unit are not designed to be trimmed.
1)
In this installation, the video monitor is mounted directly to the overhead cross-member in the roof
using the mounting screw bosses. These screw bosses should contact the cross-member directly
(i.e.: no gap between the screw boss and the roof structure). Also, be sure that the screws do not pierce
the outer roof skin when fully fastened to the cross-member. The trim ring is attached to the video
monitor using the perimeter screw bosses. It is important that the screws used in this installation are
not over tightened, and that the video monitor and trim ring are mounted in such a way that the
assembly does not distort (or bend) when the mounting screws are tightened. An alternate method is to
use the mounting bracket. First secure the mounting bracket to the cross-member, then screw the
monitor into the mounting bracket. See the drawing in this manual.
2)
It is best to mount the video monitor to the roof structure without the trim ring first. There should be a
gap between the headliner and the outer flange of the video monitor. The trim ring should be cut to fill
this gap. Apply masking tape to the outer surface of the trim ring in the areas where the cut will be made.
3)
Mark the cut to follow the necessary contour of the roof. The suggested method of marking is as
follows:
A)
First mark the narrowest point of the trim ring on the masking tape. Be careful to consider not only
vertical location, butfore-aftlocation.
B)
Using the handle of a screwdriver, make a "transfer marking tool". See diagram below. Place the
tool against the roof and the marker against the masking tape on the trim ring. Trace the cut to be
made around the entire perimeter of the trim ring.
C)
Cut the trim ring using a sharp utility knife or shears. Make the cut in several passes over the
marked line, each time cutting a little deeper. It is not necessary to cut completely through the
plastic, the cut only need be over 50% of the wall thickness of the plastic. By bending the cut back
and forth several times, the plastic will break cleanly at the cut.
D)
Check the fit ofthe trimmed console and make any minor adjustments necessary.
4)
The trim ring can be painted or covered with a material that matches the headliner before assembling
the trim ring to video monitor.
5)
The finished trim ring should be attached to the video monitor, then attach the assembly to the roof.
Lowest point mark
Tape marker to screwdriver.
Starting at your mark for the
lowest point, trace the contour of the roof
7
TRIM RING INSTALLATION:
Supplied screws as below use for install Trim Ring to unit. Please refer illustration below.
A)
M3 x 8 Self Tapping Screws (6pcs)
MOUNTING THE TRIM RING
~ROOf
. . ------===--
c=:v='+=J
~
:
:
I
I
I:
,
\:...._-i--
+ +·
~
==f=1
~
, 'I
Headliner
Mounting Bracket
Self-drilling Screws
..;.-JI
't-r--------¥
RoofS"pport
_.- - Trim Ring
+ - - - - - Video Unit
I
I
I
f .-.- --8
M5 Screw
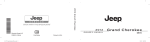
WIRING DIAGRAM
u
Auxiliary Video Display
IIJ
!
2 Pin Power
Wire Harness
w"h ,h,h,
12 Pin Power I
Signal harness
* Antenna for Wireless FM Mod.
** See Antenna Note
..--Ir· Oph'",' R""
ILSIRSWB~
--,
80.
o
~
o
o
o
Figure A
1) Make the connections to the vehicle for the 12 pin wiring harness.
2) Connect power harness to vehicles electrical system by tapping into an accessory
hot line and a good ground.
3) Connect the 12 pin harness to the mating connector on the video monitor.
4) Verify all functions of the system before final mounting of the finished assembly.
AN Source Definitions:
1. PS2 - Built in song PS2
2. AV1
- Supplied 12 Pin Power I Signal Harness to 3 RCA Jack Pigtail is used for
AV1 input.
3. AUX - AUX input.
*NOTE: If the optional relay box is PIN SIRSWB installed, it recommended that the
antenna for the FM modulator antenna wire is unplugged. See VOD1 OPS2
Wiring Diagram (Figure A) for antenna location.
**NOTE: Extending the wireless antenna beyond its 12 inch length will cause the
FM modulator to exceed FCC limits of wireless transmission. When installing
the unit position the antenna for best reception.
9
CONNECTING THE DOME LIGHTS
The dome lights in the video monitor require three connections to the vehicle's wiring. There are two common
types of dome light circuits used, positive or negative switched system. Positive switched systems supply
voltage to the interior lights to turn on, negative switched systems apply ground to illuminate the bulbs.
To determine which system you have to locate the wires at the dome light:
On a positive switched system, with all the doors closed and the lights out, both wires at the dome light will
rest at ground. When the light is activated, one of these wires will switch to +12 vdc. This is the vehicle's
switching wire.
On a negative switched system, with all the doors closed and the lights out, both wires at the dome light will
rest at + 12vdc. When the light is activated, one of these wires will switch to ground. This is the vehicle's
switching wire.
For positive systems, connect the violet / brown (Lamp auto) wire to the vehicle's switched wire. Then
connect the red / black (lamp on) wire to a fused constant 12 volt source and the black / red (lamp common)
wire to a good ground. Positive systems are commonly found on Ford vehicles.
For negative systems, connect the violet / brown (Lamp auto) wire to the vehicle's switched wire. Then
connect the red / black (lamp on) wire to a good ground and the black / red (lamp common) wire to fused
constant 12 volt source. Negative systems are commonly found on General Motors and import vehicles.
Note: Some vehicles which incorporate transistorized control of the dome light circuit, such as the 1999
Dodge Caravan, may require that the violet / brown (Lamp auto) wire be connected to the door pin switch
wire, as the additional current draw of the monitor's lights may not be supported by the output of the vehicles
body control computer.
Positive Switched Dome Lighting
To 12 pin
connector
on Monitor
Red / black - Lamp on
Black / red - Lamp common
Purple / brown - Lamp Auto
To
constant
+12vdc
Fused
---,-----I
-----,
Factory Dome light circuit
I
To
I constant
+12vdc
I ,,====:jJ
I
r------,
Factory Door ajar
switch or Body
Control computer
_ _ _ _ _ _ _ _ ....J
10
Negative Switched Dome Lighting
To 12 pin
connector
Red / black - Lamp on
Black / red - Lamp common
Purple / brown - Lamp Auto
I
To
constant
r------- -----
:
I
I
(0)
-=:L-'"
-
'
----I
To
constant
Factory Door ajar
switch or Body
:
I
,
I
co_n_trol_c_omp_u_ter
Troubleshooting:
SYMPTOM:
REMEDY:
No power at Video Monitor
Verify +12 VDC on Red wire at 2 pin Power
Harness behind video monitor. Verify ground
connection with continuity test from known good
ground to black wire at 2 pin Power Harness
Power but no video or sound
Verify that the correct source is selected (i.e.: 1,2,3
or 4). Verify that the source is on and playing a
known good media (such as a videotape). Verify
connections at both ends of the source component
harness.
11
© 2009 AUDIOVOX, 150 Marcus Blvd. Hauppauge, NY 11788
128-8668
SONY:
L.-
---'®
®
Quick Reference I Safety and Support
Aide-memoire I Securite et support technique
Referencia rapida I Seguridad ysoporte tecnico
SCPH-90001
Before using this product, carefully read the supplied documentation. Also read the User's Guide available at our Web site - http://www.us.playstation.com/support.
Avant d'utiliser ce produit, lisez attentivement la documentation foumie ainsi que Ie mode d'emploi de I'utilisateur disponible sur notre site Web a I'adresse
http://www.us.playstation.comlsupport.
Antes de utilizar este producto, lea detenidamente la documentacion suministrada. Asimismo, lea la gufa del usuario disponible en nuestro sitio Web
http://www.us.playstation.comlsupport.
3-289-799-21 (1) F2
Warning
To reduce the risk of fire or electric shock, do not expose this apparatus to rain
or moisture.
To prevent fire or shock hazard, do not place a container filled with liquids on
top of the console.
To avoid electrical shock, do not disassemble. Refer servicing to qualified
personnel only.
Caution
Use of controls or adjustments or performance of procedures other than those
specified herein may result in hazardous radiation exposure.
The use of optical instruments with this product will increase eye hazard.
This symbol is intended to alert the user to the presence of uninsulated
"dangerous voltage" within the product's enclosure that may be of
sufficient magnitude to constitute a risk of electric shock to persons.
This symbol is intended to alert the user to the presence of important
operating and maintenance (servicing) instructions in the literature
accompanying the console.
Place the console at least 10 cm (4 in) away from walls or surrounding objects.
Placing the console close to walls or other objects can cause it to overheat.
,~
10 em (4 in)
Software title compatibility
Some PlayStation® or PlayStation®2 format software titles may perform differently
on this console than they do on previous PlayStation®2 or PlayStation® consoles, or
may not perform properly on this console. For more information, visit our Web site
at http://www.us.playstation.com or call SCEA Consumer Services at 1-800-3457669.
This appliance is classified as a CLASS 1 LASER product under IEC60825-1: 2001.
About the lithium coin memory back-up battery
CAUTION: TO REDUCE THE RISK OF ELECTRIC SHOCK
DO NOT REMOVE COVER tOR BACK)
NO USER-SERVICEABLE PARTS INSIDE
REFER SERVICING TO QUALIFIED SERVICE PERSONNEL
This graphical symbol with supplemental marking is located on the bottom surface
of the PlayStation®2 console (when it is in a horizontal position).
2
The lithium coin memory back-up battery inside this product contains Perchlorate.
The following statement is required by the State of California, USA: Perchlorate
Material - special handling may apply, See
http://www.dtsc.ca. gov/hazardouswaste/perchlorate
A very small percentage of individuals may experience epileptic seizures or
blackouts when exposed to certain light patterns or flashing lights. Exposure to
certain patterns or backgrounds on a television screen or when playing video games
may trigger epileptic seizures or blackouts in these individuals. These conditions
may trigger previously undetected epileptic symptoms or seizures in persons who
have no history of prior seizures or epilepsy. If you, or anyone in your family, has an
epileptic condition or has had seizures of any kind, consult your physician before
playing.
1MMEDIA TELY DISCONTINUE use and consult your physician before
resuming gameplay if you or your child experience any of the following health
problems or symptoms:
• dizziness,
• altered vision,
• eye or muscle twitches,
• loss of awareness,
• disorientation,
• seizures, or
• any involuntary movement or convulsion.
RESUME GAMEPLAY ONLY ON APPROVAL OF YOUR PHYSICIAN.
Use and handling of video games to reduce the likelihood of a
seizure
• Use in a well-lit area and keep as far away as possible from the television screen.
• Avoid large screen televisions. Use the smallest television screen available.
• Avoid prolonged use of the PlayStation®2 console. Take a IS-minute break during
each hour of play.
• Avoid playing when you are tired or need sleep.
For customers in the USA
This equipment has been tested and found to comply with the limits for a Class B
digital device, pursuant to Part 15 of the FCC rules. These limits are designed to
provide reasonable protection against harmful interference in a residential
installation. This equipment generates, uses, and can radiate radio frequency energy
and, if not installed and used in accordance with the instructions, may cause harmful
interference to radio communications. However, there is no guarantee that
interference will not occur in a particular installation. If this equipment does cause
harmful interference to radio or television reception, which can be determined by
turning the equipment off and on, the user is encouraged to try to correct the
interference by one or more of the following measures:
- Reorient or relocate the receiving antenna.
- Increase the separation between the equipment and receiver.
- Connect the equipment into an outlet on a circuit different from that to which the
receiver is connected.
- Consult the dealer or an experienced radiorrV technician for help.
If you have questions about this product, call our technical support line at 1-800345-7669, or write to:
Sony Computer Entertainment America
Consumer Servicesffechnical Support
PO Box 5888, San Mateo, CA 94402-0888 U.S.A.
Declaration of Conformity
Trade Name:
SONY
Model No. :
SCPH-90001
Responsible Party:
Sony Electronics Inc.
Address:
16530 Via Esprillo, San Diego, CA 92127 U.S.A.
Telephone No. :
858-942-2230
This device complies with Part 15 of the FCC Rules. Operation is subject to
the following two conditions: (1) this device may not cause harmful
interference, and (2) this device must accept any interference received,
including interference that may cause undesired operation.
You are cautioned that any changes or modifications not expressly approved in this
manual could void your authority to operate this equipment.
3
For your protection, please read these safety instructions completely before
operating the PlayStation®2 console, and keep this manual for future reference.
I)
Read these instructions.
2) Keep these instructions.
3) Heed all warnings.
4) Follow all instructions.
5) Do not use this apparatus near water.
6) Clean only with dry cloth.
7) Do nor block any ventilation openings. Install in accordance with the
manufacturer's instructions.
8) Do not install near any heat sources such as radiators, heat registers, stoves. or
other apparatus (including amplifiers) that produce heat.
9) Do not defeat the safety purpose of the polarized or grounding-type plug. A
polarized plug has two blades with one wider than the other. A grounding type
plug has two blades and a third grounding prong. The wide blade or the third
prong are provided for your safety. If the provided plug does not fit into your
outlet. consult an electrician for replacement of the obsolete outlet.
10) Protect the power cord from being walked on or pinched particularly at plugs.
convenience receptacles, and the point where they exit from the apparatus.
11) Only use attachments/accessories specified by the manufacturer.
12) Use only with the cart. stand, tripod, bracket. or table specified by
the manufacturer, or sold with the apparatus. When a cart is used.
use caution when moving the cart/apparatus combination to avoid
injury from tip-over.
13) Unplug this apparatus during lightning storms or when unused for long periods
of time.
14) Refer all servicing to qualified service personnel. Servicing is required when the
apparatus has been damaged in any way, such as power supply cord or plug is
damaged, liquid has been spilled or objects have fallen into the apparatus, the
apparatus has been exposed to rain or moisture, does not operate normally, or has
been dropped.
4
Precautions
Safety
This product has been designed with the highest concern for safety. However, any
electrical device, if used improperly, has the potential for causing fire, electrical
shock or personal injury. To help ensure accident-free operation, follow these
guidelines:
• Observe all warnings, precautions and instructions.
• Stop use and unplug the AC power cord from the electrical outlet immediately jf
the device functions in an abnormal manner or produces unusual sounds or smells.
• Never connect cables other than those specified in this manual to the network
connector.
• Contact SCEA Consumer Services via our Web site at
http://www.us.playstation.com or call 1-800-345-7669 if the device does not
operate properly.
Use and handling
• When operating the unit, play in a well-lit room and keep a safe distance from the
TV screen.
• Avoid prolonged use of the console. To help prevent eye strain, take a break of
about 15 minutes during every hour of play.
• Stop using the console immediately if you experience any of the following
symptoms. If the condition persists, consult a doctor.
- Lightheadedness, nausea, or a sensation similar to motion sickness
- Tired, uncomfortable or aching hands or arms
- Tired, dry or aching eyes
• Do not use the console near water.
• Do not place the console and connected accessories on the floor or in a place where
they may cause persons walking by to trip or stumble.
• Do not place the console or accessories on surfaces that are unstable, tilted or
subject to vibration.
• Do not expose the console or accessories to high temperatures, high humidity or
direct sunlight (use in an environment where temperatures range from 5°C to 35°C/
41°F to 95°F).
• Do not place the console in locations of poor ventilation such as small, enclosed
areas, directly against a wall or on a thick carpet or bedding.
• Do not expose the console to dust, smoke or steam. Also, do not place the console
in an area subject to cigarette smoke or excessive dust. Cigarette smoke residue or
dust build-up on the internal components, such as the lens, may cause the console
to malfunction.
• Do not allow liquid or small particles to get into the console.
• Do not put any objects on the console.
• Do not touch or insert foreign objects into the connectors of the console or
accessories.
• Do not allow dust or foreign matter to build up around the console vents. Remove
the dust with a low-powered vacuum cleaner.
• Do not leave a disc in the console when moving or changing the position of the
console.
• Do not touch a disc while it is spinning.
• Do not close the disc cover in a way that could pinch your hand or fingers.
• Adjust the settings of the DVD player according to the instructions provided before
playing a DVD.
• Keep the console and accessories, including cable ties and fasteners, out of the
reach of small children.
AC power cord use
• Do not touch the plug of the AC power cord with wet hands.
• Do not touch the console or connected accessories during an electrical storm.
• Do not touch the console for extended periods of time while the console is turned
on as extended contact may cause low-temperature burns.
• To help ensure safe operation, regularly inspect the AC power cord. If damaged,
stop use immediately. Contact SCEA Consumer Services via our Web site at
hllp:llwww.us.playstation.com or call 1-800-345-7669 for assistance.
• Do not use a power cord other than the supplied AC power cord.
• Unplug the AC power cord from the electrical outlet before cleaning or moving the
console, or when you do not intend to use the console for an extended period of
time. When disconnecting, grasp the power cord by the plug and pull straight out
of the electrical outlet. Never pull by the cord and do not pull out at an angle.
• Do not connect the AC power cord to a voltage transformer or inverter.
5
Notes on safety when using the analog controller
(DUALSHOCK®2)*
• Stop using the console immediately .if you begin to feel tired or if you experience
discomfort or pain in your hands or arms while operating the analog controller
(DUALSHOCK®2). If the condition persists, consult a doctor.
• The vibration function of the analog controller (DUALSHOCK®2) can aggravate
injuries. Do not use the vibration function if you have any ailment or injury to the
bones, joints or muscles of your hands or arms. Note that some PlayStation®2 and
PlayStation® format software titles set the vibration function to "On" by default. In
most cases, the vibration function can be set to "Off' in the options menu of the
software. If you have an ailment or an injury, do not play such titles using the
analog controller (DUALSHOCK®2) unless you have set the vibration function to
"Off'.
• Avoid prolonged use of the analog controller (DUALSHOCK®2). Take a break at
about 3D-minute intervals.
* These notes also apply to other controllers.
Network (except Local Area Networks)
• A broadband Internet connection is required to connect to a network.
• When you connect your PlayStation®2 console to a network, the Internet service
provider may charge additional usage fees. For details, refer to the information
provided in your service contract or contact your Internet service provider.
• Parents are encouraged to monitor children in online gaming to ensure safe and
responsible Internet usage.
Disc handling
• Do not touch the disc surface when handling a disc; hold it by the edges.
• Do not stick paper or tape onto discs and do not write on discs.
• Fingerprints, dust, dirt or scratches on the disc can distort the picture or reduce
sound quality. Always handle carefully and make sure discs are clean before use.
• Do not leave discs near a heat source, in direct sunlight or in high humidity.
• Store discs in their cases when not in use.
• Clean discs using a soft cloth, lightly wiping from the center outwards.
Do not use solvents such as benzine, commercially available cleaners not intended
for CDs or anti-static spray intended for vinyl LPs.
• Do not use irregularly shaped discs (for example, heart- or star-shaped discs) or
damaged, reshaped or repaired discs.
Never disassemble the console or supplied accessories
Use the PlayStation®2 console and accessories according to the instructions in the
product documentation. No authorization for the analysis or modification of the
console, or the analysis and use of its circuit configurations, is provided. There are
no user serviceable components inside the PlayStation®2 console. Disassembling the
console will void the warranty. Additionally, there is a risk of exposure to laser
radiation as well as to electrical shock hazards.
When connecting the console to a plasma or projection* TV
Do not leave a still image on the TV screen for an extended period of time, as this
may leave a faint image permanently on the screen.
* Except LCD screen types
Cable compatibility
Do not connect cables or telephone cords of the following types to the network
connector:
• Cables not appropriate for use with a IDBase-Til OOBase-TX network
• Standard residential telephone lines
• Any ISDN (digital) compatible phone or data line
• PBX phone lines
• Other "unknown" types of telephone lines
If you connect the wrong type of cable, too much electrical current may pass through
the connector, causing a malfunction, excessive heat or fire in the connector.
6
Note on safety when playing DVDs or CDs
If you set the volume too high, it may harm your hearing or damage the speakers.
Exercise care when setting the volume.
Moisture condensation
If the console or disc is brought directly from a cold location to a warm one, moisture
may condense on the lens inside the console or on the disc. Should this occur, the
console may not operate properly. In this case, remove the disc and tum off and
unplug the console. Do not put the disc back in until the moisture evaporates (this
may take several hours). If the console still does not operate properly, contact SCEA
Consumer Services via our Web site at http://www.us.playstation.com or call 1-800345-7669 for assistance.
Cleaning
• For safety reasons, before cleaning the console or connected accessories, 1) turn
off the console, 2) disconnect the power plug for the console from the electrical
outlet, and 3) disconnect the Ethernet cable from the console.
• When cleaning the console, use a soft, dry cloth. Do not use solvents or other
chemicals or a chemically-treated dust cloth to clean the product.
• Do not touch the lens located inside the disc cover. To help protect the lens from
dust, keep the disc cover closed except when inserting or removing discs.
Exterior protection
To help prevent damage to the painted parts, follow the precautions below:
• Do not spill liquids such as alcohol, solvents or other chemicals on the product.
• Do not place any rubber or vinyl materials on the console exterior for an extended
period of time.
Differences to previous PlayStation®2 models
This version of the PlayStation®2 console may be different from previous models
in compatibility with optional accessories and the method of operating game
software. For full details visit our Web site at http://www.us.playstation.com or
contact SCEA Consumer Services at 1-800-345-7669.
7
The PlayStation®2 console documentation includes the following:
If any items are missing, contact SCEA Consumer Services via our Web site at
http://www.us.playstation.com or call 1-800-345-7669 for assistance .
• Quick Reference (this document)
This document contains information on setting up and performing basic operations
on the console. as well as safety and troubleshooting information.
• User's Guide (http://www.us.playstation.com/Support/PS2)
This document (in PDF format) is accessed from a PC through the Internet and
contains information on performing advanced operations on the console. technical
specifications and other information.
For up-to-date information regarding the PlayStation®2 console. visit
http://www.us.playstation.com/S upport/PS 2.
8
•
•
•
•
•
PlayStation®2 console
Analog controller (DUALSHOCK®2)
AV cable
AC power cord
Printed materials
1
1
1
1
Setting up the PiayStatione2 console
" . . . \""
.- . . .
.
~
.
'_.
'
:,
,/"",
. ,' .'.
'
,,'
.
"
.
.
~
.~
& Warning
• Do not plug the AC power cord for the console into an electrical outlet until you have made all other connections.
• The socket-outlet shall be installed near the equipment and shall be easily accessible.
Before setting up
• Do not place the console in locations subject to excessive cigarette smoke or dust. Cigarette smoke residue or dust build-up on the internal components, such as the lens, may
cause the console to malfunction.
• Make sure the TV is turned off before connecting the PlayStation®2 console.
,==---~
[2]1 i@J
I/C,) (on/standby) indicator
Audio and video
inputs of the TV
AV cable - - .
Yellow
Analog controller
(DUALSHOCK®2)
-
AC power cord
L~:;i~Ci' oul~t·
When the power cord is plugged into an
electrical outlet, the I/C,) indicator will turn red to
indicate that the console is in standby mode.
• For some regions, the plug for the electrical
outlet will differ from the one illustrated.
When using a cable other than the supplied AV cable, see "When using a cable other than the supplied AV cable" ( •• ~ page 15).
Hint
You can connect various USB devices to the PlayStation®2 console, but not all are compatible. Refer to the instructions supplied with the USB device for more information.
9
'Tlimingthe,co"e'on alld off
"
•
·~<~:;'l-·¥.~"'~'J'.
'r,~.
.~
~
.~.
' ' ." ' .. '. ',~ ,', .:'.,'
",
J
•
"'.
~,.,-",,~'"
.:.. : " .
.<,.
..
s...
t"
~
t.
TV
~.
--
I
I
;
I
--:
i
I
[1--------.
J.
!
f - - - - - - -...- - -...- - - - - - - -..-_-.-. .-Ji
L
1/6 indicator
!
[]
Turn on the TV and select
the appropriate input.
--0.
!<II
::=:=.,;;;;·~:=';;;;"'=::....:~·,;~:="··ioii'·miiiii;;.._f
~.....;;;;;;:..~;;;;;;;;. __.JII._ _-_....:_i:::f··~
l~J
c::::J c::::J
:......:
_l~J
[gJ
Press the 1/6 (on/standby)/RESET button.
The 1/6 indicator will turn green. The TV will
then display output from the console,
Press and hold the I/~!RESET button for at least one second, The lie!) indicator will turn red to indicate that the console is in standby mode,
Hint
In standby mode, power to the console is not completely turned off. If you will not be using the console for an extended period of time, unplug the power cord from the outlet.
10
Playilql content'
•
"
,
I
"
.
•
You can play games, DVD-Videos and audio CDs on the PlayStation®2 console.
Insert the disc to start playback.
Place the disc in the console
f2l with
the label side facing up.
press down on the middle
f3l ofGently
the disc cover to close it.
~
~
ANALOG mode button
-t
I'--_--'/,~~~iiiiii··iiii·
'iiii;'iiiiii"ii;;,'
[I]
Mode indicator
CJ
I/CJ (on/standby)/RESET button
Press the ~ (open) button to
open the cover.
For instructions on playing a game, see "Playing a game" ( •• ~ page 12).
For DVDs, see "Watching a DVD" ( •• ~ page 13),
For audio CDs, refer to the User's Guide ( •• ~ page 8).
Outputting Dolby Digital or DTS audio
Connect a digital audio device to the PlayStation®2 console using a commercially available optical digital cable (for audio) .
• To output audio from DVD-Videos: From the control panel ( •• ~ page 13), set "Dolby Digital" or "DTS" to "On" under ;i; (Setup) -- "Audio Setup" -- "Audio Digital Out".
• To output audio from games: The setup method varies depending on the game. For detai1s, refer to the instructions supplied with the game.
11
You can play PlaySt3lion(Jj)2 and PlaySlatinn® format software on the PlaySlalion®2
console.
You can save and load game data using a memory card (sold separately). You can
also delete game data or copy game data from one memory card to another.
Memory card types
There are two types of memory cards. Select a memory card suitable for the software
in use.
Insert the disc to start playback.
Memory card type
Compatible software
Amount of memory
Resetting a game
Memory card (SMB)
(for PlayStarlon®2)
(SCPH-I0020 U)
PlayStation®2 format software
Approx. 8 MB
Press the I/C)/RESET button. Be careful nol to acc[dentally press the I/C)/RESET
button while playing a game. as doing so will cause the game to reset.
Ending a game
After saving game data. turn the console off. and then remme the disc.
Memory <:ard
(SCPH-1020 lj)*
~ This product i~ no
longer manufactureu.
MagicGateT~1
IPlayStatioO!!'J formal software
I
IS memory blocks
(approx. J 20 KB)
is a term of copyright-protection technology developed by Sony
Corporation.
The anal~g controller IDUALSHOCK:192) is equipped with pressure-sensitive
buttons and sticks. This enables you tu control game actinn with enhanced precision
based on the force with v.:hich buttons are pressed or the angle al which the analog
stick is tilted. It is also a force feedback controller with a "jbration functioTi.
Switching modes
Depending on the game. yOUlllily neeu to set the controller to eilher digital or analug
mode. Press the ANALOG mode hulton of the conlrul!er 10 switch to the analog
mode (indicator: red). To return to digital mooe. press the ANALOG mode button
again. Some games make this adjustlJlclll automatically.
12
Inserting a memory card
Insen the memory card into a memory card slot. Some games designate a specific
memory card slot to use.
.~__
Memory card slots
Copying or deleting saved data
You can delete saved data or copy data to another memory card.
Use directional buttons and the
button to select items.
®
You can play DVDs on the PlayStation®2 console.
1
With no disc inserted in the console, turn on the console, and
then insert a memory card.
2
Select" Browser", and then select the memory card you want to
copy or delete data from.
3
Insert the Ji"c to stan DVD playback.
Select the icon for the data item, and then select "Copy" or
"Delete".
Follow the on-screen instructions to complete the operation.
Press the SELECT button.
Select an icon.
o1
You can play online games by connecting the PlayStation®2 console to a network.
I.... ....;
Items you will need
•
•
•
•
A network adaptor compatible PlayStation®2 game
Broadband Internet service
A commercially available Ethernet cable
A memory card (8MB) (for PlayStation®2) (sold separately)
Creating a network configuration
When playing online games, insert a commercially available Ethernet cable into the
network connector, and then create a network configuration. Refer to the instructions
supplied with the online game for creating a network configuration.
~==::::::::===~nneCIO<
-i
4 5 r; i r: ~
J
f~,Cr. ~(F?
e is ....r '''"
I"'
rr _
A~e~ r:;;:') C)~ ~
The control panel
is displayed on
the screen.
SELECT
button
Control panel items
You can select the following options in the control panel.
Function
Icon
€l3
Menu
~
Top
t . .'
~?
0-'
j)
Commercially available
Ethernet cable
~ ~
'b~r~
II.
~
\
f
. 1""'' '"
~·Ienu
eturn
r U(
Displ;JVS the f)VI)- Video menu
() .
III . pllons
Angle Optiuns
r Displays the DVD- Video menu
'he ,,,,,,,,"',,. ",,,.,,, ""'" wi,h', ,he
DVD\ menu
Displavs and changes audio option,., on DVDs with
. .
.
.
Illultlple <Iud\() Iracks
Displays (lnd changes viewing angles on DVDs
rerorlkd with Illulii-angle options
13
...
Icon.
Function
Icon
Subtitle Options
Displays and changes subtitle options on DVDs
with subtitle options
(iJffi)
OriginalfPlay List
For DVD-RW discs (VR mode). selects Original or
Play List content to play
GoTo
Skips to the selected title, chapter or the specified
time. and starts playback
~
Clear
Clears selected numbers or playback mudes
Setup
Displays and changes options for language. picture
quality, Parental Control level, audio, etc.
Time Display
Displays the current title or chapter number, the
elapsed time, etc.
Help
Displays the direct button functions of the analog
controller (DUALSHOCK®2)
0-9
Go to Chapter
Used to enter the number of a chapter you want to
play
~/~
Previous/Next
Returns/skips to the beginning of the current,
previous or next chapter
(3/8
Search
Fast reverses/forwards playback
Slow
Changes to playback/reverse playback in slowmotion
~
Play
Starts playback
II
Pause
Pauses playback
•
Stop
Stops playback. Selecting. (Stop) again after
playback is stopped clears resume play (playback
from the last stopping point).
A-B
A-B Repeat
Specifies a scene for playback, and starts playback
of the scene that has been set
~
Shuffle Play
Begins playback of titles or chapters in a random
order
cmD
Program Play
Begins playback of titles or chapters in a
programmed sequence
c- .. )
Repeat Play
Selects repeated playback of all the titles on the
disc, or one title or one chapter
II
t+
.....
ctii
?•
.....
14
Function
/.~
Hints
• For more details on control panel items, refer to the User's Guide ( .... page 8).
• The DVD player can be operated using the DVD remote control (for
PlayStation®2) (sold separately).
• Some control panel options cannot be selected during resume play. To select these
options, cancel resume play by selecting. (Stop) on the control panel and then
selecting. (Stop) again after playback is stopped.
• In rare instances, certain DVDs may not operate properly with the PlayStation®2
console. This is primarily due to variations in the manufacturing process or
software encoding of the DVD- Video software. If you experience problems, try
restarting your DVD. If problems persist, call the publisher of the DVD or contact
SCEA Consumer Services via our Web site at http://www.us.playstation.com or
contact 1-800-345-7669 for more information.
Parental control settings
From the control panel, select ~ (Setup) -+ "Custom Setup" -+ "Parental
Control".
Follow the on-screen instructions to register or enter the password. After the
password is registered or entered, proceed through the various screens to select a
region and parental control level.
Hints
• If you select "Other" in the region options, refer to the User's Guide ( •• ~ page 8)
for a list of region codes.
• For the parental control level, note that the lower the value, the stricter the
restriction.
• To clear the parental control setting, set the option to "Off'.
• To change your password, select "Change Password" from the parental control
options and follow the on-screen instructions to complete the operation.
When using a cable other than the supplied AV
cable
Picture quality varies depending on the type of cable used. Use the information
below to determine the best connection method. If you use a cable other than the
supplied AV cable, refer to the instructions supplied with the cable.
TV
Cable type
A TV with component video input connectors
Component AV cable (SCPH-l 0490 U)
A TV with S VIDEO inputs
S VIDEO cable (SCPH-I0480 U)
A TV without video inputs
RFU adaptor (SCPH-I 0071)
Picture quality scale
• RFU adaptor
• AV cable (supplied)
High quality
• S VIDEO cable
• Component AV cable
This scale is intended only as a reference. Depending on the product or condition of
your TV, the picture quality may be different.
Start DVD playback. When prompted by the system, select "Yes", and then enter the
password.
Hints
• You cannot change the parental control setting without a password.
• When DVD playback is stopped, the parental control level will return to its default
setting.
• If you forget your password, see "Troubleshooting" ( •• ~ page 18).
15
Region codes
Some discs are assigned "region codes" for each geographic sales region. This
console can play discs with the following region codes.
DVD
Disc
PJayStatiolJ('i:2 format DVD-ROM
-
DVD-RO,\lIDVD·VIJ~()!
DYD
I DVO+R,' DYD+R\V
I PlayStatioll\l.:2 tormal CD-ROi\J
._----
..
-
PlayStatloIJ@ format CD-ROM
I CD-DA tAudio CD)
16
~~
~~
"-I~\
,+...
-'-;
'-··~:i..P
I
, DVD-R! DVD-R\V (Video mode,' VR mudel
CD
Region code
PlayStatiol1@:2 format DVD-ROM
PiayStatiomiY2 format CD-ROM
PlaySwtiol1@ format CD-ROM
_.
~
I NTSC I U/C I
DVD-Videos
Notes
This console can only play discs recorded for the NTSC broadcast standard.
• Some discs lTIav not be playable due in scratches, du~t or recording problems.
• Throughout this manual. the term "I)VD-Video" is used to reter to DVD-R. DVDRW (Video mode), DVD+R and DVD+RW discs .
• The audio CD playback fe:1ture of this product is designed to confoml to the
Compact Disc (CD) standard. Recently. sOllle record companies have started
marketing music discs encoded \" ith copy right protection technologies. Some of
these music discs do not conform to the CD ,tand:ml and may not he playable 011
this product.
• The DVD side of a DualDisc should play on this product hut the audio sitk of a
DualDisc may llot be playable bec:llIse these discs do not conform to the
specifications required for an .-\UJIO Compact Disc. For further informatioll, please
visi t http://www.us.playsratit)n.(·oIlliNcv.·s/ConsLlmel.r\lerts/DuaIDisc.htm I
DVD-R, DVD-RW, DVD+R and DVD+RW discs
• Only discs that have been finalized can be played .
• Copy-protected video from a digital broadcast recorded on Content Protection for
Recordable Media (CPRM) compatible DVD-RW discs or on CPRM compatible
DVD-R discs cannot be played on this console.
. ~".
Accessories
.'.. ':'
• • "' "
i
~
••.•
:>-:.<'
,
.f
When purchasing optional accessories, be sure to purchase those that are compatible
with this model of the PlayStation®2 console.
About the DVD remote control (for PlayStation®2)
When purchasing a new DVD remote control, choose model number
SCPH-l0420 U which does not include the IR receiver unit (for PlayStation®2).
About multitaps
Only the multi tap (for PlayStation®2) (SCPH-70l20 U) (sold separately) can be used
with this console. Do not connect multitap products with other model numbers to the
console as this may result in damage to the console.
The following accessories for the PlayStation® console and the PlayStation®2
console are not compatible with this model of the PlayStation®2 console.
Model number
Product name
SCPH-20401 U
Internal hard disk drive
SCPH-10281
Network adaptor (Ethernet/modem)
(for PlayStation®2)
SCPH-I070 U
Multitap
SCPH-10090 U
Multitap (for PlayStation®2)
SCPH-10040 U
Vertical stand (for PlayStation®2j
SCPH-70110 U
Vertical stand (for PlayStation®2)
SCPH-10110 U
Horizontal stand (for PlayStation®2)
(40G~)
(for PlayStation®2)
17
Troubleshooting
Go through this section if you experience difficulty in operating the PlayStation®2
console. Should any problem persist, contact SCEA Consumer Services via our Web
site at http://www.us.playstation.com or call I-800-345-7669 for assistance.
For additional support information, visit our Web site at
http://www.us.playstation.com/SupportIPS2.
Check the following items first:
• Check that the console is turned on. Press the I/C)IRESET button to tum on the
console (the I/C) indicator will tum green).
• Check that the AC power cord is fully inserted into the electrical outlet.
• Check that the cables are correctly and securely connected.
. . If the console is connected to a TV or cable*1 that does not support progressive
scan (480p), no video will be displayed when "Progressive" is set to "On" under
;i; (Setup) -+ "Screen Setup" in the DVD player's control panel. In this case,
with a DVD inserted, press the I/C)/RESET button and immediately press and
hold down the START button of the controller*2. The "Progressive" setting will
be cleared and video from the DVD will be displayed properly.
*1 The component AV cable (sold separately) is compatible with progressive scan.
*2 Connect the controller to controller port I.
The size of the video image and the TV screen do not match.
. . If the console is connected to a widescreen TV (16:9), check the settings on the
TV as they may override those for the console. Refer to the instructions supplied
with your TV for details.
. . Adjust the image size of the DVD to match your TV screen. Start a DVD, and
then stop playback. Adjust the "TV Type" setting under ;i; (Setup) -+ "Screen
Setup" in the control panel.
. . With some DVDs, image size cannot be changed.
There is no picture on the TV screen.
. . Switch the input mode of the TV as appropriate for the input connector in use on
the console.
. . There may be a problem with the cable. Try using another cable that is
compatible with the PlayStation®2 console.
. . With some TVs, image size cannot be changed.
The picture is unstable.
There is no sound.
. . Set "Component Video Out" to lOy CblPb CrlPr" in the System Configuration
menu when connecting the console to the component AV inputs on a TV*. Use
the supplied Ay cable to make the setting, and then connect to the TV using the
component AV cable (sold separately).
. . Check that the TV volume is not set to "mute" and adjust the TV volume to an
appropriate level.
*
When connecting the console to a TV that only supports RGB input, set "Component Video
Out" to "RGB".
. . When the console is connected to a VCR or a DVD recorder, copy protection
used by some DVDs may cause the picture to become unstable, or the picture
may get brighter or darker. If this happens, connect the console directly to the
TV.
18
. . Check that the console is directly connected to the video input connector of the
TV. If there is a selector or receiver (AV amplifier) connected between the
console and the TV, the image size cannot be changed .
. . If the console is connected to an audio device, check the settings on the
connected device. Refer to the instructions supplied with the device for details.
. . There may be a problem with the cable in use. Try using another cable that is
compatible with the PlayStation®2 console.
. . Some PlayStation®2 format software titles do not support audio output from the
DIGITAL OUT (OPTICAL) connector. When playing such software, no sound
will be produced even if you connect using an optical digital cable for audio.
... The parental control feature may be set on the disc, Follow the on-screen
instructions and temporarily raise the parental control restriction level.
Connect the console to the audio device using an analog AV cable, such as the
supplied AV cable.
There is no sound or the sound quality from the digital audio device is
poor.
... If the console is connected to a digital audio device, you must adjust the "Digital
Out (Optical)" setting. Tum on the console with no disc inserted, and in the
System Configuration menu set "Digital Out (Optical)" to "On".
. . When playing DTS audio, set "DTS" to "On" in ;;; (Setup) -+ "Audio Setup"
-+ "Audio Digital Out". If the connected device does not have a built-in DTS
decoder, DTS audio cannot be played.
The surround effect is not produced when playing a DVD with a Dolby
Digital audio track.
... Check that the console is connected to an audio device with a built-in Dolby
Digital decoder using an optical digital cable.
... To play Dolby Digital audio, set "Dolby Digital" to "On" in ;;; (Setup)-+
"Audio Setup" -+ "Audio Digital Out" in the DVD player control panel.
~
.
", OJeration"
.
"
,
The controller does not function correctly.
... If a software title is compatible only with the analog controller
(DUALSHOCK®2), it will not work properly with the analog controller
(DUALSHOCK®). Use a controller that is appropriate for the software title.
Refer to the instructions supplied with the software for details.
. . Some software specifies a specific controller port that must be used. Check that
the controller is connected to the correct port. Refer to the instructions supplied
with the software for details.
. . There may be a problem with the controller in use.
_
Try using another controller that is compatible with the PlayStation®2 console.
The response to button operations is slow.
. . The response speed of some LCD TVs and PC displays is slow. This is not a
malfunction.
.
,
A disc cannot be played.
... Check that the disc is of a type that can be played on the console.
. . Check that the disc is clean and in good condition. If the disc is dirty, wipe it
gently with a soft cloth.
. . Some PlayStation® fonnat software may not perfonn properly on this console.
For more information, contact SCEA Consumer Services via our Web site at
http://www.us.playstation.com or call 1-800-345-7669 for assistance.
... If the disc has a label, place the disc in the console with the label side facing up.
. . If a DVD-R or DVD-RW disc is not finalized, it cannot be played.
... Copy-protected video from a digital broadcast recorded on Content Protection
for Recordable Media (CPRM) compatible DVD-RW discs or on CPRM
compatible DVD-R discs cannot be played on this console.
. . Check that the region code of the DVD is correct for the console in use. Also
check that the broadcast standard is correct.
The left and right analog sticks of the controller do not operate
properly.
. . When these symptoms occur, rotate the left and right analog sticks of the analog
controller (DUALSHOCK®2) in a large circle to adjust the sticks to an optimal
range of operation. Be sure to rotate in a circle, not twist the sticks .
The console does not recognize the memory card. Data cannot be
saved or copied to the memory card.
. . Check that the memory card is compatible with the software in use. To save or
load PlayStation®2 format software, use a memory card (8MB) (for
PlayStation®2) (SCPH-l 0020 U). To save or load PlayStation® fonnat software,
use a memory card (SCPH-1020 U).
. . You cannot copy saved data from PlayStation®2 format software to a memory
card (SCPH-I020 U).
. . Check that the memory card is securely inserted into the console.
19
. . There may be a problem with the memory card in use. If you have another
memory card that is compatible with the PlayStation®2 console, try switching
memory cards.
Data saved on a memory card is corrupted.
. . While saving, loading, copying or deleting data. do not attempt any of the
following. Doing so may cause the data to become corrupted.
• Do not remove the memory card or the controller.
• Do not open the disc cover.
The DVD does not function. Some DVD settings cannot be changed.
. . The playback status or settings of some DVDs are preset intentionally by the
manufacturer. Because the PlayStation®2 console plays DVDs according to the
settings on the disc, some functions may not be available even if you follow the
procedures in this document and the User's Guide ( •• ~ page 8).
. . Some settings cannot be changed during playback or resume play. Select
• (Stop) in the control panel to stop playback, and then select. (Stop) again to
clear resume play.
• Do not reset the console.
• Do not tum off the console.
The console does not function properly.
. . Static electricity and other similar occurrences may affect the console's
operation. Tum off the console and unplug it from the electrical outlet. Then plug
in the console and tum it on.
The I!C> indicator flashes in red and the console does not work.
. . Do not use the console until the flashing stops. Placing the console in an
extremely hot location or blocking the console's vents raises the internal
temperature of the console, thereby preventing proper operation.
You forgot your password.
. . You can clear the password using the following procedure:
1 Insert a DVD without the parental control feature.
2 In the control panel, select. (Stop) to stop playback, and then
select. (Stop) again to clear resume play.
3 In the control panel, select ~ (Setup) -+ "Custom Setup"
"Parental Control" and then press the ® button.
The screen to enter a password is displayed.
-+
4 Press the SELECT button on the controller, and then enter the
number "7444" on the screen that is displayed.
The registered password is cleared. and the screen for registering a new
password is displayed. Enter a new password.
20
A connection to the network cannot be established.
. . Check that the network settings are correct. Refer to the information from your
broadband Internet service provider and the instructions supplied with the
software in use and adjust the settings accordingly .
. . Check that the Ethernet cable is properly connected.
. . Check that you are using the correct type of Ethernet cable (cross cable or straight
cable). Refer to the instructions supplied with the network device for details.
. . Check that the network device is properly connected. Also check that the settings
of the network device in use are correct. Refer to the instructions supplied with
the network device for details.
LIMITED WARRANTY
Sony Computer Entertainment America (SCEA) warrants to the original purchaser
that each of the constituent products of this "PlayStation®2" console shall be free
from defects in material and workmanship for a period of one (I) year from the date
of purchase (the "Warranty Period"). If one or more ofthe above-identified products
is detennined to be defective during the Warranty Period, SCEA's liability shall be
limited to the repair or replacement of this product with a factory recertified product
at SCEA's option. For the purpose of this Limited Warranty, "factory recertified"
means a product that has been returned to its original specifications. You must call
1-800-345-7669 to receive instructions, and then must deliver the product, shipping
prepaid, to the authorized service facility specified to obtain repair/replacement
services.
THIS WARRANTY SHALL NOT APPLY IF THIS PRODUCT: (a) IS USED
WITH PRODUCTS NOT SOLD OR LICENSED BY SCEA (INCLUDING, BUT
NOT LIMITED TO, NON-LICENSED GAME ENHANCEMENT DEVICES ,
CONTROLLERS, ADAPTORS AND POWER SUPPLY DEVICES) OR
OTHERWISE NOT COMPATIBLE WITH THIS PRODUCT; (b) [S USED FOR
COMMERCIAL PURPOSES (INCLUDING RENTAL) OR IS MODIFIED OR
TAMPERED WITH; (c) IS DAMAGED BY ACTS OF GOD, MISUSE, ABUSE,
NEGLIGENCE, ACCIDENT, WEAR AND TEAR, UNREASONABLE USE, OR
BY OTHER CAUSES UNRELATED TO DEFECTIVE MATERIALS OR
WORKMANSHIP; (d) HAS HAD THE SERIAL NUMBER ALTERED ,
DEFACED OR REMOVED; OR (e) HAS HAD THE WARRANTY SEAL ON
THE CONSOLE ALTERED, DEFACED OR REMOVED. THIS WARRANTY
DOES NOT COVER PRODUCTS SOLD AS]S OR WITH ALL FAULTS, OR
CONSUMABLES (SUCH AS BATTERIES).
PROOF OF PURCHASE IN THE FORM OF A BILL OF SALE OR RECEIPTED
INVOICE WHICH IS EVIDENCE THAT THE UNIT IS WITHIN THE
WARRANTY PER]OD MUST BE PRESENTED TO OBTAIN WARRANTY
SERVICE.
MERCHANTABILITY AND FITNESS FOR A PARTICULAR PURPOSE, ARE
LIMITED IN DURATION TO THE DURATION OF THIS WARRANTY. IN NO
EVENT SHALL SCEA BE LIABLE FOR CONSEQUENTIAL OR INCIDENTAL
DAMAGES FOR BREACH OF ANY EXPRESS OR IMPLIED WARRANTY ON
THIS PRODUCT. SOME STATES OR PROVINCES DO NOT ALLOW
LIMITAnON ON HOW LONG AN IMPLIED WARRANTY LASTS AND SOME
STATES DO NOT ALLOW THE EXCLUSION OR LIMITATIONS OF
CONSEQUENTIAL OR INCIDENTAL DAMAGES, SO THE ABOVE
LIMITATIONS OR EXCLUSION MAY NOT APPLY TO YOU.
This warranty gives you specific legal rights, and you may also have other rights
which vary from state to state or province to province. This warranty is valid only in
the United States and Canada.
The warranty offered by Sony Computer Entertainment America on your
PlayStation®2 computer entertainment system is the same whether or not you
register your product.
REPAIR OR REPLACEMENT AS PROVIDED UNDER THIS WARRANTY [S
THE EXCLUSIVE REMEDY OF THE CONSUMER. ANY APPLICABLE
IMPLIED WARRANTIES, ]NCLUDING WARRANTIES OF
21
Copyrights and trademarks
"~ ", "PlayStation", "?S 2 " and "DUALSHOCK" are registered trademarks
of Sony Computer Entertainment Inc.
"SONY" and "~ " are registered trademarks and "MagicGate" is a trademark of
Sony Corporation.
This product incorporates copyright protection technology that is protected by
method claims of certain U.S. patents and other intellectual property rights owned by
Macrovision Corporation and other rights owners. Use of this copyright protection
technology must be authorized by Macrovision Corporation, and is intended for
home and other limited viewing uses only unless otherwise authorized by
Macrovision Corporation. Reverse engineering or disassembly is prohibited.
This product is manufactured under license from Dolby Laboratories. "Dolby" and
the double-D symbol are trademarks of Dolby Laboratories.
Confidential unpublished works. © 1992-1997 Dolby Laboratories. All rights
reserved.
"DTS" and "DTS Digital Out" are trademarks of DTS, Inc.
Sony Computer Entertainment Inc. uses DNAS (Dynamic Network Authentication
System), a proprietary authentication system, to help protect copyright and security
in connecting the PlayStation®2 console to a network. DNAS may retrieve
information about a user's hardware and software for authentication, copy protection,
account blocking, system, rules, or game management and other purposes. The
information collected does not identify the user personally. The unauthorized
transfer, exhibition, export, import or transmission of programs and devices
circumventing its authentication scheme may be prohibited by law.
22
About copy protection
Attempted copying of DVD's played on this device may be prevented or restricted
by copy protection technology contained on the DVD. Attempted recording or
copying ofDVD's for private use by the removal or circumvention of copy protection
technology may be prohibited under applicable law.
23
111111111111111111111111111111111111111111111111111 111111 1111111111111
3-289-799-21
SONY
COMPUTER
ENTERTAINMENT
®
r£l COMPACT
L!lJD~[lli
DOIDOLBY I .
DIG I TAL
DIGITAL OUT
'2%:D 2%:D
ROM
™
V IDE 0"
© 2007 Sony Computer Entertainment Inc. All rights reserved. / Tous droits reserves.
Printed in China / Imprime en Chine
PRODUCT
REGISTRATION
.
Thank you for purchasing an Audiovox product. We pride ourselves on the quality and reliability of all our
electronic products but if you ever need service or have a question, our customer service staff stands ready to
help. Contact us at www.audiovox.com
IIPURCHASE REGISTRATION:
Registering On-line will allow us to contact you in the
unlikely event a safety notification is required under the Federal Consumer Safety Act.
~AUDIO"O~
~ ELECTRONICS CORP.
Register Online at:
WWW.AUDIOVOX.COM
Click on Product Registration and Fill Out the Brief Questionnaire
ENREGISTREMENT DU PRODUIT
Merci d'avoir achete un produit Audiovox. Nous sommes
tiers de la qualite et de la fiabilite de tous nos produils
eledroniques, mais en cas de necessite de reparation ou
pour toute question, Ie personnel de notre service clientele
est pret it voos aider. Contactez-nous sur
www.audiovol.com
",ENREGISTREMENT DIACHAT:
Enregistrer votre produit en ligne nous permettra de
communiQuer avec vous pour tout avis de securite au sujet du produit en vertu du Federal
Consumer Safety Act (Loi federale de protection du consommateur).
L~ AUDI01~O~
~ ELECTRONICS CORP.
Enregislrez volre produil en ligne sur:
WWW.AUDIOVOX.COM
Cliquez sur Enregistrement produit et remplissez Ie court questionnaire
ENREGISREGISTRO DEL PRODUCTOTREMENT DU PRODUIT
Gracias por comprar un producto Audiovox. Nos enorgullece la caUdad y fiabllldad de todos nuestros produclos
eleclrOnicos, peru si alguna vez necest1a senricios temicos 0 si tiene alguna pregunta, nuestro personal de
atenci6n al cliente esta asu disposici6n para ayudarle. Comuniquese con nosotros en WINW.audiovox.com
II' REGISTRO DE COMPRA: EI registro en linea nos permitira
comunicarnos con usted en el caso de tener que enviarle algun aviso de
seguridad en virtud de la Ley Federal de Seguridad del Consumidor.
Registra al producto en linea en:
WWW.AUDIOVOX.COM
Haga clic en Registro del producto y responda al cuestionario
Content descriptors are short,
standardized phrases that indicate elements in a game that
may have triggered a particular
rating and/or may be of interest
or concern. To fully understand what to expect from a game,
parents should check both the content descriptors and the rating symbol.
Following are some of the more frequently used content
descriptors on PlayStation games:
Cartoon or pixilated depictions of blood.
Depictions of blood.
Depictions of blood or the mutilation of body parts.
Scenes depicting slapstick or gross vulgar humor.
Mild to moderate use of profanity.
Mild scenes depicting characters in unsafe and/or
violent situations.
Mild provocative references or materials.
Scenes involving aggressive conflict.
Please visit
WWW.ESRB.ORG for a complete listing of
content descriptors.
ABOUT ENTERTAINMENT SOFlWARE RATING BOARD (ESRB)
The ESRB is a non-profit, self-regulatory body established in 1994 by the
Entertainment Software Association (ESA). ESRB independently applies ratings,
enforces advertising guidelines, and helps ensure responsible online privacy
practices for the interactive entertainment software industry.
ENTERTAINMENT
SORWARE
RATING BOARD
WWW.ESRB.ORG
The Entertainment Software Rating Board
TITLES RATED EC (Early
Childhood) have content that
A GUIDE TO
VIDEO GAME
RATINGS
may
be suitable for persons ages 3 and
older. Titles in this category contain no
material that parents would find inappropriate.
TITLES RATED E (Everyone) have
content that may be suitable for
persons ages 6 and older. Titles in this
category may contain minimal cartoon,
fantasy or mild violence and/or
infrequent use of mild language.
We understand that it can be difficult to tell
which games are appropriate for children just
by looking at the title. In order to make
informed purchase decisions, parents and
other consumers should check the rating of
TITLES RATED E10+ (Everyone
10 and older) have content that
video games. The Entertainment Software
may be suitable for persons ages 10
and older. Titles in this category may
contain more cartoon, fantasy or mild
violence, mild language, and/or
minimal suggestive themes.
Rating Board (ESRB) independently applies
and enforces ratings adopted by the entertainment software industry.
The ESRB rating system has two parts: rating
.~I.I'f"'''il.lllof
symbols, which are printed on the front of
each PlayStation game box, and content
descriptors, which are printed on the back.
'.
t:
TITLES RATED T (Teen) have content
that may be suitable for persons ages
13 and older. Titles in this category
may contain violence, suggestive themes,
crude humor, minimal blood and/or
infrequent use of strong language.
Rating symbols suggest age appropriateness
for the game, and content descriptors indicate
TITLES RATED M (Mature) have
elements in a game that may have triggered
content that may be suitable for
persons 17 years and older. Titles in
this category may contain violence,
blood and gore, sexual content,
and/or strong language.
a particular rating and/or may be of interest
or concern.
To take full advantage of the ESRB rating
system, it's important to check both the rating
symbol (on the front of the game box) and
the content descriptors (on the back of the
game box).
"Ii
"
EVERYONE
I:
TITLES RATED AO (Adults Only)
have content that should only be played
by persons 18 years and older. Titles in
this category may include prolonged
scenes of intense violence and/or
graphic sexual content and nudity.
10+
Cartoon Violence
Mild Lyrics
,,
•
See reverse for more
information on content
descriptors.
Adults Only or AO ralings are rare. PloySlolion
does nol publish Adults Only games.
I I I
"PlayStation" and the "PS" Family logo are regis.tered trademarks of Sony Computer Entertainment
Inc. The rating icons are registered trademarks of
the Entertainment Software Association.
L-
-----.J
~
PRINTED IN CHINA 2-187-182-03 F2