1
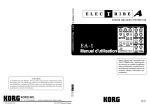
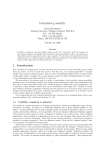
CONTENTS 1 INTRODUCTION .............................................................................................................. 2 1.1 WELCOME ........................................................................................................................ 2 1.2 BOX CONTENTS .............................................................................................................. 2 2 FEATURES ....................................................................................................................... 2 3 ABOUT MIDI CONTROL .................................................................................................. 3 4 PANEL............................................................................................................................... 3 4.1 FRONT PANEL .................................................................................................................. 3 4.2 REAR PANEL..................................................................................................................... 5 5 SETUP AND INSTALLATION ........................................................................................... 6 5.1 HARDWARE SETUP DIAGRAM .................................................................................... 6 5.2 WINDOWS PC SETUP ...................................................................................................... 6 5.3 MAC OS SETUP ................................................................................................................ 8 5.4 STANDALONE HARDWARE OPERATION .................................................................. 9 6 FUNCTIONS ..................................................................................................................... 9 6.1 KEYBOARD MULTI-FUNCTION MODE ....................................................................... 9 6.2 CONTROLLER ASSIGNMENTS ..................................................................................... 9 6.3 MIDI CHANNEL.............................................................................................................. 10 6.4 PROGRAM CHANGE ..................................................................................................... 11 6.5 BANK MSB & BANK LSB ............................................................................................. 12 6.6 KEYBOARD CURVE ...................................................................................................... 12 6.7 PEDAL CURVE ............................................................................................................... 13 6.8 RPN & NRPN ................................................................................................................... 14 6.9 DUAL................................................................................................................................ 16 6.10 SPLIT .............................................................................................................................. 16 6.11 SPLIT POINT ................................................................................................................. 17 6.12 MUTE ............................................................................................................................. 17 6.13 SNAP SHOT ................................................................................................................... 18 6.14 UPLOAD & DOWNLOAD ............................................................................................ 18 6.15 PEDAL POLARITY ....................................................................................................... 19 6.16 ALL NOTES OFF ........................................................................................................... 19 6.17 ALL SOUND OFF .......................................................................................................... 19 6.18 RESET ALL CONTROLLERS ...................................................................................... 20 6.19 GM ON ........................................................................................................................... 20 6.20 GM2 ON ......................................................................................................................... 20 6.21 GS ON ............................................................................................................................. 21 6.22 XG ON ............................................................................................................................ 21 7 OCTAVE AND TRANSPOSE .......................................................................................... 21 7.1 OCTAVE .......................................................................................................................... 21 7.2 TRANSPOSE .................................................................................................................... 22 8 APPENDIX ...................................................................................................................... 22 8.1 APPENDIX 1 ASSIGNABLE CONTROLLER LIST ...................................................... 22 8.2 APPENDIX 2 CONTROLLER LIST ............................................................................... 23 8.3 APPENDIX 3 LED STATUS LIST ................................................................................... 26 9 TECHNICAL SUPPORT ................................................................................................. 27 9.1 CUSTOMER SERVICE LIVE CHAT ............................................................................. 27 9.2 TECH SUPPORT LIVE CHAT ........................................................................................ 27 9.3 WARRANTY.................................................................................................................... 27 1 INTRODUCTION 1.1 WELCOME Congratulations on your purchase of the Monoprice 606606 keyboard, which provides quick and easy control over your music creation software. The keyboard connects to your computer via USB, which enables MIDI communication and provides power to the keyboard. Since the 606606 is class-compliant, there is no need to download any drivers. You can just plug your keyboard in, turn it on, and you’re ready to get started! 1.2 BOX CONTENTS Monoprice 606606 49-Key Controller Keyboard Monoprice 606606 Owners Manual Monoprice Pro Audio Series - Software Bundle DVD 2 FEATURES 49 Keys to trigger your MIDI hardware & software 4 rotary encoder Knobs 1 Slider Pitch-Bend & Modulation Wheels MIDI Out Port for standalone use Pedal Input Driverless Plug-N-Play on PC & Mac USB Bus-Power or 9-12 Volt DC Power Port 2 Includes DVD-ROM of audio software, so you can play music right away 3 ABOUT MIDI CONTROL MIDI is a communication standard that allows MIDI enabled devices to “talk” to each other. (MIDI stands for “Musical Instrument Digital Interface”.) The 606606 keyboard doesn’t make sounds on its own, so it uses MIDI to tell an external sound source what to play. You can connect the 606606 to a USB compatible computer in order to control music creation software, or you can connect it to hardware sound modules and synthesizers via MIDI cable. 4 PANEL 4.1 FRONT PANEL (1) EDIT - Enters and exits the Keyboard Multi-Function mode where additional features and capabilities of the keyboard may be accessed. The LED next to the Edit button indicates whether or not Keyboard Multi-Function mode is active. Please see Section 6 for more details on using Keyboard Multi-Function mode. (2) ▲/▼ Octave / Assignable Data Buttons - These buttons default to adjusting the keyboard octave range, but they can be reassigned to other useful functions. When assigned to MIDI controllers, the messages are sent out on the Global MIDI Channel. The ▲/▼ Octave / Assignable Data Buttons behave differently depending on how you press them. A single button press changes the value by one increment, while holding a 3 button down changes the values quickly. If you press both buttons at the same time, it will reset the value back to 0. Pressing both buttons and EDIT at the same time will reset any Transpose value back to 0. Please see Section 7.1 for more details on using the Octave buttons, and Section 7.2 for more information on using the Transpose feature. (3) SWITCH - This button allows you to alternate between two banks of Knob controller assignments. This means that you can actually assign eight different controllers to the knobs rather than just four, and they will all be readily available to you during performance by toggling the SWITCH button. The LEDs above and below the button indicate the currently selected controller group, either A1-A4 or B1-B4. (4) A1-A4 and B1-B4 KNOBS - The Knobs have useful default assignments, but they can be assigned to any MIDI CC (controller message) that you choose. You can even assign an independent MIDI channel for each knob. This allows you to get more expressive with your sounds during performance. For example, with a knob assigned to a synthesizer’s filter, it’s possible to make the sound brighter or darker as you play. For more details on KNOB assignments, see Section 6.2. (5) SLIDER - By default, the SLIDER is set to control Volume (MIDI CC #7), which is used to make your sound louder or softer. However, it can be assigned to any MIDI controller message that you choose, transmitting on the Global MIDI Channel. For more details on SLIDER assignment, see Section 6.2. (6) PITCH BEND - The Pitch Bend Wheel sends MIDI pitch bend messages by default, which are used to add pitch expressions to your sound (think of a guitar player making the notes swoop higher or lower). However, it can be reassigned to any MIDI CC you choose, transmitting on the keyboard’s Global MIDI Channel. For more details on PITCH BEND wheel assignment, see Section 6.2. (7) MODULATION - The Modulation Wheel transmits a Modulation message (MIDI CC #1) by default, which is normally used to add vibrato to a sound (think of a violinist wiggling the pitch of a note). However, it can be reassigned to any MIDI CC you choose, transmitting on the keyboard’s Global MIDI Channel. For more details on MODULATION wheel assignment, see Section 6.2. (8) KEYBOARD AND MULTI-FUNCTION SELECTION - The keyboard allows you to play MIDI notes, which are sent via USB to your music creation software in order to make sound. However, in Keyboard Multi-Function mode, the keyboard is also used to select various features and parameter values available in the 606606. Please see Section 6 for more details on using Keyboard Multi-Function mode. (9) LED DISPLAY - The display shows information about the current status of the keyboard. When the keyboard is at rest, it shows the currently selected MIDI Program number. If you use the KNOBS or SLIDER, the display shows the controller values being 4 the MAGIX registration web page. Upon completing registration, MAGIX will send you an individual activation code that you can use to fully unlock your software. (The trial version expires in 7 days, at which point you need to register if you want to continue using Samplitude.) Now you’re ready to use MAGIX Samplitude Pro X Silver! If you need further help, please refer to the manual included with the Samplitude software, or contact the friendly experts at MAGIX customer support. Samplitude is a registered trademark of MAGIX AG. Sound Magic BlueStone Piano - The BlueStone Piano is a Virtual Instrument or VI, which is a software sound source that can be controlled via MIDI. You can run it as a standalone application or as a VST® plug-in within a compatible DAW such as Samplitude. Before installation, be sure to first fully review this section in the manual, and any installation documentation included on the DVD. To install the standalone software, copy the Sound Magic folder to your hard drive. Double click on the “BlueStone Piano.exe” file in order to run the application. To install the VST plug-in version, copy the entire Sound Magic folder into the VST plug-in directory preferred by your VST compatible applications. For more information on the VST plug-in folder, consult the manual of your VST hosting software. When you open the BlueStone Piano, you will see a small text box above the virtual keyboard that says, “Enter Your KeyCode Here”. Open the text file named “BlueStone KeyCode” that is provided for you on the disc and copy the code to your clipboard. Click in the KeyCode entry box and make sure all the text in the box is highlighted, then paste in the KeyCode you copied. To activate the code, click on the virtual keyboard, or anywhere on the application outside of the KeyCode box. The text in the box will then change to read, “Authorised to Sound Magic Customer”. Now you’re ready to use the BlueStone Piano! If you need further help, please refer to the manual included with your Sound Magic software. VST is a registered trademark of Steinberg® Media Technologies GMBH. Platonic World VSTs - oKo virtual instrument and Bi-Polar effect - The oKo plug-in is a virtual version of an analog synthesizer while Bi-Polar is a distortion effect. To install these plug-ins, simply copy their .dll files to the VST Plug-In folder on your computer. Then they will be available to all your VST compatible applications. Platonic World – War Drumz – War Drumz is a modern drum sample library with loops and individual drum hits in .wav format. They can be used in any application that is 7 compatible with this common file format. Windows is a registered trademark of Microsoft. 5.3 MAC OS SETUP Connect the keyboard to your Mac® using a USB cable and turn the keyboard’s power switch to On. The keyboard will appear as a new USB Audio Device “MidiKeyboard”, available for use in your MIDI compatible applications. Monoprice wants you to be able to start playing right away, so we’ve included free music creation software on the disc that came with your keyboard. Sound Magic BlueStone Piano - The BlueStone Piano is a Virtual Instrument or VI, which is a software sound source that can be controlled via MIDI. You can run it as an Audio Unit plug-in within a compatible DAW such as Logic®. Before installation, be sure to first fully review this section in the manual, and any installation documentation included on the DVD. To install the BlueStone Piano AU plug-in, first double-click the SPRuntime.pkg file and follow the onscreen prompts to install the Maize sample engine, then copy the AU component file into the Mac HD\Library\Components directory on your Mac hard drive. For more information on the AU Component plug-in folder, consult the manual of your AU hosting software. When you open the BlueStone Piano, you will see a small text box above the virtual keyboard that says, “Enter Your KeyCode Here”. Open the text file named “BlueStone KeyCode AU” that is provided for you on the disc and copy the code to your clipboard. Click in the KeyCode entry box and make sure all the text in the box is highlighted, then paste in the KeyCode you copied. To activate the code, click “OK”. The text in the box will then change to read, “Authorised to Sound Magic Customer”. Now you’re ready to use the BlueStone Piano! If you need further help, please refer to the manual included with your Sound Magic software. Platonic World – War Drumz – War Drumz is a modern drum sample library with loops and individual drum hits in .wav format. They can be used in any application that is compatible with this common file format. For example, GarageBand® can import .wav files for use in song creation. Logic and GarageBand are registered trademarks of Apple®. 8 5.4 STANDALONE HARDWARE OPERATION You can connect the keyboard to other MIDI compatible devices, such as a multitimbral sound module via the MIDI Out jack on the back. Use a 5-pin din MIDI cable to connect the keyboard’s MIDI Out to the MIDI In of the device you want to control. MIDI communication occurs over Channels, so you need to make sure the 606606 and the device you want to control are both set to the same MIDI Channel. There are normally 16 channels to choose from, and other manufacturers sometime support an “Omni” setting, which transmits or receives over all channels at once. Please note that in standalone operation, the keyboard can be powered by an optional 9V-12V DC power supply if USB power is not available or convenient. 6 FUNCTIONS 6.1 KEYBOARD MULTI-FUNCTION MODE The KEYBOARD MULTI-FUNCTION mode allows you to change the various parameter settings in your 606606 keyboard, altering how the keyboard behaves. Press the EDIT button to enter KEYBOARD MULTI-FUNCTION mode. (Pressing the EDIT button again will exit the mode.) While in KEYBOARD MULTI-FUNCTION mode, press a Function key on the keyboard to select the action you want. The list of available Functions is written just above the keys on the 606606 top panel. You can then use the NUMERIC keys 0-9 to enter a new parameter value, if needed. Or, you can use the CLEAN key to set the parameter value to 0. Once the new parameter setting is input, press the ENTER key to confirm the operation. 6.2 CONTROLLER ASSIGNMENTS The Monoprice 606606 allows you to assign many different useful controller messages to the KNOBS, SLIDER, WHEELS, and BUTTONS of the keyboard. The controller messages consist of standard MIDI CCs, or “Control Change” messages, and advanced controller message assignments. All of these controller messages allow you to add more expression to your performances, enable quick editing of your favorite sound parameters, or perform other useful functions. For a list of all the available controller messages, see 9 Section 8.2. To assign a new MIDI CC or advanced controller message to the SLIDER, WHEELS, ▲/ ▼BUTTONS or KNOBS, enter the KEYBOARD MULTI-FUNCTION mode by pressing EDIT and then follow these steps: 1. Press the ASSIGN key on the keyboard. The LED will display CHO, asking you to “choose” the physical control you want to edit. 2. Just move the desired physical controller (For example, if you want to assign a new MIDI CC to the SLIDER, move the SLIDER), and then the LED will show the current MIDI Control Number of the selected controller. 3. Next, input the desired CC or advanced controller number with the NUMERIC keys, and press ENTER. (MIDI CCs are numbered from 0-127 and their functionality follows the MIDI specification, while the advanced controller functions are numbered from 128 to 159.) Lastly, the LED will show “don” (done) to confirm that the new assignment has been set. Please refer to Section 8.1 for a list of assignable controls, and Section 8.2 for a list of all available MIDI CC and advanced controller assignments. 6.3 MIDI CHANNEL MIDI is a channelized communication protocol, which allows you to keep messages separate if you have multiple MIDI compatible devices. When using the 606606 with a computer, you’ll probably just keep the MIDI Channel set to 1 and allow your software to do the routing for you. However, if you want to use the 606606 with external sound modules, you may want to change the MIDI channel to arrange how your devices will respond to each other. For either application, this section will tell you how to set the MIDI Channel on your 606606. The Global Channel is the main MIDI channel used by your 606606. The SLIDER, PEDAL, WHEELS, ▲/▼BUTTONS and KEYBOARD all use the Global MIDI channel. To assign the Global Channel, enter KEYBOARD MULTI FUNCTION mode by pressing EDIT, then complete the following steps: 1. Press the CHANNEL key on the keyboard. The LED will show the currently selected MIDI Channel. 2. Next, input the desired Global MIDI Channel number (1-16) with the NUMERIC keys, and press ENTER. The LED will show “don” (done) to confirm that the new channel has been set. For added flexibility, the KNOBS of your 606606 can each be assigned to an independent MIDI Channel. This allows you to keep the MIDI messages originating from 10 the KNOBS separate from the rest of the keyboard, and from each other, if so desired. To set an independent MIDI Channel for a KNOB, enter KEYBOARD MULTI FUNCTION mode by pressing EDIT, then complete the following steps: 1. Press the CHANNEL key on the keyboard. 2. Next, move the KNOB that you want to assign. 3. Then input the desired MIDI Channel number (0-16) with the NUMERIC keys, and press ENTER. The LED will show “don” (done) to confirm that the new channel has been set. Note that a selection of 0 assigns the KNOB to use the Global MIDI Channel. 6.4 PROGRAM CHANGE Program Change messages are used to tell hardware MIDI devices to load a specific sound for you to play. Software instruments normally don’t need Program Change messages since the sound can usually be selected and saved in the session file of your DAW. However, if you need to send Program Change messages, there are two easy ways to do it in the 606606. By default, KNOB A1 is set to send Program Change messages (advanced controller #154), which allows you to scroll through sound programs quickly and easily. However, you can assign other physical controls to perform this function, such as the ▲/▼ BUTTONS. To send a single specific Program Change message, enter KEYBOARD MULTI FUNCTION mode by pressing EDIT, then complete the following steps: 1. Press the PROGRAM key on the keyboard. The LED will show the currently selected Program. (The display may not register a change because it normally shows the currently selected program number when no other operation is in progress.) 2. Next, input the desired Program Change number (0-127) with the NUMERIC keys, and press ENTER. The LED will show “don” (done) to confirm that the Program Change message has been sent. According to the MIDI specification, sound program banks are arranged in groups of 128. You can access any sound in a bank by sending its corresponding Program Change number. Changing to a different program bank can be achieved by sending Bank MSB and Bank LSB messages. This function is described below in Section 6.5. It’s expected that most of the time you’ll be working within Program Bank 0, so within this bank, only the Program Change message is sent. However, if a different bank is selected, the 606606 will send the corresponding Bank MSB and Bank LSB messages 11 for the bank, along with the Program Change message. This helps ensure that the Program Change occurs in the correct sound bank. 6.5 BANK MSB & BANK LSB MSB and LSB are computing terms used to refer to the “Most Significant Bit” and “Least Significant Bit” respectively. Essentially, these are two values that, when combined, offer more possible choices than either one by itself. In this instance, the Bank MSB and Bank LSB are used to select between many different sound Program Banks by forming Bank Change messages. To send a specific Bank Change message, enter KEYBOARD MULTI FUNCTION mode by pressing EDIT, then complete the following steps: 1. Press either the BANK MSB or BANK LSB key on the keyboard. (A Bank Change message may consist of a Bank MSB message, a Bank LSB message, or both.) The LED will show the currently selected value. 2. Next, input the desired Bank Change number (0-127) with NUMERIC keys, and press ENTER. The LED will show “don” (done) to confirm that the Bank Change message has been sent. Bank MSB and Bank LSB can also be transmitted by the physical controls of the keyboard, such as the KNOBS. Just follow the same procedure outlined in Section 6.2 for controller assignments. Bank MSB is controller #0 and Bank LSB is controller #32. 6.6 KEYBOARD CURVE There are 5 Keyboard Curves that adjust how the keyboard feels when you play. The 606606 allows you to select your preferred Keyboard Curve either in KEYBOARD MULTI FUNCTION mode, or via advanced controller assignment. To select a curve via KEYBOARD MULTI FUNCTION mode, press EDIT, and then complete the following steps: 1. Press the KEYBOARD CURVE key on the keyboard. The LED will show the currently selected curve. 2. Next, input the desired curve number (1-5) with the NUMERIC keys, and press ENTER. The LED will show “don” (done) to confirm that the new curve has been selected. 3. Now try playing the keyboard to see what the selected Keyboard Curve feels like. If you want to audition additional curves, enter KEYBOARD MULTI FUNCTION mode again and repeat from step 1. You can also select new Keyboard Curves by assigning advanced controller #158 12 (Keyboard Curve) to one of the keyboard’s physical controls, such as the ▲ / ▼ BUTTONS, a KNOB or the SLIDER. To enable Keyboard Curve selection from a physical control, enter KEYBOARD MULTI FUNCTION mode by pressing EDIT, then complete the following steps: 1. Press the ASSIGN key on the keyboard. The LED will display CHO, asking you to “choose” the physical control you want to use. 2. Move the desired physical controller (For example, if you want to assign Keyboard Curve selection to a KNOB, move the desired KNOB), and then the LED will show the current MIDI Control Number of the selected controller. 3. Next, input the advanced controller #158 (Keyboard Curve) with the NUMERIC keys, and press ENTER. The LED will show “don” (done) to confirm that the Keyboard Curve selection has been enabled. 4. Now, adjust the Keyboard Curve values (1-5) while you play the keyboard. When you have selected the curve that you like, you can reassign the physical controller to do something else. When selecting your preferred Keyboard Curve, it’s a good idea to use a familiar velocity sensitive instrument, such as a piano sound, so you can hear how it reacts to your playing. (Velocity sensitivity means that it follows how hard you play the keyboard.) For each Curve, try playing loudly, softly, and in-between, and then select the curve that is most comfortable for your playing style. 6.7 PEDAL CURVE You can use several different kinds of foot pedals with your 606606 in order to perform different functions. The most common pedal is a Sustain Pedal, which is just a switch that turns on and off. However, you may also use an Expression Pedal that can send a range of controller values. An Expression Pedal works in a way that’s similar to a gas pedal, except it doesn’t spring back to zero when you release it. Since there are several different kinds of Expression Pedal available, you can adjust the Pedal Curve to work better with the one you have. The default value of 64 is optimized for most pedals, but as a general rule, if the pedal’s active range is short, you should try turning the Pedal Curve up. (In other words, if the gas pedal goes from 0 MPH to 100 MPH by barely touching it, the Pedal Curve should be turned up.) Conversely, if the pedal can never reach maximum or minimum values, you should try turning the Pedal Curve down. To select a curve via KEYBOARD MULTI FUNCTION mode, press EDIT, and then complete the following steps: 13 1. Press the PEDAL CURVE key on the keyboard. The LED will show the currently selected curve value. 2. Next, input the desired curve value (1-127) with the NUMERIC keys, and press ENTER. The LED will show “don” (done) to confirm that the new curve value has been selected. 3. Now try playing the keyboard while using the pedal in order to see what the selected Pedal Curve value feels like. If you want to audition additional curve values, enter KEYBOARD MULTI FUNCTION mode again and repeat from step 1. You can also select new Pedal Curve values by assigning advanced controller #159 (Pedal Curve) to one of the keyboard’s physical controls, such as the ▲/▼BUTTONS, a KNOB or the SLIDER. To enable Pedal Curve value selection from a physical control, enter KEYBOARD MULTI FUNCTION mode by pressing EDIT, then complete the following steps: 1. Press the ASSIGN key on the keyboard. The LED will display CHO, asking you to “choose” the physical control you want to use. 2. Move the desired physical controller (For example, if you want to assign the Pedal Curve adjustment to the SLIDER, move the SLIDER), and then the LED will show the current MIDI Control Number of the selected controller. 3. Next, input the advanced controller #159 (Pedal Curve) with the NUMERIC keys, and press ENTER. The LED will show “don” (done) to confirm that the Pedal Curve selection has been enabled. 4. Now, adjust the Pedal Curve values (0-127) while you play a sound from the keyboard. When you have finished adjusting the curve, you can reassign the physical controller to do something else. When adjusting the Pedal Curve, it’s a good idea to use a familiar sound that responds to pedal control, so you can hear how it reacts to your playing. The pedal should be assigned to an easily audible sound modulation such as Pitch or Volume, and then you can make your adjustments. The Pedal MIDI CC is fixed to #64 (Sustain), but it may be possible to reassign this controller message in your music creation software. Please consult your software’s instruction manual for more information on this subject. 6.8 RPN & NRPN RPN and NRPN messages help expand the MIDI universe, allowing the implementation of new MIDI controllers. RPN stands for “Registered Parameter Number” and conforms to the MIDI specification, while NRPN stands for “Non-Registered Parameter Number” and is defined by each manufacturer. Therefore, how an NRPN behaves can be different for each manufacturer, or even for each device. Either way, these controllers are your gateways to access whole new ranges of MIDI controls, provided those 14 functions are implemented in the target MIDI device. RPNs and NRPNs work in a similar fashion. Each requires a pair of MIDI controller messages and values that are used to define the RPN or NRPN to be sent. For RPNs, the controllers are #100 (LSB) and #101 (MSB), while for NRPNs, the controllers are #98 (LSB) and #99 (MSB). The values sent via these MIDI CCs define which RPN, or NRPN respectively, is selected for control. Once the RPN or NRPN is defined, another pair of controller messages is used to send the value associated with the RPN or NRPN message. MIDI CC #6 is used to send a “coarse” value, or MSB, while MIDI CC #38 is used to send a “fine” value, or LSB (although the LSB is not always necessary). On the 606606, you can use ASSIGN in KEYBOARD MULTI-FUNCTION mode to set each of the required MIDI controllers for sending RPN and NRPN messages to the available physical controls, such as the KNOBS. Then you can use those controls in the correct order to define the RPN or NRPN, and then send the associated value. You can also use the KEYBOARD MULTI-FUNCTION mode RPN MSB, RPN LSB, DATA MSB and DATA LSB keys to send RPN messages, or NRPN MSB, NRPN LSB, DATA MSB and DATA LSB keys to send NRPN messages. For example, to send an NRPN message, enter KEYBOARD MULTI FUNCTION mode by pressing EDIT, then complete the following steps: 1. Press the NRPN MSB key on the keyboard. The LED will display the currently selected value. 2. Next, input the desired NRPN MSB value (0-127) with the NUMERIC keys, and press ENTER. The LED will show “don” (done) to confirm that the new value has been selected. 3. Press EDIT again and then press the NRPN LSB key on the keyboard. The LED will display the currently selected value. 4. Next, input the desired NRPN LSB value (0-127) with the NUMERIC keys, and press ENTER. The LED will show “don” (done) to confirm that the new value has been selected. This defines the NRPN being sent. Now it’s primed to send the NRPN value. 5. Press EDIT again and then press the DATA MSB key on the keyboard. The LED will display the currently selected value. 6. Next, input the desired DATA MSB value (0-127) with the NUMERIC keys, and press ENTER. The LED will show “don” (done) to confirm that the new value has been sent. Depending on how the NRPN has been implemented by the manufacturer of your target MIDI device or software, the DATA MSB value may be all that you need (please refer to that target manufacturer’s MIDI documentation). If the LSB is required, continue through steps 7 and 8. 7. Press EDIT again and then press DATA LSB key on the keyboard. The LED will 15 display the currently selected value. 8. Next, input the desired NRPN LSB value (0-127) with the NUMERIC keys, and press ENTER. The LED will show “don” (done) to confirm that the new value has been selected. This action fully defines and sends the NRPN value. To send an RPN message, follow the steps above, but use the “RPN” labeled keys rather than the “NRPN” keys. It’s also possible to use a combination of the aforementioned techniques. You can use the KEYBOARD MULTI-FUNCTION keys to define the RPNs and/or NRPNs, and then assign the data portion of the message to be performed by a KNOB, SLIDER or WHEEL. 6.9 DUAL There may be times when you want your MIDI messages to go two places at once, while still maintaining independent MIDI channels on your target devices. If DUAL is turned on, the 606606 can send MIDI message out on two channels simultaneously. MIDI transmission on two channels will continue until DUAL mode is turned off. To turn on DUAL, enter KEYBOARD MULTI FUNCTION mode by pressing EDIT, and then press the DUAL key on the keyboard. The LED will show “on” to confirm that DUAL mode is engaged. To turn it off, re-enter KEYBOARD MULTI FUNCTION mode by pressing EDIT, and then press the DUAL key on the keyboard. At that point, the LED will display “off” to confirm that DUAL mode is disengaged. When DUAL is first activated, MIDI channels 1 and 2 are used. You can define which MIDI channels are being sent by entering KEYBOARD MULTI-FUNCTION mode to set a new MIDI channel (Press EDIT, then CHANNEL, then enter the desired channel number using the numeric keys). When DUAL mode is active, you will set the DUAL mode MIDI channel. When DUAL mode is off, you will set the Global MIDI channel. Note that the DUAL and SPLIT functions cannot be used simultaneously. Engaging DUAL mode will turn off the SPLIT function. Additionally, if new MIDI channels have been set in DUAL mode, those channels will be used in SPLIT mode, and vice versa. 6.10 SPLIT There may be times when you want to divide your keyboard into two playing areas for addressing different target instruments on separate MIDI channels. For instance, you may want to perform on a piano sound with your right hand while playing a bass sound with your left hand. SPLIT mode will allow you to do this. To turn on SPLIT, enter KEYBOARD MULTI FUNCTION mode by pressing EDIT, and 16 then press the SPLIT key on the keyboard. The LED will show “on” to confirm that SPLIT mode is engaged. To turn it off, re-enter KEYBOARD MULTI FUNCTION mode by pressing EDIT, and then press the SPLIT key on the keyboard. At that point, the LED will display “off” to confirm that SPLIT mode is disengaged. When SPLIT is first activated, MIDI channels 1 and 2 are used for the left and right sides of the split respectively. You can define which MIDI channels are being sent by entering KEYBOARD MULTI-FUNCTION mode to set a new MIDI channel (Press EDIT, then CHANNEL, then enter the desired channel number using the numeric keys). When SPLIT mode is active, you will set the MIDI channel for the right side of the split. When SPLIT mode is off, you will set the MIDI channel for the left side of the split (which follows the Global MIDI Channel). Note that the SPLIT and DUAL functions cannot be used simultaneously. Engaging SPLIT mode will turn off the DUAL function. Additionally, if new MIDI channels have been set in SPLIT mode, those channels will be used in DUAL mode, and vice versa. 6.11 SPLIT POINT When SPLIT is first activated, the keyboard is divided just below “middle C”, or C3, on the keyboard. However, you may want to change the place where the keyboard is split in order to better suit your playing. To select a new Split Point, enter the KEYBOARD MULTI-FUNCTION mode by pressing EDIT and then follow these steps: 1. Press the SPLIT POINT key on the keyboard. The LED will display CHO, asking you to “choose” the place you want the keyboard to divide. 2. Just play the key on the keyboard that you want as the first note on the right side of the split. (The key just to the left of the note you chose will be the last note of the left side of the split.) The LED will display “don” (done) to confirm that the new Split Point has been set. 6.12 MUTE There are times when you might want to move a controller on the 606606 and not send out any MIDI messages. For example, you might turn up the SLIDER in order to control volume on one virtual instrument, then change MIDI channels in order to fade in the volume on an external MIDI module, but the problem is that the SLIDER is already up. If you move the slider at this point, the volume on the external MIDI module will jump to the current volume value instead of fading in gradually. The MUTE function can help in this situation by muting the keyboard’s MIDI output so you can reset the SLIDER position. 17 When MUTE mode is active, no messages will be transmitted. To turn on MUTE, enter KEYBOARD MULTI FUNCTION mode by pressing EDIT, and then press the MUTE key on the keyboard. The LED will show “on” to confirm that MUTE mode is engaged. To turn it off, re-enter KEYBOARD MULTI FUNCTION mode by pressing EDIT, and then press the MUTE key on the keyboard. At that point, the LED will display “off” to confirm that MUTE mode is disengaged. 6.13 SNAP SHOT It’s possible for the controls on the 606606 to become out of sync with an instrument it is controlling. This can happen when you control multiple different instruments, one after another, and move the SLIDER, PEDAL, WHEELS and/or KNOBS. You may find that the physical position of the control doesn’t match the value of the parameter that you’re controlling, and when you move that control, the parameter will jump to the current value with possible unexpected affects on the audio. SNAP SHOT allows you to force your target MIDI instrument into sync with the 606606 controls by sending a “picture” of all the current controller positions and states at once. To perform a SNAP SHOT, enter KEYBOARD MULTI FUNCTION mode by pressing EDIT, and then press the SNAP SHOT key on the keyboard. The LED will show “don” to confirm that the SNAP SHOT has been sent. 6.14 UPLOAD & DOWNLOAD When you’ve configured your keyboard the way you like, you can save those settings via a System Exclusive Upload. System Exclusive, or SysEx, consists of a string of data describing the MIDI device that generated it, and this data can be recorded to a SysEx compatible sequencer for storage and Download back to the keyboard later on. (A sequencer is a software or hardware MIDI recorder. Once MIDI data is captured, the sequencer allows you to edit and play back the MIDI events in a sequence.) When you’re ready to capture SysEx data from the 606606, you should make sure that SysEx data is not being filtered out by your sequencing software. You may need to consult the manual for your sequencer in order to find out if there are MIDI filters that could impede SysEx reception. To Upload the SysEx data from the 606606, first start your sequencer recording. Then press the EDIT button to enter KEYBOARD MULTI-FUNCTION mode, and hit the UPLOAD key in order to transmit the data. The display should read “SEu”, signifying the keyboard is performing the System Exclusive Upload. When it is complete, the display will return to its original state. 18 To Download the data from your sequencer to the 606606, make sure that your sequencer is ready to play the data back. Then press the EDIT button to enter KEYBOARD MULTI-FUNCTION mode, and press the DOWNLOAD key to ready the 606606 for SysEx reception. The display should read “SEd”, signifying the keyboard is primed for System Exclusive Download. Now begin playback of the SysEx data from your sequencer. When it is complete, the display will return to its original state. 6.15 PEDAL POLARITY Sustain Pedals are switches that can be either on or off. Depending on the manufacturer, the pedal’s switch might be normally open or normally closed when it’s at rest. When you turn on the keyboard, it automatically detects the position of the Sustain Pedal and sets the appropriate pedal polarity. If you want to change the pedal polarity, you can press down the pedal while turning on the unit and the normal behavior of the pedal will be reversed. You can also switch the Pedal Polarity manually. To reverse the Pedal Polarity, enter KEYBOARD MULTI FUNCTION mode by pressing EDIT, and then press the PEDAL POLARITY key on the keyboard. The LED will show “on” to confirm that the Pedal Polarity is reversed. To return to normal polarity, re-enter KEYBOARD MULTI FUNCTION mode by pressing EDIT, and then press the PEDAL POLARITY key on the keyboard. At that point, the LED will display “off” to confirm that reversed Pedal Polarity is no longer in effect. 6.16 ALL NOTES OFF MIDI communication sometimes gets quite complex, and mistakes in transmission or reception can occur. It’s not common, but when there’s a miscommunication, it’s possible for notes to get stuck. For example, the “note on” messages might get received, but no “note off” messages make it through. If this ever occurs, you can send an “All Notes Off” command that will release any stuck MIDI notes. To transmit the All Notes Off message, enter KEYBOARD MULTI FUNCTION mode by pressing EDIT, and then press the ALL NOTE OFF key on the keyboard. The LED will show “don” to confirm that the All Notes Off command has been sent. 6.17 ALL SOUND OFF The All Sound Off message is similar to the All Notes Off message, detailed in Section 6.16 above. However, the All Sound Off message mutes all audio immediately, while All 19 Notes Off may still be affected by the state of the Sustain Pedal, or the length of time it takes for a sound to fade out after a note is released. To transmit the All Sound Off message, enter KEYBOARD MULTI FUNCTION mode by pressing EDIT, and then press the ALL SOUND OFF key on the keyboard. The LED will show “don” to confirm that the All Sound Off command has been sent. 6.18 RESET ALL CONTROLLERS With so many options for MIDI control, it can be easy to lose track of the controller values that have been sent to your target MIDI device. You might hear that some aspect of your sound has changed, and you don’t know which MIDI controller is responsible for the change. The Reset All Controllers function can help you figure things out by returning all controller values to their default state. To transmit the Reset All Controllers message, enter KEYBOARD MULTI FUNCTION mode by pressing EDIT, and then press the RESET ALL CONTROLLER key on the keyboard. The LED will show “don” to confirm that the Reset All Controllers command has been sent. 6.19 GM ON GM stands for “General MIDI”, which is a standard that defines a set of sounds available for use, and the ways in which they are controlled. The main goal of General MIDI is for GM compatible MIDI sequences to play back correctly on GM compatible sound sources. Sometimes GM compatible devices need to be told to enter GM mode. Most of the time, a GM compatible sequence will have a “GM On” message imbedded at the start of the sequence, but with some files you may find that you have to turn on GM manually. Or if you don’t have a GM sequence, you may want to just enter GM mode on your device for access to the familiar sound set and ease of use. You can send a GM On message by entering KEYBOARD MULTI FUNCTION mode. Press EDIT, and then press the GM ON key on the keyboard. The LED will show “don” to confirm that the GM On command has been sent. 6.20 GM2 ON GM2 is an extension to the GM standard discussed in Section 6.19 above. GM2 makes some additional sounds and controls available for use in GM2 compatible devices. 20 You can send a GM2 On message by entering KEYBOARD MULTI FUNCTION mode. Press EDIT, and then press the GM2 ON key on the keyboard. The LED will show “don” to confirm that the GM2 On command has been sent. 6.21 GS ON GS is another extension to the GM standard discussed in Section 6.19 above. GS makes a significant amount of additional sounds and controls available for use in GS compatible devices. You can send a GS On message by entering KEYBOARD MULTI FUNCTION mode. Press EDIT, and then press the GS ON key on the keyboard. The LED will show “don” to confirm that the GS On command has been sent. 6.22 XG ON XG is another extension to the GM standard discussed in Section 6.19 above. XG adds more controllers and options for editing the sounds within XG compatible devices. You can send an XG On message by entering KEYBOARD MULTI FUNCTION mode. Press EDIT, and then press the XG ON key on the keyboard. The LED will show “don” to confirm that the XG On command has been sent. 7 OCTAVE AND TRANSPOSE 7.1 OCTAVE Sometimes, you may want to play keys that are higher or lower than the current range of the keyboard. By default, the ▲/▼BUTTONS are assigned to adjust the octave range and pressing them allows you to shift the keyboard up and down, with the maximum range of adjustment being +/- 3 octaves. Pressing the ▲BUTTON increments the value by one, while pressing the ▼BUTTON decrements the value by one. Pressing both buttons at the same time will reset the value to zero. The ▲/▼BUTTONS have LEDs next to them that indicate the current octave and transposition status. When the LED next to a button is on, it shows that there’s an active octave adjustment. When the LED blinks slowly, it shows that there’s a transposition. If the 21 LED flickers quickly, it means that there are both octave and transpose adjustments active at the same time. And lastly, when both LEDs are off, there is no octave or transpose adjustment currently active. For information on the transposition function, see Section 7.2 below. By default, the ▲/▼BUTTONS are assigned to advanced controller #156 (Octave), but you can reassign them to send any controller you want. Please refer to Section 6.2 for details on how to reassign the ▲/▼BUTTONS. 7.2 TRANSPOSE Transposition reassigns which notes the keys play. This may come in handy if you learned a song in one musical key (like C Major), but wish to play it back in another (like E Major). If you hold EDIT and press the ▲/▼BUTTONS, it allows you to shift the keyboard up and down in semitones, with the maximum range of adjustment being +/- 12. Pressing the ▲BUTTON increments the value by one, while pressing the ▼BUTTON decrements the value by one. Pressing both buttons at the same time will reset the value to zero. The ▲/▼BUTTONS have LEDs next to them that indicate the current octave and transposition status. When the LED next to a button is on, it shows that there’s an active octave adjustment. When the LED blinks slowly, it shows that there’s a transposition. If the LED flickers quickly, it means that there are both octave and transpose adjustments active at the same time. And lastly, when both LEDs are off, there is no octave or transpose adjustment currently active. For information on the octave shift function, see Section 7.1 above. 8 APPENDIX 8.1 APPENDIX 1 ASSIGNABLE CONTROLLER LIST CHANNEL RANGE DEFAULT CONTROLLER CHANNEL RANGE 1 0~159 (OCTAVE) 156 0~153 (VOLUME) 7 PITCH 0~153 (PITCH) MODULATION 0~153 (MODULATION) PEDAL 0~153 (SUSTAIN) ITEM ▲/▼ SLIDER 1~16 GLOBAL CHANNEL 22 DEFAULT CONTROLLER 142 1 64 KNOB A1 0 0~159 (PROGRAM) 154 0 0~159 (PAN) 10 0 0~159 (REVERB) 91 0 0~159 (CHORUS) 93 KNOB B1 0 0~159 (CUTOFF) 74 KNOB B2 0 0~159 (RESONANCE) 71 KNOB B3 0 0~159 (ATTACK) 73 KNOB B4 0 0~159 (RELEASE) KNOB A2 KNOB A3 KNOB A4 0~16 0: GLOBAL CHANNEL 1~16: INDEPENDENT CHANNEL 8.2 APPENDIX 2 CONTROLLER LIST CONTROLLER NO. DEFINITION VALUE RANGE 0 (MSB) BANK SELECT 0-127 1 (MSB) MODULATION 0-127 2 (MSB) BREATH MSB 0-127 3 (MSB) UNDEFINED 0-127 4 (MSB) FOOT CONTROLLER 0-127 5 (MSB) PORTAMENTO TIME 0-127 6 (MSB) DATA ENTRY 0-127 7 (MSB) CHANNEL VOLUME 0-127 8 (MSB) BALANCE 0-127 9 (MSB) UNDEFINED 0-127 10 (MSB) PAN 0-127 11 (MSB) EXPRESSION 0-127 12 (MSB) EFFECT CONTROL 1 0-127 13 (MSB) EFFECT CONTROL 2 0-127 14-15 (MSB) UNDEFINED 0-127 16 (MSB) GENERAL PURPOSE CONTROLLER 1 0-127 17 (MSB) GENERAL PURPOSE CONTROLLER 2 0-127 18 (MSB) GENERAL PURPOSE CONTROLLER 3 0-127 19 (MSB) GENERAL PURPOSE CONTROLLER 4 0-127 23 72 20-31 (MSB) UNDEFINED 0-127 32 (LSB) BANK SELECT 0-127 33 (LSB) MODULATION 0-127 34 (LSB) BREATH 0-127 35 (LSB) UNDEFINED 0-127 36 (LSB) FOOT CONTROLLER 0-127 37 (LSB) PORTAMENTO TIME 0-127 38 (LSB) DATA ENTRY 0-127 39 (LSB) CHANNEL VOLUME 0-127 40 (LSB) BALANCE 0-127 41 (LSB) UNDEFINED 0-127 42 (LSB) PAN 0-127 43 (LSB) EXPRESSION 0-127 44 (LSB) EFFECT CONTROL 1 0-127 45 (LSB) EFFECT CONTROL 2 0-127 46-47 (LSB) UNDEFINED 0-127 48 (LSB) GENERAL PURPOSE CONTROLLER 1 0-127 49 (LSB) GENERAL PURPOSE CONTROLLER 2 0-127 50 (LSB) GENERAL PURPOSE CONTROLLER 3 0-127 51 (LSB) GENERAL PURPOSE CONTROLLER 4 0-127 52-63 (LSB) UNDEFINED 0-127 64 SUSTAIN PEDAL <63 OFF, >64 ON 65 PORTAMENTO <63 OFF, >64 ON 66 SOSTENUTO <63 OFF, >64 ON 67 SOFT PEDAL <63 OFF, >64 ON 68 LEGATO FOOTSWITCH <63 NORMAL, >64 LEGATO 69 HOLD 2 <63 OFF, >64 ON 70 VARIATION 0-127 71 RESONANCE 0-127 72 RELEASE TIME 0-127 73 ATTACK TIME 0-127 74 CUTOFF 0-127 75 DECAY TIME 0-127 76 VIBRATO RATE 0-127 77 VIBRATO DEPTH 0-127 78 VIBRATO DELAY 0-127 79 UNDEFINED 0-127 80 GENERAL PURPOSE CONTROLLER 5 0-127 81 GENERAL PURPOSE CONTROLLER 6 0-127 24 82 GENERAL PURPOSE CONTROLLER 7 0-127 83 GENERAL PURPOSE CONTROLLER 8 0-127 84 PORTAMENTO CONTROL 0-127 85-90 UNDEFINED 0-127 91 REVERB DEPTH 0-127 92 TREMOLO DEPTH 0-127 93 CHORUS DEPTH 0-127 94 CELESTE/DETUNE DEPTH 0-127 95 PHASER DEPTH 0-127 96 DATA INCREMENT 0-127 97 DATA DECREMENT 0-127 98 (LSB) NRPN 0-127 99 (MSB) NRPN 0-127 100 (LSB) RPN 0-127 101 (MSB) RPN 0-127 102-119 UNDEFINED 0-127 120 ALL SOUND OFF 0 121 RESET ALL CONTROLLERS 0 122 LOCAL CONTROL 0 OFF, 127 ON 123 ALL NOTES OFF 0 124 OMNI OFF 0 125 OMNI ON 0 126 MONO 0 127 POLY 0 128 (RPN) PITCH BEND SENSITIVITY 0-127 129 (RPN) CHANNEL FINE TUNING 0-127 130 (RPN) CHANNEL COARSE TUNING 0-127 131 (RPN) MODULATION DEPTH RANGE 0-127 132 (NRPN) VIBRATO RATE 0-127 133 (NRPN) VIBRATO DEPTH 0-127 134 (NRPN) VIBRATO DELAY 0-127 135 (NRPN) FILTER CUTOFF FREQUENCY 0-127 136 (NRPN) FILTER RESONANCE 0-127 137 (NRPN) EG ATTACK TIME 0-127 138 (NRPN) EG DECAY TIME 0-127 139 (NRPN) EG RELEASE TIME 0-127 140 POLYPHONIC KEY PRESSURE 0-127 141 AFTER TOUCH 0-127 142 PITCH BEND 0-127 25 143 (GM) MASTER VOLUME 0-127 144 (GM) MASTER BALANCE 0-127 145 (GM) MASTER FINE TUNING 0-127 146 (GM) MASTER COURSE TUNING 0-127 147 (GM2) REVERB TYPE 0-127 148 (GM2) REVERB TIME 0-127 149 (GM2) CHORUS TYPE 0-127 150 (GM2) MOD RATE 0-127 151 (GM2) MOD DEPTH 0-127 152 (GM2) FEEDBACK 0-127 153 (GM2) SEND TO REVERB 0-127 154 PROGRAM 0-127 155 GLOBAL CHANNEL 1-16 156 OCTAVE -3~3 157 TRANSPOSE -12~12 158 KEYBOARD CURVE 1-5 159 PEDAL CURVE 1-127 8.3 APPENDIX 3 LED STATUS LIST NO. STATUS DEFINITION 1 xxx 3 Digit Display, at rest shows Program Number 2 xx Positive Transposition Value 3 -xx Negative Transposition Value 4 x Positive Octave Value 5 -x Negative Octave Value 6 CHO “Choose” a function 7 on / off Current function is On or Off 8 don Current function is “done” or complete 9 Err “Error” – value range not supported 10 SEu System Exclusive upload 11 SEd System Exclusive download 26 9 TECHNICAL SUPPORT 9.1 CUSTOMER SERVICE LIVE CHAT Availability Monday – Friday: 6:00 AM – 7:00 PM PT Saturday – Sunday: 9:00 AM – 6:00 PM PT [email protected] 9.2 TECH SUPPORT LIVE CHAT Availability Monday – Friday: 6:00 AM – 7:00 PM PT Saturday – Sunday: 9:00 AM – 6:00 PM PT [email protected] 9.3 WARRANTY Limited 1-year warranty. Monoprice guarantees this product to be free of defects in material or workmanship. Please visit www.monoprice.com for full warranty support and details. Limited Warranty 1 year parts and labor © 2013 Monoprice. All rights reserved. Product features, specifications, system requirements and availability are subject to change without notice. Monoprice is a registered trademark of Monoprice. All other trademarks contained herein are the property of their respective owners. 27