1
Installation
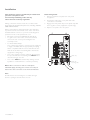
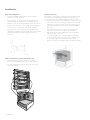
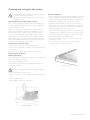
Step 3: Stability bolt
•Fasten the stability bolt bracket to the front frame
with the 2 screws supplied.
•Reposition the cooker back into the anti-tilt bracket
and then mark the position of the stability bolt hole.
•Pull the cooker back out and drill the bolt location hole.
Use a 6.5mm masonry or wood drill. When drilling into
concrete ensure a minimum hole depth of 40mm.
•Reposition the cooker back into the anti-tilt bracket,
aligning the stability bolt bracket with the 6.5mm drilled
hole. Then slide the bolt through the bracket into
the hole.
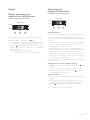
Side rack (fitted to selected models only)
•Insert the twin pegged side into the rear access
holes provided, ensuring the pegs are fully inserted.
•Then locate the front peg into the front access hole
and push in firmly.
6 installation
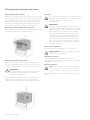
Shelves and trays
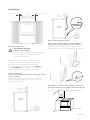
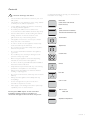
The shelves are designed so that they have maximum travel
but cannot be accidentally pulled right out. The trays are
designed the same way and fit straight into the side racks.
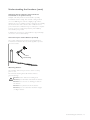
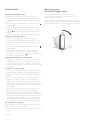
•Locate the rear edge of the shelf/tray in between 2 guide
rails of the side rack – see diagram. Ensure the same rail
positions on both sides of the oven are being engaged.
•With the front edge raised, begin to slide the shelf into
the oven.
•Once the detents have passed the front edge of the
side rack, the shelf can be pushed completely in.
•When fully inserted the shelf/tray should not interfere
with the closed oven door.
•To insert the grill tray in a separate grill product, fully
open the drawer and position the tray so that the slots
on the outer edges fit over the tabs on the slides.
•Remove extra trays and dishes before roasting or baking.