1
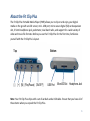
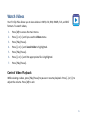
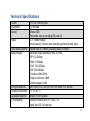
Fit Clip Plus Portable Media Player User Guide BL 8GB Thank you for purchasing a Fit Clip Plus Portable Media Player! To get the most out of your Fit Clip Plus, please read this entire user guide carefully. Disclaimers Mach Speed Technologies is not responsible for any damage to or loss of personal data due to misuse of software or hardware, abuse or damage to the device caused by the user, unauthorized attempts to modify or repair the device, use of hacked or illegal software, or other unforeseen circumstances. To prevent loss of your data, please back it up to a computer or storage device regularly. Information in this manual is subject to change without notice. Due to firmware changes, the pictures and functions described in this manual may vary somewhat from your player’s actual interface and capabilities. © 2014 Mach Speed Technologies. Copying or distributing this document without prior written consent is prohibited. i Safety and Usage Information To ensure safe operation and prevent damage to your device, please adhere to the following precautions: Do not operate your device in extreme temperatures, in wet environments, or where it may be exposed to high levels of dust or static electricity. Do not drop or strike your device or subject it to other impacts or shocks. Doing so may cause permanent damage to the battery and hardware. Do not disassemble or open the outer case of the device. This product contains no user serviceable parts. Opening the outer case or disassembling the device will void all applicable warranties. Do not disconnect the device while transferring files or formatting the hard drive or removable memory cards. Doing so may cause loss or corruption of data and permanent damage to the device. Power off the device before inserting or removing memory cards. Do not listen to your device at high volume for extended periods of time. Doing so can cause permanent hearing loss. Protect yourself by using the lowest volume setting that you can hear comfortably and take frequent breaks by removing your earphones or headphones. ii FCC Class B Statement This device complies with Part 15 of the FCC Rules. Operation is subject to the following two conditions: (1) this device may not cause harmful interference and (2) this device must accept any interference received, including interference that may cause undesired operation. This equipment has been tested and found to comply with the limits for a Class B digital device, pursuant to Part 15 of the FCC Rules. These limits are designed to provide reasonable protection. This equipment generates, uses, and can radiate radio frequency energy and, if not installed and used in accordance with the instructions, may cause interference to radio communications. If this equipment does cause harmful interference to radio or television reception, which can be determined by turning the equipment off and on, the user is encouraged to try to correct the interference by one or more of the following measures: Reorient or relocate the receiving antenna. Increase the separation between the equipment and receiver. Connect the equipment into an outlet on a circuit different from that to which the receiver is connected. Consult the dealer or an experienced radio/TV technician for help. Notice: Shielded interface cable must be used in order to comply with emission limits. Notice: Changes or modifications not expressly approved by the party responsible for compliance could void the user’s authority to operate the equipment. iii Table of Contents About the Fit Clip Plus .................. 1 View Photos.................................... 8 Charge the Battery ............................. 2 Turn the Fit Clip Plus On or Off ........... 2 Browse the Menu ............................... 2 Set a Slideshow Option ....................... 8 Add Media to Your Fit Clip Plus ... 3 Connect the Fit Clip Plus to Your Computer ........................................... 3 Add or Remove Media Files ................ 4 Synchronize Files with Windows Media Player....................................... 5 Watch Videos..................................... 6 Listen to the Radio ........................ 9 Control the Radio ................................ 9 Use the Pedometer ......................10 Control the Pedometer ..................... 10 View User Tips...............................11 Change Settings ............................11 Available Settings .............................. 12 Control Video Playback....................... 6 Get Help .........................................12 Play Music ....................................... 7 Technical Specifications................ 1 Control Music Playback ...................... 7 iv About the Fit Clip Plus The Fit Clip Plus Portable Media Player (PMP) allows you to clip on and enjoy your digital media on the go with an LCD screen, mini- USB port, micro secure digital (SD) card expansion slot, 3.5mm headphone jack, pedometer, dual band radio, and support for a wide variety of video and music file formats. Before you use the Fit Clip Plus for the first time, familiarize yourself with the Fit Clip Plus’s layout. Top [-] Bottom [+] [M] [Play/Pause] [ON/OFF] USB Port MicroSD Slot Headphone Jack Note: Your Fit Clip Plus ships with a set of earbuds and a USB cable. Ensure that you have all of these items when you unpack the Fit Clip Plus. 1 Charge the Battery Charge your Fit Clip Plus’s battery by connecting it to a computer with the supplied mini-USB cable. To charge the battery, 1. Connect the small end of the cable to the mini-USB port on the Fit Clip Plus. 2. Connect the large end of the cable to a computer. A connection icon will appear on the Fit Clip Plus’s display when you connect the device to a computer. Turn the Fit Clip Plus On or Off To turn the Fit Clip Plus on, slide the ON/OFF switch to ON. To turn the Fit Clip Plus off, slide the ON/OFF switch to OFF. Browse the Menu To access the Fit Clip Plus menu, press [M]. To navigate the menu, press [-] to move down or [+] to move up. Press [Play/Pause] to open a submenu or select an item. Press [M] to return to the previous level. 2 Add Media to Your Fit Clip Plus Your Fit Clip Plus supports a wide variety of media types, so that you can enjoy your favorite movies, digital images, and music on the move. Your Fit Clip Plus acts as a removable disk when connected to your computer, which makes transferring files quick and easy. Connect the Fit Clip Plus to Your Computer Once connected to your computer, the Fit Clip Plus acts as a removable drive. To connect the Fit Clip Plus to your computer, 1. Connect the small end of the cable to the mini-USB port on the Fit Clip Plus. 2. Connect the large end of the cable to a computer. A connection icon will appear on the Fit Clip Plus’s display when you connect the device to a computer. To disconnect the Fit Clip Plus from your computer (MS Windows), 3 1. Ensure that no media files are currently transferring to or from the device. Never disconnect the Fit Clip Plus while a file transfer is in progress. 2. Click the Safely Remove Hardware icon at the bottom right of the Windows desktop (in the System Tray). 3. When the computer informs you that it is safe to disconnect the device, disconnect the USB cable from the Fit Clip Plus. Add or Remove Media Files Once connected to your computer, you can easily drag-and-drop or copy-and-paste media files to or from the Fit Clip Plus. To transfer or remove media files, 1. Locate the Fit Clip Plus drive (on Windows computers, go to My Computer). 2. Locate a media folder on your computer. 3. Drag the media files from the media folder to the Fit Clip Plus drive or copy the files from the media folder and paste them to the Fit Clip Plus drive. 4. To remove files, select the file in the Fit Clip Plus drive and press Delete on your computer keyboard. 5. When you are finished transferring or removing files, disconnect the Fit Clip Plus from the computer. Caution: Do not disconnect the Fit Clip Plus while files are being transferred. Doing so may corrupt media files and can cause permanent damage to the Fit Clip Plus’s hard drive. Note: When you first access new media files on your Fit Clip Plus, the player may take a few seconds to update the media libraries. 4 Synchronize Files with Windows Media Player You can synchronize media files between the Fit Clip Plus and Windows Media Player. Note: The Fit Clip Plus does not support media files protected by digital rights management (DRM) protocols. To synchronize files with Windows Media Player, 1. Open Windows Media Player on your computer. 2. Connect the Fit Clip Plus to your computer with the supplied USB cable (see Connect the Fit Clip Plus to Your Computer). The Windows Media Player Device Setup screen will appear. 3. Enter a name for your device (for example, “My Fit Clip Plus”) and click Finish. The Windows Media Player Sync tab will appear. 4. Drag the music you would like to synchronize to the Sync List on the right side of the window. 5. When you are finished adding files to the Sync List, click Sync. Your Fit Clip Plus will be synchronized with the music you selected in Windows Media Player. 6. After the synchronization is complete, disconnect your Fit Clip Plus from the computer (see Connect the Fit Clip Plus to Your Computer). 5 Watch Videos Your Fit Clip Plus allows you to view videos in MP4, AVI, RM, RMVB, FLV, and DAT formats. To watch videos, 1. Press [M] to access the main menu. 2. Press [-] or [+] until you see the Videos menu. 3. Press [Play/Pause]. 4. Press [-] or [+] until Local Folder is highlighted. 5. Press [Play/Pause]. 6. Press [-] or [+] until the appropriate file is highlighted. 7. Press [Play/Pause]. Control Video Playback While viewing a video, press [Play/Pause] to pause or resume playback. Press [-] or [+] to adjust the volume. Press [M] to exit. 6 Play Music Your Fit Clip Plus allows you to play MP3, WMA, FLAC, and APE music file formats. To play music, 1. Press [M] to access the main menu. 2. Press [-] or [+] until you see the Music menu. 3. Press [Play/Pause]. The most recent track will begin playing immediately. Control Music Playback 7 To pause or resume playback, press [Play/Pause]. To adjust the volume, press and hold [-] or [+]. To skip tracks, press [-] or [+]. To select another album, folder, artist, or genre, press [M] to access the Music menu. Press [-] or [+] to highlight a folder, and then press [Play/Pause] to open the folder. Press [-] or [+] to highlight a file, and then press [Play/Pause] to select the file. To change the repeat or equalizer settings, select Repeat or Equalizer from the Music menu. Press [-] or [+] to highlight an option, and then press [Play/Pause] to set it. View Photos Your Fit Clip Plus allows you to view photos in popular file formats. To view photos, 1. Press [M] to access the main menu. 2. Press [-] or [+] until you see the Pictures menu. 3. Press [Play/Pause]. 4. Press [-] or [+] until Local Folder is highlighted. 5. Press [Play/Pause]. 6. Press [-] or [+] until the appropriate file is highlighted. 7. Press [Play/Pause]. 8. Press [-] or [+] or skip photos. Set a Slideshow Option From the Pictures menu, 1. 8 Press [-] or [+] until Playback Set is highlighted. 2. Press [Play/Pause]. 3. Press [-] or [+] to select a slideshow option, and then press [Play/Pause] to set it. Listen to the Radio Your Fit Clip Plus allows you to listen to Normal or Japanese radio bands. You must connect earphones or headphones to pick up radio stations. To listen to the radio, 1. Press [M] to access the main menu. 2. Press [-] or [+] until you see the Radio menu. 3. Press [Play/Pause]. 4. Press [-] or [+] until the appropriate band is highlighted. 5. Press [Play/Pause]. Control the Radio To change stations, press [-] or [+]. To adjust the volume, press and hold [-] or [+]. To scan for available stations automatically, press [M] to access the Radio menu. Press [-] or [+] until Auto Search is highlighted, and then press [Play/Pause]. The radio will scan and save all available stations in your area. To save or delete channels, from the Radio menu, press [-] or [+] until an option is highlighted. Press [Play/Pause] to select the option. 9 Use the Pedometer Your Fit Clip Plus includes a pedometer, to record the time, number of steps, distance, and calories you expend while walking. To use the pedometer, 1. Press [M] to access the main menu. 2. Press [-] or [+] until you see the Pedometer menu. 3. Press [Play/Pause]. 4. Press [-] or [+] until On/Off is highlighted. 5. Press [Play/Pause]. 6. Press [-] or [+] until On is highlighted. Control the Pedometer To view the pedometer, from the Pedometer menu, press [-] or [+] until Pedometer is highlighted, and then press [Play/Pause]. To view the pedometer history, from the Pedometer menu, press [-] or [+] until History is highlighted, and then press [Play/Pause]. To clear the pedometer history, from the Pedometer menu, press [-] or [+] until Clear History is highlighted, and then press [Play/Pause]. 10 View User Tips Your Fit Clip Plus includes handy user tips to get the most from your device. To view the user tips, 1. Press [M] to access the main menu. 2. Press [-] or [+] until you see the User Tips menu. 3. Press [Play/Pause]. 4. Press [-] or [+] to scroll through the user tips. Change Settings To change settings, 1. Press [M] to access the main menu. 2. Press [-] or [+] until you see the Settings menu. 3. Press [Play/Pause]. 4. Press [-] or [+] until the appropriate setting is highlighted, then press [Play/Pause] to select the setting. 5. Press [-] or [+] to change settings and press [M] to advance fields. 6. Press [Play/Pause] to save the setting. 11 Available Settings Date/Time – Set the date and time. LCD Set – Set the delay (in seconds) before the screen dims automatically when idle (AutoDim). Language – Set the display language (English, French, or Spanish). Auto Off – Set the delay (in minutes) before the player turns off automatically when idle. Memory Info – View the percentage of memory that used for media storage. Firmware Version – View the firmware version. Get Help If you are having difficulty with your Fit Clip Plus, contact Mach Speed Technical Support at 1580-272-0035. 12 Technical Specifications Screen File transfer Memory Battery Radio bands supported Media Playback File types supported Operating environment Languages supported OS compatibility 1.8” LCD: 128x160 pixels (1) mini-USB Internal: 4GB Removable: micro secure digital (SD) card slot 3.7V, 160MAH battery Music playback: 4-6 hours when used with earphones for audio output Normal band (87-108MHz), Alternative Band (76-90MHz) Max audio output (earphones): 9Mw, 32 Ohms MP3: 32-320Kbps WMA: 32-384Kbps FLAC: 700-1200kbps APE: 500-1000kbps Frequency: 20Hz-20KHz Signal to noise ratio: >90dB Distortion degree: 0.06% MP3, WAV, FLAC, APE, MP4, AVI, RM, RMVB, FLV, and DAT -5ºC to 40º C English, French, Spanish Microsoft: Windows 2000, XP, Vista, 7, 8.1 Apple: Mac OSX 10.4 and later 13 Back Cover