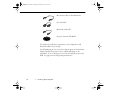
1
80009000.book Page i Monday, November 1, 1999 9:35 AM
®
®
EPSON PowerLite
8000i/9000i
User’s Guide
80009000.book Page ii Monday, November 1, 1999 9:35 AM
All rights reserved. No part of this publication may be reproduced, stored in a retrieval system, or transmitted in
any form or by any means, electronic, mechanical, photocopying, recording, or otherwise, without the prior
written permission of SEIKO EPSON CORPORATION. No patent liability is assumed with respect to the use
of the information contained herein. Neither is any liability assumed for damages resulting from the use of the
information contained herein.
Neither SEIKO EPSON CORPORATION nor its affiliates shall be liable to the purchaser of this product or third
parties for damages, losses, costs, or expenses incurred by purchaser or third parties as a result of: accident, misuse,
or abuse of this product or unauthorized modifications, repairs, or alterations to this product, or (excluding the
U.S.) failure to strictly comply with SEIKO EPSON CORPORATION’s operating and maintenance
instructions.
SEIKO EPSON CORPORATION shall not be liable against any damages or problems arising from the use of
any options or any consumable products other than those designated as Original EPSON Products or EPSON
Approved Products by SEIKO EPSON CORPORATION.
EPSON and PowerLite are registered trademarks of SEIKO EPSON CORPORATION.
SoundAdvice is a service mark and FaxAdvice is a trademark of Epson America, Inc.
SRS and the
symbol are registered trademarks of SRS Labs, Inc., in the United States
and selected foreign countries. SRS technology is incorporated under license from SRS Labs, Inc.
®
General Notice: Other product names used herein are for identification purposes only and may be
trademarks of their respective owners. EPSON disclaims any and all rights in those marks.
Copyright © 1999 by Epson America, Inc.
Long Beach, California, USA
ii
CPD 9112 R1
10/99
80009000.book Page iii Monday, November 1, 1999 9:35 AM
Important Information About Your Projector
Important Safety Information
WARNING: Never look into the projector lens when the lamp is turned on; the bright light can damage your eyes. Never
let children look into the lens when it is on. Never open any cover on the projector, except the lamp and filter covers.
Dangerous electrical voltages inside the projector can severely injure you. Except as specifically explained in this User’s
Guide, do not attempt to service this product yourself. Refer all servicing to qualified service personnel.
WARNING: The projector and its accessories come packaged in plastic bags. Keep plastic bags away from small children
to avoid any risk of suffocation.
Caution: When you replace the lamp, never touch the new lamp with your bare hands; the invisible residue left by the
oil on your hands may shorten the lamp life. Use a cloth or glove to handle the new lamp.
Remote Control Information
You can operate the projector by remote control via a line-of-sight infrared (IR) receiver at the front and rear of
the projector. The projector may not respond to remote control commands under the following conditions:
❐
❐
❐
❐
❐
There is an object between the remote control IR emitter and the IR receiver on the projector.
Ambient light is too bright.
Certain types of fluorescent lighting are used.
A strong light source shines into the IR receiver.
Other equipment that emits infrared energy, such as a radiant room heater, is in the room.
These conditions commonly cause problems for most infrared-controlled equipment. Try the following:
❐
❐
❐
❐
The remote control unit’s batteries may be low on power; replace them.
Dim the ambient lighting and/or turn off any fluorescent lights.
Close any window coverings and/or move the projector out of direct sunlight.
Turn off other equipment that emits infrared energy.
If the remote control still does not work properly, remember you can always control your computer-based
presentation directly from the computer, even in an environment containing one of the conditions listed above.
iii
80009000.book Page iv Monday, November 1, 1999 9:35 AM
FCC Compliance Statement
For United States Users
This equipment has been tested and found to comply with the limits for a Class B digital device, pursuant to
Part 15 of the FCC Rules. These limits are designed to provide reasonable protection against harmful interference
in a residential installation. This equipment generates, uses, and can radiate radio frequency energy and, if not
installed and used in accordance with the instructions, may cause harmful interference to radio or television
reception. However, there is no guarantee that interference will not occur in a particular installation. If this
equipment does cause interference to radio and television reception, which can be determined by turning the
equipment off and on, the user is encouraged to try to correct the interference by one or more of the following
measures.
❐
❐
❐
❐
Reorient or relocate the receiving antenna.
Increase the separation between the equipment and receiver.
Connect the equipment into an outlet on a circuit different from that to which the receiver is connected.
Consult the dealer or an experienced radio/TV technician for help.
WARNING
The connection of a non-shielded equipment interface cable to this equipment will invalidate the FCC
Certification of this device and may cause interference levels which exceed the limits established by the FCC for
this equipment. It is the responsibility of the user to obtain and use a shielded equipment interface cable with this
device. If this equipment has more than one interface connector, do not leave cables connected to unused
interfaces. Changes or modifications not expressly approved by the manufacturer could void the user’s authority
to operate the equipment.
For Canadian Users
This Class B digital apparatus meets all requirements of the Canadian Interference-Causing Equipment
Regulations.
Cet appareil numérique de la classe B respecte toutes les exigences du Règlement sur le materiel brouilleur du
Canada.
iv
80009000.book Page v Monday, November 1, 1999 9:35 AM
DECLARATION of CONFORMITY
According to 47CFR, Part 2 and 15
Declare under sole responsibility that the product identified herein, complies with 47CFR Part 2 and 15 of the
FCC rules as a Class B digital device. Each product marketed, is identical to the representative unit tested and
found to be compliant with the standards. Records maintained continue to reflect the equipment being produced
can be expected to be within the variation accepted, due to quantity production and testing on a statistical basis
as required by 47CFR §2.909 Operation is subject to the following two conditions: (1) this device may not cause
harmful interference, and (2) this device must accept any interference received, including interference that may
cause undesired operation.
Representative:
Address:
Telephone:
EPSON AMERICA, INC.
20770 Madrona Avenue
MS: B2-11
Torrance, CA 90503
(310) 782-5254
Manufacturer:
Address:
SEIKO EPSON CORPORATION
3-5, Owa 3-Chome, Suwa-shi, Nagano-ken 392-8502
Japan
Type of Product:
Type of Device:
Model:
LCD Projector
Class B Personal computers and peripherals
EMP-8000/9000
We hereby declare that the equipment specified above
conforms to the above Standards.
v
80009000.book Page vi Monday, November 1, 1999 9:35 AM
vi
80009000.book Page vii Monday, November 1, 1999 9:35 AM
Contents
Introduction
1
Getting the Most Out of Your Projector . . . . . . . . . . . . . . . . . . . . . . . . . . . . . . . . 3
Optional Accessories . . . . . . . . . . . . . . . . . . . . . . . . . . . . . . . . . . . . . . . . . . . . . . . 4
About This Guide . . . . . . . . . . . . . . . . . . . . . . . . . . . . . . . . . . . . . . . . . . . . . . . . . 6
Where to Get Help . . . . . . . . . . . . . . . . . . . . . . . . . . . . . . . . . . . . . . . . . . . . . . . . 7
Electronic Support Services . . . . . . . . . . . . . . . . . . . . . . . . . . . . . . . . . . . . . . . 7
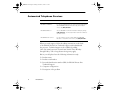
Automated Telephone Services . . . . . . . . . . . . . . . . . . . . . . . . . . . . . . . . . . . . 8
Safety Instructions . . . . . . . . . . . . . . . . . . . . . . . . . . . . . . . . . . . . . . . . . . . . . . . . . 9
1 Setting Up the Projector
13
Unpacking the Projector . . . . . . . . . . . . . . . . . . . . . . . . . . . . . . . . . . . . . . . . . . . 14
Additional Components . . . . . . . . . . . . . . . . . . . . . . . . . . . . . . . . . . . . . . . . 17
Installing the Remote Control Batteries . . . . . . . . . . . . . . . . . . . . . . . . . . . . . . . . 18
Before You Connect the Projector . . . . . . . . . . . . . . . . . . . . . . . . . . . . . . . . . . . . 19
vii
80009000.book Page viii Monday, November 1, 1999 9:35 AM
Connecting to a Computer . . . . . . . . . . . . . . . . . . . . . . . . . . . . . . . . . . . . . . . . . .21
Connecting to a PC Desktop Computer . . . . . . . . . . . . . . . . . . . . . . . . . . . .22
Connecting to a PC Laptop Computer . . . . . . . . . . . . . . . . . . . . . . . . . . . . .29
Connecting to a Desktop Macintosh . . . . . . . . . . . . . . . . . . . . . . . . . . . . . . .34
Connecting to a PowerBook . . . . . . . . . . . . . . . . . . . . . . . . . . . . . . . . . . . . .43
Connecting to a High-End Workstation . . . . . . . . . . . . . . . . . . . . . . . . . . . .52
Connecting to a Video Source . . . . . . . . . . . . . . . . . . . . . . . . . . . . . . . . . . . . . . .52
Connecting to an External Speaker or PA System . . . . . . . . . . . . . . . . . . . . . . . . .56
Turning the Equipment On and Off . . . . . . . . . . . . . . . . . . . . . . . . . . . . . . . . . . 57
Turning the Projector On and Off . . . . . . . . . . . . . . . . . . . . . . . . . . . . . . . . .58
2 Using the Projector
61
Positioning the Projector . . . . . . . . . . . . . . . . . . . . . . . . . . . . . . . . . . . . . . . . . . . .62
Calculating Image Size and Projection Distance . . . . . . . . . . . . . . . . . . . . . . . 65
Focusing and Positioning the Screen Image . . . . . . . . . . . . . . . . . . . . . . . . . . . . .69
Resizing the Projected Image . . . . . . . . . . . . . . . . . . . . . . . . . . . . . . . . . . . . . . . .71
Sleep Mode . . . . . . . . . . . . . . . . . . . . . . . . . . . . . . . . . . . . . . . . . . . . . . . . . . . . . .72
Controlling the Projector . . . . . . . . . . . . . . . . . . . . . . . . . . . . . . . . . . . . . . . . . . . 72
Using the Remote Control . . . . . . . . . . . . . . . . . . . . . . . . . . . . . . . . . . . . . . . 73
Using the Control Panel . . . . . . . . . . . . . . . . . . . . . . . . . . . . . . . . . . . . . . . .78
Projector Status Lights . . . . . . . . . . . . . . . . . . . . . . . . . . . . . . . . . . . . . . . . . . . . . 80
Power Light . . . . . . . . . . . . . . . . . . . . . . . . . . . . . . . . . . . . . . . . . . . . . . . . . .81
Projection Lamp Light . . . . . . . . . . . . . . . . . . . . . . . . . . . . . . . . . . . . . . . . . .81
Temperature Light . . . . . . . . . . . . . . . . . . . . . . . . . . . . . . . . . . . . . . . . . . . . .82
3 Using the Projector Menus
83
Accessing the Main Menu . . . . . . . . . . . . . . . . . . . . . . . . . . . . . . . . . . . . . . . . . . .85
Changing a Menu Setting . . . . . . . . . . . . . . . . . . . . . . . . . . . . . . . . . . . . . . . . . . .86
Video Menu (Image Source = Computer) . . . . . . . . . . . . . . . . . . . . . . . . . . . . . .88
viii
80009000.book Page ix Monday, November 1, 1999 9:35 AM
Video Menu (Image Source = Video) . . . . . . . . . . . . . . . . . . . . . . . . . . . . . . . . . 90
Audio Menu . . . . . . . . . . . . . . . . . . . . . . . . . . . . . . . . . . . . . . . . . . . . . . . . . . . . 92
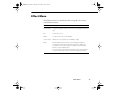
Effect Menu . . . . . . . . . . . . . . . . . . . . . . . . . . . . . . . . . . . . . . . . . . . . . . . . . . . . 93
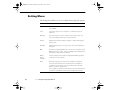
Setting Menu . . . . . . . . . . . . . . . . . . . . . . . . . . . . . . . . . . . . . . . . . . . . . . . . . . . . 94
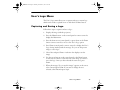
User’s Logo Menu . . . . . . . . . . . . . . . . . . . . . . . . . . . . . . . . . . . . . . . . . . . . . . . . 95
Capturing and Saving a Logo . . . . . . . . . . . . . . . . . . . . . . . . . . . . . . . . . . . . . 95
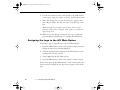
Assigning the Logo to the A/V Mute Button . . . . . . . . . . . . . . . . . . . . . . . . . 96
Reset All Menu . . . . . . . . . . . . . . . . . . . . . . . . . . . . . . . . . . . . . . . . . . . . . . . . . . . 97
Advanced Menu . . . . . . . . . . . . . . . . . . . . . . . . . . . . . . . . . . . . . . . . . . . . . . . . . . 97
About Menu (Image Source = Computer) . . . . . . . . . . . . . . . . . . . . . . . . . . . . . . 99
About Menu (Image Source = Video) . . . . . . . . . . . . . . . . . . . . . . . . . . . . . . . . . . 99
4 Using ELP Link IV
101
Installing the Software . . . . . . . . . . . . . . . . . . . . . . . . . . . . . . . . . . . . . . . . . . . . 102
Connecting Needed Cables . . . . . . . . . . . . . . . . . . . . . . . . . . . . . . . . . . . . . 102
Installing the Software for Windows . . . . . . . . . . . . . . . . . . . . . . . . . . . . . . 102
Installing the Software for a Macintosh . . . . . . . . . . . . . . . . . . . . . . . . . . . . 104
Starting ELP Link IV . . . . . . . . . . . . . . . . . . . . . . . . . . . . . . . . . . . . . . . . . . . . . 105
Starting the Program from Windows . . . . . . . . . . . . . . . . . . . . . . . . . . . . . . 105
Starting the Program on a Macintosh . . . . . . . . . . . . . . . . . . . . . . . . . . . . . 106
Changing the COM Port Assignment . . . . . . . . . . . . . . . . . . . . . . . . . . . . . 106
Customizing the Remote Control Effects Buttons . . . . . . . . . . . . . . . . . . . . . . . 107
Function Description and Usage . . . . . . . . . . . . . . . . . . . . . . . . . . . . . . . . . 107
Assigning Functions . . . . . . . . . . . . . . . . . . . . . . . . . . . . . . . . . . . . . . . . . . . 111
Setting Effects Options . . . . . . . . . . . . . . . . . . . . . . . . . . . . . . . . . . . . . . . . 112
Assigning Functions to the Keyboard . . . . . . . . . . . . . . . . . . . . . . . . . . . . . . 115
Saving and Recalling Effects Button Assignments . . . . . . . . . . . . . . . . . . . . 116
ix
80009000.book Page x Monday, November 1, 1999 9:35 AM
Controlling Projector Features . . . . . . . . . . . . . . . . . . . . . . . . . . . . . . . . . . . . . .117
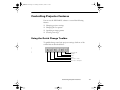
Using the Quick Change Toolbar . . . . . . . . . . . . . . . . . . . . . . . . . . . . . . . .117
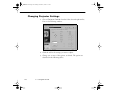
Changing Projector Settings . . . . . . . . . . . . . . . . . . . . . . . . . . . . . . . . . . . . .118
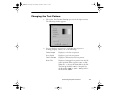
Changing the Test Pattern . . . . . . . . . . . . . . . . . . . . . . . . . . . . . . . . . . . . . .125
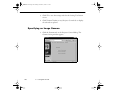
Specifying an Image Gamma . . . . . . . . . . . . . . . . . . . . . . . . . . . . . . . . . . . .126
Saving Projector Setting Files . . . . . . . . . . . . . . . . . . . . . . . . . . . . . . . . . . . .127
Opening a Projector Setting File . . . . . . . . . . . . . . . . . . . . . . . . . . . . . . . . . 128
Creating a User Logo . . . . . . . . . . . . . . . . . . . . . . . . . . . . . . . . . . . . . . . . . . 129
Creating Cursors/Stamps . . . . . . . . . . . . . . . . . . . . . . . . . . . . . . . . . . . . . . .131
Exiting the Software . . . . . . . . . . . . . . . . . . . . . . . . . . . . . . . . . . . . . . . . . . . . . .133
5 Maintenance
135
Cleaning the Lens . . . . . . . . . . . . . . . . . . . . . . . . . . . . . . . . . . . . . . . . . . . . . . .136
Cleaning the Projector Case . . . . . . . . . . . . . . . . . . . . . . . . . . . . . . . . . . . . . . . .136
Cleaning the Air Filter . . . . . . . . . . . . . . . . . . . . . . . . . . . . . . . . . . . . . . . . . . . . 137
Replacing the Lamp . . . . . . . . . . . . . . . . . . . . . . . . . . . . . . . . . . . . . . . . . . . . .138
Transporting the Projector . . . . . . . . . . . . . . . . . . . . . . . . . . . . . . . . . . . . . . . . .141
6 Troubleshooting
143
Problems with the Projector . . . . . . . . . . . . . . . . . . . . . . . . . . . . . . . . . . . . . . . .144
Problems with the Remote Control . . . . . . . . . . . . . . . . . . . . . . . . . . . . . . . . . . .147
Problems with the Image or Sound . . . . . . . . . . . . . . . . . . . . . . . . . . . . . . . . . . .148
x
7 Technical Specifications
151
Glossary
159
Index
163
80009000.book Page 1 Monday, November 1, 1999 9:35 AM
Introduction
Your EPSON® PowerLite® projector is a brilliant, lightweight,
portable projector that allows you to project full-color images and
video onto a large screen for presentations. You can connect it
simultaneously to four image sources: two computers or workstation
sources, plus two video sources, such as a VCR, DVD player,
camcorder, or digital camera. You can also connect audio for each
image source.
Images are displayed in full color (16,770,000 colors) at a resolution of
1024 × 768 pixels on the PowerLite 8000i and a resolution of
1366 × 1024 pixels on the PowerLite 9000i. The projector supports a
wide variety of video inputs, from VGA to SXGA with resolutions up
to 1600 × 1200. It produces bright images that can be easily seen in
rooms light enough to take notes.
1
80009000.book Page 2 Monday, November 1, 1999 9:35 AM
Your projector’s two speakers employ a built-in SRS ® 3D sound
system for rich, powerful audio output. You can even connect an
external speaker when further amplification is required.
For your presentations, you can select front, rear, or ceiling projection.
This provides maximum flexibility in choosing the best display
method for each environment.
You control your projector through a hand-held remote control unit,
with menus provided for image source switching and image
adjustment. The remote control can also act as a wireless mouse to
control operations on your computer screen during presentations.
Additionally, you can install the projector’s ELP Link IV software to
control the projector’s settings from your computer and enhance your
presentations with special effects.
Your projector features a new patented SizeWise™ chip for support of
VGA, SVGA, XGA, SXGA and UXGA output. No matter what type
of computer output is used, the result is a full-size video image of
outstanding clarity.
The projector supports a wide range of computers and workstations:
IBM ® compatible PCs and laptops, Apple® Macintosh,® Power
Macintosh,™ Power Macintosh G3,™ and PowerBook® computers, and
workstations such as the Sun ® SPARCstation.™ The video source can
be HDTV, NTSC, PAL, or SECAM. The projector automatically
senses the video format, which can be composite video, S-Video, or
component video. See Chapter 7 for details on supported computers
and video formats.
2
Introduction
80009000.book Page 3 Monday, November 1, 1999 9:35 AM
Getting the Most Out of Your Projector
Your projector comes with a full set of features that enable you to
control the settings for the image display, video, and audio. To get the
most out of the projector, read this section for a quick summary of the
important features.
Remote Control
The buttons on the remote control allow you to turn the projector on
and off, and provide direct access to zoom, freeze, volume, mute, and
image source switching. Use the remote control buttons to access
custom functions and the projector’s menu system. You can also use
the remote control to control your computer in place of your
computer’s mouse.
Sleep Mode
Sleep mode conserves electricity by automatically turning off the lamp
after the projector has not been used for 30 minutes. In sleep mode,
the projector remains on but the lamp is turned off, conserving
electricity, cooling the projector, and extending the life of the lamp.
To return to normal operation, press the Power button.
Online Help
Extensive online help is available for operating the projector and
working in the projector’s feature menus. You can display the help
menu at any time by pressing the Help button on either the control
panel or the remote control.
Getting the Most Out of Your Projector
3
80009000.book Page 4 Monday, November 1, 1999 9:35 AM
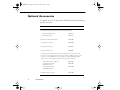
Optional Accessories
To enhance your use of the projector, EPSON provides the following
optional accessories:
Product
Product number
Customized carrying cases for the projector and its cables:
Hard shell carrying case
ATA shipping case
ELPKS22
ELPKS21
Replacement lamp and air filter
ELPLP08
Short throw zoom lens
ELPLW01
Long throw zoom lens
ELPLL02
Fixed short throw lens
ELPLR01
Communication kit cable set and computer cable so you can connect your
projector to a second computer. There is also a Mac ® adapter set so you can
connect to a second Macintosh. You may also need the VGA-13W3 video
cable if you’re connecting the projector to a high-end workstation.
ELP communication cable set
Computer video cable
(HD15/H15, 1.8m)
Computer video cable
(HD15/HD15, 3.0m)
Portable projection screen
4
Introduction
ELPKC04
ELPKC02
ELPKC09
ELPSC06
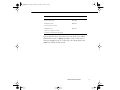
80009000.book Page 5 Monday, November 1, 1999 9:35 AM
Product
Product number
Remote IR receiver
ELPST02
Mediaphile ™ PAS
(personal audio system)
ELPPAS1
Mediaphile CVS
(clear voice system, wireless
microphone and satellite speakers)
ELPCVS1
You can purchase these accessories from your dealer or by calling
EPSON Accessories at (800) 873-7766; or visit our web site at
www.epsonsupplies.com (U.S. sales only). In Canada, please call
(800) 873-7766 for dealer referral.
Optional Accessories
5
80009000.book Page 6 Monday, November 1, 1999 9:35 AM
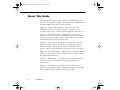
About This Guide
This guide describes how to set up and use your EPSON PowerLite
projector. The instructions apply to both the PowerLite 8000i and the
PowerLite 9000i, except where noted otherwise.
Chapter 1, “Setting Up the Projector,” provides step-by-step
instructions on how to set up your projector; connect it to your
computer, video source, or other optional equipment; and turn it on.
Chapter 2, “Using the Projector,” explains how to position the
projector relative to the screen, focus and position the screen image,
control the projector using the remote control and the control panel,
and monitor the projector’s operating status.
Chapter 3, “Using the Projector Menus,” describes how to use the
projector’s built-in menus to adjust the color and image settings,
change the display of the projected image, set and adjust various
projector options, and modify audio settings such as bass and treble.
Chapter 4, “Using ELP Link IV,” explains how to use the ELP Link IV
software to control the projector settings from the computer and use
the special effects functions.
Chapter 5, “Maintenance,” covers basic procedures for maintaining
your projector in good working order and gives guidelines for
transporting it.
Chapter 6, “Troubleshooting,” describes how to interpret your
projector’s warning lights and gives helpful information for avoiding
errors, optimizing image quality, and solving problems.
6
Introduction
80009000.book Page 7 Monday, November 1, 1999 9:35 AM
Chapter 7, “Technical Specifications,” lists the technical specifications
for the projector.
A Glossary and Index are provided at the end of the manual.
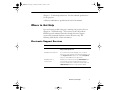
Where to Get Help
If you are having trouble setting up or running your projector, first see
Chapter 6, “Troubleshooting.” If you cannot resolve the problem,
EPSON provides technical assistance through electronic support
services and automated telephone services 24 hours a day. The
following tables list the contact information.
Electronic Support Services
Service
Access
World Wide Web
From the Internet, you can reach EPSON’s Home Page at
http://www.epson.com.
EPSON Internet FTP Site
If you have Internet FTP capability, use your Web
browser (or other software for FTP downloading) to log
onto ftp.epson.com with the user name anonymous
and your e-mail address as the password.
EPSON Forum on
CompuServe®
Members of CompuServe can type GO EPSON at the
menu prompt to reach the Epson America Forum.
For a free introductory CompuServe membership, call
(800) 848-8199 and ask for representative #529.
Where to Get Help
7
80009000.book Page 8 Monday, November 1, 1999 9:35 AM
Automated Telephone Services
Service
Access
EPSON SoundAdvice SM
For pre-recorded answers to commonly asked questions
about EPSON products 24 hours a day, seven days a
week, call (800) 922-8911.
EPSON FaxAdvice ™
Access EPSON’s technical information library by calling
(800) 922-8911. You must provide a return fax number to
use this service.
EPSON Referral Service
For the location of your nearest Authorized EPSON
Reseller or Customer Care Center, call (800) 922-8911.
When you need support, follow the calling instructions on the back
of the EPSON Private Line Technical Support card included with
the projector. Technical support is also available by calling
(562) 276-4394 between 6 AM and 6 PM, Pacific Time, Monday
through Friday. Toll or long distance charges may apply.
Before you call, please have the following information ready:
❐
❐
❐
❐
❐
8
Product name
Product serial number
Personal identification number (PIN) for EPSON Private Line
Technical Support
Computer configuration
Description of the problem
Introduction
80009000.book Page 9 Monday, November 1, 1999 9:35 AM
You can purchase accessories from EPSON Accessories at
(800) 873-7766, or visit our web site at www.epsonsupplies.com (U.S.
sales only). In Canada, please call (800) 873-7766 for dealer referral.
Safety Instructions
Follow these safety instructions when setting up and using the
projector:
1. Do not place the projector on an unstable cart, stand, or table.
2. Do not use the projector near water or sources of heat.
3. Use attachments only as recommended.
4. Use the type of power source indicated on the projector. If you are
not sure of the power available, consult your dealer or power
company.
5. Place the projector near a wall outlet where the plug can be easily
unplugged.
Placez le projecteur près d’une prise de contacte où la fiche peut être
débranchée facilement.
6. Insert the projector’s three-wire grounding-type plug into a
properly grounded outlet. If you have a two-prong outlet, contact
an electrician to replace it. Do not hold the plug with wet hands.
7. Take the following precautions for the plug. Failure to comply
with these precautions could result in sparks or fire.
Do not insert the plug into an outlet with dust present.
❐ Insert the plug firmly into the outlet.
❐
Safety Instructions
9
80009000.book Page 10 Monday, November 1, 1999 9:35 AM
8. Do not overload wall outlets, extension cords, or integral
convenience receptacles. This can cause fire or electric shock.
9. Do not place the projector where the cord can be walked on. This
may result in fraying or damage to the plug.
10. Unplug the projector from the wall outlet before cleaning. Use a
damp cloth for cleaning. Do not use liquid or aerosol cleaners.
11. Do not block the slots and openings in the projector case. They
provide ventilation and prevent the projector from overheating.
Do not operate the projector on a sofa, rug, or other soft surface,
or in a closed-in cabinet unless proper ventilation is provided.
12. Never push objects of any kind through cabinet slots. Never spill
liquid of any kind into the projector.
13. Except as specifically explained in this User’s Guide, do not
attempt to service this product yourself. Refer all servicing to
qualified service personnel. Opening or removing covers may
expose you to dangerous voltages and other hazards.
14. Unplug the projector during lightning storms or when it will not
be used for extended periods.
15. Do not place the projector and remote control on top of
heat-producing equipment or in a heated place, such as a car.
16. Unplug the projector from the wall outlet and refer servicing to
qualified service personnel under the following conditions:
When the power cord or plug is damaged or frayed
❐ If liquid has been spilled into the projector, or if it has been
exposed to rain or water
❐
10
Introduction
80009000.book Page 11 Monday, November 1, 1999 9:35 AM
If it does not operate normally when you follow the operating
instructions, or if it exhibits a distinct change in performance,
indicating a need for service
❐ If it has been dropped or the housing has been damaged.
❐
17. If you use the projector in a country other than where you
purchased it, use the power cable that is suitable to that country.
Safety Instructions
11
80009000.book Page 12 Monday, November 1, 1999 9:35 AM
12
Introduction
80009000.book Page 13 Monday, November 1, 1999 9:35 AM
1
Setting Up the Projector
T
his chapter describes how to unpack your projector, connect it to
other equipment, and turn everything on. The projector must be
connected to a computer or a video source such as a VCR, DVD
player, camcorder, digital camera, or laser disc player before it can
project any images. You may also want to set up the projector for one
or more of the following:
❐
❐
❐
Connect the mouse cable to use the remote control as a wireless
mouse. Except for some laptops, this disables your computer’s
mouse. If you are also viewing the display on your monitor, you
use the remote control’s pointer to control the screen cursor.
Provide audio for one or both image sources. The audio source can
be the computer, video source, or another device such as a stereo.
Connect to an external speaker or PA system to amplify the audio.
13
80009000.book Page 14 Monday, November 1, 1999 9:35 AM
Unpacking the Projector
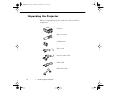
When you unpack the projector, make sure you have all these
components:
Projector
E-Zoom
Mute
eze
A/V
Remote control
Fre
2
1
3
4
Esc
ON
R/C OFF
er
Pow
er
Ent
5
2 AA batteries
Power cord
Projector video cable
Audio cable
RCA audio cable
14
1 • Setting Up the Projector
80009000.book Page 15 Monday, November 1, 1999 9:35 AM
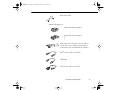
RCA video cable
Macintosh adapter set:
Macintosh desktop adapter
Macintosh monitor adapter
Main cable (for connecting a mouse cable to
use the remote as a wireless mouse and/or a
serial cable to use the ELP Link IV software)
PS/2® mouse cable (for the PC)
USB cable
Serial mouse cable (for the PC)
Unpacking the Projector
15
80009000.book Page 16 Monday, November 1, 1999 9:35 AM
Mac mouse cable (for the Macintosh)
PC serial cable
Macintosh serial cable
Projector Software CD ROM
You will not need all these components; your configuration will
determine which ones you need.
Save all packaging in case you need to ship the projector in the future.
Always transport the projector in its original packaging (or the
equivalent), or use a carrying case if you are carrying the projector by
hand. (See page 141 for transporting instructions.)
16
1 • Setting Up the Projector
80009000.book Page 17 Monday, November 1, 1999 9:35 AM
Additional Components
Depending on how you plan to use the projector, you may need
additional components:
❐
❐
❐
To receive an S-Video signal, you need an S-Video cable. (One is
usually provided with your video device.) A separate cable is
required for each video source.
To connect a second computer, you need a computer video and
audio cable.
To connect the projector to a Macintosh PowerBook, you may
need a video-out cable (provided by Apple). If your PowerBook
requires a video-out cable and you do not have one, see your
Macintosh dealer.
Note: You cannot currently use the ELP Link IV software with a
Power Macintosh G3 or iMac. Check with your dealer for future
support.
❐
❐
To connect the projector to an external sound system, you need an
RCA-to-3.5 mm stereo audio cable. You can obtain one from your
computer dealer.
To connect the mouse cable to your computer, you may require a
special connector, cable, or other components. You can obtain
these items from your computer dealer.
Note: You can connect a Kensington MicroSaver® anti-theft device in
the hole on the projector’s right side. Contact your computer dealer.
Unpacking the Projector
17
80009000.book Page 18 Monday, November 1, 1999 9:35 AM
Installing the Remote Control Batteries
You can use the remote control as a wireless mouse instead of your
computer’s mouse to control your presentation. You can also use it to
control the projector menus and use the Effects buttons.
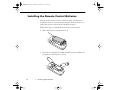
Follow these steps to install the batteries in the remote control:
1. Slide off the battery compartment cover.
2. Insert the two AA batteries included with the projector. Make sure
the polarity of the batteries is correct.
18
1 • Setting Up the Projector
80009000.book Page 19 Monday, November 1, 1999 9:35 AM
3. Replace the battery compartment cover.
When replacing batteries, take the following precautions:
❐
❐
❐
Do not mix old and new batteries.
Replace batteries as soon as they run out. If the batteries leak, wipe
away battery fluid with a soft cloth. If fluid gets on your hands,
wash them immediately.
Remove batteries if you will not be using the projector for a long
period of time.
Before You Connect the Projector
Before you start connecting the projector to your equipment, decide
where you will want to place your projector and computer or video
source. The distance between the projector and the screen determines
the actual image size. Place the projector somewhere between 3.6 and
52.1 feet (1.1 and 15.9 meters) away from the screen; use the general
guidelines in the table below to determine the proper distance. (For
more precise calculations, see “Positioning the Projector” on page 62.)
Caution: Do not hold or lift the projector by the lens. This can damage the
lens.
Before You Connect the Projector
19
80009000.book Page 20 Monday, November 1, 1999 9:35 AM
Horizontal distance from projector to screen
Image size (diagonal)
Minimum
Maximum
300 inches (10 m)
460.6 inches (11.7 m)
586.6 inches (14.9 m)
200 inches (5.1 m)
307.1 inches (7.8 m)
389.8 inches (9.9 m)
100 inches (2.54 m)
153.5 inches (3.9 m)
192.9 inches (4.9 m)
80 inches (2.03 m)
122.0 inches (3.1 m)
153.5 inches (3.9 m)
60 inches (1.52 m)
90.6 inches (2.3 m)
114.2 inches (2.9 m)
40 inches (1.02 m)
59.1 inches (1.5 m)
74.8 inches (1.9 m)
30 inches (0.76 m)
43.3 inches (1.1 m)
55.1 inches (1.4 m)
Be sure to place the projector on a sturdy, level surface within five feet
of the computer or video source.
20
1 • Setting Up the Projector
80009000.book Page 21 Monday, November 1, 1999 9:35 AM
Connecting to a Computer
You can connect the projector to any computer capable of producing
standard VGA, Super VGA (SVGA), XGA, Super XGA (SXGA), or
UXGA output, such as:
❐
❐
❐
❐
❐
IBM compatible desktop PCs
IBM compatible laptop PCs
Apple Macintosh desktop computers, including Macintosh
Quadra,® Macintosh Centris,® Power Macintosh, and Power
Macintosh G3
Any Apple PowerBook with video-out capability
Most high-end workstations from Sun, Silicon Graphics,® IBM,
and Hewlett-Packard.® (You may need an adapter cable to connect
to some high-end workstations; see page 52.)
See the section that applies to your computer. Make sure both the
computer and projector are turned off before you start.
When you have finished connecting all your components, go to
page 57 to turn on the projector and equipment.
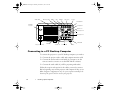
The following illustration identifies all the interface ports on the back
of the projector; you may want to refer to this as you connect your
computer or other equipment to the projector.
Connecting to a Computer
21
80009000.book Page 22 Monday, November 1, 1999 9:35 AM
Audio Out
Monitor Out
R/R-Y
G/Y
B/B-Y
H/C Sync
V Sync
L-Audio2-R
Rear IR
receiver
Computer 1
R/R-Y
G/Y
B/B-Y
Monitor Out
Computer 2/
H/C Sync V Sync
Computer 1
Audio 1 In
Component Video
Audio Out
L-Audio2-R
Audio 1
Mouse/Com2
Mouse/Com1
Mouse/Com 2
Remote
Mouse/Com 1
S-Video
A/C power inlet
Remote
L-Audio-R
Video
L-Audio-R
L-Audio-R
S-Video In
L-Audio-R
Video
Connecting to a PC Desktop Computer
To connect the projector to your PC desktop computer, you need to:
❐
❐
❐
Connect the projector video cable and computer monitor cable
Connect the mouse and/or serial cable (if you want to use the
remote control as a mouse or use the ELP Link IV software)
Connect the audio cable (if you’ll be projecting with audio)
Follow the steps in each section for the cables you need to connect.
Before beginning, turn off the projector and computer if they are on.
Note: Computer configurations vary. See your computer manual for the
location of the ports needed to connect your projector.
22
1 • Setting Up the Projector
80009000.book Page 23 Monday, November 1, 1999 9:35 AM
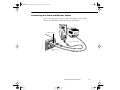
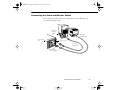
Connecting the Video and Monitor Cables
First connect the projector video cable and computer monitor cable.
Refer to this illustration while following the steps below.
Computer 1 port
projector video cable
Monitor Out
port
monitor cable
Connecting to a Computer
23
80009000.book Page 24 Monday, November 1, 1999 9:35 AM
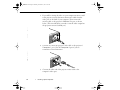
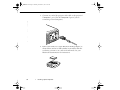
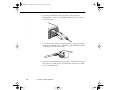
1. If you will be viewing the video on your computer monitor as well
as the projector screen, disconnect the monitor cable from the
video port on the back of your computer. Then connect the
monitor cable to the projector’s Monitor Out port, as shown
below. (This is useful when you need to view the video output but
the projection screen is behind you.)
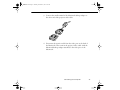
2. Connect one end of the projector video cable to the projector’s
Computer 1 port. (Use the Computer 2 port if you are
connecting a second computer.)
3. Connect the other end of the projector video cable to the
computer’s video port.
24
1 • Setting Up the Projector
80009000.book Page 25 Monday, November 1, 1999 9:35 AM
4. Tighten the screws on all connectors.
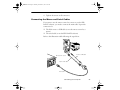
Connecting the Mouse and Serial Cables
If you want to use the remote control as a mouse or use the ELP
Link IV software, you need to connect the main cable. It provides
connectors for:
❐
❐
The PS/2 mouse or USB cable (to use the remote control as a
mouse)
The serial cable (to use the ELP Link IV software)
Refer to this illustration while following the steps below.
Mouse/Com 1 port
PS/2 or USB cable
9-pin serial cable
main cable
Connecting to a Computer
25
80009000.book Page 26 Monday, November 1, 1999 9:35 AM
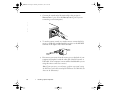
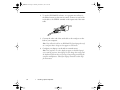
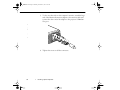
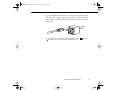
1. Connect the round end of the main cable to the projector’s
Mouse/Com 1 port. (Use the Mouse/Com 2 port if you are
connecting a second computer.)
2. To use the remote control as a wireless mouse, connect the PS/2
mouse or USB cable included with the projector to the MOUSE
terminal on the square end of the main cable.
3. Disconnect your mouse from the mouse port on the back of your
computer and replace it with the other end of the PS/2 mouse or
USB cable. (Your computer’s mouse will be disabled while you are
using the remote control as a mouse.)
Note: If your system uses a serial mouse, perform steps 2 and 3 using
the PC mouse serial cable instead of the PS/2 mouse or USB cable (not
shown in the illustration).
26
1 • Setting Up the Projector
80009000.book Page 27 Monday, November 1, 1999 9:35 AM
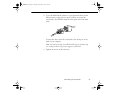
4. To use the ELP Link IV software or to program new effects for the
Effects buttons on the remote control, connect one end of the
serial cable to the SERIAL terminal on the square end of the main
cable.
Connect the other end of the serial cable to the serial port on the
back of your computer.
Note: You will not be able to use ELP Link IV if your system has only
one serial port that is being used to support a serial mouse.
5. Tighten the screws on all connectors.
Connecting to a Computer
27
80009000.book Page 28 Monday, November 1, 1999 9:35 AM
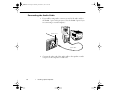
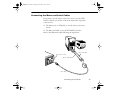
Connecting the Audio Cable
1. If you will be using audio, connect one end of the audio cable to
the Audio 1 port on the projector. (Use the Audio 2 ports if you
are connecting a second computer.)
Audio 1 port
audio cable
2. Connect the other end of the audio cable to the speaker or audio
out port on the computer’s sound card.
28
1 • Setting Up the Projector
80009000.book Page 29 Monday, November 1, 1999 9:35 AM
Connecting to a PC Laptop Computer
To connect the projector to your PC laptop computer, you need to:
❐
❐
❐
Connect the projector video cable
Connect the mouse and/or serial cable (if you want to use the
remote control as a mouse or use the ELP Link IV software)
Connect the audio cable (if you’ll be projecting with audio)
Follow the steps in each section for the cables you need to connect.
Before beginning, turn off the projector and computer if they are on.
Note: Laptop configurations vary. See your computer manual for the
location of the ports needed to connect your projector.
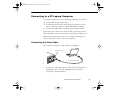
Connecting the Video Cable
First connect the projector’s video cable to your laptop.
Computer 1 port
projector video cable
1. Connect one end of the projector video cable to the projector’s
Computer 1 port. (Use the Computer 2 port if you are
connecting a second computer.)
Connecting to a Computer
29
80009000.book Page 30 Monday, November 1, 1999 9:35 AM
2. Connect the other end of the video cable to the laptop’s video
(monitor) port.
3. Tighten the screws on all connectors.
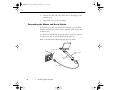
Connecting the Mouse and Serial Cables
If you want to use the remote control as a mouse or use the ELP
Link IV software, you need to connect the main cable. It provides
connectors for:
❐
❐
The PS/2 or USB cable (to use the remote control as a mouse)
The serial cable (to use the ELP Link IV software)
Refer to this illustration while following the steps below.
Mouse/Com 1
port
PS/2 or USB
cable
9-pin serial
cable
main cable
30
1 • Setting Up the Projector
80009000.book Page 31 Monday, November 1, 1999 9:35 AM
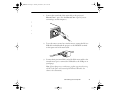
1. Connect the round end of the main cable to the projector’s
Mouse/Com 1 port. (Use the Mouse/Com 2 port if you are
connecting a second computer.)
2. To use the remote control as a wireless mouse, connect the PS/2 or
USB cable included with the projector to the MOUSE terminal
on the square end of the main cable.
3. Connect the 6-pin (mini-DIN) end of the PS/2 mouse cable to the
external mouse port or connect the USB cable to the USB port on
your laptop.
Note: If your laptop uses a serial mouse, perform steps 2 and 3 using
the PC serial mouse cable instead of the PS/2 or USB cable (not
shown in the illustration).
Connecting to a Computer
31
80009000.book Page 32 Monday, November 1, 1999 9:35 AM
4. To use the ELP Link IV software, or to program new effects for
the Effects buttons on the remote control, connect one end of the
serial cable to the SERIAL terminal on the square end of the main
cable.
5. Connect the other end of the serial cable to the serial port on the
back of your computer.
Note: You will not be able to use ELP Link IV if your laptop has only
one serial port that is being used to support a serial mouse.
6. Configure your laptop to work with an external mouse.
Note: You may have to set the display to appear on both the laptop’s
screen and the projector. Some laptops let you change this setting with
the keyboard’s function keys or by using a setup utility provided by the
computer manufacturer. Check your laptop’s manual or online help
for instructions.
32
1 • Setting Up the Projector
80009000.book Page 33 Monday, November 1, 1999 9:35 AM
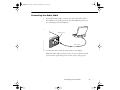
Connecting the Audio Cable
1. If you will be using audio, connect one end of the audio cable to
the Audio 1 port on the projector. (Use the Audio 2 ports if you
are connecting a second computer.)
Audio 1 port
audio cable
2. Connect the other end of the audio cable to your laptop.
Note: PC audio cable port locations vary. See your computer manual
for the location of the audio port needed to connect your projector.
Connecting to a Computer
33
80009000.book Page 34 Monday, November 1, 1999 9:35 AM
Connecting to a Desktop Macintosh
To connect the projector to your desktop Macintosh, you need to:
❐
❐
❐
Connect the projector video cable and computer monitor cable
Connect the mouse and/or serial cable (if you want to use the
remote control as a mouse or use the ELP Link IV software)
Connect the audio cable (if you’ll be projecting with audio)
Follow the steps in each section for the cables you need to connect.
Before beginning, turn off the projector and computer if they are on.
Notes:
34
❐
Macintosh configurations vary. See your computer manual for the
location of the ports needed to connect your projector.
❐
You cannot currently use the ELP Link IV software with a Power
Macintosh G3 or iMac. Check with your dealer for future support.
1 • Setting Up the Projector
80009000.book Page 35 Monday, November 1, 1999 9:35 AM
Connecting the Video and Monitor Cables
First connect the video and monitor cables. Refer to this illustration as
you follow the steps below.
Mac
Macintosh
desktop
adapter
Macintosh
monitor cable
Monitor Out
port
Computer 1 port
projector
video cable
Macintosh
monitor adapter
Connecting to a Computer
35
80009000.book Page 36 Monday, November 1, 1999 9:35 AM
1. Connect one end of the projector video cable to the projector’s
Computer 1 port. (Use the Computer 2 port if you are
connecting a second computer.)
2. Remove the small cover on the Macintosh desktop adapter (as
shown below) and set its DIP switches in accordance with the
resolution you want to use, such as 16-inch mode. See your
Macintosh documentation for instructions.
36
1 • Setting Up the Projector
80009000.book Page 37 Monday, November 1, 1999 9:35 AM
3. Connect the small terminal of the Macintosh desktop adapter to
the other end of the projector video cable.
4. Disconnect the monitor cable from the video port on the back of
the Macintosh. Then connect the projector video cable (with the
Macintosh desktop adapter attached) to the video port on the
Macintosh.
Connecting to a Computer
37
80009000.book Page 38 Monday, November 1, 1999 9:35 AM
5. To also view the video on the computer’s monitor, attach the large
end of the Macintosh monitor adapter to the monitor cable and
connect the other end of the adapter to the projector’s Monitor
Out port.
6. Tighten the screws on all the connectors.
38
1 • Setting Up the Projector
80009000.book Page 39 Monday, November 1, 1999 9:35 AM
Connecting the Mouse and Serial Cables
If you want to use the remote control as a mouse or use the ELP
Link IV software, you need to connect the main cable. It provides
connectors for:
❐
❐
The Mac mouse or USB cable (to use the remote control as a
mouse)
The Mac serial cable (to use the ELP Link IV software)
Refer to this illustration while following the steps below.
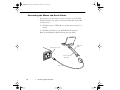
Mac serial cable
Mouse/Com 1 port
Mac or USB cable
main cable
Connecting to a Computer
39
80009000.book Page 40 Monday, November 1, 1999 9:35 AM
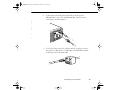
1. Connect the small end of the main cable to the projector’s
Mouse/Com 1 port. (Use the Mouse/Com 2 port to connect a
second computer.)
2. To use the remote control as a wireless mouse, connect one end of
the projector’s Mac mouse or USB cable to the MOUSE terminal
on the large end of the main cable.
3. Disconnect your Macintosh’s mouse cable. Connect the other end
of the projector’s Mac mouse or USB cable to the mouse or USB
port on your Macintosh.
40
1 • Setting Up the Projector
80009000.book Page 41 Monday, November 1, 1999 9:35 AM
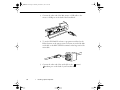
4. To use the ELP Link IV software or to program new effects for the
Effects buttons on the remote control, connect one end of the Mac
serial cable to the MAC SERIAL terminal on the large end of the
main cable.
5. Connect the other end of the Mac serial cable to the
modem port on the back of your Macintosh.
Connecting to a Computer
printer or
41
80009000.book Page 42 Monday, November 1, 1999 9:35 AM
Connecting the Audio Cable
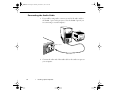
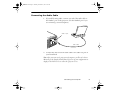
1. If you will be using audio, connect one end of the audio cable to
the Audio 1 port on the projector. (Use the Audio 2 port if you
are connecting a second computer.)
Audio 1 port
audio cable
2. Connect the other end of the audio cable to the audio-out port on
your computer.
42
1 • Setting Up the Projector
80009000.book Page 43 Monday, November 1, 1999 9:35 AM
Connecting to a PowerBook
Your PowerBook must have video-out capability in order to connect to
the projector.
To connect the projector to your PowerBook, you need to:
❐
❐
❐
Connect the projector video cable
Connect the mouse and/or serial cable (if you want to use the
remote control as a mouse or use the ELP Link IV software)
Connect the audio cable (if you’ll be projecting with audio)
Follow the steps in each section for the cables you need to connect.
Before beginning, turn off the projector and computer if they are on.
Note: PowerBook configurations vary, so the location of your computer’s
ports may not match the illustrations. See your PowerBook manual for the
port locations if necessary.
Connecting to a Computer
43
80009000.book Page 44 Monday, November 1, 1999 9:35 AM
Connecting the Video Cable
First connect the projector video cable. Refer to this illustration as you
follow the steps below.
video out cable
(if needed)
Computer 1
port
Macintosh desktop
adapter
projector video cable
Note: Some new PowerBooks may allow you to connect the video cable
directly to the computer without using a video-out cable. See your
PowerBook manual for additional information on connecting a video
cable.
44
1 • Setting Up the Projector
80009000.book Page 45 Monday, November 1, 1999 9:35 AM
1. Connect one end of the projector video cable to the projector’s
Computer 1 port. (Use the Computer 2 port if you are
connecting a second computer.)
2. Remove the small cover on the Macintosh desktop adapter and set
its DIP switches in accordance with the resolution you want to use
(such as 16-inch mode). See your Macintosh documentation for
instructions.
Connecting to a Computer
45
80009000.book Page 46 Monday, November 1, 1999 9:35 AM
3. Connect the small terminal of the Macintosh desktop adapter to
the other end of the video cable.
4. Connect the projector video cable (with the Macintosh desktop
adapter attached) to the video-out port on the PowerBook.
46
1 • Setting Up the Projector
80009000.book Page 47 Monday, November 1, 1999 9:35 AM
If a video-out cable was provided with your PowerBook, connect
the smaller end of the video-out cable to the video-out port on the
back of the PowerBook. Connect the other end to the Macintosh
desktop adapter on the end of the projector video cable.
video-out cable
Connecting to a Computer
47
80009000.book Page 48 Monday, November 1, 1999 9:35 AM
Connecting the Mouse and Serial Cables
If you want to use the remote control as a mouse or use the ELP
Link IV software, you need to connect the main cable. It provides
connectors for:
❐
❐
The Mac mouse or USB cable (to use the remote control as a
mouse)
The Mac serial cable (to use the ELP Link IV software)
Refer to this illustration while following the steps below.
Mac serial
cable
Mouse/Com 1 port
Mac mouse or
USB cable
main cable
48
1 • Setting Up the Projector
80009000.book Page 49 Monday, November 1, 1999 9:35 AM
1. Connect the round end of the main cable to the projector’s
Mouse/Com 1 port. (Use the Mouse/Com 2 port if you are
connecting a second computer.)
2. To use the remote control as a wireless mouse, connect one end of
the projector’s Mac mouse or USB cable to the MOUSE terminal
on the large end of the main cable.
Connecting to a Computer
49
80009000.book Page 50 Monday, November 1, 1999 9:35 AM
3. Connect the other end of the Mac mouse or USB cable to the
mouse or USB port on the back of the PowerBook.
4. To use the ELP Link IV software or program new effects for the
Effects buttons on the remote control, connect one end of the Mac
serial cable to the MAC SERIAL terminal on the large end of the
main cable.
5. Connect the other end of the serial cable to the
printer/
modem port on the back of your PowerBook.
50
1 • Setting Up the Projector
80009000.book Page 51 Monday, November 1, 1999 9:35 AM
Connecting the Audio Cable
1. If you will be using audio, connect one end of the audio cable to
the Audio 1 port on the projector. (Use the Audio 2 port if you
are connecting a second computer.)
Audio 1 port
audio cable
2. Connect the other end of the audio cable to the audio-out port on
your PowerBook.
Note: After you turn on the projector and computer, you’ll need to choose
Mirroring in the Display Control Panel if you set up your configuration to
display on the LCD screen as well as the projector screen.
Connecting to a Computer
51
80009000.book Page 52 Monday, November 1, 1999 9:35 AM
Connecting to a High-End Workstation
Your PowerLite projector is capable of remapping input resolutions up
to 1600 × 1200 pixels. Since 1280 × 1024 pixels is the default
resolution for most leading workstations, this capability makes these
projectors the best portable solution for the display of workstation
video output.
There is no standard for workstation video output. Those workstations
that follow the SXGA standard and use the HD15 connector don’t
need an adapter cable.
Contact your audio/video dealer for information on connecting your
workstation.
Connecting to a Video Source
You can connect a VCR, camcorder, laser disc player, DVD player, or
any other compatible video image source to your projector.
The projector can receive composite video, S-Video, or component
video. Your equipment has composite video if your video source has a
one-pin RCA video port. Your equipment has S-Video if your video
source has a four-pin (mini-DIN) video port. Your equipment has
component video if your video source has a three-connector (Y, R-Y,
B-Y) video port.
Note: The projector is not compatible with a cable TV-style F connector.
52
1 • Setting Up the Projector
80009000.book Page 53 Monday, November 1, 1999 9:35 AM
You can connect the projector to an S-Video source, a composite video
source, and a component video source at the same time. However, the
projector automatically selects the S-Video as the video source.
The projector supports HDTV, NTSC, PAL, and SECAM video
formats, and automatically detects and identifies the video format.
However, you can specify that a single broadcast format be detected.
(See Chapter 3.) Note that the projector will then be able to detect
only one type of video signal.
The type of cable you use to connect the video source to the projector
depends on whether you have composite video, S-Video, or
component video. For composite video, use the RCA audio and RCA
video cable supplied with the projector. For S-Video, use the S-Video
cable supplied with your video device or obtain one from your
computer or video equipment dealer. For component video, use the
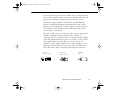
BNC type cable that came with your video source. The illustration
below shows the S-Video, component, and composite connectors.
S-Video
4-pin, mini-DIN
1
2
3
4
component
BNC connector
composite
RCA
Connecting to a Video Source
53
80009000.book Page 54 Monday, November 1, 1999 9:35 AM
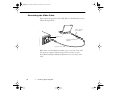
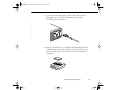
To connect a video source to the projector:
1. Turn off the projector and video source if they are on.
2. If your video source uses a small, round, one-prong composite
(RCA) video connector, you’ll need the RCA video cable that
comes with the projector. If your video source uses a large, round,
four-prong S-Video connector or a BNC type connector, you will
need to purchase the appropriate cable or use the cable that came
with your video source.
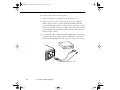
3. For composite video, connect the yellow RCA plug on one end of
the RCA video cable to the projector’s Video port. Connect the
other yellow RCA plug to the video-out port of your video source.
audio/video cable
54
1 • Setting Up the Projector
80009000.book Page 55 Monday, November 1, 1999 9:35 AM
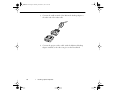
4. Connect the RCA audio cable to the Audio ports of the projector:
insert the white plug into the L port and the red plug into the R
port. Connect the plug at the other end of the RCA audio cable to
the audio output ports of the video source.
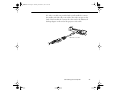
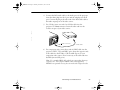
5. For S-Video, insert one end of an S-Video cable into the
projector’s S-Video connector. Insert the other end into the
S-video-out port of your video source.
S-Video connector
S-Video cable
6. For component video, insert three ends of a BNC cable into the
projector’s R/R-Y, G/Y, and B/B-Y ports. Insert the opposite ends
of the cable into the Y/Video, C/R-Y, and B-Y ports on your
component video source. (Don’t insert any of the cable ends into
the HD/Sync and VD ports.)
Note: Use a standard BNC cable, which you can purchase from any
computer store. The Computer 2/BNC video cable supplied by
EPSON as an optional accessory does not work with component video.
Connecting to a Video Source
55
80009000.book Page 56 Monday, November 1, 1999 9:35 AM
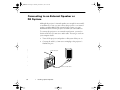
Connecting to an External Speaker or
PA System
Although the projector’s internal speakers are enough for most smallor medium-size rooms, you can connect the projector to an external
speaker or public address (PA) system for large rooms or to gain
maximum benefit from the projector’s built-in 3D sound function.
To connect the projector to an external sound system, you need to
obtain an RCA-to-3.5 mm stereo audio cable. You can get one from
your computer dealer.
1. Turn off the projector and speaker or PA system if they are on.
2. Connect the cable’s 3.5 mm stereo miniplug to the projector’s
Audio Out port.
Audio Out port
stereo audio cable
56
1 • Setting Up the Projector
80009000.book Page 57 Monday, November 1, 1999 9:35 AM
Note: EPSON offers the Mediaphile PAS (personal audio system) and
the Mediaphile CVS (clear voice system) for external amplification.
See page 5 for ordering information.
3. Connect the RCA plugs to the external amplified speaker or PA
system. Insert the cable’s red plug into the Audio R port, and the
white plug into the Audio L port.
Note: The internal speakers are disabled when an external audio
system is used.
Turning the Equipment On and Off
It’s best to turn on the projector and its attached equipment in the
following order:
1. Video source (such as a VCR), if your video source is not your
computer
2. Audio source (if different from computer or video source)
3. Computer
4. External amplified speaker or PA system (if necessary)
5. Projector (follow the steps in the next section)
When you are ready to turn off the equipment, turn them off in the
reverse order.
Turning the Equipment On and Off
57
80009000.book Page 58 Monday, November 1, 1999 9:35 AM
Turning the Projector On and Off
Follow these steps to turn on the projector:
1. Connect one end of the power cord to the projector’s power inlet.
2. Connect the other end to a grounded electrical outlet. The power
light on the projector’s control panel turns orange, indicating that
the projector is in sleep mode. (The projector is not turned on
yet.)
3. Remove the projector lens cap.
4. Press the Power button on the remote control or control panel to
turn on the projector. The power light flashes green as the
projector warms up.
If computer or video equipment is attached, the computer or video
signal is projected. Allow about 30 seconds for full illumination.
Warning: Never look into the lens when the lamp is on. This can damage
your eyes. It is especially important that children not look into the lens.
When you want to stop projecting images, press the Power button. A
confirmation message appears. Press the Power button again. The fan
remains on and the projection lamp light flashes orange for about 60
seconds as the projector cools down.When the projector has cooled
down, flashing stops. The power light remains orange.
Note: If you press the Power button to turn the projector back on while
the power light is orange, there may be a delay before a projected image
appears.
58
1 • Setting Up the Projector
80009000.book Page 59 Monday, November 1, 1999 9:35 AM
When you are done using the projector, unplug the power cord.
Never unplug the power cord when the power light is green; this may
damage the lamp.
Turning the Equipment On and Off
59
80009000.book Page 60 Monday, November 1, 1999 9:35 AM
60
1 • Setting Up the Projector
80009000.book Page 61 Monday, November 1, 1999 9:35 AM
2
Using the Projector
T
his chapter provides the following information about using your
projector:
❐
❐
❐
❐
❐
❐
Positioning the projector relative to the screen
Focusing and positioning the screen image
Resizing the projected image
Sleep mode
Controlling the projector with the remote control and the control
panel
Monitoring the projector’s operating status
61
80009000.book Page 62 Monday, November 1, 1999 9:35 AM
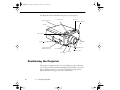
The illustration below identifies the parts of your projector.
infrared receiver
speaker
control panel
infrared receiver
speaker
status lights
handle
optical keystone
adjustment knob
foot adjust
lever
adjustable feet
foot adjust lever
zoom ring
focus ring
projection lens
Positioning the Projector
Your projector supports front, rear, and ceiling projection, allowing
you to choose the best method for displaying your images. If you use
rear or ceiling projection, you need to select this in the projector’s
Advanced menu. See page 97 for more information.
62
2 • Using the Projector
80009000.book Page 63 Monday, November 1, 1999 9:35 AM
To get the best results when projecting your images, it’s important to
position the projector at the proper height and distance relative to the
screen.
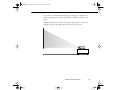
When projecting from a table or desk, place the projector so the lens is
aligned as closely as possible with the bottom of your screen:
Positioning the Projector
63
80009000.book Page 64 Monday, November 1, 1999 9:35 AM
When projecting from the ceiling, align the lens as closely as possible
with the top of your screen:
Using the Keystone Feature
In circumstances where the lens cannot be properly aligned, use the
projector’s Keystone function to help maintain optimum screen
geometry.
❐
❐
64
Press the Optical Keystone Adjustment knob on the side of the
projector (next to the handle). When the knob pops out, turn it
clockwise or counterclockwise to move the lens up or down. When
you’re finished, press the knob back in.
Adjust keystone correction digitally by pressing the Keystone
button on the control panel to increase or decrease the image
adjustment. This feature allows you to correct up to a ± 20° tilt,
maintaining an aspect ratio of 4:3. Using the ELP Link IV
software, you can correct up to a ± 30 ° tilt.
2 • Using the Projector
80009000.book Page 65 Monday, November 1, 1999 9:35 AM
Calculating Image Size and Projection Distance
The distance between the projector and the screen determines the
actual image size. To determine the exact distance required for a
particular image size (or to determine the size of an image at a
particular distance), use the formulas given below. (Remember that
the size of the image can be changed by rotating the zoom ring; see
page 69 for more information.)
Standard Lens Calculations
To determine the maximum and minimum diagonal size of an image
when you know the projection distance:
❐
❐
Inches:
Maximum diagonal size = (0.676 × projection distance) + 2.293
Minimum diagonal size = (0.483 × projection distance) + 1.639
Centimeters :
Maximum diagonal size = (1.71 × projection distance) + 5.824
Minimum diagonal size = (1.22 × projection distance) + 4.163
To determine the projection distance when you know the diagonal size
of the screen image:
❐
❐
Inches:
Maximum projection distance = (2.070 × diagonal size) - 3.393
Minimum projection distance = (1.480 × diagonal size) - 3.393
Centimeters:
Maximum projection distance = (5.257 × diagonal size) - 8.6182
Minimum projection distance = (3.759 × diagonal size) - 8.6182
Positioning the Projector
65
80009000.book Page 66 Monday, November 1, 1999 9:35 AM
For example, here are the measurements for three installations:
Horizontal distance from projector to screen
Image size (diagonal)
Minimum
Maximum
300 inches* (762 cm)
460.6 inches (11.7 m)
586.6 inches (14.9 m)
200 inches (508 cm)
307.1 inches (7.8 m)
389.8 inches (9.9 m)
100 inches (254 cm)
153.5 inches (3.9 m)
192.9 inches (4.9 m)
* For an image size of 300 inches, the projector may be up to 52.1 feet away from
the screen, depending on the setting of the zoom ring.
Long Throw Zoom Lens Calculations (ELPLL02)
To determine the maximum and minimum diagonal size of an image
when you know the projection distance:
❐
❐
66
Inches:
Maximum diagonal size = (0.487 × projection distance) + 2.336
Minimum diagonal size = (0.286 × projection distance) + 1.458
Centimeters:
Maximum diagonal size = (1.2369 × projection distance) + 5.9334
Minimum diagonal size = (0.7264 × projection distance) + 3.7033
2 • Using the Projector
80009000.book Page 67 Monday, November 1, 1999 9:35 AM
To determine the projection distance when you know the diagonal size
of the screen image:
❐
❐
Inches:
Maximum projection distance = (3.492 × diagonal size) - 5.091
Minimum projection distance = (2.053 × diagonal size) - 4.795
Centimeters:
Maximum projection distance = (8.8696 × diagonal size) - 12.9311
Minimum projection distance = (5.214 × diagonal size) - 12.1793
Short Throw Zoom Lens Calculations (ELPLW01)
To determine the maximum and minimum diagonal size of an image
when you know the projection distance:
❐
❐
Inches:
Maximum diagonal size = (0.876 × projection distance) + 3.793
Minimum diagonal size = (0.730 × projection distance) + 3.029
Centimeters:
Maximum diagonal size = (2.2250 × projection distance) + 9.6342
Minimum diagonal size = (1.8542 × projection distance) + 7.6936
To determine the projection distance when you know the diagonal size
of the screen image:
❐
❐
Inches:
Maximum projection distance = (1.369 × diagonal size) - 4.147
Minimum projection distance = (1.142 × diagonal size) - 4.331
Centimeters:
Maximum projection distance = (3.4772 × diagonal size) - 10.5333
Minimum projection distance = (2.9006 × diagonal size) - 11.0007
Positioning the Projector
67
80009000.book Page 68 Monday, November 1, 1999 9:35 AM
Fixed Short Throw Lens Calculations (ELPLR01)
To determine the diagonal size of an image when you know the
projection distance:
❐
❐
Inches:
Diagonal size = (1.239 × projection distance) + 3.415
Centimeters:
Diagonal size = (3.1470 × projection distance) + 8.6741
To determine the projection distance when you know the diagonal size
of the screen image:
❐
❐
68
Inches:
Projection distance = (0.807 × diagonal size) - 2.756
Centimeters:
Projection distance = (2.0497 × diagonal size) - 7.0002
2 • Using the Projector
80009000.book Page 69 Monday, November 1, 1999 9:35 AM
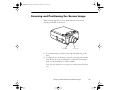
Focusing and Positioning the Screen Image
When an image appears on screen, check that it is in focus and
correctly positioned on the screen.
zoom ring
❐
❐
focus ring
To focus the image, rotate the focus ring (the inside ring on the
lens).
To adjust the size of the image, rotate the zoom ring (the outside
ring). Rotate the zoom ring clockwise to make the screen image
larger or counterclockwise to make it smaller.
Note: You can’t adjust the screen image size with the fixed short throw
lens.
Focusing and Positioning the Screen Image
69
80009000.book Page 70 Monday, November 1, 1999 9:35 AM
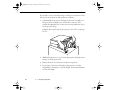
If you need to raise or lower the image on the screen, extend or retract
the two feet at the bottom of the projector as follows:
1. Stand behind the projector and support the front of it while you
lift up on the foot adjust levers, located above the feet. This
unlocks the adjustable feet so they can move up and down. Don’t
let the projector drop.
Caution: Don’t hold or lift the projector by its lens. This can damage
the lens.
2. While lifting the levers, raise or lower the projector until the screen
image is correctly positioned.
3. Release the levers to lock the feet in their new position.
4. If you want to fine-tune the height of the projector, turn the
adjustable feet clockwise to raise the height, and counterclockwise
to lower the height.
70
2 • Using the Projector
80009000.book Page 71 Monday, November 1, 1999 9:35 AM
Note: You can also use the projector’s Keystone function to help get
optimum screen geometry. Adjust angle tilt optically by pressing the Optical
Keystone Adjustment knob on the side of the projector (next to the handle),
and then turning the dial clockwise or counterclockwise to move the lens up
or down. Adjust angle tilt digitally by pressing the Keystone button on
the control panel to increase or decrease the image adjustment. This feature
allows you to correct up to a ± 20° tilt, maintaining an aspect ratio of 4:3.
Using the ELP Link IV software, you can correct up to a ± 30° tilt.
Resizing the Projected Image
The Resize button lets you select the projection method for certain
types of image signals input from a computer. Press the Resize button
on the control panel or the remote control to select one of the
following projection methods for your projector.
With images less than XGA (1024 × 768) for the PowerLite 8000i and
less than SXGA (1280 × 1024) for the PowerLite 9000i, you can either
display the image in the center of the projection area or display it full
size.
With images greater than XGA size for the PowerLite 8000i and
greater than SXGA size for the 9000i (up to 1600 × 1200 pixels), you
can project the entire image in a compressed format. If you keep
pressing the Resize button, the projector will pan around areas of the
image in the original source resolution. When displaying the full
screen, the projector automatically reduces the image size to the
projector’s maximum resolution.
Note: The Resize button cannot be used with images at XGA
(1024 × 768) resolution on the PowerLite 8000i or with images at SXGA
(1280 × 1024) resolution on the PowerLite 9000i.
Resizing the Projected Image
71
80009000.book Page 72 Monday, November 1, 1999 9:35 AM
Sleep Mode
Sleep mode conserves electricity by automatically turning off the lamp
after the projector has not been used for 30 minutes. In sleep mode,
the projector’s power status indicator is orange and only a minimum
amount of the projector’s circuitry remains on. This conserves
electricity, cools the projector, and extends the life of the lamp. When
the projector is in sleep mode, you can press the Power button to start
projecting images, or you can unplug the projector’s power cord.
Controlling the Projector
You can use the remote control or the control panel on top of the
projector to perform the following actions:
❐
❐
❐
❐
❐
❐
❐
❐
❐
❐
❐
72
Turn the power on or off
Automatically set up the computer image
Switch between input images (Computer 1, Computer 2, or
Video)
Access the projector menus to adjust the image, audio, video, and
display settings
Resize the projected image
Freeze the display (remote control only)
Temporarily display a blank screen
Adjust or mute audio/video output
Use custom functions (remote control only)
Move the mouse pointer (remote control only)
View online help
2 • Using the Projector
80009000.book Page 73 Monday, November 1, 1999 9:35 AM
Using the Remote Control
IR Output
Freeze
A/V Mute
E-Zoom
Power
A/V Mute
R/C ON
OFF
E-Zoom
Remote Control
ON/OFF
1
5
Illumination
2
3
4
Special effects
buttons (1-5)
Enter (pointer)
button
Power
Freeze
Enter
Esc
Esc button
battery cover
cover lock
Controlling the Projector
73
80009000.book Page 74 Monday, November 1, 1999 9:35 AM
Additional remote control options are available by opening the cover
just below the Esc button.
Power
Freeze
A/V Mute
R/C ON
OFF
E-Zoom
3
4
2
1
5
Enter
Menu
Esc
Help
Menu
Help
Comp1
BNC
Comp1
S-Video
BNC
S-Video
Video
Auto
Resize
P in P
Preset
Auto
P in P
Video
Resize
- Volume +
Preset
Volume
The remote control uses a line-of-sight infrared signal. To use the
remote control, point it toward one of the remote control receivers
located at the front and back of the projector. (See page 62.)
You can use the remote control up to about 32.8 feet (10 meters) from
the projector. (This distance may be shorter if the remote control
batteries are low.) You must also be within a ± 30° angle from the
front or rear sensor.
74
2 • Using the Projector
80009000.book Page 75 Monday, November 1, 1999 9:35 AM
Note: To be able to use the remote control as a wireless mouse, make sure
you’ve connected the mouse cable to the projector and your computer. (See
Chapter 1 for instructions.)
The five Special Effects buttons are preprogrammed with the
following options:
1 Change the mouse cursor to a stamp
2 Draw a box
3 Use a marker pen
4 Draw a freehand line
5 Clear the screen
For information on changing these special effects, see page 107.
The projector may not respond to remote control commands in these
conditions:
❐
❐
❐
❐
❐
❐
The R/C (remote control) on/off switch is in the OFF position
Batteries are weak
Ambient light is too bright
A certain type of fluorescent light is present
A strong light source (such as direct sunlight) shines into the
infrared receiver
Other equipment emitting infrared energy is present (such as a
radiant room heater)
Correct these conditions to use the remote control or control the
projector from a computer.
Controlling the Projector
75
80009000.book Page 76 Monday, November 1, 1999 9:35 AM
The following table summarizes the remote control functions.
76
Button
Function
Power
Starts or stops the projector.
Freeze
Keeps the current computer or video image on the screen.
A/V Mute
Turns off the audio and video, displaying either the black, blue or
user logo background.
E-Zoom
Enlarges or reduces the image size from 1x to 4x (in 24 steps).
Pressing the right side of the button enlarges the image, pressing
the left side of the button reduces the image. To display a portion
of an enlarged image which is outside of the display area, press
the Enter button and scroll the image to the desired location.
RC ON/OFF
Turns the remote control on or off.
Effects buttons
Use to display preprogrammed special effects. Additional effects
can be programmed using the ELP Link IV software, or control
panel menu options. (See page 107 for instructions.)
Enter
(Pointer button)
Use the Enter button to navigate the menus or use the remote as
a mouse pointer when the projector is connected to the computer
with the main cable and the mouse cable. When the image
source is Computer, the Enter button acts as a mouse left-click.
Illumination
Iluminates all buttons on the remote control for 10 seconds.
Esc
Stops the current function. Pressing Esc while viewing a menu or
the online help displays the previous screen or menu. When the
image source is Computer, the Esc button acts as a mouse
right-click.
Menu
Displays or hides the menu.
2 • Using the Projector
80009000.book Page 77 Monday, November 1, 1999 9:35 AM
Button
Function
Comp1
Switches to the Computer 1 image.
S-Video
Switches to the S-Video image.
Auto
Optimizes the computer image.
P in P
Displays a video or S-video image in a subscreen on the main
display. Use the Enter button to reposition the Picture in Picture
(P in P) screen, or the E-Zoom button to enlarge or reduce the
image. Changes made to the P in P screen location and size are
automatically carried over to the next P in P session.
Help
Displays the online help menu.
Comp 2/BNC
Switches to the Computer2/BNC image.
Video
Switches to and toggles the Video image.
Resize
Switches the display dot mode and resize mode for VGA, SVGA,
SXGA and UXGA input. You cannot resize the image if the input
resolution matches the output resolution of the projector.
Preset
Saves and recalls settings (resolution, tracking, sync signal and
position) for up to five different sessions. To save the current
session settings, press the Preset button and it will be assigned
the next available number 1 through 5. To recall a setting, press
the Preset button a second time and move to the desired session
number. To overwrite a saved setting, move to the setting you
want to replace and press Enter. When the confirmation message
appears, choose Yes and press Enter.
– Volume +
Adjusts the volume.
Controlling the Projector
77
80009000.book Page 78 Monday, November 1, 1999 9:35 AM
Using the Control Panel
Power
Help
Menu
Esc
Sync.
Video
king
Trac
Tracking
Computer
A/V mute
S y n c.
Keystone
Resize
Shift
Volume
You can use the control panel to control the projector instead of the
remote control. However, you can access the custom features only
when you are using the remote control.
Image Calibration for Projector Software
Included on the ELP Link IV software CD is the Image Calibration for
Projector (ICP) software. This program displays a full-screen image
pattern which can be used to fine-tune control panel tracking and
synchronization adjustments. To use ICP, with the projector
connected and operating, open the ICP folder, and then double-click
the ICP icon.
The following table summarizes the control panel functions.
78
Button
Function
Power
Starts or stops projection.
Help
Displays the online help menu.
2 • Using the Projector
80009000.book Page 79 Monday, November 1, 1999 9:35 AM
Button
Function
Computer
Switches between Computer 1 and Computer 2.
Video
Switches to the video image. Pressing the button once switches
to composite video, pressing it twice switches to S-Video.
A/V Mute
Turns off the audio and video, displaying either the black, blue or
user logo background.
Resize
Switches the display dot mode and resize mode for VGA, SVGA,
SXGA, and UXGA input. You cannot resize the image if the input
resolution matches the output resolution of the projector.
Menu
Displays or hides the menu.
Esc
Stops the current function. Pressing Esc while viewing a menu or
the online help displays the previous screen or menu. When the
image source is Computer, the Esc button acts as a mouse
right-click.
Up, down arrows Synchronizes the computer’s graphic signal. Use these buttons to
(Sync+/Sync −)
adjust an overall image that is fuzzy or streaked, or to select menu
items during menu operations. Allows movement or selection of
a menu, if a menu is displayed.
Left, right arrows Matches the projector’s internal clock to various computer
graphic signals (tracking adjustment).
(tracking−/
tracking+)
Use these buttons to adjust an image with vertical fuzzy lines, or
to change numeric settings during menu operations.
Allows movement of a menu, if a menu is displayed.
Enter
Selects a menu option or the next menu/help screen. Pressing
Enter when no menu or help screen is displayed optimizes the
computer image.
Controlling the Projector
79
80009000.book Page 80 Monday, November 1, 1999 9:35 AM
Button
Function
Shift
Pressing the shift and Keystone buttons at the same time
increases or decreases the sound volume.
– Keystone +
Adjusts a trapezoid distorted image to normal, correcting up to a
± 20° tilt.
– Volume +
Adjusts the volume when used in conjunction with the Shift
button.
Projector Status Lights
The lights on top of the projector indicate the projector’s operating
status.
power light
projection lamp light
temperature light
Caution: A red light warns you if a serious problem occurs. See Chapter 6
for what to do if a warning light comes on.
80
2 • Using the Projector
80009000.book Page 81 Monday, November 1, 1999 9:35 AM
Power Light
Light status
Meaning
Steady orange
Projector is in sleep mode. (It is plugged in, but not
projecting.)
Steady green
Power and lamp are on.
Flashing green
Projector is warming up. Allow about 30 seconds.
Flashing orange
Projector is cooling down.
Off
The projector is not plugged in or there is an internal
projector problem.
Projection Lamp Light
Light status
Meaning
Orange and red
flashing alternately
Projection lamp needs replacing.
Steady red
Projection lamp has burned out. Replace it to project images.
Flashing red
Problem with projection lamp or lamp power supply.
Off
Lamp is functioning normally.
Projector Status Lights
81
80009000.book Page 82 Monday, November 1, 1999 9:35 AM
Temperature Light
82
Light status
Meaning
Flashing orange
Projector is too hot.
Steady red
Projector has turned off automatically because of
overheating.
Flashing red
Problem with the cooling fan or temperature sensor.
Off
Projector is functioning normally.
2 • Using the Projector
80009000.book Page 83 Monday, November 1, 1999 9:35 AM
3
Using the Projector Menus
The eight projector menus allow you to control your projector from
either the remote control or the control panel:
❐
❐
❐
The Video menu controls the look and quality of the projected
image, and whether the image source is a computer or a video
source (for example, a VCR).
The Audio menu controls audio features, such as the volume level,
treble, bass, and 3D sound.
The Effect menu lets you modify the special effects assigned to the
Effects buttons on the remote control and change the cursor speed.
83
80009000.book Page 84 Monday, November 1, 1999 9:35 AM
❐
❐
❐
❐
❐
84
The Setting menu allows you to set or adjust such projector
options as the Picture in Picture (P in P) video source, blank
screen color, image source message prompt, A/V Mute display
option, and BNC input source.
The User’s Logo menu lets you capture and store a custom logo
which may be used as a startup screen or with the A/V Mute
option.
The Reset All menu lets you restore the factory defaults for all the
projector settings.
The Advanced menu allows you to specify additional projector
settings, including a language, startup logo, color matching, video
signal, rear or ceiling projection, and the mouse/com port.
The About menu provides information about H/V frequency,
lamp hours, and computer or video selection.
3 • Using the Projector Menus
80009000.book Page 85 Monday, November 1, 1999 9:35 AM
Accessing the Main Menu
To display the Main menu, press the Menu button on the control
panel or the remote control. The Main menu appears.
Press the Menu button again to hide the menu.
As you select a menu, a submenu of options appears to the right. The
options available in some submenus vary, depending on whether the
current image source is the computer or a video source. The
illustration above shows a list of submenus for the Video menu when
the image source is the computer.
Image Calibration for Projector Software
Included on the ELP Link IV software CD is the Image Calibration for
Projector (ICP) software. This program displays a full-screen image
pattern which can be used to fine-tune menu adjustments to tracking,
synchronization, display position, brightness, contrast, RGB levels,
color temperature, black and white levels, and screen sharpness.
Accessing the Main Menu
85
80009000.book Page 86 Monday, November 1, 1999 9:35 AM
To use ICP, with the projector connected and operating, open the ICP
folder, and then double-click the ICP icon.
Changing a Menu Setting
To change a menu setting:
1. Press the Menu button on the control panel or remote control to
display the Main menu.
2. Press the up or down arrows (control panel) or press up or down
on the Enter button (remote control) to scroll through the menu
choices.
Power
Freeze
A/V Mute
up button
Menu
Enter
king
Trac
Tracking
Video
A/V mute
S y n c.
Keystone
Resize
Shift
Volume
down button
86
5
Sync.
Computer
3
Esc
1
Help
4
2
Power
R/C ON
OFF
E-Zoom
3 • Using the Projector Menus
Esc
Enter
button
80009000.book Page 87 Monday, November 1, 1999 9:35 AM
3. Press the Enter button to display a submenu.
Power
Freeze
Enter button
A/V Mute
R/C ON
OFF
E-Zoom
Help
Esc
1
Menu
5
Power
4
2
3
Enter
Sync.
Esc
Video
king
Trac
Tracking
Computer
A/V mute
S y n c.
Keystone
Resize
Shift
Volume
4. Press the up or down arrows (control panel) or up or down on the
Enter button (remote control) to scroll through the submenu
choices.
5. Press either the left or right arrow buttons (control panel) or right
or left on the Enter button (remote control) to change a setting on
one of the submenus.
6. When you are finished changing settings, press Esc to go back to
the Main menu. The changes are saved automatically.
Changing a Menu Setting
87
80009000.book Page 88 Monday, November 1, 1999 9:35 AM
The settings available in each of the menus are described below.
Note: Some options are limited to being enabled (turned on) or disabled
(turned off). Enabled options are indicated by a green light. Disabled
options are blank.
Video Menu (Image Source = Computer)
The Video menu lets you make adjustments to the projected image.
The following options are available when the image source is
Computer 1 or Computer 2.
Note: The computer must be connected and operating, and the image
source on the projector must be set to Computer 1 or Computer 2 for you to
access these menu options.
Menu item
Description
Position
Select this item and then press the right arrow button (control panel)
or press right on the Enter button (remote control) to enter the screen
position adjustment mode. Then use the Enter button (remote
control) or up, down, left, and right buttons (control panel) to move
the screen position in the corresponding direction.
When you finish making adjustments, press the Esc button to return
to the Video menu.
88
Tracking
Matches the projector’s internal clock to various computer graphic
signals. Adjust this setting to remove vertical lines from the image.
Sync
Synchronizes with the tracking signal sent from the computer. Adjust
this setting to correct fuzziness or screen flicker.
3 • Using the Projector Menus
80009000.book Page 89 Monday, November 1, 1999 9:35 AM
Menu item
Description
Brightness
Lightens or darkens the overall image. Increase brightness to lighten
an image, or decrease it to darken the image.
Contrast
Adjusts the difference between light and dark areas. Increase the
contrast to make light areas lighter and dark areas darker. Decrease it
to minimize the difference between light and dark areas.
RGB
Adjusts the color balance of the input source.
Select this item and then press the right arrow button (control panel)
or press right on the Enter button (remote control) to enter the color
adjustment mode. Then use the Enter button or up and down buttons
(control panel) to select a color.
Next, use the Enter button or left and right buttons (control panel) to
adjust the selected color. Increase the color setting for more intense
color on the screen, and lower the setting for less intense color.
When you finish making adjustments, press the Esc button to return
to the Video menu.
Sharpness
Adjusts the sharpness of the screen image.
Resolution
Specifies the video signal. In most cases, this setting should be left at
the Auto setting allowing the system to automatically detect the video
signal. If you want to specify a setting, however, you can select from
32 settings.
Preset
Allows you to save and recall settings for up to five computer
sessions including the resolution, tracking, sync signal, and position.
Video Menu (Image Source = Computer)
89
80009000.book Page 90 Monday, November 1, 1999 9:35 AM
Menu item
Description
Reset
Returns all menu items to their initial factory defaults.
Select this item and then press the right arrow button (control panel)
or right on the Enter button (remote control) to display the
confirmation screen.
Select Yes and then press the Enter button to reset the menu.
If you change your mind, select No and then press the Enter button to
clear the confirmation screen without changing any settings.
Video Menu (Image Source = Video)
The Video menu lets you make adjustments to the projected image.
The following options are available when the image source is Video.
Note: The projector’s image source must be set to Video, and the video
source (such as a VCR, DVD, or camcorder) must be connected and
operating for you to access these menu options. (For example, the projector
must actually be projecting the image from your video tape if you’re using a
VCR.)
Menu item
Description
Position
Select this item and then press the right arrow button (control panel)
or press right on the Enter button (remote control) to enter the screen
position adjustment mode. Then use the Enter button (remote
control) or up, down, left, and right buttons (control panel) to move
the screen position in the corresponding direction.
When you finish making adjustments, press the Esc button to return
to the Video menu.
90
3 • Using the Projector Menus
80009000.book Page 91 Monday, November 1, 1999 9:35 AM
Menu item
Description
Brightness
Lightens or darkens the overall image. Increase brightness to lighten
an image, or decrease it to darken the image.
Contrast
Adjusts the degree of difference between light and dark areas.
Increase the contrast to make light areas lighter and dark areas
darker. Decrease it to minimize the difference between the lightest
and darkest areas of the image.
Saturation
Adjusts the color density. Increase the saturation for darker and more
opaque color. Decrease it for lighter and less opaque color.
Tint
(NTSC only)
Adjusts the red-green color balance of the screen. Increase tint to add
more green, or decrease it to add more red.
Sharpness
Adjusts the sharpness of the screen image.
Reset
Returns all Video menu items to their initial factory defaults.
Select this item and then press the right arrow button (control panel)
or right on the Enter button (remote control) to display the
confirmation screen. Next, select Yes and then press the Enter button
to reset the Video menu.
If you change your mind, select No and then press the Enter button to
clear the confirmation screen without changing any settings.
Video Menu (Image Source = Video)
91
80009000.book Page 92 Monday, November 1, 1999 9:35 AM
Audio Menu
Use the Audio menu to adjust the sound volume and quality of your
audio.
Menu item
Description
Volume
Adjusts the volume level for the speakers and audio-out terminal.
Increase the setting to raise the volume, or decrease it to lower the
volume.
Treble
Adjusts the treble tone of the speakers. (Press the right arrow button
on the control panel or press right on the remote’s Enter button to
increase the treble tone; press the control panel’s left arrow button or
left on the remote’s Enter button to decrease the treble tone.)
Bass
Adjusts the bass tone of the speakers. See Treble for details.
3D Sound or Adjusts the speakers’ stereo input. For a more expansive stereo
SRS® SPACE sound, increase this setting.
and
SRS CENTER
Reset
Returns all Audio menu items to their initial factory defaults.
Select this item and then press the Enter button to display the
confirmation screen. Next, select Yes and then press the Enter button
to reset the Audio menu.
If you change your mind, select No and then press the Enter button to
clear the confirmation screen without changing any settings.
92
3 • Using the Projector Menus
80009000.book Page 93 Monday, November 1, 1999 9:35 AM
Effect Menu
The Effect menu lets you modify the effects assigned to the remote
control Effects buttons.
Menu item
Description
Cursor/Stamp
Selects the stamp you want to use as the cursor graphic and a zoom
rate.
Box
Selects a box color.
Marker
Selects the free line color and width.
Cursor Speed
Adjusts the cursor speed to Low, Middle, or High.
Reset
Returns all Effect menu items to their initial factory defaults.
Select this item and then press the Enter button to display the
confirmation screen. Next, select Yes and then press the Enter
button to reset the Effect menu.
If you change your mind, select No and then press the Enter button
to clear the confirmation screen without changing any settings.
Effect Menu
93
80009000.book Page 94 Monday, November 1, 1999 9:35 AM
Setting Menu
The Setting menu allows you to set or adjust various projector options.
Menu item
Description
Keystone
Adjusts a trapezoid distorted image to a 4:3 rectangle, correcting up
to a ± 20° tilt.
P in P
Selects the image source (composite or S-Video) for the P in P
subscreen.
Message
Specifies whether no screen, a black screen, a blue screen, or a
user logo is displayed when the screen is blanked.
Prompt
Displays a temporary message (computer or video) identifying the
image source.
A/V Mute
Displays a blue, black, or user logo screen when the audio/video is
turned off.
BNC
Specifies the format for BNC input. If the source is computer, select
RGB. If the source is video, select YcrCb. BNC will not display if the
optional Video I/F board is not installed.
DPMS
(Power
Savings)
Turns the lamp power off when the appropriate DPMS signals are
sent from the host computer.
Reset
Returns all Setting menu items to their initial factory defaults.
Select this item and then press the Enter button to display the
confirmation screen. Next, select Yes and then press the Enter
button to reset the Setting menu.
If you change your mind, select No and then press the Enter button
to clear the confirmation screen without changing any settings.
94
3 • Using the Projector Menus
80009000.book Page 95 Monday, November 1, 1999 9:35 AM
User’s Logo Menu
The User’s Logo menu allows you to capture and save a custom logo
which can be used as a splash screen or with the A/V Mute button.
Capturing and Saving a Logo
Follow these steps to capture and save a logo:
1. Display the image (with the projector).
2. Press the Menu button on the control panel or remote control to
display the Main menu.
3. Press the down arrow (control panel) or press down on the Enter
button (remote control) to move to the User’s Logo option.
4. Press Enter (control panel or remote control) to display the User’s
Logo Setting window with the message “Do you use the present
image as a user logo?”
5. Select Yes and press Enter. A selection box displays over the
image.
6. Use the arrow buttons on the control panel or the Enter button
on the remote control to select the area of the image you want to
use as the logo. Once you have selected the entire area, press
Enter.
7. When the message “Do you use this image?” appears on the screen,
select Yes and press Enter. If you want to change the area
selected, select No and repeat step 6.
User’s Logo Menu
95
80009000.book Page 96 Monday, November 1, 1999 9:35 AM
8. Use the arrow buttons on the control panel or the Enter button
on the remote control to select a zoom rate, and then press Enter.
9. When the message “Do you save this user logo?” appears, select
Yes and press Enter. If you do not want to save the logo, select
No.
Note: Saving the logo may take a few moments. Do not use the
projector or other sources (computer, video, speaker, etc.) while the
logo is being saved.
10. When you see the message “Saving the user logo is completed,”
press the Menu or Enter button to redisplay the Main menu.
Assigning the Logo to the A/V Mute Button
Follow these steps to assign the logo to the A/V Mute button:
1. Press the Menu button on the control panel or remote control to
display the menu (if not already displayed).
2. Select the Setting menu and then press the Enter button on the
control panel or remote control.
3. Select Logo from the A/V Mute options.
4. Press the Menu button on the control panel or remote control.
Now you can press the A/V Mute button on the control panel or the
remote control to display the user logo. Press it again to turn off the
logo.
96
3 • Using the Projector Menus
80009000.book Page 97 Monday, November 1, 1999 9:35 AM
Reset All Menu
The Reset All menu lets you return all the projector settings to their
default values. Select Reset All and press the Enter button on the
control button or remote control to display the confirmation screen.
Select Yes to reset all the default settings or No to cancel.
Advanced Menu
The Advanced menu lets you set additional projector options.
Menu item
Description
Language
Selects the language to be used in the menus: English, Japanese,
French, German, Italian, Spanish, Portuguese, or Chinese.
Startup Screen
Displays your user logo during the projector’s startup.
Color Setting
Color Temp
Adjusts the whiteness of the screen. Positive color temperature
values provide a cold white; negative values provide a warmer
white. Press the right arrow button (control panel) or press right on
the Enter button (remote control) to increase the color temperature.
Press the left arrow button (control panel) or press left on the Enter
button (remote control) to decrease the color temperature.
Black Level
Press the right arrow button (control panel) or press right on the
Enter button (remote control) to decrease black in the image.
White Level
Press the left arrow button (control panel) or press left on the Enter
button (remote control) to decrease white in the image.
Reset All Menu
97
80009000.book Page 98 Monday, November 1, 1999 9:35 AM
Menu item
Description
Video Signal
Specifies the input image signal mode. You can select AUTO, NTSC,
NTSC 4.43, NTSC50, PAL, N PAL, M PAL, PAL 60 or SECAM.
Rear Projection Mirrors the projected image on its Y-axis (left-right). Selecting ON
turns mirroring on, while OFF turns it off (for a normal image). Turn
on this option when projecting from behind onto a transparent
screen.
Ceiling
Mirrors the projected image on its X-axis (top-bottom). Selecting ON
turns mirroring on, while OFF turns it off (for a normal image). Turn
this option on when the projector is mounted upside-down from the
ceiling.
Mouse/Com
Locks and unlocks the Mouse/Com port.
Select 1 to assign the wireless mouse control to the computer
connected to the Mouse/Com 1 port only.
Select 2 to assign the wireless mouse control to the computer
connected to the Mouse/Com 2 port only.
Selecting 1 ↔ 2 tells the projector to automatically switch wireless
mouse control whenever the input source computer is changed.
Reset
Returns all Advanced menu items to their initial factory defaults.
Select this item and then press the Enter button to display the
confirmation screen. Next, select Yes and then press the Enter
button to reset the Advanced menu.
If you change your mind, select No and then press the Enter button
to clear the confirmation screen without changing any settings.
98
3 • Using the Projector Menus
80009000.book Page 99 Monday, November 1, 1999 9:35 AM
About Menu (Image Source = Computer)
When the image source is a computer, the About menu displays
information about the projector’s horizontal and vertical frequency,
lamp hours, and computer connection.
Menu item
Description
Lamp
Displays the number of hours the current lamp has been used.
Frequency
Displays the projector’s horizontal and vertical frequency.
Sync Polarity
Displays the sync polarity of the computer.
Sync Mode
Displays the sync mode of the computer.
Resolution
Displays the output resolution of the computer video output.
Refresh Rate
Displays the refresh rate of the computer video output.
About Menu (Image Source = Video)
When the image source is video, the About menu displays information
about the projector’s lamp hours and video signal.
Menu item
Description
Lamp
Displays the number of hours the current lamp has been used.
Video Signal
Displays the input image signal mode.
About Menu (Image Source = Computer)
99
80009000.book Page 100 Monday, November 1, 1999 9:35 AM
100
3 • Using the Projector Menus
80009000.book Page 101 Monday, November 1, 1999 9:35 AM
4
Using ELP Link IV
T
he ELP Link IV software is a utility you can run from your desktop
or laptop computer to control projector features and draw special
graphics on your screen. You can also use the software to reconfigure
the Effects buttons on the remote control. This chapter describes
how to:
❐
Install the software
❐
Start ELP Link IV
❐
Customize the remote control Effects buttons
❐
Control standard and special projector features
101
80009000.book Page 102 Monday, November 1, 1999 9:35 AM
Installing the Software
ELP Link IV software can be used with the following operating
systems:
❐
❐
❐
❐
Windows 3.x
Windows 95 or 98
Windows NT 3.51 or 4.0
Macintosh OS System 7.5.1 and OS System 8.x.
Connecting Needed Cables
Before installing the ELP Link IV software, make sure the projector is
properly connected to your computer with the main and serial cables.
See Chapter 1 for instructions.
Installing the Software for Windows
Follow these steps to install ELP Link IV for Windows 3.x,
Windows 95 or 98, or Windows NT:
1. Turn on your computer and start Windows.
2. Insert the Projector Software CD into your CD-ROM drive.
3. If you have Windows 95, 98, or NT, the ELP Link IV Setup
window should open automatically. If if doesn’t, click Start and
then Run. The Run dialog box appears. Type E:\SETUP
(substitute the correct drive letter for your CD-ROM drive if it is
not E), then press Enter or click OK.
102
4 • Using ELP Link IV
80009000.book Page 103 Monday, November 1, 1999 9:35 AM
If you have Windows 3.x, in Program Manager click on the File
menu, then on Run. The Run dialog box appears. Type
E:\SETUP (substitute the correct drive letter for your CD-ROM
drive if it is not E), then press Enter or click OK.
4. You see the ELP Link IV Setup screen listing the languages and
options available for installation. Select the language you want for
running the software from the dropdown list, and make sure ELP
Link IV is checked.
If you don’t have Adobe ® Acrobat ® Reader on your system, also
check Acrobat Reader to install the program so you can view your
online manual. Then click OK.
5. After a moment, you see the ELP Link IV Welcome screen. Click
Next.
6. You see the Software License Agreement screen. Read the
agreement and click Yes.
7. Follow the instructions on the screen to select a directory or a
folder for the software. Then the Installer copies the ELP Link IV
files to your system.
8. When the installation is complete, click Finish.
9. If you selected to install Acrobat Reader, follow the on-screen
instructions to install it.
Note: If you ever select Always Unconnected and Execute from the
Option menu, always uncheck the setting before exiting ELP Link IV so
the program starts correctly the next time you use it.
Installing the Software
103
80009000.book Page 104 Monday, November 1, 1999 9:35 AM
Installing the Software for a Macintosh
Follow the steps below to install the software for the Macintosh.
Note: You cannot currently use the ELP Link IV software with a Power
Macintosh G3 or iMac. Check with your dealer for future support.
1. Insert the Projector Software CD into your CD-ROM drive.
2. Open the CD-ROM drive icon, if necessary.
3. Double-click the Installer icon.
4. You see a dialog box asking you to select a language for the
software. Select a language and click OK.
5. You see the Software License Agreement screen. Read the
agreement and click Accept.
6. You see the Program Install screen. Make sure ELP Link IV is
selected and, if necessary, Acrobat Reader, and then click OK.
7. You see the Folder to Install screen. Select the folder where you
want to install the software and click Install.
8. When the installation is finished, close the ELP Installation folder.
Note: If you ever select Always Unconnected and Execute from the
Option menu, always uncheck the setting before exiting ELP Link IV so
the program starts correctly the next time you use it.
104
4 • Using ELP Link IV
80009000.book Page 105 Monday, November 1, 1999 9:35 AM
Starting ELP Link IV
Follow the steps in the appropriate section below to launch the
software. If you’re using the remote control as a mouse, use the Enter
button to position the cursor and click the Enter button to launch the
software.
Note:
❐
If you have a Macintosh, your screens may look slightly different than
the screens in this chapter.
❐
If you have questions while using ELP Link IV, choose Help Topics
from the Help menu.
Starting the Program from Windows
1. If you have Windows 95, 98, or NT, click Start, select
Programs, ELP Link IV, and then click the ELP Link IV
program icon. If you have Windows 3.x, double-click the
ELP Link IV program icon in the Windows 3.x ELP Link IV
program group.
The ELP Link IV program icon appears minimized at the bottom
of your screen, or on the taskbar if you’re running Windows 95,
98, or NT.
Starting ELP Link IV
105
80009000.book Page 106 Monday, November 1, 1999 9:35 AM
Note: If you see a prompt asking you to select a port or open the
software with the projector disconnected, it may be because the
projector is disconnected or is connected to an incorrect COM port. If
you want to run the software without the projector connected, select
Unconnected and Execute. If it is connected, click Select a
port and operate again. Then select the COM port you’re using on
the next screen.
2. Click the minimized program icon. The ELP Link IV main
window appears.
Starting the Program on a Macintosh
1. Open the ELP Link IV folder.
2. Double-click the ELP Link IV icon.
If you’re launching ELP Link IV for the first time, select COM Port
from the Option menu, then choose either the
printer or
modem port (whichever port you connected the serial cable to).
Then open the Option menu and select Property Setting to display
the ELP Link IV main window.
Changing the COM Port Assignment
If you did not select the correct COM (communication) port when
setting up the software, or if you have changed the COM port to
which the projector is connected, you can change the COM port
setting from the ELP Link IV software.
1. Point to Select Port and Reconnect in the Options menu.
2. Choose a COM port from the list that appears.
106
4 • Using ELP Link IV
80009000.book Page 107 Monday, November 1, 1999 9:35 AM
Customizing the Remote Control Effects
Buttons
In addition to the preprogrammed effects, you can also assign new
functions to the remote control Effects buttons from the ELP Link IV
main dialog box.
Function Description and Usage
To assign a new function to an Effects button on the remote control,
click on the tab corresponding to the remote control Effects button
you want to assign, then choose a function for it from the dropdown
menu. Depending on the option selected, you can then make detailed
selections such as color, shapes, width, and so on.
Customizing the Remote Control Effects Buttons
107
80009000.book Page 108 Monday, November 1, 1999 9:35 AM
The following table describes these functions and how to use them.
Note: To program new effects for the Effects buttons, the ELP Link IV
software must be running. Once you have pressed an Effects button, you
can check the effect by using either your mouse or your remote control (if
you’ve set up the remote control to function as a mouse and the computer is
connected to the projector).
Function
Description and usage
Free Line
Draws a free style line on the screen.
Press the Effects button assigned to this effect. Move the cursor
using the remote Enter button to draw the line. Press the Enter
button to set the line end position. To draw another line, move the
cursor away from the line you just created and press the Enter button
again to start the new line.
Line
Draws a straight line on the screen.
Press the Effects button assigned to this effect. Then press the Enter
button once to define the line start position. Move the cursor using
the remote Enter button, and then the Enter button again to define
the line end position. To draw another line, move the cursor away
from the line you just created and press the Enter button again to
define the new line start position.
Ellipse
Draws an ellipse (oval) on the screen.
Press the Effects button assigned to this effect. Then press the Enter
button once to define the start position of the ellipse. Move the
cursor using the remote Enter button. Then press the Enter button
again to define the end position of the ellipse. To draw another
ellipse, move the cursor away from the one you just created and
press the Enter button again to define the start position for the new
ellipse.
108
4 • Using ELP Link IV
80009000.book Page 109 Monday, November 1, 1999 9:35 AM
Function
Description and usage
Square
Draws a square on the screen.
Press the Effects button assigned to this effect. Then press the Enter
button once to define the position of one corner of the square. Move
the cursor using the remote Enter button. Then press the Enter
button again to define the position of the opposite corner of the
square. To draw another square, move the cursor away from the one
you just created and press the Enter button again to define the start
position for the new square.
Bar
Creates a horizontal or vertical bar. You can use this function to
highlight a portion of the screen with a horizontal or vertical bar.
Press the Effects button assigned to this effect. Move the bar using
the remote Enter button. Press the Enter button to lock the bar in
place. To draw another bar, move the cursor away from the bar you
just created and press the Enter button again to lock the new bar in
place.
Stamp
Leaves one or several copies of a pre-selected image on the screen.
Press the Effects button assigned to this effect. Use the Enter button
to place the cursor where you want the stamp to appear. Then press
the assigned Effects button to display the stamp. To draw another
stamp, move the cursor away from the stamp you just created and
press the Enter button again to lock the new stamp in place.
Cursor
Change
Changes the cursor shape.
Sound
Plays a selected sound effect.
Press the assigned Effects button to change the cursor shape.
Press the Effects button assigned to this effect. Click the Refer To
button to select the .wav file you want to play and click Open. Press
the assigned Effects button to play the sound.
Customizing the Remote Control Effects Buttons
109
80009000.book Page 110 Monday, November 1, 1999 9:35 AM
Function
Description and usage
Spot light
Creates a spotlight effect on the screen.
Press the Effects button assigned to this effect. Use the Enter button
to place the cursor where you want the spotlight to appear. Then
press the assigned Effects button to display the spotlight. To draw
another spotlight, move the cursor away from the spotlight you just
created and press the Enter button again to lock the new spotlight in
place.
Clear Screen Clears all Effects functions previously executed.
Press the assigned Effects button to clear the screen.
Key
Types a pre-defined key sequence. This is useful when you often
need to type a sequence of characters into your computer.
Press the assigned Effects button to automatically type the key
sequence.
Note: To cancel or end a function, double-click with your mouse or press
the Enter button twice (if you’re using the remote control as a mouse).
110
4 • Using ELP Link IV
80009000.book Page 111 Monday, November 1, 1999 9:35 AM
Assigning Functions
Each of the five Effects buttons is assigned a default function:
1 Change the mouse cursor to a stamp
2 Draw a box
3 Use a marker pen
4 Draw a freehand line
5 Clear the screen
If you want to assign a different function to a button, click the tab
(1 through 5) that corresponds to the button number and select a new
function from the dropdown list.
Customizing the Remote Control Effects Buttons
111
80009000.book Page 112 Monday, November 1, 1999 9:35 AM
Setting Effects Options
Once you have assigned functions to one or more Effects buttons, you
can specify detailed options for each function. You can also modify the
detailed options assigned to the pre-programmed effects.
To set detailed options, click on the option you want to apply from the
options displayed below the Effects Type dropdown list. (The options
displayed depend on which functions are currently assigned to the
Effects buttons.)
To test a setting, click the Test button and then click the left mouse
button to start and stop each setting. To end the test, click the right
mouse button. (If you are using the remote control as a mouse pointer,
use the Enter and Esc buttons, respectively.)
112
4 • Using ELP Link IV
80009000.book Page 113 Monday, November 1, 1999 9:35 AM
The following table describes the options available for each function.
Function
Free Line
Line
Ellipse
Square
Options
Description
Width
Specify the line width, from 1 to 32 points.
Color
Choose a color for the line.
Transparent
Check this box to make the background text or image
visible through the line.
Width
Specify the line width, from 1 to 32 points.
Grid
Specify whether to have the line “snap” to the corners
of a grid by entering the size of the sides of the box, in
pixels (dots).
Color
Choose a color for the line.
Transparent
Check this box to make the background text or image
visible through the line.
Width
Specify the line width, from 1 to 32 points.
Color
Choose a color for the line.
Transparent
Click this check box to make the background text or
image visible through the ellipse.
Fill
Check this box to fill the ellipse with color.
Width
Specify the line width, from 1 to 32 points.
Color
Choose a color for the line.
Transparent
Check this box to make the background text or image
visible through the square.
Fill
Check this box to fill the square with color.
Track Shape Check this box to round the corners of the square.
Customizing the Remote Control Effects Buttons
113
80009000.book Page 114 Monday, November 1, 1999 9:35 AM
Function
Options
Description
Bar
Width
Specify the line width, from 1 to 300 points.
Color
Choose a color for the bar.
Stamp
Direction
Choose Horizontal or Vertical.
Transparent
Check this box to make the background text or image
visible through the bar.
Click on the stamp to be used.
To create a new stamp, click New. The Stamp Edit screen appears,
allowing you to create a new stamp using the line, pencil, square,
ellipse, and color tools. To add the stamp to the collection, click Add.
To close the screen, choose Close from the File menu.
To edit a stamp, select it and then click Edit. After making your
changes, click Save. You have the option to save the stamp as a new
stamp, leaving the original intact, or to overwrite the existing stamp.
To close the screen, choose Close from the File menu.
To delete a stamp, select it and then click Delete. When the
confirmation message displays, click Yes.
Cursor Change Click on the cursor shape to be used.
To create a new cursor image, click New. The Cursor Edit screen
displays allowing you to create a new cursor using the line, pencil,
square, ellipse, and color tools. To add the cursor to the collection,
click Add. To close the screen, choose Close from the File menu.
To edit a cursor, select it and then click Edit. After making your
changes, click Save. You have the option to save the cursor as a new
cursor image, leaving the original intact, or to overwrite the existing
cursor. To close the screen, choose Close from the File menu.
To delete a cursor, select it and then click Delete. When the
confirmation message displays, click Yes.
Sound
114
Click Refer To to choose the desired .wav file. After selecting the file,
click Open. To test the sound, click the Play button.
4 • Using ELP Link IV
80009000.book Page 115 Monday, November 1, 1999 9:35 AM
Function
Spot light
Options
Description
Width
Specify the line width, from 1 to 300 points.
Color
Choose a color for the bar.
Transparent
Check this box to make the background text or image
visible through the spotlight.
Clear Screen
No options available.
Key
Enter up to 16 characters, including combinations such as Ctrl + A, in
the Key to Enter field. The Backspace and Delete keys are also
recorded. After entering the desired key, press Enter.
Click the Delete All button to clear the current key assignment.
Note: Although you can save multiple sets of key assignments, only
one key set can be active at a time. Click the Enter button to save
more than one set of key assignments.
Assigning Functions to the Keyboard
If you want to execute an effect using your keyboard, follow these
steps:
1. Select the effect tab for which you want to assign function key
execution.
2. Click the mouse in the Shortcut key on execution field and
then press the function key you want to assign to this effect
(F2 through F12).
Customizing the Remote Control Effects Buttons
115
80009000.book Page 116 Monday, November 1, 1999 9:35 AM
Saving and Recalling Effects Button Assignments
To save Effects button assignments, click Enter next to the Entry
Name dropdown list. The Registering Function Settings dialog box
appears.
Specify a name for the current settings and click OK.
To recall a saved set of assignments, select its name from the Entry
Name dropdown list.
To delete a set of assignments from the Entry Name menu, select its
name and then click Delete. When the confirmation message is
displayed, click Yes.
To exit without saving the settings, select Exit from the file menu.
116
4 • Using ELP Link IV
80009000.book Page 117 Monday, November 1, 1999 9:35 AM
Controlling Projector Features
You can use the ELP Link IV software to control the following
features:
❐
❐
❐
❐
Changing projector settings
Changing the test pattern
Specifying an image gamma
Creating a user logo
Using the Quick Change Toolbar
To quickly change some basic projector settings, click one of the
toolbar buttons described below:
Power On, Off
A/V Mute
Freeze
Resize
Input Source - Video
Input Source - Computer
Controlling Projector Features
117
80009000.book Page 118 Monday, November 1, 1999 9:35 AM
Changing Projector Settings
1. Choose Projector Control from the Select Screen dropdown list.
You see the following window.
2. Click the tab for the settings you want to adjust.
3. Change one or more of the options, as desired. The options are
described in the following tables.
118
4 • Using ELP Link IV
80009000.book Page 119 Monday, November 1, 1999 9:35 AM
Video Tab (Computer Input)
Option
Description
Tracking
Adjusts tracking to remove vertical lines.
Sync
Adjusts the sync (synchronization) to remove screen flicker.
Brightness
Adjusts screen brightness.
Contrast
Adjusts screen contrast.
Sharpness
Adjusts screen sharpness.
Color
Adjusts the balance of red, green, and blue in the image.
Position
Adjusts the horizontal and vertical screen position.
Input
Resolution
Selects the signal format. You can select AUTO, PAL, NTSC, a
specific resolution, or a preset setting. AUTO automatically adjusts
the image to the signal received.
Preset
Saves and recalls settings (resolution, tracking, sync signal and
position) from up to five different sessions. To save the current
session settings, choose the present number from the dropdown list
and click OK.
Pattern
Display
Displays the test pattern currently selected.
Reset
Resets all fields to their default values.
Controlling Projector Features
119
80009000.book Page 120 Monday, November 1, 1999 9:35 AM
Video Tab (Video Input)
120
Option
Description
Tracking
Adjusts tracking to remove vertical lines.
Sync.
Adjusts the sync (synchronization) to remove screen flicker.
Brightness
Adjusts screen brightness.
Contrast
Adjusts screen contrast.
Sharpness
Adjusts screen sharpness.
Color
Adjusts the balance of red, green, and blue in the image.
Tint
(NTSC only)
Adjusts the color tint.
Input
Resolution
Selects the signal format. You can select AUTO, PAL, NTSC, a
specific resolution, or a preset setting. AUTO automatically adjusts
the image to the signal received.
Preset
Saves and recalls settings (resolution, tracking, sync signal and
position) from up to five different sessions. To save the current
session settings, choose the present number from the dropdown list
and click OK.
Pattern
Display
Displays the test pattern currently selected.
Reset
Resets all fields to their default values.
4 • Using ELP Link IV
80009000.book Page 121 Monday, November 1, 1999 9:35 AM
Audio Tab
Option
Description
Volume
Adjusts the sound volume.
Treble
Adjusts the treble tone.
Bass
Adjusts the bass tone.
3D Sound or Adjusts stereo sound effects. When you increase the number, the
SRS SPACE stereo effect is enhanced.
and
SRS CENTER
Pattern
Display
Displays the test pattern currently selected.
Reset
Resets all fields to their default values.
Controlling Projector Features
121
80009000.book Page 122 Monday, November 1, 1999 9:35 AM
Setting Tab
122
Option
Description
Keystone
Adjusts a trapezoid distorted image to normal, correcting up to a
± 30° tilt.
Prompt
Temporarily displays a prompt on the projector screen identifying
which source (computer or video) is providing the image.
DPMS
(Power
Savings)
Turns the lamp power off when the appropriate DPMS signals are
sent from the host computer.
P in P
Selects the image source (composite or S-Video) for the P in P
subscreen.
BNC
Specifies the input image signal mode as either RGB or Y, R-Y, B-Y.
Message
Specifies whether a black screen, a blue screen, or a user logo is
displayed when the screen is blanked.
A/V Mute
Displays a blue, black or user logo screen when the audio/video is
turned off.
Pattern
Display
Displays the test pattern currently selected.
Reset
Resets all fields to their default values.
4 • Using ELP Link IV
80009000.book Page 123 Monday, November 1, 1999 9:35 AM
Advanced Tab
Option
Description
Startup
Screen
Displays your user logo during the projector’s startup.
Color Setting Adjusts the temperature of the screen colors. Positive color
temperature values provide a cold white; negative values provide a
warmer white. You can also adjust the black and white levels.
Project From Specifies that you want to project from the Ceiling or Rear Projection.
Cursor Speed Specifies a cursor speed.
Video Signal
Specifies the input image signal mode. You can select AUTO, NTSC,
NTSC 4.43, NTSC50, PAL, PAL N, PAL M, PAL 60, HDTV or SECAM.
Pattern
Display
Displays the test pattern currently selected.
Reset
Resets all fields to their default values.
About Tab
Option
Description
Lamp
Displays the number of hours the current lamp has been used.
Frequency
Displays the projector’s horizontal and vertical frequency.
Sync Polarity Displays the sync polarity of the computer.
Sync Mode
Displays the sync mode of the computer.
Resolution
Displays the output resolution of the computer video output.
Controlling Projector Features
123
80009000.book Page 124 Monday, November 1, 1999 9:35 AM
Option
Description
Pattern
Display
Displays the test pattern currently selected.
Reset
Resets all fields to their default values.
Gamma Tab
Option
Description
Select
Gamma
Specifies the desired gamma:
Gamma 1
Provides a dynamic and contrastive image.
Gamma 2
Provides an image between Gamma 1 and Gamma 3.
Gamma 3
Provides a natural image.
.
124
Pattern
Display
Displays the test pattern currently selected.
Reset
Resets all fields to their default values.
4 • Using ELP Link IV
80009000.book Page 125 Monday, November 1, 1999 9:35 AM
Changing the Test Pattern
1. Choose the Test Pattern Setting option from the Option menu.
The following window appears:
2. You can display a test pattern to verify that the projector is
working properly. Choose one of the following:
Color Image
Gray Scale
Focus Pattern
User File
Displays a color bar test pattern.
Displays a gray scale test pattern.
Displays a character-based focus pattern.
Displays a bitmapped test pattern from the file
name specified. Either type the name or click
Refer to... to browse the hard disk for the file.
The bitmap should be 1024 × 768 pixels for
the PowerLite 8000i or 1366 × 1024 pixels for
the PowerLite 9000i.
Controlling Projector Features
125
80009000.book Page 126 Monday, November 1, 1999 9:35 AM
3. Click OK to save the settings and close the Setting Test Pattern
screen.
4. Click Pattern Display on any Projector Control tab to display
the selected test pattern.
Specifying an Image Gamma
1. Click the Gamma tab on the Projector Control dialog. The
Gamma Setting window appears.
126
4 • Using ELP Link IV
80009000.book Page 127 Monday, November 1, 1999 9:35 AM
2. Select the desired gamma:
Gamma 1 Provides a dynamic and contrastive image.
Gamma 2 Provides an image between Gamma 1 and Gamma 3.
Gamma 3 Provides a natural image.
3. Click Pattern Display to display the test pattern selected.
Saving Projector Setting Files
1. Choose the Save or Save As command from the File menu. The
Save As window appears.
2. Enter a file name for the setting. The file will automatically be
given an .elp extension.
3. Click Save.
Controlling Projector Features
127
80009000.book Page 128 Monday, November 1, 1999 9:35 AM
Opening a Projector Setting File
1. Choose the Open command from the File menu. The Open
window appears.
2. Locate the file (.elp) you want to open, and then click Open.
128
4 • Using ELP Link IV
80009000.book Page 129 Monday, November 1, 1999 9:35 AM
Creating a User Logo
You can create or edit a logo from the Setting User Logo dialog box,
then save it to a file on your hard disk or download it to the projector.
1. Choose the Setting User logo option from the Select Screen
dropdown menu. The Setting User Logo window appears.
2. Choose the Open command from the File menu. The Open
dialog box appears.
3. Locate and open a bitmap or logo (.bmp or .lgo) file. The selected
image appears in the display area.
Controlling Projector Features
129
80009000.book Page 130 Monday, November 1, 1999 9:35 AM
4. To crop the image, click the Selecting Area button. The
Selecting User Logo Area window appears.
5. Drag the mouse over the area you want to use as your logo.
6. Click OK to accept the changes. The User’s Logo window
reappears.
7. To increase or decrease the size at which the logo displays, select a
zoom percentage from the Zoom dropdown menu.
8. Choose the Save command from the File menu to automatically
save the logo to your hard disk. To save the logo under a different
file name, choose the Save As command.
Note: You must save logo files using the extension .lgo.
9. To download a logo file to the projector, choose the Sending
User Logo command from the Projector menu. When the
confirmation message displays, click Yes.
130
4 • Using ELP Link IV
80009000.book Page 131 Monday, November 1, 1999 9:35 AM
Creating Cursors/Stamps
You can create or edit a cursor or stamp from the Cursor/Stamp
Setting window.
1. Choose the Cursor/Stamp Setting option from the Select
Screen dropdown menu. The Cursor/Stamp Setting window
appears.
Controlling Projector Features
131
80009000.book Page 132 Monday, November 1, 1999 9:35 AM
2. Click the Edit button. The Cursor/Stamp edit window appears.
3. Create a new cursor/stamp using the pencil, line, square, ellipse,
and color tools.
4. Click Renewal to insert the cursor/stamp into the next available
spot in the Cursor/Stamp list.
5. Choose the Close command from the File menu to close the Edit
window and redisplay the Cursor/Stamp Setting window.
6. Choose the Save or Save As command from the File menu to
save your cursor/stamps.
7. To download a cursor/stamp file to the projector, choose the
Sending Cursor/Stamp command from the Projector menu.
When the confirmation message is displayed, click Yes.
132
4 • Using ELP Link IV
80009000.book Page 133 Monday, November 1, 1999 9:35 AM
Creating a New File
To create a new set of cursors/stamps, choose the New command
from the File menu. A blank Cursor/Stamp Setting window displays
allowing you to create a new set of cursors/stamps.
Opening a File
To open a cursor/stamp file:
1. Choose the Open command from the File menu. A standard
Windows Open dialog box appears.
2. Select the .csp file and click Open.
3. To edit a cursor/stamp, click on it and then click Edit.
Exiting the Software
To exit and close the ELP Link IV software, choose the Exit command
from the File menu.
Exiting the Software
133
80009000.book Page 134 Monday, November 1, 1999 9:35 AM
134
4 • Using ELP Link IV
80009000.book Page 135 Monday, November 1, 1999 9:35 AM
5
Maintenance
Your projector needs little maintenance. You should keep the lens
clean because any dirt or smears appear on the screen. You also need to
periodically clean the air filter at the bottom of the projector. A
clogged air filter can block ventilation needed to cool the projector and
keep it from overheating.
The only parts you should replace are the lamp and air filter. If any
other part needs replacing, contact your dealer or a qualified service
person.
135
80009000.book Page 136 Monday, November 1, 1999 9:35 AM
Warning: Before you clean any part of the projector, turn off the projector
and unplug the power cord. Never open any cover on the projector, except
the lamp and filter covers. Dangerous electrical voltages in the projector
can injure you severely. Do not try to service this product yourself, except as
specifically explained in this User’s Guide. Refer all other servicing to
qualified service personnel.
Cleaning the Lens
Clean the lens whenever you notice dirt or dust on the surface. Lightly
wipe the lens surface with a soft, dry, lint-free cloth. To remove dirt or
smears on the lens, moisten a soft cloth with an alcohol-based cleaner
and gently wipe the lens surface.
Cleaning the Projector Case
To clean the projector case, first unplug the power cord. To remove
dirt or dust, wipe the case with a soft, dry, lint-free cloth. To remove
stubborn dirt or stains, moisten a soft cloth with water and a neutral
detergent. Then wipe the case.
Do not use alcohol, benzene, thinner, or other chemical detergents.
These can cause the case to warp.
136
5 • Maintenance
80009000.book Page 137 Monday, November 1, 1999 9:35 AM
Cleaning the Air Filter
Clean the air filter at the bottom of the projector after every 100 hours
of use. If it is not cleaned periodically, it can become clogged with
dust, preventing proper ventilation. This can cause overheating and
damage the projector. To clean the air filter, follow these steps:
1. Turn off the projector and unplug the power cable.
2. Turn the projector on its side so that the handle is on top and you
can access the filter easily.
Note: Standing the projector with the handle at the top keeps dust
from getting inside the projector housing.
3. Pull up on the filter cover tab to release the filter cover. Remove
the cover.
Cleaning the Air Filter
137
80009000.book Page 138 Monday, November 1, 1999 9:35 AM
4. The filter is attached to the inside of the filter cover. It is
recommended that you use a small vacuum cleaner designed for
computers and other office equipment to clean the filter. If you
don’t have one, use a dry, lint-free cloth.
If the dirt is difficult to remove or if the filter is torn, replace it.
Contact your dealer or call EPSON Accessories at (800) 873-7766
in the United States and Canada to obtain a new one.
5. Replace the filter cover when you’re done.
Replacing the Lamp
The projection lamp typically lasts for about 2000 hours of use. It is
time to replace the lamp when:
❐
❐
❐
The projection image gets darker or starts to deteriorate.
The projection lamp light is either red, or flashing orange and red
alternately.
The message LAMP REPLACE appears on the screen when the
projector lamp comes on (after about 2000 hours of use). To
maintain projector brightness and image quality, replace the lamp
as soon as possible.
Contact your dealer or call EPSON Accessories at (800) 873-7766 in
the United States and Canada for a replacement lamp. Request part
number ELPLP08.
Warning: Let the lamp cool before replacing it. Also, do not touch the glass
portion of the lamp assembly. Touching the glass portion of the lamp will
result in premature lamp failure.
138
5 • Maintenance
80009000.book Page 139 Monday, November 1, 1999 9:35 AM
1. Turn off the projector and unplug the power cable.
2. Turn the projector over so you can access the lamp cover.
3. Use a screwdriver to loosen the two retaining screws on the lamp
cover. When the screws are loose, lift off the lamp cover. (You
cannot remove these screws from the cover. )
Replacing the Lamp
139
80009000.book Page 140 Monday, November 1, 1999 9:35 AM
4. Use a screwdriver to loosen the three screws holding the lamp unit
in place. (You cannot remove these screws.)
5. Lift up the handle and pull out the lamp unit.
6. Gently insert the new lamp unit by lowering it into position.
Make sure it’s inserted securely. Tighten the screws on the new
lamp unit.
7. Replace the lamp cover and tighten the cover screws. (Make sure
the lamp cover is securely fastened. The projector turns itself off
if the lamp cover is open.)
140
5 • Maintenance
80009000.book Page 141 Monday, November 1, 1999 9:35 AM
Transporting the Projector
The projector contains many glass parts and precision parts. If you
need to transport it, please follow these packing guidelines to prevent
damaging the projector:
❐
❐
❐
When shipping the projector for repairs, use the original
packaging material if possible. If you do not have the original
packaging, use equivalent materials, placing plenty of cushioning
around the projector.
When transporting the projector for business use, first put the
projector in a hard-shell carrying case (such as an optional EPSON
accessory case), then pack it in a firm box, using cushioning
around the case.
When you are hand-carrying the projector, be sure to store it in a
carrying case (such as the optional cases offered by EPSON).
Note: EPSON shall not be liable for any damages incurred during
transportation.
Transporting the Projector
141
80009000.book Page 142 Monday, November 1, 1999 9:35 AM
142
5 • Maintenance
80009000.book Page 143 Monday, November 1, 1999 9:35 AM
6
Troubleshooting
T
his chapter describes the problems indicated by the warning lights
and provides information on how to solve problems with the projector.
It is divided into the following sections:
❐ Problems with the projector. See this section if the projector is not
working and to find out what the warning lights mean.
❐ Problems with the remote control. See this section if the projector
is not responding to remote control commands.
❐ Problems with the screen image or sound. See this section if you
cannot project an image or if the screen image is not good.
143
80009000.book Page 144 Monday, November 1, 1999 9:35 AM
If you have a problem, check the appropriate section and follow all
suggestions that apply to your problem. You can also check the online
help by pressing the Help button on the control panel or remote
control. If none of the suggestions solves the problem, call your dealer
or contact EPSON as described on page 7.
Problems with the Projector
If you have problems with the projector, first turn it off and unplug it.
Then plug the power cord back in and turn on the projector. If this
does not solve the problem, check the warning lights at the top of the
projector. These lights alert you to problems with projector operation.
projection lamp light
power light
projection lamp light
temperature light
144
6 • Troubleshooting
80009000.book Page 145 Monday, November 1, 1999 9:35 AM
Light
Color
Meaning
Temperature
Flashing orange
The projector is hot.
Red
The projector is too hot and has turned off
automatically.
Flashing red
There’s a problem with the cooling fan or
temperature sensor. Call a service
representative.
Red or
flashing orange and red
The lamp needs to be replaced. (See “Replacing
the Lamp” in Chapter 5 for instructions.)
Flashing red
There’s a problem with the projection lamp,
lamp power supply, lamp fuse, or a circuit
malfunction in the projector.
Flashing green
The projection lamp is warming up.
Flashing orange
The projection lamp is off and the projector is
cooling down.
Green
The projector is operating normally.
Orange
The projector is in sleep mode.
Red
There is a problem with the projector. Contact
your service representative.
Off
The projector has turned off automatically
because of internal problems. Contact your
service representative.
Projection
lamp
Power
See the following pages for information on what to do when you see
these warning lights or encounter other specific problems with the
projector.
Problems with the Projector
145
80009000.book Page 146 Monday, November 1, 1999 9:35 AM
◗
The power light is flashing orange and you cannot turn on the
projector.
The lamp is cooling down. Wait until the light turns off and then turn
on the projector.
◗
The power light does not come on.
Turn off the projector, check that the power cable is connected
securely both at the power outlet and the projector, and press the
Power button again. Try removing and reseating the lamp.
◗
Projected images get darker or start to deteriorate, or the projection
lamp light is red.
Replace the lamp as described in Chapter 5.
◗
The temperature light is red.
The projector is overheating, which turns the lamp off automatically.
Let the projector cool for a few minutes, then turn it back on. Make
sure nothing is blocking the ventilation vents.
The air filter may be clogged. Clean it as described in Chapter 5 and
then let the projector cool for awhile.
If the projector continues to overheat after you clean the air filter, the
problem may be caused by damage to the cooling fan or internal
circuits. Contact a qualified service person.
Warning: Except as specifically explained in this User’s Guide, do not
attempt to service this product yourself.
146
6 • Troubleshooting
80009000.book Page 147 Monday, November 1, 1999 9:35 AM
Problems with the Remote Control
◗
The projector doesn’t respond to remote control commands.
Make sure the remote control is turned on. The RC switch, on the side
of the remote control, should be turned to the On position.
The remote control unit’s batteries may be low on power. Replace
them.
Make sure the projector’s mouse cable is securely connected to both
your computer’s mouse port and the projector’s main cable. See
Chapter 1 for details.
Make sure you selected the correct COM (communication) port for
the wireless mouse control when you set up the ELP Link IV software.
If necessary, you can change the COM port from the projector’s
Advanced menu. See page 97 for more information.
Light that is too strong, or certain types of fluorescent lighting may
affect the projector’s infrared receivers. Dim the ambient lighting and
turn off any fluorescent lighting. Move the projector out of direct
sunlight.
Turn off any nearby equipment that emits infrared energy, such as a
radiant room heater.
Problems with the Remote Control
147
80009000.book Page 148 Monday, November 1, 1999 9:35 AM
Problems with the Image or Sound
◗
An image does not appear on the screen.
Check that the power light is on and the lens cover is off. Also make
sure the cables are installed correctly, as described in Chapter 1.
The correct image source may not be selected. Press the Computer
button on the control panel or the Comp1, Video, or BNC button
on the remote control to choose another image source.
◗
Only part of the computer image is displayed.
If the computer’s output resolution setting is higher than 1024 × 768
for the 8000i or 1366 × 1024 for the 9000i, the image is resized. (See
page 71 for information on resizing.)
If the computer output is not compatible with this resizing, choose a
different display setting as follows.
Windows:
In Windows 95/98, right-click on the desktop, select Properties,
click the Settings tab, and use the dialog box to select the resolution
you want. In Windows 3.x, use Windows Setup in the Main program
group.
148
6 • Troubleshooting
80009000.book Page 149 Monday, November 1, 1999 9:35 AM
Macintosh:
For a Macintosh, choose Control Panels under the Apple menu and
then choose Monitors. In the Monitors screen, choose Options and
make sure Macintosh Hi-Res Display or another 1024 × 768 display
for the 8000i or 1366 × 1024 display for the 9000i is selected. For
supported display settings, see “Supported Monitor Displays” on
page 154.
You also may need to modify existing presentation files if you created
them for a different resolution. See your software manual for specific
information.
◗
The message NO SIGNAL is displayed.
An image source not connected to the projector is selected, the signal is
not being output from the computer, or the signal is not reaching the
projector. Make sure the connectors are securely attached to both the
projector and the image source. Then check that the image source is
selected correctly. If your projector is attached to a Macintosh, make
sure that the DIP switches on your Macintosh desktop adapter are set
correctly. (See your Macintosh documentation if you need
instructions.) When NO SIGNAL is displayed, you cannot access the
Video menu.
◗
A blank screen is displayed.
The computer signal cannot be interpreted by the projector. Verify the
display format (see page 154). When you see a blank screen, you
cannot access the projector menus.
Problems with the Image or Sound
149
80009000.book Page 150 Monday, November 1, 1999 9:35 AM
◗
The image or parts of the image are blurred or not in focus.
Adjust the Brightness and Contrast settings on the Video menu. If
you’re viewing a computer image, also try adjusting the Tracking and
Sync buttons on the projector’s control panel.
There may be dirt or smears on the lens. Clean the lens as described on
page 136.
◗
The image quality is poor on a laptop computer.
The video signal may be split between the computer and the projector.
If you notice a decline in the projected image quality when the image
is displayed simultaneously on your laptop computer and the
projector, turn off the laptop LCD display.
◗
The colors of the image are not right.
The color balance may be incorrect. If you’re displaying a computer
image, use the Color option in the Video menu to adjust the balance
of red, green, and blue. If you’re displaying video, adjust the
Saturation and Tint (NTSC only) settings on the Video menu.
Check your monitor’s color balance if you’re displaying a computer
image.
◗
There is no sound.
First check that the volume setting is not turned all the way down and
that the audio cable is securely attached to both the projector and the
audio source. Also, make sure the A/V Mute button is not enabled.
The wrong source is selected. Press the Computer button on the
control panel to select the proper source.
150
6 • Troubleshooting
80009000.book Page 151 Monday, November 1, 1999 9:35 AM
7
Technical Specifications
General
Type of display
Poly-silicon Thin Film Transistor (TFT)
Size of liquid crystal
panels
Diagonal: 1.3 inches (33.6 mm)
Lens
F=1.8–2.3, f=49–69 mm
Resolution
8000i: 1024 × 768 pixels
9000i: 1366 × 1024 pixels
Color reproduction
24 bit, 16.7 million colors
Brightness
8000i: 2200 lumens (ANSI)
9000i: 1700 lumens (ANSI)
151
80009000.book Page 152 Monday, November 1, 1999 9:35 AM
Image size
Wide angle: 30 to 320 inches
(at 3.6 to 43.3 feet distance)
Tele angle: 23 to 320 inches
(at 3.6 to 52.1 feet distance)
Projection distance
3.6 to 52.1 feet (1.1 to 15.9 meters)
Projection methods
Front, rear, upside-down (ceiling mount)
Internal speaker system
3 × 3 W stereo output
2 × 3 W 8 (ohm) speakers
Optical aspect ratio
4:3 (horizontal : vertical)
Zoom ratio
1:1.4
Keystone correction
angle
± 20° (± 30° using ELP Link IV)
Supported video
interface standards
Projection
Lamp
152
NTSC, PAL, PAL-M, PAL-N, HDTV,
SECAM
Type
UHE (Ultra High Efficiency)
Power consumption
220 W
Lamp life
About 2000 hours
Part number
ELPLP08
7 • Technical Specifications
80009000.book Page 153 Monday, November 1, 1999 9:35 AM
Remote
Control
Range
32.8 feet (10 meters)
Batteries
Alkaline AA (2)
Mouse Compatibility
Supports PS/2, USB, serial, ADB
Remote IR Receiver
Supports EPSON Remote IR Receiver,
10-foot cable (typical use for rear screen
projection)
Mechanical
Electrical
Height
6.1 inches (157 mm)
Width
12 inches (305 mm)
Depth
19.8 inches (475 mm)
Weight
18.3 lb (8.3 kg)
Rated frequency
50/60 Hz
Power supply
100 to 120 VAC, 2.4 A
200 to 240 VAC, 1.2 A
Power consumption
Operating: 360 W
Standby: 12 W
Environmental Temperature
Operating: 41 to 104° F (5 to 40° C),
non-condensing
Storage: 14 to 140° F (–10 to 60° C),
non-condensing
153
80009000.book Page 154 Monday, November 1, 1999 9:35 AM
Humidity
Operating: 20 to 80% RH,
non-condensing
Storage: 10 to 90% RH,
non-condensing
Safety
CE Marking
United States
FCC Part 15J Class B
UL1950 Rev. 3
Canada
DOC SOR/88-475
CSA C22.2 No. 950 Rev. 3
Directive 89/336/EEC
EN 55022 Class B
EN 50082-1
Directive 73/23/EEC
EN 60950
Supported Monitor Displays
The following table lists the display formats supported by the
projector:
154
Mode
Resolution
Frequency
H(KHz)/V(Hz)
Dot
(MHz)
VGACGA
VGAEGA
640 x 400
640 x 350
31.46 / 70
31.46 / 70
25.175
25.175
NEC400
640 x 400
24.83 / 56.65
21.053
7 • Technical Specifications
80009000.book Page 155 Monday, November 1, 1999 9:35 AM
Mode
Resolution
Frequency
H(KHz)/V(Hz)
Dot
(MHz)
VGA60
VGA72
VGA75
VGA85
640 x
640 x
640 x
640 x
480
480
480
480
31.469 / 59.94
37.861 / 72.809
37.5 / 75
48.269 / 85.008
25.175
31.5
31.5
36
SVGA56
SVGA60
SVGA72
SVGA75
SVGA85
800 x
800 x
800 x
800 x
800 x
600
600
600
600
600
35.156 / 56.25
37.879 / 60.317
48.077 / 72.188
46.875 / 75
53.674 / 85.061
36
40
50
49.5
56.25
XGA43i
XGA60
XGA70
XGA75
XGA85
1024
1024
1024
1024
1024
x 768
x 768
x 768
x 768
x 768
35.522 / 86.958
48.363 / 60.004
56.476 / 70.069
60.023 / 75.029
68.677 / 84.997
44.9
65
75
78.75
94.5
SXGA1_70
SXGA1_75
SXGA1_85
1152 x 864
1152 x 864
1152 x 864
63.851 / 70.012
67.5 / 75
77.094 / 84.002
94.5
108
121.5
SXGA2_60
SXGA2_75
SXGA2_85
1280 x 960
1280 x 960
1280 x 960
60 / 60
75 / 75
85.938 / 85.002
108
126
148.5
SXGA3_43i
SXGA3_60
SXGA3_75
SXGA_85
1280
1280
1280
1280
46.433 / 86.871
63.981 / 60.02
79.976 / 75.025
91.146 / 85.024
78.75
108
135
157.5
x 1024
x 1024
x 1024
x 1024
155
80009000.book Page 156 Monday, November 1, 1999 9:35 AM
156
Mode
Resolution
Frequency
H(KHz)/V(Hz)
Dot
(MHz)
UXGA48i
UXGA60
UXGA65
UXGA70
UXGA75
1600
1600
1600
1600
1600
62.5 / 96.080
75 / 60
81.25 / 65
87.5 / 70
93.75 / 75
135
162
175.5
189
202.5
MACLC13
MACII13
MAC16
MAC19-60
MAC19
MAC21
640 x 480
640 x 480
832 x 624
1024 x 768
1024 x 768
1152 x 870
34.975 / 66.62
35 / 66.67
49.725 / 74.55
48.193 / 59.28
60.241 / 74.93
68.682 / 75.062
31.33
30.24
57.28
64
80
100
HDTV480P
(ANSI/SMPTE)
720 x 483
31.469 / 59.940
27
HDTV480P
(ATSC)
704 x 480
31.469 / 59.940
27
HDTV480I
(ANSI/SMPTE)
720 x 487
15.734 / 59.940
13.5
HDTV480I
(ATSC)
704 x 480
15.734 / 59.940
13.5
HDTV720P
(SMPTE)
1280 x 720
44.955 / 59.940
74.176
HDTV1080I
(ANSI/SMPTE)
1920 x 1080
67.433/ 59.940
148.352
HDTV1080I
(ANSI/SMPTE)
1920 x 1080
33.716 / 59.940
74.176
7 • Technical Specifications
x 1200
x 1200
x 1200
x 1200
x 1200
80009000.book Page 157 Monday, November 1, 1999 9:35 AM
Mode
Resolution
Frequency
H(KHz)/V(Hz)
Dot
(MHz)
NTSC (SXGA)
NTSC (XGA)
1366 x 438
1024 x 438
15.734 / 60
15.734 / 60
28.486
2.890
PAL (SXGA)
PAL (XGA)
1366 x 512
1024 x 512
15.625 / 50
15.625 / 50
28.846
21.154
SECAM (SXGA)
SECAM (XGA)
1366 x 512
1024 x 512
15.625 / 50
15.625 / 50
28.846
21.154
Note: The frequencies of some computers may not allow the image to be
displayed correctly.
157
80009000.book Page 158 Monday, November 1, 1999 9:35 AM
Computer 1 and 2 and Computer Out connector pin assignments
The Computer 1, 2, and Computer Out connectors are female video
RGB, 15-pin micro-D-style connectors. Here are the pin assignments:
158
Input pin
Computer Out
connector signals
Computer 1 and 2
connector signals
1
Red out / red video
Red video
2
Green out / green video
Green video
3
Blue out / blue video
Blue video
4
Reserved
Monitor (ID bit 2)
5
GND
GND
6
GND
Red video GND
7
GND
Green video GND
8
GND
Blue video GND
9
Reserved
+5 V
10
GND
Synchronous GND
11
Reserved
Monitor (ID bit 0)
12
Reserved
SDA
13
Horizontal sync
Horizontal sync
14
Vertical sync
Vertical sync
15
Vertical sync
Reserved
7 • Technical Specifications
80009000.book Page 159 Monday, November 1, 1999 9:35 AM
Glossary
Brightness. The balance of light and dark shades in an image.
Component video. The recording and transmission of video using
separate red, green, blue and synchronization signals.
Composite video. A type of video signal that encodes picture,
luminance, and synchronization information so it can be carried in one
signal.
Contrast. A measure of the tonal differences between the highlights
and shadows of an image. In a high-contrast image, light areas are very
bright and dark areas are very dark, with relatively few levels of gray
between white and black. Contrast is decreased by adding grays.
DPMS. Display Power Management Signaling. A power saving feature
that powers down a computer’s monitor when it has been idle for a
specified amount of time.
159
80009000.book Page 160 Monday, November 1, 1999 9:35 AM
NTSC. A 525-line video broadcast format developed by the National
Television Standards Committee. NTSC is widely used in North
America, Mexico, and Japan.
PAL (Phase Alternation by Line). A 625-line video broadcast format
used in Western Europe, India, China, Australia, New Zealand, and
parts of Africa.
Point. A measurement of drawn or printed objects. One point equals
1/72 inch.
Resolution. A measure of the amount of detail contained in an image.
Resolution can be measured in dots per inch or in pixels. Image
sharpness and clarity improve as resolution increases.
RGB. A type of color scheme that defines color as percentages of red,
green, and blue.
S-Video. A type of video signal used in S-VHS videotape formats. It
transmits luminance and color separately.
SECAM (System Electronique pour Couleur Avec Memoire). A
625-line TV system used in France, Eastern Europe, Russia, and parts
of Africa.
Sleep mode. A power-saving feature in which the projection lamp is
turned off when a video signal has not been applied for 30 minutes. In
sleep mode, only a minimum amount of the projector’s circuitry
remains on.
SVGA. Super Video Graphics Array. SVGA provides higher resolution
than VGA (800 × 600).
160
Glossary
80009000.book Page 161 Monday, November 1, 1999 9:35 AM
SXGA. Super Extended Graphics Array. SXGA provides higher
resolution than XGA (1280 × 1024).
UXGA. Ultra Extended Graphics Array. UXGA provides higher
resolution than SXGA (1600 × 1200).
VGA. Video Graphics Array. A high-resolution display adapter that
provides a variety of video modes (640 × 480).
XGA. Extended Graphics Array. IBM’s display adapter, XGA provides
higher resolution than VGA (1024 × 768).
161
80009000.book Page 162 Monday, November 1, 1999 9:35 AM
162
Glossary
80009000.book Page 163 Monday, November 1, 1999 9:35 AM
Index
Numerics
B
3D Sound, 92, 121
Bar function, 114
Bass, 92, 121
Batteries, installing, 18 to 19
BNC Format, 94, 122
Brightness, 89, 91, 119, 120, 151, 159
Buttons
control panel, 78 to 80, 86 to 87
customizing the Effects buttons, 107 to
116
remote control, 73 to 77, 86 to 87
A
A/V Mute Button, 96
About menu, 84, 99
Accessories, 4 to 5, 9
Advanced menu, 84
Air filter, cleaning, 137 to 138
Amplification, 56 to 57
Anti-theft device, 17
Audio
connecting desktop, 28, 42
connecting laptop, 33
connecting PowerBook, 51
menu, 83, 92
C
Cables, 4, 14 to 17
Camcorder, adjusting the projected image,
90 to 91, 99
163
80009000.book Page 164 Monday, November 1, 1999 9:35 AM
Case, cleaning, 136
CE Marking, 154
Ceiling, hanging the projector from, 98, 99,
123
Cleaning
air filter, 137 to 138
lens, 136
projector case, 136
Color
balance, 91, 119, 120
menu option, 89
saturation, 91, 119, 120
COM port, changing, 106
CompuServe, 7
Computer connector pin assignments, 158
Computer, adjusting projected image for,
88 to 91
Connecting projector
to a desktop Macintosh, 34 to 42
to a desktop PC, 22 to 28
to a high-end workstation, 52
to a laptop PC, 29 to 33
to a PA system, 56 to 57
to a PowerBook, 43 to 51
to a video source, 52 to 55
to an external speaker, 56 to 57
Connector pin assignments, 158
164
Index
Contrast, 89, 91, 119, 120, 159
Control panel
buttons, 78 to 80
functions, 78 to 80
using, 78 to 80
Cursor
changing shape, 109, 114
creating, 131 to 133
Customizing the Effects buttons, 107 to 115
D
DIP switches, 36, 45
Display formats, supported, 154 to 157
Distance from projector to screen, 19 to 20,
62 to 68
Drawing screen graphics, 108 to 110, 113
E
Effect menu, 83, 93
Effects buttons
assigning functions, 111
customizing, 107 to 115
function options, 113 to 115
functions list, 107 to 110
saving and recalling assignments, 116
Electrical specifications, 153
Ellipse, 108, 113
80009000.book Page 165 Monday, November 1, 1999 9:35 AM
ELP Link IV, 101
About tab, 123 to 124
Advanced tab, 123
Audio tab, 121
Gamma tab, 124
installing, 102 to 104
launching, 105 to 106
Setting tab, 122
using, 105 to 133
Video tab, 119 to 120
Environmental specifications, 153 to 154
EPSON support, 7 to 8
External speakers, 56 to 57
F
FaxAdvice, EPSON, 8
Features, 1 to 2
Feet, raising or lowering, 70
Fixed short throw lens, 68
Focusing, 69 to 70
Formats, supported display, 154 to 157
Freeze button, 76
FTP site, EPSON, 7
H
Help, EPSON, 7 to 9
High-end workstation, 52
Humidity requirements, 154
I
Image
adjusting position, 69 to 71, 88, 90, 119
adjusting quality, 88 to 91
leaving a copy on the screen, 109
problems, 148 to 150
resizing, 71
size range, 152
Image Gamma, 126 to 127
Infrared receivers, location, 62
Installing batteries, 18 to 19
Installing the ELP Link IV software, 102 to
104
Internet, 7
K
Key Macro function, 110, 115
Keystone, 64, 71
G
L
Graphics, drawing screen, 108 to 110, 113
to 114
Lamp
light, 80 to 81, 144 to 145
replacing, 138 to 140
specifications, 152
165
80009000.book Page 166 Monday, November 1, 1999 9:35 AM
Language menu option, 97
Laptop, connecting to, 29 to 33, 43 to 51
Launching the ELP Link IV software, 105 to
106
Lens
accessories, 4
cleaning, 136
fixed short throw, 4, 68
long throw zoom, 4, 66 to 67
short throw zoom, 4, 67
standard, 65 to 66
Lights, status, 80 to 82, 144 to 146
Line function, 108, 113
Logo, creating, 129 to 130
Long throw zoom lens, 66 to 68
Lumens, 151
M
Macintosh
connecting projector to, 34 to 51
installing software, 104
Mechanical specifications, 153
Menus
accessing, 85
Audio, 83, 92
changing settings, 86 to 88
Video, 83, 88 to 91
Monitors, supported, 154 to 157
166
Index
O
Online Help, 3
Options for the projector, 4 to 5
P
PA system, 56 to 57
Pin assignments, connector, 158
Pointer button, 76
Positioning the projector, 19 to 20, 62 to 68
Positioning the screen image, 69 to 70, 88,
90, 119
Power
button, 76 to 78
consumption, 153
light, 80 to 81, 144 to 146
supply, 153
PowerBook, connecting projector to, 43 to
51
Projection lamp light, 80 to 81, 144 to 145
Projector
connecting, 21 to 57
distance to screen, 20, 63 to 68
focusing, 69 to 70
hanging from the ceiling, 98, 99, 123
lamp specifications, 152
parts identified, 62
positioning, 19 to 20, 62 to 68
positioning the screen image, 69 to 70,
88, 90, 119
80009000.book Page 167 Monday, November 1, 1999 9:35 AM
Projector (continued)
problems, 144 to 146
setting up, 13 to 57
status lights, 80 to 82, 144 to 146
turning on and off, 57 to 58
unpacking, 14 to 16
using the Quick Change Toolbar, 117
Projector case, cleaning, 136
Projector Setting window, 117 to 124
Prompt menu option, 94
Q
Quick Change Toolbar, 117
R
RCA video cable, 54
Rear projection, 98, 123
Remote control
buttons, 73 to 77, 86 to 87
customizing the Effects buttons, 107 to
116
functions, 76 to 77
problems, 147
specifications, 153
using, 3, 73 to 77
Remote control effects, 75
Remote control features, 76
Replacing the lamp, 138 to 140
Reset All menu, 84, 97
Resize button, 71
Resolution, 151, 160
S
Safety instructions, 9 to 11
Screen image, problems, 148 to 150
Setting menu, 84, 94
Short throw zoom lens, 67
Sleep mode, 3, 72, 160
Software
installing, 102 to 104
launching, 105 to 106
using, 105 to 133
Sound problems, 150
Speakers
adjusting the tone, 92, 121
adjusting the volume, 92, 121
connecting projector to, 56 to 57
Specifications
electrical, 153
environmental, 153 to 154
general, 151 to 152
lamp, 152
mechanical, 153
remote control, 153
safety, 154
SRS CENTER, 92, 121
SRS SPACE, 92, 121
Stamp function, 109, 114
167
80009000.book Page 168 Monday, November 1, 1999 9:35 AM
Stamp, creating, 131 to 133
Status lights, 80 to 82, 144 to 146
Support, technical, 7 to 9
S-Video signal, 17, 160
Sync, 88, 119, 120
T
Temperature
light, 82, 144 to 146
requirements, 153
Test pattern
changing, 125 to 126
displaying, 119, 120
Tint, 91
Tone, adjusting, 92, 121
Toolbar, using, 117
Tracking, 88, 119, 120
Treble, 92, 121
Troubleshooting
image and sound problems, 148 to 150
projector problems, 144 to 146
remote control problems, 147
Turning the projector on and off, 57 to 58
168
User logo, creating, 129 to 130
User’s Logo menu, 84, 95
UXGA, 2, 161
V
VCR, adjusting the projected image, 90 to
91, 99
VGA, 2, 161
Video
adjusting projected image for, 90 to 91
jacks, 54
menus, 83, 88 to 91
Video source, connecting projector to, 52 to
55
Volume, 92, 121
W
Warning lights, 80 to 82, 144 to 146
Workstations, connecting projector to, 52
World Wide Web, 7
X
XGA, 2, 161
U
Z
Unpacking projector, 14 to 16
Zoom ratio, 152
Index