1
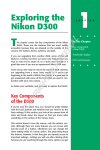
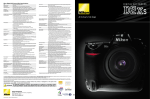
C HAP T E R
1
AL
Exploring the
Nikon D5100
T
CO
PY
RI
GH
TE
D
MA
TE
RI
his chapter covers the key components of the Nikon D5100. These are the features that are most readily accessible because they are situated on the outside of
the camera: the buttons, knobs, switches, and dials.
Although most Nikon cameras are quite similar in design, the D5100 has had a
complete redesign of the button layout to accommodate for the new design of the
Vari-Angle LCD. So even if you’re on old hand at using Nikon dSLRs check out this
chapter to acquaint yourself with the new features and layout of your Nikon D5100.
Getting to know your camera is the key to capturing your images quickly and efficiently.
Taken at ISO 200, f/13, and 1/640 second.
Nikon D5100 Digital Field Guide Key Components of the D5100
This section doesn’t cover the exterior controls of the D5100. Although you can access
many features using menu options, oftentimes you can change the same settings
with just the push of a button. Knowing exactly where these buttons are and what
they do can save you loads of time and keep you from missing a shot.
Top of the camera
You find some of the most important buttons and dials on the top of the D5100. This
is where you can change the Shooting mode and press the Shutter Release button to
take your photo (see Figure 1.1).
X
Shutter Release button. In my opinion, this is the most important button on the
camera. Halfway pressing this button activates the camera’s autofocus and light
meter. Fully depressing this button releases the shutter and a photograph is
taken. When the camera has been idle and has “gone to sleep,” lightly pressing
the Shutter Release button wakes it up. When the image review is on, lightly
pressing the Shutter Release button turns off the LCD and prepares the camera
for another shot.
X
On/Off switch. This switch, located around the Shutter Release button, is used
to turn the camera on and off. Pull the switch to the right to turn the camera on.
Push the switch all the way to the left to turn off the camera.
X
Mode dial. This is an important dial. Rotating it allows you to quickly change
your Shooting mode. You can choose one of the semiautomatic modes, the
scene mode, the effects or Manual exposure mode, which lets you pick the
exposure settings.
For a detailed description of all the exposure modes, see Chapter 2.
CROSS REF
2
X
Live View switch. This is a relatively new design feature that first appeared on
the D3100. On the D5100 this switch has been moved and is now located in top
of the camera near the mode dial. Flipping the switch instantly activates Live
View.
X
Movie-record button. When in Live View press this button to start recording
video and press again to end the recording. This button serves no other purpose
in any modes except for Live View. This button is located just to the left of the
shutter release button.
Chapter 1 Exploring the Nikon D5100
Focal length indicators
Speaker
On/Off switch
Shutter release button
Focus ring Zoom ring
Movie record button
Focal plane mark
Hot shoe
Mode dial
Live View switch
Info button
Exposure compensation/aperture button
Image courtesy of Nikon, Inc.
1.1 Top-of-the-camera controls
3
Nikon D5100 Digital Field Guide X
Information button. Pressing this button displays the Shooting Information display. This display shows all of the pertinent information; shutter speed, aperture,
WB, ISO, and so on. Pressing the button again or tapping the Shutter Release
button hides the display.
X
Exposure Compensation/Aperture button. Pressing this button in conjunction with spinning the Command dial allows you to modify the exposure that is
set by the D5100’s light meter when it is set to Programmed Auto (P), Shutter
Priority (S), or Aperture Priority (A) mode. Turning the Command dial to the right
decreases exposure while turning the dial to the left increases the exposure.
When using Manual exposure mode (M), pressing this button and rotating the
Command dial changes the aperture setting.
X
Hot shoe. This is where an accessory flash is attached to the camera body. The
hot shoe has an electronic contact that tells the flash to fire when the shutter is
released. A number of other electronic contacts allow the camera to communicate with the flash, enabling the automated features of a dedicated flash unit
such as the SB-700. You can also use this as a “cold” shoe to mount the ME-1
stereo microphone or the GP-1 GPS unit.
X
Speaker. This is used to play back the audio from your video recordings. You
can adjust the volume by pressing the Zoom-out/thumbnail button to decrease
the volume and the Zoom-in button to increase the volume.
If you purchased your D5100 with the kit lens, you find three key features on the lens:
X
Focus ring. Rotating the focus ring allows you to focus the lens manually. Select
M before attempting to manually focus. If you don’t switch it over first, you can
damage the lens.
For more information on lenses and compatibility, see Chapter 5.
CROSS REF
X
Zoom ring. Rotating the zoom ring allows you to change the focal length of the
lens.
X
Focal length indicators. These numbers indicate which focal length in millimeters your lens is zoomed to. Smaller numbers are wide-angle settings and larger
numbers are normal to short telephoto settings.
Back of the camera
The back of the camera is where you find the buttons that mainly control playback and
menu options, although a few buttons control some of the shooting functions. A lot of
4
Chapter 1 Exploring the Nikon D5100
them are used in conjunction with the Command dial or the Multi-selector. On the
back of the camera you also find several key features, including the all-important LCD
and viewfinder (see Figure 1.2).
This is where the D5100 differs most from all other Nikon dSLR: the Nikon button
configuration was redesigned in order to accommodate the new side-mounted VariAngle LCD monitor.
Playback button
Menu button
Viewfinder
Infrared sensor
Vari-angle LCD
AE-L/AF-L button
Info button
OK button
Command dial
Zoom-in button
Memory card
access lamp
Zoom-out/Thumbnail/Help button
Multi-selector
Delete button
Image courtesy of Nikon, Inc.
1.2 Back-of-the-camera controls
5
Nikon D5100 Digital Field Guide X
Vari-angle LCD monitor. This is the most obvious feature on the back of the
camera. This 3-inch, 930,000-dot liquid crystal display (LCD) is a huge improvement over the LCD on the D5000. The LCD is where you view all your current
camera settings and review your images after shooting; and it displays the video
feed for Live View and video recording. The monitor can be flipped out and swiveled, which makes it easy to take photographs or videos at odd angles such as
way down low or above your head. You can also turn it around when closing it to
prevent scratches when you transport it in your camera bag.
X
Viewfinder. This is what you look through to compose your photographs. Light
coming through the lens is reflected from a series of five mirrors (called a pentamirror), enabling you to see exactly what you’re shooting. The rubber eyepiece
around the viewfinder gives you a softer place to rest your eye and blocks any
extra light from entering the viewfinder as you compose and shoot your images.
X
Diopter adjustment control. Just to the right of the viewfinder (partially hidden
behind the eyecup) is the Diopter adjustment control. Use this control to adjust
the viewfinder lens to suit your individual vision differences (not everyone’s eyesight is the same). To adjust this, look through the viewfinder at the shooting
information. Rotate the adjustment control until the information in the viewfinder
display looks sharp.
X
Infrared receiver. This is one of two infrared receivers that allow you to use the
option ML-L3 infrared remote to control the camera.
X
Menu button. Press this button to access the D5100 menu options. There are a
number of different menus, including Playback, Shooting, Custom Settings, and
Retouch. Use the Multi-selector to choose the menu you want to view and press
OK to enter the specific menu screen.
X
Info button. Pressing this button displays the shooting information on the monitor. Press this button twice to adjust settings in the Info menu.
Pressing and holding the Menu and Info buttons simultaneously for about 2
seconds returns all settings to the camera default.
NOTE
X
AE-L/AF-L/Protect button. The Auto-Exposure/Autofocus Lock button is used to
lock the Auto-Exposure (AE) and Autofocus (AF) by pressing and holding the button.
When playing back or reviewing your images pressing this button locks the image
to prevent it from being accidentally deleted. The AE-L/AF-L button can be customized in CSM f2 to AE/AF Lock, AE lock only, AF lock only, AE lock (Hold), or AF-ON.
Protected images WILL be deleted when the memory card is formatted.
CAUTION
6
Chapter 1 Exploring the Nikon D5100
X
Command dial. This dial is used to change a variety of settings depending on
which button you are using in conjunction with it. By default, it is used to change the
shutter speed when the camera is in Shutter Priority and Manual modes. It is also
used to adjust exposure compensation and aperture when used in conjunction with
the Exposure Compensation/Aperture button, change the flash mode when pressing the Flash mode button. Using the Command dial when the Mode dial is set to
Scene or Effects allows you to select the scene mode or effects setting. When in
Playback mode you can use the Command dial to scroll through your images.
X
Multi-selector. The Multi-selector is another button that serves a few different
purposes. In Playback mode, you use it to scroll through the photographs you’ve
taken, and you can also use it to view image information such as histograms and
shooting settings. When the D5100 is in Single-point AF or Dynamic-area AF
mode, you can use the Multi-selector to change the active focus point. And you
use the Multi-selector to navigate through the menu options.
X
OK button. When the D5100 is in the Menu mode, you press the OK button to
select the menu item that is highlighted. Pressing the OK button in Playback
mode displays the Retouch menu options.
X
Memory card access lamp. This light blinks when the memory card is in use.
Under no circumstances should you remove the card when this light is on or
blinking. You could damage your card or camera and lose any information in the
camera’s buffer.
X
Playback button. Pressing this button activates the Playback mode and by
default displays the most recently taken photograph. You can also view other
pictures by pressing the Multi-selector left and right.
X
Delete button. If you are reviewing your pictures and find some that you don’t
want to keep, you can delete them by pressing the Delete button, which is marked
with a trashcan icon. To prevent you from accidentally deleting images, the camera displays a dialog box asking you to confirm that you want to erase the picture.
Press the Delete button a second time to permanently erase the image.
X
Thumbnail Zoom-out. In Playback mode, pressing this button allows you to go
from full-frame playback (or viewing the whole image) to viewing thumbnails. The
thumbnails can be displayed as 4, 9, or 72 images on a page. You can also view
images by calendar date. When you view the menu options, pressing this button
displays a help screen that explains the functions of that particular menu option. This
button also allows you to zoom out after you have zoomed in on a particular image.
X
Zoom-in button. When reviewing your images, you can press the Zoom-in button to get a closer look at the details of your image. This is a handy feature for
checking the sharpness and focus of your shot. When you are zoomed in, use
7
Nikon D5100 Digital Field Guide the Multi-selector to navigate around within the image. To view your other
images at the same zoom ratio, you can rotate the Command dial. To return to
full-frame playback, press the Zoom-out button. You may have to press the
Zoom-out button multiple times, depending on how much you have zoomed in.
Front of the camera
The front of the D5100 (the lens facing you) is the business end of the camera. There
are only a few features on this end of the camera (see Figure 1.3).
Infrared reciever
AF-assist illuminator
Image courtesy of Nikon, Inc.
1.3 Front-of-the-camera controls
8
Built-in flash
Microphone
Chapter 1 Exploring the Nikon D5100
X
Built-in flash. This option is a handy feature that allows you to take sharp pictures in low-light situations. Although not as versatile as one of the external
Nikon Speedlights, such as the SB-600 or SB-400, the built-in flash can be used
very effectively and is great for snapshots.
X
AF-assist illuminator. This is an LED that shines on the subject to help the
camera to focus when the lighting is dim. The AF-assist illuminator lights only
when in Single-servo AF mode (AF-S) or Full-time servo mode (AF-A) and the
center AF point is selected. This is also lit when the camera is set to Red-Eye
Reduction flash using the camera’s built-in flash.
X
Infrared receiver. This allows you to use the optional ML-L3 remote to control
your camera wirelessly.
X
Lens release button. This button disengages the locking mechanism of the
lens, allowing the lens to be rotated and removed from the lens mount.
Left side of the camera
On the left side of the camera (the lens facing away from you) are the output terminals
on the D5100 (see Figure 1.4).
These terminals are used to connect your camera to a computer or to an external
source for viewing your images directly from the camera. They are hidden under a rubber cover that helps keep out dust and moisture. There is also a button to control the
flash output and another customizable button that can be programmed for a number
of functions. The kit lens also has a couple of options as well.
X
Flash pop-up/Flash mode/FEC button. When you’re using P, S, A, or M exposure modes, press this button to open and activate the built-in Speedlight.
Pressing this button and rotating the Command dial on the rear of the camera
allows you to choose a flash mode.
Depending on the Shooting mode, you can choose from among Front-Curtain
Sync, Red-Eye Reduction, Red-Eye Reduction with Slow Sync, Slow Sync, and
Rear-Curtain Sync. Once the flash pops up, pressing this button in conjunction
with the Exposure Compensation button and rotating the Command dial allows
you to adjust the Flash Exposure Compensation (FEC). FEC allows you to adjust
the flash output to make the flash brighter or dimmer depending on your needs.
When you shoot in Auto or scene modes, the flash automatically activates and
some Flash sync modes aren’t available depending on the scene mode.
9
Nikon D5100 Digital Field Guide Flash pop-up/Flash mode/FEC button
Lens mounting mark
Vibration reduction switch
Self-timer/Function button
Lens release button
USB/AV out
HDMI out
Autofocus/Manual focus switch
External microphone input
GPS/Accessory terminal
Image courtesy of Nikon, Inc.
1.4 Controls on the right side of the camera
• Auto, Portrait, Child, Close-up. When using these modes, you can select
Auto-flash, Auto with Red-Eye Reduction, or set to Off.
• Night portrait. With this mode you can select Auto with Slow Sync and
Red-Eye Reduction, Auto with Slow Sync, or set to Off.
• P, A. With these modes you can select Fill flash, Red-Eye Reduction, Slow
Sync with Red-Eye Reduction, Slow Sync, or Rear Curtain with Slow Sync.
• S, M. These modes allow you to use Fill flash, Red-Eye Reduction, or RearCurtain Sync.
10
Chapter 1 Exploring the Nikon D5100
X
Function (Fn) button. You can set the Fn button to a number of different settings so that you can access them quickly, rather than searching through the
menu options manually. You can set the button to act as a self-timer, change the
Release mode, change the image quality, ISO sensitivity, white balance, Active
D-Lighting settings, HDR mode, +NEF, or Auto-bracketing. Pressing the Fn button and rotating the Command dial changes the settings. You can change the
setting options in the Custom Settings Menu (CSM f1).
X
Lens mounting mark. Most lenses have a white mark on them to help you line
up your lens bayonet so that it can be rotated and locked into place. Use this
mark to line up with the mounting mark on the lens.
X
GPS/Accessory input. This is an accessory port that allows you to connect the
optional Nikon GP-1 for geotagging your images.
X
USB/AV port. This is where you plug in the USB cable, attaching the camera to
your computer to transfer images straight from the camera to the computer. The
USB port also doubles as an AV out for connecting your camera to a standard TV
using the Nikon EG-CP14 cord supplied with the camera.
X
HDMI. This terminal is for connecting your camera to an HDTV or HD monitor.
This requires a type C mini-pin HDMI cable that’s available at any electronics store.
X
Microphone input. You can use this input to connect an external mic, which
records sound for your videos at a better quality that you can get from the builtin mic. Nikon offers the ME-1 or you can find a third-party alternative.
X
Autofocus switch. This switch is used to choose between using the lens in
Auto or Manual focus.
X
VR switch. This allows you to turn the Vibration Reduction (VR) on or off. When
you shoot in normal or bright light, it’s best to turn the VR off to reduce battery
consumption.
Right side of the camera
On the right side of the camera (the lens facing away from you) is the memory card
slot cover. Sliding this door toward the back of the camera opens it so you can insert
or remove your memory cards.
Viewfinder Display
When looking through the viewfinder, you see a lot of important information about the
photo you are setting up (see Figure 1.5).
11
Nikon D5100 Digital Field Guide Focus point
AE-L P
“
AE-Lock
indicator
Focus indicator
F
+-
0
+-
BKT ISO
AUTO
Flexible program
indicator
Shutter speed
Aperture number
Exposure indicator/
Exposure Battery indicator
compensation/
FEC indicator
Rangefinder
Exposure
compensation indicator
K
?
“K” (thousands indicator)
Bracketing indicator
Warning/Help indicator
Flash ready indicator
Remaining
exposures/Buffer/
Compensation
values/ISO
Auto ISO indicator
1.5 The Viewfinder Display
Most of the information is also shown in the Information Display, but it is less handy
when you are looking through the viewfinder composing a shot. Using the viewfinder
display allows you to see what your settings are without taking your eye off of the
scene.
12
X
Focus points. The first things you’re likely to notice when looking through the
viewfinder are the small rectangles that appear directly in your field of view.
These are the focus points. The active focus point will light up momentarily
when the focus point is selected either manually or when the camera determines focus automatically. When in Auto area Autofocus (AF-A) it’s possible for
more than one focus point to be active.
X
Focus indicator. This is a green dot that lets you know whether the camera
detects that the scene is in focus. When focus is achieved, the green dot lights
up and stays lit, the indicator blinks while the camera is actively focusing, and if
the camera is unable to achieve focus it continues to blink.
X
AE-L indicator. This icon is displayed when the Auto Exposure is locked. AE-L is
achieved by pressing the AE-L/AF-L button or when the Shutter Release button
is half-pressed and the focus is locked. AE-L for the Shutter Release button can
be disabled by setting CSM c1 to OFF.
X
Flexible Program indicator. Using Programmed Auto mode (P) the camera
allows you to adjust the setting manually from what the camera has selected to
give you more control over the outcome of the image. Rotating the Command
Chapter 1 Exploring the Nikon D5100
dial to the right allows you to open the aperture for a faster shutter speed or
shallower depth of field, rotating the Command dial left allows you to close
down the aperture for longer shutter speed or a deeper depth of field.
Flexible Program works best with Auto-ISO set to OFF. When Auto-ISO is on,
the camera will attempt to hold the shutter speed at the Minimum shutter
speed setting as indicated in the ISO Sensitivity settings in the Shooting menu.
TIP
X
Shutter speed. This area is where the current shutter speed is displayed.
Smaller numbers are slower speeds and higher numbers are faster speeds.
X
Aperture. Next to the shutter speed display is the aperture or f-stop setting. The
smaller numbers are wider openings and larger numbers are narrower openings.
X
Exposure indicator/Rangefinder. When using P, S, A, or M modes this functions as your light meter by letting you know where your exposure is. When you
have a proper exposure this indicator remains hidden; when the bars are to the
left, you are overexposed; and when the bars are to the right, you are underexposing your image. You can reverse this in CSM f5. This feature is especially
handy when using Manual exposure.
When exposure compensation is applied, this indicator will display an under- or
overexposure (depending on your exposure compensation settings). This indicator also acts as a rangefinder when CSM a3 is ON and set to manual focus (P, S,
or A). The Rangefinder option is unavailable when using Manual exposure (M).
X
Battery indicator. This icon is displayed when the EN-EL14 battery is running
low on power. When the battery is exhausted the shutter release is disabled.
X
Flash Exposure Compensation indicator. This icon appears when you adjust
Flash Exposure Compensation (FEC). FEC is adjusted by pressing the Flash
mode/pop-up button and the Exposure Compensation button simultaneously
and rotating the Command dial. Rotate left to add to the flash exposure and right
to decrease the flash exposure.
X
Exposure compensation indicator. This icon is displayed to remind you that
exposure compensation has been applied to the exposure. While adjusting the
settings, either the plus or minus will be shown to indicate whether you are adding or decreasing exposure.
X
Bracketing indicator. This icon is displayed only when the Auto-bracketing feature is in use. To use Auto-bracketing the Fn button must be set to Autobracketing in CSM f1. There are three types of bracketing to choose from;
Autoexposure (AE), White balance (WB), and Active D-Lighting (ADL).
13
Nikon D5100 Digital Field Guide X
ISO auto indicator. This is displayed when using the D5100’s Auto-ISO feature.
The Auto-ISO settings can be adjusted in the Shooting menu under ISO
Sensitivity settings.
X
Shots remaining/buffer/WB recording/EC value/FEC value/capture mode/
ISO setting/HDR. This area of the viewfinder displays a number of things
depending on what function is being used. By default, the display is the number
of shots remaining on the memory card. When the shutter is half-pressed the
number of shots remaining in the buffer is displayed.
When adjusting exposure compensation or Flash Exposure Compensation the
number displayed is the over- or underexposure in 1/3 steps. The capture mode
is displayed as PC when the camera is attached to a computer by USB cord.
When CSM d2 (ISO display) is set to ON the ISO setting is displayed here. When
the auto HDR setting is on (found in the Shooting menu) HDR is displayed here.
X
Flash ready indicator. This icon is shown when the built-in flash is raised and
ready to fire at full power.
X
Warning indicator. When this icon (shown as a question mark) is displayed
press the Zoom out/Help button for information.
Information Display
The Information Display, which I refer to as the Info display for brevity, shows some of
the same shooting information that appears in the viewfinder, but there are also quite
a few settings that are only displayed here (Figure 1.6).
When the Information Display appears on the LCD, you can view and change the settings without looking through the viewfinder. When the camera is turned on, the
Shooting info is automatically displayed on the LCD monitor. The info remains on display until no buttons have been pushed for about 8 seconds (default) or the Shutter
Release button is pressed. You can change the length of time this is displayed in the
Setup menu under the Auto-off timers option Playback/menus.
You can also view the Info display by pressing the Information (i) button. located just
to the left of the shutter release button.
This display shows you everything you need to know about your camera settings.
Additionally, the camera has a sensor built in that tells it when the camera is being
held vertically, and the Info display is shown upright no matter which way you are
holding your camera.
14
Chapter 1 Exploring the Nikon D5100
Multiple exposure indicator
Date imprint indicator
FEC/Manual flash indicator
Shooting
mode
P
HDR indicator
Beep indicator
Battery level indicator
Auto-ISO
indicator
ISO-A
DATE
NORM
HDR
QUAL
GPS
Shutter speed
display
WB
Shutter speed
11
Aperture
display
AF-Area mode
indicator/
focus points
ISO
AE–
BKT
AUTO
ADL–BKT
/ 125 F 5.6
OFF AUTO
0.0
ADL
0.0
SD
AUTO
Eye-fi
indicator
S
Aperture
number
100
AF–A
0
BKT
GPS
indicator
Exposure
indicator
A
OFF
125
Set
K “K” (thousands
indicator)
Bracketing
ADL
bracketing
Help icon
indicator Remaining exposures/
indicator
WB recording
1.6 The Information Display
The camera also allows you a number of options on how the information is displayed.
You can choose between Classic or Graphic. The Graphic option displays an aperture
icon that shows you how wide your aperture setting is and also displays a ring around
the aperture which shows whether your shutter speed is short or long.
You can also change the color of the Shooting Info Display. In Classic mode you can
choose between black, blue, and orange. In Graphic mode, you can choose between
green, black, or brown. You can also choose a different display for the scene and P, S,
A, and M modes. These settings can be accessed in the Setup menu under the Info
display format heading.
X
Shooting mode. This displays the Shooting mode that your camera is currently
set to. This can be one of the scene or effects modes, in which case the display
will be the appropriate icon, or one of the Semi-auto modes such as P, S, A, or
M, in which case the display will show the corresponding letter. This display
changes when the Mode dial is rotated.
X
Manual flash indicator. This icon appears when the built-in flash is set to
Manual, but only when the flash is popped up. When an optional Speedlight is
attached, this icon is displayed when FEC is applied directly on the Speedlight.
X
Date imprint. This icon is shown when the optional date imprint function is
applied. This function prints the date at the bottom of the image as it’s being
recorded.
15
Nikon D5100 Digital Field Guide X
Auto ISO indicator. This icon is displayed only when Auto-ISO is enabled.
X
Multiple exposure indicator. This icon is shown when the camera is set to
multiple exposure mode. This mode is accessed in the Shooting menu.
X
HDR indicator. When this option is displayed the camera is set to record two
images and merge them into one High Dynamic Range image. HDR is covered
in more depth in Chapter 2.
X
Beep indicator. This icon (musical note) tells you whether you have the camera
set to beep when focus is achieved in Single Focus mode. When the icon has a
slash through it, the beep is turned off (recommended).
X
Eye-fi connection. This icon appears only when using an Eye-fi wireless SD card.
X
GPS. This indicator is displayed when an optional GPS unit is attached to the
D3100.
X
Battery indicator. This shows you the remaining charge on your battery.
X
Aperture/f-stop number. This tells you how wide your aperture or lens opening is. The terms aperture and f-stop are interchangeable. Higher f-numbers
denote smaller openings, while lower f-numbers mean that the opening is wider,
letting in more light.
X
Exposure meter/bracketing progress. This acts as your light meter. When the
bars are in the center, you are at the proper settings to get a good exposure;
when the bars are to the left, you are overexposed; when the bars are to the
right, you are underexposing your image. This feature is only displayed in Manual
exposure.
This display blinks when the light is too dark or too bright in P, S, A, or one of the
scene modes. It is also displayed when exposure compensation is applied showing how much compensation is applied. When Auto exposure bracketing is activated this will show how much under or over you exposure is indicating where
you are at in the bracketing sequence.
16
X
Shutter speed. This shows in fractions of seconds or seconds how long your
shutter stays open when the Shutter Release button is pressed.
X
Active D-Lighting (ADL) Bracketing amount. When Auto Bracketing is set to
ADL this icon indicates how much ADL is being applied by underlining the setting.
X
K. This icon appears when you have more than 1,000 exposures remaining on
your memory card.
X
Remaining exposures. This shows you approximately how many exposures
can be saved to your memory card. When the Preset White Balance is ready to
be set, this will blink PRE.
Chapter 1 Exploring the Nikon D5100
X
Help icon. When this icon (shown as a question mark) is flashing, there may be
a problem with one of your settings. Pressing the Help/Zoom out button will
display information on rectifying the problem. When this icon appears and is not
flashing, press the Help button to display information on the currently selected
option.
X
AF-area mode. This tells you which AF area mode is selected: Auto-area,
Dynamic-area, or Single-point. This also tells you when 3D-tracking is enabled
and which focus point is selected when in Single-point AF.
X
Aperture/Shutter speed display. When set to Graphic mode, this shows you
approximately what your lens opening looks like, the ring around the aperture
gives a visual representation of your shutter speed. When the Graphic mode is
selected the graphic is shown only when the camera is being held horizontally.
Information Display Settings
Pressing the Info button located just to the right of the viewfinder twice brings up
what I call the Information Display Settings (Figure 1.7). Your most commonly changed
settings reside here. Use the multi-selector to scroll through the option to change
them quickly.
Image quality
Focus mode
RAW
WB
AUTO
S
1
/ 30
F 1.8
ISO – A
AUTO
0.0
0.0
Back
Flash mode
QUAL
ISO
Fn
100
S
AF–C
0
SD
ADL
BKT
Move
A
OFF
OK OK
Image size
White balance
ISO sensitivity
Release mode
Focus mode
AF–Area mode
Metering
Active–D Lighting
Bracketing increment
Picture
Exposure
compensation Control
Flash
exposure
compensation
1.7 The Information Display Settings
17
Nikon D5100 Digital Field Guide X
Image Quality. This setting changes the JPEG compression or allows you to
select the option to shoot in RAW or RAW+JPEG.
X
Image Size. This option allows you to select the size of JPEG files. This option
is unavailable when shooting RAW only.
X
White Balance. Adjust your White Balance settings here.
X
ISO Sensitivity. This option is where you adjust the sensitivity of the sensor.
Choose from 100-6400 or the Hi options.
X
Release mode. Change the release mode here. The choices are: Single frame,
Continuous, Self-timer, Delayed remote, or Quick response remote.
X
Focus Mode. Change your focus mode using this option. You can choose AF-A
(Auto), AF-S (Single), AF-C (Continuous).
X
AF-Area Mode. Select how your camera obtains focus. You can choose Single
Point, Dynamic-area AF, or 3D-tracking (11 points).
X
Metering. Change how the camera determines exposure settings using this
option. Choose from Matrix, Center-weighted, or Spot metering.
X
ADL. Your Active D-Lighting settings are changed here. You can choose Auto,
Extra High, High, Normal, Low, or Off.
X
Auto Bracketing. You turn on the Auto Bracketing using this option. You also
use this option to set the bracketing increments.
X
Picture Control. Set your Picture Controls here. Picture Controls determine the
color, sharpening, and more.
X
Exposure Compensation. You can add or subtract the exposure from what the
camera’s meter reads using this option.
X
Flash Exposure Compensation. When using the flash you can add or subtract
from the output of the Speedlight.
X
Flash Sync Modes. This is where you change the settings that determine how
the flash works, with the camera.
CROSS REF
18
For detailed information on any of the settings in the Info Display Settings see
Chapter 2.