1
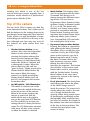
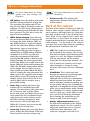
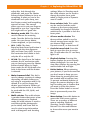
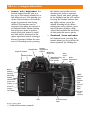
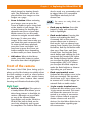
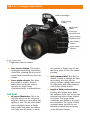
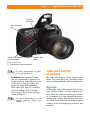
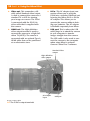
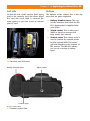
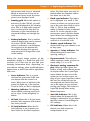
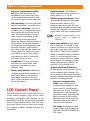
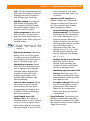
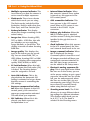
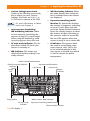
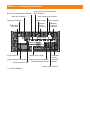
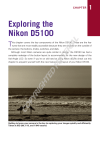
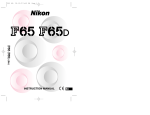
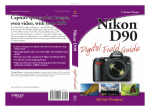
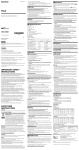
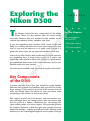
1
Exploring the
Nikon D300
C H A P T E R
✦
✦
✦
AL
T
✦
In This Chapter
Key components
of the D300
TE
RI
his chapter covers the key components of the Nikon
D300. These are the features that are most readily
accessible because they are situated on the outside of the
camera: the buttons, knobs, switches, and dials.
MA
If you are upgrading from another dSLR, some of this will
likely be a review, but there are some new features that you
may or may not be aware of, so a quick read through is a
good idea even if you are an experienced Nikon dSLR user.
GH
TE
D
Some of you who may be new to the world of dSLR cameras,
are upgrading from a more basic model, or if you’re just
beginning in the world of dSLRs, this chapter is a great way to
get acquainted with some of the terms that are used in conjunction with your new camera.
RI
So fasten your seatbelts, and get ready to explore the D300!
CO
PY
Key Components
of the D300
If you’ve read the Quick Tour, you should be pretty familiar
with the basic buttons and switches that you need to do the
basic settings. In this section, you look at the camera from all
sides and break down the layout so that you know what
everything on the surface of the camera does.
This section doesn’t cover the menus, only the exterior controls. Although there are many features you can access with
just the push of a button, oftentimes you can change the
same setting inside of a menu option. The great thing about
the buttons, however, is that they give you speedy access to
important settings — settings you will use often. Missing shots
because you are searching through the menu options can get
Viewfinder display
LCD control panel
✦
✦
✦
✦
16 Part I ✦ Using the Nikon D300
irritating fast, which is one of the key
reasons that most people upgrade from a
consumer model camera to a professionalgrade camera like the D300.
Top of the camera
The top of the D300 is where you find the
most important buttons. This is where you’ll
find the buttons for the settings that tend to
get changed most frequently. Also included
in this section is a brief description of some
of the things you will find on the top of the
lens. Although your lens may vary, most of
the features are quite similar from lens
to lens.
✦ Shutter Release button. In my
opinion, this is the most important
button on the camera. Halfway
pressing this button activates the
camera’s auto focusing and light
meter. When you fully depress this
button the shutter is released and
a photograph is taken. When the
camera has been idle and has
“gone to sleep,” lightly pressing the
Shutter Release button wakes up
the camera. When the image
review is on, lightly pressing the
Shutter Release button turns off
the LCD and prepares the camera
for another shot.
✦ On/Off switch / LCD illuminator.
This switch is used to turn on the
camera. Turn the switch all the way
to the left to turn off the camera.
When in the center position, the
camera is turned on. Pull the
switch all the way to the right to
turn on the top-panel LCD illuminator. This enables you to view your
settings when in a dimly lit environment. The LCD illuminator automatically turns off after a few seconds
or when the shutter is released.
✦ Mode button. This button, when
used in conjunction with the Main
Command dial allows you to
change among the different metering modes. You can choose
Programmed Auto, Shutter Priority,
Aperture Priority, or Manual modes
(P, S, A, or M). This button also
doubles as a format button when
pressed in conjunction with the
Delete button. Pressing and holding these two buttons down simultaneously allows you to format
your CompactFlash (CF) card without entering the Setup menu.
✦ Exposure Compensation button.
Pressing this button in conjunction
with spinning the Main Command
dial allows you to modify the exposure that is set by the D300’s light
meter or the exposure you set in
Manual exposure mode. Turning
the Main Command dial to the
right decreases exposure, while
turning the dial to the left
increases the exposure. This button
also doubles as the camera reset
button when used in conjunction
with the Quality button. Pressing
these buttons at the same time
restores the camera to the factory
default settings.
✦ Focal plane mark. The focal plane
mark shows you where the plane
of the CMOS image sensor is
inside the camera. The sensor isn’t
exactly where the mark is; the sensor is directly behind the lens
opening. When doing certain types
of photography, particularly macro
photography using a bellows lens,
you need to measure the length of
the bellows from the front element
of the lens to the focal plane. This
is where the focal plane mark
comes in handy.
Chapter 1 ✦ Exploring the Nikon D300
✦ Hot shoe. This is where an accessory flash is attached to the camera body. The hot shoe has an
electronic contact that tells the
flash to fire when the shutter is
released. There are also a number
of other electronic contacts that
allow the camera to communicate
with the flash to enable the automated features of a dedicated flash
unit such as the SB-600.
✦ Release mode dial. Rotating this
dial changes the release mode of
the camera. You can choose from
Single frame, Continuous Low
speed, Continuous High speed,
17
LiveView, Self-timer, and Mirror up.
In order to rotate the dial you must
press the Release mode dial lock
release button.
✦ Release mode dial lock release
button. This button is used to lock
the Release mode dial to prevent it
from accidentally being changed.
✦ Quality button. Press this button
and rotate the Main Command dial
to change the image size and quality. You can choose from RAW, TIFF,
JPEG, or RAW + JPEG. You can also
choose the quality at which your
JPEGs are saved: Fine, Normal, or
Basic.
Zoom ring
Mode button
Focus ring
On/Off switch
LCD illuminator
Shutter Release
button
Distance scale
Release mode dial
lock release button
Exposure
Compensation
button
Quality button
White balance
button
Focal plane
mark
ISO button
Release mode
dial
Image courtesy Nikon
1.1 Top of the camera controls
Hot shoe
18 Part I ✦ Using the Nikon D300
For more information on image
quality and size settings see
Chapter 2.
✦ ISO button. Press this button and rotate
the Main Command dial to change the
ISO sensitivity. The higher the ISO setting, the less light is needed to make an
exposure. The ISO value is displayed on
the LCD control panel while the ISO button is pressed. The ISO value is also displayed in the viewfinder.
✦ White balance button. Press this button and rotate the Main Command dial
to change the white balance (WB) setting. White balance is used to compensate for the effect that different colored
light sources have on your photos.
Adjusting the WB gives your images a
natural look. In all WB settings with the
exception of K or PRE, you can also
rotate the sub-command dial while
pressing the WB button to fine-tune the
setting. Rotating the sub-command dial
to the right allows you to add blue to the
image making it cooler while rotating the
dial to the left adds amber, which warms
up the image. You can dial in up to 6
steps of blue or amber. When the WB is
set to K, rotating the sub-command dial
allows you to set a specific color temperature. When set to PRE rotating the dial
enables you to choose from d-0 to d-4,
each of which can be used to save a
pre-set WB setting.
✦ Focus ring. Rotating the focus ring
enables you to manually focus the
camera. On most lenses, the lower end
AF-S lenses as well as older Nikon
lenses and some non-Nikon lenses you
must switch the lens to Manual focus
using the focus mode selector to disable the focusing mechanism. With
some lenses, such as the high-end
Nikkor AF-S lenses, you can manually
adjust the focus at any time.
✦ Zoom ring. Rotating the zoom ring allows
you to change the focal length of the lens.
Prime lenses do not have a zoom ring.
For more information on lenses see
Chapter 4.
✦ Distance scale. This displays the
approximate distance from the camera
to the subject.
Back of the camera
The back of the camera is where you find the
buttons that mainly control playback and
menu options, although there are a few buttons that control some of the shooting functions. Most of the buttons have more than
one function — a lot of them are used in conjunction with the Main Command dial or the
multi-selector. On the back of the camera
you also find several key features, including
the all-important viewfinder and LCD.
✦ LCD. This is the most obvious feature
on the back of the camera. This 3-inch,
920,000-dot liquid crystal display (LCD)
screen is, so far, the highest resolution
LCD on any camera on the market
today (the D3 shares this feature). The
LCD is where you review your images
after shooting, or compose using
LiveView. The menus are also displayed
here.
✦ Viewfinder. This is what you look
through to compose your photographs.
Light coming through the lens is
reflected from a mirror to a pentaprism
which has two faces which are coated
with a reflective substance enabling you
to see exactly what you’re shooting (as
opposed to a rangefinder camera, which
gives you an approximate view). Around
the viewfinder is a rubber eyepiece that
serves to give you a softer place to rest
your eye and to block any extra light
from entering the viewfinder as you
compose and shoot your images.
✦ Diopter adjustment control. Just to
the right of the viewfinder is the Diopter
adjustment control. Use this control to
adjust the viewfinder lens to suit your
individual vision differences (not
everyone’s eyesight is the same). To
Chapter 1 ✦ Exploring the Nikon D300
adjust this, look through the
viewfinder, and press the Shutter
Release button halfway to focus on
something. If what you see in the
viewfinder isn’t quite sharp, turn
the Diopter control until everything
appears in focus. The manual
warns you not to put your finger or
fingernail in your eye. I agree that
this might not be a good idea.
✦ Metering mode dial. This dial is
used to choose the metering
mode. Turn the dial to the desired
mode. You can choose Matrix,
Center-weighted, or Spot metering.
✦ AE-L / AF-L The AutoExposure/Auto-Focus lock button is
used to lock the Auto-Exposure
(AE) and Auto-Focus (AF). You can
also customize the button to lock
only the AE or only the AF.
✦ AF-ON. The Auto-Focus On button
activates the AF mechanism without you having to press the Shutter
Release button. When in Single
focus mode the AF-ON button also
locks in the focus until the button
is released.
✦ Main Command dial. This dial is
used to change a variety of settings
depending on which button you
are using in conjunction with it. By
default, it is used to change the
shutter speed when in Shutter priority and Manual mode. It can also
be used with the ISO, QUAL, and
WB buttons.
✦ Multi-selector. The multi-selector
is another button that serves a few
different purposes. In Playback
mode the multi-selector is used to
scroll through the photographs
you’ve taken, and it can also be
used to view image information
such as histograms and shooting
19
settings. When in Shooting mode
the multi-selector can be used to
change the active focus point
when in Single point or Dynamic
area AF mode.
✦ Focus selector lock. This switch
can be used to lock the multiselector so the focus point won’t
accidentally be changed. Slide the
switch to the L position to lock the
focus point.
✦ AF area mode selector. This
three-position switch is used to
choose among focus modes. You
can choose Single area AF,
Dynamic area AF, or Auto-area AF.
✦ Card slot cover latch. Press this
latch to open the door to access
the CF card when the CF card busy
light is off.
✦ Playback button. Pressing this
button displays the most recently
taken photograph. You can also
view other pictures by pressing the
multi-selector left and right.
✦ Delete button. When reviewing
your pictures, if you find some that
you don’t want to keep you can
delete them by pressing this button marked with a trashcan icon.
To prevent accidental deletion of
images the camera displays a dialog box asking you to confirm that
you want to erase the picture.
Press the Delete button a second
time to permanently erase the
image.
✦ Menu button. Press this button to
access the D300 menu options.
There are a number of different
menus including Playback,
Shooting, Custom Settings, and
Retouch. Use the multi-selector
to choose the menu you want to
view.
20 Part I ✦ Using the Nikon D300
✦ Protect / Info / Help button. The
Protect button has the icon of a
key on it. This button actually has a
few different uses. The primary use
of the Protect button is to lock the
image to prevent it from being
deleted. This function can be
accessed only when the camera is
in Playback mode. When viewing
the image you want to protect,
simply press this button. A small
key icon will be displayed in the
upper right-hand corner of images
that are protected. When the camera is in Shooting mode, pressing
Viewfinder
Playback button
Delete button
this button causes the current
shooting info such as aperture,
shutter speed, and other settings
to be displayed on the LCD screen.
Pressing the Shutter Release button lightly returns you to the
default shooting mode. When
viewing the menu options, pressing this button displays a help
screen that explains the functions
of that particular menu option.
✦ Thumbnail / Zoom out button.
In Playback mode, pressing this
button allows you to go from fullframe playback (or viewing the
Diopter
adjustment
control Metering
mode dial
AutoFocus
Auto-Exposure/ On
Main
Auto-Focus
button Command
lock button
dial
Menu
button
Protect/
Info/Help
button
Thumbnail/
Zoom out
button
Multiselector
Focus
selector
lock
CF card
busy
light
Zoom in
button
OK button
AF area
mode
selector
LCD
Image courtesy Nikon
1.2 Back of the camera controls
Card slot cover
latch
Chapter 1 ✦ Exploring the Nikon D300
whole image) to viewing thumbnails. The thumbnails can be displayed either four images or nine
images on a page.
✦ Zoom in button. When reviewing
your images you can press the
Zoom in button to get a closer look
at the details of your image. This is
a handy feature for checking the
sharpness and focus of your shot.
When zoomed in, use the multiselector to navigate around within
the image. To view your other
images at the same zoom ratio you
can rotate the main command dial.
To return to full-frame playback,
press the Zoom out button. You
may have to press the Zoom out
button multiple times depending
on how much you have zoomed in.
✦ OK button. When in the Menu
mode, press this button to select
the menu item that is highlighted.
Front of the camera
The front of the D300 (lens facing you) is
where you find the buttons to quickly adjust
the flash settings as well as some camera
focusing options, and with certain lenses
you will find some buttons that control
focusing and Vibration Reduction (VR).
Right front
✦ Built-in Speedlight. This option is
a handy feature that allows you to
take sharp pictures in low-light situations. Although not as versatile
as one of the external Nikon
Speedlights such as the SB-800 or
SB-600, the built-in flash can be
used very effectively and is great
for snapshots. The built-in flash can
21
also be used as a commander unit
to trigger Nikon CLS-compatible
Speedlights wirelessly for offcamera use.
For more on using flash, see
Chapter 6.
✦ Flash pop-up button. Press this
button to open and activate the
built-in Speedlight.
✦ Flash mode button. Pressing this
button and rotating the Main
Command dial on the rear of the
camera allows you to choose a
flash mode. You can choose from
among Front-Curtain Sync, Red-Eye
Reduction, Red-Eye Reduction with
slow sync, Slow Sync, and RearCurtain Sync. Pressing the Flash
mode button and rotating the Subcommand dial, located just below
the Shutter Release button, allows
you to adjust the flash exposure
compensation (FEC). FEC allows
you to adjust the flash output to
make the flash brighter or dimmer
depending on your needs.
✦ Flash sync terminal cover.
Underneath this rubber cover is the
flash sync terminal. This terminal,
also known as PC sync, allows you
to connect a PC cord to trigger an
external flash or studio strobe.
✦ 10-pin remote terminal cover.
Underneath this rubber cover is the
10-pin remote terminal. This terminal allows the camera to be connected to a variety of accessories.
Some of these include a remote
shutter release cord and GPS
devices. See the Nikon Web site for
more information regarding specific accessories.
22 Part I ✦ Using the Nikon D300
Built-in Speedlight
Flash pop-up
button
Flash mode
button
Flash sync
terminal cover
10-pin remote
terminal cover
Lens release
button
Focus mode
selector
AF-area mode
selector
Image courtesy Nikon
1.3 Right-front camera controls
✦ Lens release button. This button
disengages the locking mechanism
of the lens, allowing the lens to be
rotated and removed from the lens
mount.
✦ Focus mode selector. This threeway switch is used to choose
which focus mode the camera
operates in: Single focus,
Continuous focus, or Manual focus.
Left front
✦ AF-assist illuminator. This is an
LED that shines on the subject to
help the camera to focus when the
lighting is dim. The AF-assist illuminator only lights when in Single
focus mode and when the camera
is in Auto-area AF mode, or when
in Dynamic or Single area AF, and
the focus point is set to the center
position.
✦ Sub-command dial. This dial, by
default, is used to change the aperture setting. It is also used to
change various settings when used
in conjunction with other buttons,
such as the Quality button.
✦ Depth of field preview button.
Pressing this button stops down
the aperture of the lens so you can
preview how much of the subject
is in focus. The image in the
viewfinder gets darker as the aperture decreases. The Depth of field
preview button can also be customized in exactly the same way
as the Function button.
Chapter 1 ✦ Exploring the Nikon D300
23
Af-assist
illuminator
Sub-command
dial
Depth of field (DoF)
preview button
Function (Fn)
button
Image courtesy Nikon
1.4 Left-front camera controls
For more information on apertures, see Chapter 5.
✦ Fn button. The Function button
can be customized to perform different functions depending on user
preference. It can be used to set
exposure, flash, WB bracketing,
flash value (FV) lock, or a number
of other settings. The Fn button
can be set in the Custom Settings
menu (CSM) f4.
For more information on the
Custom Settings menu, see
Chapter 3.
Sides and bottom
of camera
The sides and bottom of the camera have
places for connecting and inserting things
such as cables, batteries, and memory cards.
Right side
On the right side of the camera (lens facing
you), are the D300’s various output terminals. These are used to connect your camera
to a computer or to an external source for
viewing your images directly from the camera. All of these terminals are hidden under
a rubber cover that helps keep out dust and
moisture.
24 Part I ✦ Using the Nikon D300
✦ Video out. This connection, officially called Standard video output,
is used to connect the camera to a
standard TV or VCR for viewing
your images on-screen. The D300
is connected with the EG-D100
video cable that is supplied with
the camera.
✦ HDMI out. The High-definition
video output terminal is used to
connect the camera to a high-definition TV (HDTV). The camera is
connected with an optional Type A
HDMI cable that can be purchased
at an electronics store.
✦ DC in. This AC adapter input connection allows you to plug the
D300 into a standard electrical outlet using the Nikon EH-5 or EH-5a
AC adapter. This allows you to
operate the camera without draining your batteries. The AC adapter
is available separately from Nikon.
✦ USB port. This is where the USB
cable plugs in to attach the camera
to your computer to transfer
images straight from the camera.
The USB cable is also used to connect the camera to the computer
when using Nikon’s optional
Camera Control Pro 2 software.
Standard video
output
High-definition
video output
AC adapter
input
Image courtesy Nikon
1.5 The D300’s output terminals
USB port
Chapter 1 ✦ Exploring the Nikon D300
25
Left side
Bottom
On the left side of the camera (lens facing
you) is the memory card slot cover. When
the card slot cover latch is released the
cover opens so you can insert or remove
your CF card.
The bottom of the camera has a few features that are quite important.
✦ Battery chamber cover. This covers the chamber that holds the ENEL3a battery that is supplied with
your D300.
✦ Tripod socket. This is where you
attach a tripod or monopod to
help steady your camera.
✦ Contact cover. This rubber cover is
used to protect the contact points
for the optional MB-D10 battery
grip that attaches to the bottom of
the camera. The MB-D10 allows
you to use a variety of battery
types.
Image courtesy Nikon
1.6 Memory card slot cover
Battery chamber cover
Contact cover
Image courtesy Nikon
1.7 Bottom of the D300
Tripod socket
26 Part I ✦ Using the Nikon D300
Viewfinder Display
When looking through the viewfinder you
see a lot of useful information about the
photo you are setting up. Most of the information is also displayed in the LCD control
panel on the top of the camera, but it is less
handy on top when you are composing a
shot. Here is a complete list of all the information you get from the viewfinder display.
✦ Focus points. The first thing you
are likely to notice when looking
through the viewfinder is a small
rectangle near the center of the
frame. This is your active focus
point. Note that the focus point is
only shown full time when in the
Single or Dynamic AF setting. When
the camera is set to Auto-area AF,
the focus point isn’t shown until
the Shutter Release button is
Framing grid
Battery indicator
Focus points
Flash exposure
compensation
(FEC) indicator
Exposure
compensation
indicator
Exposure
mode
Flash ready
indicator
Autoexposure
(AE) lock
Thousands (K) indicator
Focus indicator
Metering indicator
Flash value (FV)
lock indicator
Flash sync indicator
Shutter speed indicator
Exposures remaining/
buffer/exp. value
ISO sensitivity
Auto ISO indicator
Electronic analog exposure display
Aperture/f-stop indicator Aperture (f-number/number of stops)
1.8 Viewfinder display. Note that this figure displays all possible focus points. Only the
active focus points will be visible in actual shooting conditions.
Chapter 1 ✦ Exploring the Nikon D300
half-pressed and focus is achieved.
When in Auto-area AF and set to
Continuous focus mode the focus
point is not displayed at all.
✦ Framing grid. When this option is
turned on in the CSM d2, you will
see a grid displayed in the viewing
area. This is to help with composition. Use the grid to help line up
elements of your composition to
ensure that things are straight (or
not).
✦ Battery indicator. This is another
optional display that can be turned
on in the CSM d3. When this
option is activated, a small battery
icon appears in the bottom-left
corner that displays the approximate amount of charge that is left
in the battery.
Below the actual image portion of the
viewfinder display is a black bar with LCD
readouts on it. Not only do you find your
shooting information here, depending on
your chosen settings, other useful indicators
appear here as well. From left to right these
items are:
✦ Focus indicator. This is a green
dot that lets you know if the camera detects that the scene is in
focus. When focus is achieved, the
green dot lights up; if the camera
is not in focus, no dot is displayed.
✦ Metering indicator. This display
shows which metering mode you
are in: Spot, Center-weighted, or
Matrix.
✦ AE lock. When this is lit you know
that the Auto-exposure lock button
has been pressed.
✦ FV lock indicator. When the FV
lock indicator is on it means you
have locked in the flash exposure
27
value. The flash value can only be
locked when the Function button
has been set to do this.
✦ Flash sync indicator. This indicator is displayed as a small X. This
comes on when you set your camera to the sync speed that is set in
CSM e1. This is only available
when in Shutter Priority or Manual
mode. To set the camera to the
preset sync speed, dial the shutter
speed down one setting past the
longest shutter time, which is 30
seconds in S and bulb in M.
✦ Shutter speed indicator. This
shows how long your shutter is set
to stay open.
✦ Aperture / f-stop indicator. This
shows what your current lens
opening setting is.
✦ Exposure mode. This tells you
which exposure mode you are currently using: P, S, A, or M.
✦ Electronic analog exposure display. Although Nikon gives this
feature a long and confusing name,
in simpler terms this is your light
meter. When the bars are in the
center you are at the proper settings to get a good exposure; when
the bars are to the left you are
overexposed; and when the bars
are to the right you are underexposing your image. This feature is
especially handy when using
Manual exposure.
✦ Auto ISO indicator. This is displayed when the Automatic ISO
setting is activated to let you know
that the camera is controlling the
ISO settings.
✦ FEC indicator. When this is displayed your flash exposure
compensation is on.
28 Part I ✦ Using the Nikon D300
✦ Exposure compensation indicator. When this appears in the
viewfinder your camera has exposure compensation activated, and
you may not get a correct exposure.
✦ ISO sensitivity. This tells you what
the ISO sensitivity is currently set to.
✦ Exposures remaining. This set of
numbers lets you know how many
more exposures can fit on the CF
card. The actual number of exposures may vary according to file
information and compression.
When the Shutter Release button is
half-pressed, the display changes
to show how many exposures can
fit in the camera’s buffer before
the buffer is full and the frame rate
slows down. The buffer is in-camera RAM that stores your image
data while the data is being written to the memory card.
✦ K indicator. This lets you know
that there are more than 1000
exposures remaining on your
memory card.
✦ Flash ready indicator. When this
is displayed the flash, whether it is
the built-in flash or an external
Speedlight attached to the hot
shoe, is fully charged and ready to
fire at full power.
LCD Control Panel
The monochrome LCD control panel on top
of the camera displays some of the same
shooting information that appears in the
viewfinder, but there are also some settings
that are only displayed here. This LCD control panel allows you to view and change
the settings without looking through the
viewfinder.
✦ Exposure mode. This tells you
which exposure mode you are currently using: P, S, A, or M.
✦ Flexible program indicator. This is
an asterisk that appears next to the
Exposure mode when in P or
Programmed Auto mode. This lets
you know that you have changed the
default auto-exposure set by the camera to better suit your creative needs.
Flexible program mode is discussed more in depth in
Chapter 2.
✦ Flash sync indicator. This indicator is displayed as a small X. This
comes on when you set your camera to the sync speed that is set in
the CSM e1. This is only available
when in Shutter Priority or Manual
mode. To set the camera to the
preset sync speed, dial the shutter
speed down one setting past the
longest shutter time, which is 30
seconds in S and bulb in M.
✦ Shutter speed/multi-function.
By default this set of numbers shows
you the shutter speed setting. This
set of numbers also shows a myriad
of other settings depending on which
buttons are being pressed.
• Exposure compensation
value. Press the Exposure
Compensation button to view
how much EV compensation
has been set, if any. To change
the Exposure Compensation,
press the button and rotate the
Main Command Dial. Rotate
the dial to the left to add compensation and to the right to
decrease the exposure.
• FEC value. Pressing the Flash
mode button and rotating the
Sub-command dial displays the
FEC value.
Chapter 1 ✦ Exploring the Nikon D300
• ISO. The ISO sensitivity appears
when the ISO button is pressed.
Rotating the Main Command
dial changes the sensitivity.
• WB fine-tuning. Pressing the
WB button and rotating the
Sub-command dial fine-tunes
the white balance setting. A is
warmer, and B is cooler.
• Color temperature. When the
WB is set to K, the panel displays the color temperature in
the Kelvin scale when you press
the WB button.
For more information on white
balance and Kelvin, see
Chapter 2.
• WB preset number. When the
WB is set to one of the preset
numbers, pressing the WB button displays the preset number
that is currently being used.
• Bracketing sequence. When
the D300 auto-bracketing feature is activated pressing the
Function button displays the
number of shots left in the
bracketing sequence. This
includes WB, exposure, and
flash bracketing.
29
lens is displayed. You must
enter the lens data in the Setup menu.
✦ Aperture/multi-function. At
default settings this displays the
aperture at which the camera is
set. This indicator also displays
other settings as follows:
• Auto-bracketing compensation increments. The exposure
bracketing can be adjusted to
over- and underexpose in 1/3stop increments. When the
Function button is set to Autobracketing the number of exposure value (EV) stops is
displayed in this area. The
choices are 0.3, 0.7, or 1.0 EV.
The WB auto-bracketing can
also be adjusted; the settings
are 1, 2, or 3.
• Number of shots per interval.
When the D300 is set to
Interval Timer shooting the
number of frames shot in the
interval is displayed here.
• Maximum aperture (non-CPU
lenses). When the non-CPU
lens data is activated the maximum aperture of the specified
lens appears here.
• Interval timer number. When
• PC mode indicator. When the
the camera is set to use the
interval timer for time-lapse
photography this displays the
number of shots remaining in
the current interval.
D300 is connected to a computer via the USB cable the
letters PC are displayed to
inform you that your camera
is connected.
• Focal length (non-CPU
lenses). When the camera’s
Function button is set to choose
a non-CPU lens number when
the Function button is pressed,
the focal length of the non-CPU
✦ Beep indicator. This informs you
that the camera will beep when
the self-timer is activated or when
the camera achieves focus when in
Single focus mode.
30 Part I ✦ Using the Nikon D300
✦ Multiple exposure indicator. This
icon informs you that the camera is
set to record multiple exposures.
✦ Flash mode. These icons denote
which flash mode you are using.
The flash modes include Red-Eye
Reduction, Red-Eye with slow sync,
Slow Sync, and Rear-Curtain Sync.
✦ Battery indicator. This display
shows the charge remaining on the
active battery.
✦ Image size. When shooting JPEG,
TIFF, or RAW + JPEG files, this tells
you whether you are recording
Large, Medium, or Small files. This
display is turned off when shooting
RAW files.
✦ Image quality. This displays the
type of file format you are recording. You can shoot RAW, TIFF, or
JPEG. When shooting JPEG or RAW
+ JPEG, it displays the compression
quality: FINE, NORM, or BASIC.
✦ FV lock indicator. When this indicator is shown the Flash value (FV)
is locked. The Function button
must be assigned to FV lock.
✦ Auto ISO indicator. This is displayed when the Automatic ISO
setting is activated to let you know
that the camera is controlling the
ISO settings.
✦ Exposure compensation indicator. When this appears in the LCD
control panel, your camera has
exposure compensation activated.
This will affect your exposure.
✦ FEC indicator. When this is displayed, your flash exposure
compensation is on.
✦ Interval timer indicator. When
the camera’s Interval Timer option
is turned on, this appears in the
LCD control panel.
✦ GPS connection indicator. This
icon appears in the LCD control
panel when a GPS system is connected to the D300’s 10-pin
connector.
✦ Battery grip indicator. When the
MB-D10 battery grip is attached
and the camera is using the battery
installed in the grip this icon is
displayed.
✦ Clock indicator. When this appears
in the LCD control panel, the camera’s internal clock needs to be set.
✦ Image comment indicator. When
this is displayed, the Image
Comment option is turned on and
all images recorded will have your
customized comment attached in
the EXIF data. Image comments
can be added in the Setup menu.
✦ Electronic analog exposure display. This is your light meter. When
the bars are in the center, you are
at the proper settings to get a good
exposure; when the bars are to the
left, you are underexposed; when
the bars are to the right, you are
overexposing your image. This feature comes in especially handy
when using Manual exposure.
✦ Shooting menu bank. The D300
allows you to save different shooting settings for different situations.
This displays which bank you are
in: A, B, C, or D. The bank is
selected in the Shooting menu.
Chapter 1 ✦ Exploring the Nikon D300
✦ Custom Settings menu bank.
✦ WB fine-tuning indicator. When
Similar to the Shooting menu bank,
this is where you store Custom
Settings. The banks are A, B, C, or
D. This bank is chosen in the CSM.
For more information on Menu
banks, see Chapter 3.
✦ Auto-exposure bracketing/
WB bracketing indicator. When
in Auto-exposure bracketing this
appears on the LCD control panel;
when using WB bracketing, a WB
icon also appears above the icon.
✦ AF area mode indicator. This display shows which AF mode your
camera is currently in.
✦ WB indicator. This shows you
which white balance setting is currently selected.
the white balance fine-tuning feature is activated these two arrows
are displayed.
✦ Exposures remaining/multifunction. By default, this displays
the number of exposures remaining
on your CF card. When you halfpress the Shutter Release button to
focus, the display changes to show
the number of shots remaining in
the camera’s buffer. In preset WB,
the icon PRE appears when the
camera is ready to set a custom WB.
✦ K indicator. This appears when
the number of remaining exposures exceeds 1000. This is not
to be confused with the K that
may appear in the WB area which
is used to denote the Kelvin
temperature.
Shutter speed/multi-function
Flexible program indicator
Exposure
mode
Image
size
Aperature/multi-function
Color temp.
Flash mode
Battery
indicator
White balance (WB) indicator
Image quality
AF area mode
indicator
1.9 LCD display 1
31
Exposures remaining/multi-function
Thousands (K) indicator
32 Part I ✦ Using the Nikon D300
Exposure compensation indicator
Auto ISO indicator
Flash sync indicator
Flash value
(FV) lock
Flash exposure compensation
(FEC) indicator
GPS connection indicator
Aperture stop
Beep indicator
Interval
timer
indicator
Clock indicator
Custom menu bank
Image comment indicator
Auto-exposure bracketing/
WB bracketing indicator
Shooting menu bank
Multiple
exposure
indicator
Electronic
analog
exposure
display
Battery grip indicator
1.10 LCD display 2