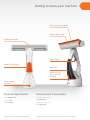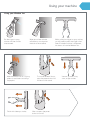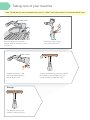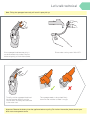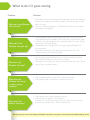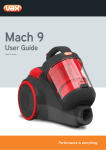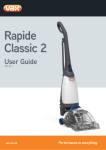
1
User Guide
Stick Steam Cleaner
St eam
C l e an e r
Get Cleaning...
What’s your Vax model number?
(Located on the flap of the packaging)
e.g. S 8 7- C X
What’s your serial number?
–
(Located on the base of the machine)
–
–
–
–
Note these down in case you need them in future. Please keep instructions for further use.
vax.co.uk
S87-CX series
Machine Overview
1
2
3
4
5
6
Handle
Upper cord clip
Lower cord clip
Power cord
Clean water tank
LED indicator
a) Water heating/power on
(orange LED)
b) Steam ready
(orange LED) + (green LED)
7 Floor head
8 Steam release trigger
Unit
8
1
2
4
3
5
12
6
a
7
b
9 Microfibre cleaning pad
10 Carpet glider (dependant on model)
11 Hard water filter (hidden)
(pre-assembled in unit)
12 Cooling base (dependant on model)
13 Measuring jug (dependant on model)
14 Screw x 1
15 Washer x 1
Accessories
9
10
12
13
11
2
14
15
General Safety Information
FOR HOUSEHOLD USE ONLY.
13.
When using the stick steam cleaner, basic safety precautions should
always be observed, including the following:
IMPORTANT: Please refer to floor manufacturer’s care recommendations
before use and test the steamer on a discrete area of flooring to
begin with.
WARNING: The stick steam cleaner head gets very hot
during operation.
WARNING:
1.
14.
Turn off all controls before unplugging.
15.
Do not attempt to remove blockages with sharp objects as
they may cause damage.
16.
Store indoors and put away after use to prevent
tripping accidents.
17.
Using improper voltage may result in damage to the motor
and possible injury to the user. The correct voltage is listed on
the rating label.
18.
A hazard may occur if the stick steam cleaner runs over the
power supply cord.
Danger of scalding. Avoid contact with the steam.
Do not leave the appliance unattended while it is switched on.
Unplug the appliance from the mains supply socket before
carrying out any maintenance or trouble shooting checks and
before you fill/empty the water tank.
Only use water in this appliance. De-scaling products,
perfume, detergent etc. should not be used with this
appliance, in order to avoid damage.
2.
The appliance must be kept out of children’s reach and should
not be used by children.
NOTE: If the supply cord is damaged it must be replaced by the
manufacturer, or a similarly qualified person in order to avoid a
hazard, or invalidating the guarantee.
3.
In order to ensure safety, the appliance should only be
assembled, connected and operated as set out in the
instructions. Only use accessories, which are recommended
by manufacturer.
NOTE: Before performing cleaning or maintenance tasks and after
each use unplug the appliance from the mains supply socket and let
it cool down sufficiently.
4.
This appliance is not intended for use by persons (including
children) with reduced physical, sensory or mental capabilities,
or lack of experience and knowledge, unless they have been
given supervision or instruction concerning the use of the
appliance by a person responsible for their safety.
5.
Examine the appliance before use in order to detect signs of
damage. Do not operate if the appliance, its power cord or
plug, show any signs of damage. In order to comply with
safety regulations and to avoid hazards, qualified personnel
must carry out repairs of electrical appliances. If repair is
needed contact the Vax Careline.
NOTE: The liquid or steam must not to be directed towards
equipment containing electrical components, such as the interior
of ovens.
IMPORTANT: The clean water tank must not
be removed.
WARNING: The appliance heats up during operation, therefore only
touch handle or buttons. Always let the appliance cool down before
attaching or removing accessories
WARNING: Never try to modify or change the mains plug
of the appliance. Make sure that the supply voltage corresponds to
the voltage marked on the rating label of the appliance.
6.
Do not use the stick steam cleaner if it has been dropped,
damaged, left outdoors or dropped into water.
7.
Check the appliance and the mains wire before each use.
This stick steam cleaner is intended for household use only and
NOT for commercial or industrial use.
8.
Do not unplug by pulling on the cord.
PLEASE KEEP INSTRUCTIONS FOR FURTHER USE.
9.
Do not handle the plug or stick steam cleaner with
wet hands.
10.
After use unplug the appliance from the mains
supply socket.
11.
When the appliance is in operation, the floor head should not
be directed toward humans, animals or plants.
12.
Never immerse the appliance in water or other liquid.
vax.co.uk
3
Operation
Assembling your stick steam cleaner
Remove clean water tank.
Insert handle into main body. Line
up the screw holes on the handle
and the main body.
Secure the handle in place with
one of the screws provided.
Before you begin cleaning
IMPORTANT: Please refer to floor manufacturer’s care recommendations before use and test the
steamer on a discrete area of flooring to begin with.
WARNING: To reduce the risk of personal injury, unplug the steamer when assembling the unit.
IMPORTANT: Do not over-fill the water tank.
Remove the clean
water tank.
4
Twist the cap anticlockwise to remove.
Fill the tank with 500ml
of water and replace the
water cap, Tighten by
twisting clockwise.
Replace the clean water
tank, clicking into place
making sure the hard water
filter is in place.
Operation
Before you begin cleaning
a
a
b
Orange LED will illuminate when the unit is
switched on at the plug and water is heating.
b
After approximately 1 minute the green LED will
also illuminate showing steamer is ready to use.
The green LED will go off when unit water is
re-heating.
Attaching the microfibre cleaning pad
WARNING: To reduce the risk of personal injury, unplug the steamer when assembling the accessories.
IMPORTANT: Never use the stick steam cleaner without the microfibre cleaning pad correctly attached to the floor head.
Place microfibre
cleaning pad over
the floor head.
vax.co.uk
1
2
Tighten the
drawstring so the
microfibre cleaning
pad is fitted securely.
5
Operation
Steam cleaning hard floors
IMPORTANT: Please refer to floor manufacturer’s care recommendations before use and test the steamer on
a discrete area of flooring to begin with.
WARNING: Never leave the stick steam cleaner in one spot on any surface for an extended period of time with
a damp or wet microfibre cleaning pad attached as this may damage the floor surface.
WARNING: Your stick steam cleaner should only be used on tiles, lino or sealed wood flooring.
Do not use on laminate flooring.
IMPORTANT: Never use the stick steam cleaner without the microfibre cleaning pad properly attached
to the floor head.
WARNING: To reduce the risk of personal injury, unplug the steamer when assembling the accessories.
Plug into mains and wait
for the green light (on the
main body) to switch on
after 1 min.
To recline the unit place
foot on floor head and
tilt handle.
To produce steam
squeeze the trigger.
Move the stick steam cleaner
slowly backwards and
forwards across the floor
paying particular attention
to high traffic areas.
Refreshing carpets (dependant on model)
IMPORTANT: When using on carpets, always ensure the microfibre cleaning pad is properly attached to the
floor head.
Attach carpet glider
attachment to
floor head.
6
To recline the unit place
foot on floor head and
tilt handle.
To produce steam
squeeze the trigger.
Move the stick steam cleaner
slowly backwards and
forwards across the floor
paying particular attention
to high traffic areas.
Maintenance
(Keep your Vax as good as new)
Empty the water tank
IMPORTANT: Allow the unit to fully cool down before performing any maintenance or troubleshooting checks.
Remove the clean water tank.
Twist the cap anti-clockwise
to remove.
Empty any excess water over the
sink, replace water cap and
return to the unit.
Remove the microfibre cleaning pad from the unit
IMPORTANT: Allow the unit to fully cool down before performing any maintenance or troubleshooting checks.
1
Undo drawstring.
Remove microfibre
cleaning pad.
2
Cleaning the microfibre cleaning pad
IMPORTANT: Never use bleach or fabric softener when washing the microfibre cleaning pad.
1
Machine washable at max temperature 40˚C. Always use a mild detergent.
2
Leave the pad to dry for 24 hours.
vax.co.uk
7
Maintenance
(Keep your Vax as good as new)
Replacing the hard water filter
IMPORTANT: The condition of the filter affects the performance of your machine.
Check and change filter (depending on level of use).
Your machine is fitted with a hard water filter. If you live in an area of hard water the filter will
discolour/darken over time (2). Depending on water hardness and/or frequency of use the filter should be
changed every 6 months, or once the filter has completely darkened.
1
2
Replacing the washers (dependant on model)
IMPORTANT: Allow the unit to cool down fully before performing maintenance or troubleshooting checks.
Over time, the floor head can become loose. You may need to replace the washers at the end of the body unit
with the replacement washers provided.
After steamer use/using cooling base/storage (dependant on model)
After using the stick steam cleaner and to avoid damage to your floors, unplug the unit and place stick steam
cleaner on cooling base until product cools. Once cooled, remove steamer pad and follow ‘cleaning the pads’
section. Empty out any remaining water in the tank and clean the external surface with a dry cloth.
8
FAQs
WARNING: to reduce the risk of personal injury, unplug the steam stick before performing
maintenance/troubleshooting checks.
Is there an accessory missing?
Why is the stick steam cleaner not producing steam?
• Check the Parts Overview page in the guide to make sure
the part is definitely included in your unit
• There may be no water in the tank; please refer to the
operation section
• If the part is missing we’re here to help. Simply call us on:
0844 412 8455
• The water tank may not be fitted correctly; please refer to
the operation section
Why won’t the stick steam cleaner run?
Why won’t the microfibre cleaning pad pick up dirt?
• Unit may not be plugged into the electrical outlet correctly,
ensure the plug is pushed in securely
• The cleaning pad may already be saturated with dirt and
needs washing, please refer to the maintenance section
• The electrical outlet may not be working properly, check
the fuse or breaker, or consult an electrician
• The power cord may be damaged, if it is it must be
replaced by the manufacturer or similarly
qualified person
we’re here if you need us
Instead of taking me back to the shop, simply visit;
What do I do if an accessory/the unit has become damaged
or broken?
• Visit vax.co.uk for parts and spares
• Please call our Careline to purchase new spares or order
a replacement
vax.co.uk
vax.co.uk/support • vaxireland.ie
or call:
(UK) 0844 412 8455 (ROI) 1-800 928 308
This does not affect your statutory rights.
9
Other Information
UK Service & Help
Any queries or concerns about using your Vax, simply visit; vax.co.uk/support – vaxireland.ie or call the
Vax Careline. Calls are charged at the UK local rate. Please make a note of the serial number and model
number of the vacuum cleaner before calling.
Vax Careline:
(UK) 0844 412 8455
(ROI) 1-800 928 308
Monday-Friday 8.30am to 6.30pm
Saturday
9.00am to 5.00pm
Consumables
To purchase spares and accessories, please visit vax.co.uk
The use of genuine vax spare parts helps to maintain optimised
performance and validates your guarantee
Hard water filter (Type 2): 1-1-132541-00
Microfibre cleaning pads (Type 2): 1-1-132541-00
Coral cleaning pads (Type 1): 1-1-131643-00
Technical Specification
Voltage:
Wattage:
Water tank capacity:
Cord length:
Weight:
220-240V
1400-1600W (dependant on model)
400ml
5.5m
3.8kg
Subject to technical change without notice.
EEC Statement of Compliance
Manufacturer/EEC importer: Vax Limited, hereby on our own responsibility, declare that the
S87-CX series is manufactured in compliance with the following Directives:
Safety: 2006/95/EC Low Voltage Directive
EMC: 2004/108/EC Electromagnetic Compatibility Directive
Waste electrical products should not be disposed of with household waste. Please recycle where facilities exist.
Check with your Local Authority or retailer for recycling advice.
10
Notes
vax.co.uk
11
Vax Ltd, Kingswood Road, Hampton Lovett, Droitwich, Worcestershire, WR9 OQH, UK
email: [email protected] - website: vax.co.uk
Version 1.0
Window Vac
Window Cleaner Range
Let’s get started
H87-WV-B
/VRS1WV
vax.co.uk
Let’s talk safety
Basic safety precautions
This Window Vac is intended for household use only
and NOT for commercial or industrial use.
have been given supervision or instruction concerning use
of the appliance in a safe way and understand the hazards
involved. Children shall not play with the appliance.
Cleaning and user maintenance shall not be made by
children without supervision.
When using the Window Vac basic safety precautions should
always be observed, including the following:
• Keep fingers, hair and loose clothing from moving parts and
openings whilst using the Window Vac.
• Only Vax recommend charger, accessories and solution
should be used with this Window Vac.
• This appliance can be used by children aged 8 years and
above and persons with reduced physical, sensory or mental
capabilities or lack of experience and knowledge if they
Please keep instructions for future reference and use the
Window Vac only as instructed in this guide.
Don’ts
This Window Vac is intended for indoor use only
and NOT for outdoor use.
8 Don’t handle the plug or use the Window Vac with wet hands.
8 Don’t use this Window Vac if it has been dropped, damaged,
immersed in water or left outdoors.
8 Don’t throw the Window Vac into fire or expose to high
temperatures, as the Window Vac contains a rechargeable
battery which may cause damage or burst. Never dismantle the
battery or replace with a different type .
8 Don’t use the Window Vac whilst connected to the charger unit.
8 Don’t unplug the Window Vac or pull the Window Vac by the
charger cord. Don’t use the charger cord as a handle, pull the
charger cord around corners or sharp edges or close a door
over the charger cord.
8 Don’t attempt to remove blockages with sharp objects as this
may cause damage to your Window Vac.
8 Don’t charge the Window Vac if the Charger cord or plug is
damaged. Please contact our Customer Care Line.
8 Don’t use the Window Vac charger with incorrect voltage as this
may result in damage or injury to the user. The correct voltage is
listed on the ratings label.
8 Don’t vacuum up hot coals, cigarette butts, matches or smoking
hot burning items or use in an area where there may be harmful
fluids (chlorine, bleach, and ammonia drain cleaner).
Do’s
3 Only use the Window Vac indoors on vertical surfaces.
3 Always make sure water container are fitted correctly before
using your Window Vac.
3 Turn off all controls on the Window Vac before disconnecting or
connecting the charger.
3 Always switch off the Window Vac and disconnect the charger
before carrying out any maintenance.
3 Always replace the fuse in the plug with a British 13amp fuse.
Always protect the charger cable from heated surfaces or near
open flames.
3 Use only CE approved 13amp extension cords, non-approved
extension cords may overheat.
3 Always charge the Window Vac indoors.
3 Always carry the Window Vac by the handle.
3 Store your Window Vac in a cool, dry area away from children.
3 Only use Vax recommended batteries and solution.
Thank you for buying this Window Vac
Taking care of your windows
The Window Vac Window Cleaner is designed to clean windows regularly as effectively and
efficiently as possible and this user guide will help you get the most out of your machine.
Clean windows look better and make your home brighter.
Taking care of your Window Vac
Also inside this guide are instructions on maintaining your new machine, so that it’s always
ready when you are to tackle your windows.
Taking care of you
We’re here if you need us. Instead of taking me back
to the shop, simply visit:
vax.co.uk/support or call:
(UK) 0844 412 8455 (ROI) 1-800 928 308
Monday-Friday 8.30am to 6.30pm, Saturday 9.00am to 5.00pm
Calls are charged at the UK local rate. Please make a note of the serial number and model number
of the Window Vac before calling.
Alternatively, you can write to us at:
Vax Ltd., Kingswood Road, Hampton Lovett, Droitwich, Worcestershire, WR9 0QH, UK
Let us know what you think @VaxUK
Contents
Let’s talk safety
Getting to know your machine
Getting started
Window Vac
Included with
your machine
Charger
Microfibre pad
Using your machine
Scrub pad
Taking care of your machine
Let’s talk technical
What to do if it goes wrong
Getting in touch
Vax window
cleaning solution
Getting to know your machine
Water recovery squeegee
Solution spray outlet
Cleaning pad holder
Spray trigger
Power On/Off button
Water tank
Water tank cap/
water tank filter
(unseen)
Power charger
connector
Technical Specification
Accessories & Consumables
Name Window Vac
Voltage 3.7V
Weight 0.75kg
Microfibre pads (Type 1)*
1-1-133091-00
Subject to technical change without notice.
*To purchase consumables and accessories, please visit vax.co.uk
Scrub pads (Type 2)*
1-1-133092-00
Getting started
PLEASE READ ‘LET’S TALK SAFETY’ AT THE BEGINNING BEFORE USE
IMPORTANT: This Window Vac is to be used on vertical surfaces only.
NOTE: Fully charge the battery before first use. Initial charge is 3 hours. Don’t use the Window Vac whilst
connected to the charger unit.
Plug charger into the
mains and insert the
charger cable into the back
of the Window Vac.
Remove foam filter.
The indicator light will
show red while the
machine is charging.
The indicator light will
change to green when
fully charged.
To fill the water tank lift the
water tank cap.
Pour in 40ml Vax Window
Cleaner solution.
WARNING
Top up with water (max 40°C) to max level. Replace filter
and push the water tank cap back into the machine. When
fitting the water tank cap back into the machine ensure
the tab is facing downwards to prevent leaking.
Always switch off and unplug the
Window Vac from the electrical
socket before assembling, opening
or emptying the water tank, or
before connecting/disconnecting
the attachments or performing any
maintenance.
Using your machine
Using your Window Vac
Pull the trigger to spray
solution onto the surface
to be cleaned.
Move the Window Vac in a zig-zag
pattern to avoid over-saturating a
single point.
Finish with sideways strokes.
Wipe the surface with the
microfibre or scrub pad on
the back of the machine.
Whilst pulling the trigger to spray solution,
you may need to press the trigger a few
times first before solution is dispensed,
this clears air from the Window Vac.
To turn the Window Vac on,
press the power button. You
will hear a click sound.
After use press the power
button to turn off.
Vacuum up water using
slow, straight strokes.
Taking care of your machine
Note: The Window Vac must be emptied after each use – DON’T store water/solution in the machine between uses.
After use, open the water tank,
remove the filter and empty water
into the sink.
Squeeze any excess water
from filter before replacing
into the Window Vac.
Storage
The Window Vac must be
stored in a vertical position.
Rinse filter under running
warm water (Max 40’C).
To remove the cleaning pad grasp one end
of the cleaning pad and gently pull, this
can be machine washed (Max 40’C).
Let’s talk technical
Note: Fitting the squeegee incorrectly will result in poor pick up.
If the squeegee blade becomes dirty it
can be removed and washed. Grip the
blade and gently pull from the machine.
Rinse under running water (Max 40’C).
3
To refit, push the squeegee blade back
into the machine. Making sure the
suction holes are facing the same side
as the water tank.
8
The squeegee needs to be pushed firmly
down into the machine so there is no gap.
Important: Remove the battery from the appliance before recycling. For further information please contact your
local waste management centre.
What to do if it goes wrong
Problem
Why won’t my Window
Vac turn on?
Why won’t the
Window Vac pick up?
Why does my
Window Vac leak?
Why does my
Window Vac leave
a smear on my
window?
Why won’t the
battery recharge?
Solution
• The battery may not be charged. Connect the charger, the indicator
light will turn green when fully charged. The initial charge should
be for 3 hours.
• The unit might be plugged in. The Window Vac will not run when
the charge is plugged in.
• The squeegee blade may be blocked. Remove from the machine,
rinse and clear any dirt/debris. Go to the ‘Let’s talk technical’ page.
• The filter may be clogged or dirty, clean the filter. Go to the ‘Taking
care of your machine’ pages.
• The Window Vac may be low on charge, plug the Window Vac
in to recharge
• The water tank may be full, empty the water tank. Go to the
‘Taking care of your machine’ pages.
• You may be using the Window Vac on a flat, horizontal surface,
only use the Window Vac on vertical surfaces
• The water tank may be full, empty the water tank. Go to the ‘Taking
care of your machine’ pages.
• The squeegee blade may be dirty, remove and clean.
• The cleaning pads may be dirty, remove and wash.
• The charger may not be inserted correctly.
• Check the mains power is switched on.
• The electrical outlet may not be working. Check the fuse in the
plug, always replace with a British 13amp fuse.
Warning: Always turn off and unplug the Window Vac before carrying out and maintenance/troubleshooting checks.
Getting in touch
* Calls are charged at the UK local rate. Please make a note of the serial number and model number of the Window Vac
before calling.
@VaxUK
Vax Ltd., Kingswood Road, Hampton Lovett, Droitwich, Worcestershire, WR9 0QH, UK
email: [email protected] website: vax.co.uk
Version 1.0
EEC Statement of Compliance: Manufacturer/EEC importer: Vax Limited, hereby on our own responsibility,
declare that the H87-WV/VRS1WV series is manufactured in compliance with the following Directives:
Safety: 2006/95/EC Low Voltage Directive. EMC: 2004/108/EC Electromagnetic Compatibility Directive.
Waste electrical products should not be disposed of with household waste. Please recycle where facilities exist.
Check with your Local Authority or retailer for recycling advice.